Augustine Surgical HotDog WC7 Series User manual
User and Technical Manual
HotDog Patient Warming System
Temperature Management Controller
Model WC7X
WC71 Single Port Controller
WC77 Multiport Controller
Manufactured by:
EU Authorized Representative:
Augustine Temperature Management
6581 City West Parkway
Eden Prairie, MN 55344 USA
TEL: 952.465.3500
FAX: 952.465.3501
EMAIL: cs@augsurg.com
www.hotdogwarming.com
TEL (31) (0) 70 345-8570
FAX (31) (0) 70 346-7299

User and Technical Manual: HotDog Temperature Management Controller Page 2
Contents
Introduction.................................................................................................................................................................3
Device Description ..................................................................................................................................................3
Indications for Use...................................................................................................................................................3
Contraindications.....................................................................................................................................................3
Warnings.....................................................................................................................................................................3
Cautions......................................................................................................................................................................4
Precautions..................................................................................................................................................................4
Initial Setup and Assembly..........................................................................................................................................5
Contents ..................................................................................................................................................................5
Mounting the Controller to an IV Pole .....................................................................................................................5
Instructions for Use.....................................................................................................................................................6
Temperature Monitoring and Auto Mode Guide ..........................................................................................................8
Control Screen Overview...........................................................................................................................................10
Alarms and Alerts......................................................................................................................................................11
Cleaning the Controller .............................................................................................................................................12
Cleaning Warming Blankets and Mattresses ..............................................................................................................12
Frequently Asked Questions...................................................................................................................................13
Accessories ...............................................................................................................................................................14
Definition of Product Symbols...................................................................................................................................16
Technical Manual......................................................................................................................................................17
Read Before Servicing Equipment..........................................................................................................................17
Maintenance & Testing .............................................................................................................................................17
Electrical Safety Checks and Functional Testing ....................................................................................................17
Specifications............................................................................................................................................................20
Electromagnetic Compatibility (EMC).......................................................................................................................22
Customer Service Contact
Phone: +1-952-465-3500

User and Technical Manual: HotDog Temperature Management Controller Page 3
INTRODUCTION
Device Description
General Description:
The HotDog Patient Warming System consists of a Controller, reusable Warming Devices (e.g., Warming
Blankets, Warming Mattresses), and other accessories.
It is the responsibility of the clinician to determine whether warming is appropriate for each individual patient. The
System should not be used when clinical considerations indicate that warming of the patient is not advisable.
Core Temperature Monitoring / Auto Mode Description:
The Controller (WC7X) can measure patient core temperature from probes and function on AUTO mode whereby
the Controller self-adjusts warming temperature settings based on the patient’s core temperature.
The Controller can output the patient’s temperature to patient monitors in order to provide information to the
electronic medical record.
Indications for Use
General Indications for Use:
The HotDog Patient Warming System is intended to prevent or treat hypothermia and to provide warmth to
patients. The System should be used in circumstances in which patients could become cold. The System can be
used with adult and pediatric patients.
The System in intended primarily for use in hospitals and surgical centers including, without limitation, operating
rooms, recovery rooms, emergency rooms, burn units and on other medical/surgical floors.
Core Temperature Monitoring / Auto Mode Indications for Use:
The Controller (WC7X) is intended to measure patient core temperature from probes and function on AUTO mode
whereby the Controller self-adjusts warming temperature settings based on the patient’s core temperature.
The System monitors the YSI 400-compatible temperature probes, checking for a valid internal patient
temperature. YSI 400-compatible temperature probe parameters, such as patient body temperature values between
31°C and 43°C (inclusive) and valid slew rates of ±1°C per minute, are confirmed before allowing use in AUTO
Mode.
Contraindications
•DO NOT warm ischemic or non-perfused tissue; thermal injury may result. Examples include tissue distal to
aortic cross clamping or when vasoconstrictive drugs would lead to severe, prolonged vasoconstriction.
•DO NOT warm patients receiving transdermal medication; increased drug delivery may occur.
WARNINGS
General
•EXPLOSION HAZARD –DO NOT use the System in the presence of flammable anesthetics or highly
oxygen-enriched environments such as hyperbaric chambers, oxygen tents, etc.
•Inspect System components prior to each use for signs of damage or excessive wear such as cuts, holes, or
loose electrical connections or cold areas. If signs of wear are evident or if the warming device has been
subjected to extreme physical force (e.g. pinched by clamps or run over by carts), do not use the product until it
has been inspected by technical staff.

User and Technical Manual: HotDog Temperature Management Controller Page 4
•DO NOT continue to use the System if the over-temperature indicator and/or any other alarms continue to
sound after reset. Refer to the “Alarms and Alerts” section of this manual for more information.
•Warning required per IEC 2-35 Standard: use of materials of good thermal conductivity, such as
water, gel, and similar substances, with the heating device not switched on can decrease the
temperature of the body of a patient.
CAUTIONS
Federal law (USA) restricts this device to sale by or on the order of a licensed healthcare professional.
PRECAUTIONS
General
•Use under the direct supervision of a clinician.
•Monitor the patient’s vital signs regularly during warming according to institutional protocol. If vital sign
instability occurs, notify the clinician.
•Care should be taken when using multiple warming methods.
•The risk of skin irritation caused by pooling of surgical prep solutions under the patient may increase with
warming; ensure that surgical prep solution instructions for use are followed.
•Only plug an approved 3.5mm jack into Tout for the purposes of porting patient temperature data to the patient
monitor.
•Dispose of the Controller per local regulations. Follow Warming Blanket and Mattress User Manuals for
proper disposal.
•The Controller is designed to accept approved, YSI 400-compatible temperature probes. The temperature
display range is 31C-43C. Resolution: 0.1C. Accuracy: ±0.125°C. Functions as a “Direct Mode” thermometer,
displaying the measured temperature from the site of measurement.
•Do not open the Controller. Only approved personnel can open the Controller for service. There are no user-
serviceable parts. If service is required, contact Customer Service. The manufacturer assumes no responsibility
for the reliability, performance, or safety of the System if any of the following occur:
•The Controller is disassembled or serviced by an unauthorized person.
•The System components are used in a manner other than described in the User Manuals.
•The Controller is installed in an environment that does not meet the appropriate electrical and grounding
requirements.
•The Controller is grounded and attached to an un-grounded table intended for use with a hyfrecator or
equivalent devices.
User and Technical Manual: HotDog Temperature Management Controller Page 5
INITIAL SETUP & ASSEMBLY
Contents
The following components are included in the Controller shipping carton:
•1—Controller Model WC7X
•1—Mains power cord
•1—IV pole adapter and mounting hardware
•1—HotDog Warming Blanket Cable (P/N A101)
Reusable HotDog accessories are sold separately.
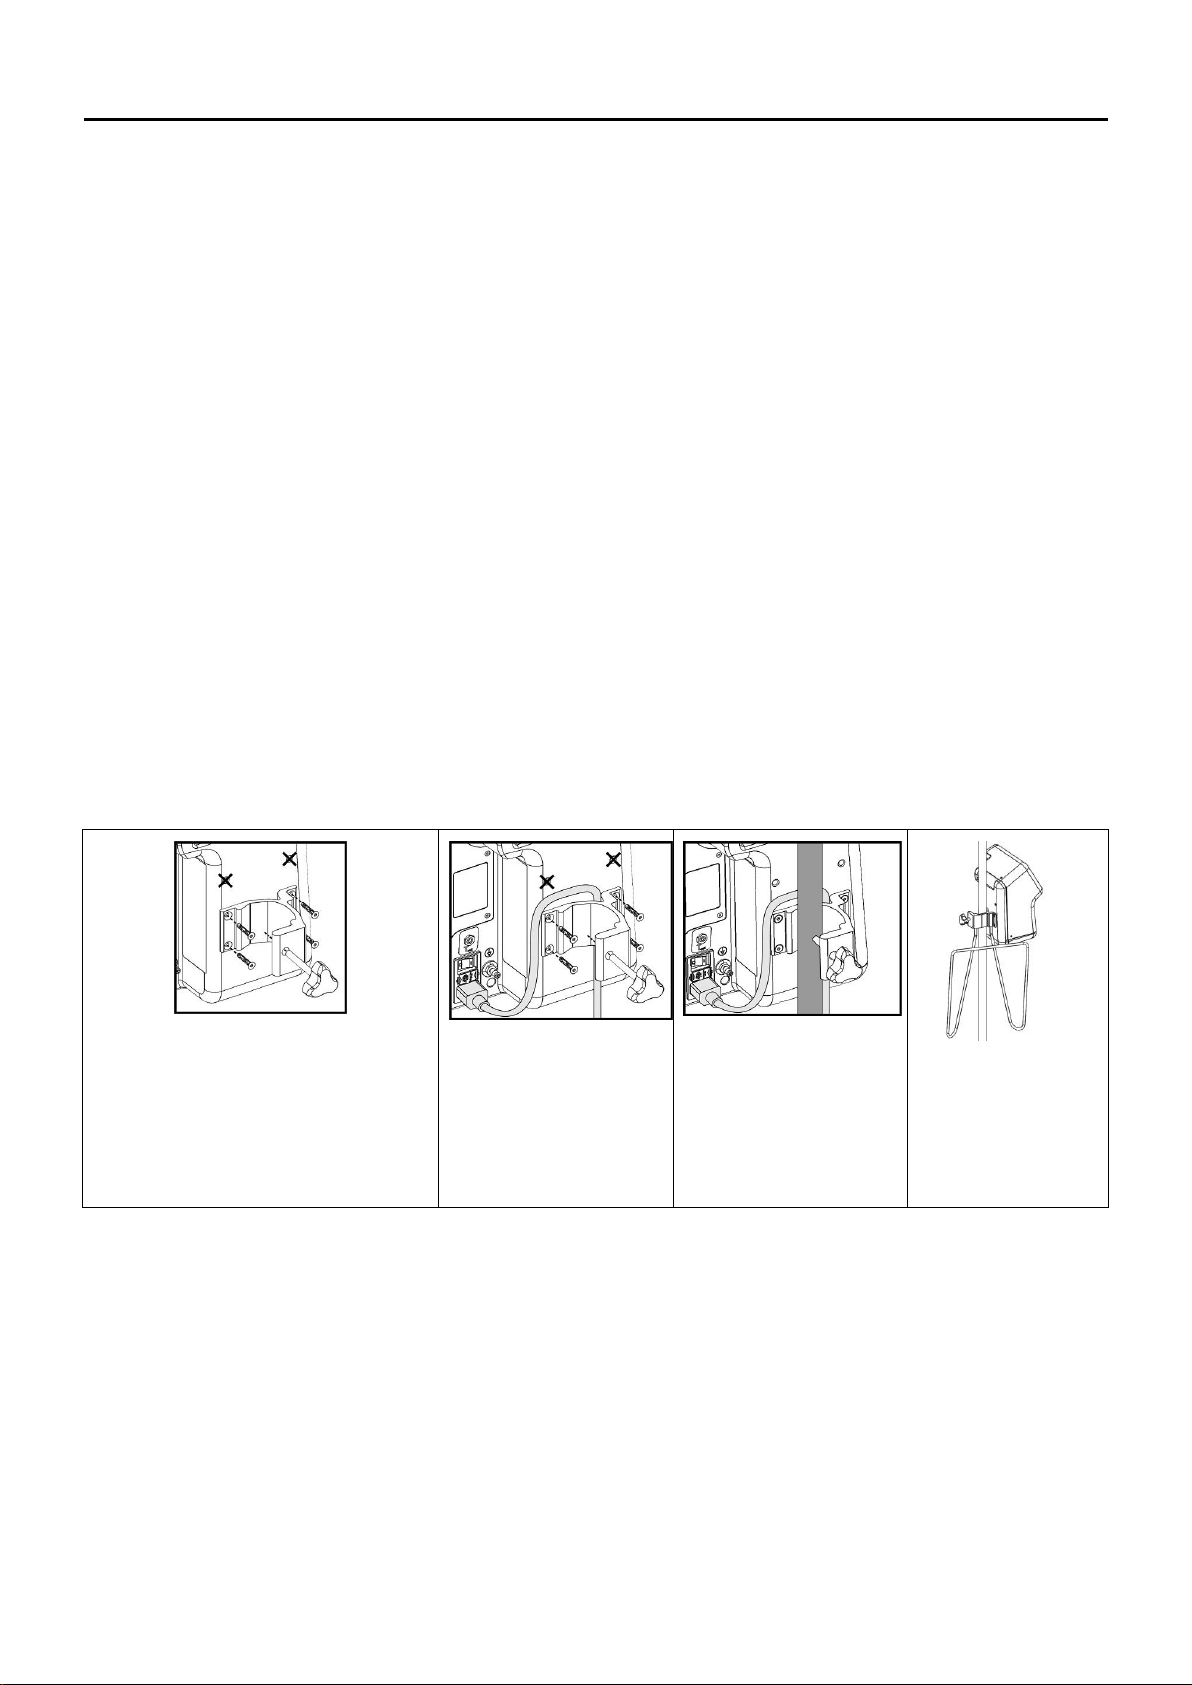
Mounting the Controller to an IV Pole
To mount the Controller to an IV pole, first secure the IV pole adapter to the Controller with the provided screws.
Place the Controller IV pole adapter around the IV pole and turn the clamp handle clockwise until securely
tightened (Figure 1).
Caution
To prevent the IV pole from tipping, attach the Controller at a height that provides stability. It is recommended to
use an IV pole with a minimum wheelbase radius of 35.6 cm (14 in) and to mount the Controller no higher than
112 cm (44 in) from the floor. Failure to properly mount the Controller may cause the IV pole to tip, possibly
resulting in injury.
Figure 1: Controller Mounted on an IV Pole
Line up the mounting clamp with the
bottom two sets of screw holes.
IMPORTANT: The clamp will not fit
on the top two sets of screw holes.
Ensure the power cable
is in the clamp slot to
strain relief cable.
Tighten screws using
supplied Allen wrench.
Mount the Controller to
the IV pole
and tighten the clamp
Optional storage
rack sold
separately.
Attach if available.
The back of the Controller features a standard VESA 75mm x 75mm interface, allowing for additional mounting
options when using top and bottom holes. The provided IV pole clamp only works with the bottom four holes.
Rotate the clear cable-retention loop down on the side of the Controller. Use the loop to assist with cable
management when the Controller is mounted to an IV pole.

User and Technical Manual: HotDog Temperature Management Controller Page 6
INSTRUCTIONS FOR USE
The instructions below describe how to operate the Controller. For information about Warming Devices and
accessories, refer to the User Manual provided with each item.
1. Insert the Controller power plug into a properly grounded hospital-grade electrical outlet. Turn on the
Controller via the rocker switch at rear.
WARNING: To avoid risk of electric shock, this equipment must only be connected to a supply mains with
protective earth grounding.
Note: The Controller is grounded and should not be attached to un-grounded tables intended for use with a
hyfrecator or equivalent devices.
2. Position and secure the Device (e.g., Warming Blanket, Warming Mattress) following instructions in the User
Manual for each device.
3. Insert the device’s connecting cable into the proper port on the Controller.
Table 1.
WC77 Multi Port
WC71 Single Port
Port Color
Device
A, B, C, D
A
Yellow
Warming Blanket, Clinician Vest
M
Blue
Warming Mattress
Tprobe (In)
Tprobe (In)
Silver
Patient Temperature Probe (3.5mm TSR jack)
Tout
Tout
Silver
3.5mm TR Jack (YSI 400 compatible output)
Figure 2: Controller Ports
Port A on front of
Controller
Ports B, C, D and M on
back upper left of the
Controller
(Multiport only)
Back of the Controller,
lower left
TTruCore (Not Currently
Available), Tprobe and Tout on
back of Controller (Single Port
and Multiport)
Note: When the connecting cable is inserted into the Controller, an audible sound indicates that the control sensor
and over-temperature thermistor are present and functioning properly. The Port becomes available on the
touchscreen.

User and Technical Manual: HotDog Temperature Management Controller Page 7
4. Control Warming Devices using the touchscreen.
•Plug in a Warming Device to begin. When the
cable is properly inserted into the Controller, an
audible sound indicates that the Device is
properly connected, and its port icon illuminates
on the screen.
•Touch the illuminated icon to activate.
•The Warming Device highlighted in green is the
currently selected Device. To select its
temperature, use the + thermometer to increase
the temperature or the –thermometer to
decrease the temperature. Turn off the
highlighted port at the red power icon.
•Each connected Warming Device can be
adjusted separately. Other icons to the right
adjust all port temperatures simultaneously:
•All High
•All Medium
•All Low
•All Off
5. If using a temperature probe and you wish to engage AUTO mode, see the instructions on pages 8 and 9.
6. When patient warming therapy is complete, turn the Mains Power Switch to OFF.
7. After use, disconnect the Controller from the electrical outlet.

User and Technical Manual: HotDog Temperature Management Controller Page 8
TEMPERATURE MONITORING AND AUTO MODE GUIDE
1. This Controller can monitor patient core temperature when receiving a signal from a YSI 400-
compatible temperature probe. This requires at least an A411-IN cable to make the connection. The
Controller can also output the patient temperature to a third-party monitor (e.g. to port to the EMR). To
output patient temperature to a third-party patient monitor, attach an industry-standard “headphone”
jack (3.5mm mono) to the Tout port.
2. If utilizing an invasive temperature probe, esophageal or rectal probes are recommended for accuracy.
Ensure the probe is correctly positioned in the patient, (or in the case of noninvasive probes, on the
patient) and plug the probe into A411-IN cable, which must then be plugged into Tprobe port. Note: If
consistent with the temperature probe’s IFU, placement of an esophageal temperature probe should be
past the initial “pressure” of the esophagus flattening by the heart. Pushing just past this point should
yield accurate core temperature behind the heart.
3. While the Controller is awaiting a valid patient temperature from the probe, an hourglass displays next
to the “T”. After a valid patient temperature has been established (31°-43°C & <1°C change / minute),
the patient temperature will be displayed.
4. AUTO mode is available if Warming Devices are placed on the patient and plugged in and a valid
human temperature is measured. AUTO mode automatically adjusts the Warming Device temperature
settings based on a user-selectable “Normothermia Zone” in increments described in Table 2. The
upper and lower limits of the Normothermia Zone are selectable in the Menu - Settings - Temperature
Graph. The zone must extend 1°C or greater.
5. Note: While in AUTO mode, the clinician must still follow all indications and contraindications for
use. For example, AUTO mode does not know whether a patient is aortic cross-clamped or if ischemic
tissue is present: AUTO mode should never be used in these instances. The clinician must always be
present during use. The clinician must ensure continual patient temperature monitoring and should not
use AUTO mode on patients who are mobile (e.g. ICU patients who could dislodge their temperature
probe). AUTO mode should not be used when temperature goals are other than simply rewarming (e.g.
in certain cardiac surgery with forced cooling, followed by rewarming). Manual operation is
recommended in these cases.
Table 2: AUTO mode -- Example
Normothermia Zone
(User Selectable)
Example
Patient
Temperature
Devices:
All High
Devices:
All Medium
Devices:
All Low
Devices:
All Off
>=Upper Limit Setting
38.0°C
X
67% of Upper Limit
37.3°C
X
33% of Upper Limit
36.7°C
X
<Lower Limit Setting
36.0°C
X

User and Technical Manual: HotDog Temperature Management Controller Page 9
Touchscreen Control -AUTO Mode Example
a. This screen appears when valid
conditions are present to operate in
AUTO mode (Warming devices are
plugged in and a valid patient
temperature is detected).
b. The clinician selects (✓) to engage
AUTO mode.
c. AUTO Mode automatically sets all connected
Warming Devices to the highest temperature setting.
Patient temperature is displayed and logged for the
case. Patient temperature data can be permanently
logged to the EMR via the Tout port in increments of
0.1°C when using the appropriate cable. This prevents
loss of data if power stops unexpectedly. Start time of
AUTO is logged as T-0 for the duration of the case.
Device warming settings are not logged.
d. When the predetermined level of patient
normothermia is achieved, the Device’s
temperature settings are automatically
adjusted downward in increments based
on the percentage of the normothermia
zone. See Table 2 on page 8 for an
example.
e. Device remains in AUTO mode until the AUTO mode
icon is deselected. The clinician can reenter AUTO
mode by reselecting the AUTO mode icon. If the
patient temperature is deemed invalid while in AUTO
mode, the Controller will display an E7 Alert
indicating that AUTO mode is disengaged. At this
point the Warming Devices will turn to standby, and
the clinician will need to operate warming manually.
6. When patient warming therapy is complete, turn the Mains Power Switch to OFF.
7. After use, disconnect the Controller from the electrical outlet.

User and Technical Manual: HotDog Temperature Management Controller Page 10
CONTROL SCREEN OVERVIEW
1. Back
2. Menu Title
3. Main Menu
4. Sub Menu
5. Next Page
6. Pages
7. Previous Page
1. Currently Selected Device (green
border)
2. Decrease Selected Device Temperature
3. Increase Selected Device Temperature
4. Set All Devices to High Temperature
5. Set All Devices to Medium Temperature
6. Set All Devices to Low Temperature
7. Turn Off All Devices
8. View Selected Device Info
9. Turn off Selected Device
1. Zoom Out
2. Zoom In
3. Auto Mode switch (On/Off)
4. Patient Temperature “T” (TruCore (NA)
or Probe)
5. Patient Temperature Graph
6. Scroll Right
7. Graph Overview
8. Scroll Left
Display Tips:
A. Do not press down hard. This is not needed.
B. An overly thick glove may prevent detection of finger.
C. Moisture on screen can confuse the system; ensure screen is dry before use.

User and Technical Manual: HotDog Temperature Management Controller Page 11
ALARMS AND ALERTS
NOTE: WARMING BLANKET OR MATTRESS WILL STOP WARMING IF AN ALARM CONDITION APPEARS
Error Codes
Error Description
Problem Solving Steps
E1
Over-Temperature
When the temperature exceeds one degree above the set point, the
Alarm sounds and power is removed from the Warming Device.
Unplug the Device to reset the Alarm. Wait 5 minutes and then
reconnect the Device. Turn the Controller on and select the
temperature. If the Alarm occurs again, stop using the Device and
contact technical support.
E2
Failure To Reach Temp
When the Warming Device does not reach the temperature set point
within 10 minutes, the Alarm sounds, and power is removed from the
Device. Check to make sure the Device is in contact with a patient
and the sensor area is touching the patient. Unplug the Device and
reconnect to reset. If the Alarm occurs again, stop using the Device
and contact technical support.
E3
Port Current Reached
If the electrical current in the Warming Device exceeds the allowable
limit, the Alarm sounds and power is removed from the Device. This
may indicate and electrical problem with the Device. Unplug the
Device from the Controller and reconnect to reset. If the Alarm
occurs again, stop using the Device and contact technical support.
E4
Sensor or Cable Failure
If the Controller loses communication with the sensor in the Warming
Device, an Alarm sounds, and power is removed from the Device.
This may be caused by an electrical problem in the Device or
Controller. Swap the cables and Device with known good product to
isolate the problem if possible. If the problem continues, stop using
the Device or cable and contact technical support
E5
Device Fold Detection
In Warming Device equipped with an over-temperature array, local
overheating caused by folding of the Blanket causes an alarm, and
power to the Blanket is turned off. Check the Blanket for folded areas.
To reset Alarm, unplug the cable, wait 5 minutes and reconnect. If
Alarm reoccurs, stop using the Blanket and contact technical support
E7
Auto Mode Disengaged
Ensure proper placement of the Temperature Sensor to continue use of
AUTO mode or manually control Warming Devices.
E8
Over-Temperature Sensor
(Secondary)
The temperature sensor has exceeded 46° C. Disconnect the Warming
Devices and contact technical support.
EA, EC, EF,
EH or EP
Hardware Failure
Please turn off the Controller, wait one minute, and then restart. If the
problem persists, contact technical support.
Automatic Shutoff Timer - This feature prevents the System from unintentionally being left on. The System is not
intended for use without a clinician present. The System defaults to a 6-hour automatic shutoff, if there is no
interaction with the Controller. This time period can be adjusted for up to 24 hours, should it be required by the

User and Technical Manual: HotDog Temperature Management Controller Page 12
case length. To adjust the automatic shutoff timer go to: Settings -> Automatic Shutoff Timer -> Use –or + to
adjust the time.
CLEANING THE CONTROLLER
Warnings
•DO NOT use a dripping wet cloth, and DO NOT immerse the Controller in liquid. Moisture will damage the
components, and thermal injury may result.
Precautions
•DO NOT use pure harsh solvents (e.g., MEK, acetone, etc.) or cleaners containing hydrogen peroxide to clean
the Controller.
Frequency
As needed
Tools/Equipment
•Sponge or soft cloth
•Mild detergent or anti-microbial spray
•Dry soft cloth
Method
1. Disconnect the Controller from the power source before cleaning.
2. Wipe the Controller with a moistened sponge or soft cloth; avoid pushing fluids into any openings.
3. Dry with a separate soft cloth.
CLEANING WARMING BLANKETS AND MATTRESSES
Intro:
HotDog Warming Blankets and Mattresses are non-sterile electric warming devices for use in the operating room
and in pre- and post-operative areas in healthcare facilities. Clean and disinfect Mattresses and Blankets between
patient uses if they appear visibly soiled. If Mattresses and Blankets are not visibly soiled, disinfection at the end of
the operating day is recommended.
Cautions:
Do not immerse Blankets or Mattresses in water. Do not use high-level disinfectants to clean Blankets or
Mattresses. The CDC (USA) recommends against the use of high level disinfectants for cleaning environmental
surfaces that may contact the patient since the chemicals are highly toxic. Do not spray cleaning solutions into the
electrical connector.
Do not use peroxide-based cleaning solutions as these can adversely affect the internal heater. Do not place the
Warming Devices in an autoclave, sterilizer, automatic washer - disinfector, or any other high-temperature system
as this may damage the Devices.
Cleaning Steps
Blankets and Mattresses should be cleaned following protocols for non-critical medical devices that may contact
intact skin. Examples of similar devices are blood pressure cuffs, exam table covers, operating room table pads and

User and Technical Manual: HotDog Temperature Management Controller Page 13
surgical supports. The cleaning steps are general recommendations and are not meant to replace hospital-specific
cleaning protocols.
1. Avoid getting cleaning fluids into the electrical connector.
2. If visible body fluids or soiling are present, these must be removed before applying a disinfectant. Scrub
the areas using detergent and a soft brush or sponge to remove any organic matter. Wipe the surface of the
Warming Device with water using a dampened cloth. Do not immerse blankets in liquids.
3. Apply a low- or intermediate-level disinfectant to the entire Device by spraying or wiping. Follow the
disinfectant manufacturer's application instructions to ensure adequate disinfection.
4. Following cleaning, ensure that the Device is dry before using again.
Frequently Asked Questions
1. How does HotDog work? Blankets and Mattresses use a conductive polymer fabric called ThermAssure.
A low voltage DC current flows over this light, flexible fabric, and the resistance generates even warmth.
Blankets and Mattresses do not use carbon fiber or ink, which could break and create hot spots.
2. Why is HotDog safe? The Controller is really a microprocessor with many built-in safety features. It
monitors connected Warming Devices at the patient and will automatically stop operation if readings are
out of safe parameters. The Blankets and Mattresses use a low-voltage floating isolated DC current to
warm. The flexible conductive polymer fabric generates uniform heat with no hot spots.
3. Are the Blankets and Mattresses difficult to clean? The cleaning process takes 30 seconds or less. The
Warming Devices can be cleaned in the OR by wiping with a low- to intermediate-level disinfectant. Do
not use with cleaners that contain hydrogen peroxide. The Warming Devices are designed for easy
cleaning. The non-porous outer shell contains an anti-microbial and the edges are heat-sealed to eliminate
crevices. The CDC says noncritical items like HotDog Blankets and Mattresses are safe and present
virtually no risk of cross-contamination.
4. Is there a greater risk of cross-contamination with reusable HotDog Blankets and Mattresses than
with disposable FAW? No. The Warming Devices are considered "non-critical items," meaning they only
come in contact with intact skin. According to the CDC, "Virtually no risk has been documented for
transmission of infectious agents to patients through noncritical items..." The risk of contamination may
actually be greater with FAW. FAW is only partially disposable. The blower and hose are used with
thousands of different patients, sometimes moving from one OR to another. One published study showed
that 92% of FAW blowers are contaminated with bacteria, and 58% internally generated and emitted germ-
sized particles (Albrecht, AJIC, 2011). The contamination is significant because high-velocity air blows
across the germ colonies. The contaminated hot air vents under the drapes, mixes with "dirty" floor air and
rises into the sterile field.
5. How is HotDog safer for orthopedic surgeries? Air-free HotDog patient warming is safer for surgeries
involving implanted foreign materials—such as orthopedic and cardiac surgery—because there is no waste
heat disrupting the sterile field with contaminants. Rising waste heat from forced-air warming
contaminates the sterile surgical field above the table with dirty air from the floor by generating convection
currents. There is a large body of peer-reviewed evidence published on this issue.
6. How do I get the best warming results? BODY SURFACE AREA: Warm as much surface area as
possible. Warming the core is more effective than the periphery. EARLY START: Start warming as soon
as the patient arrives in the OR. SENSOR CONTACT: Ensure that the sensor is in contact with the patient.
THIN BARRIER: Use the thinnest barrier possible between the patient and the Warming Blankets or
Mattress.

User and Technical Manual: HotDog Temperature Management Controller Page 14
7. Can the HotDog System be used in x-rays? Yes. The heater fabric is completely radiolucent. However,
each Warming Blanket and Mattress has parallel busbars that run along the long edge of the warming
device. These can be seen on x-ray. In addition, the area around the sensor is also radio-opaque. If x-raying
will be done (through the chest cavity, for example) then the Mattress should be positioned or rotated 180°
such that the imaging area does not contain the sensor.
8. Does HotDog offer any warming options for cases using steep Trendelenburg? Yes. Procedures where
the patient is positioned in steep Trendelenburg historically result in high rates of hypothermia due to the
small surface area available for warming. The HotDog WaffleGrip Trendelenburg positioning accessory
effectively prevents the patient from sliding on the table while still providing warmth under the patient.
9. Why do HotDog blankets and mattresses expire? Over time the electric current flowing over the
conductive polymer fabric oxidizes it, changing its resistance and the time it needs to reach temperature.
When new it only takes a few minutes to reach the set temperature. After 30 months of use it will take
closer to 10 minutes to reach the set temperature. We have no data to support the use of the Devices
beyond 30 months.
ACCESSORIES
Part Number
Description
B103
Lower Body Warming Blanket
B104
Full Body Warming Blanket
B105
Multi-position Warming Blanket
B107
Head Warming Blanket
B110
Chest and Torso Warming Blanket
B500
Universal Warming Blanket
B502
Warming Blanket, Heated Arm Protection
B503
HotDog Lower Body Blanket Air-free 2.0
B504
HotDog Full Body Blanket Air-free 2.0
B505
HotDog Multi-Position Blanket Air-free 2.0
B510
HotDog Torso Blanket Air-free 2.0
B203
Small Lower Body Warming Blanket
B270
Small Pediatric Head Wrap
B271
Large Pediatric Head Wrap
S104
Lower and Full Body Disposable Sheet
U101
Underbody Warming Mattress, 82 cm (32in)
U102
Underbody Warming Mattress, 127 cm (50in)
U220
Pediatric Underbody Warming Mattress
U300
Trendelenburg Position Warming Mattress 89 cm (35in)
U501
Underbody Warming Mattress + Return Electrode, 82 cm (32in)
U502
Underbody Warming Mattress + Return Electrode, 127 cm (50in)
U522
Pediatric Underbody Warming Mattress + Return Electrode
U530
Trendelenburg Position Warming Mattress + Return Electrode
A101
Cable, Blanket, 4 meter, yellow
A102
Cable, Blanket, 5 meter, yellow
A108
Wire Storage Rack, IV Pole Mount
A109
Wire Storage Rack, Wall Mount
A110
Wire Storage Rack, WC7X Clamp-Mountable
A112
Cable, Mattress, 5 meter, blue
A136
Cable, Return Electrode, 4 meter, green
A137
Y Adapter, Return Electrode, (Requires A136 to operate)
A300
Trendelenburg Positioning Kit

User and Technical Manual: HotDog Temperature Management Controller Page 15
Part Number
Description
A301
Trendelenburg Positioning Kit with BackSaver Slide Sheet
A302
Trendelenburg Positioning Kit with BackSaver Slide Sheet, Heated Arm Protection
A303
Table Cover, Draw Sheet, Arm Barriers
A400-YSI400
Adapter - Output, 3.5mm TSF (headphone) —YSI 400 Series (1/4 in Phono)
A401-PH-2
Adapter - Output, 3.5mm TSF (headphone) —Philips 2 pin
A402-SPLAB
Adapter - Output, 3.5mm TSF (headphone) —Spacelabs
A403-DRAE
Adapter - Output, 3.5mm TSF (headphone) —Draeger
A404-MRY-DAT
Adapter - Output, 3.5mm TSF (headphone) —Mindray / Datascope
A405-GE-MARQ
Adapter - Output, 3.5mm TSF (headphone) —GE / Marquette Adapter
A410-OUT
Cable, Output 3.5mm TSM-TSM (headphone male) 2 meter
A411-IN
Cable, NTC Input Cable extension 3.5mm TRSM-TRSF (2M)
A412-IN-ADP
Adapter –Input TRSM-TBD
User and Technical Manual: HotDog Temperature Management Controller Page 16
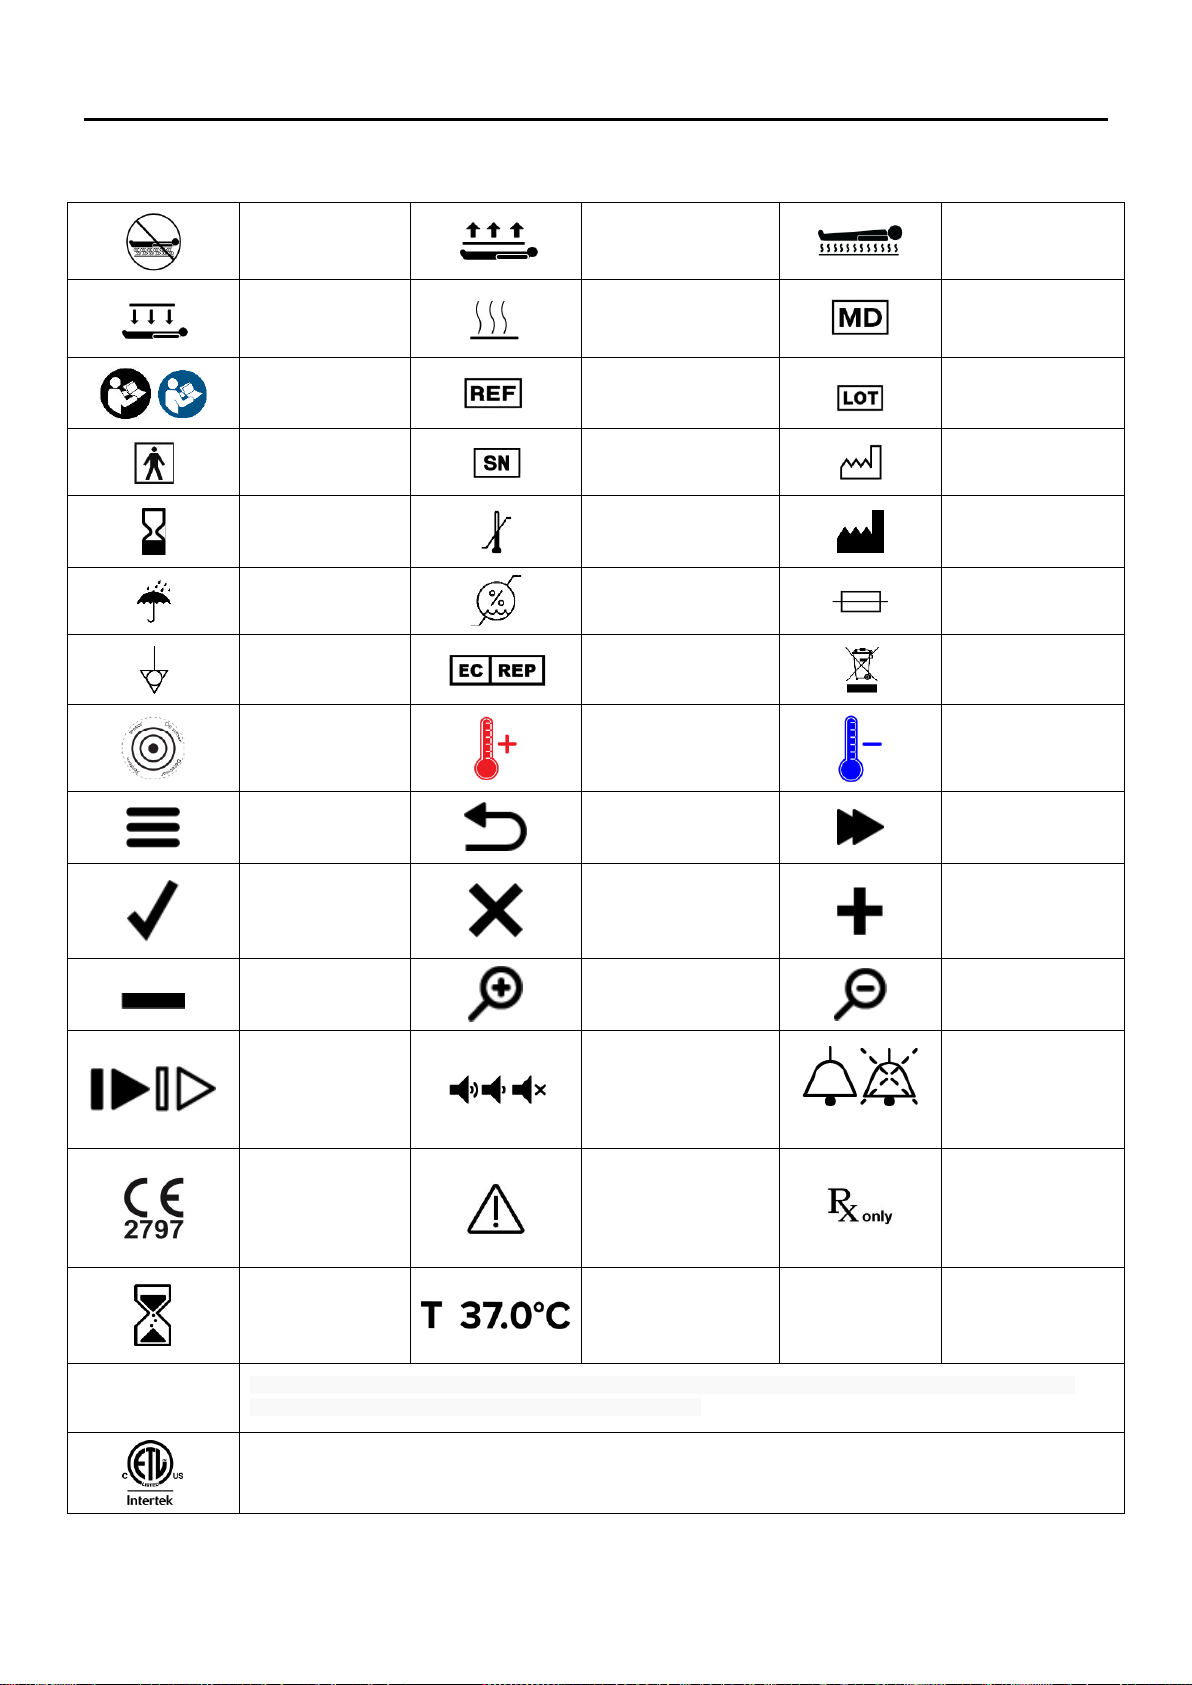
DEFINITION OF PRODUCT SYMBOLS
Do Not Place Under
Patient
This Side Up
This Side Under Patient
This Side Down
Heating Area
Medical Device
Attention; consult
accompanying
documents
Reference Number
Lot Number
BF Patient Applied
Part according to
IEC60601-1.
Serial Number
Manufacture Date
Do not use after
YYYY-MM-DD
Transport and storage
temperature range
Manufacturer
Keep Dry
Transport and storage
humidity range
Fuse
Equipotential
EU Authorized
Representative
Return to Authorized
Representative
Temperature Sensor
Device Temperature
Increase Button +1°C
(When gray, device is at
maximum temperature.)
Device Temperature
Decrease Button -1°C
(When gray, device is at
minimum temperature.)
Main Menu Button
Back Button
Next/Previous Page
Graph Scroll Left/Right
Confirm/Yes Button
Cancel/No Button
Increase Setting Button
(Volume, Brightness,
Etc.)
Decrease Setting
Button (Volume,
Brightness, Etc.)
Graph Zoom in Button
Graph Zoom out Button
Slideshow Play/Pause
Button
(Outline indicates
pause)
Slideshow Volume Button
Alarm Mute Button
(X indicates alarm is
muted.)
Conforms to Medical
Device Regulation (OJ
No L 117/1 of 2017-
05-05)
See IFU for Warnings and
Precautions
Medical Device restricted
to sale by or on the order
of a physician
Measured
temperature (invalid
patient temperature)
Valid Patient Temperature
(example)
IPX2
Protected against dripping water when tilted up to 15°; vertically dripping water shall have no harmful effect when the
enclosure is tilted at an angle up to 15° from its normal position.
Medical Equipment Classified by Intertek Testing Services NA Inc. with respect to electric shock, fire, and mechanical hazards only, in
accordance with UL 60601-1. Classified under the Medical Device Directive (93/42/EEC) as a Class IIb device.

User and Technical Manual: HotDog Temperature Management Controller Page 17
TECHNICAL MANUAL
Read Before Servicing Equipment
Repair, preventive maintenance, safety testing, and servicing of the System require the skill of qualified medical-
equipment service technicians, who are familiar with good practice for medical device repair. Do not open the
Controller. There are no user-serviceable parts. If service is required, contact Technical Support. Perform all
maintenance activities in accordance with the instructions in this technical manual. Approved personnel: unplug
the Warming Device before servicing internal components.
MAINTENANCE & TESTING
Electrical Safety Checks and Functional Testing
Frequency
These tests should be completed once every 24 months (or more frequently if required by hospital guidelines).
Tools/Equipment
•Warming Device Cable (A101 or A102, A112)
•Ground continuity tester
•Leakage current tester
•Calibrated, fast-reacting thermocouple and meter
•HotDog Warming Blanket or Warming Mattress (optional)
Method
1. Insert the Controller power plug into a properly grounded hospital-grade electrical outlet and confirm that no
cables or devices are connected to any of the ports.
WARNING: To avoid risk of electric shock, this equipment must only be connected to a supply mains with
protective earth ground.
Note: The Controller is grounded and should not be attached to un-grounded tables intended for use with a
hyfrecator or equivalent devices.
2. Perform the following tests on the Controller per standard institutional protocol:
A. Ground continuity
B. Connect a Warming Blanket to the Controller and test leakage current to ensure the maximum leakage
current does not exceed the requirements in Table 3.
Note: The equipotential stud on the back of the Controller
may be used as a grounding point for these tests.
Equipotential stud is for ease of attaining ground connection
during electrical safety testing. Clip to stud during test.
Reference 60601-1 8.6.7
Table 3: Maximum Allowable Leakage Current
Polarity
Condition
Current (mA)
Normal /
Reversed
Normal
0.1
Open Ground
0.5
Open Neutral
0.5
Open Ground & Open Neutral
0.5
User and Technical Manual: HotDog Temperature Management Controller Page 18
1. Perform “Functional Testing” described on the following pages.
Functional Testing Method for Controller
Place the Controller in Diagnostic Test mode by navigating to the Service Menu (Main Menu>Service>Diagnostic
Test). To run the Diagnostic Test, click the green checkmark button. The test will not begin until all Warming
Devices have been disconnected from the Controller. If a failure is observed during any of these steps, call
Customer Service.
To verify functionality of Alarms, Alarm should sound near the end of the test.
Per IEC 2-35: Test verifies that the independent thermal cut-out (i.e. secondary overtemperature sensor) is
operational
When the test is successfully completed, “Passed” will display on the screen. If the test is unsuccessful, “Failed”
will display.
Functional Testing for Blanket or Mattress and Controller
Use a Warming Blanket or Mattress to perform the steps outlined below. If a failure is observed during any of
these steps, repeat testing using a different Warming Blanket or Mattress. If failure is observed with the second
Warming Blanket or Mattress, contact Customer Service
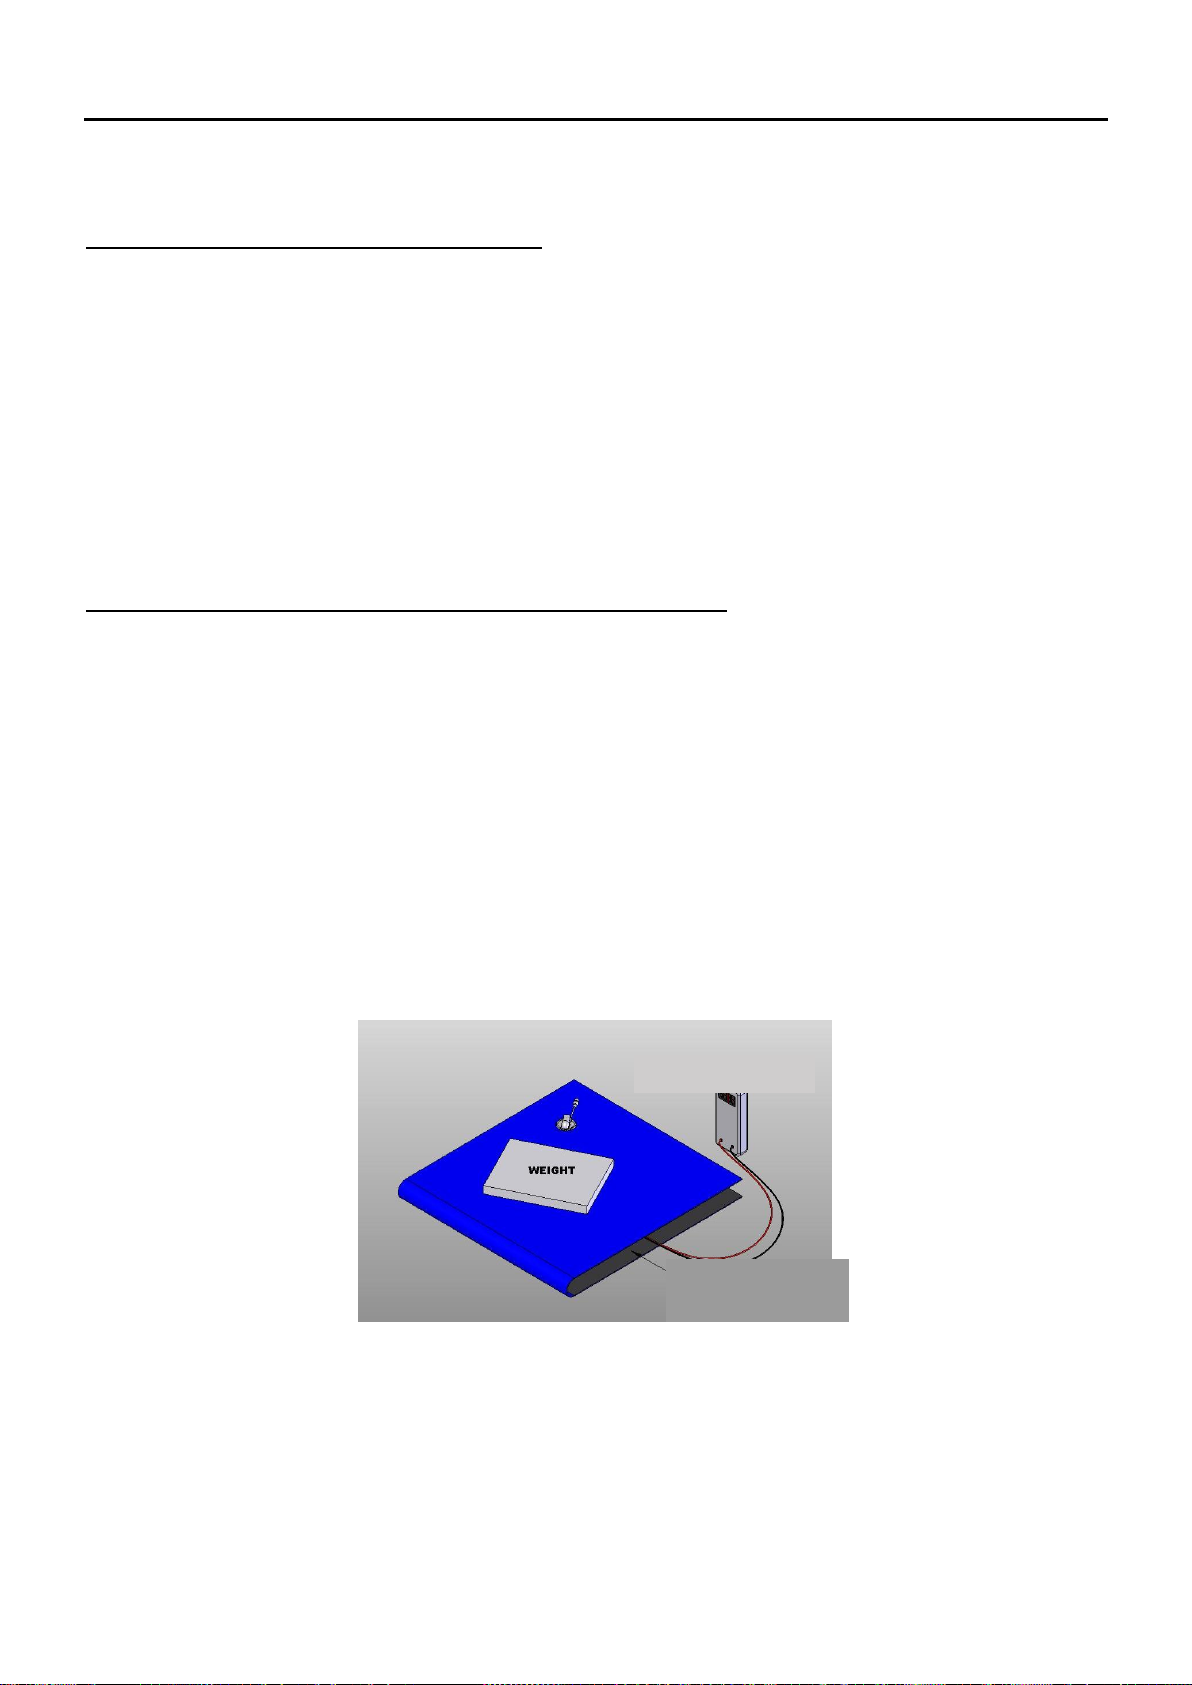
1. Tape a calibrated, fast-reacting temperature sensor to the patient-facing surface of the Warming Blanket or
Mattress directly over the sensor marking.
2. Fold the Warming Blanket or Mattress back on itself (black face to black face in the case of using a Warming
Blanket) so that the temperature sensor is inside the folded area. Place a 750 to 1000g weight (such as a small
book or notebook) over the sensor location to ensure that the Device remains folded and that there is good
contact between the sensor and the folded Warming Blanket or Mattress.
Figure 3: Warming Blanket Test Configuration
3. Turn the Mains Power Switch on the Controller to the ON position. Connect the Warming Blanket or Mattress
cable to the Controller. The Controller will emit an audible tone when the Warming Blanket or Mattress is
connected.
4. Set the Controller to the temperature that is to be verified. If checking all set-points, start with the low
temperature.
TEMPERATURE SENSOR
POSITIONED BETWEEN
BLANKET LAYERS
TEMPERATURE METER

User and Technical Manual: HotDog Temperature Management Controller Page 19
5. After the Device reaches the set point (indicated when the set point readout is no longer flashing), allow the
temperature to stabilize for an additional 10 minutes. NOTE: A temperature overshoot will be noted when
testing this way, which is normal.
6. After 10 minutes, the reading on the temperature sensor should be within +/-1°C of the set-point temperature.
When measuring temperature, the accuracy and tolerance of the sensor must be taken into account. This will
depend on the type of sensor being used and can range from +/- 0.2°C to +/- 2.0°C. The measurement
tolerance of the sensor must be added to the +/- 1.0°C tolerance for the System to determine the pass/fail
criteria for this test. For example: If the Controller is set to 41°C, and the measurement is being made with a
temperature sensor that has a +/- 1.0°C measurement tolerance, the acceptable range of measured temperatures
will be 39 to 43°C. (i.e. 41 +/- 2°C).
7. Repeat steps 4-6 for the next temperature setting, if required.
Error Codes: Alerts & Alarms
When an Alarm or Alert condition occurs, the associated error code will remain on the display until the
condition is resolved.
If multiple Alarm or Alert conditions occur sequentially, the code associated with the highest priority Alert
condition will be displayed first, followed by the next highest priority alarm or alert condition until all Alarm
or Alert conditions have been displayed to the user. Once all Alarm or Alert conditions have been displayed,
the display will return to the main operating screen where the error codes will still be present on the screen in
place of the temperature set point.
If a new Alarm or Alert condition occurs, all active Alarm or Alerts will be displayed to the user again sorted
by priority as described above.
To resolve an Alarm, follow the on-screen instructions. Devices will not be active when an Alarm is
occurring.
Alarm "audio paused”duration is 10 minutes, after which time audio resumes.
Alert Error Condition
Code
Alarm Error Condition
Code
Calibration failure
EA
Overcurrent (System)
E3
Hardware failure (secondary
circuitry)
EC
Primary Over-temperature
E1
System Failure (Power
Switch Failure)
EF
Port Current Limit Reached
E3
Hardware I2C failure
EH
Sensor or Cable Failure
E4
Hardware power supply
failure
EP
Blanket Fold Detection
E5
Failure to Reach Temp
E2
Over Temperature (Secondary)
E8
Auto mode Disengaged
E7
Automatic Shutoff Timer
-- (returns to
Standby mode)

User and Technical Manual: HotDog Temperature Management Controller Page 20
Alarm Error Condition
Code
Condition
Delay
Signal Generation Delay
(Software Alarm)
Signal Generation
Delay
(Hardware Alarm)
Overcurrent (System) [hardware]
E3
< 1 millisecond
< 200 milliseconds
< 50 seconds
Primary Over-temperature [software]
E1
15 Sec
< 200 milliseconds
(software only;
won’t alarm)
Port Current Limit Reached [hardware]
E3
< 1 millisecond
< 200 milliseconds
< 50 seconds
Sensor or Cable Failure [software]
E4
15 Sec
< 200 milliseconds
(software only;
won’t alarm)
Blanket Fold Detection [software]
E5
15 Sec
< 200 milliseconds
(software only;
won’t alarm)
Over Temperature TruCore (NA) [hardware]
E6
< 1 millisecond
Not implemented
< 50 seconds
Over Temperature (Secondary) [hardware]
E8
< 1 millisecond
< 200 milliseconds
< 50 seconds
SPECIFICATIONS
Physical Characteristics
Dimensions
28 cm high x 17.8 cm deep x 22.2 cm wide (11” high x 7” deep x 8.75” wide)
Weight
2.8-3.2 kg (6.25 –7.15 lbs.) without the clamp
Mounting
Can be placed on a horizontal flat surface (i.e. table top), clamped to an IV pole, or hung using a VESA mount of
either FDMI MIS-C (35 × 75 mm) or FDMI MIS-D (75 × 75 mm) specifications
Temperature Characteristics
Temperature Control
Micro-processor
Operating Temperatures
Blanket Ports A, B, C, and D adjustable in 1oC increments
37° to 43° ± 1.0°C
98.6° to 109.4° ± 1.8°F
Mattress Port M adjustable in 1oC increments
35° to 40° ± 1.0°C
95° to 104° ± 1.8°F
Safety System
All alarm conditions are classified as Medium Priority Technical Alarms
Auditory Alarms
Minimum SPL of 65 dB(A) at 3m (from front of controller) with a back ground SPL not to exceed 55dB(A)
Primary Over-temp Alarm
Ports A, B, C, D (Warming Blanket)
Medium Priority Alarm sounds when temperature sensor is at set point + 1°C
Port M (Warming Mattress)
Medium Priority Alarm sounds when temperature sensor at set point + 1°C
Secondary Over-temp Alarm
Ports A, B, C, D (Warming Blanket)
Independent electronic circuit shuts the heater off if the Warming Blanket temperature sensor reaches max set
This manual suits for next models
2
Table of contents
Other Augustine Surgical Medical Equipment manuals


