Smart MED iBreeze Series User manual
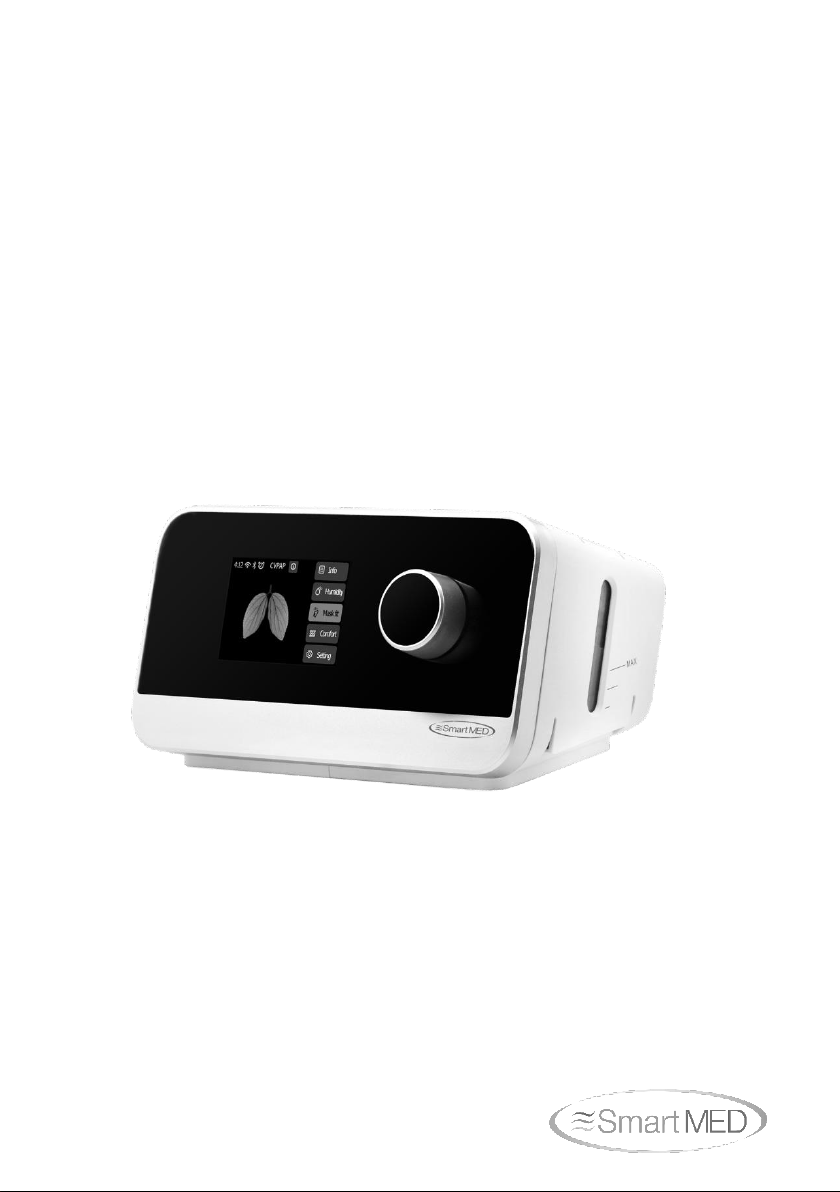
User Manual
iBreeze Series CPAP

Contents
1 Welcome...........................................................................................................................................................1
2 Intended Use..................................................................................................................................................1
3 Contraindications..........................................................................................................................................1
4 Safety Information........................................................................................................................................2
5 Symbol ............................................................................................................................................................6
6 System Contents..........................................................................................................................................7
7 System Overview..........................................................................................................................................8
8 Navigating the Device Screens........................................................................................................... 12
9 Operation....................................................................................................................................................... 13
10 Device Alert............................................................................................................................................... 21
11 Troubleshooting....................................................................................................................................... 24
12 Cleaning and Maintaining................................................................................................................... 26
13 Maintenance............................................................................................................................................. 28
14 Storage and Disposal........................................................................................................................... 28
15 Specification.............................................................................................................................................. 29
16 EMC Declaration..................................................................................................................................... 31

iBreeze CPAP Systems User Manual
1
1 Welcome
The iBreeze PAP Devices contain either CPAP or CPAP and APAP (variable pressure)
Modes. These modes are both continuous positive airway pressure modes during the
respiratory cycle devices.
These devices carry a 2 year limited warranty from the date of purchase.
The iBreeze CPAP Systems include the following models:
iBreeze 20C, iBreeze 20C Pro, iBreeze 20A, iBreeze 20A Pro.
Responsibility of the Manufacturer
Resvent is responsible for the effects on safety, reliability and performance of this
product, provided:
•All installation operations, expansions, changes, modifications and repairs of
this product are conducted by Resvent authorized personnel.
•All spare parts for repair, accessories and consumables are conducted by
Resvent or authorized personnel.
•The electrical installation of the relevant room complies with the applicable
national standard and the manual requirements.
•The product is used in accordance with these instruction for use.
IMPORTANT
Read this entire guide before using the device.
2 Intended Use
The iBreeze™ CPAP systems deliver positive airway pressure therapy for the
treatment of Obstructive Sleep Apnea (OSA). It is intended for use by spontaneously
breathing patients weighting over 30kg (66lbs), it is for use in the home, hospital, or
institutional environment.
The system is also intended for a spot check transcutaneous measurement of oxygen
saturation (SpO2) in the blood using light detection given from a special probe for adults
and pediatrics.
3 Contraindications
When assessing the relative risks and benefits of using this equipment, the clinician
should understand that this device can deliver pressures up to 20 cmH2O. In the event
of certain fault conditions, a maximum pressure of 40 cmH2O is possible. Studies have
shown that the following pre-existing conditions may contraindicate the use of CPAP
therapy for some patients:
•Severe coronary artery disease
•Bullous Lung Disease
•Pathologically Low Blood Pressure
•Bypassed Upper Airway
•Pneumothorax
Caution should be used when prescribing CPAP for susceptible patients such as those
with: cerebral spinal fluid (CSF) leaks, abnormalities of the cribriform plate, prior history
of head trauma, and/or Pneumothorax.

iBreeze CPAP Systems User Manual
2
The use of positive airway pressure therapy may be temporarily contraindicated if you
exhibit signs of a sinus or middle ear.
Note: In any case mentioned, it is important to consult a competent physician with
regards to whether to use a CPAP device.
User qualifications
The person operating the device by the instruction in the user’s manual is referred as
the “user”. In contrast, a “patient” is the person receiving the therapy. Always perform
all the operating steps in accordance with the user’s manual.
4 Safety Information
WARNINNG: Indicate the possibility of injury to the user or operator.
CAUTION: Indicate the possibility of damage to the device.
WARNING:
This manual serves as a reference. The instructions in this manual are not intended
to supersede the health care professional’s instructions regarding the use of the
device.
This device is not intended for life-supporting device.
The device must be used only with the masks and accessories that meet health
regulations.
The exhalation port(s) associated with the mask should never be blocked. The
device is intended to be used with special masks or connectors that have
exhalation ports to allow continuous flow of air out of the mask. When the device is
turned on and functioned properly, new air from the device flushes the exhaled air
out through the mask exhalation port. However, when the device is not operating,
enough fresh air will not be provided through the mask.
If you are using a full face mask (a mask covering both your mouth and your nose),
the mask must be equipped with a safety (entrainment) valve.
When using oxygen with this system, always make sure that the device is turned on
and airflow generated before the oxygen supply is turned on. Always turn the
oxygen supply off before the device is turned off, so that unused oxygen does not
accumulate within the device enclosure and create a risk of fire.
Sources of oxygen must be located more than 1 m from the equipment to avoid the
risk of fire and burns.
Do not connect the device to an unregulated or high pressure oxygen source.
Oxygen must not be used while smoking or in the presence of an open flame.
Do not use the device in the presence of a flammable anaesthetic mixture in
combination with oxygen or air, or in the presence of nitrous oxide.
Do not use the device near a source of toxic or harmful vapors.
Do not use this device if the room temperature exceeds 35°C (95°F). If the device is
used at room temperatures warmer than 35°C (95°F), the temperature of the airflow
may exceed 43°C (109°F). This could cause irritation or injury to your airway.
The device is not used exceed the specified temperature range.
Do not operate the device in direct sunlight or near a heating appliance because
these conditions can increase the temperature of the air coming out of the device.
Contact your health care professional if symptoms of sleep apnea recur.

iBreeze CPAP Systems User Manual
3
If you notice any unexplained changes in the performance of this device, if it is
making unusual or harsh sounds, if it has been dropped or mishandled, if water is
spilled into the enclosure, or if the enclosure is broken, disconnect the power cord
and discontinue use. Contact your home care provider.
Repairs and adjustments must be performed by Resvent authorized service
personnel only. Unauthorized service could cause injury, invalidate the warranty, or
result in costly damage.
Do not use any accessories, detachable parts, and materials not recommended by
Resvent. Incompatible parts or accessories can result in degraded performance.
The Health Industry Manufacturers Association recommends that a minimum
separation of 16cm be maintained between a wireless phone and a pacemaker to
avoid potential interference with the pacemaker.
Use only power cords supplied by Resvent for this device. Use of power cords not
supplied by Resvent may cause overheating or damage to the device and may
result in increased emissions or decreased immunity of the equipment or system.
The device should not be used while stacked or in close approximation to other
non-approved devices.
Use only approved cables and accessories. Misuse may affect EMC performance
and should be avoided.
Inspect the tubing for damage or wear. Discard and replace the tubing as
necessary.
Periodically inspect electrical cords and cables for damage or signs of wear.
Discontinue use and replace if damaged.
To avoid electrical shock, always unplug the power cord from the wall outlet before
cleaning the device. DO NOT immerse the device in any fluids.
Be sure to route the power cord to the outlet in a way that will prevent the cord from
being tripped over or interfered with by chairs or other furniture.
This device is activated when the power cord is connected.
For safe operation when using a humidifier, the humidifier must always be
positioned below the breathing circuit connection at the mask. The humidifier must
be level for proper operation.
Nebulization or humidification can increase the resistance of breathing system
filters and the operator must monitor the breathing system filter frequently for
increased resistance and blockage to ensure the delivery of the therapeutic
pressure.
Please check whether there is water in the device before use. The maximum fill
level is 290 ml.
Failure to use a mask or accessory that minimizes re-breathing of carbon dioxide or
permits spontaneous breathing can cause asphyxiation.
Do not connect breathing tubes or accessories with any humidifier and ventilator
that are not specified for use with these breathing tubes or accessories.
Do not cover or heat the breathing tube with anything influent the patient end
temperature.
Do not use this device outside the specified ambient temperature range or humidity
range. The humidity performance of the device can be compromised when used
outside the specified ambient temperature range or humidity range.
No modification of this equipment is allowed.
Parts of the equipment are not serviced or maintained while in use with the patient.
The PATIENT is an intended OPERATOR.
The Patient can safely use therapy functions of the equipment and this equipment
shall not be serviced or maintained while in use with the patient.

iBreeze CPAP Systems User Manual
4
Please first check the breathing tube is connected correctly to avoid strangulation
risk due to breathing tube and hoses when used.
Do not pull or stretch the tubing. This could result in circuit leaks.
If the device is used by multiple persons (such as rental devices), a low-resistance,
main flow bacteria filter should be installed in-line between the device and the
circuit tubing to prevent contamination.
Allow the humidifier heater plate and water to cool down for approximately 15
minutes before removing the water chamber. A burn may result from: touching the
heater plate, coming in contact with the heated water, or touching the chamber pan.
CAUTION:
Medical electrical equipment needs special precautions regarding EMC and needs
to be installed according to EMC information, Contact your home care provider
regarding EMC installation information.
Mobile RF communications equipment can affect medical electrical equipment.
Pins of connectors marked with the ESD warning symbol shall not be touched and
connections shall not be made without special precautions. Precautionary
procedures include methods to prevent build-up of electrostatic charge (e.g., air
conditioning, humidification, conductive floor coverings, non-synthetic clothing),
discharging one’s body to the frame of the equipment or system or to earth. It is
recommended that all individuals that will handle this device understand these
precautionary procedures at a minimum as part of their training.
Condensation may damage the device. If this device has been exposed to either
very hot or very cold temperatures, allow it to adjust to room temperature (operating
temperature) before starting therapy. Do not operate the device outside of the
operating temperature range shown in the Specifications.
Do not use extension cords with this device.
Make sure the filter area on the side of the device is not blocked by bedding,
curtains, or other items. Air must flow freely around the device for the system to
work properly.
Make sure the gas intake port on the side of the device is not blocked by bedding,
curtains, or other items. Air must flow freely around the device for the system to
work properly.
Do not place the device directly onto carpet, fabric, or other flammable materials.
Do not place the device in or on any container that can collect or hold water.
A properly installed, undamaged filter is required for proper operation.
Tobacco smoke may cause tar build-up within the device, which may result in the
device malfunctioning.
Dirty inlet filters may cause high operating temperatures that may affect device
performance. Regularly examine the inlet filters as needed for integrity and
cleanliness.
Always ensure that the DC power cord securely fits into your therapy device prior to
use. Contact your home care provider or Resvent to determine if you have the
appropriate DC cord for your specific therapy device.
When DC power is obtained from a vehicle battery, the device should not be used
while the vehicle’s engine is running. Damage to the device may occur.
Only use a Resvent DC Power Cord and Adapter Cable. Use of any other system
may cause damage to the device.
When change the pressure setting, please consult your doctor.
Do not position next to a curtain that blocks the flow of cooling air, thereby causing
the equipment to overheat.

iBreeze CPAP Systems User Manual
5
Do not block the gas INTAKE PORT, thereby interfering with therapy.
Please follow the local regulation when disposal the device
The proper placement and positioning of the MASK on the face is critical to the
consistent operation of this equipment.
Please check that the compatibility of the equipment and all of the parts and
accessories used to connect to the patient before use.
Ensure that the therapeutic pressure settings were determined for the patient
individually with the configuration of the equipment to be used, including
accessories.
For multiple patients use, please use your own personal breathing tube and mask,
do not use someone else’s.
You should position the device far away your pets, pests or children when you use
the device in home environment.
In the case you feel uncomfortable when you connect and use the device, turn the
device off and contact your CPAP provider immediately.
Please periodically reassess the setting(s) of the therapy for effectiveness.
Never install a wet filter into the device. You must ensure sufficient drying time for
the cleaned filter.
If you need to measure the oxygen saturation in the system, please refer the Wrist
Pulse Oximeter User Manual for the oximeter adapter.
Empty the water chamber before packing or moving the device!
iBreeze CPAP Systems User Manual
6
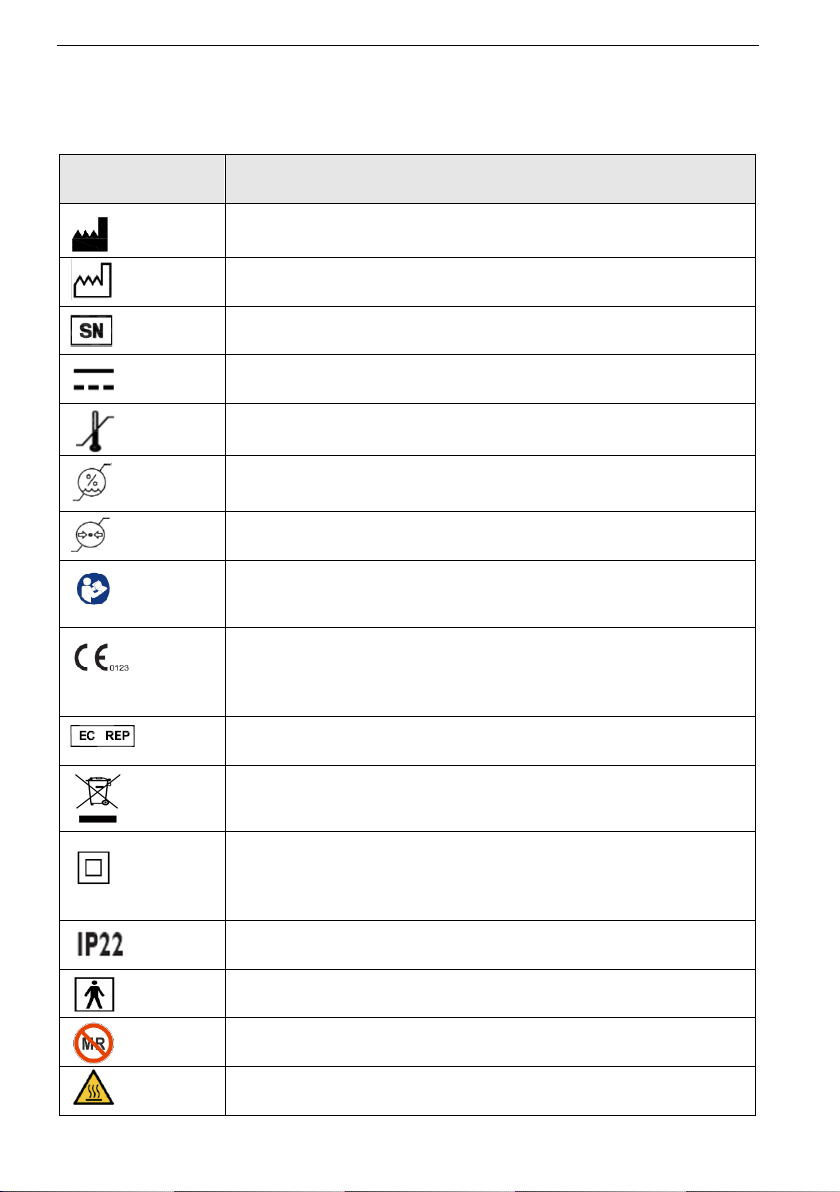
5 Symbol
The following symbols may appear on the device, power supply and accessories.
Symbol
Definition
Manufacturer.
Date of Manufacture.
Serial number.
DC Power.
Temperature limitations at transport and storage.
Humidity limitations at transport and storage.
Atmospheric pressure at transport and storage.
Follow instruction for use. This label on the device points the
user to the operator’s manual for complete information. In the
operator’s manual, this symbol cross-references the label.
The product bears CE mark indicating its conformity with the
provisions of the Council Directive 93/42/EEC concerning
medical devices and fulfils the essential requirements of Annex
I of this directive.
European Authorized Representative.
Dispose according to Council Directive 2012/19/EU or WEEE
(Waste Electrical and Electronic Equipment).
Indicates the degree of protection against electric shock
according to IEC 60601-1. Class II devices have double or
reinforced insulation, as they have no provision for protective
grounding.
Indicates the degree of protection provided by enclosure
according to IEC 60601-1.
Type BF Applied part (classification of medical electrical
equipment, type B, as specified by IEC 60601-1).
The device is not suitable for use in MRI environment.
Respiratory air humidifier is heated. Do not touch the element.
iBreeze CPAP Systems User Manual
7
Therapy On/Off Button (Starts and stops the airflow for
therapy).
This way up at transport and storage.
Fragile, handle with care.
Keep dry at transport and storage.
Stacking limitations.
Recyclable materials.
6 System Contents
Your CPAP system may include the following items:
CPAP Device
Power Adapter
Power Cord
SD Card
Flexible Tube: 19 mm or 15 mm tube
Travel Bag
User Manual
NOTE: If any of these items are missing, please contact your home care provider.
iBreeze CPAP Systems User Manual
8
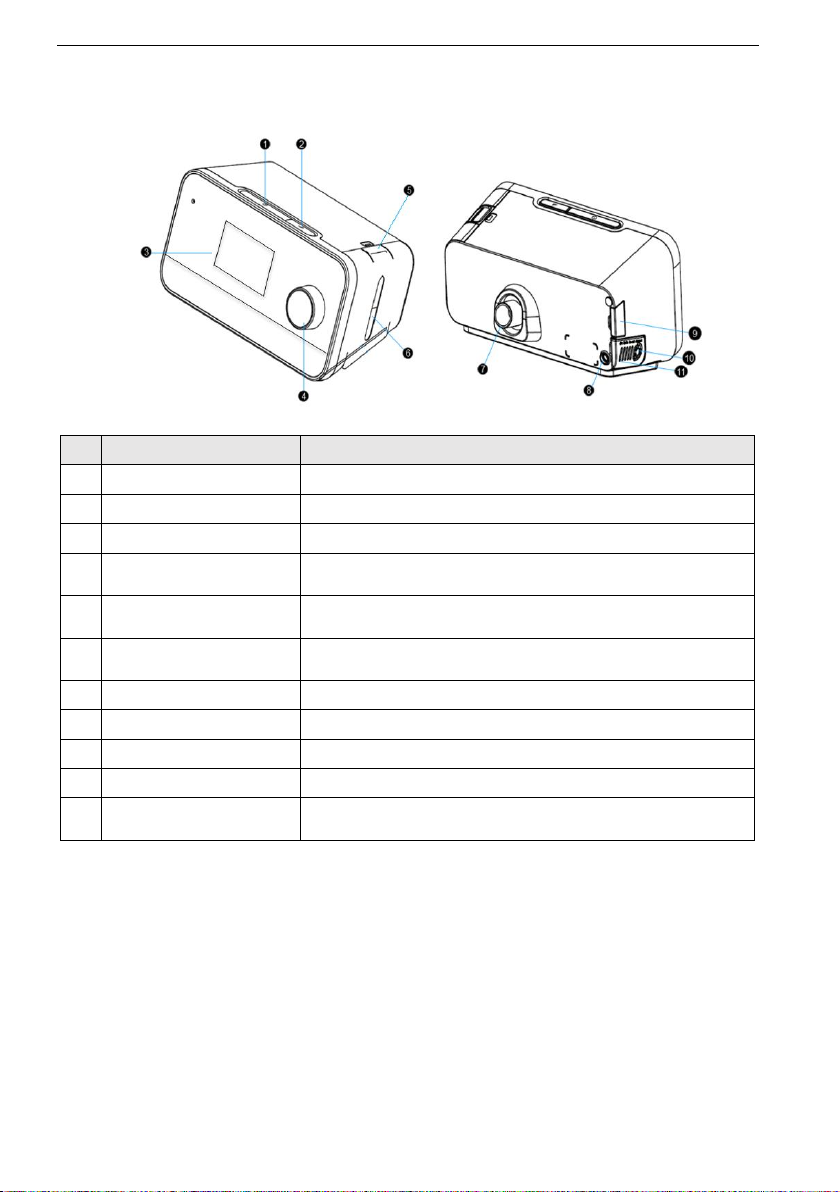
7 System Overview
#
Device Feature
Description
1
Therapy On/Off Key
Starts and stops the airflow for therapy.
2
Ramp Key
Activate the ramp feature during therapy.
3
LCD Display screen
This is the User interface for the therapy device.
4
Control Dial
Turn the dial to scroll between options on the screen.
Press the dial to choose the option.
5
Water Chamber Lock
Press the water chamber lock to remove the water
chamber.
6
Water Chamber
This one piece removable water chamber holds the
water for humidification.
7
Air Outlet Port
Connect the tubing here.
8
Power Inlet
Connect the power cord here.
9
SD card Access Door
This door lifts open for access to SD card.
10
Air Inlet Port
Inlet for room air.
11
Filter Cotton Cover
Open the filter cotton cover to place or change the
filter cotton.
7.1 Placing the Device
Place the device on a firm, flat surface somewhere within easy reach of where you will
use it at a level lower than your sleeping position. Make sure the device is away from
any heating or cooling equipment (e.g., forced air vents, radiators, air conditioners).
Note: When positioning the device, make sure that the power cable is accessible
because removing power is the only way to disconnect power from the device.
CAUTION:
Make sure the filter area on the side of the device is not blocked by bedding,
curtains, or other items. Air must flow freely around the device for the system to
work properly.
iBreeze CPAP Systems User Manual
9
Do not place the device directly onto carpet, fabric, or other flammable materials.
Do not place the device in or on any container that can collect or hold water.
Do not touch the metal surface of the heater when you pull out the water
chamber.
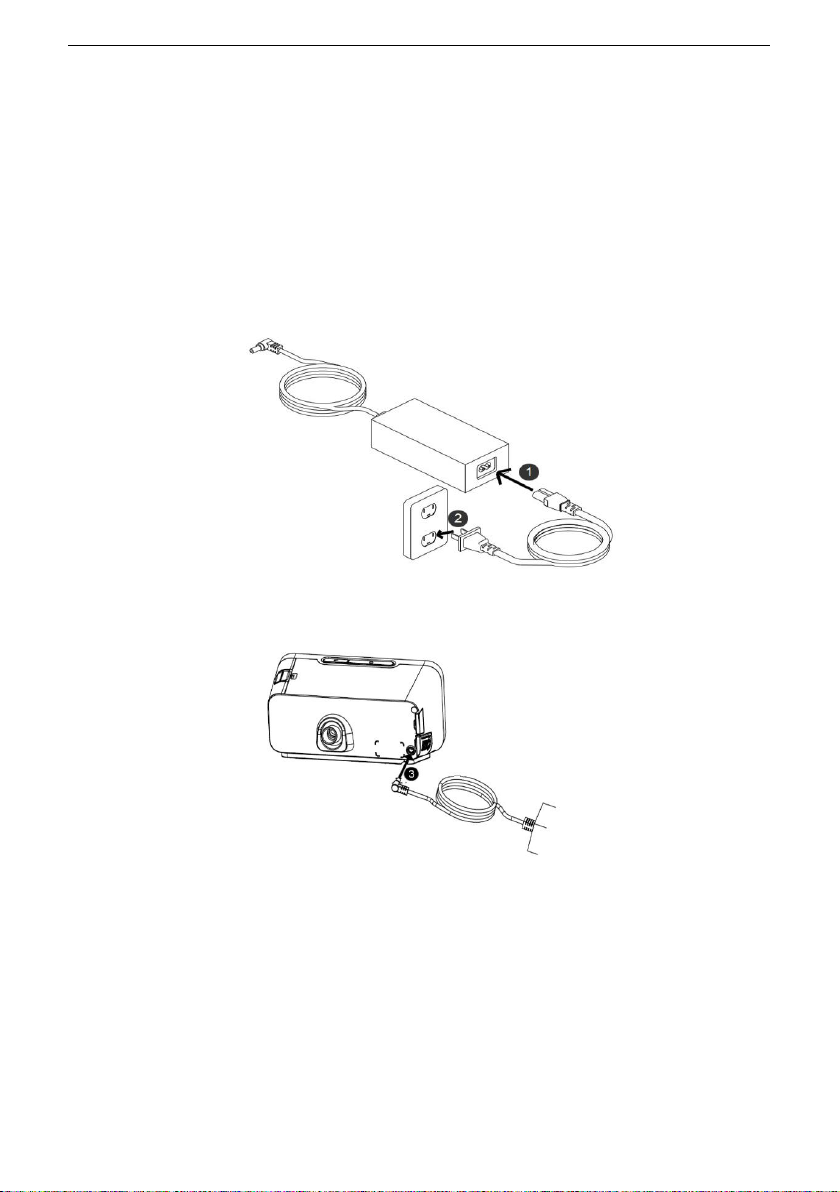
7.2 Supplying AC Power
Complete the following steps to operate the device using AC power:
1. Plug the socket end of the AC power cord (included) into the power supply (also
included).
2. Plug the pronged end of the AC power cord into an electrical outlet that is not controlled
by a wall switch.
3. Plug the power supply cord’s connector into the power inlet on the side of the device.
4. Verify that the plug at the side of the device, at the power supply, and at the
electrical outlet are fully inserted.
WARNING:
During use if the power cord is disconnected or in case of a power failure, the
device buzzer alarm beeps. Please stop using it and check the power status.
Please do not touch any power component if it is broken.
Please avoid arcing, wiggling, or dropping the power supply on hard surfaces.
Please periodically inspect electrical cords and cables for damage or signs of wear
and to discontinue use and replace if damaged.
Never place the power cord around the neck.
iBreeze CPAP Systems User Manual
10
Do not use any small parts to fix power cord in position as they might be
accidentally swallowed.
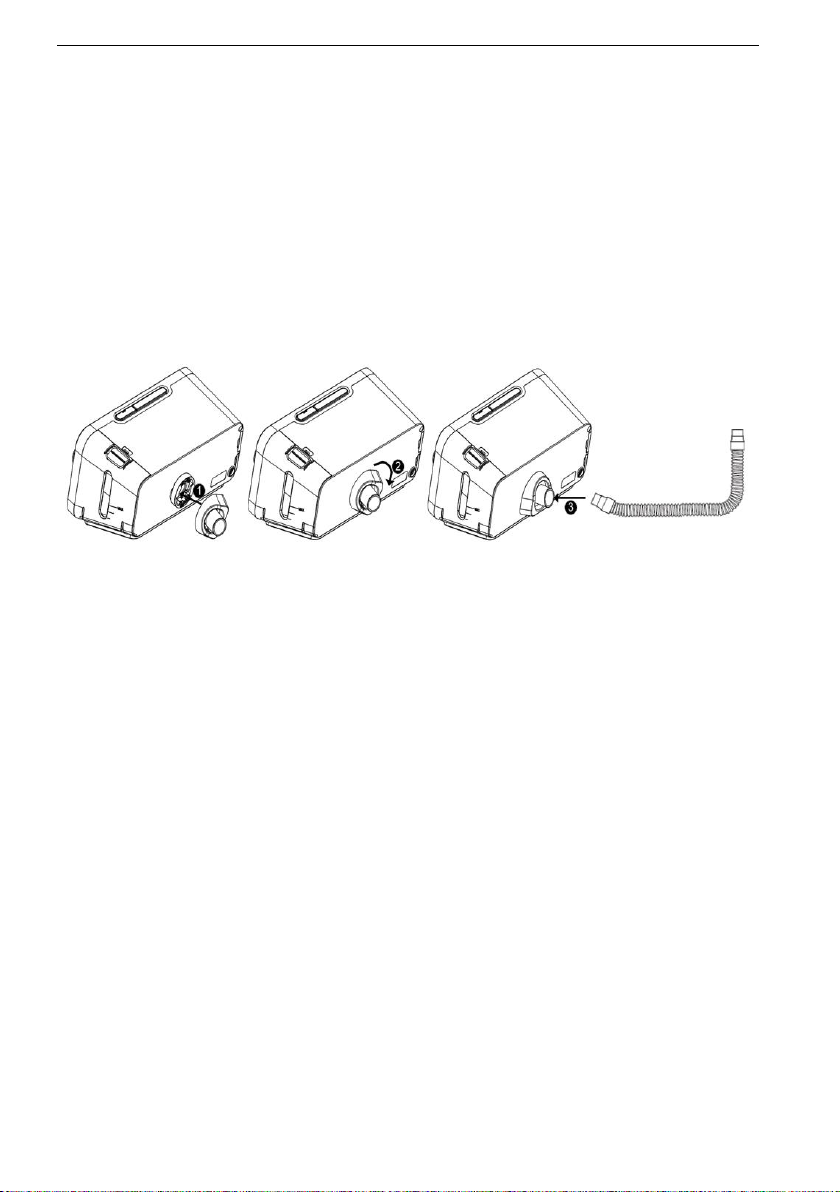
7.3 Connecting the Breathing Circuit
To use the system, you need the following accessories in order to assemble the
recommended breathing circuit:
Approved mask interface (nasal, pillows or full face) with integrated exhalation
port.
Resvent flexible tubing, 1.8 m.
To connect your breathing circuit to the device, please follow the below steps:
1. Install the connector to the back of the device, and connect the tubing with it.
Note: If you are using a standard tube (not shown) instead of a heated tube, simply
slide the tubing over the air outlet port on the therapy device.
2. Connect the tubing to the mask. For specific parameters and the correct use of the
method, please refer to the breathing hose manual.
WARNING: Do not pull or stretch the tubing, this could result in circuit leaks.
Inspect the tubing for damage or wear. Discard and replace the tubing as necessary.
WARNING:
If you are using a full face mask (a mask covering both your mouth and your
nose), the mask must be equipped with a safety (entrainment) valve.
If multiple users share the same equipment, use low-resistance and bacteria-
filtered cotton between the equipment and the tube.
Note: The selected mask, breathing tube shall meet the performance
requirements with good stability. The user should check the mask and tube for
damage before each use.
If necessary, bacterial filters are available to filter the airflow further. Please
contact your CPAP provider for more information.
Never place the respiration hose around the neck.
Do not use any small parts to fix the respiration hose in position as they might be
accidentally swallowed.
Do not squash the respiration hose.
iBreeze CPAP Systems User Manual
11
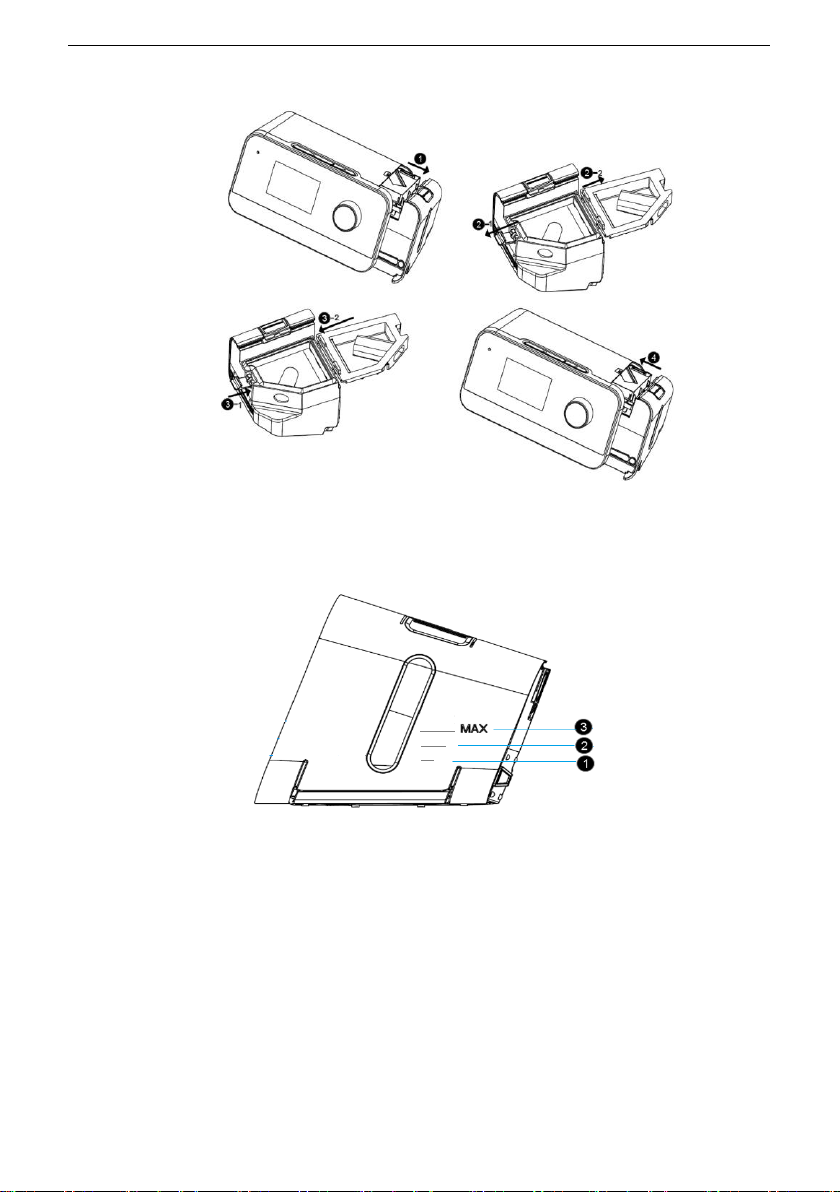
7.4 Water-filling Operation
1. Remove the water chamber from the device.
2. Open the water chamber lid, fill it with water up to the maximum fill line.
3. Lock the water chamber lid.
4. Install the water chamber on the device.
❶The fill line indicates 1/3 water level for safe operation.
❷The fill line indicates 2/3 water level for safe operation.
❸The fill line indicates the maximum water level for safe operation.
CAUTION:
Use only room temperature distilled water or purified water.
Do not fill the water chamber above the maximum fill line. If the water chamber is
overfilled, water may leak into the therapy device, humidifier, or onto your furniture.
Damage to the humidifier or therapy device may occur.
Empty the water chamber each day when the device is not in use.

iBreeze CPAP Systems User Manual
12
8 Navigating the Device Screens
The User Interface (UI) on this device allows you to adjust the device settings and view
information about your therapy. The UI is comprised of the display screen and the
control dial. Rotate the control dial in either direction to scroll through the menu options
on the display screen.
Note: The screen does not support touch operations. You must use the control dial to
navigate the device menu.
To adjust a setting:
1. Rotate the control dial to your desired menu option.
2. Press the control dial to select that setting.
3. Rotate the control dial to change the setting.
4. Press the control dial again to save the change.
Note: The screens shown throughout this manual are examples for reference only.
Actual screens may vary based upon device model and provider settings.
iBreeze CPAP Systems User Manual
13
9 Operation
This chapter describes basic operation and precautions associated with this device.
Each time you turn on the device, it will automatically run using the last settings
entered by the user.
9.1 Starting the Device
1. Ensure power is supplied to the device. The SmartMed logo will appear for 5
seconds, followed by the patient standby screen (See Figure 1).
2. Put on your mask.
3. Press the Therapy On/Off key on top of the device to turn on airflow and begin therapy.
The screen will display to patient therapy clean interface (see Figure 2).
4. Make sure that no air is leaking from your mask. If necessary, adjust the mask and
headgear until the air leak stops.
5. If you are using the device in a bed with a headboard, try placing the tubing over the
headboard. This may reduce tension on the mask.
6. Press the Therapy On/Off key again to turn off therapy.
Note:
1. If mains power is interrupted during therapy, (e.g., blackout) the device will resume
therapy mode if the power is restored within 60 minutes.
9.2 Patient Menu Navigation Settings
Patient Menu Navigation Setting including Standby interface shortcut operation、
Therapy interface shortcut operation、Comfort Parameters setting interface、System
setting interface.
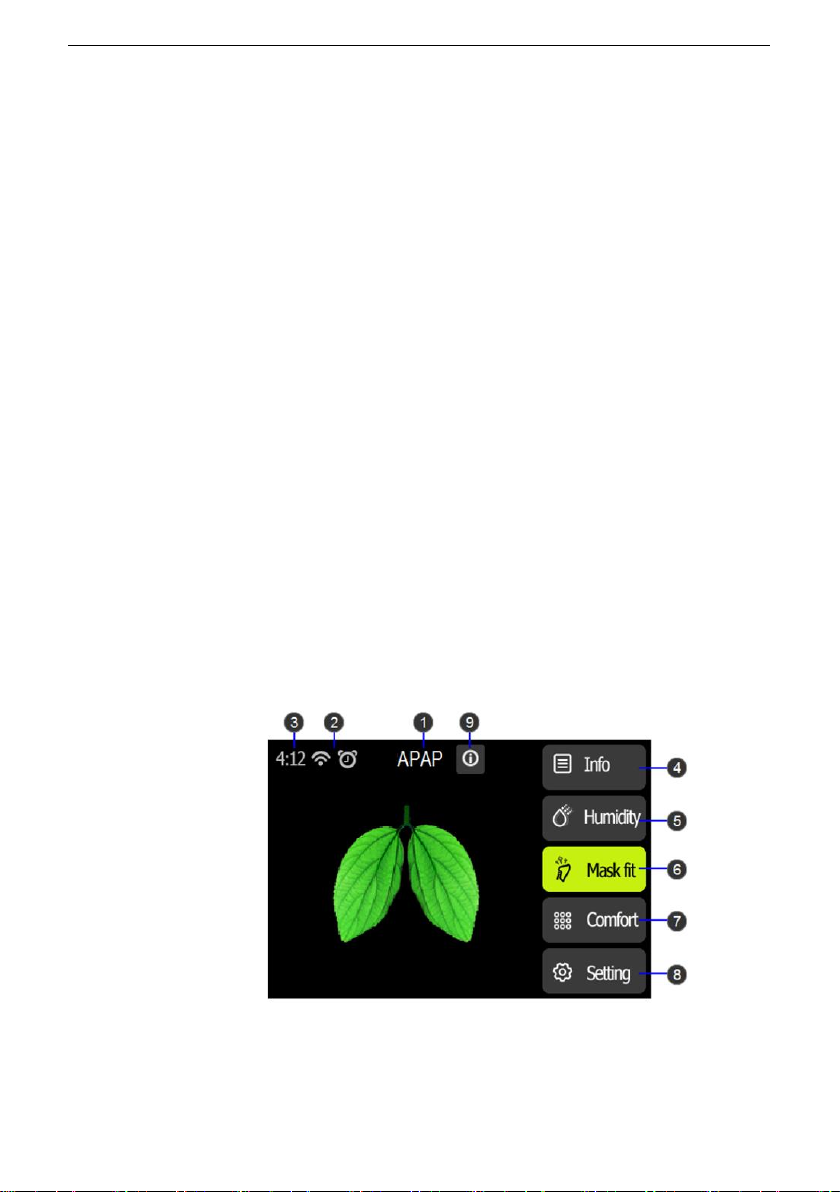
9.2.1 Patient Standby Interface
The Patient Standby Interface displays setup menus for the system main features,
and the icons to indicate the current enabled features.
Figure1 Patient Standby Interface

iBreeze CPAP Systems User Manual
14
#
Feature
Description
1
Mode
Display the current mode.
2
Enabled features
Depending on setup, certain enabled therapy features
will display here.
3
Time
Display the current time.
4
Patient Sleep Quality
Report
Displays the patient sleep quality report and the options
for period of the report are: daily (recent 6 days) / 7
days / 14 days / 1 month / 3 months / 6 months / 1
year.
5
Humidity
Set humidifier level to enhance patient comfort.
Option: Auto / 0-8 Default: 3
Note:
1.The humidity level only can be set when the water in
humidifier exceeds the minimum water level for safe
operation.
2. The option Auto is not available in the iBreeze 20C.
6
Mask fit
Mask fit feature allows you to check the fit of your mask
prior to starting therapy. This is done by measuring the
amount of leak.
7
Comfort
Press to enter Comfort setting interface.
8
Setting
Press to enter Patient System Setting interface.
9
Alarm Message
Display the alarm messages.
iBreeze CPAP Systems User Manual
15
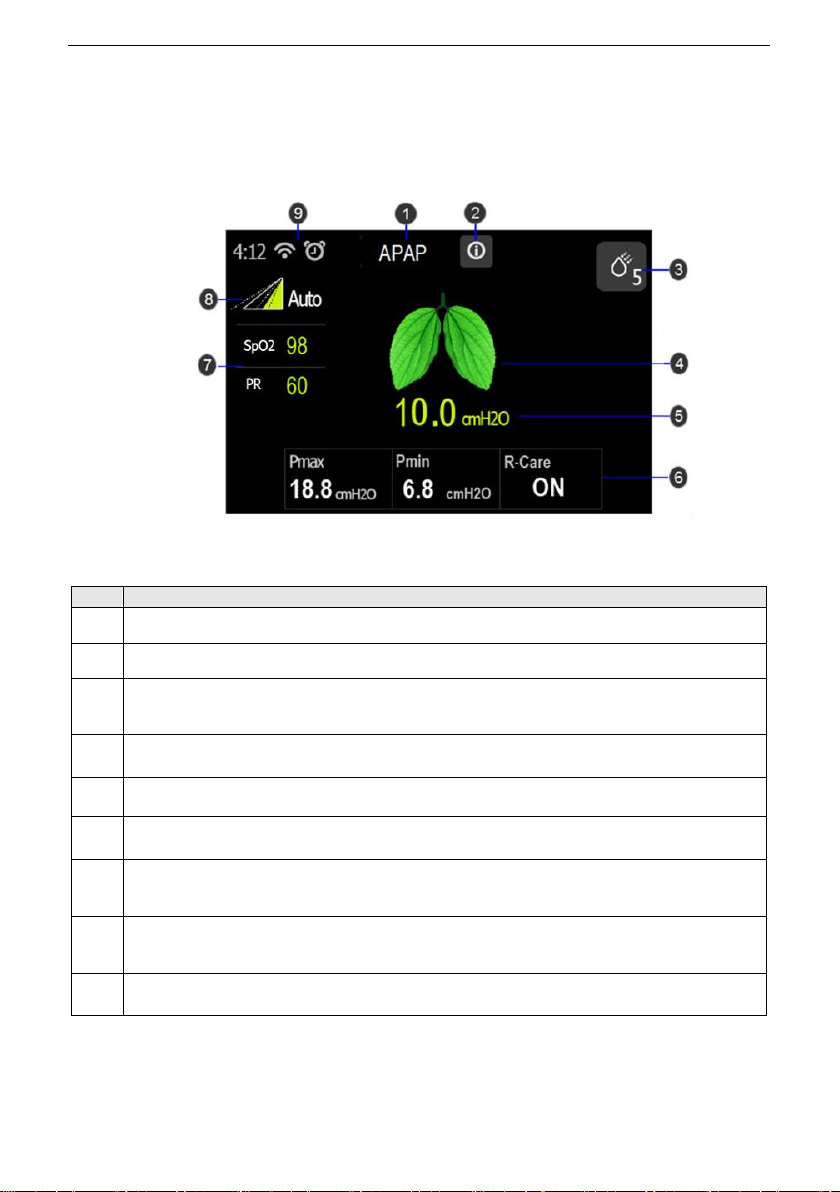
9.2.2 Patient Therapy Interface
When the therapy starts, the screen will switch to the Patient Therapy Interface, which
displays the therapy parameters monitoring during therapy (See Figure2). The
displayed parameters depend on the current therapy mode.
Figure2 Patient Therapy Interface
#
Description
1
The current therapy mode.
2
Display the alarm messages.
3
Humidity adjustment shortcut key and humidity level.
Note: The humidity level is available when the humidity function is on.
4
Background breathing dynamic diagram.
5
The current therapy pressure.
6
The therapy parameters monitoring during therapy.
7
Displays the oxygen saturation and pulse rate values when the oximeter
adapter is connected.
8
Ramp time dynamic diagram.
Note: Only available when the Ramp function is on.
9
Work status icon bar.
iBreeze CPAP Systems User Manual
16
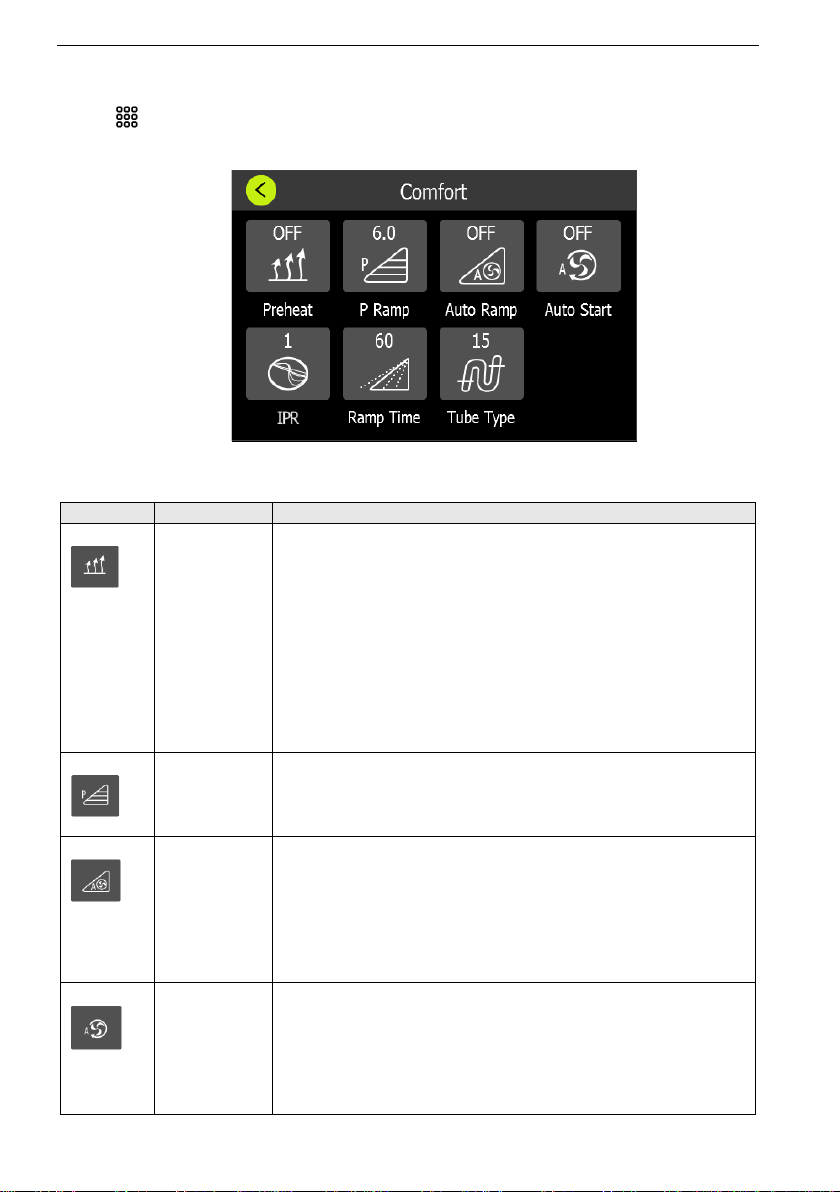
9.2.3 Patient Comfort Setting
Press key in the Patient Standby interface to enter Patient Comfort Setting
Interface.
Figure3 Patient Comfort Setting Interface
Icon
Text
Description
Preheat
Turn Preheat function on or off. When the Preheat is on,
the humidifier starts preheating in the standby mode and
the maximum preheating time is 30 minutes. In the
therapy mode, the preheating stops.
Option: ON / OFF Default: OFF
Note:
1. If the humidifier water level below the limit, preheat
function will be turned off automatically.
2. If humidifier function is turned off, preheat function will
be disabled.
3.Preheat function is not available in the iBreeze 20C.
P Ramp
Set the starting pressure of Ramp.
Setting Range: 3 cmH2O-Setting pressure, 0.5 cmH2O
increments.
Default: 4 cmH2O
Auto Ramp
Turn Auto Ramp function on or off.
When Auto Ramp is on, the device will start at the set
ramp pressure until sleep is detected and the device will
begin to ramp to therapy pressure.
Option: ON / OFF Default: OFF
Note: Auto Ramp function is not available in the iBreeze
20C.
Auto Start
Turn Auto Start function on or off.
When the Auto Start function is on, the system will start
therapy once breathing is detected through the tube.
During therapy, if the mask is removed for more than 5
seconds, the therapy mode will stop.
Option: ON / OFF Default: ON
iBreeze CPAP Systems User Manual
17
Icon
Text
Description
IPR
Set IPR (Intelligence Pressure Release) level.
Option: OFF / 1-3 Default: 2
Backs the pressure off to make it easier to exhale.
Ramp Time
Set the increase time from Ramp pressure to the setting
therapy pressure.
Option: 0-60 mins, 5 mins increments
Default: 15 mins
Note: if Ramp Time sets to 0 min, Ramp function will be
off.
Tube Type
Set the Tube type.
Option: 15 mm / 19 mm Default: 15 mm
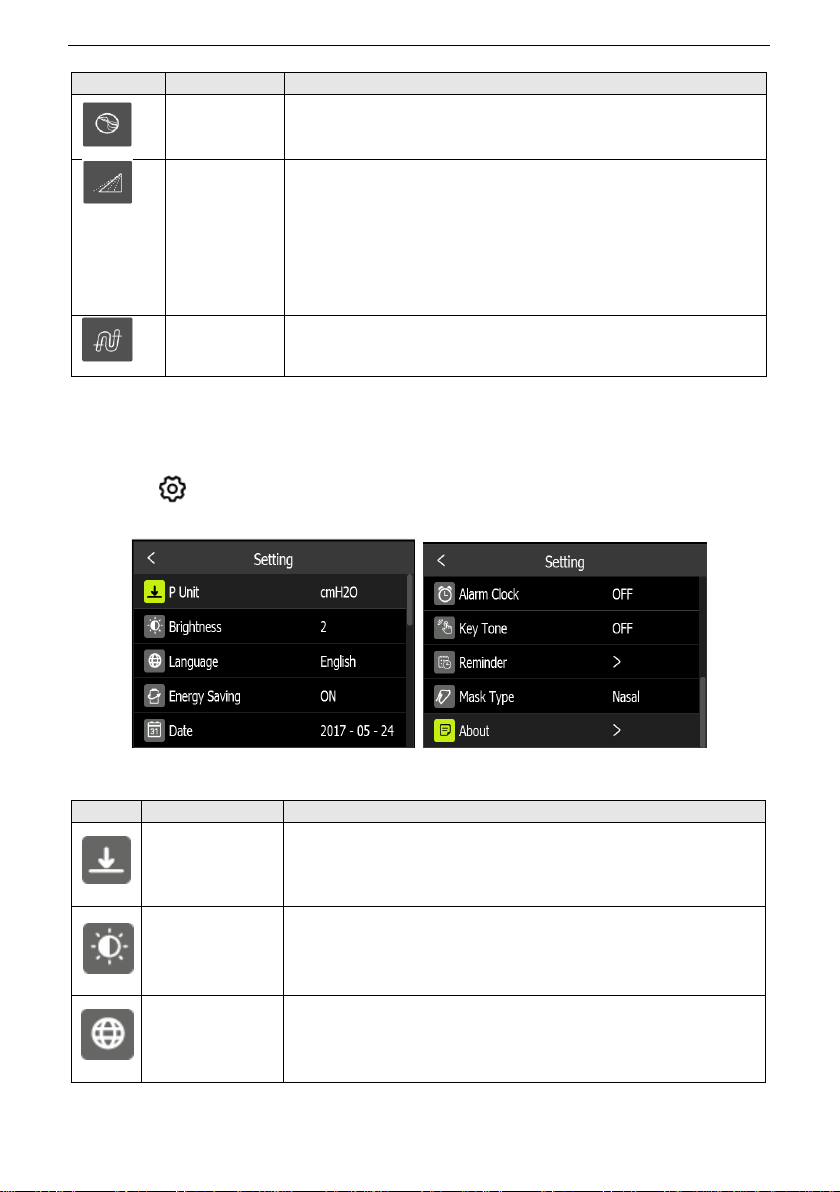
9.2.4 Patient System Setting
Press key in the Patient Standby interface to enter Patient Setting interface.
Figure4 Patient Setting Interface
Icon
Text
Description
Pressure Unit
Set the pressure unit.
Option: hPa / cmH2O Default: cmH2O
Screen
Brightness
Adjust the Screen Brightness.
Option: Auto / 1-3 Default: 2
Language
Set the system interface language.
Default: English / Chinese Default: English.
iBreeze CPAP Systems User Manual
18
Icon
Text
Description
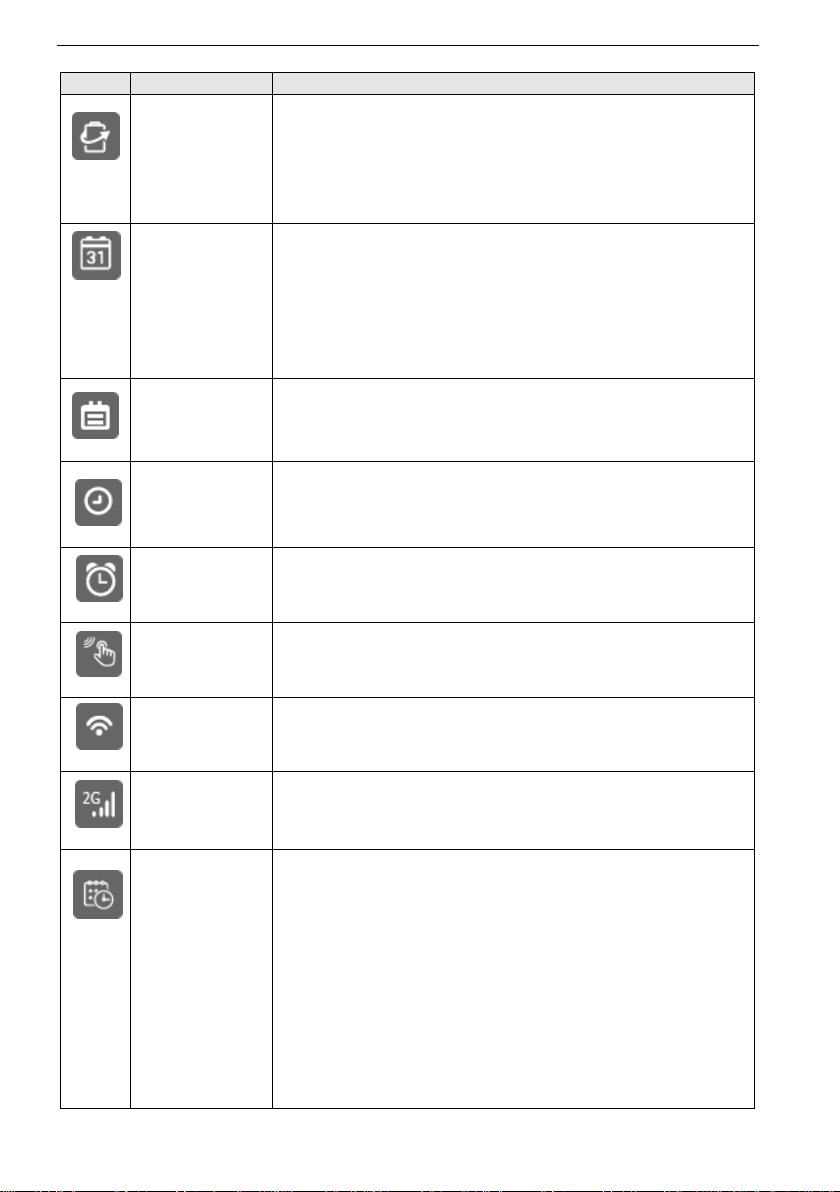
Energy Saving
Set the Energy Saving function on or off.
When Energy Saving is on, the screen will be turned off
automatically if there is no operation within 3 minutes in
standby mode, or 30 seconds in therapy mode. If Energy
Saving is off, the screen is always on.
Option: ON / OFF Default: ON
Date
Set the system date.
Note:
1. Date setting can’t be earlier than the latest time of the
report in the device.
2. The system date is required to reset on the first time
start up when the device is restored the factory default
settings.
Date Format
Set the system date format.
Option: YYYYMMDD / MMDDYYYY / DDMMYYYY
Default: YYYYMMDD
Time
Set the system time.
Note: time setting can’t be earlier than the latest time of
the report in the device.
Alarm Clock
Set the Alarm clock on or off, and the alarm time.
Option: ON / OFF Default: OFF
Key Tone
Set the switch key tone volume on or off.
Option: ON / OFF Default: OFF
WiFi
Set the WiFi function on or off.
Option: ON / OFF Default: OFF
GPRS
Set the GPRS function on or off.
Option: ON / OFF Default: OFF
Reminder
Set the Reminder type and time. You can turn on or off
the different type of reminders, including: Mask, Filter,
Water chamber, Tube, Clinic, Maintenance interval.
Option: ON / OFF Default: OFF
Note:
1. Set the date of reminder, will pop-up reminder box first
time to enter standby mode in the day of setting
reminder day.
2. Click OK to change the relevant accessories, and then
no longer remind.
3. Click Ignore, the next day and next starting time will
pop-up reminder box.
This manual suits for next models
4
Table of contents
Other Smart MED Medical Equipment manuals

Popular Medical Equipment manuals by other brands


Getinge
Getinge Arjohuntleigh Nimbus 3 Professional Instructions for use

Mettler Electronics
Mettler Electronics Sonicator 730 Maintenance manual

Pressalit Care
Pressalit Care R1100 Mounting instruction

Denas MS
Denas MS DENAS-T operating manual

bort medical
bort medical ActiveColor quick guide

AccuVein
AccuVein AV400 user manual


