auna multimedia MIC 900 LED User manual

www.auna-multimedia.com10028786 10028787
Kondensator USB-Mikrofon mit blauer LED
MIC 900 LED

2
Sehr geehrter Kunde,
zunächst möchten wir Ihnen zum Erwerb Ihres Gerätes gratulieren.
Bitte lesen Sie die folgenden Anschluss- und Anwendungshinweise sorgfältig durch und befolgen Sie diese
um möglichen technischen Schäden vorzubeugen.
Technische Daten
Artikelnummer 10028786, 10028787
Typ USB-Kondensator-Mikrofon
Charakteristik Niere
Frequenzbereich 30 Hz - 18 KHz
Empndlichkeit -32dB
Stromversorgung Via USB (Anschluss: Typ B)
Maße / Gewicht
Mikrofon: 16,5 x Ø 5 cm (H x Ø)
Mikrofonspinne:9 x 9 x 6 cm (BxHxT)
Kabellänge: ca. 3 Meter
Gewicht Mikrofon: ca. 295g
Gewicht Mikrofonspinne: ca. 180g
Lieferumfang Mikrofon, Spinne, 3/8“ auf 5/8“ - Adapter, Schutzta-
sche, USB-Kabel
Warnung
• Diese Bedienungsanleitung dient dazu, Sie mit der Funktionsweise dieses Produktes vertraut zu ma-
chen. Bewahren Sie diese Anleitung daher stets gut auf, damit Sie jederzeit darauf zugreifen können.
• Sie erhalten bei Kauf dieses Produktes zwei Jahre Gewährleistung auf Defekt bei sachgemäßem Ge-
brauch.
• Bitte verwenden Sie das Produkt nur in seiner bestimmungsgemäßen Art und Weise. Eine anderweiti-
ge Verwendung führt eventuell zu Beschädigungen am Produkt oder in der Umgebung des Produktes.
• Ein Umbauen oder Verändern des Produktes beeinträchtigt die Produktsicherheit.
• Önen Sie das Produkt niemals eigenmächtig und führen Sie Reparaturen nie selber aus!
• Behandeln Sie das Produkt sorgfältig. Es kann durch Stöße, Schläge oder den Fall aus bereits geringer
Höhe beschädigt werden.
• Halten Sie das Produkt fern von Feuchtigkeit und extremer Hitze.
• Lassen Sie keine Gegenstände aus Metall in dieses Gerät fallen.
• Stellen Sie keine schweren Gegenstände auf dieses Gerät.
• Reinigen Sie das Gerät nur mit einem trockenen Tuch.
• Verwenden Sie ausschließlich vom Hersteller oder vom qualizierten Fachhandel empfohlenes Zubehör.

3
Die Gewährleistung verfällt bei Fremdeingrien in das Gerät.
Kleine Objekte/Verpackungsteile (Plastikbeutel, Karton, etc.)
Bewahren Sie kleine Objekte (z.B. Schrauben und anderes Montagematerial, Speicherkarten) und
Verpackungsteile außerhalb der Reichweite von Kindern auf, damit sie nicht von diesen verschluckt
werden können. Lassen Sie kleine Kinder nicht mit Folie spielen. Es besteht Erstickungsgefahr!
Transport des Gerätes
Bitte bewahren Sie die Originalverpackung auf. Um ausreichenden Schutz beim Transport des Gerätes zu
erreichen, verpacken Sie das Gerät in der Originalverpackung.
Reinigung der äußeren Oberäche
Verwenden Sie keine üchtigen Flüssigkeiten, wie Insektensprays. Durch zu starken Druck beim
Abwischen können die Oberächen beschädigt werden. Gummi- oder Plastikteile sollten nicht über einen
längeren Zeitraum mit dem Gerät in Kontakt sein. Nutzen Sie ein trockenes Tuch.
Technische Anforderungen
Das Mikrofonsignal wird über einen USB-Anschluss an einen Computer gesendet. Über diesen wird es auf
mit Strom versorgt.
Ihr Computer muss folgende Mindestanforderungen erfüllen:
PC Mac
Intel oder AMD CPU, 1GHz oder besser G4/G5, 800MHz oder besser
Mindestens 512MB RAM Mindestens 512MB RAM
USB 2.0-Anschluss USB 2.0-Anschluss
Windows XP/Vista Mac OS X 10.3.9 (Panther) oder besser
Installation
• Starten Sie Ihren Computer.
• Schließen das Mikrofon an einem freien USB-Anschluss an
Hinweis: Das Betriebssystem installiert automatisch die benötigten Treiben.
• Wählen Sie das Mikrofon als Eingangsquelle für die von Ihnen verwendete Aufnahmesoftware.
Windows:
• Stellen Sie die Aufnahmelautstärke über die Windows-Lautstärkeregler ein (Lautsprechersystem auf
der Taskleiste).
• (Optional:) Wählen Sie Mikrofon unter Systemeinstellungen->Sounds und Audiogeräte-> Audio-Tab
als Soundaufnahmegerät aus.

4
Mac OS:
• Stellen Sie die Aufnahmelautstärke über das Audio Midi Setup ein. Hinweis: Das Mikrofon ist nun
betriebsbereit.
• (Optional:) Wählen Sie Mikrofon im Audio Midi Setup im Audio Devices-Tab als Standard-Soundauf-
nahmegerät aus.
Hinweise zu Montage und Nutzung
Um den gewünschten Klang zu erreichen, testen Sie verschiedene Position zur Schallquelle. Bewegen Sie
das Mikrofon ruhig im Aufnahmeraum und testen verschiedene Abstände und Winkel. Erst wenn Sie den
passenden Grundton erreicht haben, sollten Sie Equalizer und Klangprozessoren verwenden.
Wegen dem extrem linearen Frequenzgang und der hohen Klangauösung des Mikrofons sollte „EQing“
nicht notwendig für Hochfrequenzen sein. Dieses beeinusst das Eingangssignal nur zu stark und erhöht
den Störton unnötig. Das Mikrofon verfügt über die Klarheit, die zur Aufnahme und Abmischen notwendig
ist.
Das Mikrofon verfügt über einen Adapter, der auf europäische und amerikanische Mikrofonhalter passt.
Lösen Sie den Adapter von Mikrofon, befestigen Sie diesen am Mikrofonhalter und xieren dann das Mik-
rofon auf dem Adapter. Das Mikrofon sollte aufrecht befestigt werden und der Schall sollte in einem rechten
Winkel auf dieses eintreen. Testen Sie verschiedene Positionen bis Sie den gewünschten Klang erzielen.
Falls nötig können Sie es auch mit dem Scharnier vertikal verstellen.
NOTIZ: Behandeln Sie das Mikrofon und den Adapter sorgsam. Setzen Sie die Gewinde keiner zu großen
Gewalt aus.
Sie können das Mikrofon natürlich auch ohne diesen Adapter auf einen passenden, von Ihnen gekauften
Mikrofonständer montieren.

5
Hinweise zur Entsorgung
Elektroaltgeräte: Be ndet sich die diese Abbildung (durchgestrichene Mülltonne auf
Rädern) auf dem Produkt, gilt die Europäische Richtlinie 2002/96/EG. Diese Produkte
dürfen nicht mit dem normalen Hausmüll entsorgt werden. Informieren Sie sich über die
örtlichen Regelungen zur getrennten Sammlung elektrischer und elektronischer Gerät-
schaften. Richten Sie sich nach den örtlichen Regelungen und entsorgen Sie Altgeräte
nicht über den Hausmüll. Durch die regelkonforme Entsorgung der Altgeräte werden
Umwelt und die Gesundheit ihrer Mitmenschen vor möglichen negativen Konsequenzen
geschützt. Materialrecycling hilft, den Verbrauch von Rohsto en zu verringern.
Konformitätserklärung
Der Hersteller dieses Produktes ist die CHAL-TEC Vertriebs- + Handels GmbH, Wallstraße 16, 10179 Berlin, Deutschland
Dieses Produkt entspricht den folgenden Europäischen Richtlinien:
2011/65/EU (RoHS)
2014/30/EU (EMV)

6
Dear Customer,
Congratulations on purchasing this product. Please read and follow these instructions, in order to avoid
damaging the item. We do not cover any damages that may arise from improper use of the item or the
disregard of the safety instructions.
Technical Data
Article # 10028786, 10028787
Type USB Condenser Mikrophone
Pattern Cardioid
Requency range 30 Hz - 18 KHz
Sensitivity -32dB
Power supply Via USB (Connection: type B)
Dimensions / Weight
Mikrophone: 16,5 x Ø 5 cm (H x Ø)
Shockmount: 9 x 9 x 6 cm (BxHxT)
Cable: ~ 3m
Weight mikrophone: 295g
Weight shockmount: ca. 180g
Lieferumfang Mikrophone, shockmount, adapter (3/8“ to 5/8“),
pouch, USB cable
Safety advice
• Read all instructions before using.
• To protect against a re, electric shock or personal injury, do not immerse cord, electric plugs or device
in water or other liquids.
• Do not expose the appliance to extreme temperatures. The appliance shall be used in moderate cli-
mates.
• The use of attachments that are not recommended by the appliance manufacturer may result in re,
electric shock or personal injury.
• Do not open the unit by removing any cover parts. Do not attempt to repair the unit. Any repairs or
servicing should be done by qualied personell only.
• Only qualied persons may perform technical work on the product. The product may not be ope-
ned or changed. The components cannot be serviced by the user. The manufacturer is not responsible
for any radio or TV interference caused by unauthorized modications.
• The appliance is not a toy. Do not let children play with it. Never let children insert foreign objects into
the appliance.
• Never clean the surface of the device with solvents, paint thinners, cleansers or other chemical pro-

7
ducts. Instead, use a soft, dry cloth or soft brush.
• This appliance is to be used with 12V car power supply.
• Save these instructions.
Small objects: Keep small objects (i.e. screws, mounting material, memory cards etc.) and packaging out of
the range of children. Do not let Children play with foil. Choking hazard!
Transporting the device: Please keep the original packaging. To gain suicient protection of the device
while shipment or transportation, make sure to put it back in its original packaging.
Cleaning the surface: Do not use any volatile liquids, detergents or the like. Use a clean dry cloth.
Technical requirements
Your microphone comes with a USB connector. The audio signal is sent from the microphone to the com-
puter through this connection. At the same time the computer uses the USB connection to supply the mi-
crophone with the necessary power. A connection is made by using the included USB cable with type-B
connector.
NOTE: Use only the included cable to ensure an optimal signal quality and a reliable power supply. To ope-
rate the microphone, your computer needs to meet the following system requirements:
Windows PC Mac
Intel or AMD CPU, 1GHz or higher G4/G5, 800MHz or higher
minimum 512MB RAM minimum 512MB RAM
USB 2.0 interface USB 2.0 interface
Windows XP/Vista Mac OS X 10.3.9 (Panther) or higher
Initial Operation
Before you can use your microphone, connect it to a free USB port on your computer. For initial operation
of your microphone, complete the following steps:
• Power up your computer.
• Connect your microphone to a free USB port on your computer
NOTE: Your operating system automatically installs the required drivers.
• Select the microphone as input source in your preferred audio software application.
Windows:
• Adjust the recording level as required, using the Windows Volume Control panel. (Shortcut: Louds-
peaker icon found in the taskbar)

8
• Select the microphone in the pull-down menu of Sound recording by clicking on Sounds and Audio
Devices in the Control Panel and then clicking the tab Audio
•
Mac OS:
• Adjust the recording level as required, using Audio Midi Setup in Mac OS.
NOTE: Your microphone is now ready for use.
•
• (Optional:) Wählen Sie Mikrofon im Audio Midi Setup im Audio Devices-Tab als Standard-Soundauf-
nahmegerät aus.
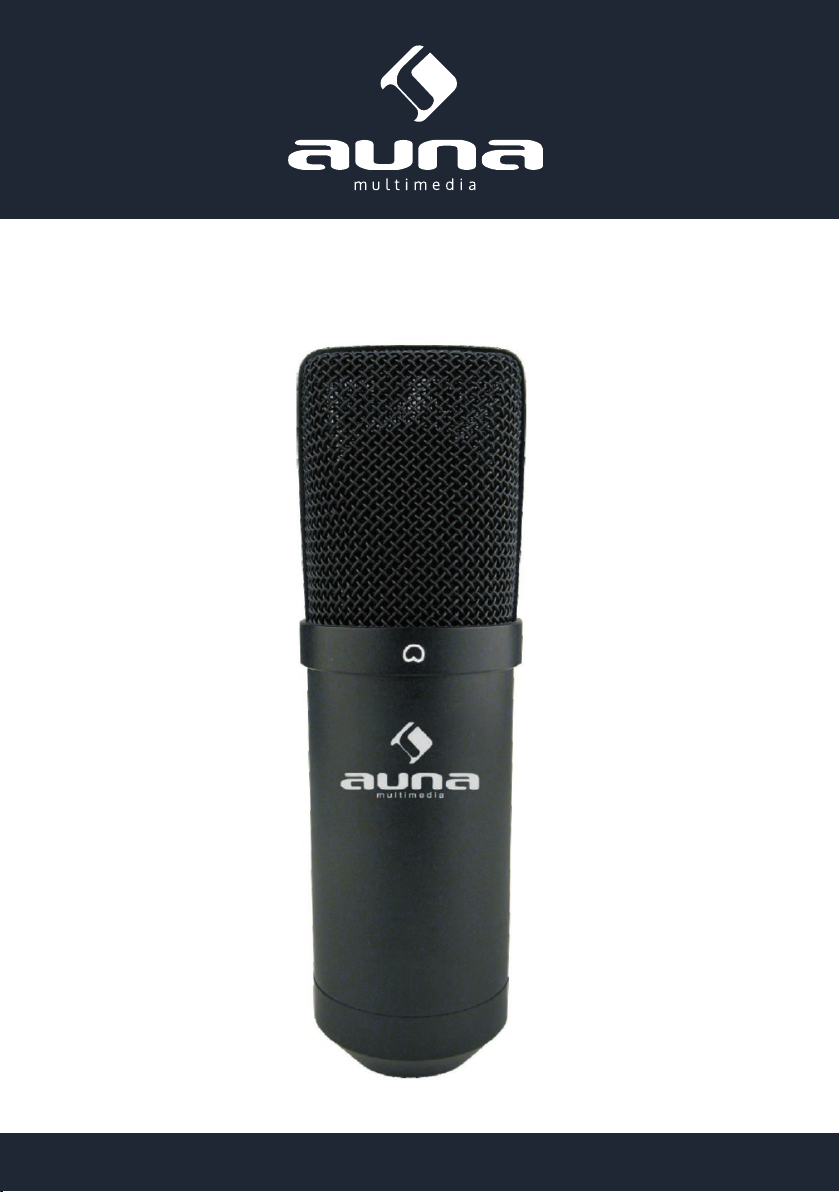
Mounting and Operation
To get the sound you want, try changing the mic position relative to the sound source oreven move the
microphone around in the recording room of your studio. Adjusting the angle at which walls face the sound
source can also be helpful. Only when the desired basic sound has been achieved, should you start to use
equalizers and signal processors,if any at all (remember: less is often more!). Due to the extremely linear
frequency response and the high sonic resolution of your microphone, there is no need for high-frequency
“EQing” that can heavily inuence the signal and unnecessarily increase the noise level. The microphone
provides that much-desired transparency which often gets lost during recording and mixing.
There is an adapter on your microphone that lets you mount it on mic stands with either metric (Europe) or
imperial-gauge threads (North America).
First dismantle the microphone from the stand mount adapter by detaching the ne-thread shoulder screw
at the bottom end of the microphone. Fasten the adapter onto the microphone stand, place the micropho-
ne into it and tighten the screw again. Basically, the microphone in the stand mount adapter should stand
upright and face the sound source at a right angle.
The angle of the microphone to the sound source inuences the sound of the recording; therefore, experi-
ment with dierent positions until you achieve the desired sound. To this end, you can rotate the mic in the
stand mount adapter by loosening the screw somewhat and tightening it again. If necessary, you can bend
the microphone out of its vertical position by using the hinge on the microphone stand.
NOTE: Please make sure to handle the microphone shaft with attention and care to avoid damaging the
screw thread. In no situation should you ever apply excessive force.
Of course, you can detach the microphone from the stand mount adapter and attach it to a commercially
available suspension mount.

9
Environment Concerns
According to the European waste regulation 2002/96/EG this symbol on the product
or on its packaging indicates that this product may not be treated as household waste.
Instead it should be taken to the appropriate collection point for the recycling of electrical
and electronic equipment. By ensuring this product is disposed of correctly, you will hep
prevent potential negative consequences for the environment and human health, which
could otherwise be caused by inappropriate waste handling of this product. For more
detailled information about recycling of this product, please contact your local council or
your household waste disposial service.
Declaration of Conformity
Producer: CHAL-TEC Vertriebs- + Handels GmbH, Wallstraße 16, 10179 Berlin, Germany.
This product is conform to the following European directives:
2014/30/EU (EMC)
2011/65/EU (RoHS)
This manual suits for next models
2
Table of contents
Languages:
Other auna multimedia Microphone manuals