AURICA pixel User manual

1
Инструкция
по эксплуатации
USER´S MANUAL
3
Your Hearing Aid.........................................................................................5
Usage/Safety Tips.......................................................................................7
Contraindications.....................................................................................8
Caring for Your Hearing Aid.......................................................................8
Battery Replacement................................................................................10
How To Properly Wear Your Hearing Aid.........................................11
Switching ON/OFF.....................................................................................13
Insertion and removal..............................................................................14
Trimmer Controls......................................................................................17
Maintenance...............................................................................18
Accessories/Cleaning Solutions...........................................................18
Troubleshooting.....................................................19
Package.................................................................21
Packing and transporting........................................................................22
Storage....................................................................22
Warranty................................................................23
Reclamation................................................................25
Disposal.......................................................................26
Technical DATA..........................................................................................26
All rights reserved. No part of this document may be copied, repro-
duced or distributed in any form without express written permission
from AURICA or ONKOCET company.
Contents

54
This User Manual, including the specications, is an aperating manual for the
AURICA
Pixel
Hearing Aid
Your Hearing Aid
Read this User Manual before using AURICA Every hearing aid. The
User Manual contains the description of the device, operating princi-
ple, technical characteristics and operating instructions for AURICA
Pixel Hearing Aid (further - HA).
Safety Signs
Refer to User Manual/booklet
General safety sign
General prohibitory sign
General warning sign
Your Hearing Aid is connected by the earhook to the customized earmold
that ts comfortably in your ear. This mold was crafted directly from the ear
impression taken by your hearing professional. Your Hearing Aid may be pro-
grammed to match your particular hearing requirements. These parameters
have been set by your professional or the manufacturer and are not adjust-
able by the wearer. We are condent that your listening enjoyment will be en-
hanced by the attention given to the performance and appearance.
Features
1-8 Channel WDRC.
Up to 4-6 memories.
8-16 Band equalizer.
Memory Selection Button.
Volume control.
Telecoil.
Auto telecoil (option).
Audio Input.
LED indication of operating modes (option).
On/Off switch built into battery door.
Adaptive Noise Reduction – algorithm monitors noise levels independently
in 128 individual bands and employs advanced psychoacoustic models to
provide user’s comfort.
Evoke Advanced Programmable multi−frequency tones simulating musical
notes or chords Acoustic Indicators for Low Battery, Power On events and
Memory Changes.
European Authorised/
Authorized Representative

76
Your Hearing Aid Usage/Safety Tips
Adaptive Feedback Canceller – Automatically reduces acoustic feedback
and allows for an increase in the stable gain while minimizing artifacts for
music and tonal input signals.
Tinny Mask - Tinnitus is a disease caused by various reasons and other
described as ringing and buzzing in ears This kind of noise may become
very irritating for people with hearing impairments, exacerbating their prob-
lems with perception and decoding the audio stream. the innovative design
solution offered by Aurica – built-in tinnitus musker - eliminate the incon-
venience of having to use two different devices.
In−situ – tone generatorm selection, volume setting and ambient sound
levels. The iSceneDetect environmental classication algorithm is capable
of analyzing the hearing aid user’s acoustic environment and automatically
optimizes the hearing aid to maximize comfort and audibility.
Data logging - enables the recording of various hearing aid parameters
such as program selection, volume setting and ambient sound levels.
3D Plazma technology - The unique technology of 3D Plazma is a reli-
able protection against moisture and dirt ! Most hearing aids are afraid of
water. Drops of water or sweat falling on the body penetrate into the device
and lead to the failure of its importamt elements (chip, microphone, receiver,
etc.). Thanks to its nanocoating 3D PLazma signicantly improves moisture
resistance of the hearing instrument as water getting inside does not wet
the surface of the electronic components and simply evaporates over time.
Please note
• Protect your HA from mechanic impact.
• Avoid exposure to moisture (rain, sauna, shower, greenhouse etc.).
• Take your HA off when putting on cosmetics and hygiene solutions o
(hairspray, cream, lotion, etc.).
• If you HA got wet, don’t try drying it under high temperatures (blow dry,
microwave oven, stove, etc.).
• High temperatures will damage the device, so avoid the direct exposure to
sun.
• If you are not using the device for a long time, remove the battery.
• The maintenance of the device must be done only by a specialist.
• Take off the device when you are being medically examined (for example
when getting X-Ray or CAT done).
• Keep the batteries separately from medications. You can easily confuse
them with pills.
Pixel hearing aids are intended for sound amplication through the air con-
duction, to compensate severe hearing loss. In Pixel, modern production s
are used Nanotechnologie coating that ensures protection of a device from
moisture and dirt; parts made by the world leading manufacturers; shock-
proof plastic body, etc. This ensures a high reliability of products and excellent
quality of sound.
Before using the HA, read carefully the following safety instructions and im-
portant information

98
Usage/Safety Tips Caring for Your Hearing Aid
• Hearing aids, their parts and batteries need to be kept away from
children, pets and mentally challenged people.
• Be careful with leaking batteries. The liquid inside them is harmful
for your health.
• If you have swallowed a battery, immediately seek medical attention/
Contra-indications
Hearing aid is contraindicated in case of:
• Malfunction of vestibular apparatus
• Acute and chronic disease in outer and middle ear
• In the rst months after cerebral meningitis and hearing improve-
ment surgeries
• Allergic intolerance to ear ttings
HA requires careful handling. The proper handling ensures the safe
operation of the HA. Keep your HA clean. Wipe it regularly with a soft
cloth (Pic.1). Never wash your HA with water, cleaning solutions or
other liquids. Remove ear wax from your ears, because it can affect
the functionality of the HA or even break the device.
pic. 1 pic. 2 pic. 3
Earmold care
Earmold is an important parth of your HA, that’s why it’s necessary to keep
it clean.
Cleaning of earmolds
Carefully separate the tube from the main body. Gently wash the mold with
warm, soapy water or place it in a special solution for 15-30 minutes (Pic.2).
After the treatment, the mold has to be dried completely. If there is still mois-
ture in the tube or in the mold, use the air blowing device (Pic.3). If the ear-
mold’s tube haslost its elasticity, became yellowish and cracked, it should be
replaced. Consult your a hearing aid specialist about this problem/
Caring for your Hearing Aid
If your HA was exposed to excessive moisture, dry it with a special kit,remove
the battary before you start drying. To avoid damages keep the HA in a special
case.
Never use any spirit solution for cleaning the earmold. Never treat
the hearing aid with the earmold cleaning solution.
1110
How To Properly Wear Your Hearing Aid
Battery Replacment
Use the batteries specially intended for the HA!
pic. 4a pic. 4b pic. 4c
Using wrong batteries (for watch etc.) can wreck the device. In this case
the warranty doesn’t cover the maintenance! Gently swing out the battery
door with your ngernail and then open it completely (Pic.4a), take a new
battery, take the tab off and wait 1 minute so the battery could become
saturated with oxygen to increase its energy. Insert the new battery into
the battery compartment with plus(+) sign on the battery facing the same
way as the (+) sign on the edge of the battery door. This will ensure that the
battery door closes properly.
Put the battery ONLY in the lid of the battery compartment.
Note: If the battery is inserted incorrectly, the door will not close.
Never press too hard to close the door of the battery compartment.
Lower amplication power and volume, or spontaneous shutdown
indicate a low battery.
Buying a hearing aid, bear in mind that it will take some time to get used to
new sounds and sensations. How much time this process will take depends
on the individual peculiarities of an organism, level of hearing loss, time
spent using the HA, etc. If you start feeling discomfort while using the HA ,
you need to lower the volume or turn it off and take a break.
While watching TV set the volume to a medium level. If you have a hard time
distinguishing sounds, turn the volume up using the volume control. How-
ever, you should remember that turning the volume up very high doesn’t
always improve your perception of speech, but can cause sudden fatigue
and provoke the deterioration of hearing.
In a noisy environment it’s pretty hard to distinguish certain words, so don’t
be embrassed to ask again.
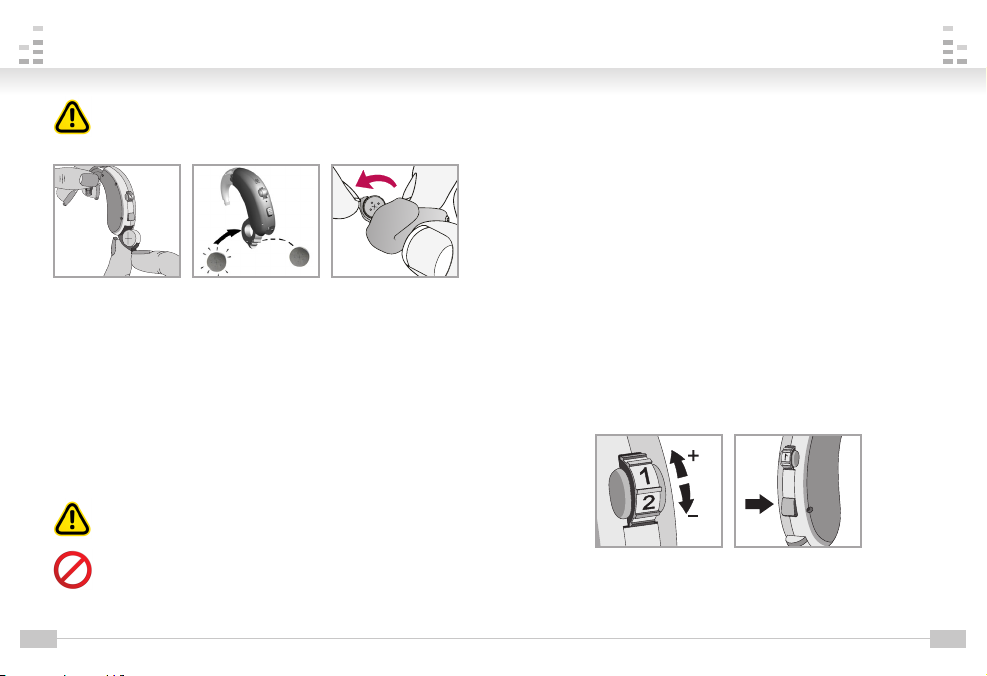
The volume is adjusted with the volume control - switching from position 1
(min volume) up to position 4 (max volume) (Pic. 5a, 5b).
pic. 5a pic. 6a

1312
How To Properly Wear Your Hearing Aid
Switching ON/OFF
Мy Hearing Aid has a volume control
Мy Hearing Aid has a button to switch programs
Besides, you can change the listening conditions with the program selec-
tion button (Pic. 6a, 6b). Switching the programs, you can choose the lis-
tening mode appropriate for different situations: microphone mode, tele-
phone mode (telecoil), mic+telecoil and tinnitus masker mode.
The listening parameters are set by an expert when tting and ad-
justing your hearing aid.
1. To increase the volume rotate forward (Piс. 5b, 7).
2.
To decrease the volume, rotate back (Piс. 8).
pic. 7 pic. 8
Your Hearing Aid has a three-position battery door that acts as an OFF/
ON switch and that allows access to the battery compartment. To turn the
Hearing Aid on, close the battery door fully (Pic. 9a, 9c). To turn OFF: open
the battery door until it clicks, so the battery is no longer touching the con-
tacts (Pic. 9b, 9d).
pic. 5b pic. 6b
How To Properly Wear Your Hearing Aid
pic. 9a pic. 9b

1514
Insertion and Removal
pic. 10 pic. 11 pic. 12
In-The-Ear hearing aids
To insert a hearing aid in the ear:
1 . Hold the shell between your thumb and forenger (Pic. 13a).
2 . Insert the tip of the hearing aid into the ear canal and gently press the shell
with your nger tip to position it correctly (Pic. 13b).
pic. 13a pic. 13b
Insertion and Removal
Before placing the BTE onto your ear, be sure the battery is in-
serted and the battery compartment door is closed securely.
Also
make sure that ON/OFF switch is set to OFF.
To insert, hold the earmold on the outer side near the tubing with your
thumb and forenger (Pic.10)
The upper part of the earmold must be directed upwards. The tube must
be directed to the ear canal.
If expenencing difcultes, pull down the earlobe or pull the auride back or
up and gently insert the earmold into the ear. (Pic. 11)
The directed upwards elastic part must t into place. (Pic. 12)
pic. 9c pic. 9d
Switching ON/OFF

1716
Insertion and Removal
To remove, take the instrument out from behind your ear and gently pull the
earmold outwards.
Pulling down on the ear lobe may help loosen the earmold when it is being
removed
It’s not recommended to pull the earmold tubing , otherwise it can be
damaged, which will require repair or change of the earmold.
Trimmer Controls
Trimmer controls are under the lid of your Hearing Aid (Pic.11), placed in the
upper part of the frame. The lid must always be closed to avoid the penetra-
tion of dust and moisture. In case of the lid is lost, consult a specialist.
The specialist determines the position of trimmer controls while examining
a patient, in accordance with individual characteristics of your hearing loss
(audiogram).
pic. 14a pic. 14b
Don’t open the lid of the trimmer compartment and change the
controls position in your HA by yourself.
Insertion and Removal
To remove the hearing aid:
Hold the shell between your thumb and forenger and twisting it carefully
pull the hearing aid up and out of the ear.
For the hearing aids with removal handle: hold the removal handle and gen-
tly pull the hearing aid up and out of the ear.
Tips
• The rst days after you start using a hearing aid, you will feel it in your ear,
and there is nothing unusual in that. In a while, you will get used to it and
won’t feel any inconvenience. You will need some time to get used to wear-
ing a hearing aid – little by little increase the wearing time every day.
• When you only start using a hearing aid, there may be some irritation in
your ear because of a foreign object. In this case, ask for specialist advice.
• In case of any allergic reactions, ask for specialist advice.
• In case of intensive sweating and earwax formation, consult a specialist.
• For easier insertion of a hearing aid, you may gently pull your ear up to
make the ear canal wider. A hearing aid is inserted correctly if it ts tightly
into the ear and you do not feel it inside.
• Check if your hearing aid is positioned properly in the ear canal using a
mirror. The hearing aid must not be seen.
To properly insert the elastic part you need to:
• With the fornger try to place it under the skin crease
• At the same time, with the other hand pull the ear up and back
• After you have inserted the earmold, carefully place the Hearing Aid behind
the ear.
• Try not to twist the tube.
1918
Trouble Shooting
The device is not functioning:
- Make sure the battery is inserted correctly in the battery compartment (see
“Battery Replacement”).
- Make sure the battery door lid is closed completely.
- Make sure the battery isn’t dead.
- Make sure the earmold tubing isn’t dirty.
- Check the tube for ear wax and condensate, clean if it necessary.
If there is condensate or moisture in your hearing instrument, put it in a spe-
cial container with a drying tablet.
The sound is too quiet, static or breaking up:
- Check the volume control.
- Make sure the battery isn’t dead.
- Make sure the earmold tubing isn’t dirty.
- Make sure there isn’t any condensate or ear wax in the tube; clean it if nec-
essary.
- If there is condensate or moisture in your HA, put it in a special container
with a drying tablet.
If all the attempts to x the problem are unsuccessful , contact your hearing
aid specialist.
Maintenance
Maintenance is necessary to avoid expensive and complicated repairs and
ensure the uninterrupted performance of the device. Free-of-charge main-
tenance is performed during the warranty period and applieds only to the
parts covered by the warranty (see “Limited Warranty”).
To obtain maintenance services, contact your hearing aid specialist (seller
the devise).
The same specialist can tell you about the “after warranty” maintenance
service.
Accessories/Cleaning solutions
Care Products:
• Cleaning kit;
• Drying container;
• Drying tablets;
• Earpiece;
• Battery (see color chart);
• Brown –312;
• Blue – 675;
• Yellow – 10;
• Orange – 13/
You can get detailed information about the accessories and HA
cleaning solutions(and their prices) from your hearing aid specialist.
2120
Contents
The set consists of______________items
Customer’s signature_________________
Customer’s signature
Hearing Aid Aurica family Pixel
Models__________________________________________________
Complies with specication TU 9444-005-81271212-2013 and is service-
able.
Registration №___________________________________________
Serial №__________________________________________________
Q.C. Passed
The HA is whistling:
- The earmold does not sit tight enough in the ear canal. Take it out and put
it in again.
- Make sure the tubing is not damaged. If it needs to be changed, contact a
specialist.
- The earmold is deformed, it needs to be replaced with a new one. Ear wax
has built up in the ear tubing. Contact the specialist, so he cleans it up.
- Your ear canal shape has changed. You need to contact the specialist to
have a new earmold made.
Troubleshooting
№ of
Item Name of Item
Quantity
1 Hearing Aid
2 Batteries
3 Earmolds
4 User Manual
5 Case
6Box
2322
The warranty does not cover the accessories, such as batteries, ear
tubing, earmolds ?etc!
The Warranty period begins when you rst take the delivery of your hearing
instrument from an authorized hearing professional and expires twenty four
months later (“warranty period”).
Your Hearing Aid is covered with warranty. This warranty covers only manu-
factering defects and/or materials used to make the hearing instrument con-
form to Aurica’s design and manufacturing specications and tolerances.
Your hearing professional may have issued a warranty or service plan that
goes beyond the provisions of this Warranty.
Warranty
Package and Transportation
The Hearing Aid is packed into a plastic case and cardboard.
Technical documentation is plotted in the watertight packet and is packed
together with the housing SPO.
The Hearing Aid can be transported by any flight or transport excluding
non-heated airplane sections, climatic conditions must correspond to the
national standard GOST 15150, group 5.
Storage
For short term the « Hearing Aid » must be stored indoors at 10…40C tem-
perature, and relative humidity must be 85 per cent at temperature of 25C.
For long term the « Hearing Aid » must be stored at a warehouse of a manu-
facturer or EU representant/dealer in accordance with store conditions of
the national standards GOST 15150. For repair (change) within the warranty term
Medical device - «Hearing Aid»
Technical conditions TU 9444-005-81271212-2013
Number and production date_________________________________________
Purchased_________________________________________________________
(date, signature and stamp of saller)
set in operation____________________________________________________
(date, signature)
accepted for warranty ______________________________________________
WARRANTY CERTIFICATE

2524
Reclamation Disposal
Disposal of packaging - packaging components (cardboard,
plastics etc.) are all classied as solid waste and can be
therefore easily disposed of with the use of recycling processes.
Before disposal is always advisable that you check the validity of the rel-
evant provisions in the place of installation.
Please male proper disposal!
Product disposal – Aerocryotherapeutic complex is made of vari-
ous materials. Most of them (plastic, metal, electric conductors,
etc.) may be handed over in recycling sites and can be recycled.
However, other components (electric plates, etc.) may contain hazardous
substances. Therefore the following components should be submitted in
the respective centers or the European representative of the producer, where
the qualied specialists ensure their disposal.
Before disposal is always advisable that you check the validity of the rel-
evant provisions of the disposal site.
Please male proper disposal!
For a reclamations the following form must be lled in:
Initial
exploitation
date
Problem
occurrenced
date
Brief
description
of problem
Comments

«Aurica» Ltd,
Russia, 300026 Tula,
Ryazanskaya street 4.
Tel.: +7 (4872) 231060
E-mail: aurica@aurica.ru,
www.aurica.ru
EU REP ONKOCET Ltd.,
Kutuzovova 4, 90102
Pezinok, Slovakia
Tel.: +421 (2) 44640977
www.onkocet.eu
Last revision: June 10th 2016
Technical DATA
Voltage 1,2V
Current 2mA
Applied pert type BF
Table of contents
Other AURICA Hearing Aid manuals


