Auriol IAN 88977 User manual

IAN 88977
RADIO-CONTROLLED
ALARM CLOCK
RADIO-CONTROLLED
ALARM CLOCK
Operation and Safety Notes
RADIOSTYRD
VÄCKARKLOCKA
B
ruksanvisning och säkerhetsanvisningar
RADIOVÆKKEUR
Brugs- og sikkerhedsanvisninger

GB/IE Operation and Safety Notes Page 7
SE Bruksanvisning och säkerhetsanvisningar Sidan 27
DK Brugs- og sikkerhedsanvisninger Side 48

3
1 2 3 4
5
A

4
DST
B
14 1115
76
9
8
13
1012

5
C16

6
D17

7GB/IE
Intended use................................................ Page 9
Parts description...................................... Page 9
Technical Data............................................ Page 11
Scope of delivery.................................... Page 12
General Safety Instructions .......... Page 12
Battery safety information............ Page 13
Before Initial Use..................................... Page 14

8 GB/IE
Initial use
Automatic or manual DCF signal activation...... Page 16
Changing basic settings ..................................... Page 17
Setting the alarm................................................. Page 21
Turning the alarm on/off................................... Page 22
Switching off the alarm signal............................ Page 22
Using the snooze function.................................. Page 23
Lighting the LC display........................................ Page 23
Switching the temperature display unit.............. Page 23
Replacing batteries............................... Page 24
Troubleshooting....................................... Page 24
Cleaning and Care.................................. Page 25
Disposal............................................................ Page 25
Declaration of Conformity.............. Page 26

9GB/IE
Radio-controlled alarm clock
Intended use
This radio controlled alarm clock shows time, date and indoor
temperature. The radio controlled alarm clock is intended for
household use and not suitable for commercial use.
Parts description
The control panel (see Fig. A)
1ALARM button: Press this button to access the alarm
function. Use to activate/deactivate the alarm function and
shut off the alarm.
2MODE button: Press this button to access the general
settings for the radio controlled alarm clock. Confirm settings
with this button. In activate alarm mode, press this button to
return to clock mode.
3+/RCC button: Press this button to activate/deactivate
DCF signal reception. In time mode press this button to select
24 or 12 hour format. In settings mode use this button to
increase the values you wish to set.

10 GB/IE
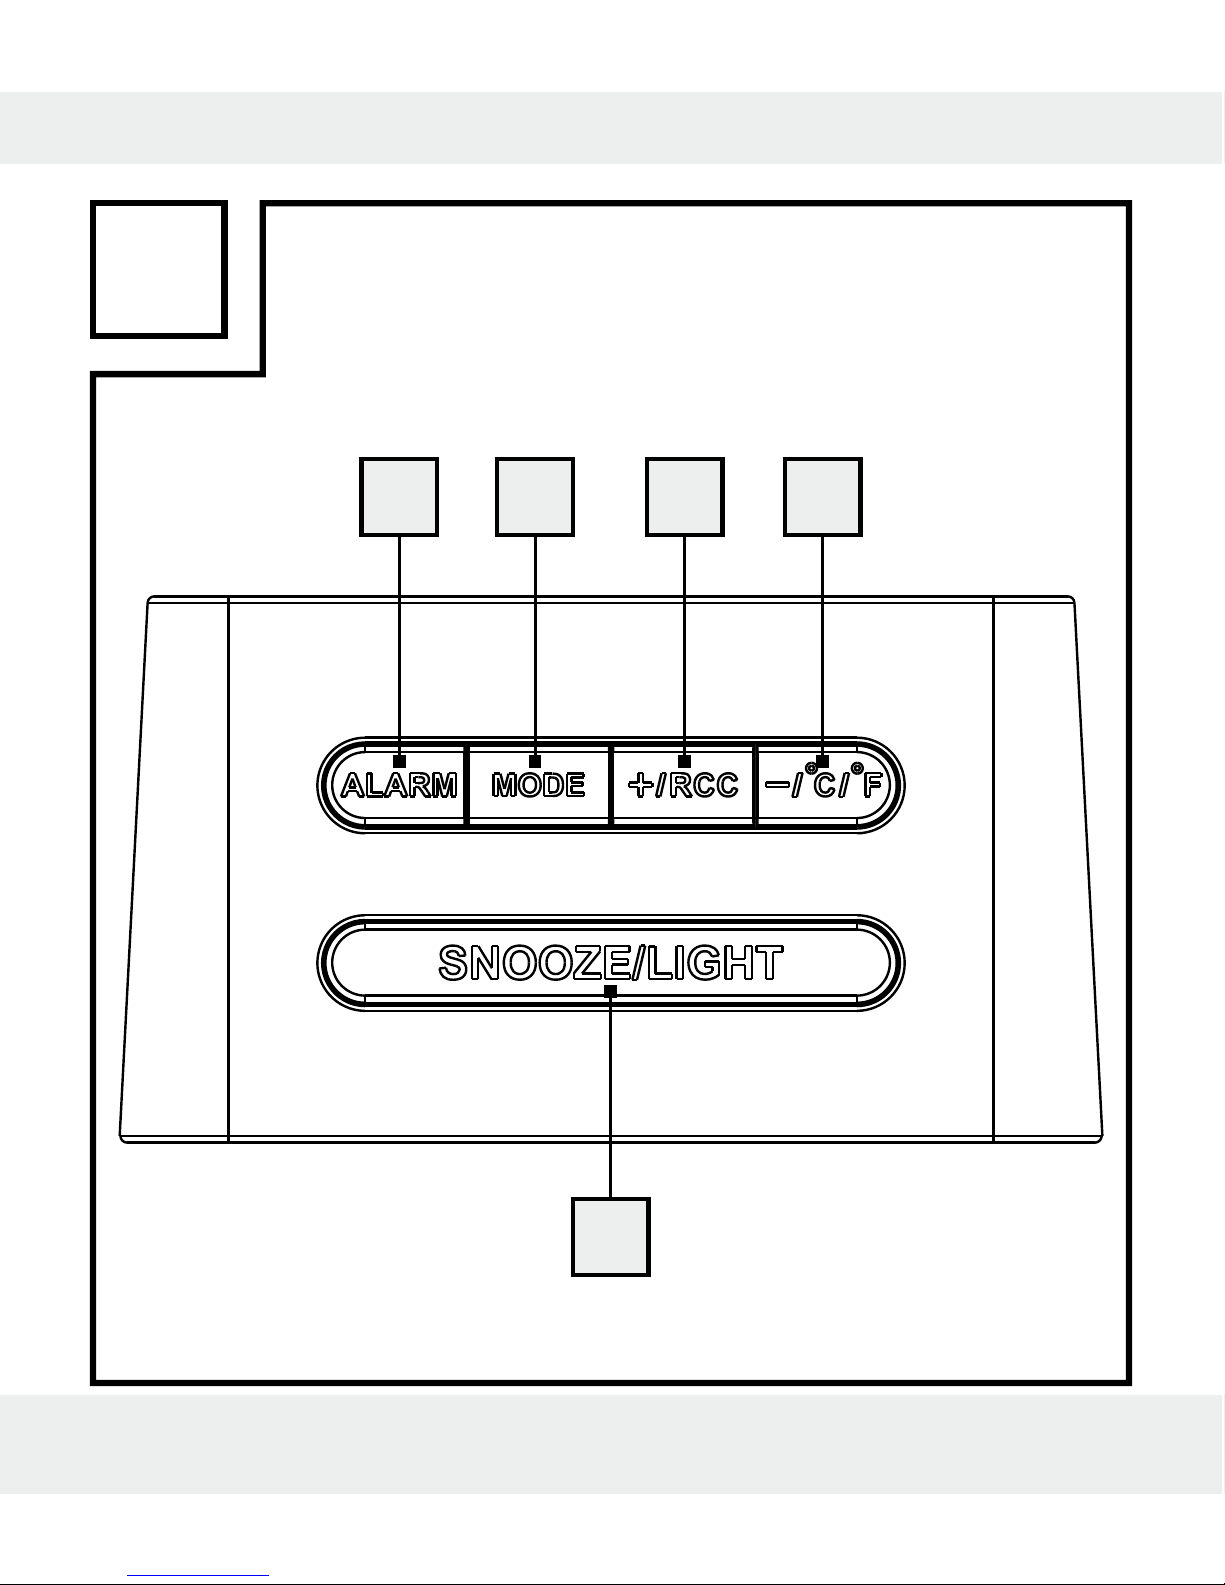
4–/°C/°F button: Press this button to select the tempera-
ture display unit (°C or °F). In settings mode use this button to
decrease the values you wish to set.
5SNOOZE/LIGHT button: When the alarm sounds
press this button to snooze the alarm for 10 minutes. Otherwise
press this key to activate the backlight for approx. 5 seconds.
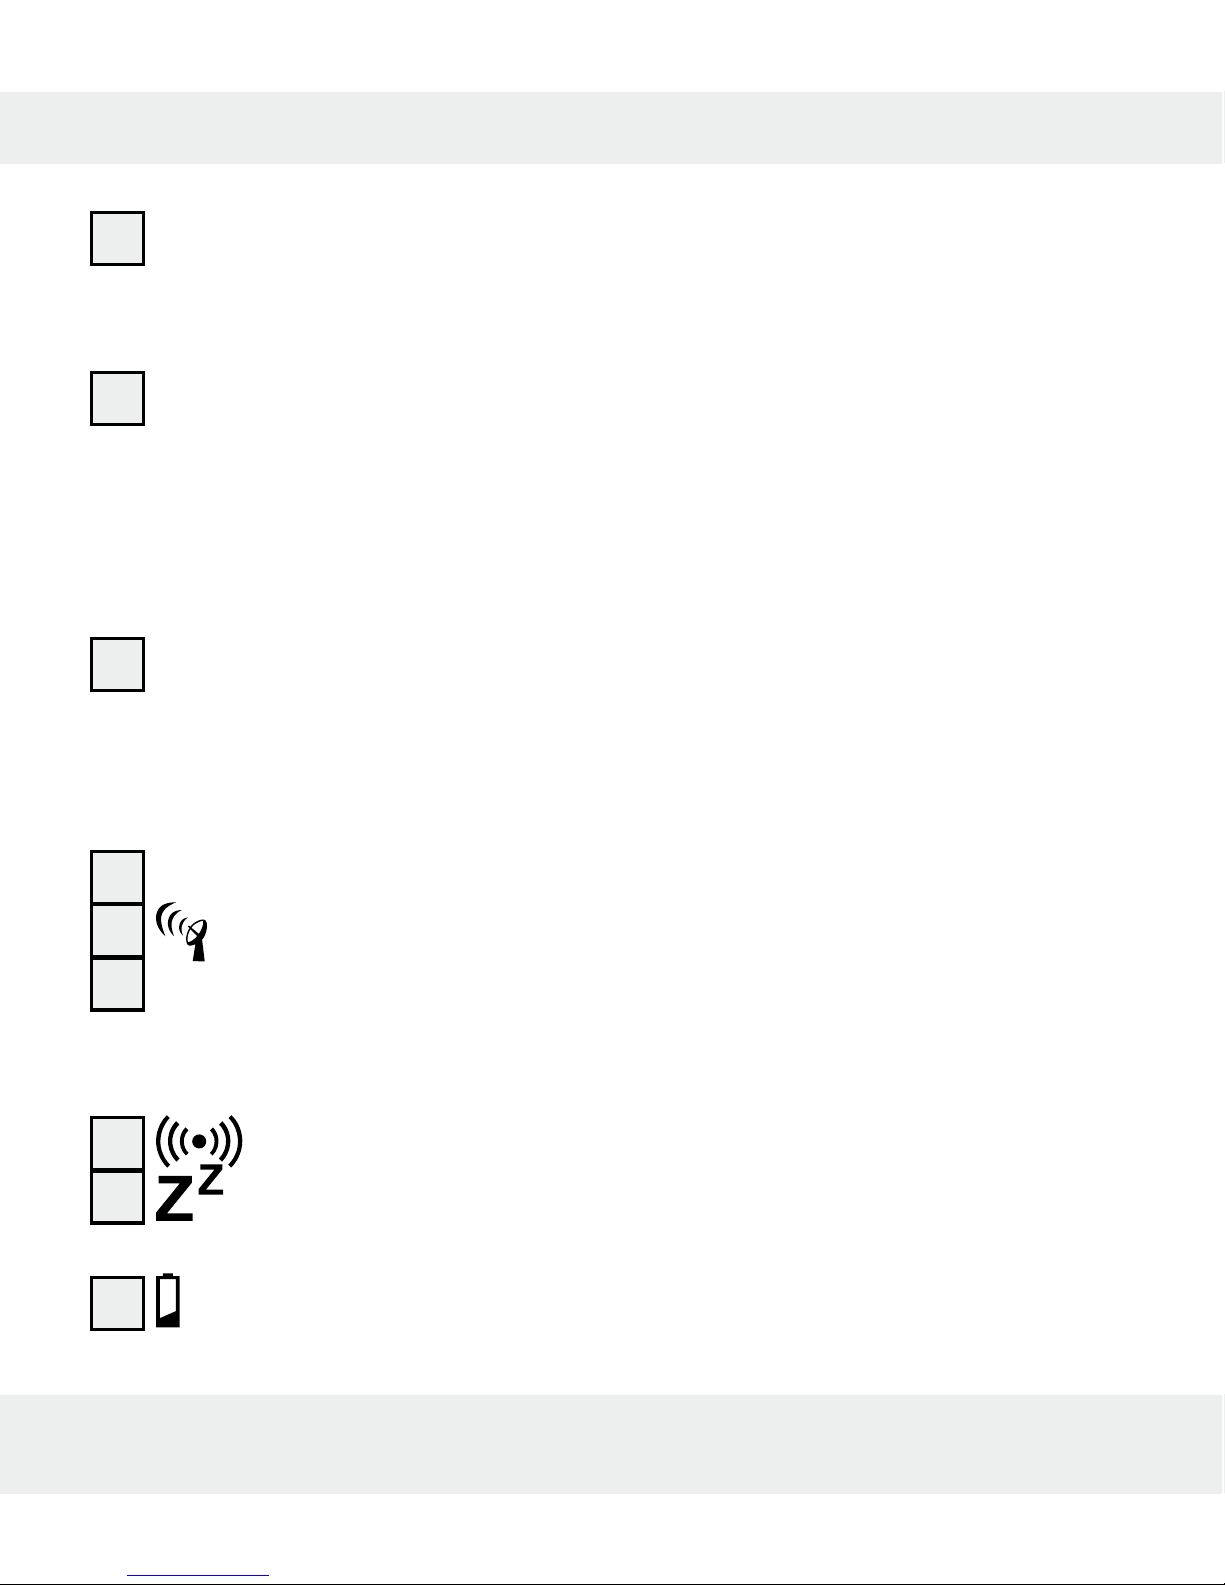
The display (see Fig. B)
6Time field: The time field indicates the time in 24 or
12 hour format. In 12 hour format it will also show AM (lat.
„ante meridiem“ = before noon) and PM (lat. „post meridiem“ =
after noon).
7Info field: This field may show four different symbols:
8:The DCF symbol indicates the DCF reception status.
9DST: DST („Daylight Saving Time“) only appears during
European daylight saving time. This symbol cannot be manually
activated.
10 :The alarm symbol indicates the alarm is activated.
11 : The Snooze symbol indicates the snooze function
has been activated.
12 :This symbol indicates the batteries should be replaced.

11GB/IE
13 Temperature field: The temperature field indicates the
temperature either in °C or °F.
14 Weekday field: In clock mode the weekday field
indicates the day of the week under the DAY caption. When
wetting the language this will indicate the selected language.
In alarm activation mode and in alarm mode this will show ALM.
15 Date field: The date field shows the day of the month
under DATE and the month under MONTH. You may also set
it to show the year.
16 Battery compartment cover
17 Battery compartment
Technical Data
Operating voltage: 3V
Batteries: 2x Batteries LR03 (type AAA, 1.5V)
Temperature range: approx. 0–50°C (32–122°F)
Colours: white: model no.: Z31481A
purple: model no.: Z31481B
anchracite: model no.: Z31481C

12 GB/IE
Scope of delivery
1 Radio controlled alarm clock
2 Batteries LR03 (inserted)
1 Set of operating instructions
General Safety Instructions
Before using the product, please familiarise yourself with all of
the safety information and instructions for use! When passing
this product on to others, please also include all the documents!
DANGER TO LIFE AND
RISK OF ACCIDENTS FOR INFANTS AND
CHILDREN! This appliance may be used by
children age 8 years and up, as well as by persons with
reduced physical, sensory or mental capacities, or lack-
ing experience and/or knowledge, so long as they are
supervised or instructed in the safe use of the appliance
and understand the associated risks. Children should not
be allowed to play with the appliance. Cleaning and user

13GB/IE
maintenance should not be performed by children without
supervision.
Battery safety
information
DANGER TO LIFE! Batteries are not in-
tended for children. If accidentally swallowed seek immediate
medical attention.
CAUTION! EXPLOSION HAZARD!
Never recharge non-rechargeable batteries,
short-circuit and/or open batteries.
Never throw batteries into fire or water.
Do not exert mechanical loads to batteries.
Risk of battery leakage!
In the event of a battery leak, immediately remove it from
the device to prevent damage.
Avoid contact with the skin, eyes and mucous membranes.
In the event of contact with battery acid, thoroughly flush

14 GB/IE
the affected area with plenty of clean water and seek
immediate medical attention.
Only use the same type of batteries. Do not mix used and
new batteries.
Avoid extreme conditions and temperatures which may
impact batteries, e.g. on radiators.
Remove the batteries if the appliance has not been used
for a long period.
Risk of equipment damage!
Only use the specified battery type!
When inserting the battery ensure the correct polarity!
This is shown in the battery compartment.
If necessary, clean the batteries and device contacts
before inserting batteries.
Promptly remove drained batteries from the product.
Before Initial Use
First remove the protective film from the display of the
radio controlled alarm clock.

15GB/IE
Remove the plastic strip sticking out of the battery com-
partment.
Note: The LC display will now perform a quick function check
and starts receiving the DCF signal (for details please refer to:
automatic and manual DCF signal activation). This process
may take a few minutes and is indicated by the DCF symbol
flashing in the info field 7.
Upon successful reception of the radio signal the DCF symbol
will stop flashing.
The radio controlled alarm clock is now in clock mode and in-
dicates the current time (CET - Central European Time). It also
indicates the date, weekday in German and the temperature
in °C.
Note: If you are located in a time zone other than Central
European Time or wish to display the weekday in another
language, it must be manually set. Please refer to chapter
„Changing basic settings“.
Note: If the radio controlled alarm clock is unable to receive
a signal after 7 minutes, the DCF symbol will turn off. In this
case, possibly change the location of the radio controlled
alarm clock and start reception of the radio signal manually.

16 GB/IE
Please refer to chapter „Automatic or manual DCF signal
activation“.
Note: If a signal can‘t be received after changing the location
the time must be set manually. Please refer to chapter „Chang-
ing basic settings“.
Initial use
Automatic or manual
DCF signal activation
automatic:
Note: The DCF signal (time signal transmitter) consists of time
pulses emitted by one of the most accurate clocks in the world
close to Frankfurt/Main, Germany – this varies by 1 second
in 30,000 years. Your radio-controlled alarm clock will receive
the time signal under optimum conditions up to a distance of
approx. 1,500km from Frankfurt am Main, Germany. Recep-
tion of the radio signal generally takes approx. 3–10 minutes.
Reception can be considerably impaired by obstacles (e.g.
concrete walls) or sources of interference (e.g. other electrical
devices). You may have to change the location of the radio-
controlled clock (e.g. near a window) if there are problems

17GB/IE
with reception. This radio controlled alarm clock updates its
time once daily via DCF signal. The reception process is indi-
cated with an animated DCF symbol 8in the info field 7.
If reception is successful the DCF symbol will be static. If re-
ception is unsuccessful the DCF symbol will disappear until
the next successful reception.
manually:
Press and hold the +/RCC 3button for 3 seconds. The
flashing DCF symbol in the info field 7indicates the radio
controlled alarm clock is attempting to receive a signal.
Note: You may cancel reception by pressing the +/RCC 3
button again. The DCF symbol will then stop flashing.
Changing basic settings
Press and hold the MODE 2button for 3 seconds to
access the basic settings mode from clock mode.
During each of the following programming steps press the
+/RCC 3or -/°C/°F 4button to make a change.
TIP: Pressing and holding the +/RCC or -/°C/°F
button will quickly increase or decrease the numbers.

18 GB/IE
Press the MODE 2button to confirm a setting. You will
automatically advance to the next programming step.
Note: If no changes are made for 20 seconds the radio con-
trolled alarm clock will automatically return to clock mode.
The following settings can be adjusted one after the other:
Program-
ming step
Setting Standard
display
Explanation
Setting the
time zone
0 Enter your time
difference from
Central Euro-
pean Time. The
time difference
can be set
ranging from
+12 hours to
-12 hours.

19GB/IE
Programming steps to should only be adjusted if the
DCF signal reception failed. When receiving the DCF signal
any deviations from the will be corrected.
Set hour The hour
display in the
clock field
6flashes
Set minutes The minute
display in the
clock field
6flashes
Set year The year
display in the
date field
15 flashes
The year can
be set up to
2099.
Set month The month
display in the
date field
15 flashes

20 GB/IE
Set day The day dis-
play in the
date field
15 flashes
The following language setting impacts the weekday
display in the weekday field 13 .
Set language The acronym
for the current
language
flashes in the
weekday
field 14
Choose from
the following
languages:
GER – German
ITA - Italian
FRE - French
NET - Dutch
ESP - Spanish
DAN - Danish
ENG - English
In program step press the MODE button 2to con-
firm the language. The radio controlled alarm clock will
return to clock mode.
Table of contents
Languages:
Other Auriol Clock Radio manuals

Auriol
Auriol Z31408A User manual

Auriol
Auriol 4-LD4948 Parts list manual

Auriol
Auriol 4-LD3131 User manual

Auriol
Auriol 4-LD4166 Parts list manual

Auriol
Auriol 4-LD3905 Parts list manual

Auriol
Auriol 4-LD4146 Parts list manual

Auriol
Auriol Z30300 A User manual

Auriol
Auriol Z30237B User manual

Auriol
Auriol Z30237B User manual

Auriol
Auriol z31163 User manual
Popular Clock Radio manuals by other brands

Lumie
Lumie Bodyclock Classic with Radio 150 operating instructions

MAJORITY
MAJORITY HISTON CB24-DAB-COP Instruction guide

Sony
Sony DREAM MACHINE ICF-C135 operating instructions

Philips
Philips AJ3431 Product information

Sony
Sony Walkman ICF-C492 operating instructions

AudioSonic
AudioSonic CL-1472 instruction manual