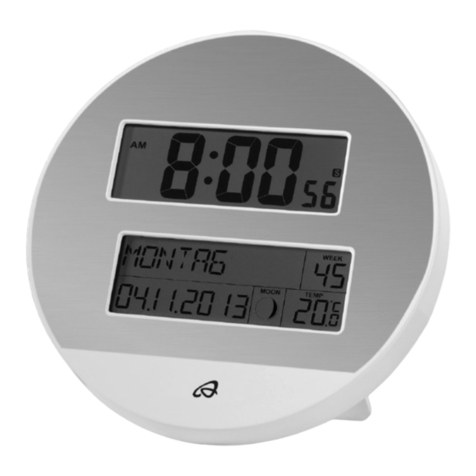
Auriol 4-LD4146 Parts list manual

IAN
270796
OS
LCD
-
FUNKWECKER
/
LCD RADIO
-
CONTROLLED ALARM CLOCK
/
RÉVEIL LCD RADIOGUIDÉ
·
11/2015 · Art -Nr : 4-LD4146
LCD-FUNKWECKER
Bedienungs- und Sicherheitshinweise
LCD RADIO-CONTROLLED
ALARM CLOCK
Usage and safety instructions
RÉVEIL LCD RADIOGUIDÉ
Mode d'emploi
LCD-RADIOWEKKER
Gebruiksaanwijzing
DESPERTADOR LCD
Indicaciones sobre su utilización y su seguridad
SVEGLIA RADIOCONTROLLATA
Istruzioni per l’uso e indicazioni
per la sicurezza
RÁDIO DESPERTADOR LCD
Avisos de utilização e segurança

Bedienungs- und Sicherheitshinweise - 1 -
Usage and safety instructions - 7 -
Utilisation et avertissements de sécurité - 12 -
Gebruiksaanwijzing en veiligheidstips - 18 -
Indicaciones sobre su utilización y su seguridad - 23 -
Istruzioni per l’uso e indicazioni per la sicurezza - 29 -
Avisos de utilização e segurança - 35 -

-
1
-
Bedienungs- und Si herheitshinweise
Inhaltsverzei hnis
Inhaltsverzeichnis
-
1
-
Einleitung - 2 -
Bestimmungsgemäße Verwendung - 2 -
Lieferumfang - 2 -
Technische Daten - 2 -
Wichtige Sicherheitshinweise
Wichtige SicherheitshinweiseWichtige Sicherheitshinweise
Wichtige Sicherheitshinweise - 2 -
Den Wecker sicher aufstellen - 2 -
Benutzer - 2 -
Batterien - 2 -
Display und Bedienfelder - 3 -
Inbetriebnahme - 3 -
Empfangsstörung - 3 -
Neustart - 3 -
Licht - 4 -
Temperaturanzeige - 4 -
Schnelleinstellung - 4 -
Grundeinstellung - 4 -
Weckalarm - 4 -
Schlummerfunktion (SNOOZE) - 4 -
Reinigungshinweis - 4 -
Hinweis zur Konformität - 4 -
Entsorgung des Elektrogeräts - 4 -
Entsorgung der Batterien - 4 -
Garantie der digi-tech gmbh - 4 -
Garantiebedingungen - 5 -
Garantiezeit und gesetzliche Mängelansprüche - 5 -
Garantieumfang - 5 -
Abwicklung im Garantiefall - 5 -
Service - 6 -
Lieferant - 6 -

-
2
-
LCD-FUNKWECKER
Einleitung
Herzlichen Glückwunsch zum Kauf Ihres neuen Weckers Sie haben sich damit für ein hochwertiges
Gerät entschieden Die Bedienungsanleitung ist Bestandteil dieses Weckers Sie enthält wichtige
Hinweise für Sicherheit, Gebrauch und Entsorgung Machen Sie sich vor der Benutzung des Weckers
mit allen Bedien- und Sicherheitshinweisen vertraut Benutzen Sie den Wecker nur wie beschrieben
und für die angegebenen Einsatzbereiche
Händigen Sie alle Unterlagen bei Weitergabe des Weckers an Dritte mit aus
Bestimmungsgemäße Verwendung
Das Gerät ist zur Zeitanzeige und zur Verwendung der beschriebenen Zusatzfunktionen geeignet
Jede andere Verwendung oder Veränderung des Gerätes gilt als nicht bestimmungsgemäß Der
Hersteller haftet nicht für Schäden, die durch nicht bestimmungsgemäßen Gebrauch oder falsche
Bedienung verursacht werden
Das Gerät ist nicht für den gewerblichen Einsatz vorgesehen
Lieferumfang
Hinweis: Bitte überprüfen Sie nach dem Kauf den Lieferumfang. Stellen Sie sicher, dass alle Teile
vorhanden und nicht defe t sind.
•
••
• Wecker
•
••
• 1x Batterie 1,5 V AA R6/LR6
•
••
• Bedienungsanleitung
Te hnis he Daten
• Quarzwerk
• Betrieb mit einer 1,5 V AA R6/LR6 Batterie
Den Wec er sicher aufstellen
Er ist nicht für den Betrieb in Räumen mit hoher Luftfeuchtigkeit (z B Badezimmer) ausgelegt Achten
Sie darauf, dass:
• das Gerät beim Betrieb nicht auf einem dicken Teppich oder Bett aufgestellt wird
• keine direkten Wärmequellen (z B Heizungen) auf das Gerät wirken;
• kein direktes Sonnenlicht auf das Gerät trifft;
• der Kontakt mit Spritz- und Tropfwasser vermieden wird (stellen Sie keine mit Flüssigkeiten
gefüllten Gegenstände, z B Vasen, auf oder neben das Gerät);
• das Gerät nicht in unmittelbarer Nähe von Magnetfeldern (z B Lautsprechern) steht;
• keine Fremdkörper eindringen
• Kerzen und andere offene Flammen zu jeder Zeit von diesem Produkt ferngehalten werden
müssen, um das Ausbreiten von Feuer zu verhindern
Benutzer
Dieses Gerät kann von Personen (einschließlich Kindern ab 8 Jahren) mit verringerten physischen,
sensorischen oder mentalen Fähigkeiten oder Mangel an Erfahrung und Wissen benutzt werden,
wenn sie beaufsichtigt oder bezüglich des sicheren Gebrauchs des Geräts unterwiesen wurden und
die daraus resultierenden Gefahren verstehen Kinder dürfen nicht mit dem Gerät spielen Reinigung
und Benutzer-Wartung dürfen nicht von Kindern ohne Beaufsichtigung durchgeführt werden Halten
Sie auch die Verpackungsfolien von Kindern fern Es besteht Erstickungsgefahr
Batterien
Bewahren Sie Batterien für Klein inder unerreichbar auf Wurde eine Batterie verschluckt, muss
sofort medizinische Hilfe in Anspruch genommen werden
Batterien/Akkus müssen stets polrichtig eingelegt werden Reinigen Sie Batterie- und Gerätekontakte
zuvor bei Bedarf Versuchen Sie nicht Batterien wieder aufzuladen, kurzzuschließen oder zu öffnen
Werfen Sie niemals Batterien ins Feuer, da diese explodieren können Wenn Sie das Gerät längere
Zeit nicht benutzen, entnehmen Sie die Batterie und verstauen Sie das Gerät an einem trockenen und
staubfreien Ort Bei unsachgemäßem Gebrauch der Batterie besteht Explosions- und Auslaufgefahr
Sollte die Batterie doch einmal ausgelaufen sein, vermeiden Sie Kontakt mit Haut, Augen und
Schleimhäuten Benutzen Sie Handschuhe Bei Kontakt mit Batteriesäure die betroffenen Stellen mit
reichlich klarem Wasser spülen und umgehend einen Arzt aufsuchen Entfernen Sie erschöpfte
Batterien umgehend aus dem Gerät, es besteht erhöhte Auslaufgefahr
Wi htige Si herheitshinweise

-
3
-
Display und Bedienfelder
1
Display
11
Sekunden
2
SNOOZE/LIGHT
12
Funkturm
3
SET
13
Temperaturanzeige
4
ALARM
14
Wochentagsanzeige
5
RCC
15
Datumsanzeige, D=Tag, M=Monat
6
DOWN
16
Alarm 2 (6
-
7)
7
UP
17
Alarm 1 (1
-
5)
8
Lautsprecher
18
Alarmzeit
9
Batteriefach
19
Snoozeanzeige
10
Uhrzeit
20
Stundenformat
Inbetriebnahme
Ziehen Sie die Schutzfolie vom Display des Weckers ab Öffnen Sie das Batteriefach auf der
Rückseite des Gerätes und setzen Sie eine 1,5V AA R6/LR6 Batterie polrichtig ein Schließen Sie das
Batteriefach
Nach dem Einsetzen der Batterie startet automatisch der Empfang des Funksignals, es ertönt ein
Signalton Der Funkturm blinkt im Display Dieser Vorgang kann 3-10 Minuten dauern
Hinweis: Bitte bewegen Sie den Wec er während des Empfangsvorgangs nicht.
Der Wecker synchronisiert die interne Uhrzeit täglich von 01:00 bis 04:00 zu jeder vollen Stunde
Sollte der Empfangsversuch nicht erfolgreich sein, wird er um 05:00 und 06:00 wiederholt Wenn
der Empfang des Zeitsignals erfolglos bleibt, stellen Sie die Zeit manuell ein (siehe
Grundeinstellung)
Bei erfolgreichem Empfang erscheint der Funkturm permanent und es stellen sich automatisch die
Uhrzeit, Datum und Wochentag ein Während der Sommerzeit erscheint DST auf dem Display rechts
neben dem Funkturm
Empfangsstörung
Das DCF77 Funksignal wird aus der Nähe von Frankfurt am Main gesendet und kann bis zu ca
1500 km im Radius um Frankfurt am Main empfangen werden Allerdings gibt es einige Störquellen,
die den Empfang erheblich behindern können Falls Ihre Wetterstation das Funksignal nicht richtig
empfängt, hängen oder stellen Sie die Wetterstation an einem anderen Platz auf und beachten Sie,
dass es in der Nähe vom Computer, Telefon, Radio und TV zu elektromagnetischen Strahlungen
kommen kann, die den Empfang des DCF77 Funksignals stören können Weitere Störquellen für den
Empfang des Funksignals können starke Gebäudedämmungen (metallische Bauelemente), hohe
Berge oder atmosphärische Störungen sein Ersetzen Sie ggf die Batterien
Neustart
Sie können manuell einen Neustart des Funkempfangs starten, indem Sie RCC auf der Rückseite des
Weckers 4 Sekunden gedrückt halten
War der Funkempfang erfolglos, muss die Uhrzeit manuell eingestellt werden (siehe
Grundeinstellung)

-
4
-
Li ht
Drücken Sie SNOOZE/LIGHT oben auf dem Wecker, um die Beleuchtung kurzzeitig zu aktivieren
Temperaturanzeige
Drücken Sie SET, um die Temperatureinheit Celsius (°C) oder Fahrenheit (°F) zu wählen
S hnelleinstellung
Bei der Einstellung von numerischen Werten können Sie durch Drücken und Halten der jeweiligen
Tasten die Schnelleinstellung verwenden
Grundeinstellung
Sie können folgende Einstellungen vornehmen: Sprache der Wochentagsanzeige, 12/24- Stunden
Zeitformat, Datum, Zeit und Zeitzone
Drücken und halten Sie SET in der Normalzeitanzeige ca 3 Sekunden, die Sprache der
Wochentagsanzeige blinkt und kann mit UP oder DOWN eingestellt werden Es stehen folgende
Sprachen zur Auswahl: GE=deutsch, EN=englisch, IT=italienisch, FR=französisch,
DU=niederländisch, SP=spanisch, HU=ungarisch, SL=slowenisch Drücken Sie die SET-Taste um die
Einstellung zu bestätigen Stellen Sie auf die gleiche Weise das 12/24-Stunden Zeitformat, das Jahr,
das Datumsformat (M=Monat, D=Tag), den Monat, den Tag, die Stunden, die Minuten und die
Zeitzone ein Verwenden Sie die Zeitzonenanpassung, um Ihren Wecker in einer anderen Zeitzone
als Ihrer Heimatzeitzone zu verwenden Stellen Sie in diesem Fall bei der Zeitzonenanpassung die
Differenz in Stunden zu Ihrer Heimatzeitzone ein Führen Sie anschließend einen Neustart durch
We kalarm
Der Wecker verfügt über 2 separat einstellbare Weckzeiten Alarm 1 (1-5) ist für die Tage von
Montag bis Freitag, Alarm 2 (6-7) für Samstag und Sonntag
Drücken und halten Sie die ALARM-Taste, um in den Einstellungsmodus der Weckzeit zu wechseln
Die Stundenanzeige von Alarm 1 (1-5) blinkt auf dem Display Drücken Sie zum Einstellen UP oder
DOWN und bestätigen Sie die Einstellung durch Druck auf ALARM Stellen Sie auf die gleiche
Weise die Weckzeit des zweiten Alarms (6-7) ein
Drücken Sie in der Normalzeitanzeige die UP-Taste um den Alarm 1 (1-5) ein- bzw auszuschalten
Drücken Sie in der Normalzeitanzeige die DOWN-Taste um den Alarm 2 (6-7) ein- bzw
auszuschalten Bei eingeschaltetem Alarm erscheint das Glockensymbol
S hlummerfunktion (SNOOZE)
Drücken Sie bei Ertönen des Alarms SNOOZE/LIGHT oben auf dem Gehäuse Die Beleuchtung ist
kurzzeitig aktiviert, es blinken z
z
und das Glockensymbol im Display, der Alarm wird vorübergehend
deaktiviert und ertönt nach ca 8 Minuten erneut
Reinigungshinweis
Reinigen Sie den Wecker nur mit einem trockenen, fusselfreien Tuch, wie es z B zur Reinigung von
Brillengläsern verwendet wird
Hinweis zur Konformität
Dieses Gerät entspricht bei bestimmungsgemäßer Verwendung den grundlegenden Anforderungen
des § 3 und den übrigen einschlägigen Bestimmungen des FTEG (Artikel 3 der R&TTE) Die
Konformitätserklärung können Sie hier anfordern: conformity@digi-tech-gmbh com
Entsorgung des Elektrogeräts
Dieser Wecker darf nicht im normalen Hausmüll entsorgt werden Entsorgen Sie den
Wecker über einen zugelassenen Entsorgungsbetrieb oder über Ihre kommunale
Entsorgungseinrichtung Beachten Sie die aktuell geltenden Vorschriften Setzen Sie sich im
Zweifelsfall mit Ihrer Entsorgungseinrichtung in Verbindung
Entsorgung der Batterien
Bitte entsorgen Sie Ihre Batterien sachgerecht in extra hierfür aufgestellten Gefäßen im
Handel Batterien gehören nicht in den Hausmüll Entsorgen Sie Batterien bitte über einen
zugelassenen Entsorgungsbetrieb oder über Ihre kommunale Entsorgungseinrichtung Beachten Sie
die aktuell geltenden Vorschriften Setzen Sie sich im Zweifelsfall mit Ihrer Entsorgungseinrichtung in
Verbindung
Garantie der digi-te h gmbh
Sie erhalten auf dieses Gerät 3 Jahre Garantie ab Kaufdatum Im Falle von Mängeln dieses Produkts
stehen Ihnen gegen den Verkäufer des Produkts gesetzliche Rechte zu Diese gesetzlichen Rechte
werden durch unsere im Folgenden dargestellte Garantie nicht eingeschränkt

-
5
-
Garantiebedingungen
Die Garantiefrist beginnt mit dem Kaufdatum Bitte bewahren Sie den Original Kassenbon gut auf
Diese Unterlage wird als Nachweis für den Kauf benötigt Tritt innerhalb von drei Jahren ab dem
Kaufdatum dieses Produkts ein Material- oder Fabrikationsfehler auf, wird das Produkt von uns –
nach unserer Wahl – für Sie kostenlos repariert oder ersetzt Diese Garantieleistung setzt voraus,
dass innerhalb der Drei-Jahres-Frist das defekte Gerät und der Kaufbeleg (Kassenbon) vorgelegt und
schriftlich kurz beschrieben wird, worin der Mangel besteht und wann er aufgetreten ist Wenn der
Defekt von unserer Garantie gedeckt ist, erhalten Sie das reparierte oder ein neues Produkt zurück
Mit Reparatur oder Austausch des Produkts beginnt kein neuer Garantiezeitraum
Garantiezeit und gesetzli he Mängelansprü he
Die Garantiezeit wird durch die Gewährleistung nicht verlängert Dies gilt auch für ersetzte und
reparierte Teile Eventuell schon beim Kauf vorhandene Schäden und Mängel müssen sofort nach
dem Auspacken gemeldet werden Nach Ablauf der Garantiezeit anfallende Reparaturen sind
kostenpflichtig.
Garantieumfang
Das Gerät wurde nach strengen Qualitätsrichtlinien sorgfältig produziert und vor Anlieferung
gewissenhaft geprüft Die Garantieleistung gilt für Material- oder Fabrikationsfehler Diese Garantie
erstreckt sich nicht auf Produktteile, die normaler Abnutzung ausgesetzt sind und daher als
Verschleißteile angesehen werden können oder für Beschädigungen an zerbrechlichen Teilen, z B
Schalter, Akkus oder die aus Glas gefertigt sind
Diese Garantie verfällt, wenn das Produkt beschädigt, nicht sachgemäß benutzt oder gewartet
wurde Für eine sachgemäße Benutzung des Produkts sind alle in der Bedienungsanleitung
aufgeführten Anweisungen genau einzuhalten Verwendungszwecke und Handlungen, von denen in
der Bedienungsanleitung abgeraten oder vor denen gewarnt wird, sind unbedingt zu vermeiden
Das Produkt ist lediglich für den privaten und nicht für den gewerblichen Gebrauch bestimmt Bei
missbräuchlicher und unsachgemäßer Behandlung, Gewaltanwendung und bei Eingriffen, die nicht
von unserer autorisierten Service-Niederlassung vorgenommen wurden, erlischt die Garantie
Abwi klung im Garantiefall
Um eine schnelle Bearbeitung ihres Anliegens zu gewährleisten, folgen Sie bitte den folgenden
Hinweisen:
• Bitte halten sie für alle Anfragen den Kassenbon und die Artikelnummer (IAN 270796) als
Nachweis für den Kauf bereit
• Die Artikelnummer entnehmen Sie bitte dem Typenschild, einer Gravur, auf dem Titelblatt Ihrer
Anleitung (unten links) oder als Aufkleber auf der Rück- oder Unterseite
• Sollten Funktionsfehler oder sonstige Mängel auftreten onta tieren Sie zunächst die
nachfolgende Serviceabteilung telefonisch oder per E-Mail.
• Ein als defekt erfasstes Produkt können sie dann unter Beifügung des Kaufbelegs (Kassenbon) und
der Angabe, worin der Mangel besteht und wann er aufgetreten ist, für Sie portofrei an die Ihnen
mitgeteilte Service Anschrift übersenden
Auf www lidl-service com können Sie diese und viele weitere Handbücher,
Produktvideos und Software herunterladen

-
6
-
Servi e
Name: Inter-Quartz GmbH
Str : Valterweg 27A
Stadt: Eppstein 65817
Land: Deutschland
E-Mail: support@inter-quartz de
Telefon: +49 (0)6198 571825
00800 5515 6616 00800 5515 6616
00800 5515 6616 00800 5515 6616
0800 563862 00800 5515 6616
00800 5515 6616 00800 5515 6616
00800 5515 6616 00800 5515 6616
00800 5515 6616
IAN
270796
Art
-
Nr : 4
-
LD41
4
6
Lieferant
Bitte beachten Sie, dass die folgende Anschrift keine Serviceanschrift ist Kontaktieren Sie zunächst
die oben benannte Servicestelle
Name: digi-tech gmbh
Str : Valterweg 27A
Stadt: Eppstein 65817
Land: Deutschland

-
7
-
Usage and safety instru tions
Table of ontents
Table of contents
-
7
-
Preliminary note - 8 -
Intended use - 8 -
Scope of delivery - 8 -
Technical specifications - 8 -
Important safety information
Important safety informationImportant safety information
Important safety information - 8 -
Set up the alarm clock safely - 8 -
User - 8 -
Batteries - 8 -
Display and controls - 9 -
Setup - 9 -
Reception problems - 9 -
Restarting radio reception - 9 -
Light - 9 -
Temperature display - 10 -
Speed setting - 10 -
Basic settings - 10 -
Alarm - 10 -
Snooze - 10 -
Cleaning instructions - 10 -
Declaration of Conformity - 10 -
Disposal of the electronic appliance - 10 -
Disposal of the batteries - 10 -
digi-tech gmbh warranty - 10 -
Warranty conditions - 10 -
Warranty period and defects liability - 11 -
Scope of the warranty - 11 -
Warranty claim procedure - 11 -
Service - 11 -
Supplier - 11 -

-
8
-
LCD RADIO-CONTROLLED ALARM CLOCK
Preliminary note
Congratulations on the purchase of your new alarm clock You have chosen a high quality
appliance The manual is part of the appliance It contains important safety, usage and disposal
information Please read all usage and safety instructions before using the appliance Please only
use the appliance as described and for the described uses If you sell or give this appliance to
someone else it is very important to also include this manual
Intended use
This electronic device is intended for time display and the described additional features Any other
use or modification of the electronic device does not comply with the intended uses The
manufacturer is not liable for damages caused by improper use or misuse The device is not intended
for commercial use
S ope of delivery
Please note: Chec the scope of delivery after purchase. Please ensure that all parts are included
and undamaged.
•
••
• Alarm clock
•
••
• 1x battery 1,5 V AA R6/LR6
•
••
• instruction manual
Te hni al spe ifi ations
• Quartz movement
• Operates with 1,5 V AA R6/LR6 battery
Set up the alarm cloc safely
The alarm clock is not intended for use in rooms with high humidity (example: bath room)
Make sure that:
• the device isn’t placed on a thick carpet or bed during operation ;
• no direct heat sources (i e radiators) influence the device;
• no direct sunlight reaches the device;
• contact with splashing or dripping water must be avoided (don’t place any items filled with
liquids, i e vases, onto or next to the device);
• the device doesn’t stand near magnetic fields (i e speakers);
• candles and other open flames must be kept away from this product at all times to prevent the
spread of fire
• no foreign objects penetrate the housing
User
This device may be used by persons (including children over 8 years of age) with reduced physical,
sensory or mental abilities or lack of experience and knowledge, if they are supervised or instructed
regarding the safe use of the device and understand the dangers that may arise Children may not
play with the device Cleaning and user maintenance of the device may not be performed by
children without supervision Keep packaging films out of the hands of children There is a danger of
suffocation
Batteries
Keep batteries out of reach of small children If a battery is swallowed, you must seek medical
attention immediately Batteries/rechargeable batteries must always be inserted in the correct
polarity If necessary, clean the battery and device contacts Never attempt to recharge non-
rechargeable batteries Never short-circuit or attempt to open batteries Never throw batteries into
fire as they may explode
If the device will not be used for an extended time period, remove the battery and store the device in
a dry and dust-free area Improper use of the battery can lead to explosion or leakage
If the battery leaks, avoid contact with skin, eyes and mucous membranes Use gloves If you are
exposed to battery acid, rinse the affected areas with plenty of clean water and immediately seek
medical attention Remove discharged batteries from the device as they present an increased risk of
leakage
Important safety information

-
9
-
Display and ontrols
1
Display
11
Seconds
2
SNOOZE/LIGHT
12
Radio tower indicator
3
SET
13
Temperature indicator
4
ALARM
14
Day of the week indicator
5
RCC
15
Date
indicator, D=day, M=month
6
DOWN
16
Alarm 2 (6
-
7)
7
UP
17
Alarm 1 (1
-
5)
8
Buzzer
18
Alarm time
9
Battery compartment
19
Snooze indicator
10
Time
20
PM indicator for 12
-
hour time format
Setup
Remove the protective film from the display of the alarm clock Open the battery compartment on the
backside of the device and insert a 1 5V AA R6/LR6 battery in the correct polarity Close the battery
compartment
Radio time signal reception starts automatically after inserting the battery and the alarm clock will
beep once The radio tower indicator will blink on the display This process can take 3-10 minutes
Note: Please do not move the alarm cloc during the reception process.
The alarm clock synchronizes the internal clock every day from 01:00 to 04:00 on each full hour If
reception is unsuccessful, the clock will reattempt reception at 05:00 and 06:00 Please set the time
manually, if reception fails (see "Basic settings")
If reception is successful, the radio tower indicator appears permanently on the display and the
time, date and day of the week are set automatically During daylight saving time, DST appears on
the display next to the radio tower indicator
Re eption problems
The DCF77 radio signal is transmitted from a location near Frankfurt am Main and can be received
within a radius of approximately 1500 km around Frankfurt am Main However, there are some
obstacles and sources of interference, which may substantially hinder reception If your weather
station does not correctly receive the DCF77 radio signal, please hang or place the weather station
in a different location at your site Please note that devices such as computers, telephones, radios
and televisions may cause electromagnetic radiation with can interfere with the DCF77 signal
reception Other possible detriments to reception are: strong building insulation (metal building
materials), nearby mountains or atmospheric interference It may also be necessary to replace the
batteries
Restarting radio re eption
Press and hold RCC on the backside of the alarm clock for 4 seconds to restart radio time signal
reception Please set the time manually if reception fails (see "Basic settings")
Light
Press SNOOZE/LIGHT the case downward from above to briefly activate the backlight

-
10
-
Temperature display
Press SET to select the temperature unit Celsius (°C) or Fahrenheit (°F)
Speed setting
Press and hold buttons when setting numerical values to use the speed setting feature
Basi settings
The following settings are adjustable: Language of the day of the week, 12/24-hour time format,
date, time and time zone
Press and hold SET for 3 seconds in normal time display mode The language of the day of the week
will blink on the display Set the language by pressing UP or DOWN The following languages are
selectable: GE=German, EN=English, IT=Italian, FR=French, DU=Dutch, SP=Spanish,
HU=Hungarian, SL=Slovenian Press SET to confirm your setting Set the12/24-hour time format, the
year, the date format (M=month, D=date), the month, the day, the hours, the minutes and the time
zone adjustment in the same way Use the time zone adjustment to adjust the time if you are not in
your home time zone Set the difference in hours of your current time zone to your home time zone
Restart radio time signal reception after setting the time zone adjustment
Alarm
The alarm has 2 separate adjustable alarm times Use Alarm 1 (1-5) for Monday to Friday Use
Alarm 2 (6-7) for Saturday and Sunday
Press and hold ALARM to enter alarm time setting mode The hour display for alarm 1 (1-5) will blink
on the display Press UP or DOWN to set the hour and confirm your setting by pressing ALARM Set
the minutes for alarm 1 and the hours and minutes for alarm 2 (6-7) in the same way
Press UP in normal time display mode to activate or deactivate alarm 1 (1-5)
Press DOWN in normal time display mode to activate or deactivate alarm 2 (6-7)
The bell symbol will appear if the alarm is activated
Snooze
Press SNOOZE/LIGHT on the top of the case to use the snooze feature The light activates briefly, z
z
and the bell symbol blink on the display The alarm sound will stop for about 8 minutes and then
restart
Cleaning instru tions
Clean the alarm clock with a soft, dry and lint-free cloth A glasses cleaning cloth is ideal
De laration of Conformity
If used as intended this product conforms to the basic standards of § 3 and the other relevant
provisions of the FTEG (Section 3 of the R&TTE directive) The declaration of conformity may be
requested here: conformity@digi-tech-gmbh com
Disposal of the ele troni applian e
This alarm clock may not be disposed of with normal household waste Dispose of the
alarm clock at an approved disposal facility or at your local recycling centre Please
observe the current rules and regulations when disposing of the appliance Contact the disposal
system if in doubt
Disposal of the batteries
Please dispose of your batteries properly in containers especially set up at retailers
Batteries do not belong in household waste Dispose of the batteries at an approved
disposal facility or at your local recycling centre Contact the disposal system if in doubt
digi-te h gmbh warranty
This alarm clock includes a 3 year warranty starting on the day of purchase In case of defects of this
alarm clock you have, by law, certain rights regarding the vendor of the alarm clock These rights
are not changed by the warranty which is described in the following paragraphs
Warranty onditions
The warranty duration starts on the date of purchase Please keep the original receipt in a safe place
The receipt is needed as a proof of purchase If a defect occurs in the alarm clock within 3 years, the
alarm clock will be repaired or replaced (according to our choice) free of charge This warranty
requires that, within the 3 year warranty period, the alarm clock and the receipt can be made
available to us along with a short written description of the defect and when it occured If the defect
is covered by the warranty, you will receive the repaired alarm clock or a new alarm clock Repair
or replacement does not cause the warranty period to restart

-
11
-
Warranty period and defe ts liability
The warranty period is not increased by the defect liability This also applies to repaired or replaced
parts If defects are noticed at the time of purchase they must be reported immediately upon
unpacking the item Paid repair may be available after the end of the warranty period
S ope of the warranty
The alarm clock was manufactured according to strict quality guidelines and was carefully inspected
before delivery The warranty does not include parts that experience normal wear and tear and can
thus be seen as wear parts or fragile parts that are damaged Examples include Switches, Batteries
or parts made of glass This warranty becomes void if the alarm clock is damaged, is not used in the
recommended way or is improperly repaired For proper use of the alarm clock all instructions in this
manual must be adhered to exactly Use of the alarm clock in a way that is discouraged in the
manual must be avoided The alarm clock not intended for commercial use Abusive or improper use,
excessive force and changes that are made by non-authorized repair centers will void the warranty
Warranty laim pro edure
To ensure that your call is processed in a fast and efficient manner please note the following
directions:
• Have your receipt (as proof of purchase) and the article number (270796) handy
• The article number can be found on the type label, an engraving, the front page of the manual
(bottom left) or a sticker on the back side or bottom side of the case
• In case defects occur, please first contact the service center (see below) by phone or email.
Visit www lidl-service com to download this and many other manuals, product videos and
software
Servi e
Name: Inter-Quartz GmbH
Street: Valterweg 27A
Town: Eppstein 65817
Country: Germany
Email: support@inter-quartz de
Telephone: +49 (0)6198 571825
00800 5515 6616 00800 5515 6616
00800 5515 6616 00800 5515 6616
0800 563862 00800 5515 6616
00800 5515 6616 00800 5515 6616
00800 5515 6616 00800 5515 6616
00800 5515 6616
IAN
270796
Art
-
Nr : 4
-
LD4146
Supplier
Please note that the following address is not a service address
Please first contact the service address (see above)
Name: digi-tech gmbh
Street: Valterweg 27A
Town: Eppstein 65817
Country: Germany

-
12
-
Utilisation et avertissements de sé urité
Sommaire
Sommaire
-
12
-
Introduction - 13 -
Utilisation conforme - 13 -
Contenu livré - 13 -
Données Techniques - 13 -
Consignes de sécurité importantes
Consignes de sécurité importantesConsignes de sécurité importantes
Consignes de sécurité importantes - 13 -
Installez votre réveil à un endroit sûr - 13 -
Utilisateur - 13 -
Piles - 13 -
Ecran et cases d‘affichage - 14 -
Mise en service - 14 -
Mauvaise réception du signal radio - 14 -
Réactiver la recherche du signal horaire - 14 -
Eclairage - 15 -
Affichage de la température - 15 -
Réglage rapide - 15 -
Réglage de base - 15 -
Alarme réveil - 15 -
Répétition de l‘alarme (SNOOZE) - 15 -
Conseil d’entretien - 15 -
Remarques sur conformité produit - 15 -
Evacuation des appareils électriques - 15 -
Mise au rebut des piles - 15 -
Garantie de digi-tech gmbh - 16 -
Conditions de la garantie - 16 -
Durée de la garantie et recours légaux en cas de défauts - 16 -
Couverture de la garantie - 16 -
Procédure dans un cas de garantie - 16 -
Service Après Vente - 17 -
Fournisseur - 17 -

-
13
-
RÉVEIL RADIOGUIDÉ
Introdu tion
Félicitations pour l’achat de votre nouveau réveil Vous avez fait le choix d’un appareil de haute
qualité La notice d’utilisation fait partie de ce réveil Elle contient des consignes importantes pour la
sécurité, l’utilisation et le traitement des déchets Vous devez d’abord vous familiariser avec toutes les
consignes d’utilisation et de sécurité avant d’utiliser votre réveil Veuillez utiliser votre réveil
uniquement comme décrit et dans les domaines d’application indiqués En cas de transmission à un
tiers, veuillez remettre tous les documents
Utilisation onforme
L’appareil est conçu pour l’affichage de l’heure et pour l’utilisation des fonctions supplémentaires
décrites Toute autre utilisation ou modification de l’appareil est considérée comme non-conforme Le
fabricant décline toute responsabilité pour des dommages, qui ont été occasionnés par un usage
non-conforme ou une utilisation incorrecte L’appareil n’est pas prévu pour une utilisation
commerciale
Contenu livré
Remarque : Veuillez vérifier le contenu livré après achat. Veuillez vous assurer que toutes les
pièces sont disponibles et ne sont pas défectueuses.
• Réveil
• 1x Pile 1,5 V AA R6/LR6
• Notice d‘utilisation
Données Te hniques
• Mouvement à quartz
• Moteur à pile 1,5 V AA R6/LR6
Installez votre réveil à un endroit sûr
Ce réveil n’a pas été conçu pour servir en milieu fortement humide (comme une salle de bains, par
ex ) Veillez bien à ce que :
• L’appareil ne soit pas posé sur un tapis épais ou un lit pendant son fonctionnement ;
• Aucune source directe de chaleur (ex Chauffages) ne puisse affecter l’appareil ;
• Aucun rayon direct du soleil n’atteigne l’appareil ;
• Tout contact avec des projections ou des gouttes d’eau soit évité (veuillez ne pas déposer d’objets
contenant des liquides, par ex des vases, sur ou à côté de l’appareil) ;
• L’appareil ne se trouve pas à proximité immédiate de champs magnétiques (ex hauts-parleurs) ;
• Aucun corps étranger ne s’infiltre ;
• Des bougies et d’autres flammes ouvertes soient toujours maintenues éloignées de l’appareil, pour
prévenir toute propagation de feu ;
Utilisateur
Cet appareil peut être utilisé par des personnes dont les capacités physiques, sensorielles ou
intellectuelles sont restreintes ou limitées par un manque d’expérience ou de connaissances (les
enfants à partir de 8 ans compris), si elles ont été placées sous la surveillance d’une personne ou si
elles ont reçu les instructions nécessaires à l’utilisation sûre de cet appareil et si elles sont en mesure
de comprendre les dangers possibles Les enfants ne doivent pas jouer avec cet appareil Le
nettoyage et l’entretien de l’appareil ne doivent pas être effectués par un enfant sans la surveillance
d’un adulte Eloignez également les enfants des films d’emballage, il y a danger d’étouffement
Piles
Conservez vos piles hors de portée de jeunes enfants En cas d’avalement d’une pile, il faut consulter
un médecin immédiatement Les piles/accus doit être mis dans le bon sens (respect des polarités)
Nettoyez les contacts des piles et appareils avant N’essayez pas de recharger des piles, de les
court-circuiter ou de les ouvrir Ne jetez jamais de piles dans le feu car il y a danger d’explosion Si
vous n’utilisez pas cet appareil pendant un certain temps, retirez-en les piles et conservez-le à un
endroit sec et à l’abri de la poussière En cas d‘utilisation mal appropriée des piles/accus, il y a
danger d’explosion et d’écoulement
Si une pile devait avoir coulé, évitez tout contact avec la peau, les yeux et les muqueuses Mettez
des gants En cas de contact avec l’acide des piles, rincez abondamment les parties touchées à
l’eau claire et consultez immédiatement un médecin Des piles usées doivent être retirées
immédiatement de l’appareil : danger d’écoulement accru
Consignes de sé urité importantes

-
14
-
E ran et ases d‘affi hage
1
Ecran
11
Secondes
2
Bouton SNOOZE/LIGHT (Répétition
Sonnerie/Eclairage) 12 Icône Tour radio
3
Bouton SET
13
Affichage de la température
4
Bouton ALARM
14
Affichage du jour de la
semaine
5 Bouton RCC 15
Affichage de la date, D=Jour,
M=Mois
6
Bouton DOWN
16
Alarm 2 (boutons 6 à 7)
7
Bouton UP
17
Alarm 1 (boutons 1 à 5)
8
Haut
-
parleur
18
Heure de l’alarme réveil
9
Compartiment à piles
19
Répétition sonnerie SNOOZE
10
Heure
20
Format horaire
Mise en servi e
Retirez le film de protection de l’écran de votre réveil Ouvrez le compartiment à piles au dos de
l‘appareil et mettez une pile R6/LR6 à 1,5V AA en en respectant la polarité Refermez le couvercle
La pile mise en place, la recherche du signal horaire est activé automatiquement, un signal
acoustique se fait entendre L’icône de radio-pilotage (la tour radio) clignote sur l‘écran La
recherche peut durer entre 3 et 10 mn
Remarque: Prière de ne pas bouger le réveil pendant la recherche du signal horaire.
Ce réveil synchronise le comptage interne de l’heure avec le signal radio horaire tous les jours entre
01:00 h et 04:00 h et à chaque heure pleine Si la recherche du signal horaire ne devait pas aboutir
à cette heure-là, le réveil activerait une nouvelle recherche à 05:00 h et 06:00 h Au cas où aucune
recherche n’aboutirait, mettez votre réveil à l’heure manuellement (voir Réglage de base)
Quand la recherche du signal horaire a abouti, la tour radio s’affiche en permanence sur l’écran
et l’heure, la date ainsi que le jour de la semaine s’affichent automatiquement Pendant l’heure
d’été, la mention DST s’affiche sur l’écran, à droite de la Tour radio
Mauvaise ré eption du signal radio
Le signal radio horaire DCF77 est envoyé par un émetteur situé dans la région de Francfort sur le
Main, son rayon de transmission est d’env 1500 km à partir de Francfort/Main Toutefois, certains
parasites peuvent perturber considérablement la bonne réception du signal
Pour le cas où votre horloge ne recevrait pas bien le signal DCF77, accrochez-la à un autre endroit
en tenant compte des perturbations possibles causées par le rayonnement électromagnétique
d’appareils comme ordinateurs, téléphone, postes de radio ou téléviseurs Les matériaux d’isolation
épais (éléments de construction métalliques), montagnes élevées ou perturbations atmosphériques
peuvent également nuire à la bonne réception du signal Procédez éventuellement à un changement
de piles
Réa tiver la re her he du signal horaire
Il est possible de réactiver manuellement la recherche du signal horaire en appuyant sur le bouton
RCC au dos du réveil et en le maintenant enfoncé 4 secondes
Si la recherche n’aboutit pas, mettez votre réveil à l’heure manuellement (voir Réglage de base)

-
15
-
E lairage
Pour activer provisoirement l’éclairage, appuyez sur le bouton SNOOZE/LIGHT en haut du réveil
Affi hage de la température
Appuyez sur SET pour choisir l‘unité de température en degrés Celsius (°C) ou Fahrenheit (°F)
Réglage rapide
Pour entrer des valeurs numériques, on pourra accélérer les réglages en maintenant les boutons
enfoncés (longue pression)
Réglage de base
Les réglages suivants peuvent être effectués: langue pour affichage du jour de la semaine, format en
12 ou 24 heures, date, heure et fuseau horaire
En mode d’affichage de l’heure normale, appuyez sur SET et maintenez enfoncé env 3 secondes
pour régler ces paramètres, deux lettres pour la langue d’affichage apparaissent en clignotant,
réglez avec les boutons UP ou DOWN Les langues disponibles sont: GE=allemand, EN=anglais,
IT=italien, FR=français, DU=néerlandais, SP=espagnol, HU=hongrois, SL=slovène Appuyez sur SET
pour confirmer votre réglage On réglera de la même manière le format horaire (12/24), l‘année,
le format de la date (M=mois, D=jour), le mois, le jour, les heures, les minutes et le fuseau horaire
Servez-vous de la fonction fuseau horaire pour utiliser votre réveil dans une zone horaire différente
de celle de votre pays Entrez dans ce cas la différence en heures entre votre fuseau horaire et celui
de l’autre pays Réinitialisez ensuite votre réveil
Alarme réveil
Ce réveil est équipé de 2 alarmes réglables séparément La première, Alarm 1 (boutons 1 à 5), est
programmée pour une partie de la semaine du lundi au vendredi, la seconde, Alarm 2 (boutons 6 à
7), pour le samedi et le dimanche
Pour accéder au mode de réglage de l’heure de réveil, appuyez sur le bouton ALARM et maintenez
enfoncé L’affichage des heures pour „Alarm 1” (1-5) clignote sur l’écran Pour régler, appuyez sur
UP ou DOWN et confirmez votre réglage par pression du bouton ALARM L’heure de réveil de
„Alarm 2” (6-7) est réglable de la même manière
Pour activer ou désactiver „Alarm 1” (1-5), appuyez sur le bouton UP en mode d’affichage de
l’heure normale
Pour activer ou désactiver „Alarm 2” (6-7), appuyez sur le bouton DOWN en mode d’affichage de
l’heure normale
Quand une des alarmes est active, une icône (petite clochette) apparaît sur l’écran
Répétition de l‘alarme (SNOOZE)
Appuyez sur SNOOZE/LIGHT en haut du réveil quand l’alarme se fait entendre L’écran s‘éclaire
provisoirement, les lettres z
z
et une clochette clignotent sur l‘écran, l’alarme est interrompue
provisoirement, elle reprendra 8 mn plus tard
Conseil d’entretien
Pour nettoyer votre réveil, utilisez seulement un chiffon sec ne faisant pas de peluches, comme ceux
utilisés pour nettoyer les verres de lunettes, par ex
Remarques sur onformité produit
Ce produit, manipulé de manière conforme aux prescriptions, satisfait entièrement aux exigences
fondamentales des Directives du § 3 et autres dispositions pertinentes du FTEG (art 3 du R&TTE)
Vous obtiendrez une déclaration de conformité en vous adressant sur internet à: conformity@digi-
tech-gmbh com
Eva uation des appareils éle triques
Cet appareil ne doit pas être évacué avec les déchets ménagers Veuillez faire évacuer
votre réveil par l’intermédiaire d’un prestataire agréé ou par votre décharge municipale
Respectez les directives d’évacuation en vigueur En cas de doute, demandez conseil auprès de
votre décharge municipale
Mise au rebut des piles
Veuillez vous débarrasser des piles dans les réceptacles prévus à cet effet dans le
commerce Les piles ne font pas partie des ordures ménagères courantes Veuillez vous
débarrasser des piles auprès d’une usine de traitement des déchets ou bien auprès de votre
déchetterie communale Veillez bien à respecter les consignes actuelles en cours de validité En cas
de doute, veuillez prendre contact avec votre déchetterie

-
16
-
Garantie de digi-te h gmbh
Vous recevez une garantie de 3 ans à partir de la date d’achat de cet appareil En cas de défauts
sur cet appareil, vous bénéficiez de recours légaux contre le vendeur du produit Ces droits légaux
ne sont pas limités par notre garantie décrite ci-après
Conditions de la garantie
La période de la garantie débute à la date d’achat Veuillez conserver précieusement le ticket de
caisse original Ce document est nécessaire comme preuve d’achat Si, pendant cette période de
trois ans à partir de la date d’achat de cet appareil, un défaut de matériel ou de fabrication devait
apparaître, l’appareil serait réparé par nous-mêmes ou bien remplacé gratuitement – selon notre
choix Cette prestation sous garantie implique que pendant la durée de trois ans, l’appareil
défectueux et le justificatif d’achat (ticket de caisse) soient présentés, et que soit précisé par écrit, où
se trouve le défaut et quand il est apparu Si le défaut est couvert par notre garantie, vous recevrez
un appareil réparé ou bien neuf en retour Après la réparation ou bien le remplacement du produit, il
n’y a pas de renouvellement de la durée de la garantie
Durée de la garantie et re ours légaux en as de défauts
La durée de la garantie n’est pas allongée suite à la prise en charge Cela vaut aussi pour les pièces
remplacées ou réparées Les dommages ou défauts éventuels apparus dès l’achat doivent être
notifiés dès le déballage Après expiration de la durée de la garantie, les réparations sont payantes
Couverture de la garantie
L’appareil a été fabriqué avec soin selon de strictes directives de qualité et a fait l’objet de tests
scrupuleux avant livraison La garantie couvre les défauts de matériel ou de fabrication Cette
garantie ne s’étend pas aux pièces qui sont soumises à une usure normale et qui peuvent donc être
considérées comme des pièces d’usure ou pour les détériorations sur les pièces fragiles, par ex
interrupteur, batteries ou les pièces qui sont en verre Cette garantie s’annule si l’appareil a été
endommagé, utilisé ou entretenu de façon non-conforme Pour une utilisation conforme du produit,
les consignes détaillées dans la notice d’utilisation doivent être respectées scrupuleusement Des
utilisations ou des manipulations, qui ont fait l’objet de contre-indications ou bien de mises en garde
dans la notice d’utilisation, doivent être absolument évitées L’appareil est destiné uniquement à un
usage privé et non à un usage commercial En cas de manipulation abusive et inadéquate, de
recours à la force et d’interventions qui n’ont pas été effectuées par notre succursale « Service
Après-Vente », la garantie disparaît
Pro édure dans un as de garantie
En vue de traiter votre demande le plus rapidement possible, nous vous prions de bien vouloir
observer les instructions suivantes:
• Tenez, pour toute demande, votre ticket de caisse et le numéro de l’article (270796) en tant que
preuve de votre achat à notre disposition
• Vous trouverez le numéro de l’article sur une plaque d’identification, dans une mention gravée,
dans le titre de votre mode d’emploi (en bas à gauche) ou sur une étiquette au dos de l’article ou
sous l’article
• Si vous deviez constater un défaut de fonctionnement ou un vice quelconque, veuillez contacter
d‘abord le SAV ci-après mentionné par par téléphone ou en envoyant un courriel (mail).
Vous pourrez télécharger ce mode d’emploi et beaucoup d’autres manuels d’utilisation
ainsi que des vidéos produits et logiciels sur ce site internet : www lidl-service com

-
17
-
Servi e Après Vente
Nom: Inter-Quartz GmbH
Rue: Valterweg 27A
Ville: Eppstein 65817
Pays: Allemagne
Courriel/Mail: support@inter-quartz de
Téléphone: +49 (0)6198 571825
00800 5515 6616 00800 5515 6616
00800 5515 6616 00800 5515 6616
0800 563862 00800 5515 6616
00800 5515 6616 00800 5515 6616
00800 5515 6616 00800 5515 6616
00800 5515 6616
IAN
270796
Art
-
Nr : 4
-
LD4146
Fournisseur
Veuillez noter que l’adresse suivante n’est pas une adresse de SAV Prière de contacter d’abord
l’adresse indiquée plus haut
Nom: digi-tech gmbh
Rue: Valterweg 27A
Ville: Eppstein 65817
Pays: Allemagne

-
18
-
Gebruiksaanwijzing en veiligheidstips
Inhoudsopgave
Inhoudsopgave
-
18
-
Introductie - 19 -
Beoogd gebruik - 19 -
Inhoud van het geleverde - 19 -
Technische specificaties - 19 -
Belangrijke veiligheidsinformatie
Belangrijke veiligheidsinformatieBelangrijke veiligheidsinformatie
Belangrijke veiligheidsinformatie - 19 -
De wekker veilig opstellen - 19 -
Gebruiker - 19 -
Batterijen - 19 -
Display und Bedieningsveld - 20 -
Ingebruikname - 20 -
Ontvangststoring - 20 -
Opnieuw starten - 20 -
Licht - 20 -
Temperatuur-weergave - 21 -
Snelle instelling - 21 -
Basis instelling - 21 -
Alarm - 21 -
Sluimerfunctie (SNOOZE) - 21 -
Onderhoud - 21 -
Heenwijs m b t konformiteit - 21 -
Het elektrische apparaat bij het afval doen - 21 -
De batterijen bij het afval doen - 21 -
Garantie door digi-tech gmbh - 21 -
Garantievoorwaarden - 21 -
Garantieperiode en wettelijke aanspraken bij gebreken - 22 -
Garantiedekking - 22 -
Afhandeling in geval van garantie - 22 -
Klantenservice - 22 -
Leverancier - 22 -
This manual suits for next models
1
Table of contents
Languages:
Other Auriol Clock Radio manuals

Auriol
Auriol 4-LD4166 Parts list manual

Auriol
Auriol Z30300 A User manual

Auriol
Auriol Z30237B User manual

Auriol
Auriol Z30237B User manual

Auriol
Auriol 4-LD3131 User manual

Auriol
Auriol IAN 88977 User manual

Auriol
Auriol Z31481A User manual

Auriol
Auriol Z31408A User manual

Auriol
Auriol z31163 User manual

Auriol
Auriol 4-LD4948 Parts list manual