Auriol 4-LD4948 Parts list manual

IAN
296172
OS
LCD
-
FUNKWECKER
/
LCD RADIO
-
CONTROLLED ALARM CLOCK
/
RÉVEIL LCD RADIOGUIDÉ · 11/2017 · Art.-Nr. 4-LD4948
LCD-FUNKWECKER
Bedienungs- und Sicherheitshinweise
LCD RADIO-CONTROLLED
ALARM CLOCK
Usage and safety instructions
RÉVEIL LCD RADIOGUIDÉ
Mode d'emploi
LCD-RADIOWEKKER
Gebruiksaanwijzing
LCD BUDÍK ŘÍZENÝ
RÁDIOVÝM SIGNÁLEM
Návod k obsluze a bezpečnostní
upozornění
DESPERTADOR
RADIOCONTROLADO LCD
Indicaciones sobre su utilización y su
seguridad
RÁDIO DESPERTADOR LCD
Avisos de utilização e segurança
Bedienungs- und Sicherheitshinweise ........................................ - 1 -
Usage and safety instructions ................................................................. - 8 -
Utilisation et avertissements de sécurité ................................................ - 14 -
Gebruiksaanwijzing en veiligheidstips ................................................. - 22 -
Návod k obsluze a bezpečnostní upozornění ............................................... - 29 -
Indicaciones sobre su utilización y su seguridad............................................ - 36 -
Avisos de utilização e segurança ..................................................................... - 43 -

-
1
-
Bedie u gs- u d Sicherheitshi weise
I haltsverzeich is
Inhaltsverzeichnis .................................................................................................................. - 1 -
Einleitung ................................................................................................................................ - 2 -
Bestimmungsgemäße Verwendung ..................................................................................... - 2 -
Lieferumfang .......................................................................................................................... - 2 -
Technische Daten .................................................................................................................. - 2 -
Allgemeine Sicherheitshinweise für Benutzer
Allgemeine Sicherheitshinweise für BenutzerAllgemeine Sicherheitshinweise für Benutzer
Allgemeine Sicherheitshinweise für Benutzer ................................................................ - 2 -
Sicherheitshinweise zu den Batterien
Sicherheitshinweise zu den BatterienSicherheitshinweise zu den Batterien
Sicherheitshinweise zu den Batterien .............................................................................. - 2 -
Den Wecker sicher aufstellen ...................................................................................... - 3 -
Display und Bedienfelder ..................................................................................................... - 3 -
Inbetriebnahme ..................................................................................................................... - 3 -
Zeitzonenanpassung ............................................................................................................ - 4 -
Neustart ................................................................................................................................. - 4 -
Empfangsstörung ................................................................................................................... - 4 -
Licht ......................................................................................................................................... - 4 -
Temperaturanzeige ............................................................................................................... - 4 -
Schnelleinstellung .................................................................................................................. - 4 -
Grundeinstellung ................................................................................................................... - 4 -
Weckalarm ............................................................................................................................ - 5 -
Schlummerfunktion (SNOOZE) ........................................................................................... - 5 -
Reinigungshinweis ................................................................................................................. - 5 -
Vereinfachte EU-Konformitätserklärung ............................................................................. - 5 -
Entsorgung des Elektrogeräts............................................................................................... - 5 -
Entsorgung der Batterien ...................................................................................................... - 5 -
Garantie der digi-tech gmbh ............................................................................................... - 5 -
Garantiebedingungen .......................................................................................................... - 6 -
Garantiezeit und gesetzliche Mängelansprüche .............................................................. - 6 -
Garantieumfang .................................................................................................................... - 6 -
Abwicklung im Garantiefall ................................................................................................. - 6 -
Service.................................................................................................................................... - 7 -
Lieferant .................................................................................................................................. - 7 -
-
2
-
LCD-FUNKWECKER
Ei leitu g
Herzlichen Glückwunsch zum Kauf Ihres neuen Weckers. Sie haben sich damit für ein
hochwertiges Gerät entschieden. Die Bedienungsanleitung ist Bestandteil dieses
Weckers. Sie enthält wichtige Hinweise für Sicherheit, Gebrauch und Entsorgung.
Machen Sie sich vor der Benutzung des Weckers mit allen Bedien- und
Sicherheitshinweisen vertraut. Benutzen Sie den Wecker nur wie beschrieben und für die
angegebenen Einsatzbereiche. Händigen Sie alle Unterlagen bei Weitergabe des
Weckers an Dritte mit aus. Die Verpackung und Bedienungsanleitung für spätere
Rückfragen bitte aufbewahren.
Bestimmu gsgemäße Verwe du g
Das Gerät ist zur Zeitanzeige und zur Verwendung der beschriebenen Zusatzfunktionen
geeignet. Jede andere Verwendung oder Veränderung des Gerätes gilt als nicht
bestimmungsgemäß. Der Hersteller haftet nicht für Schäden, die durch nicht
bestimmungsgemäßen Gebrauch oder falsche Bedienung verursacht werden.
Das Gerät ist nicht für den gewerblichen Einsatz vorgesehen.
Lieferumfa g
Hinweis: Bitte überprüfen Sie nach dem Kauf den Lieferumfang. Stellen Sie sicher, dass
alle Teile vorhanden und nicht defe t sind.
Wecker
1x Batterie 1,5 V AA R6/LR6
Bedienungsanleitung
Tech ische Date
Quarzwerk
Betrieb mit einer 1,5 V AA R6/LR6 Batterie
- Kennzeichen für Gleichstrom
Allgemei e Sicherheitshi weise für Be utzer
WARNUNG ! VERLETZUNGSGEFAHR!
Dieses Gerät kann von Personen (einschließlich Kindern ab 8 Jahren) mit verringerten
physischen, sensorischen oder mentalen Fähigkeiten oder Mangel an Erfahrung und
Wissen benutzt werden, wenn sie beaufsichtigt oder bezüglich des sicheren Gebrauchs
des Geräts unterwiesen wurden und die daraus resultierenden Gefahren verstehen.
Kinder dürfen nicht mit dem Gerät spielen. Reinigung und Benutzer-Wartung dürfen
nicht von Kindern ohne Beaufsichtigung durchgeführt werden. Halten Sie auch die
Verpackungsfolien von Kindern fern. Es besteht Erstickungsgefahr.
Sicherheitshi weise zu de Batterie
WARNUNG !
GESUNDHEITSGEFAHR!
EXPLOSIONSGEFAHR!
Bewahren Sie Batterien für Klein inder unerreichbar auf. Wurde eine Batterie
verschluckt, muss sofort medizinische Hilfe in Anspruch genommen werden.
Batterien/Akkus müssen stets polrichtig eingelegt werden. Reinigen Sie Batterie- und
Gerätekontakte zuvor bei Bedarf. Versuchen Sie nicht, Batterien wieder aufzuladen,
kurzzuschließen oder zu öffnen. Werfen Sie niemals Batterien ins Feuer, da diese
explodieren können. Wenn Sie das Gerät längere Zeit nicht benutzen, entnehmen Sie

-
3
-
die Batterie und verstauen Sie das Gerät an einem trockenen und staubfreien Ort. Bei
unsachgemäßem Gebrauch der Batterie besteht Explosions- und Auslaufgefahr.
Sollte die Batterie doch einmal ausgelaufen sein, vermeiden Sie Kontakt mit Haut, Augen
und Schleimhäuten. Benutzen Sie Handschuhe. Bei Kontakt mit Batteriesäure die
betroffenen Stellen mit reichlich klarem Wasser spülen und umgehend einen Arzt
aufsuchen. Entfernen Sie erschöpfte Batterien umgehend aus dem Gerät, es besteht
erhöhte Auslaufgefahr.
Den Wec er sicher aufstellen
Er ist nicht für den Betrieb in Räumen mit hoher Luftfeuchtigkeit (z.B. Badezimmer)
ausgelegt. Achten Sie darauf, dass
das Gerät beim Betrieb nicht auf einem dicken Teppich oder Bett aufgestellt wird
keine direkten Wärmequellen (z.B. Heizungen) auf das Gerät wirken;
kein direktes Sonnenlicht auf das Gerät trifft;
der Kontakt mit Spritz- und Tropfwasser vermieden wird (stellen Sie keine mit
Flüssigkeiten gefüllten Gegenstände, z.B. Vasen, auf oder neben das Gerät);
das Gerät nicht in unmittelbarer Nähe von Magnetfeldern (z.B. Lautsprechern) steht;
keine Fremdkörper eindringen
Kerzen und andere offene Flammen zu jeder Zeit von diesem Produkt ferngehalten
werden müssen, um das Ausbreiten von Feuer zu verhindern.
Display u d Bedie felder
1
Display
14
SET
2
SNOOZE/LIGHT
15
ALARM
3
Uhrzeit
16
RCC
4
Sekunden
17
DOWN
5
Funkturm / DST
18
UP
6
Temperaturanzeige
19
Lautsprecher
7
Wochentagsanzeige
20
Batteriefach
8
Datumsanzeige, D=Tag, M=Monat
9
Alarm 2 (6
-
7)
10
Alarm 1 (1
-
5)
11
Alarmzeit
12
Snoozeanzeige
13
Stundenformat
I betrieb ahme
Ziehen Sie die Schutzfolie vom Display des Weckers ab. Öffnen Sie das Batteriefach 20
auf der Rückseite des Gerätes und setzen Sie eine 1,5V AA R6/LR6 Batterie polrichtig
ein. Schließen Sie das Batteriefach 20.
-
4
-
Nach dem Einsetzen der Batterie startet automatisch der Empfang des Funksignals, es
ertönt ein Signalton. Der Funkturm 5 blinkt im Display. Dieser Vorgang kann 3-10
Minuten dauern.
Hinweis: Bitte bewegen Sie den Wec er während des Empfangsvorgangs nicht.
Der Wecker synchronisiert die interne Uhrzeit täglich von 01 00 bis 04 00 zu jeder
vollen Stunde. Sollte der Empfangsversuch nicht erfolgreich sein, wird er um 05 00 und
06 00 wiederholt. Wenn der Empfang des Zeitsignals erfolglos bleibt, stellen Sie die
Zeit manuell ein (siehe Grundeinstellung).
Bei erfolgreichem Empfang erscheint der Funkturm 5 permanent und es stellen sich
automatisch die Uhrzeit, Datum und Wochentag ein. Während der Sommerzeit erscheint
DST auf dem Display rechts neben dem Funkturm.
Zeitzo e a passu g
Befinden Sie sich in einem Land in dem die aktuelle Uhrzeit trotz DCF77-Signal
abweicht, nutzen Sie die Zeitzonenanpassung, um Ihren Wecker in einer anderen
Zeitzone als der Standardeinstellung (UTC + 1 = Mitteleuropäische Zeit) zu verwenden.
Stellen Sie die Differenz in Stunden (z. B. -01) zur gewünschten Zeitzone ein.
Drücken und halten Sie SET 14 in der Normalzeitanzeige ca. 3 Sekunden, die Sprache
der Wochentagsanzeige blinkt. Drücken Sie 8 x SET 14, es blinkt nun die Zeitzone (00)
und kann mit UP 18 oder DOWN 17 eingestellt werden. Bestätigen Sie Ihre Eingabe
durch drücken auf SET 14.
Führen Sie anschließend einen Neustart durch. Ihr Wecker empfängt weiterhin das
DCF77-Funksignal, zeigt aber die geänderte Uhrzeit (z. B. 1 Stunde weniger) an.
Neustart
Sie können manuell einen Neustart des Funkempfangs starten, indem Sie RCC 16 auf der
Rückseite des Weckers 4 Sekunden gedrückt halten. Der Funkturm 5 blinkt im Display.
Dieser Vorgang kann 3-10 Minuten dauern.
War der Funkempfang erfolglos, muss die Uhrzeit manuell eingestellt werden (siehe
Grundeinstellung).
Empfa gsstöru g
Das DCF77 Funksignal wird aus der Nähe von Frankfurt am Main gesendet und kann bis
zu ca. 1500 km im Radius um Frankfurt am Main empfangen werden. Allerdings gibt es
einige Störquellen, die den Empfang erheblich behindern können. Falls Ihr Funkwecker
das Funksignal nicht richtig empfängt, hängen oder stellen Sie den Funkwecker an einem
anderen Platz auf und beachten Sie, dass es in der Nähe vom Computer, Telefon, Radio
und TV zu elektromagnetischen Strahlungen kommen kann, die den Empfang des DCF77
Funksignals stören können. Weitere Störquellen für den Empfang des Funksignals können
starke Gebäudedämmungen (metallische Bauelemente), hohe Berge oder
atmosphärische Störungen sein. Ersetzen Sie ggf. die Batterien.
Licht
Drücken Sie SNOOZE/LIGHT 2 oben auf dem Wecker, um die Beleuchtung kurzzeitig
zu aktivieren.
Temperatura zeige
Drücken Sie SET 14, um die Temperatureinheit Celsius (°C) oder Fahrenheit (°F) zu
wählen.
Sch ellei stellu g
Bei der Einstellung von numerischen Werten können Sie durch Drücken und Halten der
jeweiligen Tasten die Schnelleinstellung verwenden.
Gru dei stellu g
Sie können folgende Einstellungen vornehmen Sprache der Wochentagsanzeige,
12/24- Stunden Zeitformat, Datum, Zeit und Zeitzone.

-
5
-
Drücken und halten Sie SET 14 in der Normalzeitanzeige ca. 3 Sekunden, die Sprache
der Wochentagsanzeige blinkt und kann mit UP 18 oder DOWN 17 eingestellt werden.
Es stehen folgende Sprachen zur Auswahl GE=deutsch, EN=englisch, IT=italienisch,
FR=französisch, DU=niederländisch, SP=spanisch, HU=ungarisch, SL=slowenisch.
Drücken Sie die SET-Taste 14 um die Einstellung zu bestätigen. Stellen Sie auf die
gleiche Weise das 12/24-Stunden Zeitformat, das Jahr, das Datumsformat (M=Monat,
D=Tag), den Monat, den Tag, die Stunden, die Minuten und die Zeitzone ein.
Weckalarm
Der Wecker verfügt über 2 separat einstellbare Weckzeiten.
Alarm 1-(1-5) ist für die Tage von Montag bis Freitag.
Alarm 2 -(6-7) ist für Samstag und Sonntag.
Drücken und halten Sie die ALARM-Taste 15, um in den Einstellungsmodus der Weckzeit
zu wechseln. Die Stundenanzeige von Alarm 1-(1-5) blinkt auf dem Display. Drücken Sie
zum Einstellen UP 18 oder DOWN 17 und bestätigen Sie die Einstellung durch Druck
auf die ALARM-Taste 15. Stellen Sie auf die gleiche Weise die Minuten und die
Weckzeit des zweiten Alarms 2 -(6-7) ein.
Drücken Sie in der Normalzeitanzeige die UP-Taste 18 um den Alarm 1-(1-5) 17 ein-
bzw. auszuschalten.
Drücken Sie in der Normalzeitanzeige die DOWN-Taste 17 um den Alarm 2 -(6-7) 16
ein- bzw. auszuschalten.
Bei eingeschaltetem Alarm erscheint das Glockensymbol.
Der Alarm ertönt zur eingestellten Zeit und erhöht 3 x alle 10 Sekunden seine Frequenz.
Wird der Alarm nicht ausgeschaltet, schaltet er sich selbständig nach 5 Minuten ab.
Schlummerfu ktio (SNOOZE)
Drücken Sie bei Ertönen des Alarms SNOOZE/LIGHT 2 oben auf dem Gehäuse. Die
Beleuchtung ist kurzzeitig aktiviert, es blinken z
z
19 und das Glockensymbol im Display,
der Alarm wird vorübergehend deaktiviert und ertönt nach ca. 8 Minuten erneut.
Rei igu gshi weis
Reinigen Sie den Wecker nur mit einem trockenen, fusselfreien Tuch, wie es z.B. zur
Reinigung von Brillengläsern verwendet wird.
Verei fachte EU-Ko formitätserkläru g
Hiermit erklärt digi-tech gmbh, dass der Funk-Wecker 4-LD4948 den Richtlinien R&TTE
1999/5/EC und RED 2014/53/EU entspricht. Der vollständige Text der EU-
Konformitätserklärung ist unter der folgenden Internetadresse verfügbar
http //www.digi-tech-gmbh.com/ce/296172_WE.pdf
E tsorgu g des Elektrogeräts
Dieser Wecker darf nicht im normalen Hausmüll entsorgt werden. Entsorgen Sie
den Wecker über einen zugelassenen Entsorgungsbetrieb oder über Ihre
kommunale Entsorgungseinrichtung. Beachten Sie die aktuell geltenden Vorschriften.
Setzen Sie sich im Zweifelsfall mit Ihrer Entsorgungseinrichtung in Verbindung.
E tsorgu g der Batterie
Bitte entsorgen Sie Ihre Batterien sachgerecht in extra hierfür aufgestellten
Gefäßen im Handel. Batterien gehören nicht in den Hausmüll. Entsorgen Sie
Batterien bitte über einen zugelassenen Entsorgungsbetrieb oder über Ihre kommunale
Entsorgungseinrichtung. Beachten Sie die aktuell geltenden Vorschriften. Setzen Sie sich
im Zweifelsfall mit Ihrer Entsorgungseinrichtung in Verbindung.
Gara tie der digi-tech gmbh
Sie erhalten auf dieses Gerät 3 Jahre Garantie ab Kaufdatum. Im Falle von Mängeln
dieses Produkts stehen Ihnen gegen den Verkäufer des Produkts gesetzliche Rechte zu.
Diese gesetzlichen Rechte werden durch unsere im Folgenden dargestellte Garantie nicht
eingeschränkt.
-
6
-
Gara tiebedi gu ge
Die Garantiefrist beginnt mit dem Kaufdatum. Bitte bewahren Sie den Kassenbon gut auf.
Diese Unterlage wird als Nachweis für den Kauf benötigt. Tritt innerhalb von drei Jahren
ab dem Kaufdatum dieses Produkts ein Material- oder Fabrikationsfehler auf, wird das
Produkt von uns – nach unserer Wahl – für Sie kostenlos repariert oder ersetzt. Diese
Garantieleistung setzt voraus, dass innerhalb der Drei-Jahres-Frist das defekte Gerät und
der Kaufbeleg (Kassenbon) vorgelegt und schriftlich kurz beschrieben wird, worin der
Mangel besteht und wann er aufgetreten ist. Wenn der Defekt von unserer Garantie
gedeckt ist, erhalten Sie das reparierte oder ein neues Produkt zurück. Mit Reparatur
oder Austausch des Produkts beginnt kein neuer Garantiezeitraum.
Gara tiezeit u d gesetzliche Mä gela sprüche
Die Garantiezeit wird durch die Gewährleistung nicht verlängert. Dies gilt auch für
ersetzte und reparierte Teile. Eventuell schon beim Kauf vorhandene Schäden und
Mängel müssen sofort nach dem Auspacken gemeldet werden. Nach Ablauf der
Garantiezeit anfallende Reparaturen sind kostenpflichtig.
Gara tieumfa g
Das Gerät wurde nach strengen Qualitätsrichtlinien sorgfältig produziert und vor
Anlieferung gewissenhaft geprüft. Die Garantieleistung gilt für Material- oder
Fabrikationsfehler. Diese Garantie erstreckt sich nicht auf Produktteile, die normaler
Abnutzung ausgesetzt sind und daher als Verschleißteile angesehen werden können
oder für Beschädigungen an zerbrechlichen Teilen, z. B. Schalter, Akkus oder die aus
Glas gefertigt sind. Diese Garantie verfällt, wenn das Produkt beschädigt, nicht
sachgemäß benutzt oder gewartet wurde. Für eine sachgemäße Benutzung des Produkts
sind alle in der Bedienungsanleitung aufgeführten Anweisungen genau einzuhalten.
Verwendungszwecke und Handlungen, von denen in der Bedienungsanleitung
abgeraten oder vor denen gewarnt wird, sind unbedingt zu vermeiden.
Das Produkt ist lediglich für den privaten und nicht für den gewerblichen Gebrauch
bestimmt. Bei missbräuchlicher und unsachgemäßer Behandlung, Gewaltanwendung
und bei Eingriffen, die nicht von unserer autorisierten Service-Niederlassung
vorgenommen wurden, erlischt die Garantie.
Abwicklu g im Gara tiefall
Um eine schnelle Bearbeitung Ihres Anliegens zu gewährleisten, folgen Sie bitte den
folgenden Hinweisen
Bitte halten sie für alle Anfragen den Kassenbon und die Artikelnummer (IAN
296172) als Nachweis für den Kauf bereit.
Die Artikelnummer entnehmen Sie bitte dem Typenschild, einer Gravur, auf dem
Titelblatt Ihrer Anleitung (unten links) oder als Aufkleber auf der Rück- oder Unterseite.
Sollten Funktionsfehler oder sonstige Mängel auftreten, onta tieren Sie zunächst die
nachfolgende Serviceabteilung telefonisch oder per E-Mail.
Ein als defekt erfasstes Produkt können sie dann unter Beifügung des Kaufbelegs
(Kassenbon) und der Angabe, worin der Mangel besteht und wann er aufgetreten ist,
für Sie portofrei an die Ihnen mitgeteilte Service-Anschrift übersenden.
Auf www.lidl-service.com können Sie diese Anleitung und viele weitere
Handbücher, Produktvideos und Software herunterladen.

-
7
-
Service
Name Inter-Quartz GmbH
Str. Valterweg 27A
Stadt DE-65817 Eppstein
Land DEUTSCHLAND
E-Mail support@inter-quartz.de
Telefon +49 (0)6198 571825
00800 5515 6616
00800 5515 6616 00800 5515 6616
00800 5515 6616 00800 5515 6616
0800 563862 800 142 315
00800 5515 6616 00800 5515 6616
00800 5515 6616 00800 5515 6616
IAN
296172
Art.
-
Nr.
4
-
LD4948
Liefera t
Bitte beachten Sie, dass die folgende Anschrift keine Serviceanschrift ist. Kontaktieren Sie
zunächst die oben benannte Servicestelle.
Name digi-tech gmbh
Str. Valterweg 27A
Stadt DE-65817 Eppstein
Land DEUTSCHLAND
-
8
-
Usage a d safety i structio s
Table of co te ts
Table of contents ................................................................................................................... - 8 -
Preliminary note ..................................................................................................................... - 9 -
Intended use .......................................................................................................................... - 9 -
Scope of delivery .................................................................................................................. - 9 -
Technical specifications ........................................................................................................ - 9 -
Important safety information for users
Important safety information for usersImportant safety information for users
Important safety information for users ............................................................................ - 9 -
Important safety information for the batteries
Important safety information for the batteriesImportant safety information for the batteries
Important safety information for the batteries ............................................................... - 9 -
Set up the alarm clock safely ..................................................................................... - 10 -
Display and controls ........................................................................................................... - 10 -
Setup .................................................................................................................................... - 10 -
Time zone adjustment ......................................................................................................... - 11 -
Restarting radio reception .................................................................................................. - 11 -
Reception problems ............................................................................................................ - 11 -
Light ...................................................................................................................................... - 11 -
Temperature display ........................................................................................................... - 11 -
Speed setting ....................................................................................................................... - 11 -
Basic settings........................................................................................................................ - 11 -
Alarm .................................................................................................................................... - 12 -
Snooze ................................................................................................................................. - 12 -
Cleaning instructions ........................................................................................................... - 12 -
Simplified EU declaration of conformity ........................................................................... - 12 -
Disposal of the electronic appliance ................................................................................. - 12 -
Disposal of the batteries ..................................................................................................... - 12 -
digi-tech gmbh warranty .................................................................................................... - 12 -
Warranty conditions ........................................................................................................... - 12 -
Warranty period and defects liability ............................................................................... - 12 -
Scope of the warranty ........................................................................................................ - 13 -
Warranty claim procedure ................................................................................................ - 13 -
Service.................................................................................................................................. - 13 -
Supplier ................................................................................................................................ - 13 -

-
9
-
LCD RADIO-CONTROLLED ALARM CLOCK
Prelimi ary ote
Congratulations on the purchase of your new alarm clock. You have chosen a high
quality appliance. The manual is part of the appliance. It contains important safety,
usage and disposal information. Please read all usage and safety instructions before
using the appliance. Please only use the appliance as described and for the described
uses. If you sell or give this alarm clock to someone else it is very important to also
include this manual. Please keep the packaging and the instruction manual for future
reference.
I te ded use
This electronic device is intended for time display and the described additional features.
Any other use or modification of the electronic device does not comply with the intended
uses. The manufacturer is not liable for damages caused by improper use or misuse. The
device is not intended for commercial use.
Scope of delivery
Please note: Chec the scope of delivery after purchase. Please ensure that all parts
are included and undamaged.
Alarm clock
1x battery 1,5 V AA R6/LR6
instruction manual
Tech ical specificatio s
Quartz movement
Operates with 1,5 V AA R6/LR6 battery
- Symbol for direct current
Importa t safety i formatio for users
WARNING! RISK OF INJURY!
This device may be used by persons (including children over 8 years of age) with
reduced physical, sensory or mental abilities or lack of experience and knowledge, if
they are supervised or instructed regarding the safe use of the device and understand the
dangers that may arise. Children may not play with the device. Cleaning and user
maintenance of the device may not be performed by children without supervision. Keep
packaging films out of the hands of children. There is a danger of suffocation.
Importa t safety i formatio for the batteries
WARNING!
HEALTH HAZARD!
RISK OF EXPLOSION!
Keep batteries out of reach of small children. If a battery is swallowed, you must seek
medical attention immediately. Batteries/rechargeable batteries must always be inserted
in the correct polarity. If necessary, clean the battery and device contacts. Never attempt
to recharge non-rechargeable batteries. Never short-circuit or attempt to open batteries.
Never throw batteries into fire as they may explode.
If the device will not be used for an extended time period, remove the battery and store
the device in a dry and dust-free area. Improper use of the battery can lead to explosion
or leakage.
If the battery leaks, avoid contact with skin, eyes and mucous membranes. Use gloves. If
you are exposed to battery acid, rinse the affected areas with plenty of clean water and
-
10
-
immediately seek medical attention. Remove discharged batteries from the device as they
present an increased risk of leakage.
Set up the alarm cloc safely
The alarm clock is not intended for use in rooms with high humidity (example bath room).
Make sure that
the device isn’t placed on a thick carpet or bed during operation ;
no direct heat sources (i.e. radiators) influence the device;
no direct sunlight reaches the device;
contact with splashing or dripping water must be avoided (don’t place any items filled
with liquids, i.e. vases, onto or next to the device);
the device doesn’t stand near magnetic fields (i.e. speakers);
candles and other open flames must be kept away from this product at all times to
prevent the spread of fire
no foreign objects penetrate the housing.
Display a d co trols
1
Display
14
SET
2
SNOOZE/LIGHT
15
ALARM
3
Time
16
RCC
4
Seconds
17
DOWN
5
Radio tower indicator
18
UP
6
Temperature indicator
19
Buzzer
7
Day of the week
indicator
20
Battery compartment
8
Date indicator, D=day, M=month
9
Alarm 2 (6
-
7)
10
Alarm 1 (1
-
5)
11
Alarm time
12
Snooze indicator
13
PM indicator for 12
-
hour time format
Setup
Remove the protective film from the display of the alarm clock. Open the battery
compartment 20 on the backside of the device and insert a 1.5V AA R6/LR6 battery in
the correct polarity. Close the battery compartment 20.
Radio time signal reception starts automatically after inserting the battery and the alarm
clock will beep once. The radio tower indicator 5 will blink on the display. This
process can take 3-10 minutes.
Note: Please do not move the alarm cloc during the reception process.

-
11
-
The alarm clock synchronizes the internal clock every day from 01 00 to 04 00 on each
full hour. If reception is unsuccessful, the clock will reattempt reception at 05 00 and
06 00. Please set the time manually, if reception fails (see "Basic settings").
If reception is successful, the radio tower indicator 5 appears permanently on the
display and the time, date and day of the week are set automatically. During daylight
saving time, DST appears on the display next to the radio tower indicator.
Time zo e adjustme t
If you are in a country, in which the clock displays the wrong time even though it can
receive the time signal, please use the time zone adjustment to use your alarm clock in a
time zone other than the standard time zone (UTC+1 = Central European Time). Set the
difference in hours (- 01 for example) to the desired time zone.
Press and hold SET 14 for 3 seconds in normal time display mode, the language of the
day of the week display will blink. Press SET 14 8 times to reach the time zone (00), then
press UP 18 or DOWN 17 to set the time zone. Confirm your setting by pressing SET 14.
Restart radio reception after changing this setting. Your clock receives the DCF77 time
signal but will show the adjusted time (1 hour less for example).
Restarti g radio receptio
Press and hold RCC 16 on the backside of the alarm clock for 4 seconds to restart radio
time signal reception. Please set the time manually if reception fails (see "Basic settings").
The radio tower indicator 5 will blink on the display. This process can take 3-10
minutes.
Receptio problems
The DCF77 radio signal is transmitted from a location near Frankfurt am Main and can
be received within a radius of approximately 1500 km around Frankfurt am Main.
However, there are some obstacles and sources of interference, which may substantially
hinder reception. If your alarm clock does not correctly receive the DCF77 radio signal,
please hang or place the alarm clock a different location at your site. Please note that
devices such as computers, telephones, radios and televisions may cause
electromagnetic radiation which can interfere with the DCF77 signal reception. Other
possible detriments to reception are strong building insulation (metal building materials),
nearby mountains or atmospheric interference. It may also be necessary to replace the
batteries.
Light
Press SNOOZE/LIGHT 2 the case downward from above to briefly activate the
backlight.
Temperature display
Press SET 14 to select the temperature unit Celsius (°C) or Fahrenheit (°F).
Speed setti g
Press and hold buttons when setting numerical values to use the speed setting feature.
Basic setti gs
The following settings are adjustable Language of the day of the week, 12/24-hour
time format, date, time and time zone.
Press and hold SET 14 for 3 seconds in normal time display mode. The language of the
day of the week will blink on the display. Set the language by pressing UP 18 or
DOWN 17. The following languages are selectable GE=German, EN=English,
IT=Italian, FR=French, DU=Dutch, SP=Spanish, HU=Hungarian, SL=Slovenian. Press
SET 14 to confirm your setting. Set the12/24-hour time format, the year, the date format
(M=month, D=date), the month, the day, the hours, the minutes and the time zone
adjustment in the same way.
-
12
-
Alarm
The alarm has 2 separate adjustable alarm times. Use Alarm 1 (1-5) for Monday to
Friday. Use Alarm 2 (6-7) for Saturday and Sunday.
Press and hold ALARM15 to enter alarm time setting mode. The hour display for alarm 1
(1-5) will blink on the display. Press UP 18 or DOWN 17 to set the hour and confirm
your setting by pressing ALARM 15. Set the minutes for alarm 1 and the hours and
minutes for alarm 2 (6-7) in the same way.
Press UP 18 in normal time display mode to activate or deactivate alarm 1 (1-5).
Press DOWN 17 in normal time display mode to activate or deactivate alarm 2 (6-7).
The bell symbol will appear if the alarm is activated.
S ooze
Press SNOOZE/LIGHT 2 on the top of the case to use the snooze feature. The light
activates briefly, z
z
and the bell symbol blink on the display. The alarm sound will stop for
about 8 minutes and then restart.
Clea i g i structio s
Clean the alarm clock with a soft, dry and lint-free cloth. A glasses cleaning cloth is ideal.
Simplified EU declaratio of co formity
Hereby, digi-tech gmbh declares that the radio equipment type 4-LD4948 is in
compliance with Directive 2014/53/EU. The full text of the EU declaration of conformity
is available at the following internet address
http //www.digi-tech-gmbh.com/ce/296172_WE.pdf
Disposal of the electro ic applia ce
This alarm clock may not be disposed of with normal household waste. Dispose
of the alarm clock at an approved disposal facility or at your local recycling
centre. Please observe the current rules and regulations when disposing of the appliance.
Contact the disposal system if in doubt.
Disposal of the batteries
Please dispose of your batteries properly in containers especially set up at
retailers. Batteries do not belong in household waste. Dispose of the batteries at
an approved disposal facility or at your local recycling centre. Contact the disposal
system if in doubt.
digi-tech gmbh warra ty
This alarm clock includes a 3 year warranty starting on the day of purchase. In case of
defects of this alarm clock you have, by law, certain rights regarding the vendor of the
alarm clock. These rights are not changed by the warranty which is described in the
following paragraphs.
Warra ty co ditio s
The warranty duration starts on the date of purchase. Please keep the original receipt in a
safe place. The receipt is needed as a proof of purchase. If a defect occurs in the alarm
clock within 3 years, the alarm clock will be repaired or replaced (according to our
choice) free of charge. This warranty requires that, within the 3 year warranty period, the
alarm clock and the receipt can be made available to us along with a short written
description of the defect and when it occured. If the defect is covered by the warranty,
you will receive the repaired alarm clock or a new alarm clock. Repair or replacement
does not cause the warranty period to restart.
Warra ty period a d defects liability
The warranty period is not increased by the defect liability. This also applies to repaired
or replaced parts. If defects are noticed at the time of purchase they must be reported
immediately upon unpacking the item. Paid repair may be available after the end of the
warranty period.

-
13
-
Scope of the warra ty
The alarm clock was manufactured according to strict quality guidelines and was
carefully inspected before delivery. The warranty does not include parts that experience
normal wear and tear and can thus be seen as wear parts or fragile parts that are
damaged. Examples include Switches, Batteries or parts made of glass. This warranty
becomes void if the alarm clock is damaged, is not used in the recommended way or is
improperly repaired. For proper use of the alarm clock all instructions in this manual must
be adhered to exactly. Use of the alarm clock in a way that is discouraged in the manual
must be avoided. The alarm clock not intended for commercial use. Abusive or improper
use, excessive force and changes that are made by non-authorized repair centers will
void the warranty.
Warra ty claim procedure
To ensure that your call is processed in a fast and efficient manner please note the
following directions
Have your receipt (as proof of purchase) and the article number (296172) handy.
The article number can be found on the type label, an engraving, the front page of the
manual (bottom left) or a sticker on the back side or bottom side of the case.
In case defects occur, please first contact the service center (see below) by phone or
email.
Visit www.lidl-service.com to download this and many other manuals,
product videos and software.
Service
Name Inter-Quartz GmbH
Street Valterweg 27A
Town DE-65817 Eppstein
Country GERMANY
Email support@inter-quartz.de
Telephone +49 (0)6198 571825
00800 5515 6616
00800 5515 6616 00800 5515 6616
00800 5515 6616 00800 5515 6616
0800 563862 800 142 315
00800 5515 6616 00800 5515 6616
00800 5515 6616 00800 5515 6616
IAN
296172
Art.
-
Nr.
4
-
LD4948
Supplier
Please note that the following address is not a service address.
Please first contact the service address (see above).
Name digi-tech gmbh
Street Valterweg 27A
Town DE-65817 Eppstein
Country GERMANY
-
14
-
Utilisatio et avertisseme ts de sécurité
Sommaire
Sommaire ............................................................................................................................. - 14 -
Introduction .......................................................................................................................... - 15 -
Utilisation conforme ............................................................................................................ - 15 -
Contenu livré ....................................................................................................................... - 15 -
Données Techniques ........................................................................................................... - 15 -
Avertissements de sécurité pour les utilisateurs
Avertissements de sécurité pour les utilisateursAvertissements de sécurité pour les utilisateurs
Avertissements de sécurité pour les utilisateurs .......................................................... - 15 -
Avertissements de sécurité pour les piles
Avertissements de sécurité pour les pilesAvertissements de sécurité pour les piles
Avertissements de sécurité pour les piles ..................................................................... - 15 -
Installez votre réveil à un endroit sûr ......................................................................... - 16 -
Ecran et cases d‘affichage ................................................................................................. - 16 -
Mise en service.................................................................................................................... - 16 -
Réglage du fuseau horaire................................................................................................. - 17 -
Réactiver la recherche du signal horaire .......................................................................... - 17 -
Mauvaise réception du signal radio ................................................................................. - 17 -
Eclairage .............................................................................................................................. - 17 -
Affichage de la température .............................................................................................. - 17 -
Réglage rapide ................................................................................................................... - 17 -
Réglage de base ................................................................................................................. - 18 -
Alarme réveil ....................................................................................................................... - 18 -
Répétition de l‘alarme (SNOOZE).................................................................................... - 18 -
Conseil d’entretien .............................................................................................................. - 18 -
Declaration UE de conform ite simplifiée ......................................................................... - 18 -
Evacuation des appareils électriques ............................................................................... - 18 -
Mise au rebut des piles ...................................................................................................... - 18 -
Logo TRIMAN ..................................................................................................................... - 19 -
Garantie de digi-tech gmbh .............................................................................................. - 19 -
Conditions de garantie ....................................................................................................... - 19 -
Durée de la garantie et recours légaux en cas de défauts ............................................. - 19 -
Couverture de la garantie .................................................................................................. - 20 -
Procédure dans un cas de garantie .................................................................................. - 20 -
Service Après Vente ............................................................................................................ - 21 -
Fournisseur ........................................................................................................................... - 21 -

-
15
-
RÉVEIL LCD RADIOGUIDÉ
I troductio
Félicitations pour l’achat de votre nouveau réveil. Vous avez fait le choix d’un appareil
de haute qualité. La notice d’utilisation fait partie de ce réveil. Elle contient des consignes
importantes pour la sécurité, l’utilisation et le traitement des déchets. Vous devez
d’abord vous familiariser avec toutes les consignes d’utilisation et de sécurité avant
d’utiliser votre réveil. Veuillez utiliser votre réveil uniquement comme décrit et dans les
domaines d’application indiqués. En cas de transmission à un tiers, veuillez remettre tous
les documents. Veuillez SVP conserver emballage et mode d'emploi pour d'éventuelles
demandes d'informations ultérieures.
Utilisatio co forme
L’appareil est conçu pour l’affichage de l’heure et pour l’utilisation des fonctions
supplémentaires décrites. Toute autre utilisation ou modification de l’appareil est
considérée comme non-conforme. Le fabricant décline toute responsabilité pour des
dommages, qui ont été occasionnés par un usage non-conforme ou une utilisation
incorrecte. L’appareil n’est pas prévu pour une utilisation commerciale.
Co te u livré
Remarque : Veuillez vérifier le contenu livré après achat. Veuillez vous assurer que
toutes les pièces sont disponibles et ne sont pas défectueuses.
Réveil
1x Pile 1,5 V AA R6/LR6
Notice d‘utilisation
Do ées Tech iques
Mouvement à quartz
Moteur à pile 1,5 V AA R6/LR6
- Symbole pour courant continu
Avertisseme ts de sécurité pour les utilisateurs
ATTENTION ! RISQUE DE BLESSURE !
Cet appareil peut être utilisé par des personnes dont les capacités physiques,
sensorielles ou intellectuelles sont restreintes ou limitées par un manque d’expérience ou
de connaissances (les enfants à partir de 8 ans compris), si elles ont été placées sous la
surveillance d’une personne ou si elles ont reçu les instructions nécessaires à l’utilisation
sûre de cet appareil et si elles sont en mesure de comprendre les dangers possibles. Les
enfants ne doivent pas jouer avec cet appareil. Le nettoyage et l’entretien de l’appareil
ne doivent pas être effectués par un enfant sans la surveillance d’un adulte. Eloignez
également les enfants des films d’emballage, il y a danger d’étouffement.
Avertisseme ts de sécurité pour les piles
ATTENTION !
DANGEREUX POUR LA SANTÉ !
DANGER D’EXPLOSION !
Conservez vos piles hors de portée de jeunes enfants. En cas d’avalement d’une pile, il
faut consulter un médecin immédiatement. Les piles/accus doit être mis dans le bon sens
(respect des polarités). Nettoyez les contacts des piles et appareils avant. N’essayez pas
de recharger des piles, de les court-circuiter ou de les ouvrir. Ne jetez jamais de piles
dans le feu car il y a danger d’explosion. Si vous n’utilisez pas cet appareil pendant un
certain temps, retirez-en les piles et conservez-le à un endroit sec et à l’abri de la
poussière. En cas d‘utilisation mal appropriée des piles/accus, il y a danger d’explosion
et d’écoulement. Si une pile devait avoir coulé, évitez tout contact avec la peau, les
-
16
-
yeux et les muqueuses. Mettez des gants. En cas de contact avec l’acide des piles,
rincez abondamment les parties touchées à l’eau claire et consultez immédiatement un
médecin. Des piles usées doivent être retirées immédiatement de l’appareil danger
d’écoulement accru.
Installez votre réveil à un endroit sûr
Ce réveil n’a pas été conçu pour servir en milieu fortement humide (comme une salle de
bains, par ex.). Veillez bien à ce que
L’appareil ne soit pas posé sur un tapis épais ou un lit pendant son fonctionnement ;
Aucune source directe de chaleur (ex. Chauffages) ne puisse affecter l’appareil ;
Aucun rayon direct du soleil n’atteigne l’appareil ;
Tout contact avec des projections ou des gouttes d’eau soit évité (veuillez ne pas
déposer d’objets contenant des liquides, par ex. des vases, sur ou à côté de
l’appareil) ;
L’appareil ne se trouve pas à proximité immédiate de champs magnétiques (ex. hauts-
parleurs) ;
Aucun corps étranger ne s’infiltre ;
Des bougies et d’autres flammes ouvertes soient toujours maintenues éloignées de
l’appareil, pour prévenir toute propagation de feu ;
Ecra et cases d‘affichage
1
Ecran
14
Bouton SET
2
Bouton SNOOZE/LIGHT (Répétition
Sonnerie/Eclairage) 15 Bouton ALARM
3
Heure
16
Bouton RCC
4
Secondes
17
Bouton DOWN
5
Icône Tour radio
18
Bouton UP
6
Affichage de la
température
19
Haut
-
parleur
7
Affichage du jour de la semaine
20
Compartiment à piles
8
Affichage de la date, D=Jour, M=Mois
9
Alarm 2 (boutons 6 à 7)
10
Alarm 1 (boutons 1 à 5)
11
Heure de l’alarme réveil
12
Répétition sonnerie SNOOZE
13
Format horaire
Mise e service
Retirez le film de protection de l’écran de votre réveil. Ouvrez le compartiment 20 à
piles au dos de l‘appareil et mettez une pile R6/LR6 à 1,5V AA en en respectant la
polarité. Refermez le couvercle 20.

-
17
-
La pile mise en place, la recherche du signal horaire est activé automatiquement, un
signal acoustique se fait entendre. L’icône de radio-pilotage (la tour radio) 5 clignote
sur l‘écran. La recherche peut durer entre 3 et 10 mn.
Remarque: Prière de ne pas bouger le réveil pendant la recherche du signal horaire.
Ce réveil synchronise le comptage interne de l’heure avec le signal radio horaire tous les
jours entre 01 00 h et 04 00 h et à chaque heure pleine. Si la recherche du signal
horaire ne devait pas aboutir à cette heure-là, le réveil activerait une nouvelle recherche
à 05 00 h et 06 00 h. Au cas où aucune recherche n’aboutirait, mettez votre réveil à
l’heure manuellement (voir Réglage de base).
Quand la recherche du signal horaire a abouti, la tour radio 5 s’affiche en
permanence sur l’écran et l’heure, la date ainsi que le jour de la semaine s’affichent
automatiquement. Pendant l’heure d’été, la mention DST s’affiche sur l’écran, à droite de
la Tour radio.
Réglage du fuseau horaire
Si vous vous trouvez dans un pays dont l'heure actuelle diffère de l'heure du signal
DCF77, modifiez le fuseau horaire. Utilisez la fonction de réglage du fuseau horaire
pour vous servir du réveil dans un autre pays/sous un autre fuseau horaire que celui du
format standard (UTC + 1 = Heure en Europe Centrale). Entrez la différence en heures (-
01, par ex.) entre le format standard et le fuseau horaire souhaité.
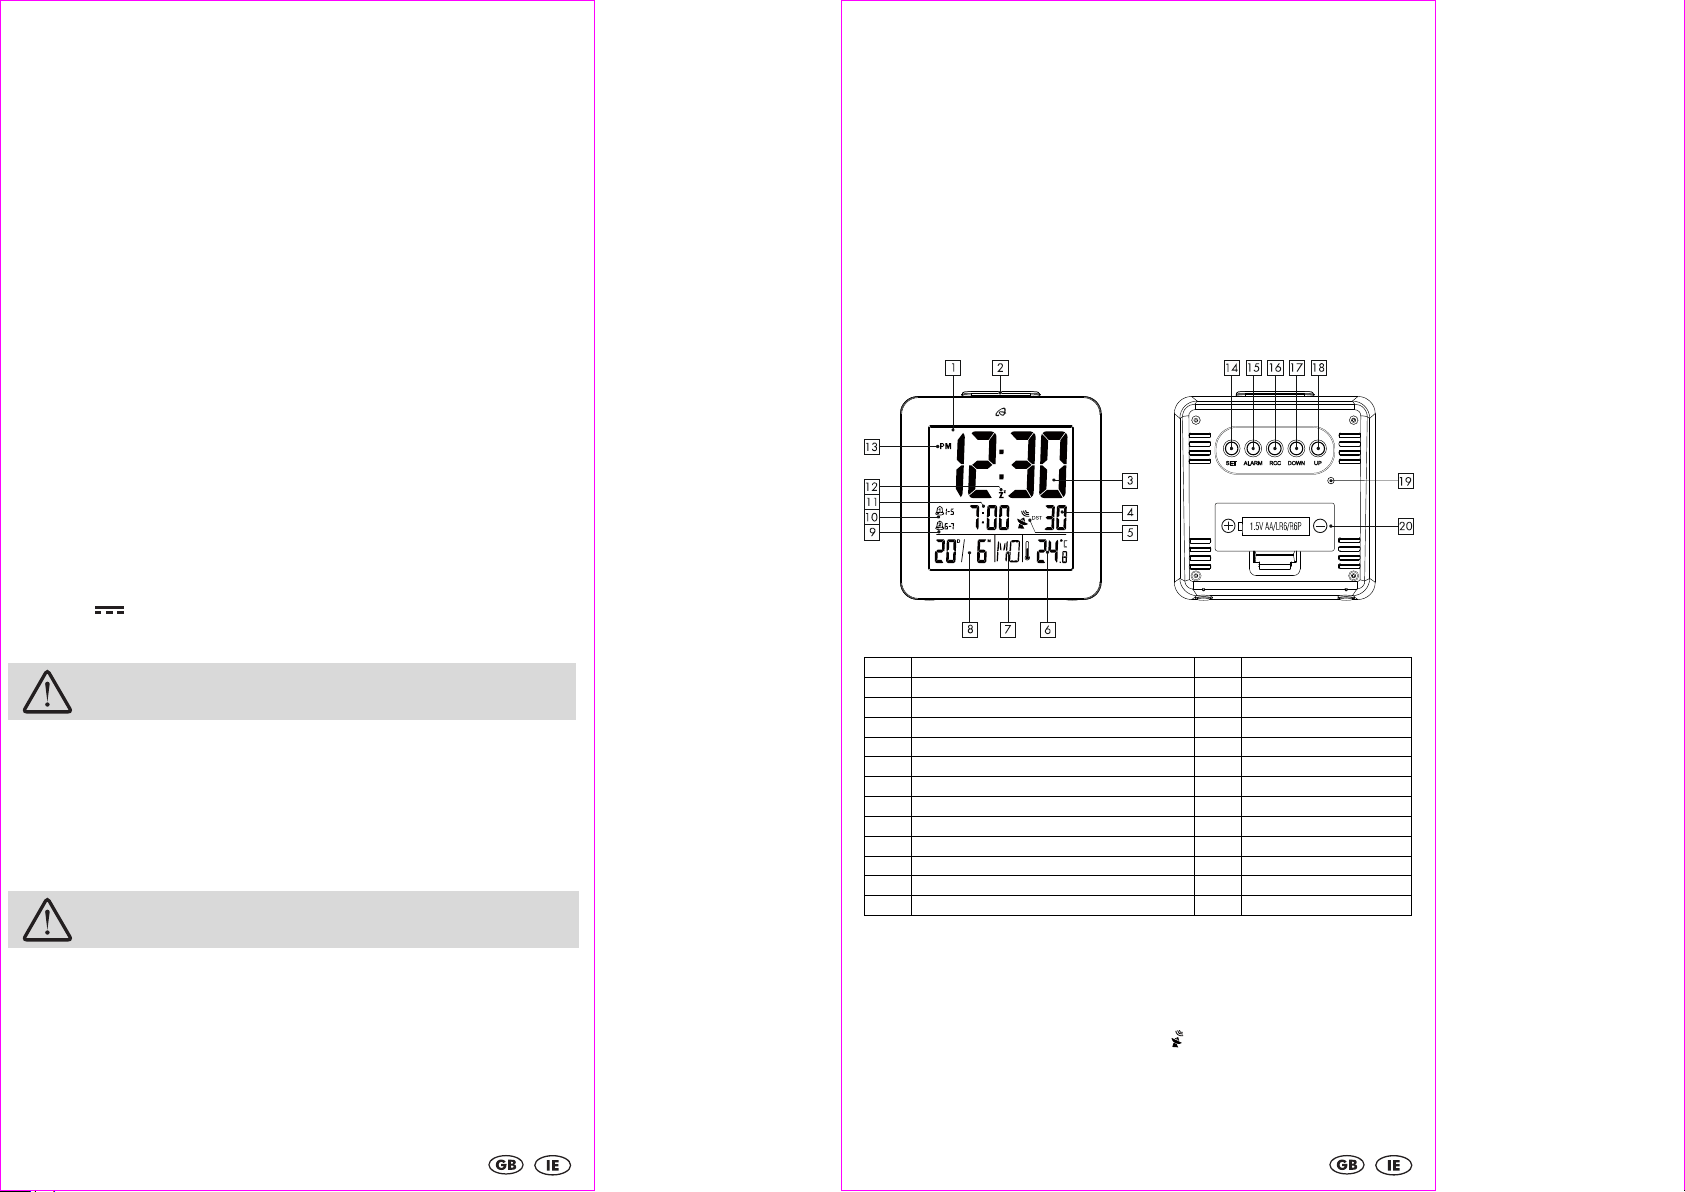
En mode d’affichage normal de l’heure, appuyez sur SET 14 et maintenez enfoncé env.
3 secondes, la langue pour afficher le jour de la semaine se met à clignoter. Appuyez
alors 8 x sur SET 14, le fuseau horaire (00) apparaît en clignotant, il peut être réglé par
pressions répétées de UP 18 ou de DOWN 17. Validez en appuyant sur SET 14.
Ensuite, réactivez la recherche du signal radio horaire. Votre réveil capte le signal radio
horaire DCF77, mais n'affiche pas l'heure corrigée voulue (1 heure de moins, par ex.).
Réactiver la recherche du sig al horaire
Il est possible de réactiver manuellement la recherche du signal horaire en appuyant sur
le bouton RCC au dos du réveil et en le maintenant enfoncé 4 secondes.
Si la recherche n’aboutit pas, mettez votre réveil à l’heure manuellement (voir Réglage
de base). L’icône de radio-pilotage (la tour radio) 5 clignote sur l‘écran. La recherche
peut durer entre 3 et 10 mn.
Mauvaise réceptio du sig al radio
Le signal radio horaire DCF77 est envoyé par un émetteur situé dans la région de
Francfort sur le Main, son rayon de transmission est d’env. 1500 km à partir de
Francfort/Main. Toutefois, certains parasites peuvent perturber considérablement la
bonne réception du signal.
Pour le cas où votre réveil ne recevrait pas bien le signal DCF77, accrochez-la à un
autre endroit en tenant compte des perturbations possibles causées par le rayonnement
électromagnétique d’appareils comme ordinateurs, téléphone, postes de radio ou
téléviseurs. Les matériaux d’isolation épais (éléments de construction métalliques),
montagnes élevées ou perturbations atmosphériques peuvent également nuire à la
bonne réception du signal. Procédez éventuellement à un changement de piles.
Eclairage
Pour activer provisoirement l’éclairage, appuyez sur le bouton SNOOZE/LIGHT 2 en
haut du réveil.
Affichage de la température
Appuyez sur SET 14 pour choisir l‘unité de température en degrés Celsius (°C) ou
Fahrenheit (°F).
Réglage rapide
Pour entrer des valeurs numériques, on pourra accélérer les réglages en maintenant les
boutons enfoncés (longue pression).
-
18
-
Réglage de base
Les réglages suivants peuvent être effectués langue pour affichage du jour de la
semaine, format en 12 ou 24 heures, date, heure et fuseau horaire.
En mode d’affichage de l’heure normale, appuyez sur SET 14 et maintenez enfoncé
env. 3 secondes pour régler ces paramètres, deux lettres pour la langue d’affichage
apparaissent en clignotant, réglez avec les boutons UP 18 ou DOWN 17. Les langues
disponibles sont GE=allemand, EN=anglais, IT=italien, FR=français, DU=néerlandais,
SP=espagnol, HU=hongrois, SL=slovène. Appuyez sur SET 14 pour confirmer votre
réglage. On réglera de la même manière le format horaire (12/24), l‘année, le format
de la date (M=mois, D=jour), le mois, le jour, les heures, les minutes et le fuseau horaire.
Alarme réveil
Ce réveil est équipé de 2 alarmes réglables séparément. La première, „Alarm 1“ (1-5),
est programmée pour une partie de la semaine du lundi au vendredi, la seconde,
„Alarm 2“ (6 -7), pour le samedi et le dimanche.
Pour accéder au mode de réglage de l’heure de réveil, appuyez sur le bouton
ALARM 15 et maintenez enfoncé. L’affichage des heures pour „Alarm 1” (1-5) clignote
sur l’écran. Pour régler, appuyez sur UP 18 ou DOWN 17 et confirmez votre réglage
par pression du bouton ALARM 15. Les minutes et l’heure de réveil de „Alarm 2” (6-7)
est réglable de la même manière.
Pour activer ou désactiver „Alarm 1” (1-5), appuyez sur le bouton UP 18 en mode
d’affichage de l’heure normale.
Pour activer ou désactiver „Alarm 2” (6-7), appuyez sur le bouton DOWN 17 en mode
d’affichage de l’heure normale.
Quand une des alarmes est active, une icône (petite clochette) apparaît sur l’écran.
Le signal acoustique de l’alarme se fait entendre à l’heure programmée, la fréquence
d’émission du signal augmente toutes les 10 secondes, soit 3 x fois. Si l’alarme n’est pas
désactivée avant, celle-ci s’arrête automatiquement au bout de 5 mn.
Répétitio de l‘alarme (SNOOZE)
Appuyez sur SNOOZE/LIGHT 2 en haut du réveil quand l’alarme se fait entendre.
L’écran s‘éclaire provisoirement, les lettres z
z
et une clochette clignotent sur l‘écran,
l’alarme est interrompue provisoirement, elle reprendra 8 mn plus tard.
Co seil d’e tretie
Pour nettoyer votre réveil, utilisez seulement un chiffon sec ne faisant pas de peluches,
comme ceux utilisés pour nettoyer les verres de lunettes, par ex.
Declaratio UE de co form ite simplifiée
Le soussigné, digi-tech gmbh, déclare que l'équipement radioélectrique du type
4-LD4948 est conforme à la directive 2014/53/EU. Le texte complet de la déclaration
UE de conformité est disponible à l'adresse internet suivante http //www.digi-tech-
gmbh.com/ce/296172_WE.pd
Evacuatio des appareils électriques
Cet appareil ne doit pas être évacué avec les déchets ménagers. Veuillez faire
évacuer votre réveil par l’intermédiaire d’un prestataire agréé ou par votre
décharge municipale. Respectez les directives d’évacuation en vigueur. En cas de doute,
demandez conseil auprès de votre décharge municipale.
Mise au rebut des piles
Veuillez vous débarrasser des piles dans les réceptacles prévus à cet effet dans
le commerce. Les piles ne font pas partie des ordures ménagères courantes.
Veuillez vous débarrasser des piles auprès d’une usine de traitement des déchets ou bien
auprès de votre déchetterie communale. Veillez bien à respecter les consignes actuelles
en cours de validité. En cas de doute, veuillez prendre contact avec votre déchetterie.

-
19
-
Logo TRIMAN
Ce produit est recyclable, il est soumis à un dispositif de responsabilité élargie
du producteur et de collecte séparée.
Gara tie de digi-tech gmbh
Vous recevez une garantie de 3 ans à partir de la date d’achat de cet appareil. En cas
de défauts sur cet appareil, vous bénéficiez de recours légaux contre le vendeur du
produit. Ces droits légaux ne sont pas limités par notre garantie décrite ci-après.
Co ditio s de gara tie
La période de garantie commence à partir de la date de l‘achat. Veuillez conserver
soigneusement votre ticket de caisse en original. Ce document est nécessaire comme
preuve d‘achat. En cas de vice dû à un défaut de matériel ou de fabrication révélé au
cours de la période de garantie, soit pendant 3 ans à partir de la date de l‘achat, nous
réparons ou remplaçons – à notre choix – gratuitement votre produit défectueux. La
prestation de garantie présuppose la restitution du produit réclamé ainsi que la fourniture
d’une preuve d’achat (ticket de caisse) pendant la période de garantie convenue de 3
ans, accompagnée d’une courte description écrite du défaut avec indication de la date
à laquelle celui-ci s’est révélé. Si ce vice est couvert par la garantie du produit, nous
vous renverrons ce produit réparé ou un produit neuf. La période de garantie n’est pas
prolongée par une réparation ou un échange.
Durée de la gara tie et recours légaux e cas de défauts
La durée de la garantie n’est pas allongée suite à la prise en charge. Cela vaut aussi
pour les pièces remplacées ou réparées. Les dommages ou défauts éventuels apparus
dès l’achat doivent être notifiés dès le déballage. Après expiration de la durée de la
garantie, les réparations sont payantes.
Article L211-16 du Code de la consommation
Lorsque l‘acheteur demande au vendeur, pendant le cours de la garantie
commerciale qui lui a été consentie lors de l‘acquisition ou de la réparation d‘un
bien meuble, une remise en état couverte par la garantie, toute période
d‘immobilisation d‘au moins sept jours vient s‘ajouter à la durée de la garantie qui
restait à courir. Cette période court à compter de la demande d‘intervention de
l‘acheteur ou de la mise à disposition pour réparation du bien en cause, si cette mise
à disposition est postérieure à la demande d‘intervention.
Indépendamment de la garantie commerciale souscrite, le vendeur reste tenu des
défauts de conformité du bien et des vices rédhibitoires dans les conditions prévues
aux articles L211-4 à L211-13 du Code de la consommation et aux articles 1641 à
1648 et 2232 du Code Civil.
Article L211-4 du Code de la consommation
Le vendeur est tenu de livrer un bien conforme au contrat et répond des défauts de
conformité existant lors de la délivrance. Il répond également des défauts de
conformité résultant de l‘emballage, des instructions de montage ou de l‘installation
lorsque celle-ci a été mise à sa charge par le contrat ou a été réalisée sous sa
responsabilité.
Article L211-5 du Code de la consommation
Pour être conforme au contrat, le bien doit
1° Etre propre à l‘usage habituellement attendu d‘un bien semblable et, le cas
échéant
- correspondre à la description donnée par le vendeur et posséder les qualités que
celui-ci a présentées à l‘acheteur sous forme d‘échantillon ou de modèle ;
- présenter les qualités qu‘un acheteur peut légitimement attendre eu égard aux
déclarations publiques faites par le vendeur, par le producteur ou par son
représentant, notamment dans la publicité ou l‘étiquetage ;
-
20
-
2° Ou présenter les caractéristiques définies d‘un commun accord par les parties ou
être propre à tout usage spécial recherché par l‘acheteur, porté à la connaissance
du vendeur et que ce dernier a accepté.
Article L211-12 du Code de la consommation
L‘action résultant du défaut de conformité se prescrit par deux ans à compter de la
délivrance du bien.
Article 1641 du Code civil
Le vendeur est tenu de la garantie à raison des défauts cachés de la chose vendue
qui la rendent impropre à l‘usage auquel on la destine, ou qui diminuent tellement
cet usage que l‘acheteur ne l‘aurait pas acquise, ou n‘en aurait donné qu‘un
moindre prix, s‘il les avait connus.
Article 1648 1er alinéa du Code civil
L‘action résultant des vices rédhibitoires doit être intentée par l‘acquéreur dans un
délai de deux ans à compter de la découverte du vice.
Les pièces détachées indispensables à l’utilisation du produit sont disponibles
pendant la durée de la garantie du produit.
Couverture de la gara tie
L’appareil a été fabriqué avec soin selon de strictes directives de qualité et a fait l’objet
de tests scrupuleux avant livraison. La garantie couvre les défauts de matériel ou de
fabrication. Cette garantie ne s’étend pas aux pièces qui sont soumises à une usure
normale et qui peuvent donc être considérées comme des pièces d’usure ou pour les
détériorations sur les pièces fragiles, par ex. interrupteur, batteries ou les pièces qui sont
en verre.
Cette garantie s’annule si l’appareil a été endommagé, utilisé ou entretenu de façon
non-conforme. Pour une utilisation conforme du produit, les consignes détaillées dans la
notice d’utilisation doivent être respectées scrupuleusement. Des utilisations ou des
manipulations, qui ont fait l’objet de contre-indications ou bien de mises en garde dans
la notice d’utilisation, doivent être absolument évitées.
L’appareil est destiné uniquement à un usage privé et non à un usage commercial. En
cas de manipulation abusive et inadéquate, de recours à la force et d’interventions qui
n’ont pas été effectuées par notre succursale « Service Après-Vente », la garantie
disparaît.
Procédure da s u cas de gara tie
En vue de traiter votre demande le plus rapidement possible, nous vous prions de bien
vouloir observer les instructions suivantes
Tenez, pour toute demande, votre ticket de caisse et le numéro de l’article (296172)
en tant que preuve de votre achat à notre disposition.
Vous trouverez le numéro de l’article sur une plaque d’identification, dans une
mention gravée, dans le titre de votre mode d’emploi (en bas à gauche) ou sur une
étiquette au dos de l’article ou sous l’article.
Si vous deviez constater un défaut de fonctionnement ou un vice quelconque, veuillez
contacter d‘abord le SAV ci-après mentionné par par téléphone ou en envoyant un
courriel (mail).
Vous pourrez télécharger ce mode d’emploi et beaucoup d’autres manuels
d’utilisation ainsi que des vidéos produits et logiciels sur ce site internet
www.lidl-service.com

-
21
-
Service Après Ve te
Nom Inter-Quartz GmbH
Rue Valterweg 27A
Ville DE-65817 Eppstein
Pays ALLEMAGNE
Courriel/Mail support@inter-quartz.de
Téléphone +49 (0)6198 571825
00800 5515 6616
00800 5515 6616 00800 5515 6616
00800 5515 6616 00800 5515 6616
0800 563862 800 142 315
00800 5515 6616 00800 5515 6616
00800 5515 6616 00800 5515 6616
IAN
296172
Art.
-
Nr.
4
-
LD4948
Four isseur
Veuillez noter que l’adresse suivante n’est pas une adresse de SAV. Prière de contacter
d’abord l’adresse indiquée plus haut.
Nom digi-tech gmbh
Rue Valterweg 27A
Ville DE-65817 Eppstein
Pays ALLEMAGNE
-
22
-
Gebruiksaa wijzi g e veiligheidstips
I houdsopgave
Inhoudsopgave ................................................................................................................... - 22 -
Introductie ............................................................................................................................ - 23 -
Beoogd gebruik .................................................................................................................. - 23 -
Inhoud van het geleverde .................................................................................................. - 23 -
Technische specificaties ...................................................................................................... - 23 -
Veiligheidsinformatie voor gebruiker
Veiligheidsinformatie voor gebruikerVeiligheidsinformatie voor gebruiker
Veiligheidsinformatie voor gebruiker ............................................................................ - 23 -
Veiligheidsinformatie voor batterijen
Veiligheidsinformatie voor batterijenVeiligheidsinformatie voor batterijen
Veiligheidsinformatie voor batterijen ............................................................................ - 23 -
De wekker veilig opstellen. ........................................................................................ - 24 -
Display und Bedieningsveld............................................................................................... - 24 -
Ingebruikname .................................................................................................................... - 24 -
Aanpassing tijdzones.......................................................................................................... - 25 -
Opnieuw starten .................................................................................................................. - 25 -
Ontvangststoring ................................................................................................................. - 25 -
Licht ....................................................................................................................................... - 25 -
Temperatuur-weergave ...................................................................................................... - 25 -
Snelle instelling .................................................................................................................... - 25 -
Basis instelling...................................................................................................................... - 25 -
Alarm .................................................................................................................................... - 26 -
Sluimerfunctie (SNOOZE) ................................................................................................. - 26 -
Onderhoud .......................................................................................................................... - 26 -
Vereenvoudigde EU-Conformiteitsverklaring................................................................... - 26 -
Het elektrische apparaat bij het afval doen ..................................................................... - 26 -
De batterijen bij het afval doen ......................................................................................... - 26 -
Garantie door digi-tech gmbh........................................................................................... - 26 -
Garantievoorwaarden ....................................................................................................... - 26 -
Garantieperiode en wettelijke aanspraken bij gebreken ............................................... - 27 -
Garantiedekking ................................................................................................................. - 27 -
Afhandeling in geval van garantie .................................................................................... - 27 -
Klantenservice ..................................................................................................................... - 28 -
Leverancier .......................................................................................................................... - 28 -

-
23
-
LCD-RADIOWEKKER
I troductie
Van harte gefeliciteerd met de aankoop van uw nieuwe wekker. U hebt hiermee voor
een hoogwaardig apparaat gekozen. De handleiding is onderdeel van deze wekker. Hij
bevat belangrijke informatie over veiligheid, gebruik en verwijdering als afval. Raak
eerst vertrouwd met alle bedienings- en veiligheidsinstructies voordat u de wekker gaat
gebruiken. Gebruik de wekker alleen zoals beschreven en voor de aangegeven
doeleinden. Overhandig ook alle bijbehorende documenten wanneer u het wekker aan
iemand anders overdraagt. Gelieve aub de verpakking en instructies bij te houden voor
eventuele verzoeken voor extra informatie.
Beoogd gebruik
Het apparaat is geschikt voor het weergeven van de tijd en het gebruik van de
beschreven extra functies. Ieder ander gebruik of wijziging van het apparaat geldt als
oneigenlijk. De fabrikant is niet aansprakelijk voor schade veroorzaakt door verkeerd
gebruik of verkeerde bediening. Het apparaat is niet bestemd voor handelsdoeleinden.
I houd va het geleverde
Opmer ing: controleer na aan oop de inhoud van het geleverde. Zorg ervoor dat alle
onderdelen aanwezig en niet beschadigd zijn.
Wekker
1x 1,5 V AA / LR6/R6 batterij
Handleiding
Tech ische specificaties
Kwartsuurwerk
Te gebruiken met een 1,5 V AA / LR6/R6 batterij
- Symbool voor gelijkstroom
Veiligheidsi formatie voor gebruiker
WAARSCHUWING! KANS OP VERWONDINGEN!
Dit apparaat kan door personen (ook inderen vanaf 8 jaar) met verminderde fysieke,
sensorische of mentale capaciteiten of met gebrek aan ervaring en kennis gebruikt
worden, wanneer dat onder toezicht gebeurt of ze instructie gekregen hebben hoe ze
het apparaat moeten gebruiken en ze de gevaren begrijpen die voortkomen uit het
gebruik. Kinderen mogen niet spelen met het apparaat. Schoonmaken en
gebrui ersonderhoud mag door inderen alleen onder toezicht verricht worden. Houd
de verpakkingsfolie uit de buurt van kinderen. Bij verkeerd gebruik ervan bestaat
verstikkingsgevaar.
Veiligheidsi formatie voor batterije
WAARSCHUWING!
SCHADELIJK VOOR DE
GEZONDHEID!
EXPLOSIEGEVAAR!
Bewaar batterijen buiten bereik van kleine kinderen. Na inslikken van een batterij
meteen medische hulp inroepen. Batterijen/accu's moeten altijd geplaatst worden met
de polen in de juiste positie. Reinig de contactpunten van batterij en apparaat van
tevoren indien nodig. Probeer niet batterijen weer op te laden, kort te sluiten of te
openen. Gooi nooit batterijen in vuur! Ze kunnen exploderen. Gebruikt u het apparaat
langere tijd niet, haal de batterijen er dan uit en bewaar het apparaat op een droge en
stofvrije plek. Bij verkeerd gebruik van de batterij bestaat gevaar voor exploderen en
-
24
-
lekken. Als de batterij gelekt heeft, contact met huid, ogen en slijmvliezen vermijden.
Handschoenen gebruiken. Bij contact met batterijzuur de aangedane plekken
overvloedig afspoelen met schoon water en zo snel mogelijk naar een arts gaan.
Verwijder lege batterijen meteen uit het apparaat, er bestaat verhoogd gevaar voor
lekken.
De we er veilig opstellen.
Het apparaat is niet geschikt voor het gebruik in ruimtes met een hoge luchtvochtigheid.
(bijv. Badkamer). Zorg ervoor dat
het apparaat bij gebruik niet op een dik tapijt of bed wordt neergezet;
er geen directe warmtebronnen (zoals een verwarming) op het apparaat inwerken;
er geen direct zonlicht op het apparaat valt;
contact met waternevel en waterdruppels wordt vermeden (plaats geen met vloeistof
gevulde voorwerpen, zoals vazen, op of naast het apparaat);
het apparaat niet in de onmiddellijke nabijheid van magnetische velden (zoals
luidsprekers) staat;
er geen vreemde voorwerpen kunnen binnendringen
kaarsen en ander open vuur altijd bij dit product weg worden gehouden om
verspreiding van het vuur tegen te gaan.
Display u d Bedie i gsveld
1
Display
14
SET
2
SNOOZE/LIGHT
15
ALARM
3
Tijd
-
weergave
16
RCC
4
Seconden
17
DOWN
5
Ontvangst
-
weergave
18
UP
6
Temperatuur
-
weergave
19
Luidspreker
7
Dag van de week
-
weergave
20
Batterijvak
8
Datum
-
weergave, D=dag, M=maand
9
Alarm 2 (6
-
7)
10
Alarm 1 (1
-
5)
11
Alarm tijd
12
Snooze
-
weergave
13
Uur
-
formaat
I gebruik ame
Verwijder de plastic folie van het display van de wekker. Open het batterijvakje 20 aan
de achterkant van het apparaat. Plaats een 1,5V AA R6/LR6 batterij in het batterijvakje
met de polen in de juiste richting. Sluit het batterijvakje 20.
Na het plaatsen van de batterijen, zoekt de klok automatisch naar het tijdsignaal en
hoort u een pieptoon. De zendmast 5 knippert in het display. Dit kan 3-10 minuten
duren.

-
25
-
Aanwijzing: Tijdens het ontvangst van het tijdsignaal, de we er niet bewegen.
De wekker sychroniseert de tijd dagelijks van 01 00 tot 04 00 uur, elk vol uur. Indien de
ontvangst zonder succes was, herhaalt het zich nog een keer om 05 00 en 06 00 uur.
Indien er geen ontvangst mogelijk is, kunt u de tijd manueel instellen (zie basis
instellingen).
Bij succesvolle ontvangst verschijnt de zendmast 5 blijvend en stellen zich de tijd, de
datum en de dag van de week automatisch in. Tijdens de zomertijd verschijnt DST op het
display, rechts naast het torensymbool.
Aa passi g tijdzo es
Bevindt u zich in een land waar de actuele tijdsaanduiding ondanks het DCF77-signaal
afwijkt, gebruik dan de tijdzone aanpassing. Gebruik de aanpassing van de tijdzone om
uw wekker in een andere tijdzone dan de standaard instelling (UTC + 1 = centraal
Europese tijd) te gebruiken.
Druk SET 14 in en houd deze in de normale tijdsaanduiding ongeveer 3 seconden vast
totdat de de taal van de aanduiding van de weekdag knippert. Druk 8 x op SET 14, de
tijdzone (00) knippert en kan worden ingesteld met UP 18 of DOWN 17. Bevestig uw
keuze door op SET 14 te drukken.
Geef het verschil in uren met de gewenste tijdzone in. Start daarna de wekker opnieuw.
Uw wekker ontvangt nog steeds het DCF77-radiosignaal, maar geeft een aangepaste
tijd weer (bv.1 uur vroeger).
Op ieuw starte
U kunt manueel een nieuw ontvangst van het tijdsignaal starten, indien u 4 seconden op
de RCC 16-toets aan de achterkant van de wekker drukt. Indien het tijdsignaal niet
automatisch ontvangen wordt, moet u de tijd manueel instellen (zie basis-instellingen).
De zendmast 5 knippert in het display. Dit kan 3-10 minuten duren.
O tva gststori g
Het DCF77 tijdsignaal komt uit de buurt van Frankurt am Main (Duitsland). Het
radiosignaal kan binnen een straal van ca. 1500 km rond Frankfurt ontvangen worden.
Er kunnen echter storingsbronnen zijn die het ontvangst kunnen belemmeren. Indien uw
wandklok het radiosignaal niet goed kan ontvangen, kunt u het nog eens proberen op
een andere plaats. Let erop dat in de buurt van een computer, telefoon, radio of TV,
elektromagnetische stralingen kunnen zijn die het ontvangen van het DCF77 tijdsignaal
storen kunnen. Verdere storingsbronnen kunnen zijn, sterke gebouw dempingen (metalen
bouwelementen), hoge bergen of atmosferische storingen.
Indien nodig, vervang de batterijen.
Licht
Om de verlichting kort te activeren, drukt u op SNOOZE/LIGHT 2 boven op de wekker.
Temperatuur-weergave
Druk op SET 14, om te kiezen tussen Celsius (°C) of Fahrenheit (°F).
S elle i stelli g
Bij de instelling van nummerieke waarden kunt u gebruik maken van een snellere
instelling door de desbetreffende toets ingedrukt te houden.
Basis i stelli g
U kunt volgende instellingen maken Taalkeus voor de weekdag, 12/24-uurs
tijdformaat, datum, tijd en tijdzone. De SET 14-toets 3 seconden ingedrukt houden in de
normale tijdweergave, de taal van de weekdag knippert en kan met UP 18 of DOWN
17 ingestelt worden. U kunt kiezen uit de volgende talen GE=duits, EN=engels,
IT=italiaans, FR=frans, DU=nederlands, SP=spaans, HU=hongaars, SL=sloveens. Druk op
de SET-toets om de instelling te bevestigen. Op dezelfde manier kunt u ook het 12/24-
-
26
-
uurs tijdformaat, het jaar, het formaat van de datum (M=maand, D=dag), de maand, de
dag, de uren, de minuten en de tijdzone instellen.
Alarm
De wekker beschikt over twee afzonderlijk instelbare wektijden. Alarm 1 (1-5) is voor de
dagen maandag tot vrijdag, alarm 2 (6-7) voor zaterdag en zondag.
Door de ALARM 15-toets ingedrukt te houden, kunt u de wektijd instellen. De uur-
weergave van alarm 1 (1-5) knippert op het display. Druk op UP 18 of DOWN 17 voor
de instelling en bevestig de instelling door op ALARM 15 te drukken. Op dezelfde
manier kunt u ook de minuten en de wektijd voor het tweede alarm (6-7) instellen. Druk
in de normale tijdweergave op de UP 18-toets om het alarm 1 (1-5) aan- of uit te zetten.
Druk in de normale tijdweergave op de DOWN 17-toets om het alarm 2 (6-7) aan- of
uit te zetten.
Indien het alarm geactiveerd is verschijnt het klok-symbool. Het alarm klinkt op de
ingstelde tijd en verhoogt 3 x iedere 10 seconden zijn frequentie. Wanneer het alarm
niet wordt uitgeschakeld, schakelt het zichzelf automatisch uit na 5 minuten.
Sluimerfu ctie (SNOOZE)
Als het alarm afgaat drukt u op de SNOOZE/LIGHT 2 toets boven op de wekker De
verlichting is kort geactiveerd, er knippert z
z
19 en het klok symbool in het display, het
alarm is tijdelijk uitgeschakelt en herhaalt zich na 8 minuten opnieuw.
O derhoud
Reinigt u de wekker alleen met een droge, niet pluisende zachte doek, zoals bijv. ook bij
het reinigen van een bril wordt gebruikt.
Veree voudigde EU-Co formiteitsverklari g
Hierbij verklaar ik, digi-tech gmbh, dat het type wekker 4-LD4948 conform is met
Richtlijn R&TTE 1999/5/EC en RED 2014/53/EU.
De volledige tekst van de EU-conformiteitsverklaring kan worden geraadpleegd op het
volgende internetadres http //www.digi-tech-gmbh.com/ce/296172_WE.pdf
Het elektrische apparaat bij het afval doe
Deze wekker mag niet in het gewone huisvuil landen. Levert u deze wekker bij de
gemeentelijke inzamelpunten in. Let op de gemeentelijke, aktuele bestemmingen.
Bij twijfel,a.u.b. contact opnemen met de gemeentelijke recycling dienst.
De batterije bij het afval doe
Gooi de batterijen weg als afval in de speciaal voor dit doel in winkels
neergezette bakken. Batterijen horen niet in de gewone vuilnisbak. Gooi
batterijen weg via een erkend afvalverwerkingsbedrijf of via uw gemeentereiniging.
Neem de op dat moment geldende voorschriften in acht. Neem in geval van twijfel
contact op met uw afvalverwijderingsbedrijf.
Gara tie door digi-tech gmbh
U krijgt 3 jaar garantie op dit apparaat vanaf de datum van aankoop. In het geval dat
dit product gebreken vertoont, kunt u tegenover de verkoper van het product aanspraak
maken op uw wettelijke rechten. Deze wettelijke rechten worden niet beïnvloed door
onze hieronder weergegeven garantie.
Gara tievoorwaarde
De garantieperiode begint op de datum van aankoop. Bewaar uw originele
aankoopbon. Deze is nodig als bewijs van aankoop. Treedt binnen drie jaar na de
datum van aankoop van dit product een materiaal- of fabricagefout op, dan wordt het
product door ons – naar eigen goeddunken - gratis gerepareerd of vervangen. Deze
garantie vereist dat binnen de periode van drie jaar het defecte apparaat en het bewijs
van aankoop (kassabon) worden overlegd en er schriftelijk kort wordt aangegeven
waaruit het gebrek bestaat en wanneer het is opgetreden. Als het defect wordt gedekt
door onze garantie, krijgt u het gerepareerde of een nieuw product terug. Met de
reparatie of vervanging van het product begint geen nieuwe garantieperiode.

-
27
-
Gara tieperiode e wettelijke aa sprake bij gebreke
De garantieperiode wordt door de garantie niet verlengd. Dit geldt ook voor vervangen
en gerepareerde onderdelen. Eventuele reeds bij aankoop bestaande schade of
gebreken moeten direct na het uitpakken worden gemeld. Voor reparaties na de
garantieperiode moet worden betaald.
Gara tiedekki g
Het apparaat werd zorgvuldig geproduceerd volgens strenge kwaliteitsrichtlijnen en
voorafgaande aan de levering nauwgezet gecontroleerd. De garantie geldt voor
materiaal- en fabricagefouten. Deze garantie dekt geen productonderdelen die zijn
blootgesteld aan normale slijtage en dus kunnen worden beschouwd als slijtende
onderdelen of voor schade aan kwetsbare onderdelen zoals schakelaars, batterijen of
onderdelen van glas. Deze garantie vervalt indien het product beschadigd of verkeerd
gebruikt of onderhouden is. Om een goed gebruik van het product te garanderen,
moeten alle in de handleiding aangegeven instructies strikt worden opgevolgd.
Gebruiksdoeleinden en handelingen die worden afgeraden in de handleiding of
waarvoor wordt gewaarschuwd, moeten absoluut worden vermeden. Het product is
voor privé-gebruik en niet voor handelsdoeleinden bestemd. Bij misbruik en oneigenlijk
gebruik, het gebruik van geweld of ingrepen die niet zijn uitgevoerd door onze erkende
serviceafdeling, vervalt de garantie.
Afha deli g i geval va gara tie
Om uw verzoek snel te kunnen behandelen, volgt u a.u.b. onderstaande aanwijzingen
Houdt voor alle aanvragen de kassabon en het artikelnummer (296172) als bewijs
van aankoop bereid.
Het artikelnummer vindt u op het typeplaatje, als gravering, op het titelblad van de
handleiding (links beneden) of als sticker op de achter- of onderkant.
Bij niet functioneren en/of andere fouten, neemt u eerst contact op met de
navolgende serviceafdeling; telefonisch of per e-mail.
Op www.lidl-service.com kunt u dit (en andere) handboek, productvideos
en software downloaden.
-
28
-
Kla te service
Naam Inter-Quartz GmbH
Str. Valterweg 27A
Stad DE-65817 Eppstein
Land DUITSLAND
E-Mail support@inter-quartz.de
Telefoon +49 (0)6198 571825
00800 5515 6616
00800 5515 6616 00800 5515 6616
00800 5515 6616 00800 5515 6616
0800 563862 800 142 315
00800 5515 6616 00800 5515 6616
00800 5515 6616 00800 5515 6616
IAN
296172
Art.
-
Nr.
4
-
LD4948
Levera cier
NB het onderstaande adres is géén serviceadres, Neem eerst contact op met de
bovengenoemde klantenservice!
Naam digi-tech gmbh
Str. Valterweg 27A
Stad DE-65817 Eppstein
Land DUITSLAND

-
29
-
Návod k obsluze a bezpeč ost í upozor ě í
Obsah
Obsah .................................................................................................................................. - 29 -
Úvodní slovo ........................................................................................................................ - 30 -
Určení užívání ...................................................................................................................... - 30 -
Obsah balení....................................................................................................................... - 30 -
Technické údaje .................................................................................................................. - 30 -
Bezpečností upozornění pro uživatele
Bezpečností upozornění pro uživateleBezpečností upozornění pro uživatele
Bezpečností upozornění pro uživatele ......................................................................... - 30 -
Bezpečností upozornění pro baterie
Bezpečností upozornění pro baterieBezpečností upozornění pro baterie
Bezpečností upozornění pro baterie ............................................................................ - 30 -
Bezpečné umístění budíku .......................................................................................... - 31 -
Displej a ovládací panely .................................................................................................. - 31 -
Uvedení do provozu ........................................................................................................... - 31 -
Upravení časové zóny........................................................................................................ - 32 -
Nový start příjmu rádiového signálu ................................................................................. - 32 -
Rušení příjmu signálu .......................................................................................................... - 32 -
Osvětlení .............................................................................................................................. - 32 -
Ukazatel teploty .................................................................................................................. - 32 -
Rychlé nastavování ............................................................................................................. - 32 -
Základní nastavení .............................................................................................................. - 32 -
Budík ..................................................................................................................................... - 33 -
Funkce opakovaného buzení (SNOOZE) ....................................................................... - 33 -
Pokyny pro čistění ............................................................................................................... - 33 -
Zjednodušené EU prohlášení o shodě .............................................................................. - 33 -
Likvidace elektrického přístroje .......................................................................................... - 33 -
Likvidace baterií .................................................................................................................. - 33 -
Záruka firmy digi-tech gmbh .............................................................................................. - 33 -
Záruční podmínky ............................................................................................................... - 33 -
Záruční lhůta a zákonný nárok při nedostatcích ............................................................. - 34 -
Rozsah záruky ..................................................................................................................... - 34 -
Postup v případě uplatnění záruky .................................................................................... - 34 -
Servis .................................................................................................................................... - 35 -
Dodavatel ............................................................................................................................ - 35 -
-
30
-
LCD BUDÍK ŘÍZENÝ RÁDIOVÝM SIGNÁLEM
Úvod í slovo
Gratulujeme Vám ke koupi Vašeho nového budíku. Rozhodli jste se pro kvalitní přístroj.
Tento návod k obsluze je součástí tohoto budíku. Obsahuje důležitá upozornění o
bezpečnosti, provozu a likvidaci. Před užíváním budíku se seznamte se všemi
upozorněními k obsluze a bezpečnosti. Užívejte budík pouze podle popisu a určení.
Obal a návod k obsluze, prosím, uschovejte pro případ další potřeby.
Urče í užívá í
Přístroj je určen k použití jako ukazatel času a k popsaným doplňkovým funkcím. Jiné
užití nebo úprava přístroje není v souladu s určením. Výrobce neručí za škody vzniklé
nevhodným užíváním nebo špatnou obsluhou. Přístroj není určen pro průmyslové užití.
Obsah bale í
Upozornění: Prosím, po za oupení z ontrolujte obsah balení. Přesvědčte se, že jsou
zabaleny všechny díly a že jsou fun ční.
Budík
1x baterie 1,5 V AA R6/LR6
Návod k obsluze
Tech ické údaje
Hodinky Quartz
Baterie typu 1,5 V AA R6/LR6
- Označení stejnosměrného proudu
Bezpeč ostí upozor ě í pro uživatele
VAROVÁNÍ! NEBEZPEČÍ ZRANĚNÍ!
Toto zařízení může být používáno i osobami se sníženými fyzickými, smyslovými nebo
duševními schopnostmi nebo bez patřičných zkušeností a znalostí (včetně dětí starších
než 8 let), pokud jsou pod dohledem nebo pokud byly poučeny o bezpečném používání
přístroje a jsou schopny pochopit z toho plynoucí rizika. Nedovolte dětem hrát si se
spotřebičem. Čištění a uživatelskou údržbu nesmí provádět děti bez dozoru. Obaly
uchovávejte mimo dosah dětí. Hrozí nebezpečí udušení.
Bezpeč ostí upozor ě í pro baterie
VAROVÁNÍ! ZDRAVOTNÍ NEBEZPEČÍ!
NEBEZPEČÍ VÝBUCHU!
Uchovávejte baterie mimo dosah dětí. Pokud dojde ke spolknutí baterie, je třeba ihned
vyhledat lékařskou pomoc.
Baterie / akumulátory musí být vždy vloženy podle správné polarity. V případě potřeby
předem vyčistěte kontakty baterie i přístroje. Nepokoušejte se o dobíjení baterií, jejich
zkratování nebo otvírání. Nikdy nevhazujte baterie do ohně, neboť hrozí nebezpečí
výbuchu. Nesprávné použítí baterie může způsobit výbuch a vytečení baterie.
V případě vytečení baterie zabraňte kontaktu s kůží, očima a sliznicemi. Používejte
ochranné rukavice. V případě kontaktu s kyselinou baterie opláchněte postižené místo
čistou vodou a okamžitě vyhledejte lékaře.
Okamžitě vyjměte vybité baterie z přístroje, je zde zvýšené riziko vytečení.

-
31
-
Bezpečné umístění budí u
Není určen na provoz v prostorech s vysokou vlhkostí vzduchu (např. koupelna).
Dbejte na to, aby
přístroj při provozu nestál na tlustém koberci nebo na posteli;
na přístroj nepůsobily žádné přímé tepelné zdroje (např. topení);
na přístroj nedopadaly žádné sluneční paprsky;
na přístroj nekapala nebo nestříkala žádná kapalina (nestavte na přístroj nebo vedle
něj žádné nádoby plněné tekutinou, např. vázy);
přístroj nestál bezprostředně v oblasti působení magnetických polí (např.
reproduktory);
do přístroje nevnikla žádná cizí tělesa;
svíčky a jiný otevřený oheň nikdy nebyly v blízkosti tohoto přístroje, aby se tak
zamezilo rozšíření požáru.
Displej a ovládací pa ely
1
Displej
14
SET
2
SNOOZE/LIGHT
15
ALARM
3
Čas
16
RCC
4
Sekundy
17
DOWN
5
Ukazatel rádiového signálu
18
UP
6
Ukazatel teploty
19
Reproduktor
7
Ukazatel dne v týdnu
20
Prostor na baterie
8
Ukazatel
data, D=den, M=měsíc
9
Budík 2 (6
-
7)
10
Budík 1 (1
-
5)
11
Čas buzení
12
Ukazatel snooze
13
Hodinový formát
Uvede í do provozu
Odstraňte ochrannou fólii z displeje budíku. Otevřete prostor na baterie 20 na zadní
straně přístroje a vložte jednu baterii typu 1,5V AA R6/LR6 podle vyznačené polarity.
Prostor na baterie 20 uzavřete.
Po vložení baterie začne automaticky příjem rádiového signálu, rozezní se signální tón.
Ukazatel rádiového signálu 5 bliká na displeji. Tento proces může trvat 3-10 minut.
Upozornění: V průběhu přijímacího procesu s budí em, prosím, nehýbejte.
Budík synchronizuje čas denně mezi 01 00 až 04 00 každou celou hodinu. Pokud by
příjem rádiového signálu nebyl úspěšný, bude se opakovat v 05 00 a v 6 00 hodin.
Když nebude příjem časového signálu úspěšný, nastavte čas ručně (viz Základní
nastavení).
-
32
-
Po úspěšném přijetí signálu se ukazatel rádiového signálu 5 zobrazí trvale a
automaticky se nastaví správný čas, datum a den v týdnu. Během letního času se vpravo
vedle ukazatele rádiového signálu zobrazí DST.
Uprave í časové zó y
Pokud se nacházíte v zemi, kde je aktuální čas i přes signál DCF77 odchylný, upravte
časovou zónu pro užívání Vašeho budíku v jiné časové zóně než je standardní nastavení
(UTC + 1 = středoevropský čas). Časovou zónu upravte nastavením hodinového rozdílu
(např. -01) k požadované časové zóně.
Stiskněte a držte cca 3 vteřiny tlačítko SET 14 v normálním ukazateli času, jazyk
ukazatele dne v týdnu bliká. Stiskněte 8x tlačítko SET 14, nyní bliká časová zóna (00) a
můžete ji nastavit tlačítkem UP 18 nebo DOWN 17. Nastavení potvrďte stisknutím
tlačítka SET 14.
Následně proveďte nový start příjmu rádiového signálu. Váš budík nadále přijímá
rádiem řízený signál DCF77, ukazuje ale pozměněný čas (např. o 1 hodinu méně).
Nový start příjmu rádiového sig álu
Nový start příjmu rádiového signálu můžete ručně vyvolat držením tlačítka RCC 16 na
zadní straně budíku po dobu 4 vteřin. Pokud příjem rádiového signálu nebyl úspěšný,
nastavte čas ručně (viz Základní nastavení). Ukazatel rádiového signálu 5 bliká na
displeji. Tento proces může trvat 3-10 minut.
Ruše í příjmu sig álu
Rádiový signál stanice DCF77 je vysílán z Frankfurtu nad Mohanem v Německu a může
být přijímán v okruhu zhruba 1500 km. Jsou ovšem rušivé zdroje, které mohou příjem
podstatně omezovat.
Pokud Vaše nástěnné hodiny rádiový signál nepřijímají správně, pověste je na jiné místo
a berte ohled na to, že v blízkosti počítače, telefonu, rádia a televize mohou vznikat
elektromagnetická záření, která mohou rušit příjem signálu stanice DCF77. Dalšími
rušivými zdroji pro příjem signálu mohou být silné izolace budov (kovové stavební
materiály), vysoké kopce nebo atmosférická rušení. Případně vyměňte baterie.
Osvětle í
Stiskněte tlačítko SNOOZE/LIGHT 2 na horní straně budíku, abyste dočasně aktivovali
osvětlení.
Ukazatel teploty
Pro výběr měření teploty ve stupních Celsia (°C) nebo Fahrenheita (°F) zmáčkněte
tlačítko SET 14.
Rychlé astavová í
Při nastavení číselných hodnot můžete dlouhým stiskem a držením tlačítek využít rychlého
nastavování.
Základ í astave í
Můžete nastavit následující údaje jazyk ukazatele dne v týdnu, 12/24 hodinový formát,
datum, čas a časovou zónu.
V normálním ukazateli času stiskněte a držte 3 vteřiny tlačítko SET 14, jazyk ukazatele
dne v týdnu bliká a můžete ho nastavit tlačítkem UP 18 nebo DOWN 17. Můžete volit
mezi následujícími jazyky GE=německy, EN=anglicky, IT=italsky, FR=francouzsky,
DU=holandsky, SP=španělsky, HU=maďarsky, SL=slovinsky. Tlačítkem SET 14 Vaši volbu
potvrďte. Stejným způsobem nastavte 12/24 hodinový formát, rok, formát data
(M=měsíc, D=den), měsíc, den, hodiny, minuty a časovou zónu. Upravte časovou zónu,
pokud Váš budík užíváte v jiné časové zóně než je Vaše domácí. V tom případě upravte
časovou zónu nastavením hodinového rozdílu mezi Vaší aktuální a domácí časovou
zónou. Následně proveďte nový start příjmu rádiového signálu.

-
33
-
Budík
Na budíku lze jednotlivě nastavit 2 časy buzení. Budík 1 (1-5) je pro dny pondělí až
pátek, budík 2 (6-7) pro sobotu a neděli.
Stiskněte a držte tlačítko ALARM 15, abyste přešli do módu nastavení času buzení. Na
displeji bliká hodina budíku 1 (1-5). Nastavte ji tlačítkem UP 18 nebo DOWN 17 a
volbu potvrďte zmáčknutím tlačítka ALARM 15. Stejným způsobem nastavte minuty a čas
buzení druhého budíku (6-7).
Abyste aktivovali nebo deaktivovali budík 1(1-5), stiskněte při běžném zobrazení času
tlačítko UP 18.
Abyste aktivovali nebo deaktivovali budík 2 (6-7), stiskněte při běžném zobrazení času
tlačítko DOWN 17. Při aktivovaném budíku se objeví symbol zvonku.
Alarm se rozezní při nastaveném času a zvýší 3x každých 10 vteřin svou frekvenci.
Pokud alarm nevypnete, zruší se samostatně po 5 minutách.
Fu kce opakova ého buze í (SNOOZE)
Při zaznění budíku stiskněte tlačítko SNOOZE/LIGHT 2 na horní straně budíku.
Osvětlení je dočasně aktivováno, na displeji bliká z
z
19 a symbol.
Poky y pro čistě í
Čistěte přístroj pouze suchým hladkým hadříkem, který se hodí například na čistění
brýlových skel.
Zjed oduše é EU prohláše í o shodě
Tímto digi-tech-gmbh prohlašuje, že typ budík 4-LD4948 je v souladu se směrnicí
1999/5/EG a 2014/53/EU. Úplné znění EU prohlášení o shodě je k dispozici na této
internetové adrese
http //www.digi-tech-gmbh.com/ce/296172_WE.pdf
Likvidace elektrického přístroje
Tento budík nesmí být odstraněn s běžným domovním odpadem. Odevzdejte
tento přístroj sběrně oprávněné k likvidaci nebo komunální sběrně odpadu.
Dbejte na dodržování aktuálních platných předpisů. Pokud máte pochybnosti, poraďte
se se sběrnou.
Likvidace baterií
Zlikvidujte, prosím, baterie řádně ve speciálních sběrných schránkách v
obchodech. Baterie nepatří do domovního odpadu. Baterie, prosím,
odevzdejte sběrně oprávněné k likvidaci nebo komunální sběrně odpadu. Dbejte na
dodržování aktuálních platných předpisů. Pokud máte pochybnosti, poraďte se se
sběrnou.
Záruka firmy digi-tech gmbh
Na tento přístroj poskytujeme záruku 3 roky od data zakoupení. V případě závady
tohoto výrobku Vám vůči prodejci samozřejmě přísluší zákonná práva. Tato zákonná
práva nejsou naší následně zmiňovanou zárukou omezena.
Záruč í podmí ky
Záruční lhůta začíná dnem koupě. Prosím, pečlivě uschovejte originální účtenku. Tento
doklad je potřebný jako důkaz data zakoupení. Pokud se v průběhu tří let od data
zakoupení tohoto výrobku vyskytnou závady materiálu nebo výrobní vady, bude tento
výrobek námi zdarma opraven nebo nahrazen – podle naší volby. Uplatnění záruky
vyžaduje, aby byl v tomto tříletém období předložen vadný přístroj a doklad o koupi
(účtenka) a písemně bylo krátce uvedeno, o jakou závadu se jedná a kdy vznikla. Pokud
závada zakláda nárok k uznání záruky, obdržíte od nás opravený nebo nový výrobek.
Opravou nebo výměnou výrobku nezačíná běžet nová záruční lhůta.
-
34
-
Záruč í lhůta a záko ý árok při edostatcích
Plněním garance se záruční lhůta neprodlouží. Toto platí i pro nahrazené nebo opravené
díly. Případné škody a závady existující již při koupi, musí být uplatněny ihned po
vybalení. Opravy provedené po skončení záruční lhůty Vám budou naúčtovány.
Rozsah záruky
Tento přístroj byl pečlivě vyroben podle přísných směrnic kvality a před dodáním
důkladně ověřen. Záruka se vztahuje na vady materiálu nebo výrobní vady. Tato záruka
se nevztahuje na díly, které jsou vystaveny běžnému opotřebení a mohou proto být
považovány za opotřebovávané díly, nebo na poruchy na rozbitných dílech, např.
vypínač, baterie nebo díly, které jsou vyrobeny ze skla.
Tato záruka propadá, pokud je výrobek poškozen, nebyl řádně užíván nebo o něj bylo
špatně pečováno. Pro řádné užívání výrobku se musí přesně dodržovat všechna nařízení
v návodu k obsluze. Vyvarujte se užití nebo zacházení, před kterým je zrazováno nebo
je před ním varováno v tomto návodu.
Tento výrobek je určen pouze pro soukromé a nikoliv průmyslové užívání. Při zneužití
nebo neodborném zacházení, užití násilí nebo při zákrocích, které nejsou provedeny
naší autorizovanou servisní pobočkou, zaniká záruka.
Postup v případě uplat ě í záruky
Abychom Vám mohli zaručit rychlé zpracování Vaší žádosti, dodržujte, prosím,
následující pokyny
Prosím, připravte si pro všechny dotazy účtenku a číslo výrobku (IAN 296172) jako
doklad o koupi.
Číslo výrobku zjistíte na typovém štítku, rytině, na titulní stránce Vašeho návodu (dole
vlevo) nebo na nálepce na zadní nebo spodní straně výrobku.
Pokud by se vyskytly funkční chyby nebo jiné závady, onta tujte nejdříve telefonic y
nebo e-mailem níže zmíněnou servisní poboč u.
Na www.lidl-service.com si můžete stáhnout tuto i jiné příručky, videa o
produktech nebo softwarové programy.

-
35
-
Servis
Název Inter-Quartz GmbH
Ulice Valterweg 27A
Město DE-65817 Eppstein
Země NĚMECKO
E-mail support@inter-quartz.de
Telefon +49 6198 571825
00800 5515 6616
00800 5515 6616 00800 5515 6616
00800 5515 6616 00800 5515 6616
0800 563862 800 142 315
00800 5515 6616 00800 5515 6616
00800 5515 6616 00800 5515 6616
IAN
296172
Art.
-
Nr.
4
-
LD4948
Dodavatel
Upozorňujeme, že následující adresa není adresa servisního centra. Kontaktuje, prosím,
výše zmíněné místo.
Jméno digi-tech gmbh
Ulice Valterweg 27A
Město DE-65817 Eppstein
Země NĚMECKO
-
36
-
I dicacio es sobre su utilizació y su
seguridad
Í dice
Índice .................................................................................................................................... - 36 -
Introducción ......................................................................................................................... - 37 -
Uso conforme a su propósito ............................................................................................. - 37 -
Elementos incluidos en la entrega ..................................................................................... - 37 -
Datos técnicos ..................................................................................................................... - 37 -
Instrucciones de seguridad para el usuario
Instrucciones de seguridad para el usuarioInstrucciones de seguridad para el usuario
Instrucciones de seguridad para el usuario ................................................................ - 37 -
Instrucciones de seguridad sobre las pilas
Instrucciones de seguridad sobre las pilasInstrucciones de seguridad sobre las pilas
Instrucciones de seguridad sobre las pilas.................................................................. - 37 -
Posicione el despertador seguramente ..................................................................... - 38 -
Pantalla y paneles de mando ............................................................................................ - 38 -
Puesta en funcionamiento .................................................................................................. - 38 -
Ajuste de la zona horaria .................................................................................................. - 39 -
Reinicio ................................................................................................................................. - 39 -
Interferencia en la recepción ............................................................................................. - 39 -
Luz ........................................................................................................................................ - 39 -
Visualización de la Temperatura ....................................................................................... - 39 -
Ajuste rápido ....................................................................................................................... - 39 -
Ajuste básico ....................................................................................................................... - 40 -
Alarma del despertador ..................................................................................................... - 40 -
Función de dormitar (SNOOZE) ....................................................................................... - 40 -
Instrucciones de limpieza ................................................................................................... - 40 -
Declaración UE de Conformidad Simplificada ............................................................... - 40 -
Eliminación y reciclaje del aparato electrónico .............................................................. - 40 -
Eliminación de las pilas ...................................................................................................... - 40 -
Garantía de digi-tech gmbh .............................................................................................. - 40 -
Condiciones de la garantía ............................................................................................... - 41 -
Duración de la garantía y derecho de reclamación ....................................................... - 41 -
Ámbito de la garantía ........................................................................................................ - 41 -
Procedimiento en caso de garantía .................................................................................. - 41 -
Servicio técnico ................................................................................................................... - 42 -
Proveedor ............................................................................................................................ - 42 -

-
37
-
DESPERTADOR RADIOCONTROLADO LCD
I troducció
Enhorabuena por la compra de su nuevo despertador. Se ha decidido Ud. por un
dispositivo de alta calidad. Este manual de instrucciones forma parte del equipamiento
del despertador. Contiene indicaciones importantes sobre su seguridad, su manejo y su
eliminación como residuo. Antes de comenzar a utilizar su despertador, familiarícese
con todas las indicaciones de uso y seguridad. Utilice el despertador únicamente de la
forma y para los ámbitos de aplicación indicados. En caso de ceder el despertador a
terceros, entrégueles también esta documentación. Por favor conserve el embalaje y el
manual de instrucciones para futuras consultas.
Uso co forme a su propósito
El aparato está diseñado para indicar la fecha y la hora, así como para las funciones
adicionales que aquí se detallan. La utilización para cualquier otro propósito o la
realización de modificaciones en el aparato no se consideran adecuadas a sus
propósitos. El fabricante no se hace responsable de los daños causados por una
utilización no adecuada a sus propósitos o por una utilización errónea. Este aparato no
es apto para un uso de carácter comercial o industrial.
Eleme tos i cluidos e la e trega
Nota: una vez adquirido el producto, compruebe los elementos incluidos en la
entrega. Asegúrese de que no falta ningún componente y de que estos no presentan
defectos.
Despertador
1x pila 1,5 V AA R6/LR6
Manual del usuario
Datos téc icos
Maquinaria de cuarzo
Accionamiento con una pila 1,5 V AA R6/LR6
- Señal distintiva de corriente continua
I struccio es de seguridad para el usuario
ADVERTENCIA! PELIGRO DE LESIONES!
Este aparato puede ser usado por personas (incluídos niños a partir de los 8 años) con
capacidades físicas, sensoriales o mentales disminuídas o con falta de experiencia y
conocimentos siempre que sean supervisionadas o hayan sido instruídas sobre el uso
seguro del aparato y hayan comprendido los peligros resultantes. Los niños no deben
jugar con el aparato. Los niños no deben limpiar o mantener el aparato sin supervisión.
Mantenga las películas del embalaje fuera del alcance de los niños. Hay riesgo de
asfixia.
I struccio es de seguridad sobre las pilas
ADVERTENCIA!
PELIGRO PARA LA SALUD!
PELIGRO DE EXPLOSIÓN!
Mantenga las pilas fuera del alcance de los niños pequeños. En caso de haber sido
tragada una pila, deverá ser prestada inmediatamente ayuda médica. Las pilas/baterías
han de colocarse siempre teniendo en atención la polaridad correcta. Siendo necesario,
limpie primero los contactos de las pilas y del aparato. No intente cargar, provocar
cortocircuito o abrir las pilas. Nunca tire las pilas al fuego, porque podrían explotar. El uso
inadequado de las pilas puede provocar explosión o derrame. Si la pila ha derramado,
-
38
-
evite el contacto con la piel, los ojos o las mucosas. Use guantes. En caso de contacto con
el ácido de la pila lave las partes afectadas con bastante água limpia y vaya a ver
inmediatamente a un médico. Retire inmediatamente las pilas gastadas del aparato, hay
peligro elevado de derrame.
Posicione el despertador seguramente
No deberá utilizarlo en habitaciones con humedad elevada (por ej. el baño).
Asegúrese de
no dejar el aparato en funcionamiento sobre una alfombra gruesa o una cama;
evitar exponerlo a una fuente de calor directa (como la calefacción);
no exponerlo a la luz directa del sol;
evitar las salpicaduras y las gotas de agua (no coloque objetos que contengan
líquidos, como jarrones, encima ni al lado del aparato);
no colocar el aparato cerca de campos magnéticos (p. ej. altavoces);
no insertar elementos extraños;
mantener el aparato alejado de velas y fuentes de llamas en todo momento, para
evitar una posible propagación del fuego.
Pa talla y pa eles de ma do
1
Pantalla
14
SET
2
SNOOZE/LIGHT
15
ALARM
3
Hora
16
RCC
4
Segundos
17
DOWN
5
Torre de radiodifusión
18
UP
6
Visualización de la temperatura
19
Altavoz
7
Visualización de los días de la
semana 20 Compartimiento de la pila
8
Visualización de la fecha, D=Día,
M=Mes
9
Alarma 2 (6
-
7)
10
Alarma 1 (1
-
5)
11
Hora de la alarma
12
Visualización de Snooze
13
Formato de la hora
Puesta e fu cio amie to
Retire el folio protector de la pantalla del despertador. Abra Usted el compartimiento de
la pila 20 al reverso de su aparato y coloque una pila 1,5V AA R6/LR6 con la
polaridad correcta. Cierre el compartimiento de la pila 20.
Luego de colocar la pila, se inicia automáticamente la recepción de la señal de
radiofrecuencia, se emite una señal acústica. La torre de radiodifusión 5 parpadea en
la pantalla. Este proceso puede durar de 3-10 minutos.
This manual suits for next models
1
Table of contents
Languages:
Other Auriol Clock Radio manuals

Auriol
Auriol 4-LD3131 User manual

Auriol
Auriol Z31481A User manual

Auriol
Auriol Z30237B User manual

Auriol
Auriol Z30237B User manual

Auriol
Auriol Z30300 A User manual

Auriol
Auriol 4-LD3905 Parts list manual

Auriol
Auriol 4-LD4166 Parts list manual

Auriol
Auriol 4-LD4146 Parts list manual

Auriol
Auriol z31163 User manual

Auriol
Auriol IAN 88977 User manual