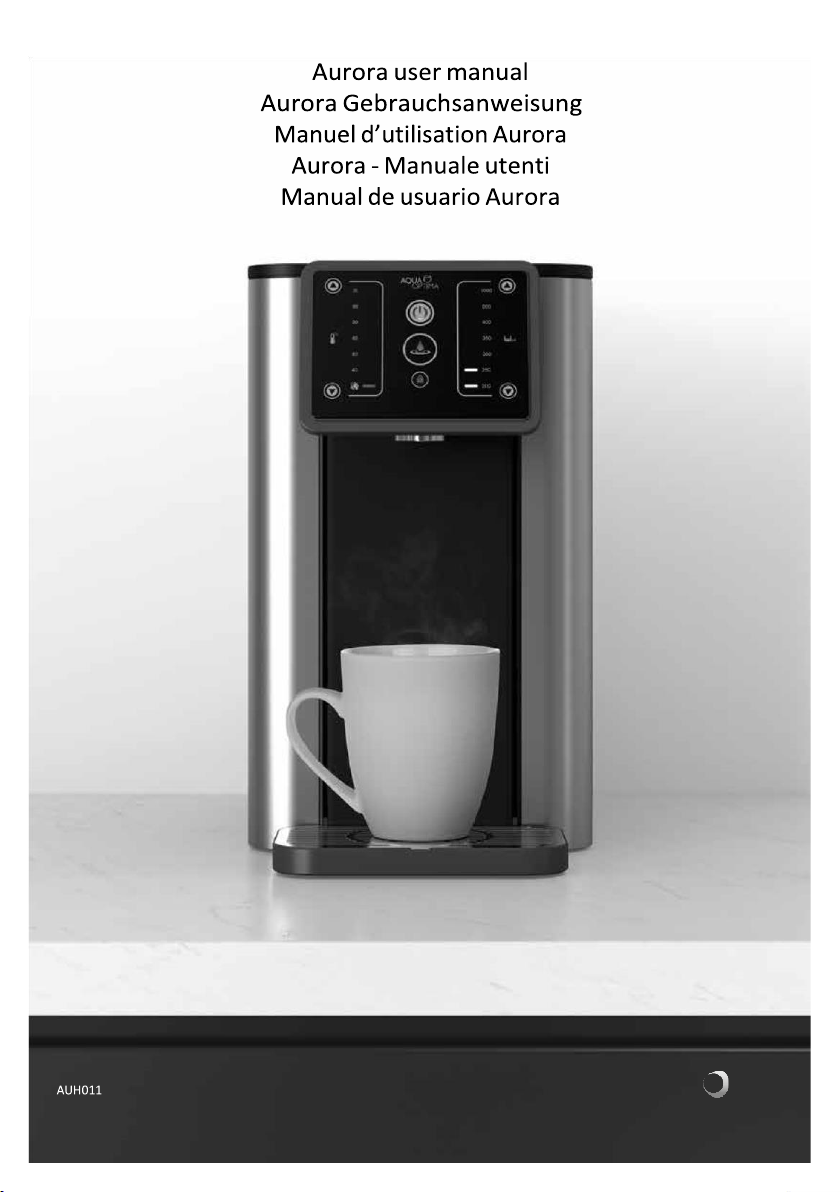
Aurora AUH011 User manual


1
READ ALL INSTRUCTIONS BEFORE USE
EN & SAVE THEM FOR FUTURE REFERENCE
1. Parts Guide
Before use ensure the filter is fitted in the inner water tank.
Before first use, clean the appliance, following the points
in the installation set up and cleaning section.
IMPORTANT SAFEGUARDS
Necessary precautions must be taken when using electrical
appliances, and these include the following:1. Keep the
appliance cord out of reach of children.
2. This appliance can be used by children aged 8 and above
and persons with reduced physical, sensory or mental
capabilities or lack of experience of knowledge if they
have been given supervision or instruction concerning use
of the appliance in a safe way and understand the hazards
involved. Children shall not play with this appliance.
Cleaning and user maintenance shall not be carried out by
children without supervision.
3. Install the appliance according to the installation
instructions in this user manual.
4. Use on a flat heat resistance surface.
5. Use in a well ventilated area. This appliance emits hot
steam.
6. Ensure the voltage on the appliance rating plate
corresponds to that of the mains electricity.
7. Never place the appliance on or close to sources of heat or
very damp places.
8. Ensure that the power cord does not come into contact
with hot surfaces.
9. NEVER PLACE THE APPLIANCE BODY, PLUG OR POWER
CORD IN WATER OR OTHER LIQUIDS; ALWAYS WIPE CLEAN
WITH A DAMP CLOTH.
10. Always ensure that your hands are thoroughly dry before
using or adjusting the switches on the appliance, or before
touching the power plug or power connections.
11. Do not obstruct the ventilation on the sides of the
appliance.
12. This product is intended to filter tap water only. Do not
put water of unknown quality or that has been
microbiologically impaired into the product. Use only cold
or room temperature water. Do not use for the
preparation of baby food.
13. Consume filtered water within three days.
14. To unplug the appliance, grip the plug and remove it
directly from the power socket. Never pull the power cord
to unplug the appliance.
15. Never use the appliance if the power cord or plug are
damaged or if the appliance itself is faulty.
16. Any changes to this product that have not been expressly
authorized by the manufacturer may lead to the user’s
guarantee being rendered null and void.
17. Packaging must never be left within the reach of children
since it is potentially dangerous.
18. This appliance is designed for filtering and heating water.
19. Do not store or use this appliance outdoors.
20. If the appliance is used incorrectly, please remove the plug
from the socket and contact Aqua Optima customer
services.
21. The appliance is designed for use with Aqua Optima
Evolve+ filters, the performance is not guaranteed if any
other filters are used.
22. Do not leave the appliance unattended during operation.
23. Do not clean with solvents or harsh chemicals.

2
24. Do not move the appliance when in use.
25. Do not operate appliance with a damaged cord, plug or
after the appliance has malfunctioned or been damaged in
any manner. If the cord is damaged it must be changed by
a qualified person to avoid a hazard.
26. Do not fill the appliance with water over 30°C.
27. Do not remove filter while the appliance is running.
28. Do not use appliance without the filter correctly placed or
if the filter is damaged or broken.
29. At first use or after the appliance has been completely
drained of water in all tanks, ensure the instructions for
first use are followed.
30. The appliance should not be placed in a cabinet when in
use.
31. Do not store explosive substances such as aerosol cans
with a flammable propellant in this appliance.
Replacement Evolve+ filters are available from all Aqua Optima stockists.
The heating element surface is subject to residual heat after use.
Appliance outlet and other items may be hot after a cycle.
Failure to follow these instructions could cause scalding or damage to the product.
2. Control Panel
On/Off Button: Press for 1 second to activate or deactivate the appliance.
Blue light shows when power is on.
Lock: Press and hold for 3 seconds to lock or unlock appliance, white light
shows when unlocked, red light shows when locked.
Dispense Button: Press to start/stop dispensing, light will fade in & out
whilst dispensing.
Temperature Selection: 40°C to 95°C & boiling temperature. Use the up
and down arrows to press through settings.
Water Volume Selection: 200 to 1000ml. Use the up and down arrows to
press through settings.
Filter Icon: Orange light shows when the filter requires changing. See
the instructions for replacing the Aqua Optima Evolve+ filter cartridge in
section 3. Set up, first use and cleaning.
Refill Icon: Orange light shows when the water tank needs refilling (Non
interactive).
Descale Icon: Orange light shows when appliance requires descaling.
See the descale procedure in section 5. Descaling.

3
3. Set up, first use and cleaning
BEFORE USING THE AURORA APPLIANCE FOR THE FIRST
TIME
•Remove all packaging. There is clear film covering the
display, this can be removed.
•Remove the tank lid and extract the inner water tank and
water tank. Wash rinse and dry thoroughly.
•Prepare filter as per the instructions.
PREPARING THE AQUA OPTIMA EVOLVE+ WATER FILTER
CARTRIDGE
Aqua Optima is a unique water filtration system developed to
deliver filtered water quickly –reducing chlorine, limescale,
organics, herbicides, pesticides, lead and other heavy metals.
1. Remove all packaging from the filter
cartridge. There may be a small residue
of black carbon particles in the bag or
adhering to the cartridge body; this is
normal. These particles are harmless
and are washed off during the
preparation process.
2. Soak the cartridge in a bowl of water for
5-10 minutes to remove all air bubbles
(A).
3. Flush for 1 minute under a running tap (B).
4. The filter cartridge is now ready for use.
SET UP THE APPLIANCE AS PER THE INSTALLATION
INSTRUCTIONS IN SECTION 6. OF THIS MANUAL
1. Using the tank handle lift the water tank from the
appliance. Take out the inner water tank.
2. Ensure the seal ring is installed correctly.
3. Fit the Aqua Optima water filter
cartridge into the underside of the inner
water tank, rotating clockwise to lock
into place (A). Ensure it is firmly secure.
4. Reinsert the inner water tank into the
water tank.
5. Attach the power cord to the socket at
the base of the appliance (B).
6. Fill the water tank through the lid to the
“MAX” with cold tap water and refit the
water tank. Allow the water to filter
through to the main tank. Refill the
water tank to “MAX” with cold tap
water and refit the water tank into the
appliance.
7. Place drip tray and drip tray plate on the front of the
appliance (C).
8. Place jug or vessel under the dispense outlet.
9. Plug the power cord into the mains socket and turn on.
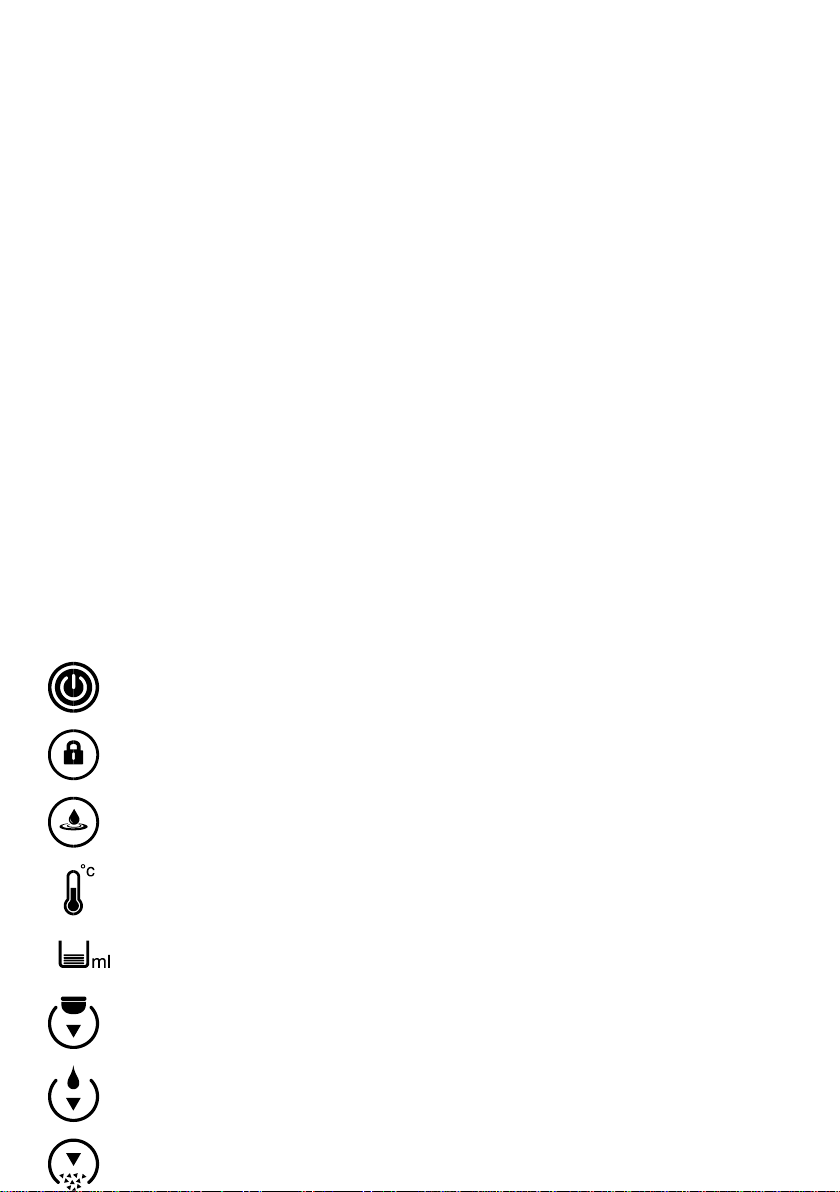
10. Using the On/Off button turn the appliance on.
11. Select the 1000ml dispense volume.
12.Press the dispense button to start dispensing. Repeat this
so that 2L is discarded.
13. Your appliance is now ready to use.
CLEANING
•ATTENTION: NEVER PLACE THE APPLIANCE BODY, PLUG OR
POWER CORD IN WATER OR OTHER LIQUIDS; ALWAYS WIPE
CLEAN WITH A DAMP CLOTH.
•Always switch off and unplug appliance before cleaning.
•Ensure the appliance is cool before cleaning.
•Wash, rinse and dry the inner water tank, water tank and
the tank lid regularly, at least when the filter cartridge is
replaced.
•Wash the drip tray with soapy water. Rinse all soap away
with clean water. Allow to air dry.
•Do not use scouring pads, solvents or abrasives to clean as
they may damage the appliance.
•The inner water tank, water tank, tank lid and drip tray are
not dishwasher proof.
•For hygiene and safety reasons you should always clean the
inner water tank, water tank and tank lid if it has been
unused or in storage for longer than 2 weeks.
REPLACING THE AQUA OPTIMA EVOLVE+ FILTER
CARTRIDGE
An orange light will show on the control panel when the filter
requires changing.
This appliance is only intended for use with Aqua Optima
Evolve+ filters.
1. Drain the water from the tanks and remove the tank lid.
2. Take out the inner water tank and remove the filter
cartridge by rotating it anti-clockwise.
3. Insert the new filter cartridge as described previously.
4. Reinsert the inner water tank into the water tank. Fill the
water tank up to the max line and refit the water tank into
the appliance.
5. Dispense water to remove any unfiltered water in the
appliance and top up.
6. Press and hold the filter warning symbol for 3 seconds to
reset the filter timer.
7. The appliance is now ready to use.
To ensure the best performance, the filter cartridge should be
changed after 100 litres, which is approximately 30 days of
typical use.
CARE & MAINTENANCE
•Water is a foodstuff. We recommend using the filtered
water within 3 days. If the appliance is not used for more
than 72 hours the water system will need draining. Unplug
the appliance and take it to the sink. Unscrew the drainage
cap located on the underside of the appliance and remove
the silicon bung over a sink. Allow all water to drain out of
the system. Re-insert the drainage bung and screw on the
cap. Repeat the process in section 3. first use, to refill the
appliance to continue use.
•Should the appliance not be used for an extended period of
time (for example a holiday) we recommend that the filter
is removed and placed in a clean plastic bag and stored in
the fridge. This will help to maintain the filter when not in

4
use. Before using the filter after storage, follow the
preparation and fitting instructions for use as normal.
•Do not overfill the water tank, do not fill above the “MAX”
fill to avoid risk of water overflow in the inner water tank.
4. How to use
1. Fill water tank to the “MAX” mark; water will flow
through the filter at a set rate and may take some time
due to the action of the filter cartridge.
2. Adjust the height of the drip tray to
accommodate the size of the mug
used. Ensure the drip tray is fully
engaged with the appliance. There are
3 height options (A).
3. Place mug or glass on drip tray (B).
4. Press the On/Off button. The On/Off
button will light up blue (C).
5. Press the up or down button to select
the desired temperature and volume
settings (D).
6. Press the dispense button to start
dispensing. One beep at the start (E).
7. The dispense button will fade in and
out whilst dispensing and beep twice
once complete.
8. To engage the child lock, press and
hold the lock button for 3 seconds. The
lock button will change from white to
red (F).
Note:
•To stop the cycle at any time press the dispense button.
Once the cycle has stopped it cannot be continued. A new
cycle must be started.
•Sound - all button sounds can be turned off (not sound in
6. & 7.) in How to use guide, section 4.) by pressing and
holding the temperature down arrow and the volume up
arrow for 3 seconds in the locked mode.
•The refill icon will turn orange when the water tank needs
refilling.
•The filter icon will turn orange when the filter needs
replacing, at 100L usage, follow the filter preparation and
replacement instructions in this manual.
5. Descaling
For safe & efficient operation of your Aurora appliance it is
important to descale regularly.
Untreated scale deposits prevent the element conducting heat
efficiently and may affect its performance. The appliance will
display the descale warning symbol when the appliance
requires the descale process. Ensure the water tank is empty
and the filter is removed before starting the descale process.
Descale Procedure:
1. Fill water tank with 2 litres of white vinegar (minimum 4%
acidity).
2. Place jug under dispense nozzle.
3. Press and hold the descale warning symbol for 3 seconds.
4. The descale warning symbol will flash and the appliance
will run a descale process. Caution: Dispense solution will
be hot; around 60°C.
5. When the water tank is empty, refill with 2L of cold water
and press the descale warning symbol again.
6. The appliance will run a cleaning cycle. Caution:
Dispense solution will be hot; around 60°C.
7. The descale warning symbol will turn off once complete.
8. Re-insert the Aqua Optima filter after descale process is
complete.
9. The appliance is now ready to use. Note:
• To abort the descale process, press the dispense button.
Unless the process is run completely the de-scale indicator
will not be reset and the appliance will continue displaying
descale icon.
6. Installation
The appliance comes with two plug types, one for UK and one
for EU, the correct plug should be used and inserted into the
plug socket.
WARNING: PLEASE DO NOT DISASSEMBLE THIS
APPLIANCE YOURSELF. ELECTRIC ELEMENTS WILL BE
EXPOSED AND THERE IS A RISK OF ELECTROCUTION
POSITIONING OF APPLIANCE
•Do not install this appliance in a very damp or hot place or
near heat source.
•Place the appliance on a flat and even surface.
•Install the appliance in a dry place to avoid damage,
moisture or rust.
•Do not use this appliance outdoors. This appliance is only
suitable for use indoors.

5
•Do not overhang the power cord and/or water tray off a
table, counter or other surface and avoid contact with hot
surfaces.
•WARNING: DO NOT INSTALL THIS APPLIANCE IN DIRECT
SUNLIGHT.
•Ensure that the ventilation on both sides is never blocked
or covered.
•WARNING: When positioning the appliance, ensure the
supply cord is not trapped or damaged.
•WARNING: Do not locate multiple portable socket-outlets
or portable power supplies at the rear of the appliance.
TROUBLESHOOTING
Condition
Possible cause
Solution
Machine will not start.
Appliance is unplugged.
Ensure the power cord is inserted in the
appliance and the plug is securely placed
into the socket.
Descale warning symbol on screen.
Appliance needs descaling.
Descale appliance using instructions in
manual.
Refill water warning symbol on screen.
Water tank is empty.
Refill water tank following the descaling
instructions.
Change filter warning symbol on screen (will
illuminate after 100L).
Filter life expired.
Change filter following the Aqua Optima
filter instructions. Reset filter warning
symbol by holding for 3 seconds.
Code
Operation
Error Description
EAC
Lock + boiling light blink
Wrong input AC power
DSO
Lock + 95°C light blink
Running without water
ENTC
Lock + 90°C light blink
NTC failure
E09
Lock + 80°C light blink
No power to element/heater
This symbol on the products and accompanying
documents means that used electrical and
electronic products should not be mixed with
general household waste.
For proper disposal or treatment, recovery and
recycling, please take these products to designated collection
points where they will be accepted on a free of charge basis. In
some countries you may be able to return your products to
your local retailer upon the purchase of a new product.
Disposing of this product correctly will help you save valuable
resources and prevent any possible effects on human health
and the environment, which could otherwise arise from
inappropriate waste handling. Please contact your local
authority for further details of your nearest collection point for
WEEE.
Penalties may be applicable for the incorrect disposal of this
product in accordance with national legislation.
This appliance conforms to the (LVD) 2014/35/EU, (EMC)
2014/30/EU and (RoHS) 2011/65/EU directives.
The appliance is designed for domestic and small office use
only. It should not be used for commercial purposes.
Do not immerse in water.
Warning! Children should be supervised to ensure that they
do not play with the appliance.
If the supply cord is damaged, it must be replaced by the
manufacturer, its service agent or similarly qualified persons in
order to avoid a hazard.
The product is supplied with a BS 1363 mains plug containing a
13A fuse. If it ever becomes necessary to replace the fuse, only
use fuses that are marked BS 1362, and rated at 13A. A second
mains cord and CEE 7/7 plug is supplied for use in European
markets.
Table of contents
Other Aurora Kettle manuals

Aurora
Aurora AU 3019 User manual

Aurora
Aurora AU 3408 User manual

Aurora
Aurora AU 3505 User manual

Aurora
Aurora AU 338 User manual

Aurora
Aurora AU 3018 User manual

Aurora
Aurora AU 3010 User manual

Aurora
Aurora AU 185 User manual

Aurora
Aurora AU 015 User manual

Aurora
Aurora AU 3517 User manual

Aurora
Aurora AU 339 User manual

Aurora
Aurora AU 337 User manual

Aurora
Aurora AU 3503 User manual

Aurora
Aurora AU 3506 User manual

Aurora
Aurora AU 3017 User manual

Aurora
Aurora AU 332 User manual

Aurora
Aurora AU 3011 User manual

Aurora
Aurora AU 3515 User manual

Aurora
Aurora AU 3404 User manual

Aurora
Aurora AU 3332 User manual

Aurora
Aurora AU 3508 User manual