Aurora T700 User manual

T700 RALLY KIT
INSTALLATION MANUAL

You must properly install this product, following the instructions in
the installation video. There are several crucial steps that must be
understood and performed by the installer and the rider to ensure
your motorbike will function properly.
READ ME FIRST
WARNING
To avoid serious injury or death:
• Read and follow the instructions on any “Important” label included
in this kit before using this product.
• Watch and follow the installation video to ensure proper installa-
tion of the product.
• Only a qualied mechanic should install this product.
• If you are installing this product by yourself, make sure you have
the required skills to complete the installation. If in doubt, contact
us at support@aurora-rally.com
See installation videos online at
https://aurora-rally.com/support/videos
or the included installation manual for directions.
2

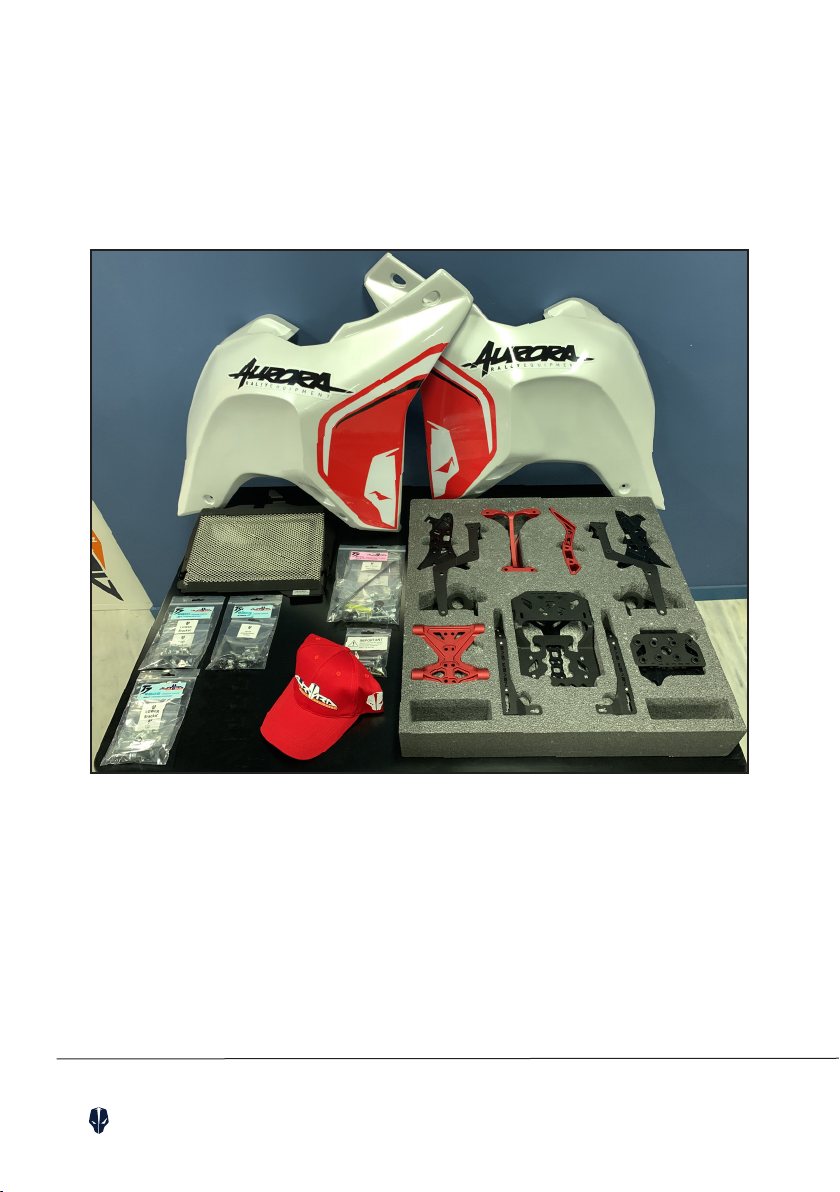
1. WHAT’S IN THE BOX ...................................................................... 4
2. REMOVING THE SIDE PANELS ...................................................... 5
3. REMOVING THE TANK COVER ...................................................... 7
4. REMOVING THE WINDSCREEN ..................................................... 8
5. REMOVING THE HEADLIGHT SUPPORT ....................................... 9
6. REMOVING THE SPEEDO ............................................................. 10
7. REMOVING THE HEADLIGHT ....................................................... 12
8. REPLACING THE RADIATOR GUARD ........................................... 13
9. PREPARE FOR INSTALLATION ..................................................... 14
10. NAVIGATION TOWER INSTALLATION ....................................... 24
11. TOP FAIRING BRACKETS INSTALLATION ................................. 26
12. HEADLIGHT INSTALLATION ...................................................... 27
13. BACKPLATE SUPPORT INSTALLATION .................................... 28
14. BACKPLATE INSTALLATION ..................................................... 29
15. CABLE MANAGEMENT .............................................................. 31
16. LOWER FAIRING BRACKETS ..................................................... 32
17. SIDE PANELS INSTALLATION ................................................... 33
18. WINDSHIELD INSTALLATION ................................................... 35
19. SPEEDO ON BARS (OPTIONAL) .............................................. 36
CONTENTS
T700 Rally kit installation manual. Aurora Rally Equipment PLC
web: aurora-rally.com, phone: +30 210 60 25 003
3

1. WHAT’S IN THE BOX
• A foam with all the necessary parts for the navigation tower
• Left and right side panels
• Radiator guard
• Five bags with bolts and hardware
for mounting the kit on the bike
• Aurora hat
• Warranty card
• Kit parts identication card
• A 2021 calendar memento
4

Start dissasembling the bike
by removing the side panels.
Use an 8mm wrench to
remove the six indicated
bolts.
The green arrows indicate
the three bolts that secure
the radiator guard on the
inside of the panel.
Push the panel towards the
rear of the bike to release
it from the securing slots.
Before removing the panel,
disconnect the turn
indicator.
2. REMOVING THE SIDE PANELS
T700 Rally kit installation manual. Aurora Rally Equipment PLC
web: aurora-rally.com, phone: +30 210 60 25 003
5
Remove the plastic clips
by pressing the pin in the
middle.

6
Remove the two bolts that
keep the plastic vent in
place.
Remove the three allen bolts
that keep the small frame
cover in place.

Remove the seat.
Remove the plastic clips on
the front of the tank cover
and the two allen bolts on
the rear.
Remove the fuel cap.
3. REMOVING THE TANK COVER
T700 Rally kit installation manual. Aurora Rally Equipment PLC
web: aurora-rally.com, phone: +30 210 60 25 003
7
Place your hand in the
middle of the tank cover and
pull it upwards to release it
from the securing slot on
the tank.
Repeat the procedure on the
other side of the tank cover.
Put the fuel cap back in
place.

8
Remove the four allen bolts
that keep the windscreen in
place.
Remove both side screens
by removing the indicated
bolts. Pull them forward to
release them from the
securing slots (red circle).
4. REMOVING THE WINDSCREEN

Cut the zip tie that
secures the cables on the
headlight support.
Disconnect the 12V socket
connector.
Repeat on the other side
and disconnect the
headlight connector.
5. REMOVING THE HEADLIGHT SUPPORT
T700 Rally kit installation manual. Aurora Rally Equipment PLC
web: aurora-rally.com, phone: +30 210 60 25 003
9
Remove the two bolts that
secure the silver bar.

10
Remove the three allen bolts
that keep the left side of the
headlight support in place.
Repeat the procedure on the
right side.
Remove the two bolts that
secure the speedo
on the headlight.
6. REMOVING THE SPEEDO

Pull the rubber cover and
disconnect the speedo
connector.
Disconnect the smaller
connector on the air temp
sensor.
T700 Rally kit installation manual. Aurora Rally Equipment PLC
web: aurora-rally.com, phone: +30 210 60 25 003
11
Pull the speedo upwards to
release it from it’s mounting
point.

Carefully cut the black tape
that keeps the speedo cable
on the plastic clip.
Alternatively, you can try to
remove the clip from the
headlight, but we don’t
recommend doing this as
it’s very easy to break it.
12
Remove these two bolts
that secure the headlight on
the bike.
7. REMOVING THE HEADLIGHT

T700 Rally kit installation manual. Aurora Rally Equipment PLC
web: aurora-rally.com, phone: +30 210 60 25 003
13
Use a small pliers to release
the two clips that secure the
brake hose on the radiator
guard.
Push the guard towards the
right side of the bike
to release it from
the mounting pin.
Remove the bolts that
secure the guard
on the radiator
(one on each side).
8. REPLACING THE RADIATOR GUARD

14
Install the new radiator
guard by reversing the
removal procedure.
Use the supplied bolts
instead of the original ones.
Place the headlight on a
soft surface. Remove the
four bolts that secure the
headlight cover.
You will be using these bolts
for mounting the speedo
bracket on the navigation
backplate.
9. PREPARE FOR INSTALLATION

T700 Rally kit installation manual. Aurora Rally Equipment PLC
web: aurora-rally.com, phone: +30 210 60 25 003
15
Install the spider clamp on
the headlight using the
supplied M6 bolts.
Apply thread lock and
torque them according to
specications.
Thead lock: Loctite 243
or Permatex Blue
Torque value: 10Nm
Remove the 12V socket
from the headlight support.
Remove the round rubber
cover from the other side of
the headlight support.

16
Install the 12V socket on the
right top fairing bracket.
Install the rubber cover on
the left top fairing bracket.
Remove the three philips
screws that secure the
speedo on the mount
(green cicles).
Remove the allen bolt that
keeps the air temp sensor in
place (red circle).

T700 Rally kit installation manual. Aurora Rally Equipment PLC
web: aurora-rally.com, phone: +30 210 60 25 003
17
Remove the three rubber
grommets from the speedo
mount.
We will be using this on our
speedo mount.
Mount the grommets on
Aurora speedo mount using
a small pliers.

18
Install the speedo bracket
on the navigation backplate.
Use the four allen bolts that
you removed from the
headlight cover.
Apply a bit of threadlock.
Thead lock: Loctite 243
or Permatex Blue
Torque value: 10Nm
Put the speedo on the
bracket. Turn the backplate
upside down and secure the
speedo in it’s place using
the original Philips screws.
Carefully hand tight them
untill they stop turning.
Do not use thread lock.

T700 Rally kit installation manual. Aurora Rally Equipment PLC
web: aurora-rally.com, phone: +30 210 60 25 003
19
Install the air temp sensor
on the supplied bracket
using the original bolt.
Put the hose on the sensor.
Secure the sensor bracket
at the rear side of the
backplate using
the supplied zip tie.
Install the supplied
anti-vibration dampeners on
the backplate support.
Hand tight them.
Do not use threadlock.

20
Assemble the main part of
the navigation tower using
the supplied nuts and bolts.
We recommend to install all
the navigation tower bolts
from the left side, just like
the original bolts
on the bike.
This is only for aesthetic
reasons.
Table of contents