ausdom AD250 User manual

FHD 1080P
Car DVR Dash Cam
Instruction Manual
AD 250

CONTENTS
Introduction
Package Contents
Features
Appearance
Safety Precautions
About the unit
About the car charger
About the mounting location
About backing up data
Mounting the Unit
Inserting the Memory Card
Connecting to Power
LED/Charging LED Indicators
Power the Unit On and Off
Power Indication
Video Recording
Taking Photos
Video Menu Configurations
Still Menu Configurations
Specifications
2
2
2
3
4
4
4
4
4
5
6
6
7
7
8
8
9
11
14
16

Introduction
Package Contents
Thank you for purchasing the AD 250 Car DVR Dash Cam. This car
camera is designed to capture real-time video of any events
happening when you are driving (and even when or dashboard. With
a 120° wide angle lens for the best field of view, you can be sure to
capture any the important events that happen around you or your
vehicle. The camera records video in Full HD 1080P and features up
to 32GB storage (via micro SD card).
This manual will give you the instructions and information about the
AD 250. Please read it carefully before using the AD 250, and keep it
properly for future reference.
- AD250 Car DVR Recorder *1
- Car Charger *1
- Mounting Bracket *1
- Charging Cable *1
- User Manual *1
- Mini size, 120°wide viewing angle
- 2.0 inch HD LCD display
- 1/4 inch color CMOS 2.0 mega-pixel high resolution sensor
- 4 layers fixed focus lens. Focusing range: 60cm to Infinity
- Compatible with TF (high speed microSD – called an SDHC card)
memory card up to 32GB. Memory card is not included in the package.
- SOS Button. You can protect the current recording by pressing the
SOS button to instantly save the file.
- Loop recording
- Motion detection
- Seamless recording
- Auto screen saver (wake up screen by any button on panel)
- Select cycle recording time
- Low power warning and auto power off to save videos.
- Auto power on and record while auto engine started
- Time-lapse power off after disconnecting with car power
- Instant mute function
- Video restore function if damaged
- WDR conducting balancing light automatically in the shooting process
- Built in microphone and speaker
- Built in G-sensor
- Built in 180 mAh rechargeable lithium battery
- Parking Monitor: Collision or shaking will trigger to start recording
- Ten on screen menu languages to choose from
Features

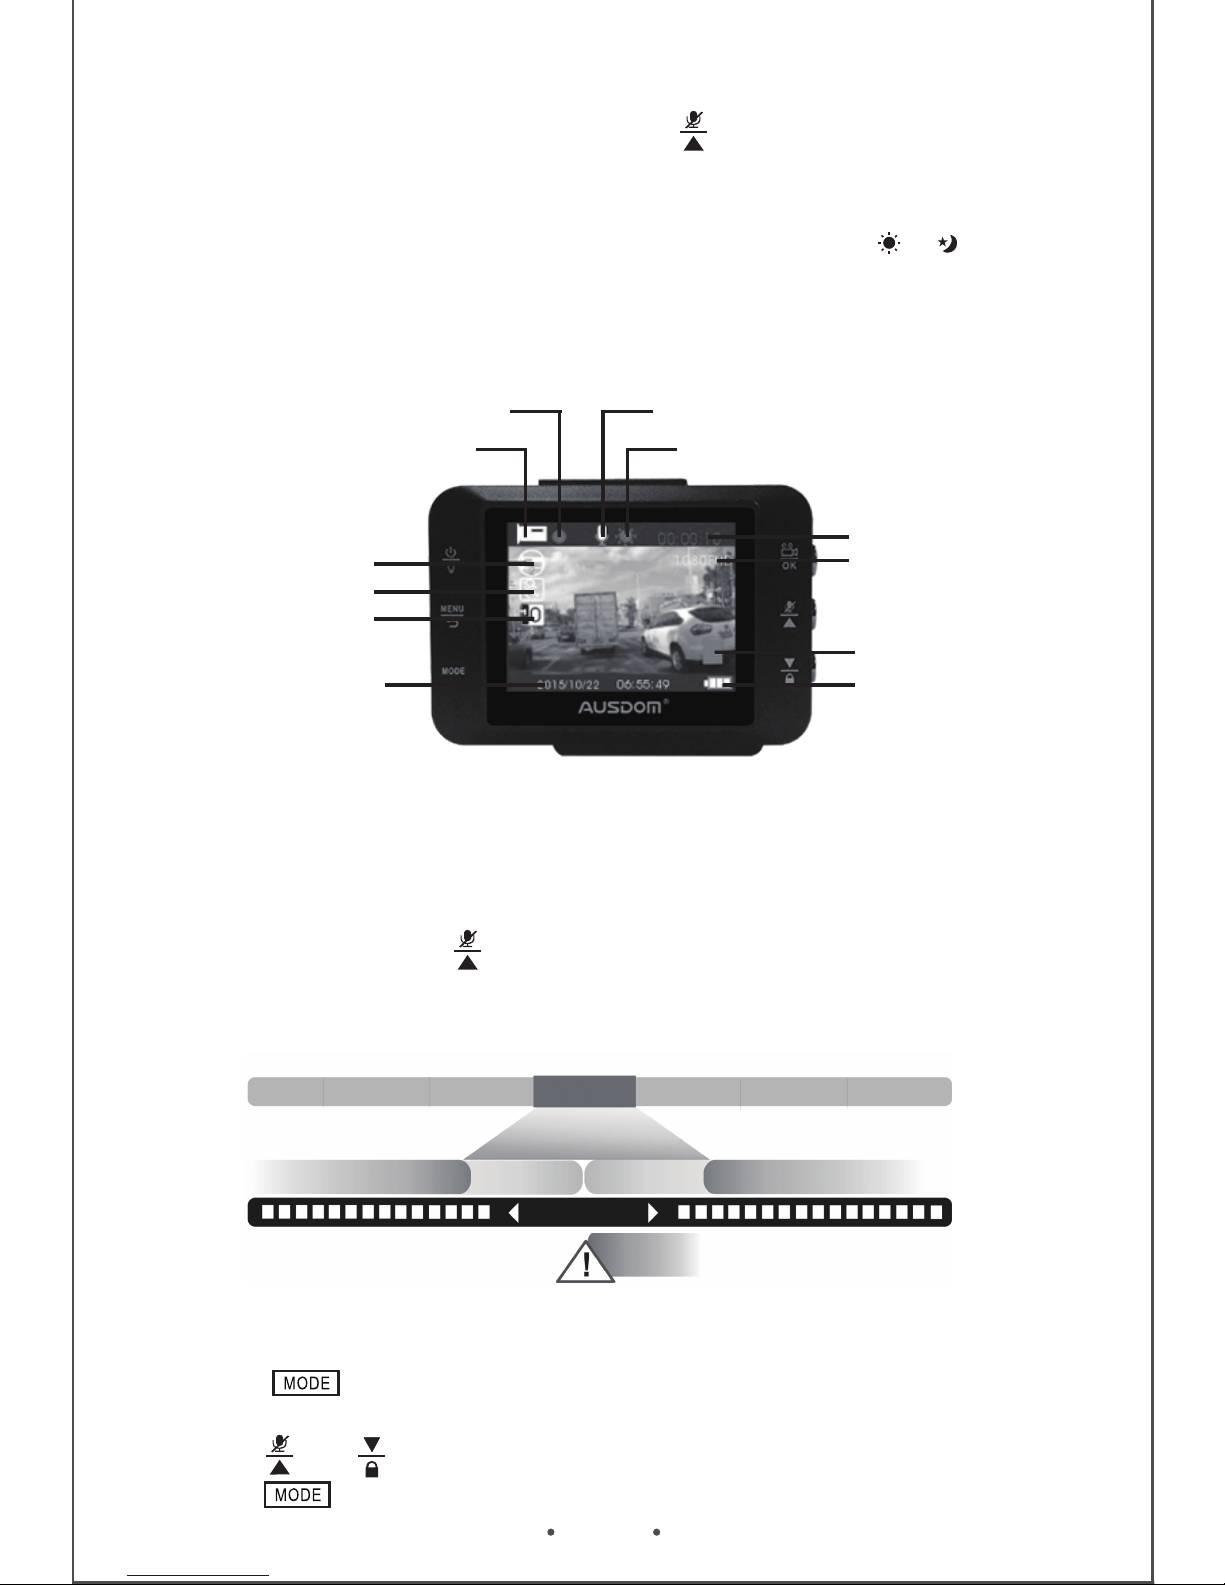
1. Micro USB interface
2. Power button/Night vision light
3. Menu /Back button
4. MODE/PIV
5. Reset button
6. Next/SOS
7. Prev/MIC
8. Record/OK
9. TF insert
10. HD out
Appearance
- Mini size, 120°wide viewing angle
- 2.0 inch HD LCD display
- 1/4 inch color CMOS 2.0 mega-pixel high resolution sensor
- 4 layers fixed focus lens. Focusing range: 60cm to Infinity
- Compatible with TF (high speed microSD – called an SDHC card)
memory card up to 32GB. Memory card is not included in the package.
- SOS Button. You can protect the current recording by pressing the
SOS button to instantly save the file.
- Loop recording
- Motion detection
- Seamless recording
- Auto screen saver (wake up screen by any button on panel)
- Select cycle recording time
- Low power warning and auto power off to save videos.
- Auto power on and record while auto engine started
- Time-lapse power off after disconnecting with car power
- Instant mute function
- Video restore function if damaged
- WDR conducting balancing light automatically in the shooting process
- Built in microphone and speaker
- Built in G-sensor
- Built in 180 mAh rechargeable lithium battery
- Parking Monitor: Collision or shaking will trigger to start recording
- Ten on screen menu languages to choose from
5
8
7
6
2
3
4
9
10
1

Safety Precautions
About the unit
- Do not disassemble or modify the unit by yourself. Contact the dealer
for help when the unit is failed to work.
- Do not press hard on the LCD screen that will cause the unit
malfunction.
- Do not clean the unit with cleaners containing strong acid or alkaline.
- Avoid using or storing the unit in an extreme temperature environment
or exposing to sunlight directly.
- Avoid using the unit in the environment with strong magnetic wave or
excessive vibration.
- Store the unit in a dry place away from moisture.
- In order to avoid the car's lighter socket to continue supplying power
when the car's engine is turned off or idled. Unplug the unit to reduce
unnecessary power consumption and avoid any unexpected problems.
About the car charger
- Only use the car charger or adapter provided with the camera to
avoid malfunction.
- Avoid damage, please do not constantly plug in and remove the car
charger.
- Do not touch the car charger with wet hands.
About the mounting location
- Mount the unit with constantly in the range between the windshield
wipers to ensure clear visibility in a rainy day.
- Do not place the unit where obstructing the driver’s view or deployment
of airbags.
About backing up the data
- Do not remove the memory card during operating to avoid file damage.
- To avoid the loss of data caused by improper use, it is recommended
to back up the data pre-saved in micro SD card to a computer or other
storage device before using this unit.

1. Clean and dry thoroughly the windshield area where you want to mount
the unit. (Refer to Picture 1)
Note: Dirty and moist glass will cause the mounting bracket can not be
firmly mounted on the windshield.
2. Insert the mounting bracket into the mount socket located on the top
of the unit and slide sideways until the mounting bracket is mounted on
the unit firmly. (Refer to Picture 2)
3. Turn the adjustment knob counter-clockwise to loosen and then
adjust the unit to a suitable angle. (Refer to Picture 3)
4.Find the best position on the windshield to mount the unit. Peel off
the protective film from the mounting bracket’s foam sticker and move
the rotatable knob clockwise until you hear a click to ensure the unit
firmly mounted on the windshield. (Refer to Picture 4)
Mounting the Unit
Picture 1
Windshield
Picture 2
Picture 3 Picture 4
Mount Bracket Car DVR Recorder

Note: For the best field of view, it is better to mount the unit in the
middle of the windshield near the rear-view mirror.
1. Connect the small end of the power/transmission cable to the USB
connector located on the side of the unit.
2. Connect the other end of the power/transmission cable to the
included car charger. (Picture 7)
3. Plug the included car charger into the car’s lighter socket. (Picture 8)
4. The unit will power on and start recording automatically after your
car engine is starting.
5. When the car engine is turned off, the unit will automatically power
off after saving the recordings.
3. To remove the memory card, push to eject memory card out of the slot.
Note:
- Make sure the memory card has been formatted before using.
- Do not remove the memory card during recording.
- You have to insert the memory card into the camera before connecting
the camera to the power supply.
- For best results, use the format function of the car camera to prepare
your memory card.
Inserting the Memory Card
Connecting to Power
1. Before starting to record, you have to insert a Class 6 or above
micro SD card with up to 32GB capacity into the slot located on the
side of the unit. (Refer to Picture 5)
Memory Card
Picture 5 Picture 6
2. Press button twice to enter Setup setting, press the or
button to select “Format” item and press button to format the
memory card. (Refer to Picture 6)

Note:
- The unit can be recharged and connected to the car’s lighter socket,
PC or USB power supplier with the included cable. When the unit is
connected to a PC, it can only be used for transferring files. You will
not be able to use any of the unit’s features at this time. Please
disconnect the unit from the PC to resume normal function.
- Only use the included car charger with 5V output to charge the unit.
Non-compliant car charger will damage the unit and cause malfunction.
The unit provides you the LED and charging LED indicators located on
the top of the screen that specifying the unit current status.
1. Power On: Press the power button located on the side of the unit.
2. Power Off: Press and hold the power button located on the side of the
unit for 3 seconds.
3. Auto Power On and Off: You have to enable the “Auto Power” feature
in the menu configurations to process Auto Power On/Off function. The
unit will automatically power off if no action during the configured time.
Note:
The unit will automatically power on when you connect the unit to the power
supplier via charging cable for charging. Relatively, the unit will power off
automatically when you unplug the charging cable to stop charging.
LED/Charging LED Indicators
Power the Unit On and Off
Picture 8
Picture 7
Car Charger
Charging Cable
Solid Red
Flashing Blue Once
Charging
Taking a photo
Flashing Blue Recording
Charging LED Status Definition
LED Status Definition

Note:
When the device crashes, you can press the Reset button located on
the side of your unit to restore all settings to factory default settings
and reboot.
The unit provides you a battery indication appeared on the bottom left
of the screen clearly so that you can understand the current battery
status. (Refer to Picture 9)
Note:
- Whether the unit is in the power on or power off status that will not
affect the charging.
- When the battery is running out of power (low power status), the unit
will show “Low Battery” warning message on the screen and power off
immediately. (Refer to Picture 10)
Power Indication
Video Recording
Normal Recording
Picture 9
Picture 10
After the car engine is starting, the unit will automatically power on and
start recording. Or you can press button to start recording and press
once to stop manually.
You can configure the recording length for saving. Refer to Loop
Record for more information. After the car engine is off, the unit will
automatically save the current recording and power off.
EN 9
Note:
- In the Recording Mode, you can press button to enable or disable
the microphone function.
- You can choose White Day Mode or Night Mode to improve the quality
of photography by pressing power button once. The icon or will show
on the upper middle of screen.
Event Recording
Taking Photos
1. Press button on the left side of the unit to Still Mode. Icon
shows on the upper left screen.
2. Press and to adjust the digital zoom.
3. Press button to take a photo. The LED flashes blue once.
Picture 11
Battery indication
Memory card
Resolution
Recording time
White day
Microphone(on)
Recording
Video mode
Loop recording in
2 mins lengths
Motion detection
Exposure
Date/Time
Picture 12
Recycle Record
Event
Saving
Emergency Recording
20 Secretary
Recording
Normal RecordingNormal Recording
Locked File
If the Event Recording function is enabled, in the Recording Mode,
the unit records the event and saves it automatically. Or you can
press and hold the button to manually activate emergency
recording. The recorded files are protected not be overwritten. (Refer
to Picture 12)

1. Press to start, press again to pause. Press and hold and to
fast forward and reverse.
2. Press to return to the Playback Mode.
EN 10
1. Press and hold 2 seconds to enter Playback Mode.
2. Press and to select the photo or video clip you want to playback.
3. In the Playback Mode, you can press a press and to adjust the
digital zoom.
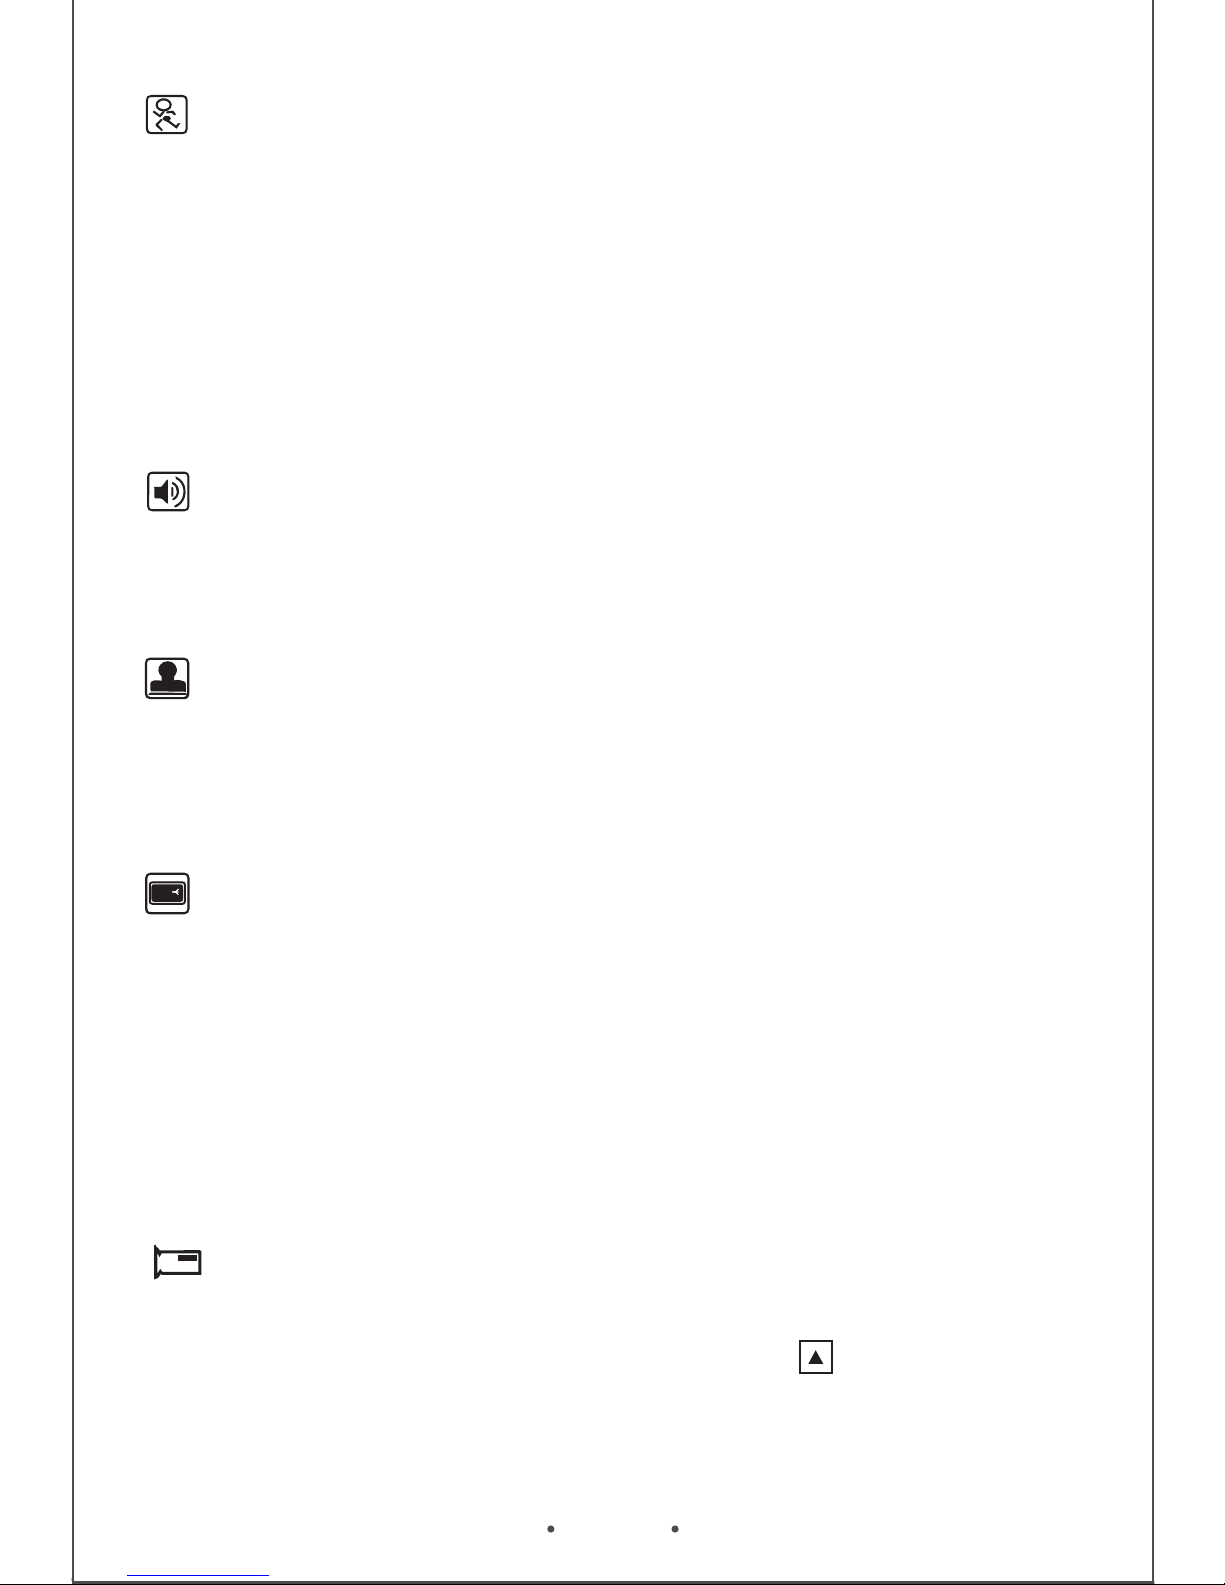
1. Press to enter Playback setting, press and to select and
press to delete the photo or the video clip.
2. Select to protect the photo or the video clip from overwritten.
3. Select to start slide show of all the photos and the video clips.
4. Select to adjust the volume of the video clips.
5. Select to start the Thumbnail function, displaying up to 9 photos
or video clips simultaneously to browse quickly. (Refer picture 14)
Playback Mode
When play backing a video
When delete, protect, slide show the photo or the video clip,
adjust the volume and use the thumbnail function
Picture 13
Resolution
Remaining
numbers of photos
Quality
Memory card
Battery indication
Expose
Still mode
White day
White balance
ISO

EN 11
The feature is used to adjust the exposure composition value to lighten
or darken of the preview images.
Values: +2.0,+5/3,+4/3,+1.0,+2/3,+1/3,+0.0,-1/3,-2/3,-1.0,-4/3,-5/3,-2.0
Exposure
In the Video Mode, press button once to enter Video setting .
Press button twice enter Setup setting .
Note:
You can not configure the menu settings in the Recording Mode.
When operating in the Recording Mode, press button to stop
recoding and press button to enter menu configurations.
Video Menu Configurations
Picture 14
Set the resolution for recording video. As the resolution goes up, the image
becomes clearer, sharper, more defined, and more detailed as well.
Values: 1080FHD 1920*1080 / 1080P 1440*1080 / 720P 1280*720 30fps
Resolution
Adjust the length of time for the video saved. When the storage of memory
card is full, the oldest files will be overwritten automatically. Conversely, if
this feature is disabled, it will stop recording when the memory card is full.
Value: Off/1 Minute/2 Minutes/3 Minutes/5 Minutes/10 Minutes
Loop Recording
In the recording mode, the unit records the event of 20 or 40 seconds
and saves it automatically. Or you can press the button to manually
activate emergency recording. The recorded files are protected not be
overwritten. (Refer to Picture 11)
Values: Off/20/40
Event Recording
EN 12
When the Motion Detection is configured to on, any movement around
the car’s surrounding will be recorded automatically. Recording will
automatically power off if nothing happened and moved during the
monitor mode. Once anything is movement, the unit will start recording
immediately.
Values: Off/On
Note: This feature required to be connected to a constant power supply.
Motion Detection
Enable or disable microphone during video recording.
Values: Off/On
Recording Audio
Adding the current date, time of the event to the video being recorded
and they will be displayed at the bottom right corner of videos.
Values: Off/On
Date Stamp
When the car is detected vibration and collision, the built-in G-Sensor
feature will automatically enter the emergency recording mode to lock
the recorded images. A lock sign will appear on the top right corner of
the screen. Real-time locked the file to ensure that files will not be
overwritten by Loop Record. This item allows you to adjust the sensitivity
of the G-Sensor.
Values: Off/High/Medium/Low
G-Sensor Setting

EN 13
It depends on what voltage the country uses. 60Hz systems usually
use 110V – 120V while 50Hz systems tend to use 220V – 240V.
Values: 50Hz/60Hz
Frequency
LCD OFF
Value:Off/On
Format the memory card. Values: OK/Cancel
Format
Set the current date and time. Use buttons to switch Y/M/D/H/M
and click button to confirm/save the settings.
Date/Time
Enable or disable the sound of the buttons located on the unit
Values: On/Off
Beep Sound
Set PAL mode or NTSC mode.
PAL → a frame rate of 25 frames per second (fps) at an aspect ratio
of 720x576.
NTSC → a frame rate of 30 frames per second (fps) at an aspect ratio
of 720x480.
Values: PAL / NTSC
TV mode
Set the auto-off time without any operation and recording upon continuous
power supply.
Values: Off/1 minute/3 minutes
Auto Power Off
Set the language displayed on the screen.
Values:English/French/Spanish/Portuguese/Germany/Italian/Simplified
Chinese/Traditional Chinese/Russian/Japanese
Language

EN 14
Note: Backup desired data before formatting. You can backup the data
to the PC (Win XP2/Vista/Win 7/Win 8) via included USB cable.
Photo Resolution
Reset all settings to factory default values.
Values: OK/Cancel
Default Setting
Display the current firmware version.
Version
Set the resolution for recording photo. As the resolution goes up, the
image becomes clearer, sharper, more defined, and more detailed as well.
Values: 3M 2048*1536/2MHD 1920*1080/VGA 640*480/1.3M 1280*960/
12M 4000*3000/10M 3648*2736/8M 3264*2448/5M 2592*1944
Shooting immediately or pressing button to take a photo after 2/5/10
seconds.
Values: Single/2S Timer/5S Timer/10S Timer
Capture Mode
Continuously taking 5 photos if enable Sequence function.
Values: Off/On
Sequence
There are three quality values for the image quality. The value (ex. Fine)
used less compression and has the highest quality.
Values: Fine/Normal/Economy
Quality
Still Menu Configurations
In the Still Mode, press button once to enter Video setting .
Press button twice to enter Setup setting .

EN 15
Higher the sharpness is, clearer the picture.
Values: Strong/Normal/Soft Off/On
Sharpness
The White Balance feature can boil down to the concept of color
temperature. Color temperature is a way of measuring the quality of a
light source. Adjust the white balance to get the colors in your images
as accurate as possible recorded the video.
Values: Auto/Daylight/Cloudy/Tungsten/ Fluorescent
White Balance
Set the background hue of the photos.
Values: Color/Blake & White/Sepia
Color
ISO value is used to indicate the sensitivity to light of photos. The ISO
value higher is, higher the sensitivity.
Values: Auto/100/200/400
ISO
The feature is used to adjust the exposure composition value to lighten
or darken of the preview images.
Values: +2.0,+5/3,+4/3,+1.0,+2/3,+1/3,+0.0,-1/3,-2/3,-1.0,-4/3,-5/3,-2.0
Exposure
Adding the current date, time of the event to the photo being recorded and
they will be displayed on the playback mode.
Values: Off/Date/Date & Time
Note: The Setup setting of the Still Mode is the same as The Setup
setting of the Video Mode.
Date Stamp

EN 16
Specifications
Display Spec.
Display Type 2.0” TFT LCD display
480*240
NT96220+5B3
Black
SAMSUNG 5B3
Micro SD Card up to 32GB
USB 2.0
Yes
Built in
yes
1080FHD 1920*1080/1080P 1440*1080/
720P 1280*720 30fps
3M 2048*1536/2MHD 1920*1080/
VGA 640*480/1.3M 1280*960/12M
4000*3000/10M 3648*2736/8M
3264*2448/5M 2592*1944
JPEG
Win XP2/Vista/Win 7/Win 8
AVI
LCD Resolution
Chipset
Color
Sensor
Storage Expansion
USB Interface
HD OUT
Microphone
G-sensor
System
Decode Format
Video Resolution
Photo Resolution
Photo Format
SupportLoop-cycle Recording
50HZ/60HZ
Frequency
PAL/NTSCTV mode
Language
SupportMotion Detection
SupportDelay Shutdown
Auto/Daylight/Cloudy/Tungsten/
fluorescent lamp
White Balance
+2.0,+5/3,+4/3,+1.0,+2/3,+1/3,+0.0,
-1/3,-2/3,-1.0,-4/3,-5/3,-2.0
Exposure
Hardware
Spec.
Video/Image
Spec.
Main Functions
Spec.
Battery Spec.
Built in 180 mAh-3C 3.7V rechargeable
lithium battery
Battery Type
Micro USBCharging Port
1-2 hoursCharging Time
-10-60 oCOperating Temp.
-20-75 oCStorage Temp.
English/French/Spanish/Portuguese/Ger-
many/Italian/Simplified Chinese/Traditional
Chinese/Russian/Japanese

For more information, please visit our official website
www.ausdom.com
Your valuable comments and suggestions on improving
AUSDOM products are welcomed!
Table of contents
Other ausdom Dashcam manuals


