ausdom AW615 User manual

AUSDOm®
Enjoy
Smart
Life
1080P
WebCam
User
Manual
AW
615

Introduction
AUSDOM
AW615
is
a
WebCam
with
high-resolution,
foldable
and
easy
to
carry.
Providing
1080P
HD
resolution
can
capture
the
video
with
the
best
resolution
without
any
blurs.
Build-in
microphone
with
noise
reduction
and
recording
functions.
AW615
also
provides
2.0
super-large
aperture
making
first-class
shots
possible
even
in
poor
light.
Package
Contents
1.
WebCam*1
2.
User
Manual*1
3.
CD
Driver*
1
Features
-
High
Resolution
HD
1080P
CMOS
Sensor
-
Large
window
capture
size:
4608*3456
-Video
mode:
MJPG&YUY2
-Interface:
USB3.0/2.0/1.1
port
-Transmission
rate:
(640*480)
30F/S;
(1280*720)
30F/S
-
Dynamic
range:
Larger
than
72dB
-
Image
Focus:
30cm
to
infinity
-
Non-Compression
Image
Processor
-
AWB
(Automatic
Whiteness
Balance)
-
4-layer
film-coated
glass
lens
group
-
Photo
frame
function
and
Built-in
microphone
Note:
Feature
and
Spec,
are
subject
to
be
changed
without
any
notice.
System
Requirements
-
IBM
PC
or
compatible
PC
or
laptop
with
USB
port
-
Pentium
1G
or
higher
CPU
-
Over
500MB
free
hard-disc
space
-
CD-ROM
driver
-
256MB
memory
-
Support
DirectX
9.0
VGA
card
-
Windows
XPA/ista/7/8
•
EN
1
•

For
HD
720P
Video
Recording
-2.4GHz
Intel®
Core
™
2
Duo
-
2
GB
RAM
-
1GB
hard
drive
space
-
USB
2.0
port
Product
Overview
Manual
swivel
lens
Cable
Mounting
and
Connecting
the
Camera
Place
the
WebCam
where
you
want
it
on
a
computer
monitor
or
a
flat
surface
desktop.
For
a
computer
monitor
deployment,
unfold
the
flexible
clip
and
place
the
WebCam
on
your
computer
monitor
to
grip
the
edge
of
the
screen
with
the
foldable
flexible
clip.
After
fixing
the
WebCam,
connect
the
USB
cable
to
your
PC’s
USB
port.
Note:
As
well
as
a
WebCam
and
video
calling
application,
you
need
a
sound
card,
microphone
and
an
internet
connection.
•
EN
2
•
Driver
Installation
1.
Power
on
your
computer.
2.
Connect
the
WebCam’s
USB
cable
to
the
USB
port
of
your
computer.
3.
Insert
the
supplied
CD
into
your
CD-ROM
drive.
4.
The
installation
dialog
screen
will
appear,
follow
the
instructions
on
the
screen
to
finish
the
installation.
(If
the
auto-run
program
does
not
be
launched,
click
on
the
Start|
My
Computer
and
then
double
click
the
AUSDOM
1080P
camera
driver.exe
to
begin
the
installation)
Note:
Please
make
sure
the
connection
between
your
PC
and
WebCam
is
correctly
before
installing
the
driver.
Using
your
WebCam
The
AW615
WebCam
provides
Camera
Manager
application
allowing
you
to
control
your
WebCam
by
launching
the
application
or
right-clicking
the
[o]
icon
located
on
the
Windows
toolbar.
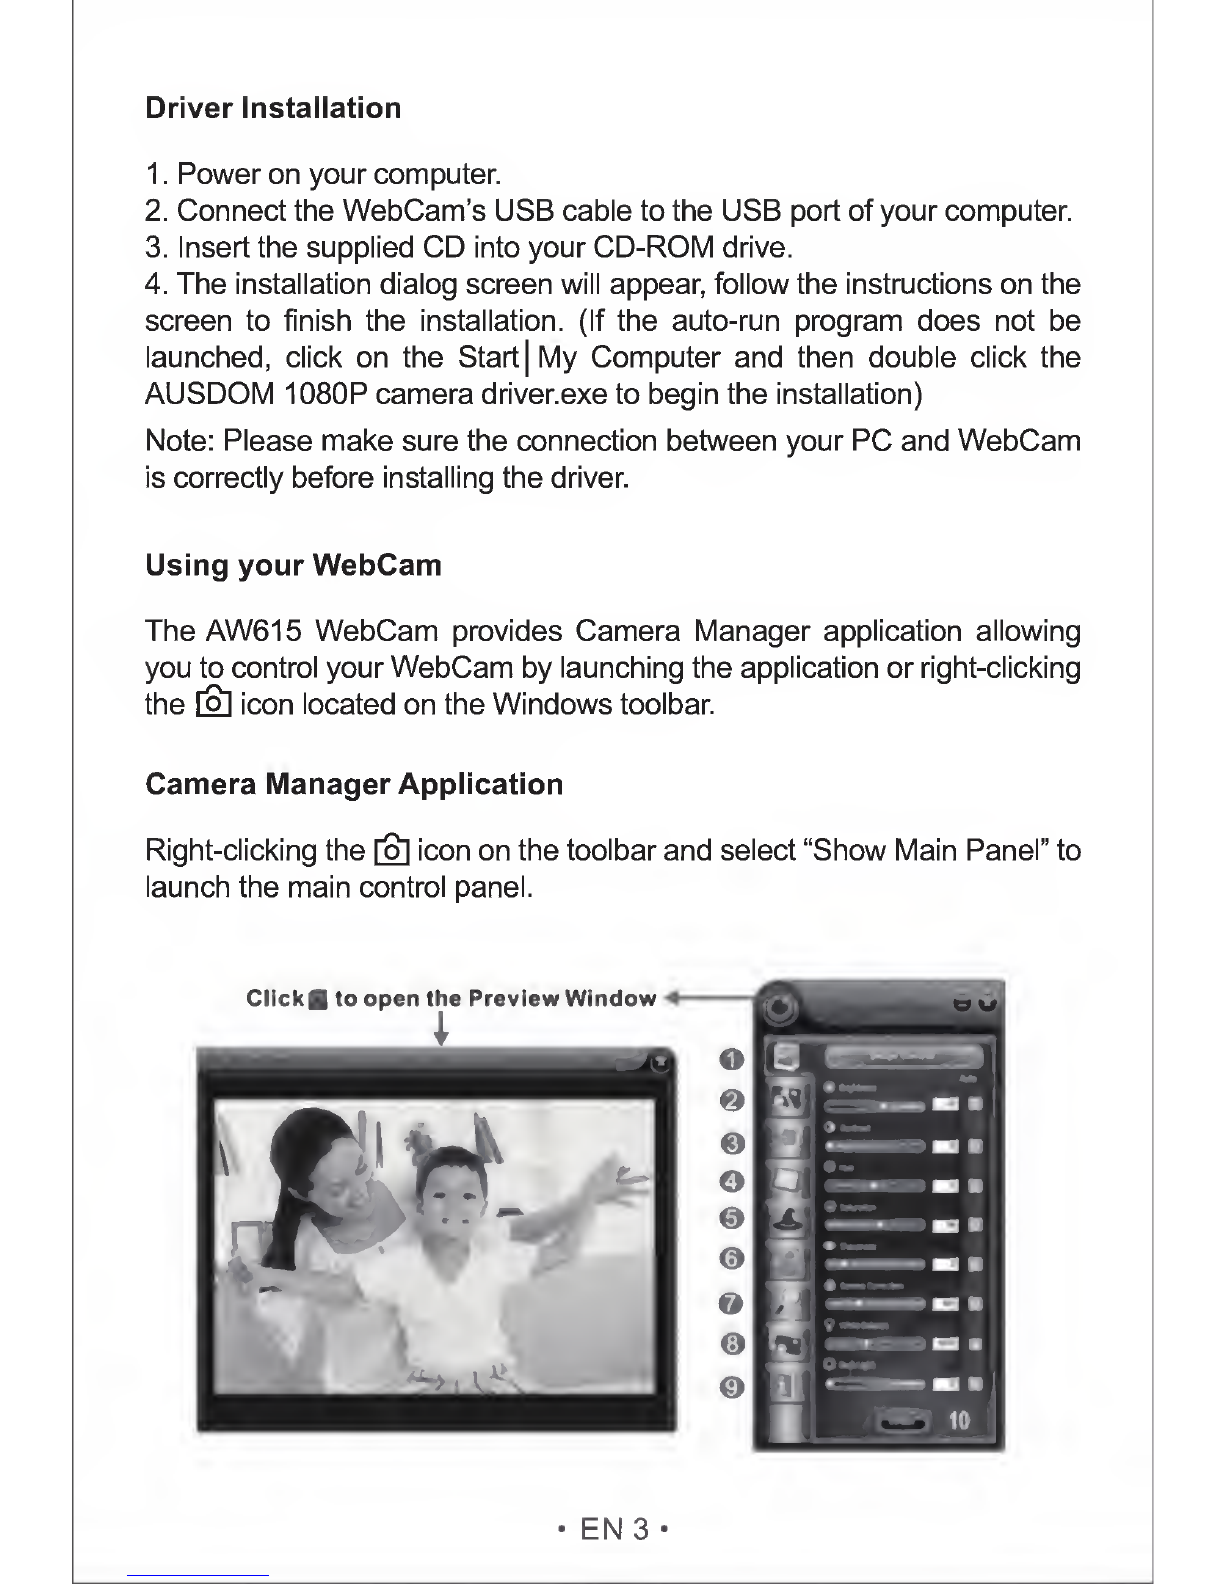
Camera
Manager
Application
Right-clicking
the
[o]
icon
on
the
toolbar
and
select
“Show
Main
Panel”
to
launch
the
main
control
panel.
•
EN
3
•

1.
Image
Control
2.
Camera
Control
3.
Image
Style
4.
Photo
Frame
5.
Filter
Effect
6.
Face
Track
7.
Digital
Zoom
8.
Photograph
9.
Information
10.
C
ontrol
Interface
Image
Control
In
the
Image
Control
panel,
you
can
adjust
the
quality
of
the
image
including
Brightness,
Contrast,
Flue,
Saturation,
Sharpness,
Gamma
Correction,
White
Balance
and
Back
Light.
Click
Default
button
to
restore
all
settings
to
the
factory
default
values.
Camera
Control
In
the
Camera
Control
panel,
you
can
adjust
the
parameters
of
your
WebCam
including
Exposure,
Focus,
Anti-Flicker,
Flip
and
Low
Light.
Click
Default
button
to
restore
all
settings
to
the
factory
default
values.
Image
Style
AW615
WebCam
provides
you
6
kinds
of
image
styles
including
Normal,
Mono,
Grey,
Ancient
Movie,
Colorful
and
Soft.
Image
Control
Camera
Control
•
EN
4
•
Image
Style

Photo
Frame
In
the
Photo
Frame
panel,
you
can
configure
the
frame
with
Static
or
Animation.
Click
Apply
button
to
take
the
changed
values
effect.
Filter
Effect
In
the
Filter
Effect
panel,
you
can
configure
the
image
with
None,
Whirl,
Pinch,
Fat,
Thin,
Splash
or
Emboss
special
efficacy.
Face
Track
Use
the
Face
Track
feature
to
confirm
you
are
always
in
the
picture
including
Close,
Tracking
me
and
Tracking
us
selection
items.
□
□
□
L3
H

Digital
Zoom
In
the
Digital
Zoom
panel,
you
can
zoom
in
or
out
to
include/exclude
your
surroundings.
Click
Back
to
100%
button
to
make
your
image
restore
to
the
original
size.
Photograph
In
the
Photograph
panel
allows
you
to
adjust
the
resolution
for
your
image.
Click
M
to
take
a
snapshot
and
click
Saved...
button
to
save
the
image.
Note:
High
resolution
will
slow
down
the
processing
speed.
Information
The
Information
panel
includes
Data
and
Driver
Information.
You
can
launch
the
Preview
Window
by
clicking
^
located
on
the
upper
left
corner
or
select
the
Enable
item
in
the
Data
Information
area.
-
Data
Information:
Including
Preview,
Camera
List,
Color
Space,
Output
Size
and
Frame
Rate
(fps/sec).
-
Driver
Information:
Including
Camera
Driver
Version,
Camera
Controller
and
Language
configurations.
——
8
(
8
)
•
.
.
.
*
jj
1
■
Digital
Zoom
Photograph
Information
•
EN
6
•

Specifications
Lens
Spec.
F/No.
2.0
Focus
30CM
to
infinity
Lens
Material
4-layer
film
coated
glass
lens
group
Viewing
Angle
Horizontal:
65°
Zoom
Yes
Microphone
Spec.
MIC.
Built-in
S.P.L
-36dB+2dB
Directivity
Omni-directional
Hardware
Spec.
Chipset
P269+MA1080
Control
1C
5822
Built-in
Mic
Sensor
MA1080(5B3)CSP-481/4.5
COMS
“SAMSUNG”
Interface
USB3.0/2.0/11
(Free
Driver)
Power
Consumption
<220MA
Support
OS
(UVC)
Windows7,
windows
XP2,
Windows8,
Windows
Vista
Video/Image
Spec.
Video
Resolution
(Video
mode:
YUY2)
Max.
Resolution:
1920*1080
5fps
Min.
Resolution:
160*120
30fps,
Default:
1280*720
8fps
Video
Resolution
(Video
mode:
MJPG)
Max.
Resolution:
1920*1080
30fps
Min.
Resolution:
160*120
30fps,
Default:
1280*720
30fps
Photo
Resolution
1920*1080
Photo
Format
JPG
Storage
Temp.
-10°C-80°C
Operating
Temp.
-10°C-50”C
•
EN
7
•
EINFUHRUNG
Wir
bedanken
uns
fur
Ihre
Wahl
unserer
HD
Webkamera!
Sie
ist
ein
digitales
Web-Hochleistungsprodukt,
welches
durch
unsere
Technologie
und
Qualitat
garantiert
ist.Es
ist
ein
PNP
(Plug
and
Play)
Produkt
fur
Echtzeit
Dateniibertragung
an
eine
PC
uber
einen
USB
Port.
Es
hat
eine
hohe
Auflosung
und
schnelle
Ubertragungsrate,
es
sieht
ansprechend
aus
und
ist
eine
Internet-Lebens-Erfahrung
mit
Ihren
fernen
Freunden
und
Familien!
SICHERHEITSWARN
UNGEN
•
Versuchen
Sie
bitte
nicht,
die
Webcam
abzuandern.
•
Stellen
Sie
die
Webcam
bitte
nicht
an
extrem
feuchten
oder
staubigen
Orten
auf.
•
Bitte
setzen
Sie
die
Webcam
nicht
extrem
hohen
Temperaturen
aus,
wie
in
einem
geschlossenen
Fahrzeug
Oder
in
direktem
Sonnenlicht.
Hohe
Temperaturen
konnen
die
Funktion
der
Webcam
und
ihrer
inneren
Bauteile
beeinflussen
•
Entfernen
Sie
bitte
nicht
das
Webcam-Gehause.
Die
interne
Inspektion,
Wartung
und
Reparaturen
sollten
von
einer
autorisierten
Kundendienststelle
ausgefiihrt
werden.
•
Trennen
Sie
die
Webcam
von
Ihrem
Computer
und
nehmen
Sie
Kontaktzu
Ihrem
Handler
vor
Ort
Oder
einer
autorisierten
Kundendienststelle
auf.
Benutzen
Sie
die
Webcam
nicht
weiter.
•
Setzen
Sie
bitte
das
Produkt
nicht
Feuer,
Wasser,
hohen
Temperaturen,
direktem
Sonnenlicht
oder
einem
ubermaftigen
StoR.
aus.
•
Trennen
Sie
die
Webcam
von
Ihrem
Computer
und
nehmen
Sie
Kontaktzu
Ihrem
Handler
vor
Ort
oder
einer
autorisierten
Kundendienststelle
auf.
Benutzen
Sie
die
Webcam
nicht
weiter.
•
Bitte
stolen
Sie
die
Webcam
nicht
und
lassen
Sie
diese
nicht
fallen,
dies
kann
zu
Storungen
in
der
Webcam
fiihren.
Falls
Ihre
Webcam
herunterfiel
oder
das
Gehause
beschadigt
ist,
trennen
Sie
die
Webcam
von
Ihrem
Computer
und
nehmen
Sie
Kontakt
zu
Ihrem
Handler
vor
Ort
oder
einer
autorisierten
Kundendienststelle
auf.
Benutzen
Sie
die
Webcam
nicht
weiter.
A
Telekonferenzen
und
Videokonferenzen
benotigen
eine
Audiokarte,
Mikrofon
und
eine
Internetverbindung.
•DEI-
PARAMETER
UND
EIGENSCHAFTEN
*
Hohe
Auflosung
HD
1080P
CMOS
Sensor
*
Groftformatige
Datenerfassungsfenster:
4608*3456
*
Video
Modus:
MJPG
und
YUY2
*
Schnittstelle:
USB
3.0
/
2,0
/1.1
Port
*
Obertragungsrate:
(640x480)30
F/S;
(1280x720)30
F/S
*
Signal-Rausch-Verhaltnis:
Grosser
als
48
dB
*
Dynamikbereich:
Grosser
als
72
dB
*
Bildfokus:
30
cm
bis
Unendlich
*
Bildverarbeitung
ohne
Kompression
*AWB
(automatischerWeiftabgleich)
*
Hoch
qualitative
Glaslinse
*
Automatische
Gesichtsverfolgung
*
Fotorahmen-Funktion
*
Eingebautes
Mikrofon
Eigenschaften
und
technische
Daten
konnen
sich
ohne
vorherige
Bekanntmachung
andern.
SYSTEMANFORDERUNGEN
*
IBM
PC
Oder
kompatible
PC
Oder
Laptop
mit
USB
Port
*
Pentium
1
G
Oder
hohere
CPU
*
Mehr
als
500
MB
freier
Platz
auf
Festplatte
*
CD
-ROM
Treiber
*
256
MB
Memory
*
Unterstutzt
DirectX
9.0
VGA
Karte
*
Windows
XP/Vista/7/8
Zur
HD
1080P
Videoaufzeichnung
*
2.4GHz
Intel®
Core
™
2
Duo
*
2
GB
RAM
*
1GB
Festplattenplatz
*
USB
2.0
Port
TREIBER-INSTALLATION
Stellen
Sie
bitte
sicher,
dass
die
Webcam
vor
der
Installation
im
USB
Port
eingesteckt
ist.
1.
Schalten
Sie
Ihren
Computer
ein.
Beenden
Sie
alle
laufenden
Programme.
2.
Verbinden
Sie
das
USB-Kabel
Ihrer
Webcam
mit
dem
USB-
Port
Ihres
Computers.
3.
Laden
Sie
enthaltene
Webcam
SOFTWARE
CD
in
Ihren
CD-
ROM
Treiber.
4.
Folgen
Sie
den
Anweisungen
des
Installationsprogramms
auf
dem
Bildschirm,
urn
die
Installation
fertigzustellen.
(Falls
das
Programm
nicht
startet,
klicken
Sie
auf
die
Start-Menu
Taste
und
wahlen
Sie
Mein
Computer,
dann
ein
Doppelklick
auf
den
Treiber,
urn
die
Installation
zu
starten.)
WIE
IST
DAS
USB
VIDEOGERAT
ZU
BENUTZEN
Rechtes
Klick
auf
das
Webcam
Symbol
auf
der
Taskleiste,
wahlen
Sie
„Hauptpanel
zeigen“.Linkes
Klick
auf
das
Vorschau-
Fenster
in
der
oberen
linken
Ecke,
danach
konnen
Sie
es
•
DE3-
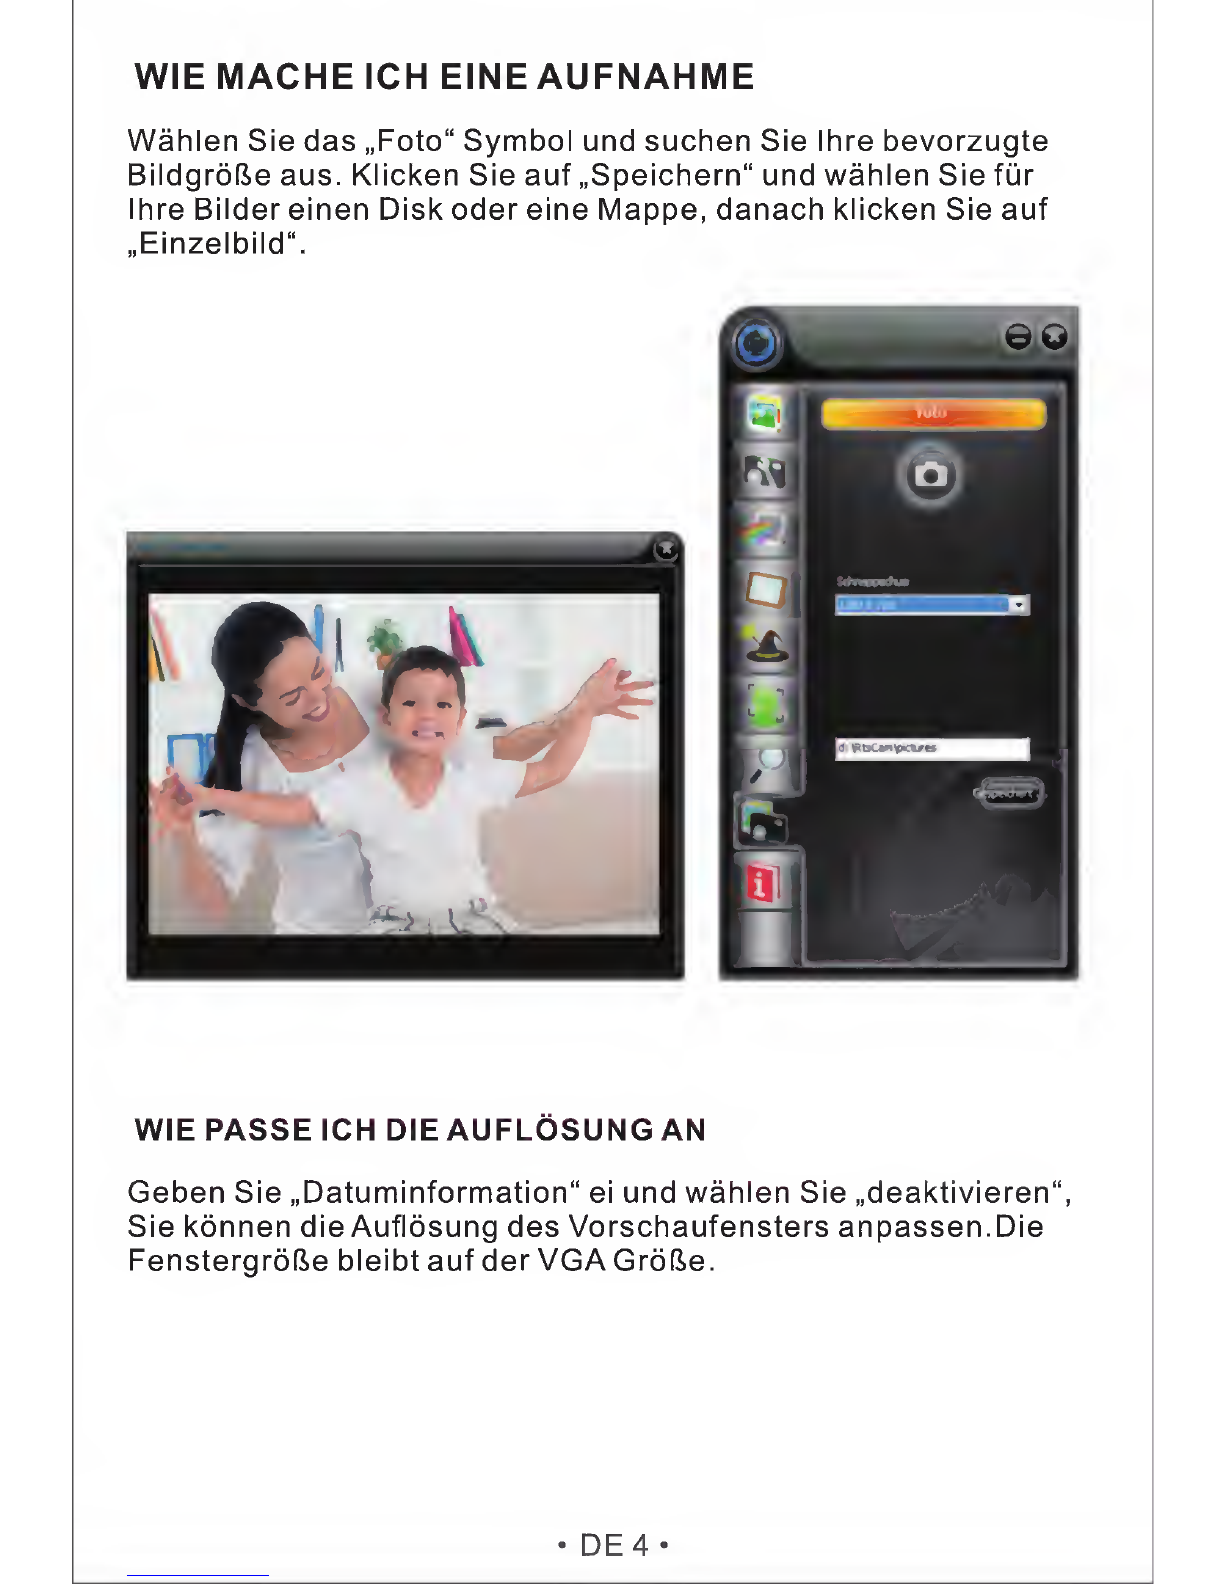
WIE
MACHE
ICH
EINE
AUFNAHME
Wahlen
Sie
das
„Foto“
Symbol
und
suchen
Sie
Ihre
bevorzugte
Bildgrofle
aus.
Klicken
Sie
auf
„Speichem“
und
wahlen
Sie
fur
Ihre
Bilder
einen
Disk
Oder
eine
Mappe,
danach
klicken
Sie
auf
„Einzelbild“.
WIE
PASSE
ICH
DIE
AUFLOSUNG
AN
Geben
Sie
„Datuminformation“
ei
und
wahlen
Sie
„deaktivieren“,
Sie
konnen
die
Auflosung
des
Vorschaufensters
anpassen.Die
FenstergroGe
bleibt
auf
der
VGA
GrofJe.
•
DE
4
•
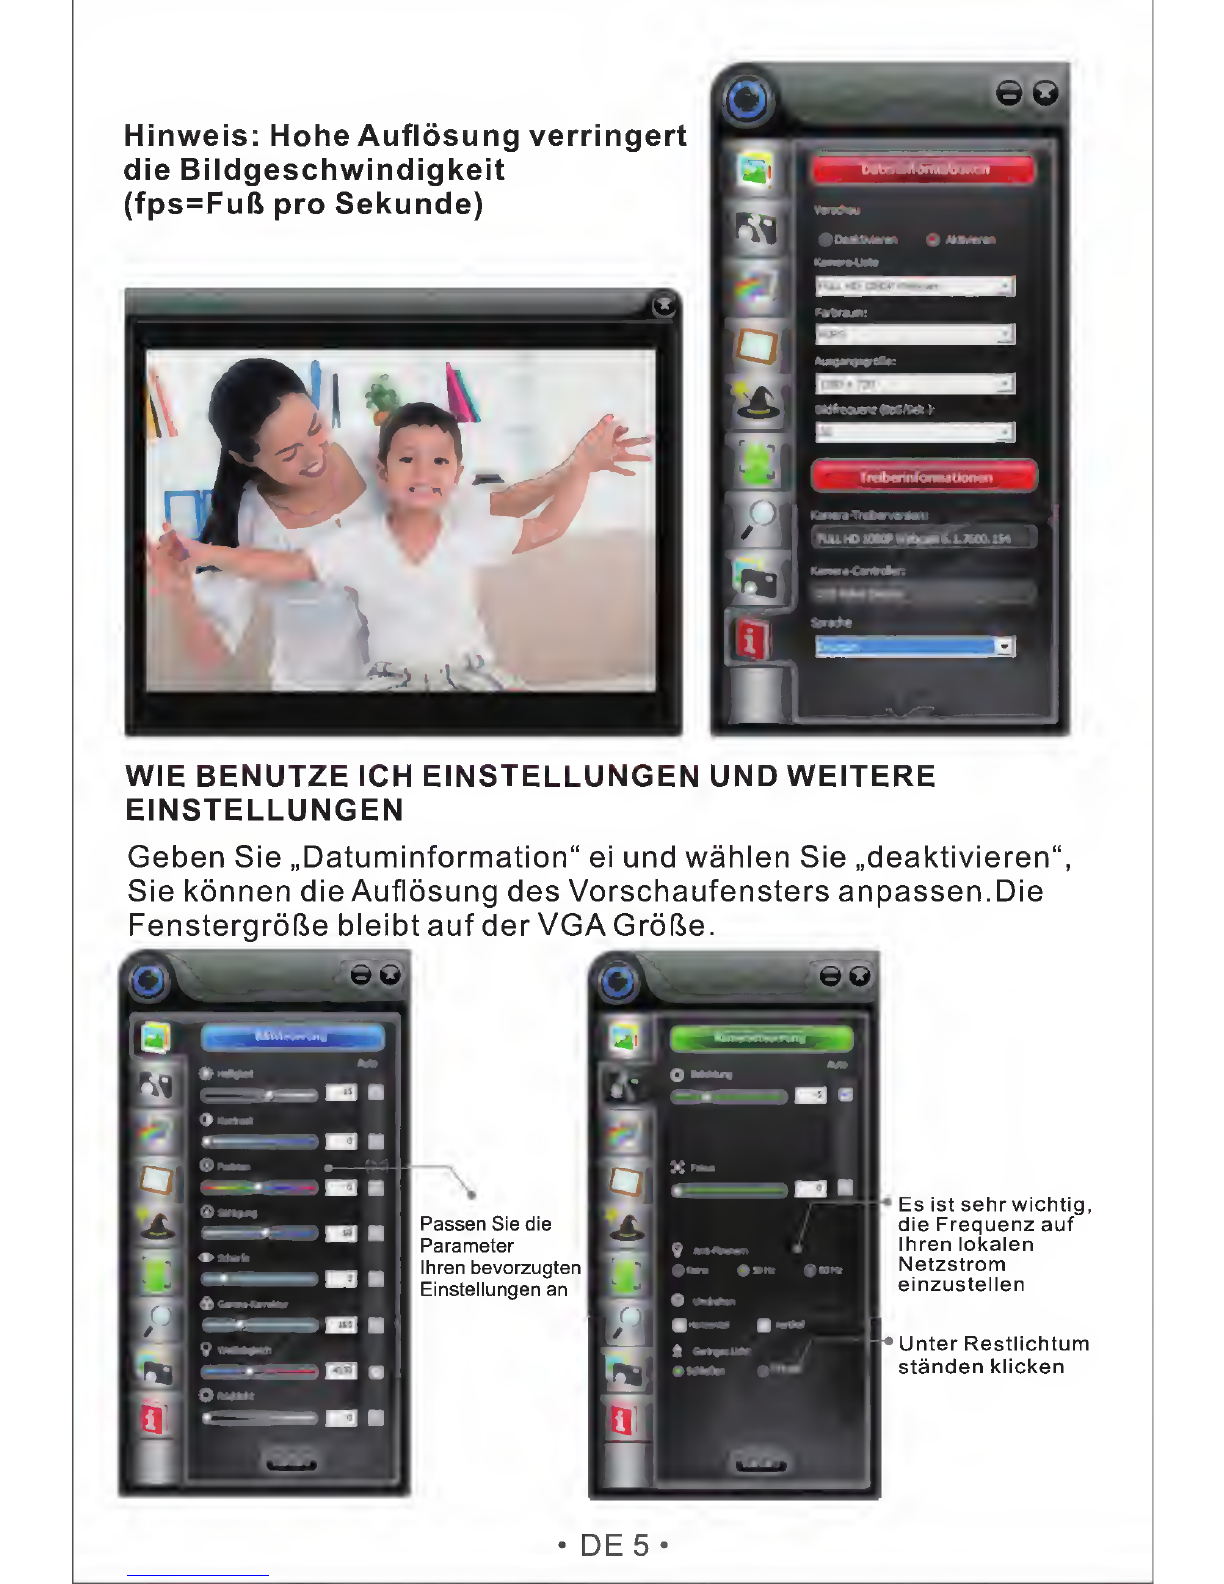
WIE
BENUTZE
ICH
EINSTELLUNGEN
UND
WEITERE
EINSTELLUNGEN
Geben
Sie
„Datuminformation“
ei
und
wahlen
Sie
„deaktivieren“,
Sie
konnen
die
Auflosung
des
Vorschaufensters
anpassen.Die
FenstergroGe
bleibt
auf
der
VGAGrofte.
Es
ist
sehr
wichtig,
die
Frequenz
auf
Ihren
lokalen
Netzstrom
einzustellen
Unter
Restlichtum
standen
klicken
•
DE
5
•
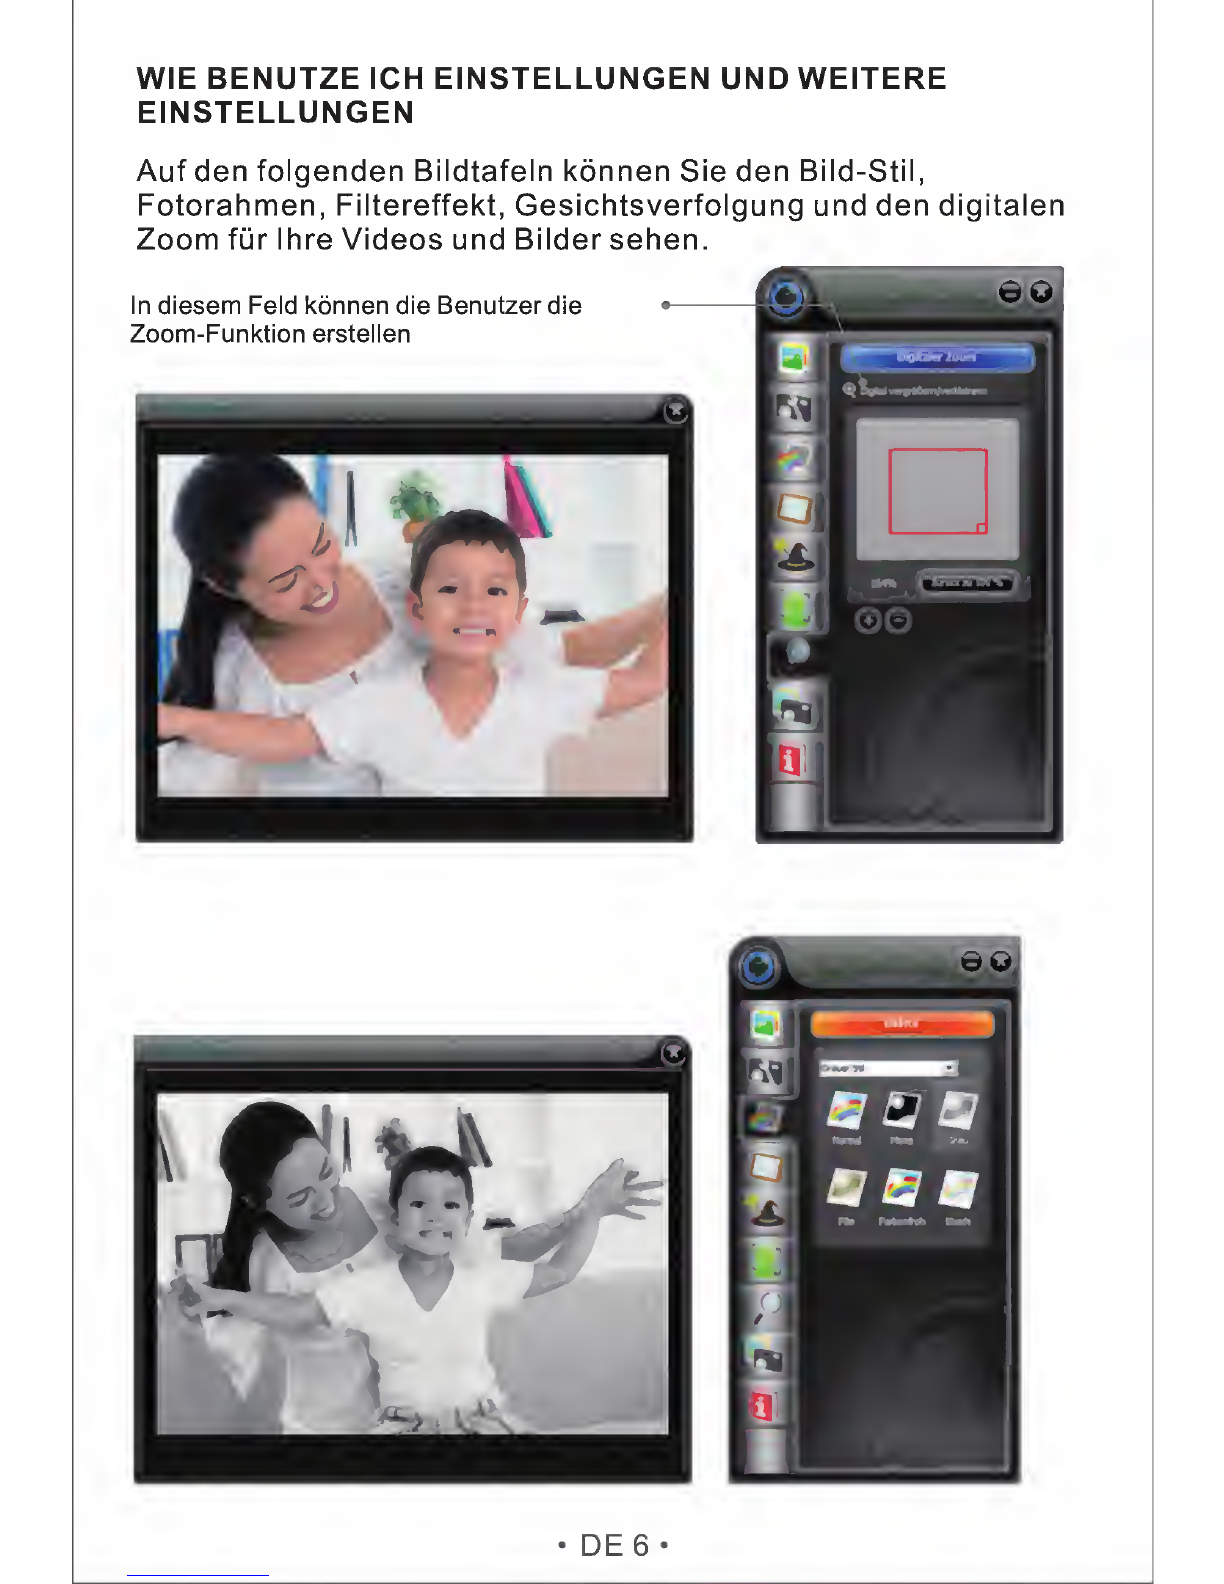
WIE
BENUTZE
ICH
EINSTELLUNGEN
UND
WEITERE
EINSTELLUNGEN
Auf
den
folgenden
Bildtafeln
konnen
Sie
den
Bild-Stil,
Fotorahmen,
Filtereffekt,
Gesichtsverfolgung
und
den
digitalen
Zoom
fur
Ihre
Videos
und
Bilder
sehen.
•
DE6-

Feld
zur
Erstellung
der
Effekte
5
□□
.
CD
6
□
!
I
“
■
I
_
•
DE
7
•
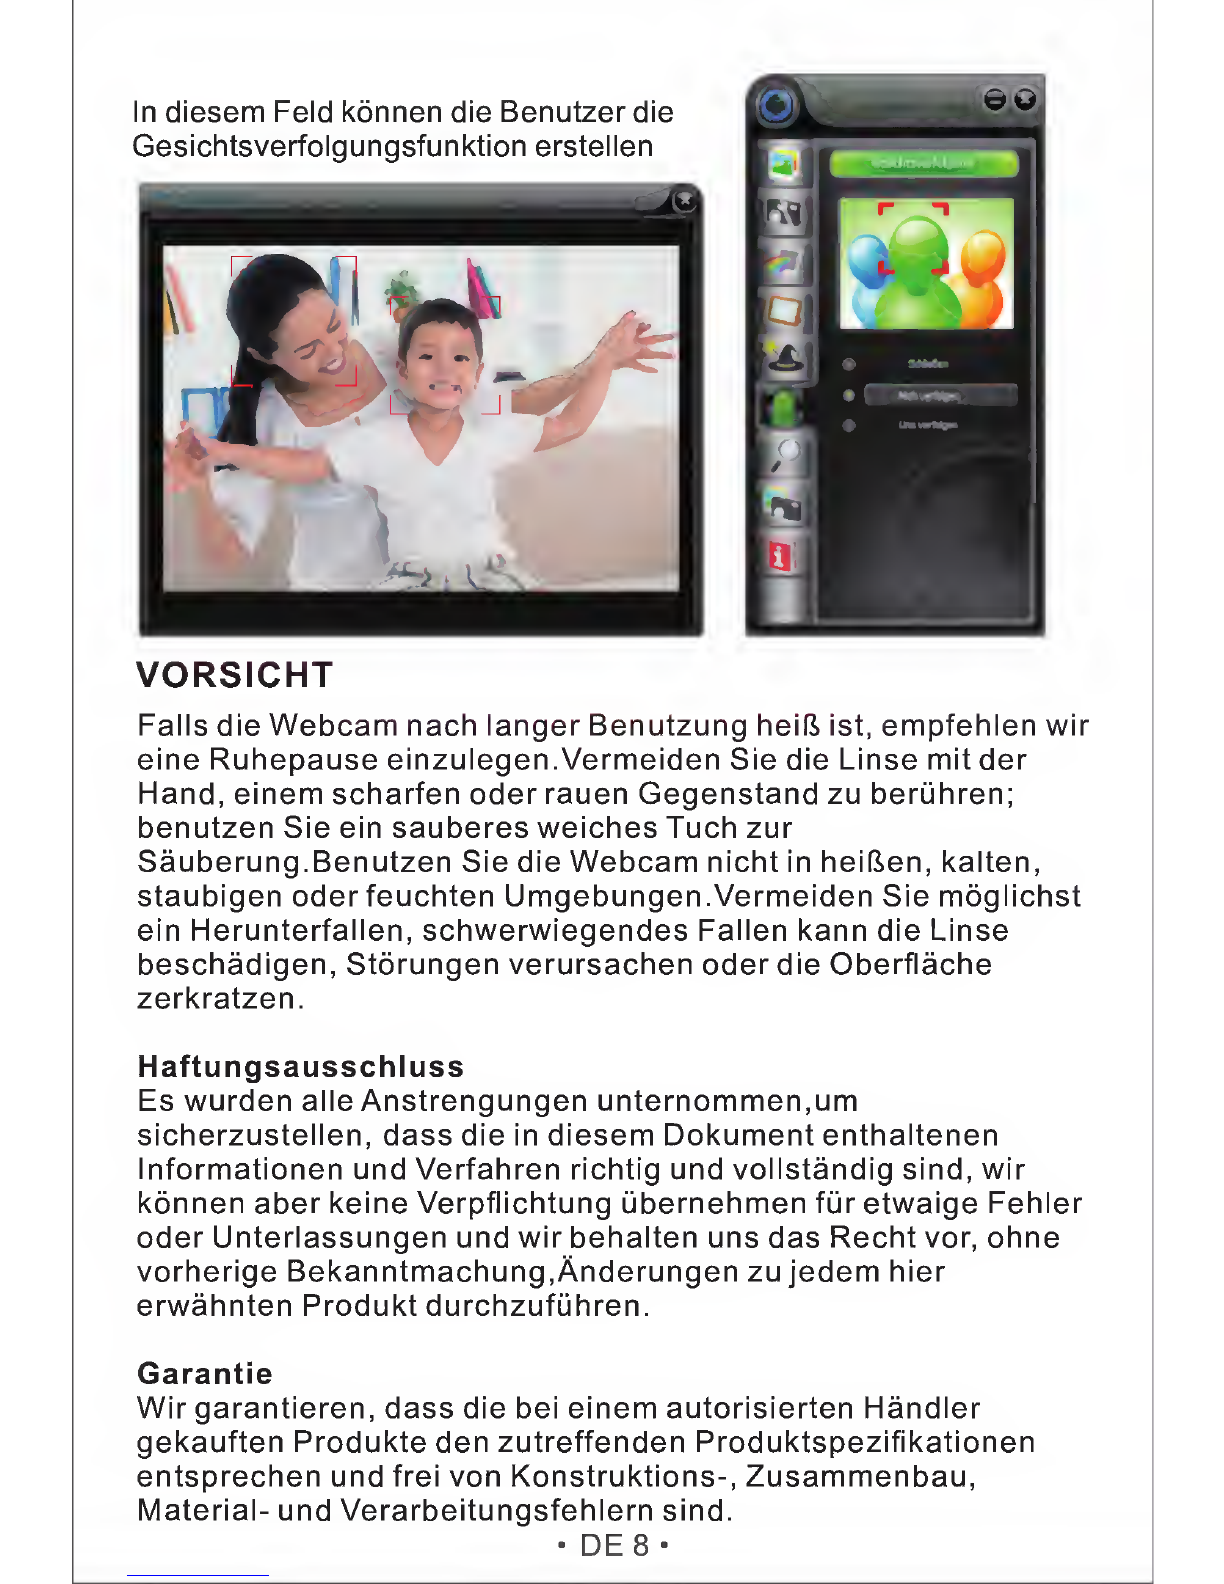
In
diesem
Feld
konnen
die
Benutzerdie
Gesichtsverfolgungsfunktion
erstellen
VORSICHT
Falls
die
Webcam
nach
langer
Benutzung
heifi
ist,
empfehlen
wir
eine
Ruhepause
einzulegen.Vermeiden
Sie
die
Linse
mit
der
Hand,
einem
scharfen
Oder
rauen
Gegenstand
zu
beruhren;
benutzen
Sie
ein
sauberes
weiches
Tuch
zur
Sauberung.Benutzen
Sie
die
Webcam
nicht
in
heiften,
kalten,
staubigen
oderfeuchten
Umgebungen.Vermeiden
Sie
moglichst
ein
Herunterfallen,
schwerwiegendes
Fallen
kann
die
Linse
beschadigen,
Storungen
verursachen
oder
die
Oberflache
zerkratzen.
Haftungsausschluss
Es
wurden
alle
Anstrengungen
unternommen,um
sicherzustellen,
dass
die
in
diesem
Dokument
enthaltenen
Informationen
und
Verfahren
richtig
und
vollstandig
sind,
wir
konnen
aber
keine
Verpflichtung
ubernehmen
fur
etwaige
Fehler
Oder
Unterlassungen
und
wir
behalten
uns
das
Recht
vor,
ohne
vorherige
Bekanntmachung.Anderungen
zu
jedem
hier
erwahnten
Produkt
durchzufiihren.
Garantie
Wir
garantieren,
dass
die
bei
einem
autorisierten
Handler
gekauften
Produkte
den
zutreffenden
Produktspezifikationen
entsprechen
und
frei
von
Konstruktions-,
Zusammenbau,
Material-
und
Verarbeitungsfehlern
sind.
•
DE
8
•

AUSDOm®
Enjoy
Smart
Life
For
more
information,
please
visit
our
official
website
www.ausdom.com
Yourvaluable
comments
and
suggestions
on
improving
AUSDOM
products
are
welcomed!
Shenzhen
Ausdom
Cloud
Technology
Co.,
Ltd
S
□
www.ausdom.com
Other manuals for AW615
3
Table of contents
Languages:
Other ausdom Webcam manuals

ausdom
ausdom AW335 User manual

ausdom
ausdom AW615S User manual

ausdom
ausdom aw525 User manual

ausdom
ausdom AW635 User manual

ausdom
ausdom AF225 User manual

ausdom
ausdom AW920 User manual

ausdom
ausdom AW615 User manual

ausdom
ausdom AW620 User manual

ausdom
ausdom AF660 User manual

ausdom
ausdom AW615 User manual


