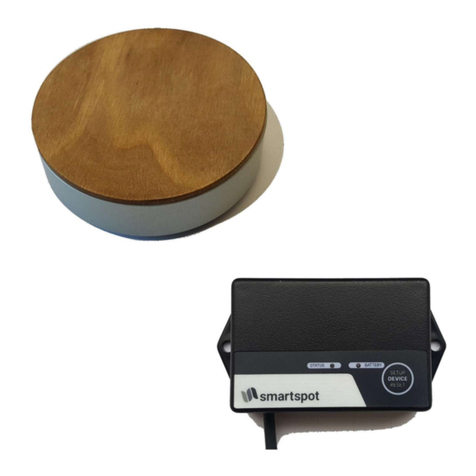
Austro Flamm SmartSpot User manual

Benutzerhandbuch / User instructions
Manuel d’instructions / Manuale
SmartSpot
SmartSpot Receiver


1 deutsch
Inhaltsverzeichnis
1 Inbetriebnahme des SmartSpot Sensors ....................................................................................... 2
2 Verbinden des SmartSpot Sensors mit dem XL-Display (NUR AB XL-DISPLAY BJ 2020) ....... 2
3 Installation des SmartSpot Receivers ............................................................................................ 3
4 Verbinden des SmartSpot Sensors mit dem Receiver ................................................................. 3
5 Zusätzliche Funktionen des SmartSpot Sensors .......................................................................... 4
6 LED Farbcodes und Fehlerursachen .............................................................................................. 4
Danke, daß Sie sich für den Austroflamm SmartSpot Raumtemperatursensor entschieden haben. Dieser ermöglicht
Ihnen die Messung der aktuellen Raumtemperatur an der von Ihnen gewünschten Position im Wohnraum. Die
Verbindung zum Ofen erfolgt mittels Bluetooth Funktechnologie.
Abhängig vom Ofenmodel ist für die Funktion des SmartSpot die zusätzliche Installation eines SmartSpot Receivers
erforderlich.
Technische Daten:
Abmessungen 84 x 28 mm
Gewicht 100 g
Batterie 2 x AAA Batterien (incl.)
Batterie-Lebensdauer > 1 Jahr
Signal Reichweite (Außen / Innen) 40 m / 20 m
Umgebungstemperatur -20 bis +70 °C
Verbindung 2,4 GHz
Temperaturmessbereich und Genauigkeit -40 bis +85 °C, +/- 1 °C
Montageposition Horizontal oder Vertikal
Schutzklasse IP22

2 deutsch
1 Inbetriebnahme des SmartSpot Sensors
Für die erste Inbetriebnahme des Sensors drehen Sie den SmartSpot mit der Rückseite nach oben.
Drehen Sie das untere Gehäuseteil nach rechts. Nun
lösen sich der obere und untere Gehäuseteil von
einander.
Entfernen Sie den Isolierstreifen von den
Batteriekontakten.
2 Verbinden des SmartSpot Sensors mit dem XL-DISPLAY (ab BJ 2020)
Ofenmodelle, die über ein XL-DISPLAY ab Baujahr 2020 verfügen, benötigen keinen SmartSpot Receiver. Der
SmartSpot Sensor kann hier direkt mit dem Display verbunden werden.
Wechseln Sie in den Einstellungen auf „Bluetooth
Geräte“. Starten Sie die Funktion „Gerät hinzufügen“.
Drücken Sie auf „Verbinden“.
Ein neues Gerät wird gesucht.
Nun drücken Sie einmal kurz auf die mit „1“ markierte
Taste im Inneren des SmartSpot Sensors.
Nach einigen Sekunden wird die Verbindung
bestätigt.
Die gewünschte Verwendung des Raumsensors
kann nun ausgewählt werden.
Wählen Sie die Einstellung „Raumtemp.“, damit der
Ofen die vom SmartSpot gemessene Temperatur
regelt.

3 deutsch
3 Installation des SmartSpot Receivers
Wir empfehlen: Lassen Sie die Installation von einen Fachmann ausführen.
Der Ofen muss beim Anschluss des SmartSpot Receivers an die Steuerung vom Stromnetz getrennt sein !
Die Steuerung befindet sich hinter einer Verkleidung (abhängig vom Ofenmodell) des Ofens. Die entsprechende
Seitenverkleidung muss vorab demontiert werden.
Der serienmäßig installierte, kabelgebundene Raumsensor am Anschluss „T01“ der Steuerplatine ist
abzuschließen. (Trennung des QUICK RELEASE STECKERS oder 2 x schwarze Leitung aus der Steckleiste
nehmen )
Anschließend klemmen Sie den SmartSpot Receiver wie folgt an der Steuerung an.
4 Verbinden des SmartSpot Sensors mit dem Receiver
Der SmartSpot Receiver muß an der Ofensteuerung angeschlossen und mit Strom versorgt sein. (KONTROLLE:
LED am Receiver blinkt langsam grün.)
Die Batterien des SmartSpot Sensor müssen richtig eingelegt sein.
Nun drücken Sie kurz die mit „1“ markierte Taste
des SmartSpot Sensors. LED blinkt nun grün.
Danach drücken Sie die „Setup“ Taste am
Receiver. Die LED beginnt schnell grün zu blinken.
Der Verbindungsaufbau dauert ca. 30 Sekunden. Bei erfolgreicher Verbindung leuchtet die LED am Receiver
durchgehend grün und der Sensor blinkt alle 3 Minuten kurz auf.
Die Temperaturanzeige und Regelung funktioniert nun wie mit dem kabelgebundenen Temperaturfühler.
Grün
Weiß
Braun
Grün T01 (2.Kontakt)
Weiß +5V
Braun GND

4 deutsch
5 Zusätzliche Funktionen des SmartSpot Sensors
BLINKSIGNAL – FUNKTIONSBESTÄTIGUNG:
Der SmartSpot Sensor blinkt als “Lebenszeichen“ alle 3 Minuten kurz auf. Die Farbe bzw. die Funktion dieses
Lebenszeichens kann geändert werden. Drücken Sie dazu die mit „1“ markierte Taste so lange, bis Ihre
gewünschte Farbe leuchtet.
Diese Funktion lässt sich auch wegschalten.
Diese FARBEINSTELLFUNKTION signalisiert durch schnelles Blinken der LED, daß sie deaktiviert wurde.
6 LED Farbcodes und Fehlerursachen
SmartSpot Sensor:
LED
Status
Mögliche Ursache
Lösung
LED leuchtet nicht - Isolierstreifen bei Batterien nicht
entfernt
- Fehlende oder leere Batterie
- Batteriepolarität falsch
- „Lebenszeichen“ Funktion
deaktiviert
-
Isolierstreifen entfernen
-
Batterien überprüfen
-
Batterien richtig einlegen
-
Drücken Sie die entsprechende
Taste lange, um die „Lebens-
zeichen“ Funktion wieder zu
aktivieren
LED blinkt schnell Grün - Der Sensor sucht nach einer
Verbindung
-
Drücken Sie auch am Receiver bzw.
Display die Taste zum „Verbinden“
LED blinkt Gelb - Batterie schwach
-
Batteriestatus <20%
LED blinkt Rot - Batterie leer
-
Batteriestatus <10%
Keine oder falsche
Temperaturwerte
- SmartSpot ist nicht verbunden
-
Verbinden Sie den SmartSpot laut
Anleitung
Keine Verbindung - Der SmartSpot ist zu weit entfernt
-
Verringern Sie die Entfernung zum
Ofen
Gemessene Temperatur ist
zu hoch
- falsch Platzierung des SmartSpot
-
Direkte Sonneneinstrahlung, die
Nähe von Elektrogeräten und
anderen Wärmequellen beim
SMART SPOT vermeiden
Verbindung wird oft getrennt - SmartSpot ist zu weit vom
Receiver / Display entfernt
-
Entfernung zum Receiver, Display
verringern
SmartSpot Receiver:
LED Status
Mögliche Ursache
Lösung
blinkt langsam Grün - Keine Verbindung mit Sensor
-
Mit Sensor laut Anleitung verbinden
blinkt schnell Grün - Receiver sucht nach Verbindung
-
Drücken Sie auch am Sensor die
Verbindungstaste
Grün leuchtet - Verbindung zum Sensor aufrecht
-
Funktion OK
Grün leuchtet
Rot blinkt
- Batterie am Sensor ist leer
-
Batterie am Sensor tauschen
Grün leuchtet
Rot leuchtet
- FACTORY Reset
-
Der Receiver wurde auf Werks-
einstellung zurückgesetzt
Keine Verbindung Der SmartSpot ist zu weit entfernt Verringern Sie die Entfernung zum
Ofen

1 english
Contents
1 Start up of the SmartSpot Sensor .................................................................................................. 2
2 Connecting the SmartSpot Sensor with the XL-DISPLAY (year of manufacture 2020)............. 2
3 Installation of the SmartSpot receiver ............................................................................................ 3
4 Connecting the SmartSpot sensor with the receiver .................................................................... 3
5 Additional functions of the SmartSpot sensor .............................................................................. 4
6 LED colour codes and error causes ............................................................................................... 4
Thanks for having chosen the Austroflamm SmartSpot room temperature sensor. It will enable you to measure the
current room temperature at your favoured position in your living room. The connection with your stove will be made
via Bluetooth.
Depending on the stove model an additional installation of a SmartSpot receiver may be necessary in order to use
the function of the SmartSpot.
Technical data:
dimensions 84 x 28 mm
weight 100 g
battery 2 x AAA batteries (incl.)
battery lifespan > 1 year
signal reach (outside/inside) 40 m / 20 m
ambient temperature -20 ° C bis +70 ° C
connection 2,4 GHz
temperature metering range and accuracy -40 ° C to +85 ° C, +/- 1 ° C
mounting position horizontal or vertical
protection rating IP22

2 english
1 Start up of the SmartSpot Sensor
For the first start up of the sensor please turn the SmartSpot upside down.
Turn the lower casing to the right. The upper and lower
casing come undone now.
Remove the insulating strip from the battery contacts.
2 Connecting the SmartSpot Sensor with the XL-DISPLAY (year of manufacture
2020)
Stove models already equipped with an XL-DISPLAY (manufacture year 2020), do not need a SmartSpot receiver.
The SmartSpot sensor can be connected directly with the display.
Change the setting to „Bluetooth devices“. Choose
the function „add Bluetooth device“.
Press „connect“.
A new device is being searched for.
Now briefly press the highlighted button „1“ on the
inside of the SmartSpot sensor.
After a few seconds the connection build-up is being
confirmed.
The desired use of the room sensor can now be
chosen.
Choose „air“, thus the stove can regulate the
temperature measured by the SmartSpot.

3 english
3 Installation of the SmartSpot receiver
We recommend: Have the installation done by a professional.
The stove must be disconnected from the power supply before the SmartSpot receiver is being connected to
the control board on the stove!
The control board is situated behind the stove cladding, which needs to be disassembled beforehand. Where
exactly depends on the stove model.
The standardly connected, wired room sensor connected to port „T01“ on the control board has to be
disconnected. (Detachment of the QUICK RELEASE PLUG or remove 2 x black wires from the cable connector)
Ensuing, connect the SmartSpot receiver to the control board as follows:
4 Connecting the SmartSpot sensor with the receiver
The SmartSpot receiver must be connected to the stove’s control board and the power must be on. (TEST: LED
light on the receiver slowly blinks green.)
The batteries of the SmartSpot sensor must be inserted correctly.
Now briefly press the highlighted button „1“ on the
inside of the SmartSpot sensor. LED light blinks
green now.
Press the setup button on the receiver. The LED
light starts to blink green quickly.
The connection build-up takes about 30 seconds. If the connection works correctly the LED light on the receiver
shines green permanently and the sensor flashes every three minutes. The temperature display and control now
work just like a wired temperature sensor.
green
white
brown
green T01 (2. contact)
white +5 V
brown GND

4 english
5 Additional functions of the SmartSpot sensor
BLINKING SIGNAL – PROCESSING CONFIRMATION:
As a processing confirmation, the SmartSpot sensor briefly flashes every 3 minutes. The colour and function of this
processing confirmation can be changed. Press the highlighted button „1“ permanently and hold down until the
desired colour is on. This feature can also be switched off.
A fast flashing of the LED indicates that the colour setting has been deactivated.
6 LED colour codes and error causes
SmartSpot sensor:
LED s
tatus
possible cause
solution
does not shine - insulating strips on the batteries
were not removed
- missing or empty batteries
- batterie poles the wrong way
round
- „processing confirmation“ feature
was disabled
- remove insulation strips
- check batteries
- insert batteries correctly
- press the highlighted button „1“
long enough to reactivate this
feature
flashes green quickly - sensor is looking for a connection
-
also press the button on the receiver
or the display in order to connect
flashes yellow - batterie low
-
batterie status <20%
flashes red - batterie empty
-
batterie status <10%
no or wrong
temperature display
- SmartSpot is not connected
-
connect the SmartSpot acc. to the
instructions
no connection - SmartSpot is too far away from
the receiver/display
-
reduce the distance to the stove
measured temperature is too
high
- misplacement of the SmartSpot
-
avoid direct sun, the immediate
vicinity of electric appliances and
other sources of warmth near the
SMART SPOT
connection gets disrupted
frequently
- SmartSpot is too far away from
the receiver/display
-
reduce the distance to the
receiver/display
SmartSpot receiver:
LED status
possible cause
solution
flashes green slowly - no connection with the sensor
-
connect with sensor acc. to the
instructions
flashes gree quickly - receiver is looking for a
connection
-
also press the button on the sensor
in order to connect
shines green - connection to the sensor OK
-
function OK
shines green
blinks red
- sensor batterie is empty
-
exchange batterie in the sensor
shines green
shines red
- FACTORY reset
-
the receiver was set back to factory
setting
no connection - SmartSpot is too far away - reduce the distance to the stove

1 français
Sommaire
1 Mise en service du capteur SmartSpot .......................................................................................... 2
2 Connexion du capteur SmartSpot à l’ÉCRAN XL (à partir des modèles 2020) .......................... 2
3 Installation du récepteur SmartSpot .............................................................................................. 3
4 Connexion du capteur SmartSpot au récepteur............................................................................ 3
5 Fonctions supplémentaires du capteur SmartSpot ...................................................................... 4
6 Codes couleur de la LED et causes d’erreurs ............................................................................... 4
Merci d’avoir choisi SmartSpot, le capteur de température ambiante d’Austroflamm. Grâce à lui, vous pouvez
mesurer la température de l’air là où vous le souhaitez dans votre pièce à vivre. La connexion au poêle se fait par
technologie sans fil Bluetooth.
Selon le modèle, le fonctionnement du SmartSpot peut nécessiter l’installation d’un récepteur SmartSpot.
Caractéristiques techniques :
Dimensions 84 x 28 mm
Poids 100 g
Piles 2 piles AAA (incl.)
Durée de vie des piles > 1 an
Portée du signal (extérieur / intérieur) 40 m / 20 m
Température ambiante de -20 à +70 °C
Connexion 2,4 GHz
Gamme de température et précision -40 à +85 °C, +/- 1 °C
Position de montage Horizontale ou verticale
Classe de protection IP22

2 français
1 Mise en service du capteur SmartSpot
Pour la première mise en service du capteur, retournez le SmartSpot.
Faites tourner la partie inférieure du boîtier vers la
droite. Séparez ensuite la partie supérieure de la
partie inférieure du boîtier.
Retirez la languette d’isolation des piles.
2 Connexion du capteur SmartSpot à l’ÉCRAN XL (à partir des modèles
2020)
Les modèles de poêles disposant d’un ÉCRAN XL, produits à partir de 2020, ne nécessitent pas de récepteur
SmartSpot. Le capteur SmartSpot peut en effet être connecté directement à l’écran.
Dans les réglages, sélectionnez « appareils
bluetooth ». Lancez la fonction « ajouter appareil ».
Appuyez sur « connecter » pour lancer la recherche
d’un nouvel appareil.
Appuyez alors brièvement sur la touche marquée
d’un « 1 » à l’intérieur du capteur SmartSpot.
La connexion est confirmée
au bout de quelques secondes.
Il est ensuite possible de sélectionner l’utilisation
souhaitée du capteur de température ambiante.
Sélectionnez le réglage « temp. air » pour que le poêle
règle la température mesurée avec SmartSpot.

3 français
3 Installation du récepteur SmartSpot
Notre conseil : pour installer le récepteur, faites appel à un spécialiste.
Le poêle doit être débranché du réseau électrique pendant le raccordement du récepteur SmartSpot à la
commande. La commande se trouve derrière l’un des capots du poêle, son emplacement étant différent d’un
modèle à l’autre. Démontez préalablement le capot latéral concerné.
Débranchez le capteur filaire de série raccordé au port « T01 » de la platine de commande (soit en débranchant
le CONNECTEUR RAPIDE, soit en retirant les 2 câbles noirs du bornier).
Raccordez ensuite le récepteur SmartSpot à la commande comme suit :
4 Connexion du capteur SmartSpot au récepteur
Le récepteur SmartSpot doit être raccordé à la commande du poêle et alimenté en courant (CONTRÔLE :
clignotement vert lent de la LED du récepteur).
Les piles du capteur SmartSpot doivent être installées correctement.
Appuyez alors brièvement sur la touche marquée
d’un « 1 » du capteur SmartSpot. La LED clignote
alors vert.
Appuyez ensuite sur la touche de configuration
« SETUP » du récepteur. La LED commence à
clignoter vert rapidement.
Il faut environ 30 secondes pour établir la connexion. Une fois la connexion établie, la LED du récepteur reste allumée
vert et le capteur clignote brièvement toutes les 3 minutes.
L’affichage et le réglage de la température fonctionnent ensuite comme avec la sonde de température filaire.
Vert
Blanc
Brun
Vert T01 (2e contact)
Blanc +5V
Brun GND

4 français
5 Fonctions supplémentaires du capteur SmartSpot
SIGNAL CLIGNOTANT – CONFIRMATION DE FONCTIONNEMENT
Le capteur SmartSpot envoie un « signal de vie » en clignotant brièvement toutes les 3 minutes. Il est possible de
modifier la couleur et de désactiver ce signal de vie. Pour ce faire, maintenez appuyée la touche marquée d’un « 1 »
jusqu'à obtenir la couleur souhaitée. Vous pouvez également éteindre cette fonction.
Un clignotement rapide de la LED signalise que cette FONCTION DE RÉGLAGE DE LA COULEUR a été désactivée.
6 Codes couleur de la LED et causes d’erreurs
Capteur SmartSpot :
État de la LED
Cause
possible
Solution
LED éteinte - Languette d’isolation des piles
toujours en place
- Pile manquante ou déchargée
- Mauvaise polarité des piles
- Fonction « signal de vie »
désactivée
-
Enlevez la languette d’isolation
-
Contrôlez les piles
-
Mettez les piles dans le bon sens
-
Appuyez longuement sur la touche
correspondante pour réactiver la
fonction « signal de vie »
La LED clignote vert
rapidement
- Le capteur cherche une connexion
-
Appuyez également sur la touche
« connecter » du récepteur ou de
l’écran
La LED clignote jaune - Pile faible
-
Niveau de charge <20 %
La LED clignote rouge - Pile déchargée
-
Niveau de charge <10 %
Aucune ou mauvaises
températures
- Le SmartSpot n’est pas connecté
-
Connectez le SmartSpot
conformément aux instructions
Pas de connexion - Le SmartSpot est trop éloigné
-
Rapprochez-le du poêle
Température mesurée trop
élevée
- Mauvais emplacement du
SmartSpot
-
Évitez d’exposer le SmartSpot à un
rayonnement solaire direct et de le
placer à proximité d’appareils
électriques et d’autres sources de
chaleur
Coupure répétée de la
connexion
- SmartSpot trop éloigné du
récepteur / de l’écran
-
Réduisez la distance au récepteur /
à l’écran
Récepteur SmartSpot :
État de la LED
Cause possible
Solution
Clignote vert lentement - Pas de connexion au capteur
-
Établissez la connexion au capteur
conformément aux instructions
Clignote vert rapidement - Le récepteur cherche une
connexion
-
Appuyez également sur la touche
« connecter » du capteur
Allumée verte - Connexion au capteur établie
-
Fonctionnement OK
Allumée verte
Clignote rouge
- Pile du capteur déchargée
-
Remplacez la pile du capteur
Allumée verte
Allumée rouge
- Réinitialisation d’USINE
-
Le récepteur a été réinitialisé aux
réglages d’usine
Pas de connexion Le SmartSpot est trop éloigné Rapprochez-le du poêle

1 Italiano
Indice
1 Attivazione SmartSpot ..................................................................................................................... 2
2 Collegamento dello SmartSpot con il DISPLAY XL (anno produzione 2020) ............................. 2
3 Installazione del ricevitore dello SmartSpot .................................................................................. 3
4 Collegamento dello SmartSpot con il ricevitore ........................................................................... 3
5 Funzioni aggiuntive dello SmartSpot ............................................................................................. 4
6 Codici colore LED e cause possibili errori .................................................................................... 4
Grazie di aver scelto il rilevatore di temperatura SmartSpot di Austroflamm. Vi consentirà di misurare la
temperatura ambiente laddove preferite trascorrere il vostro tempo. Il collegamento con la vostra stufa avviene via
Bluetoooth.
In funzione del modello di stufa, il funzionamento dello SmartSpot potrebbe richiedere l’installazione di un ricevitore
SmartSpot.
Dati tecnici:
dimensioni 84 x 28 mm
peso 100 g
batteria 2 x batterie AAA (incl.)
Durata batteria > 1 anno
Portata del segnale (fuori/dentro) 40 m / 20 m
Temperatura ambiente Da -20 ° C fino a +70 ° C
Collegamento 2,4 GHz
Spettro temperature e scarto di precisione Da -40 ° C a +85 ° C, +/- 1 ° C
Posizione dispositivo Orizzontale o verticale
Classe di protezione IP22

2 Italiano
1 Attivazione SmartSpot
Per effettuare la prima attivazione, capovolgete lo SmartSpot..
Ruotate la parte inferiore dell’involucro verso destra.
Separate poi la parte superiore e inferiore della
copertura.
Rimuovete la linguetta isolante delle batterie.
2 Collegamento dello SmartSpot con il DISPLAY XL (anno di produzione 2020)
I modelli già dotati di DISPLAY XL (anno di 2020), non necessitano di ricevitore. Lo SmartSpot può essere
collegato direttamente con il display.
Nelle impostazioni, sotto „Dispositivi Bluetooth“,
scegliete la funzione „aggiungi dispositivo Bluetooth“.
Premete su „connessione“.
Viene avviata la ricerca di un nuovo dispositivo.
Ora premete leggermente il tasto „1“ all’interno dello
SmartSpot.
Dopo alcuni secondi, la connessione viene
confermata.
E’ quindi possibile selezionare la funzione desiderata
del rilevatore di temperatura ambiente.
Selezionate „temp. aria“. In questo modo, la stufa può
regolare la temperatura rilevata attraverso lo
SmartSpot.

3 Italiano
3 Installazione del ricevitore dello SmartSpot
Raccomandazione: Fate installare il dispositivo da un tecnico specializzato.
La stufa deve essere scollegata dalla presa di corrente prima che il ricevitore dello SmartSpot si colleghi con
il pannello di controllo della stufa!
Il pannello di controllo si trova nella parte posteriore della stufa, dietro il rivestimento, il quale dev’essere smontato
prima dell’operazione. L’esatta posizione varia in funzione del modello.
Scollegate il cavo del sensore temperatura standard collegato all’entrata „T01“ del quadro comandi - (scollegando
il CONNETTORE RAPIDO, opppure rimuovendo i due cavi neri del quadro)
Successivamente, collegate il ricevitore dello SmartSpot con il pannello di controllo come indicato di seguito:
4 Collegamento dello SmartSpot con il ricevitore
Il ricevitore dello SmartSpot deve essere collegato con il pannello di controllo della stufa, la quale deve essere
collegata alla presa di corrente. (PROVA: sul ricevitore, la luce verde LED lampeggia lentamente)
Le batterie dello SmartSpot devono essere inserite correttamente.
Ora premete rapidamente il tasto „1“dello
SmartSpot. Il LED dovrebbe lampeggiare di colore
verde.
Premete poi sul tato di configurazione “SETUP”
del ricevitore. La Luce LED inizia a lampeggiare
velocemente di colore verde.
Ci vogliono circa 30 secondi per stabilire la connessione. Se la connessione funziona correttamente, la luce LED
del ricevitore rimane accesa (verde) e lo SmartSpot lampeggia brevemente ogni 3 minuti. La visualizzazione e
regolazione della temperatura funzioneranno come il cavo della sonda di temperatura.
verde
bianco
marrone
verde T01 (2° contatto)
bianco +5 V
mrarrone GND

4 Italiano
5 Funzioni aggiuntive dello Smartspot
SEGNALE LAMPEGGIANTE – CONFERMA DI FUNZIONAMENTO:
A conferma di funzionamento, lo Smartspot lampeggia brevemente ogni 3 minuti. Il colore e questo tipo di funzione
possono essere cambiati. Mantenete premuto il tasto „1“ fino a quando non appare il colore desiderato. Questa
funzione può anche essere disattivata.
Un rapido lampeggiamento del LED indica che l’impostazione del colore è stata disattivata.
6 Codici colori LED e cause possibili errori
SmartSpot:
Status del LED
possibile causa
soluzione
LED spento - Le linguette isolanti delle batterie
non sono state rimosse
- Batterie mancanti o scariche
- Batterie inserite nel verso errato
- La funzione „conferma di
funzionamento“ è stata disabilitata
- Rimuovete le linguette isolanti
- Controllate le batterie
- Inserite le batterie correttamente
- Mantenete premuto il tasto „1“ fino
a riattivare la funzione
Lampeggia verde
velocemente
- Il sensore sta cercando di
connettersi
-
In aggiunta premete il tasto
„connessione“ del ricevitore o del
display
Lampeggia giallo - batterie quasi scariche
-
status batterie <20%
Lampeggia rosso - batterie scariche
-
status batterie <10%
Mancata visualizzazione o
visualizzazione errata della
temperatura
- Lo SmartSpot non è connesso
-
connettete lo SmartSpot seguendo le
istruzioni
Non connesso - Lo SmartSpot è troppo lontano da
ricevitore/display
-
Riducete la distanza dalla stufa
La temperatura misurata è
troppo elevata
- Lo SmartSpot non è posizionato
correttamente
-
Evitate l’esposizione diretta al sole,
l’immediata vicinanza a dispositivi
elettrici e altre fonti di calore
ravvicinate allo SMART SPOT
La connessione si interrompe
frequentemente
- Lo SmartSpot è troppo lontano da
ricevitore/display
-
Riducete la distanza da
ricevitore/display
Ricevitore SmartSpot:
Status LED
possibile causa
soluzione
Lampeggia verde lentamente - Nessuna connessione con lo
SmartSpot
-
Connettetevi allo SmartSpot
seguendo le istruzioni
Lampeggia verde
velocemente
- Il ricevitore sta cercando una
connessione
-
In aggiunta premete il tasto dello
SmartSpot per connettervi
Acceso verde - Connessione al sensore OK
-
funzione OK
Acceso verde - lampeggia
rosso
- la batteria del sensore è scarica
-
sostituite la batteria del sensore
Acceso verde - lampeggia
rosso
- Reset FABBRICA
-
Il ricevitore è stato riportato alle
impostazioni originali di fabbrica
Nessuna connessione - Lo SmartSpot è troppo distante - Riducete la distanza dalla stufa


Austroflamm GmbH, Austroflamm Platz 1, 4631 Krenglbach, Austria, Stand 03/2020
Other manuals for SmartSpot
1
Table of contents
Languages:
Other Austro Flamm Temperature Controllers manuals
Popular Temperature Controllers manuals by other brands
Hubbell
Hubbell GAI-TRONICS TempSense TS100 manual

Honeywell
Honeywell FIRE-LITE ALARMS W-H355 Installation and maintenance instructions
Rehau
Rehau NEA SMART 2.0 Quick install
Emerson
Emerson E2 Quick reference guide
Emerson
Emerson TS1-G Operating instruction
Intertec Data Systems
Intertec Data Systems TC D operating instructions
