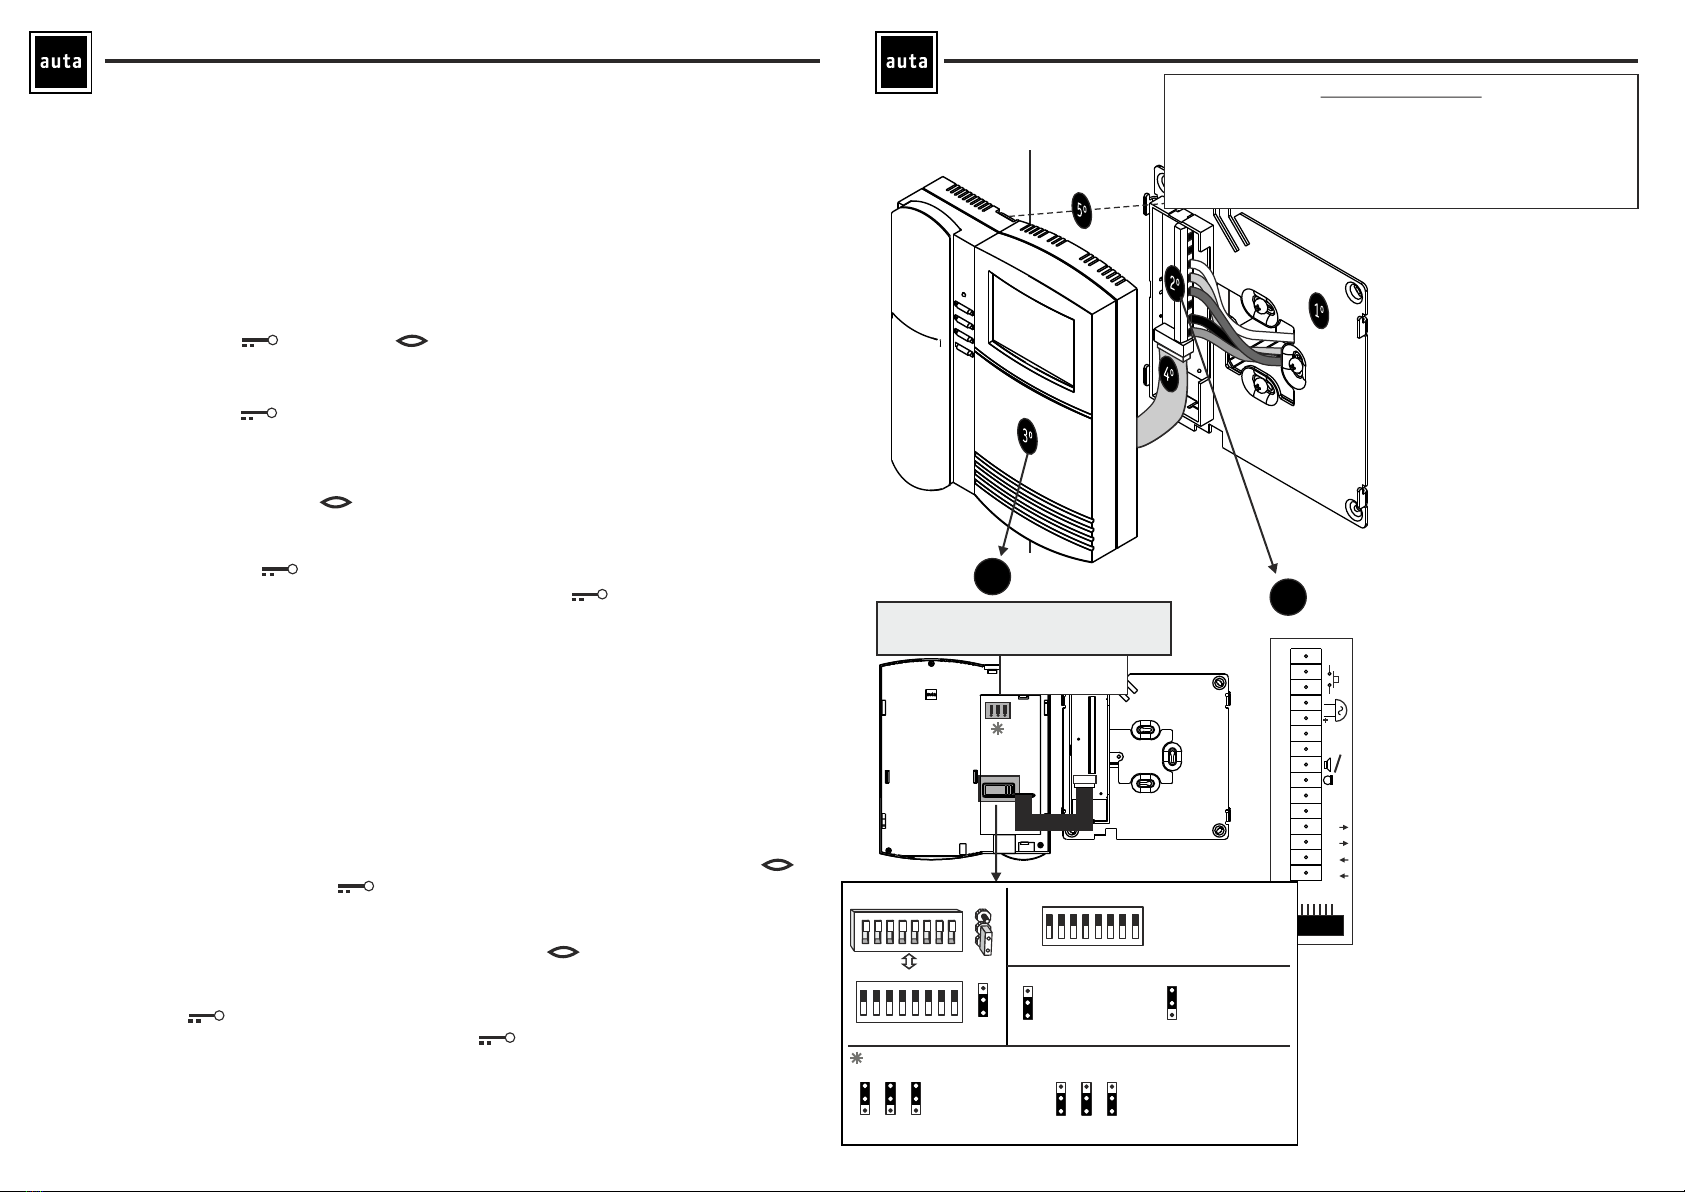
INSTALACIÓN - Installation
3º
CONFIGURACION DEL MONITOR (Ver pag.3)
MONITOR CONFIGURATION (See page 3)
AUX.
+
2C
-
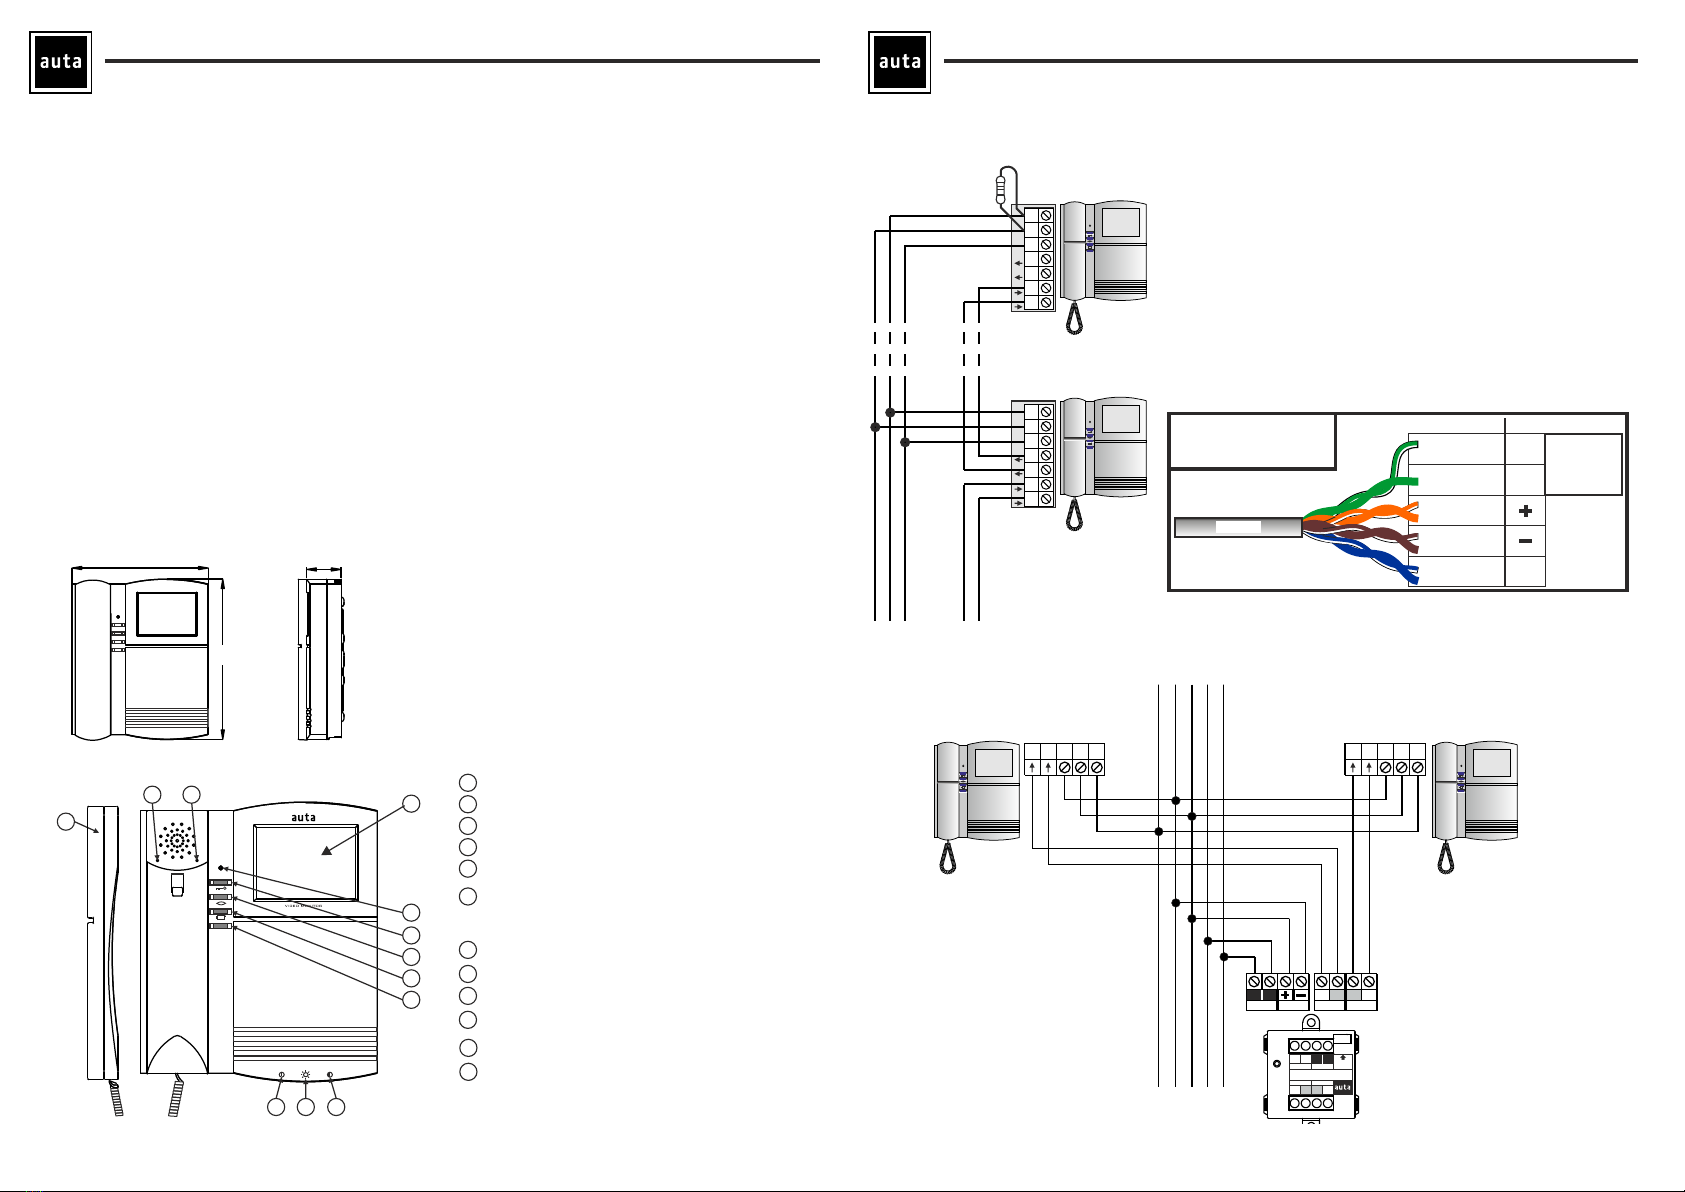
Módulo de conexión estandar
Standar module of connection
EXTENSION DE LLAMADA ELECTRONICA (SALIDA POLARIZADA)
SALIDA PULSADOR AUXILIAR - OUTPUT AUXILIARY PUSH-BUTTON
LINEA Z - Z LINE
POSITIVO - POSITIVE
}
}
Electronic call extension (polarized output)
Connector of the 5H digital COMPACT monitor
CONECTOR DEL MONITOR COMPACT DIGITAL 5H
2º
Vb
ENTRADA DE VIDEO - VIDEO INPUT
}
SALIDA DE VIDEO - VIDEO OUTPUT
NEGATIVO - NEGATIVE
LLAMADA DESDE LA PUERTA DE LA VIVIENDA
CALL FROM DOORBELL
1º Fijar la plancha a la pared con los
tacos y tornillos suministrados
2º Embornar los cables.
3º Configurar el monitor Ver pag.3
4º Conectar el monitor con el
latiguillo al circuito del módulo
de conexión.
5º Colgar el monitor en la plancha
fijada en la pared
1º Fix the bracket to the wall
using supplied screws.
2º Connect the wires
3º Set up the monitor
(see page 3)
4º Connect monitor's plug
to circuit's bracket
5º Plug the monitor to the bracket.
FUNCIONAMIENTO - FUNCTIONING
VISTA POSTERIOR
REAR VIEW
5 2
AD
SIN FUNCION - WITHOUT FUNCTION
Va
Vb
Va
Monitor Compact 5Hvisualtech Monitor Compact 5Hvisualtech
Z
SIN FUNCION - WITHOUT FUNCTION
ESTADOS DEL MONITOR
Reposo:
Conmutador de ON/OFF en posición ON. da un destello solo al encender el monitor o al
colgar el brazo telefónico.
Línea Ocupada:
Sistema ocupado por una llamada en otra vivienda.
brazo. Si quien ocupa la línea es de la misma vivienda se encenderá en rojo intermitente.
el indicador luminoso
El indicador luminoso
El indicador luminoso se enciende (color rojo) SOLO al
descolgar el
FUNCIONAMIENTO
LLAMADA. Suena el tono de aviso, parpadea y se enciende la pantalla. Sin descolgar se
puede abrir la puerta con ( ) y/o cortar con ( ).
La llamada dura 30s. (5 tonos de aviso)
Para establecer una comunicación de audio, descuelgue el brazo telefónico. Duración máxima de 1m 30s.
Para abrir la puerta pulse ( )
*Monitor auxiliar: Los tonos de llamada sonarán intercalados con los tonos del monitor principal. No
aparecerá imagen de video hasta que descuelgue.
AUTOENCENDIDO. Se puede activar y volver a desactivar el vídeo del monitor con la última placa que ha
llamado pulsando autoencendido ( ). Pulsando otra vez se mostrará la imagen de la siguiente
placa/cámara.
Para establecer una comunicación de audio, descuelgue el brazo telefónico.
Se puede abrir la puerta con ( ) incluso sin descolgar.
LLAMADA A CONSERJERIA: En estado de reposo, descolgar y pulsar ( ). La conserjería devolverá la
llamada o la memorizará. Si no hay conserjería, el monitor efectuará 3 destellos rojos.
MONITOR STATUS
Stanby:
The ON/OFF switch is in the ON position. The luminous indicator (LED) blinks once only when the
monitor is powered up or when the handset is hanged up.
Line engaged:
The system is busy attending a call to another monitor. The luminous indicator will ONLY light (red)
when the handset is lifted up. If the line is busy by a monitor in the same house, the luminous
indicator will blink red.
FUNCTIONING
CALL. When the monitor receives an incoming call, the LED begins to shine in a green color, the speaker
starts the ringing tones and the screen turns on. At this step, the call can be finished pressing ( )
and the door can be opened pressing ( ).
*Auxiliary Monitor. The auxiliary monitor puts in the ringing tones with those of the main monitor and
it will not activate the screen unless the handset lifts up.
SELF STARTING. The video can be activated or deactivated pressing ( ) and it will show image of the last
calling panel. To get audio, lift the handset up. Pressing again it will show image of the next panel/camera.
The maximum communication time is 1m and 30s.
The door-opener ( ) can be activated even without leaving the handset up.
CALL TO SWITCHBOARD: lift the handset up and press ( ). The switchboard will return the call or
memorize it. If it is not available there will be three red flashes.
SIN FUNCION - WITHOUT FUNCTION
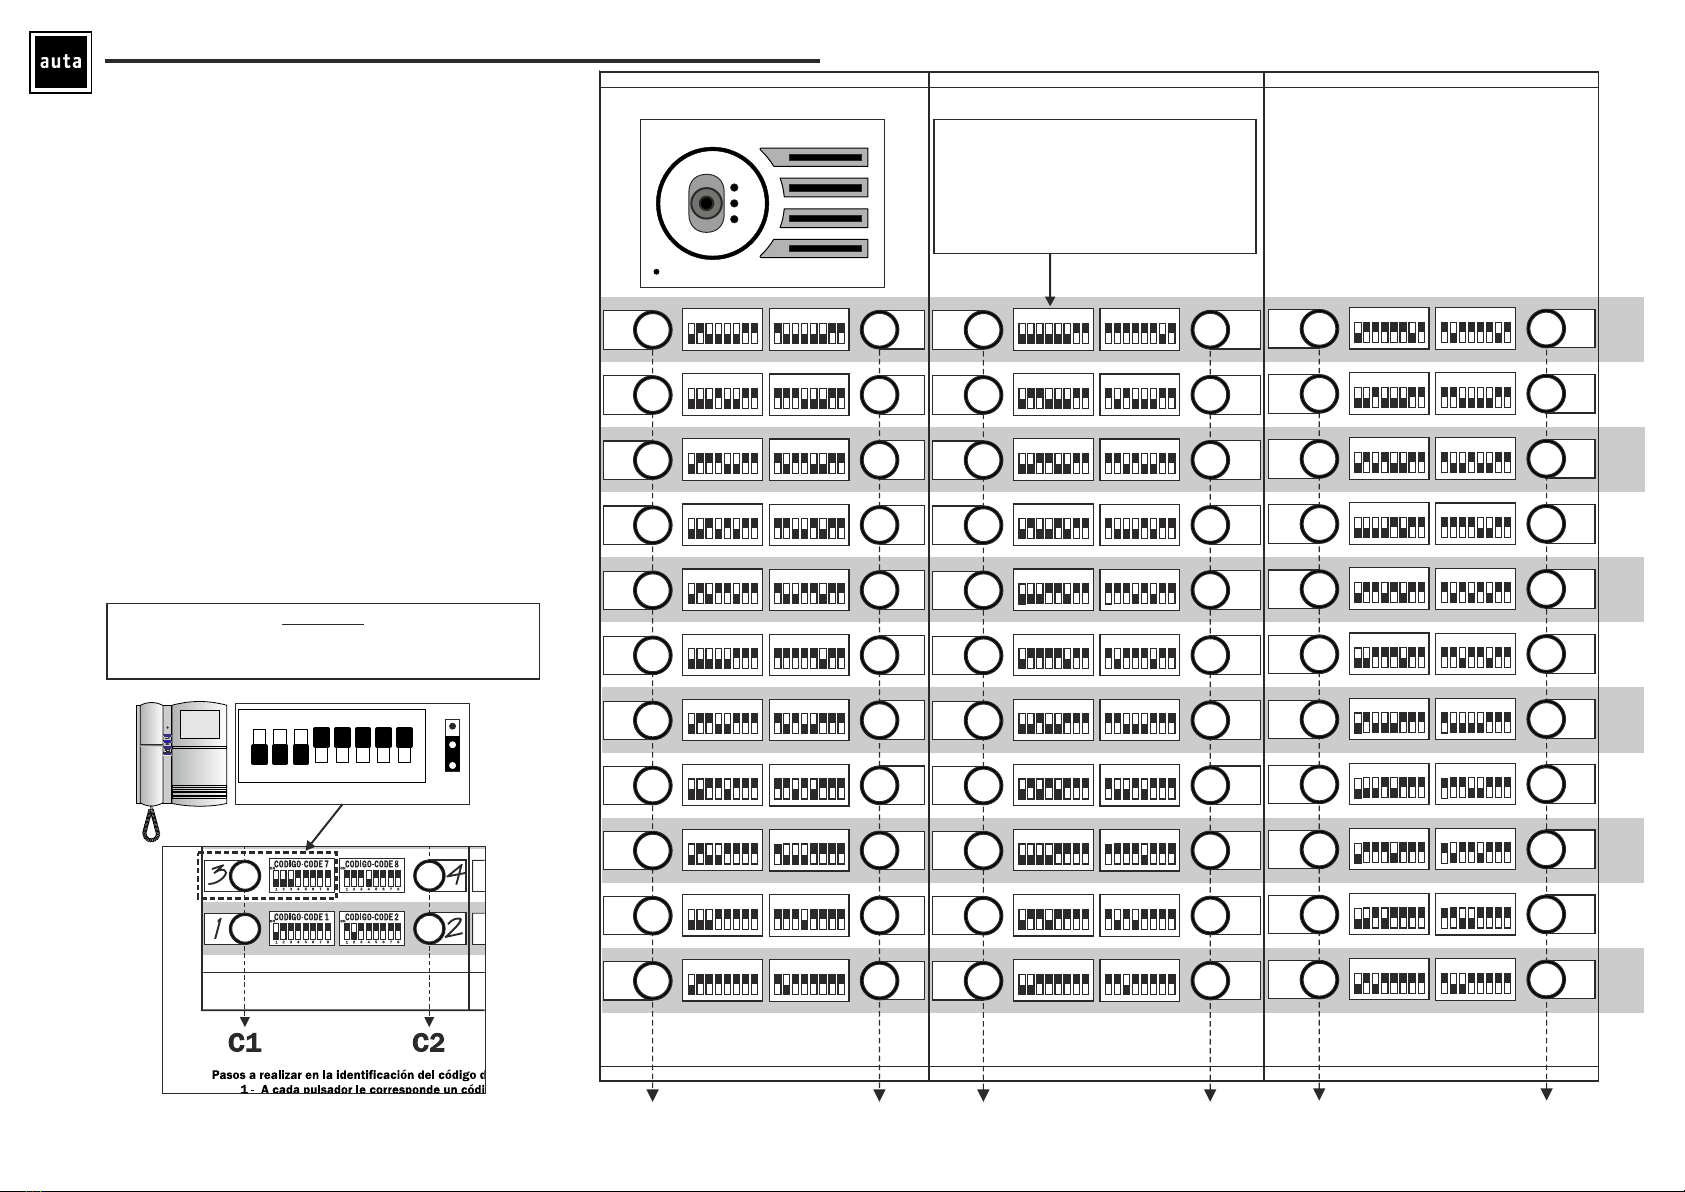
código de llamada
call code
7 8
ON
1 2 3 4 5 6
Monitor principal
main monitor
1
J1
2
3
ON
1 2 3 4 5 6 7 8
J1
ON
1 2 3 4 5 6 7 8
REPRESENTACIÓN-REPRESENTATION
1
J1
2
3
Monitor auxiliar
auxiliary monitor
1
J1
2
3
1J2
2
3
1J3
2
3
1
J4
2
3
Posiciòn de fábrica
Factory mode
1J2
2
3
1J3
2
3
1J4
2
3
Solo compatibilidad con
versiones antiguas (v 1.x)
Only old devices
compatibility (v 1.x)
WARNING-ATENCIÓN
THE BELLOW INSTALLATION INSTRUCTIONS SHALL BE
FOLLOWED IN ORDER TO PREVENT INJURES.
AVOID DRIPPING OR WATER SPLASH.
SIGA LAS INSTRUCCIONES PARA EVITAR DAÑOS.
EVITE QUE EL EQUIPO ENTRE EN CONTACTO CON LÍQUIDOS.