AUTLED LC-012-004 User manual
LED RF WiFi Interface - 8 Zones - User Manual
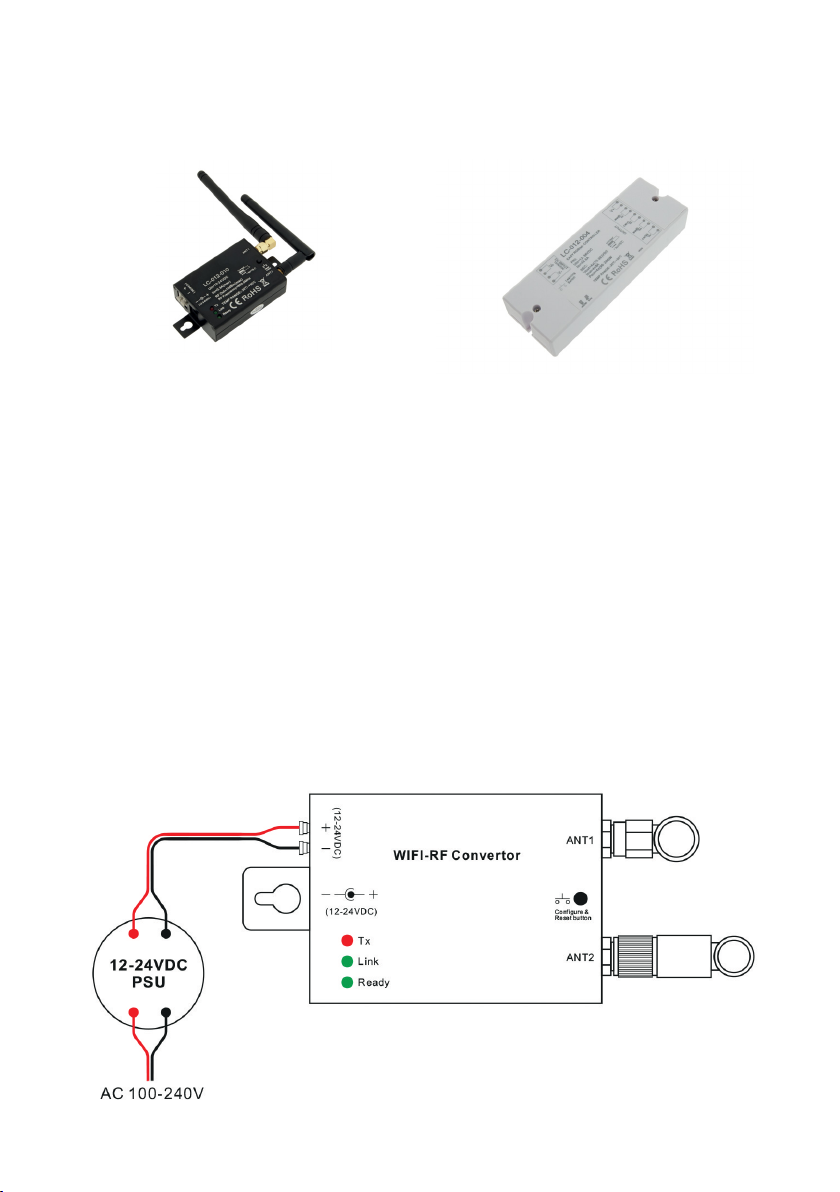
Receiver: LC-012-004WiFi Interface: LC-012-010
1. Product Description
The RF Wifi Interface is a Converter which works with receiver LC-012-004 to be controlled by
iOS or Android system via WiFi. With the Interface you can control upto 8 different zones.
2. Specification
2.1 Interface LC-012-010:
Operation Voltage: 12-24VDC, RF Signal, Operation Frequenz 2.4G
2.2 Receiver LC-012-004:
12-36VDC Operation Voltag, 4 channels x 8A, constant voltage, 4 channels x (96-192)W
3. Wiring Diagram

4. Introduction of Buttons
6. User Manual
There are three different ways to configure smart phone connect to convertor:
1. Easylink to router
2.Autolink to router
3.Directly connected to WIFI controller
We just need choose any one according different situation.
Three different ways to configure smart phone
connect to convertor:
1.Easylink to router
2.Autolink to router
3.Directly connected to WIFI controller
P1

1. Easylink to Router
Mostly be used when convertor installing place is easy to be accessed and need to control LED
lighting by own house‘s WiFi.
1. Install the App „Easylighting“ on your smartphone or tablet
2. Smartphone or Tablet connect to house‘s WiFi
3. Enter the „Easylighting“ App
4. Short press „Setting“ Button (P2)
5. Short press the „Easylink to Router“ Button (P3)
P2 P3
6. Short press the „Configure“ Button on WiFi Interface (P4)
7. Press the „OK“ Button (P5)
P5P4

8. Enter the password from the router and then press „OK“ Button (P6)
9. There will be a interface indicate successful, then press „OK“
P6
2. Autolink to Router
Most popular way when need to control LED lighting by own house‘s WIFI.
1. Search and connect the Easylighting(WIFI controller default password 0123456789)
2. Enter easy lighting application
3. Short press setting button (P2)
4. Short press Autolink to router (P10)
P9 P10
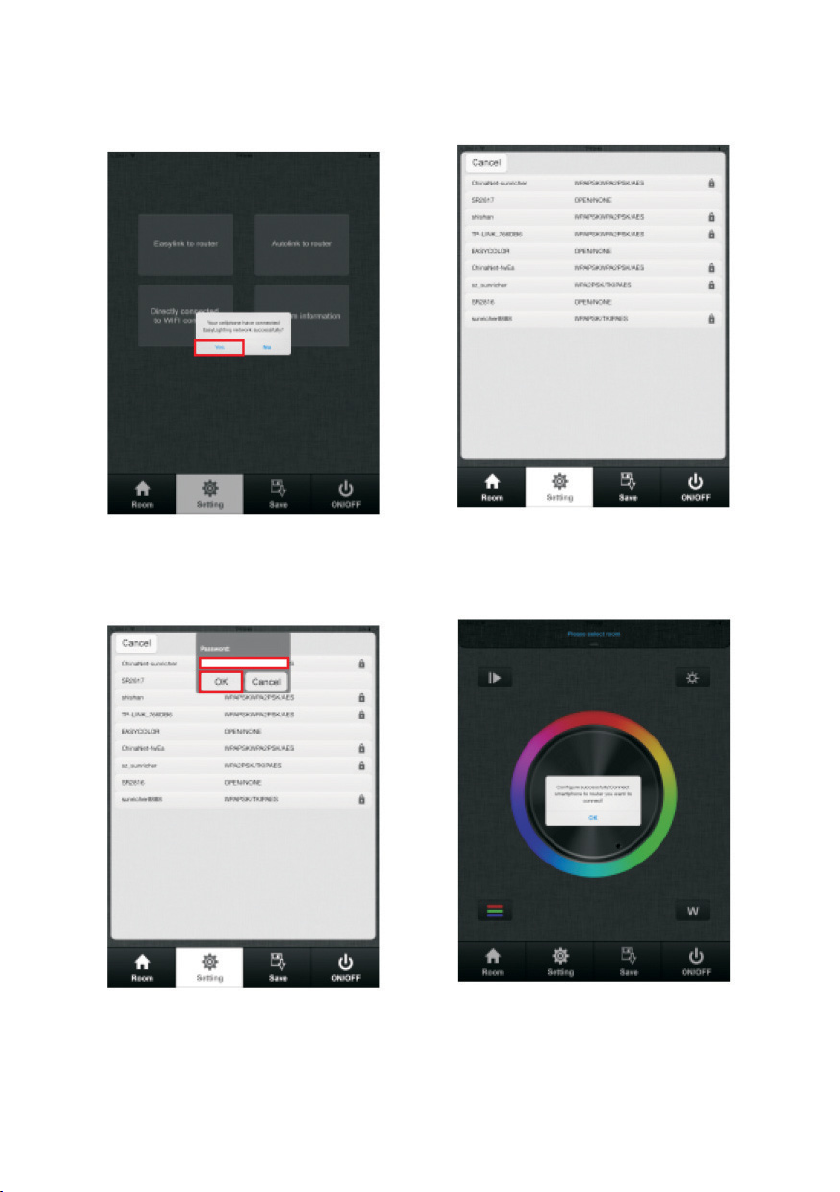
6. Press yes, it will search all the router around automatically (P11.P12)
P12P11
6. Choose router we want connect
7. Enter password and then press OK (P13.P14)
P14P13
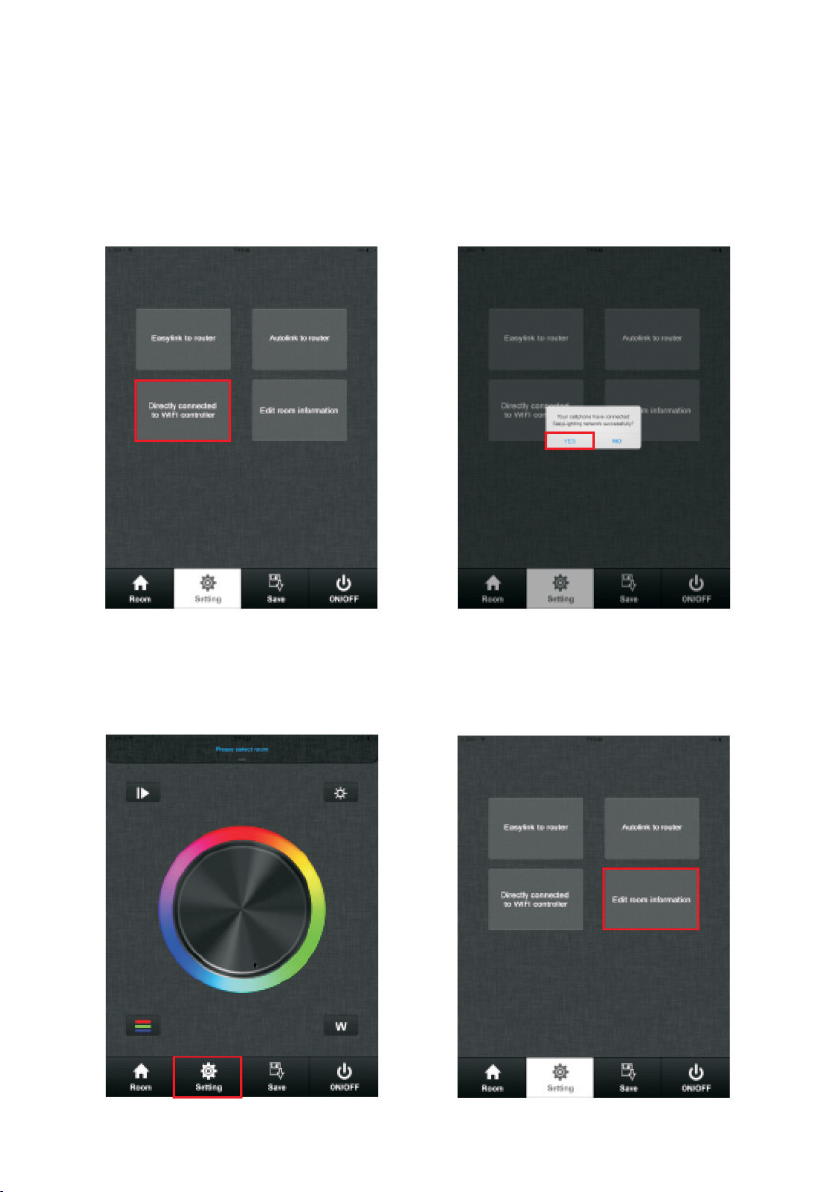
3. Directly connect to WIFI controller
Be used without house‘s wifi
1. Search and connect the Easylighting (WIFI controller default password 0123456789)
2. Enter easy lighting application
3. Short press setting button.
4. Press „directly connected to WiFi controller“ (P15)
5. Press yes (P16).
P15 P16
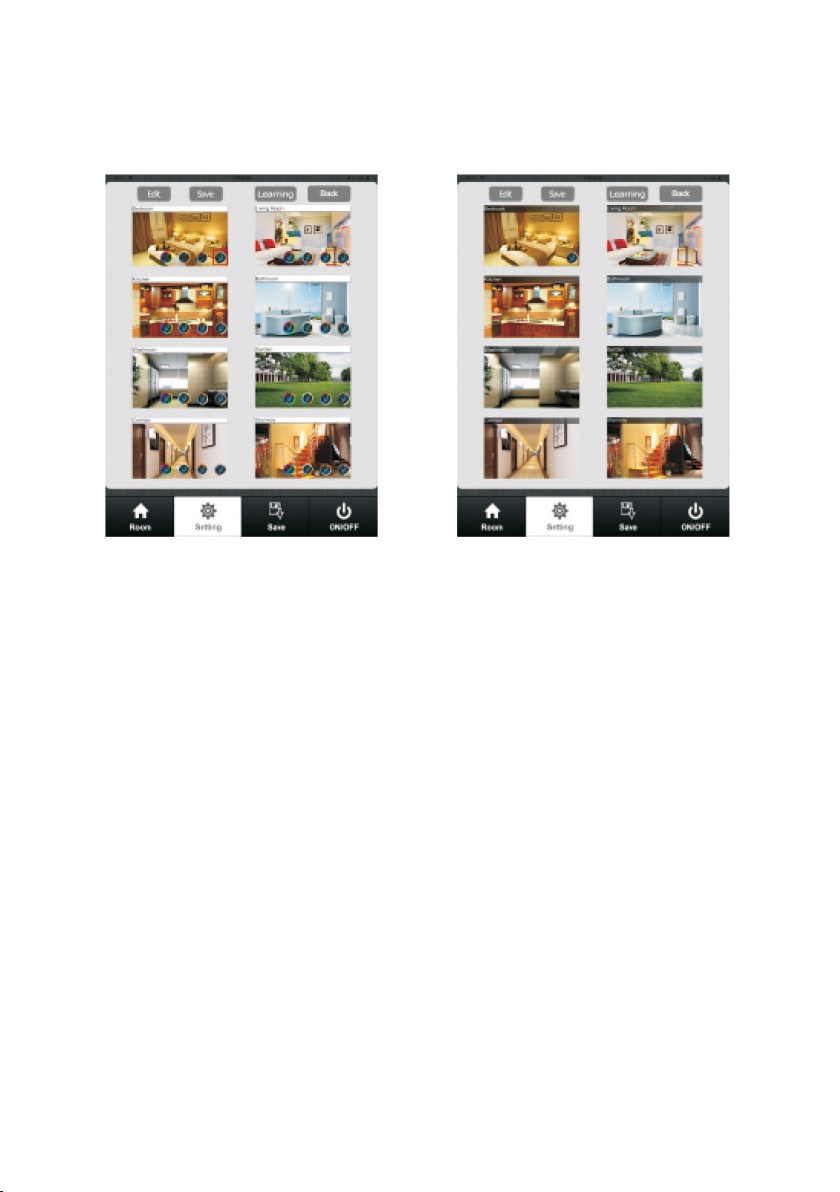
Room editing
1.Short press setting button (P17)
2.Short press Edit room information button (P18) there will be room editing page as(P19)
P17 P18
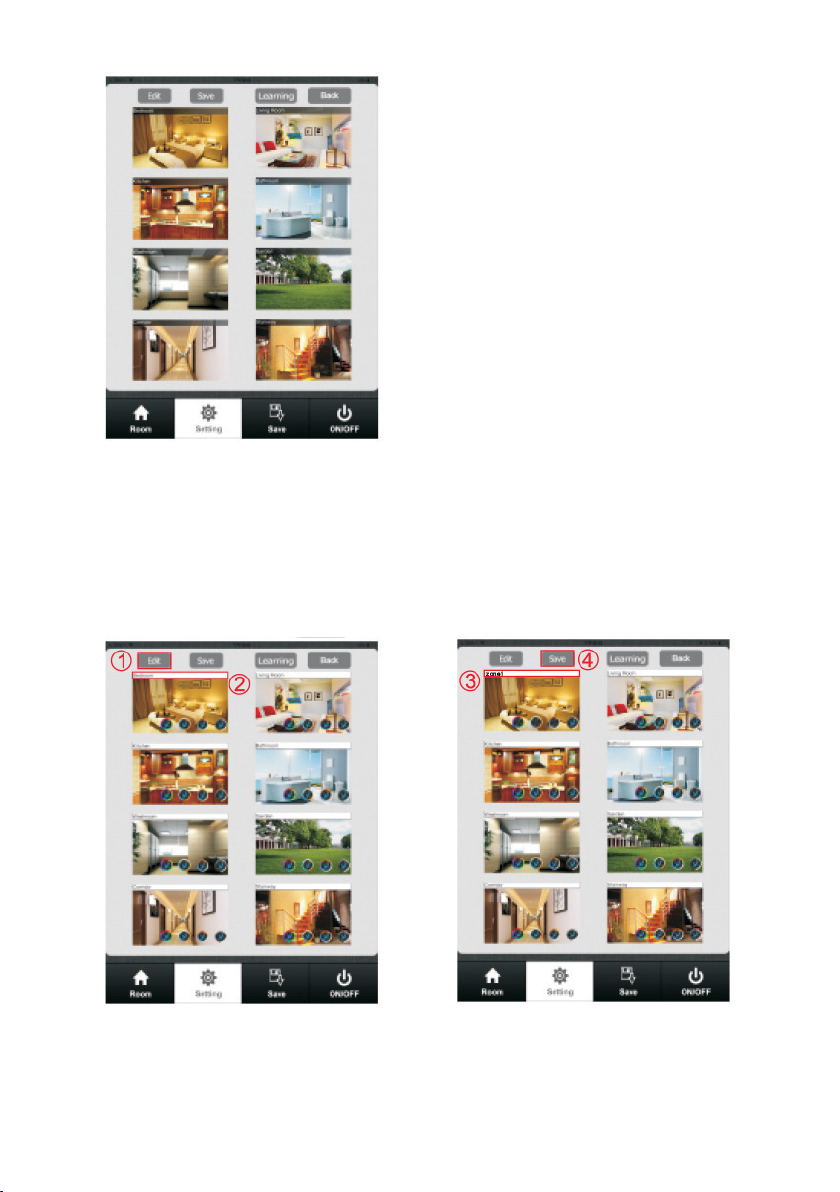
P19
Edit room/zone name
1. Press Edit button (P20)
2. Click the words (”bedroom” for example)
3. Delete the old name and enter a new name (zone 1 for example)
4. Press save button (P21)
P20 P21

Change picture for the room
1. Press Edit button (P20)
2. Short press the middle of the room picture(P22)
3. Camera will be opened automatically, Take a picture and Click use photo (P23)
4. Press save button (P22)
P22 P23
Edit color wheel for corresponding LED lighting
1. Press Edit button there will be four different color wheel in lower right
P24
for RGBW LED lighting
for RGB LED lighting
for DW LED lighting
for single color LED lighting
2. Cancel the mark for other three color wheels and keep one (take single color as example) (P25)
3. Press save
4. Choose this zone there will be one directly enter corresponding color wheel
P25 P26
Learning (pairing)
a) Normal learning way
1. Selected any one room and there will be small mark on the upper right side.
2. Press room button.
3. Press learning key on RF controller
4. Touch the color wheel,LED lighting will blink to confirm room designation
Delete:
Press at learning key on receiver over 10 seconds until LED light flash, then delete the learned ID.
b. Special learning way: using learning key in room editing page. This learning way can only be
activated in 15 seconds after power on the controller
1. Enter to room editing page
2. Power off and on RF controller
3. Short press the room which we want learning to
4. Short press the learning key
5. LED lighting will blink to confirm room designation
Delete:
1. Power off and on RF controller
2. Long press learning key over 5 second until LED light blink
3. Then deletes the learned ID
Attention: This way normally is used when the RF controller was installed in a place cannot be
accessed.

Room Button (P27, P28)
1. Choose Room button
2. Short press middle of zone picture
3. Mark on the upper right side of room picture to indicate choose successfully, multiple rooms can
be choose at same time
4. Press room button again be confirm the rooms’ selection
5. Upper area will indicate room’s name we selected.
P27 P28
Long press middle of the room picture to on/off corresponding rooms/zones.
There will be a red off mark on the right upper side of the room picture when the room
is switched off.
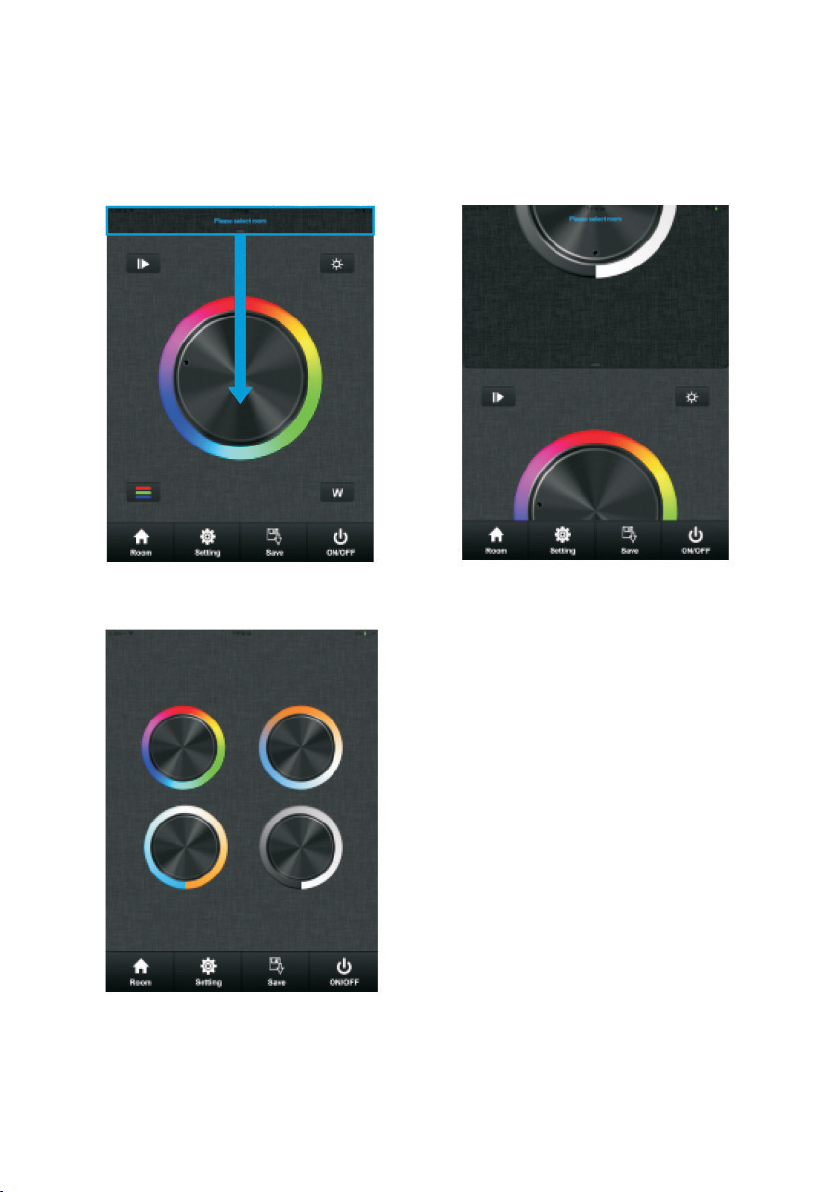
Color Wheel
There will be four different color wheels we can select if we did not edit the room:
RGBW, RGB, DW and Single color.
1. Slide the upper areas from top to down to choose color wheel from one to one. (P29,P30)
P29 P30
P31
Or fast press twice to enter the color wheel selec-
tion interface to choose color wheel (P31)

Pause & Run Button (P32)
Running button exist in RGB, CDW color wheel interface. Press pause&run button, mode will run.
Press it once, it runs one mode. Press button again, it stops, then press one more time, it will enter
next mode. There are total 10 build-in modes. If we pressed color after we pause the running, the
running mode will back form first one.
P32
Fastest speed
Moving speed adjustable
Lowest speed
Music
P33
LED lighting will move
according the voice
decibel nearby. Bigger
decibel, faster speed.
LED lighting will back to
adjusted speed when no
voice effect.
LED lighting will move
according the level of
music voice. Bigger
decibel, faster speed.
LED lighting will back to
adjusted speed when no
voice effect.
Voice Sensitivity
The lowest,need a high
voice affect moving speed.
The highest,a low voice
will affect the moving
speed lowest
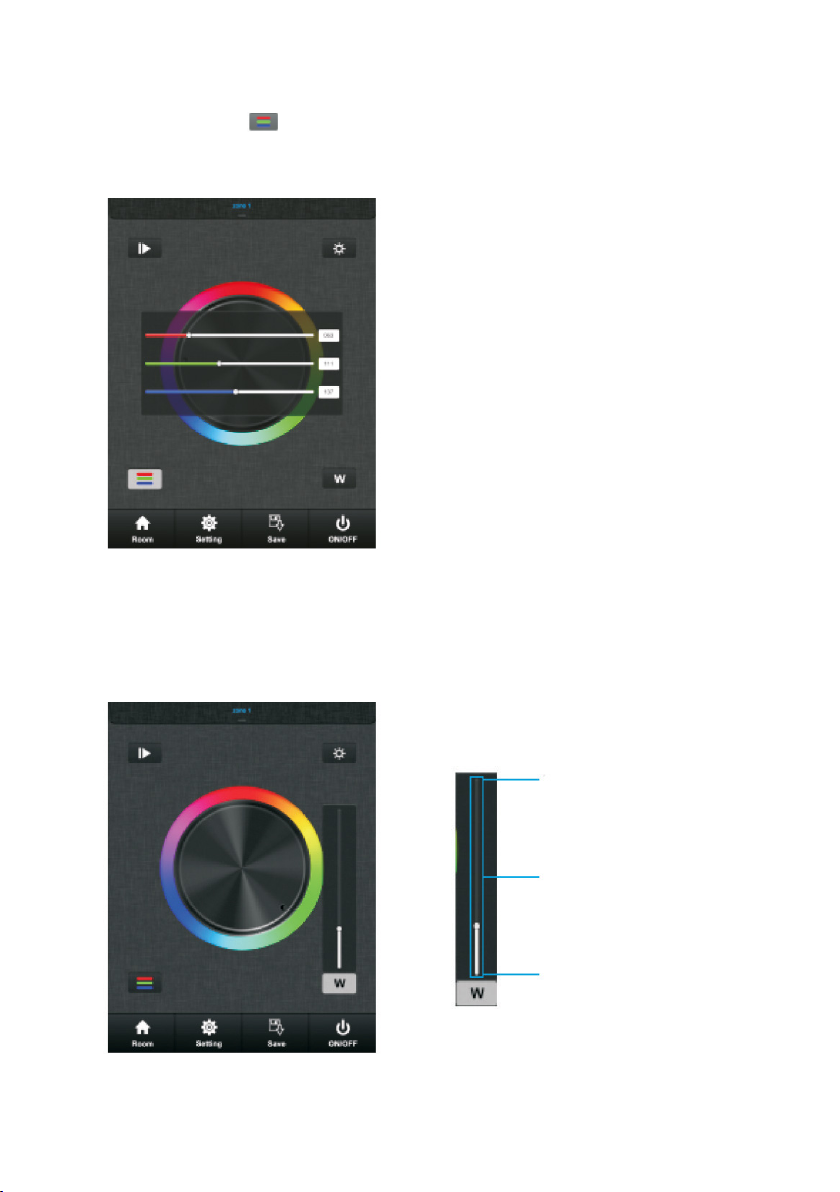
RGB/CDW brightness level line
This button exist in RGB/CDW interface.
1. Short press the button
2. Brightness level can be adjusted from 0-255 to an accurate color.
P36
W- Button (White)
This button only exists in RGBW channels color wheel interface to adjust W channel brightness
independently.
P37
100% Brightness
W channel‘s
brightness level
1% brightness
long press W-button to switch ON/OFF the white channel independently.
Attention
Before adjust the color by color line, LED might
in already in an existing color, so we need zero
clearing each channel first:
moving each channel in any level between
1-225, then move it back to zero, then RGB
lighting will off which means zero clearing
successfully.

Brightness Button
Brightness button exist in RGBW, RGB and DW color wheel interface.
P38
In RGBW color wheel interface, it only adjusts
R, G and B three channels brightness, and
cannot adjusts W channel. We need use
W button to adjust W channel brightness
independently.
100% brightness
1% brightness
In RGB and DW color wheel interface, it adjusts all channels brightness.
Save Button
Save:
1. select rooms/zones
2. select color or moving modes
3. short press save button
4. long press any button of S1-S8
5. LED lighting will flash indicate save successfully.
Recall of saved colors/moving modes with the S1-S8 buttons:
1. select rooms/zones
2. short press save button
3. short press button S1-S8 (which one you have saved before the selected color/moving mode)
4. LED will indicate saved color or moving modes

7. Safety warnings
1. The product shall be installedc and serviced by a qualified person.
2. Please avoid directly sun and rain/wet conditions.
3. Always be sure to mount this unit in an area with proper ventilation to avoid overhaeting.
4. Please check if the output voltage of any LED power supplies used comply with the working
voltage of the product.
5. Never connect any cables while power is on and always assure correct connections to avoid
short circuits before switching on.
6. Please ensure that the cable is secured tightly in the connector.
7. For update information please consult your supplier.
Other manuals for LC-012-004
3
This manual suits for next models
1
Table of contents
Other AUTLED Recording Equipment manuals


Popular Recording Equipment manuals by other brands


HHB
HHB CDR-850 operating instructions

Mitsubishi Electric
Mitsubishi Electric DX-TL2500U Installation and operation manual

Sony
Sony SIU-100 operating instructions

Xpression
Xpression fX Enhancer user manual

SEW-Eurodrive
SEW-Eurodrive Movipro PZM2xA-A Series Addendum to the operating instructions

Ko Propo
Ko Propo for DRIFT instruction manual