AutoPets Litter-Robot Open-Air User manual

Instruction Manual
The Self-Cleaning Litter Box
that Really Works!


+33 (0) 8 00 00 18 37
2
Table of Contents
Important – Read This First............................................ 3
Introduction .................................................................. 4
Unpacking Your Litter-Robot........................................... 5
Getting Your Cat to Use the Litter-Robot.......................... 8
Components and Features............................................ 11
Control Panel - Button Functions................................... 11
Power Button................................................................................11
Cycle Button .................................................................................12
Empty Button................................................................................13
Reset Button.................................................................................14
Control Panel - Indicator Lights..................................... 15
Cat Sensor .................................................................. 16
Drawer Full Indicator.................................................... 17
Automatic Night Light................................................... 17
Bonnet........................................................................ 18
Internal Shield and Key ................................................ 19
Step Mat..................................................................... 19
8 Hour Sleep Mode ...................................................... 19
Wait Time Setting........................................................ 20
Control Panel Lockout .................................................. 21
Battery Backup............................................................ 21
Use & Care.................................................................. 23
Safety Features ........................................................... 28
Money-Back Guarantee and Warranty............................ 30
Contact Customer Service............................................. 31
Frequently Asked Questions.......................................... 32
Troubleshooting........................................................... 36

http://www.robotshop.com/eu/en/litter-robot-en.html
3
Important – Read This First
•The Litter-Robot is not recommended for kittens, or small
cats that weigh less than 2,5 kg.
•Always be sure that each cat in your household is heavy
enough to activate the Cat Sensor before you let the
Litter-Robot operate in automatic mode.
•Make sure the Litter-Robot is placed on a level firm
surface. Placing the Litter-Robot on deep carpet may
affect the sensitivity of the unit.
•Do not put anything in the Globe other than clumping cat
litter. You can use water and soap to clean the Globe.
•Do not force your cat into the Litter-Robot.
•Do not sit on, or place anything on the Litter-Robot.
•Do not remove the Globe or Bonnet while unit is rotating.
•Do not turn power on if Globe is removed as hair or
fingers can get caught or pinched in the turning gear.
•Do not wet or submerge the Base and/or Bonnet.

+33 (0) 8 00 00 18 37
4
Introduction
Thank you for purchasing Litter-Robot™
Open Air
, the self-
cleaning litter box
that really works!
At AutoPets (Automated Pet Care Products, Inc.) we aim to
develop products that keep your pets happy and make your
life easier. This manual will help you get the most out of
your Litter-Robot
Open Air
. We will guide you through the
setup process, as well as provide you with useful tips and
advice for getting your cat acclimated to its new, automatic
self-cleaning litter box.
Along with its larger capacity and ergonomically shaped litter
chamber, there are many new features to explore with the
Open Air
unit, so keep this manual handy and in a safe place
for future reference. You can also download it from our web
site.
Try the Litter-Robot
Open Air
in your home for 90 days. If
you or your cats are not completely satisfied, for any reason,
simply return it within 90 days for a full refund.Please note
that you are responsible for return shipping costs. If you
need assistance during your trial period, or a little extra time,
please call us at +33 (0) 8 00 00 18 37 or e-mail us at
support@robotshop.com.
Enjoy your Litter-Robot, and
Enjoy your Freedom!
Brad Baxter
President
AutoPets
(Automated Pet Care Products, Inc.)

http://www.robotshop.com/eu/en/litter-robot-en.html
5
Unpacking and Setting Up Your Litter-Robot
Your Litter-Robot comes completely assembled and ready to
use.
Make sure box is right side up. Find and set aside the power
supply in the pocket of the top cardboard insert.
Remove and set aside the top cardboard insert.
Remove and set aside the cardboard corner braces.

+33 (0) 8 00 00 18 37
6
Reach down along the sides of the unit and find the hand
holds on the base unit and lift the whole unit out of the box.
The unit weighs 12 kg. Try to avoid cutting open or
damaging the outer box as you may need it later.
Remove cardboard spacers between the Bonnet and Globe.
If possible, place the Litter-Robot in the same location as the
old litter box. Make sure the Litter-Robot is on a level, firm
surface.
1. Fill the Globe with litter. The Litter-Robot litter sifting
system requires a clumping type litter to work
properly. We recommend a high quality clay-based
clumping litter such as Litter-Robot™ Premium Clumping
litter.Litter beads, and crystals may also be used with
the Litter-Robot as long as the beads and crystals are
small enough to pass through the screen – periodic
changing of this type of litter is required. Litters that DO
NOT work in the Litter-Robot are the strictly absorbent,
http://www.robotshop.com/eu/en/litter-robot-en.html
7
non-clumping litters, newspaper based litters, loose
clumping litters, and absorbent wood-based pellets. If
you are using a litter alternative not listed here, please
contact us at support@robotshop.com to make sure you
are using a compatible litter.
If you are filling the Litter-Robot with litter for the first
time, we recommend that you do not switch litter brands
at this time. Your cat/s need to get used to this new
litter box and introducing a new litter may increase their
level of apprehension and anxiety. However, if you are
currently using a non-clumping litter you will need to
switch to a clumping type litter.
For the initial charge of litter, we recommend starting
with 4,5 to 5 kg, or approximately 5 L (volume) of
clumping litter.
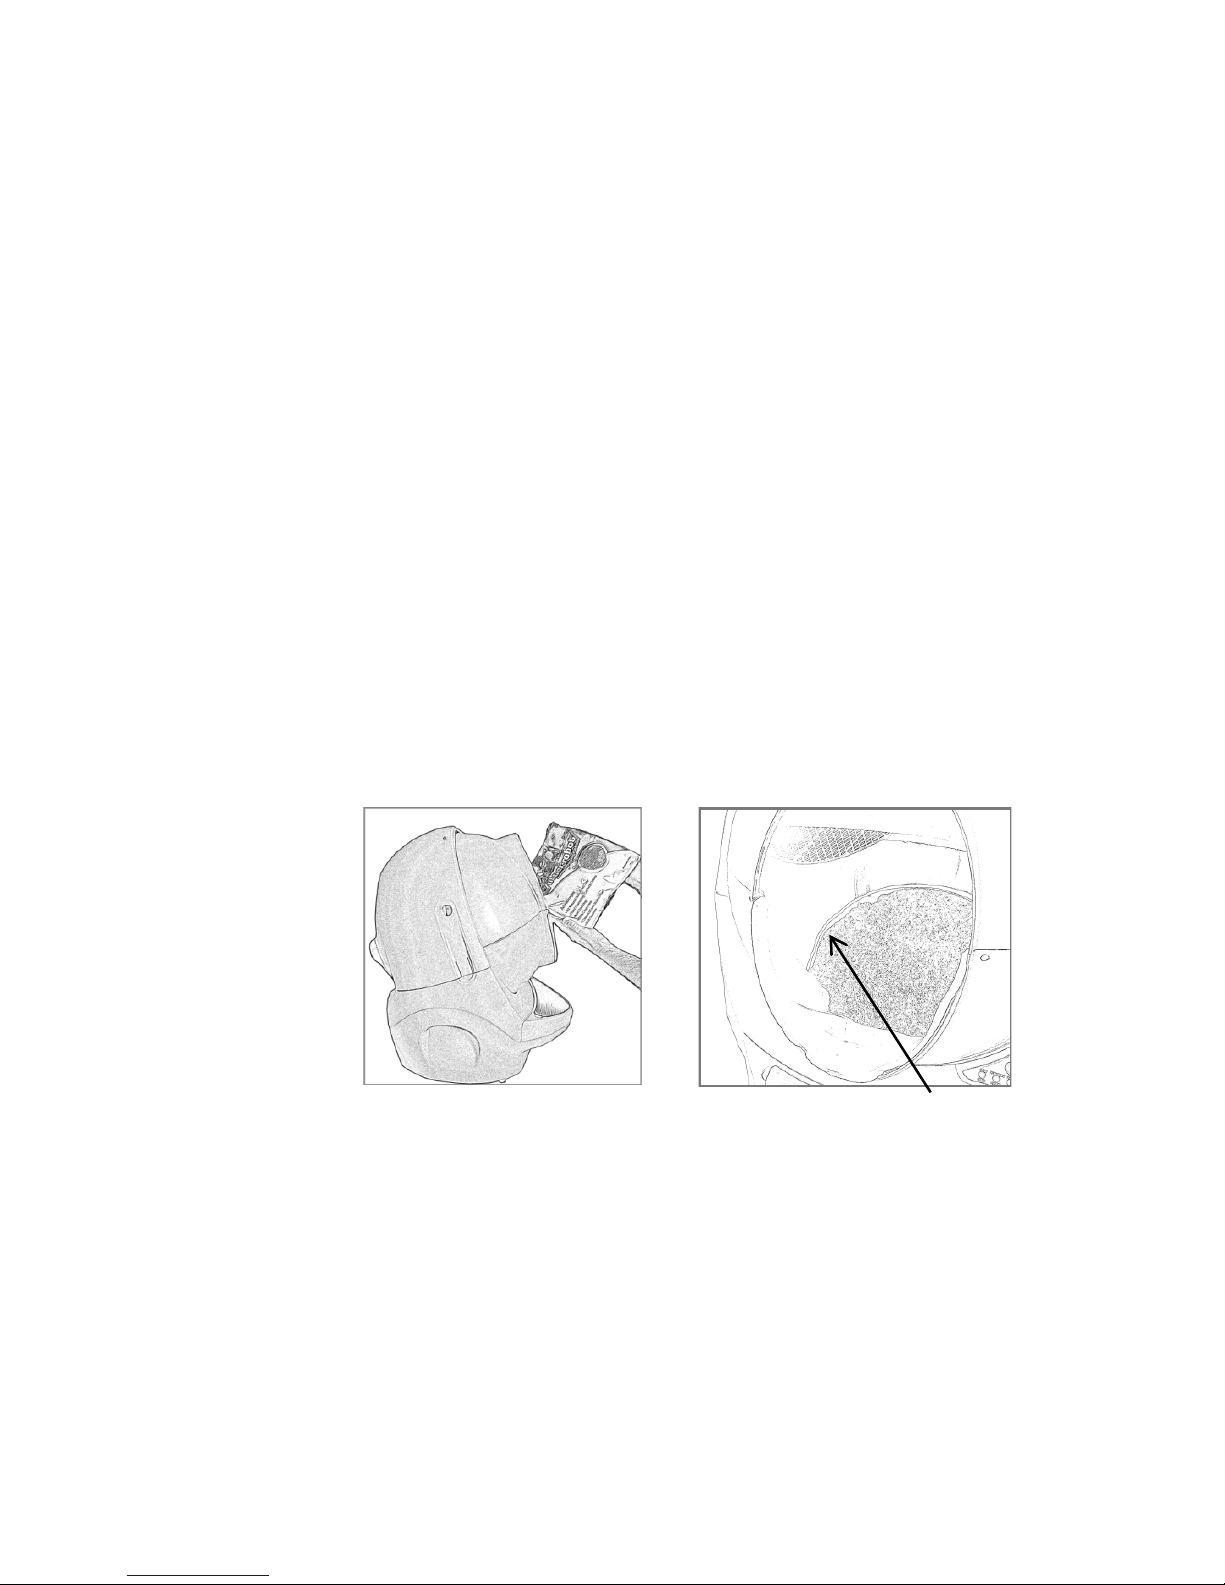
Fill with clumping litter through the Entryway.Once
litter has been added, spread litter in bottom of globe
and note the raised fill line. Litter should be at or below
Fill Line.
Tip
You can use one of the corner braces from the original
packaging as a temporary funnel for the initial charge of
litter.
Fill litter to raised Fill Line on
black rubber liner.

+33 (0) 8 00 00 18 37
8
2. Insert the small plug end of the AC/DC adapter cord into
socket located in back of the Base unit.
3. Next, plug the AC/DC adapter into a wall outlet.
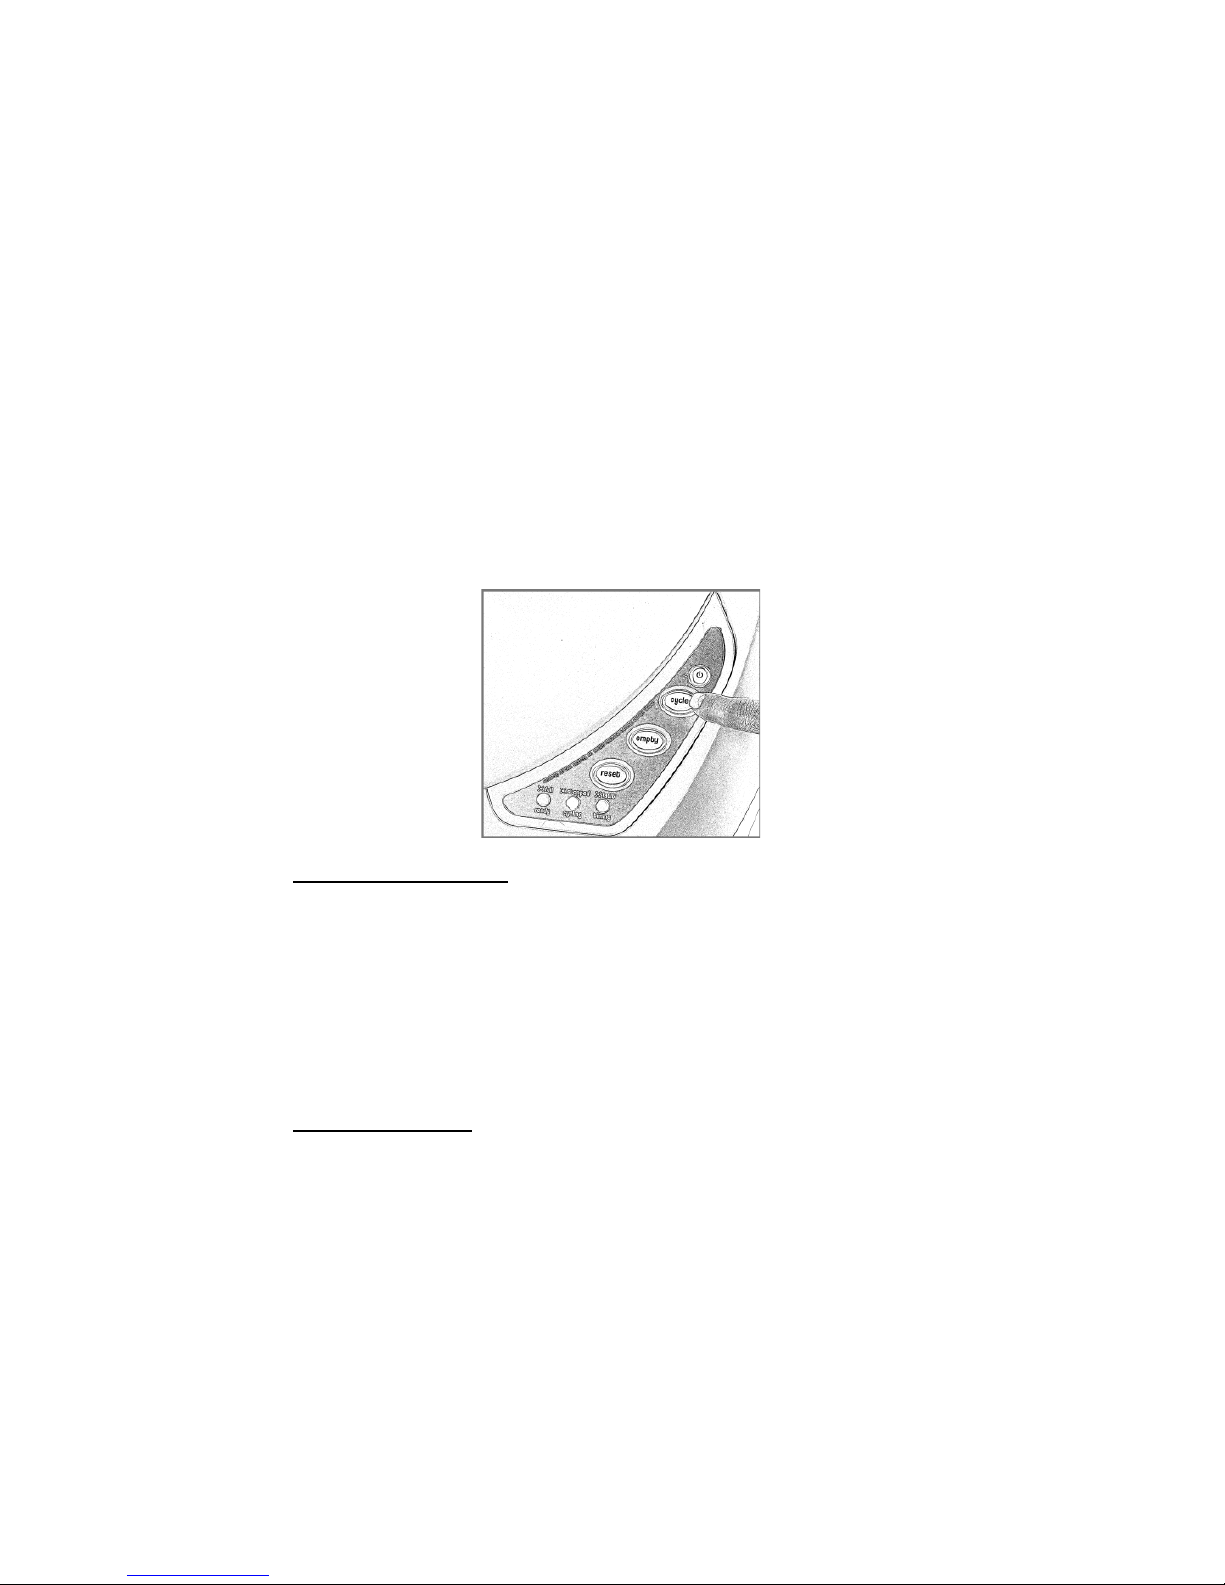
4. Locate and press the Power Button. The Litter-Robot will
now perform an initialization cycle which will last
approximately 2 ½ minutes. After completing the cycle,
the Globe should be in the Home position with the blue
LED on. Your Litter-Robot is now ready to use,
however, we recommend powering off the unit until your
cat/s become familiar with and begin to use the Litter-
Robot.
Tip
If this is the first time you have filled the Litter-Robot
with litter and you are trying to get your cats acclimated,
you can pour a cup of used litter from the old litter box
on top of the new litter in the Litter-Robot. This will
provide a familiar scent for your cat. See the next
section “Getting Your Cat to Use the Litter-Robot” for
more tips.
Getting Your Cat to Use the Litter-Robot
Most likely, your cat will quickly adapt to the Litter-Robot.
We recommend the following steps:
•Place the Litter-Robot in the same location as the current
litter pan. Set up the Litter-Robot according to the
instructions (make sure you add litter to the Globe) and

http://www.robotshop.com/eu/en/litter-robot-en.html
9
make sure it is turned OFF. Give your cats a day or two
to explore the Litter-Robot. If your cats show no
interest, you can entice them to approach the Litter-
Robot by using some catnip or their favorite treat.
•Add a scoop of litter from the old litter pan. This
provides a familiar scent for your cat.
•Place treats on the ledge or around the Litter-Robot so
that the cat associates rewards with the unit.
•Since cats are curious and love to go into boxes, you can
try putting the original packaging over the Litter-Robot
with a hole cut out for the entry and the drawer.
•Once you notice that your cats have used the Litter-
Robot, you can cycle the unit manually by turning the
unit ON. If the cats are present, it will give them a
chance to observe the motion and become familiar with
the sound of the Litter-Robot while you are present to
reassure them. Turn the unit OFF again after the
cleaning cycle has completed (the Litter-Robot should be
in the home position). We recommend that you no
longer clean the old litter pan once the Litter-Robot has
been used by your cats.
•If your cats are not using the Litter-Robot within a few
days, continue using the old brand of litter in the old
litter box, and let it go as long as possible without
cleaning it. Cats prefer a clean litter box and a dirty litter
pan might persuade them to use the clean Litter-Robot.
Also, consider replacing the litter in the Litter-Robot with
a type specifically formulated for litter box training.
•Once your cats are consistently using the Litter-Robot,
you can turn the unit ON and leave it ON letting it
operate in automatic mode. You can now remove the old
litter box.
Congratulations, you have successfully introduced your cats
to the Litter-Robot. Enjoy your freedom from litter box
scooping!

+33 (0) 8 00 00 18 37
10
Components and Features
Night Light
Fill Line
Flexible Liner
Power Button
Control Panel
Indicator Lights
Base
Globe
Internal Shield
Bonnet
Cat Entry/Exit
Step Mat
Waste Drawer
Carbon Filter
Front View
Shown in Home Position
Key
Cat Sensor
Bonnet
Globe
Power Input
Rear View
Shown in Home Position

http://www.robotshop.com/eu/en/litter-robot-en.html
11
Control Panel - Button Functions
1. Power Button + [Night Light Function]
Press and Release:This turns the system power On and
Off.
Press and Hold: Holding the Power Button toggles the
LED Night Light On and Off.
1. If the Night Light function is already activated and
light is on, light will turn off, and if light is off (ambient
light levels too high), light will flash on then off
indicating Night Light function has been deactivated.
Cat Sensor
Base
Handles
Waste Drawer
Handle
Key
Battery Pocket
(Battery Backup Optional)
Carbon Filter
Waste Drawer
Bottom View
Night Light
Sensor
+33 (0) 8 00 00 18 37
12
2. If the Night Light function is deactivated and the
ambient light levels are high (day light) the light will
flash on then off indicating Night Light function has been
activated. In low ambient light (dark room) the light will
come on and stay on.
The status of the Night Light function can be checked at
any time by covering the light sensor, located above the
Cycle button on the Control Panel, to see if the Night
Light comes on or not.
Night Light settings are remembered when the unit is
powered Off and back On again.
2. Cycle Button + [8 Hour Sleep Mode]
Press and Release:Press Cycle to start the Litter-Robot
cleaning cycle. To pause the cycle, press any button on
the Control Panel during the cleaning cycle. Press Cycle
once again to resume the cleaning cycle.
To stop and abort the cleaning cycle, press any button
to pause the cycle, then press either Empty or Reset to
return the Globe to the home position.
Press and Hold:Hold Cycle to activate the 8 Hour Sleep
Mode. When activated, the yellow LED will light up in
addition to blue LED. The Cat Sensor will be de-
activated for the next 8 hours and unit will only cycle if
Cycle is manually pressed during this 8-hour window.
Immediately after 8 hours, the unit will perform a
cleaning cycle and then return to the home position with

http://www.robotshop.com/eu/en/litter-robot-en.html
13
only the blue LED on and the Cat Sensor will be active.
The 8 Hour Sleep Mode period (Cat Sensor deactivated)
will be repeated every 24 hours at the time of initial
setting. Press and hold Cycle to exit this mode - note
that if not within 8 Hour Sleep Mode period, yellow LED
will flash on then off indicating you have exited this
mode.
3. Empty Button + [Wait Time Setting]
Press and Release:Empties all litter from Globe into the
Waste Drawer. Press any button to return the Globe to
home position.
Press and Hold:Hold Empty to enter Wait Time Setting
mode. One of the LEDs will flash to indicate you’ve
entered the mode. Use the Reset button to toggle
between the different wait times:
Blue flashing= 3 minute wait time
Yellow flashing = 7 minute wait time
Red flashing = 15 minute wait time
Press and hold the Empty button to save this setting.
The Wait Time is the elapsed time starting from when
your cat exits the unit to when the unit runs a clean
cycle.
It may be useful to reduce the wait time to minimize
odor and/or the time that the waste is available to other
pets - such as dogs. However, reducing the wait time
may reduce the cleaning effectiveness (clumps do not

+33 (0) 8 00 00 18 37
14
have enough time to set up). Extending the wait time
may be desirable when using a lower quality clumping
litter that needs more time to set up.
4. Reset Button + [Control Panel Lockout]
Press and Release: Press Reset to pause the unit
during cycling or reset the Cat Sensor’s baseline when
pushed at home position with blue LED on.
Press and Hold: Holding the Reset button will activate
the Control Panel Lockout feature indicated by the blue
LED blinking temporarily when this setting is activated.
This setting will lock out all button functions on the
Control Panel while still allowing unit to function in
automatic mode. Note that the unit may still be
Powered Off by pressing and holding the Power button
for 3 seconds. Press and hold Reset to turn off Control
Panel Lockout feature. Blue LED will blink temporarily to
indicate lockout function has been turned off.

http://www.robotshop.com/eu/en/litter-robot-en.html
15
Control Panel - Indicator Lights
Blue LED On (OK/Waiting)
Indicates that the unit is OK and that the Litter-Robot is
ready for your cat.
Blue LED Flashing (Waste Drawer is Full)
Indicates that the Waste Drawer is almost full. Empty the
waste drawer and press Reset to cancel the indicator light.
Yellow LED On (Cycling/In Use)
The Litter-Robot is cycling (Cleaning cycle or Empty cycle).
Yellow LED Flashing Once per Second (Cycle
Interrupted by Cat Sensor or Bonnet Removal)
1. While cycling, if the Cat Sensor is activated by your cat
entering the Globe, the unit will stop and the yellow LED will
flash once per second. 15 seconds after your cat has left the
Globe, the unit will start to cycle again.
2. If Bonnet is removed during a cycle or while Globe is at
home position, the unit will stop (if previously cycling) and
the yellow LED will flash once per second.
3. Unit will resume previous function 5 seconds after
replacing Bonnet.
Yellow LED Flashing Twice per Second (Cycle
Interrupted by Anti-Pinch Safety Feature)
While cycling, if the Anti-Pinch Safety feature is activated, the
Globe will stop and reverse direction for 2 seconds and then
stop. The yellow LED will then flash twice per second for 1
minute. After this 1-minute period the yellow LED will stop
flashing and Globe will attempt to rotate toward Home
position again.
Red LED (Sensor/Timing)
The red LED indicates that the Cat Sensor has been
activated. The Litter-Robot will begin cycling with yellow LED

+33 (0) 8 00 00 18 37
16
on after three, seven or fifteen minutes depending on the
setting. Default setting is seven minutes.
Note
If the Cat Sensor is tripped again within the set count-down
period, the count-down timer resets. The Globe will not
rotate until another three, seven or fifteen minutes have
elapsed, depending on the setting. You can cancel the
count-down timer (red LED is on) at any time by pressing the
Reset Button.
Red LED Flashing (Cat Sensor Fault)
A red LED flashing indicates that the Cat Sensor has been
continuously activated for 2 minutes or more either from a
cat that won't leave the Globe, or from too much weight in
the unit caused by overfilling with litter.
Cat Sensor
The Litter-Robot Cat Sensor is a weight sensitive switch that
detects your cat entering or exiting the Globe.
Your cat must be at least five 2,5 kg for the sensor to work.
Do not use the Litter-Robot with kittens or cats that weigh
less than 2,5 kg.
Always be sure that each cat in your household is heavy
enough to activate the Cat Sensor before you let the Litter-
Robot operate in automatic mode.
Make sure the Litter-Robot is placed on a level firm surface.
Placing the Litter-Robot on deep carpet may affect the
sensitivity of the unit.
Note that the Cat Sensor does not detect weight on
the Step Mat and this is intentional. The Cat Sensor
only detects weight inside the Globe.
The standard setting is for a seven-minute count-down to be
started when the cat leaves the Globe. At the end of the

http://www.robotshop.com/eu/en/litter-robot-en.html
17
count-down the Litter-Robot will start its cleaning cycle. Any
subsequent tripping of the Cat Sensor starts a new seven-
minute count-down, preventing the Globe from rotating with
your cat inside. You can adjust this time setting by pressing
and holding the Empty button for 5 seconds and then
pressing the Reset button to toggle through the settings.
(Blue: 3 minutes, Yellow: 7 Minutes, Red: 15 Minutes)
Caution:
Make sure that your smallest cat weighs at least 2,5
kg before operating the Litter-Robot in the
unattended automatic mode. Your cat must weigh at
least 2,5 kg to trip the Cat Sensor.
Drawer Full Indicator (DFI)
Your Litter-Robot is equipped with
infrared emitters and sensors
located above the waste drawer that
detect when the drawer is full. The
Control Panel displays a blue
flashing LED when the DFI is
activated. The Waste Drawer is
checked every time the Globe
returns to home position. Upon the
first activation of the DFI, the blue LED flashes, and the Cat
Sensor remains active. Upon the 3rd activation of the DFI
(after 2 more clean cycles), the Cat Sensor becomes inactive
and the unit will no longer cycle automatically. Check or
empty Waste Drawer and push the Reset button to cancel
mode.
Automatic Night Light
Although cats in general have excellent vision in low light
conditions, as they get older their vision can diminish and the
Automatic Night Light (located in the upper Bonnet) is there
to assist elderly cats find the litter box in extreme low light

+33 (0) 8 00 00 18 37
18
conditions such as a basement room without any windows. A
light sensor located below and to the left of the Power Button
turns the Night Light On and Off automatically. The Night
Light function can be turned On and Off by pressing and
holding the Power Button (see Control Panel - Buttons section
-> Power Button, page 11).
Bonnet
The Bonnet functions as a cover and guard for the waste port
as the Globe (and waste port)
rotate from the top of the unit into
the Base. The Bonnet also
provides a mount location for the
Automatic Night Light, wires, and
electrical terminals that provide a
low and safe 5VDC to the Night
Light. The Globe will not rotate
without the Bonnet installed (see
Control Panel - Indicator Lights
section -> Yellow LED Flashing,
page 15). The Bonnet is
assembled to the Base by inserting the tabs at the bottom
and rear of the Bonnet into the small holes in the Base, and
rotating the Bonnet downward such
that the snaps located at the bottom
and front of the Bonnet are inserted
into the matching slots and latched.
Holes above the snaps provide a
convenient finger hold while
removing or installing the Bonnet.
(See page 26-27 for bonnet
assembly instructions.)
Underside of Bonnet
showing Night Light
Bonnet

http://www.robotshop.com/eu/en/litter-robot-en.html
19
Internal Shield and Key
The Internal Shield is located near the top, left side of the
litter chamber or Globe. It provides a barrier between the
working surfaces of the interior Globe and the space used by
your cat. The position of the Internal Shield during cycling is
controlled by the 'Key' located at the back of the Globe. Make
sure the Key is positioned properly within the Base pocket.
Note that the Internal Shield and Key are not required for the
unit to function and may be removed if so desired.
Step Mat
The flexible and removable Step Mat
provides a soft and gripping surface
for entry/exit as well as acts as a
litter catch for tracked litter. The
Step Mat can be cleared of litter by
simply removing, turning upside
down and flexing within the Globe.
8 Hour Sleep Mode
This mode allows you to deactivate the Cat Sensor for 8
hours such that the unit will not cycle automatically. This
mode is useful for units located in bedrooms or areas where
you may not want the unit to cycle for a period of 8 hours.
Key
Rear view of Litter-Robot
Globe Front View
Internal
Shield
Table of contents
Other AutoPets Pet Care Product manuals


