AutoPets Litter-Robot 3 User manual

Headquarters
1080 W Entrance Dr
Auburn Hills, MI 48326
Assembly
561 S Fairfield Ave
Juneau, WI 53039
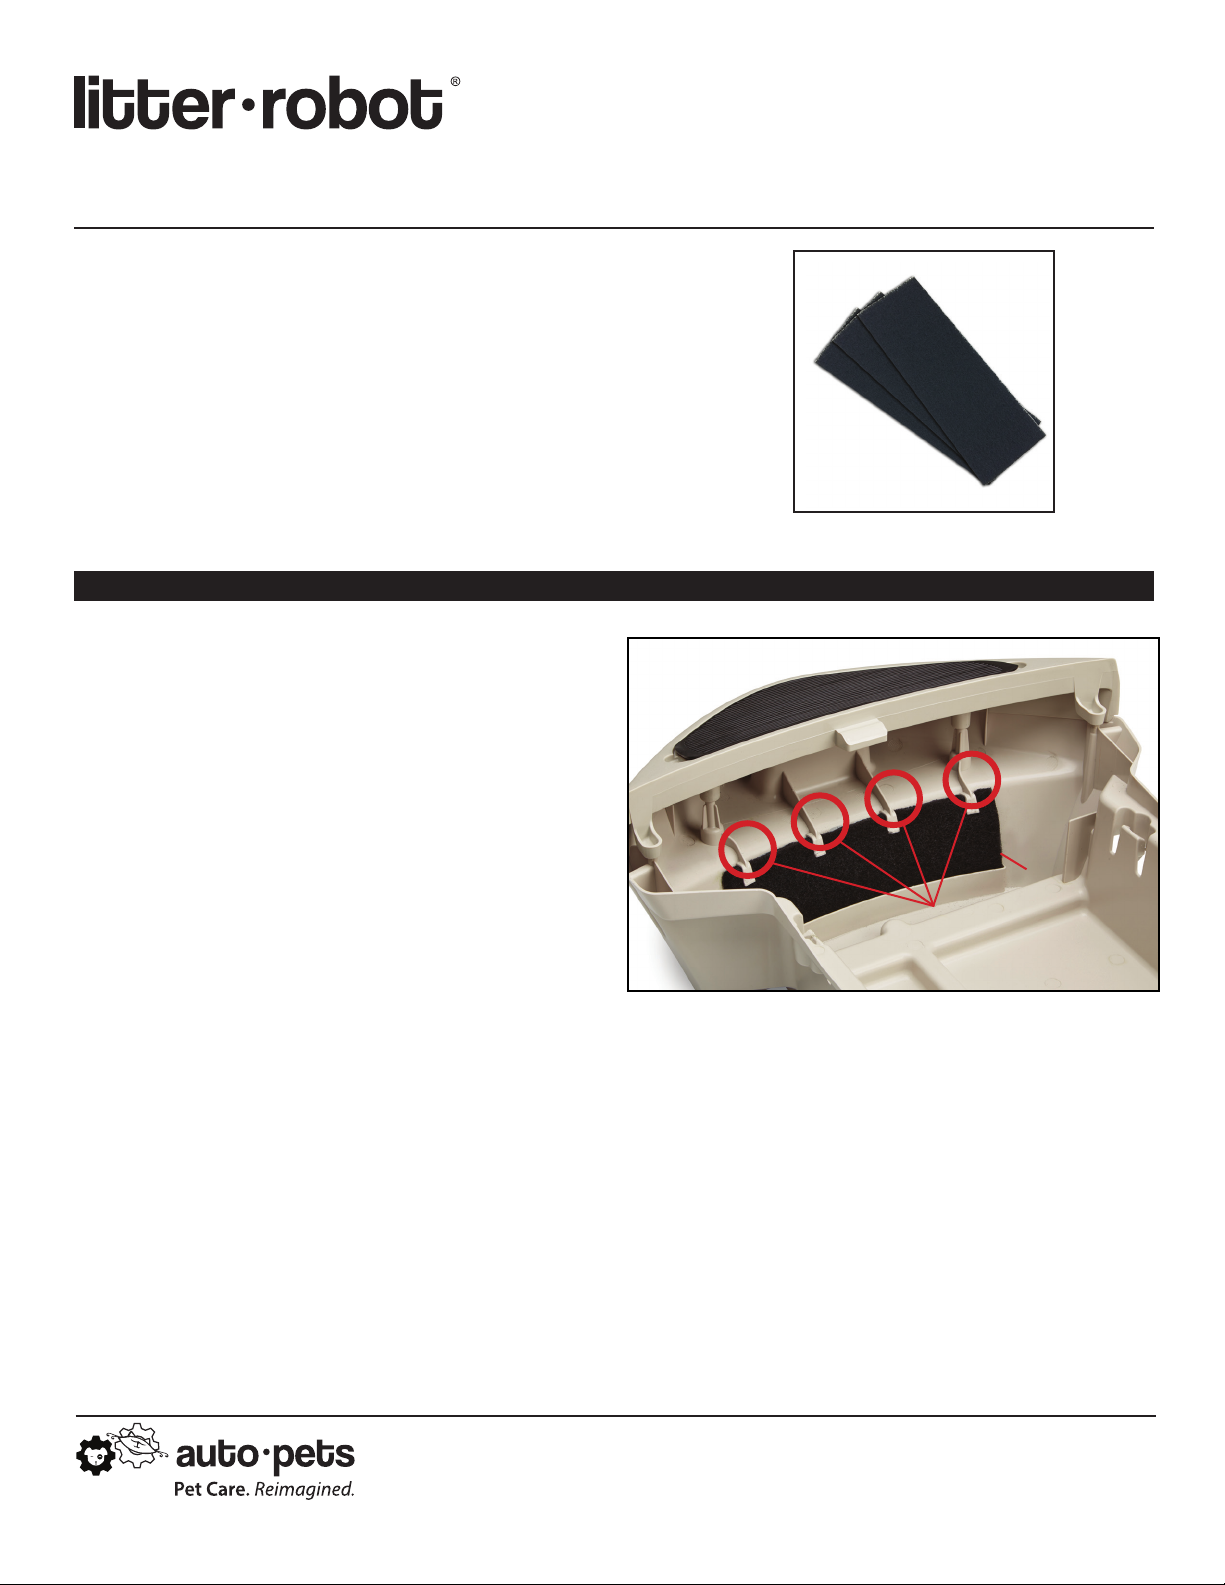
Carbon Filter installation Guide
installation
The Litter-Robot 3 is equipped with a Carbon Filter for absorbing
odors and controlling moisture in the Waste Drawer. The flexible
filter pad can be removed and replaced when cleaning the drawer.
For optimal odor control, we recommend changing the filter every
three months. If you use scented litter, change the filter more
frequently, as it will also absorb the fragrance.
Replacement Carbon Filters can be ordered at www.litter-robot.com.
Removal:
1. Pull out the Waste Drawer and locate the
Carbon Filter in the front wall.
2. Push the top edge of the filter downward to free
it from the hooks.
3. Pull the filter out of the slot and discard.
Installation:
1. In the front wall of the Waste Drawer, slide the
new filter into the slot.
2. Bend the top edge of the filter and slide it under
each hook.
3. Adjust the filter, so it covers the front-facing
vent completely.
Note: It is normal for the Carbon Filter to shed
during installation. Simply wipe up or vacuum
any debris.
Properly installed Carbon Filter
Slot
Hooks
Visit www.litter-robot.com for installation videos.
Contact Customer Service
Monday - Friday, 9am - 5pm EST
1-877-250-7729 or support@litter-robot.com
LR3-8155

Headquarters
1080 W Entrance Dr
Auburn Hills, MI 48326
Assembly
561 S Fairfield Ave
Juneau, WI 53039
seal strip installation Guide
installation
The Litter-Robot 3 is equipped with brush-type Seal Strips that sit
on the Base under the Globe and help contain odor within the Waste
Drawer.
Replace the Seal Strips when they are worn flat or peeling. You can
make them last longer by trimming loose edges between replacements.
Seal Strips are not required for the unit to function.
Replacement Seal Strips can be ordered at www.litter-robot.com.
1. Press the Power button to turn the unit o, then
unplug the unit.
2. Remove the Bonnet and Globe.
For complete instructions, see the Manual or visit
https://www.litter-robot.com/owners-manual.html.
3. On the Base, peel o the old Seal Strips and
discard. Remove any leftover adhesive with a
cotton ball and rubbing alcohol. Make sure the
surface is dry and free of oils and litter debris
before installing new seals.
4. Plan the layout of all four Seal Strips, starting
from the corner closest to the Control Panel.
5. Peel back 3-4 inches of the protective backing
from the adhesive of one seal and begin placing
it along the rib, making sure to curve the strip
with the Base. Press down firmly and remove
the backing as you go.
6. If the Seal Strip overlaps any grooves or
recesses, trim the ends with scissors.
7. Reassemble the Globe and Bonnet, then plug
the unit in and turn it on.
Properly installed Seal Strips
When cleaning the Base, be careful not to wet the Seal
Strips or they may begin to peel.
To maintain the Seal Strips, use a lint roller or vacuum to
remove debris.
Tips
Visit www.litter-robot.com for installation videos.
Start here
Contact Customer Service
Monday - Friday, 9am - 5pm EST
1-877-250-7729 or support@litter-robot.com
LR3-8155
Siège social
1080 W Entrance Dr
Auburn Hills, MI 48326
Montage
561 S Fairfield Ave
Juneau, WI 53039
Guide d’installation d’un Filtre àCharbon
installation
Le Litter-Robot 3 est équipé d’un filtre à charbon pour absorber les
odeurs et contrôler l’humidité dans le tiroir à déchets. Le tampon
filtrant souple peut être retiré et remplacé lors du nettoyage du tiroir.
Pour une élimination optimale des odeurs, nous recommandons
de changer le filtre tous les trois mois. Si vous utilisez une litière
parfumée, changez le filtre plus fréquemment, car il absorbera
également le parfum.
Les filtres à charbon de rechange peuvent être commandées sur
le site www.litter-robot.com.
Retrait :
1. Sortez le tiroir à déchets et repérez le filtre
à charbon dans la paroi avant.
2. Poussez le bord supérieur du filtre vers le bas
pour le libérer des crochets.
3. Tirez le filtre hors de la fente et jetez-le.
Installation :
1. Dans la paroi avant du tiroir à déchets, faites
glisser le nouveau filtre dans la fente.
2. Pliez les bords supérieurs du filtre et glissez-le
sous chaque crochet.
3. Ajustez le filtre de manière à ce qu’il couvre
complètement la ventilation de la face avant.
Remarque : Il est normal que le filtre à charbon
se détache lors de l’installation. Il sut d’essuyer
ou d’aspirer les débris.
Filtre à charbon correctement installé
Fente
Crochets
Rendez-vous sur le site www.litter-robot.com pour obtenir des vidéos d’installation.
Contactez le service à la clientèle
Du lundi au vendredi, de 9 h à 17 h HNE
au 1-877-250-7729 ou sur le site
support@litter-robot.com
LR3-8155

Guide d’installation d’une bande d’étanChéité
installation
Le Litter-Robot 3 est équipé de bandes d’étanchéité de type brosse
qui reposent sur la base sous le globe et aident à contenir les odeurs
dans le tiroir à déchets.
Remplacez les bandes d’étanchéité lorsqu’elles sont usées ou décollées.
Vous pouvez augmenter leur durée en retirant les bords lâches entre les
remplacements.
Les bandes de scellement ne sont pas nécessaires au fonctionnement
de l’unité.
Des bandes d’étanchéité de rechange peuvent être commandées sur
www.litter-robot.com.
1. Appuyez sur le bouton « Marche/Arrêt » (Power)
pour éteindre l’appareil et débranchez l’unité.
2. Retirez le capot et le globe.
Consultez le manuel ou rendez-vous sur le site
https://www.litter-robot.com/owners-manual.html.
3. Sur la base, enlevez les anciennes bandes de
scellés et jetez-les. Enlevez les restes d’adhésif
avec un coton et de l’alcool à friction. Assurez-
vous que la surface est sèche et exempte
d’huiles et de débris de litière avant d’installer
de nouveaux joints.
4. Planifiez la disposition des quatre bandes
de scellés, en commençant par le coin le plus
proche du panneau de contrôle.
5. Retirez 3 à 4 pouces du support protecteur de
l’adhésif d’un sceau et commencez à le placer
le long de la côte, en veillant à courber la bande
avec la base. Appuyez fermement et retirez
le support au fur et à mesure.
6. Si la bande de scellement recouvre des rainures
ou des encoches, coupez les extrémités avec
des ciseaux.
7. Remontez le globe et le capot, puis branchez
l’appareil et mettez-le en marche.
Bandes d’étanchéité correctement installées
Lors du nettoyage de la base, veillez à ne pas mouiller les
bandes de scellement, sinon elles pourraient commencer
à se décoller.
Pour entretenir les bandes de scellement, utilisez un rouleau
anti-peluche ou un aspirateur pour enlever les débris.
Conseils
Commencez ici
Siège social
1080 W Entrance Dr
Auburn Hills, MI 48326
Montage
561 S Fairfield Ave
Juneau, WI 53039
Rendez-vous sur le site www.litter-robot.com pour obtenir des vidéos d’installation.
Contactez le service à la clientèle
Du lundi au vendredi, de 9 h à 17 h HNE
au 1-877-250-7729 ou sur le site
support@litter-robot.com
LR3-8155

Sede centrale
1080 W Entrance Dr
Auburn Hills, MI 48326
Assemblaggio
561 S Fairfield Ave
Juneau, WI 53039
Guida all'installazione del Filtro aCarbone
installazione
Litter-Robot 3 è dotato di un Filtro a carbone in grado di assorbire gli
odori e controllare il livello di umidità all'interno della Vaschetta dei rifiuti.
Il pad flessibile del filtro può essere rimosso e sostituito per la pulizia della
vaschetta.
Per un controllo ottimale degli odori, raccomandiamo di cambiare il filtro
ogni tre mesi. Nel caso si utilizzi un tipo di lettiera profumata, cambiare il
filtro più spesso poiché assorbirà anche la fragranza.
È possibile ordinare i Ricambi per il Filtro a carbone su www.litter-robot.com.
Rimozione:
1. Estrarre la Vaschetta dei rifiuti e individuare il
Filtro a carbone sul lato anteriore.
2. Premere il bordo superiore del filtro verso il
basso per staccarlo dai ganci.
3. Estrarre il filtro dalla fessura e provvedere allo
smaltimento.
Installazione:
1. Sul lato anteriore della Vaschetta dei rifiuti,
infilare il nuovo filtro all'interno dell'apposita
fessura.
2. Piegare il bordo superiore del filtro e infilarlo
sotto ciascun gancio.
3. Regolare il filtro in modo che copra
completamente la presa d'aria frontale.
Nota: è normale che il Filtro a carbone
si disperda durante l'installazione. Basta
semplicemente ripulire o aspirare gli eventuali
residui.
Filtro a carbone installato correttamente
Fessura
Ganci
Visita www.litter-robot.com per guardare i video di installazione.
Servizio clienti
Lunedì-Venerdì, 9:00-17:00 EST
1-877-250-7729 o support@litter-robot.com
LR3-8155
Table of contents
Languages:
Other AutoPets Pet Care Product manuals


