Avantco Equipment 177MG12R User manual

User Manual
www.AvantcoEquipment.com
11/2023
#177MG12R #12 • 110V • 1 HP
#177MG22R #22 • 110V • 1 1/2 HP
Models:
Meat Grinders
Please read and keep these instructions. Indoor use only.
Note:
Improper installation, adjustment, alteration, service, or
maintenance can cause property damage, injury, or death.
Read the installation, operating, and maintenance instructions
thoroughly before installing or servicing this equipment.
Warning:
Do not store or use gasoline or other flammable vapors or
liquids in the vicinity of this or any other appliance.
For Your Safety:

User Manual
Meat Grinders
2
www.AvantcoEquipment.com
Table of Contents
Safety Precautions .....................................................................................................................................3
Parts Identification .....................................................................................................................................4
Assembly ......................................................................................................................................................5
Sausage Stung Assembly.....................................................................................................................5
Operation .....................................................................................................................................................6
Cleaning & Maintenance..........................................................................................................................6
Troubleshooting..........................................................................................................................................6
CONFORMS TO NSF STD NSF8
CONFORMS TO UL STD UL763
50172105017210
NEMA
5-15P

User Manual
Meat Grinders
3
www.AvantcoEquipment.com
WARNING
CAUTION
• NEVER operate the grinder if the power cord, plug, or any other parts are damaged.
• ALWAYS keep fingers clear of the auger and cutting blades.
• NEVER reach into the grinder.
• NEVER operate grinder without tray securely in place.
• NEVER reach into any grinder inlet.
• NEVER operate the grinder with loose hair, clothing, bracelets, jewelry, etc. Tie back or remove any
loose articles.
• ALWAYS use the stomper to push meat into the grinder head.
• NEVER use fingers to scrape food away from the grinding plate while the grinder is in operation.
• NEVER use any accessories or parts from other manufacturers.
• ALWAYS disconnect the grinder from the power source before any disassembly for cleaning or any
other reason.
• DO NOT submerge the grinder motor into liquid or water.
Safety Precautions
FIRE, ELECTRICAL SHOCK, OR SERIOUS INJURY CAN OCCUR
The warnings, cautions, and instructions discussed in this instruction manual cannot cover all possible
conditions or situations that could occur. It must be understood by the operator that common sense
and caution are factors that cannot be built into this product, but must be supplied by the operator.
Please operate according to operation method and read the proper operation procedures before using.
Please assemble and operate carefully. To avoid any possible injuries, please do not put your hands in
or near the grinder head while unit is plugged in.
(Continued on next page)
• Keep all loose clothing away from moving parts while grinder is in use.
• Keep fingers and hair away from moving parts when grinder is in use.
• DO NOT run grinder without meat in the grinder head. This can cause severe damage to the head
and auger as a result.
• Turn the grinder o before unplugging it from the outlet.
• Always unplug the grinder when changing a part (head, plates, blades, stung tubes, etc.) on the
grinder.
• Remove all tendons, bone, and skin from meat before grinding.
• Unplug when assembling or disassembling the unit.
• Provide supervision when this appliance is used near children.
• When carrying the unit, be sure to hold the motor housing with both hands.
• Never remove or attach hopper plate, head, or cap while the motor is running.

User Manual
Meat Grinders
4
www.AvantcoEquipment.com
• DO NOT disassemble the grinder during operation.
• Avoid contact with moving parts. Never feed meat by hand. Always use the meat stomper.
• DO NOT use the grinder if the power cord is broken. Please return the unit to the place of purchase
or contact customer service.
• To protect against risk of electrical shock, DO NOT put electrical parts (motor, power cord, etc.) in
water or other liquid.
• Unplug from the outlet when not in use, before putting on or taking o parts, and before cleaning.
• Avoid contact with moving parts. Never feed food by hand. Always use a food pusher. DO NOT use
fingers to scrape food away from the grinder plate while the appliance is operating.
• DO NOT operate any appliance with a damaged cord or plug, after the appliance malfunctions, or if
the appliance is dropped or damaged in any manner. Return the appliance to the nearest authorized
service facility for examination, repair, or mechanical adjustment.
• The use of attachments not recommended or sold by the manufacturer may cause fire, electric
shock, or injuries.
• DO NOT use outdoors.
• DO NOT let cord hang over edge of table or counter.
• DO NOT force too much product into the grinding chamber. It can overload the grinder, causing it
to stop.
• NEVER operate the grinder without meat. The meat and fat help to lubricate the blade and plate.
• DO NOT tighten the retaining ring more than hand tight.
• DO NOT operate unit without the white thrust washer in place.
• DO NOT operate with incorrect knife orientation. See Assembly Instructions for correct orientation.
Wrong orientation may damage unit.
• SAVE THESE INSTRUCTIONS.
CAUTION

User Manual
Meat Grinders
5
www.AvantcoEquipment.com
1. Make sure power cord is disconnected.
2. Place housing into enclosure and make sure pin is
aligned with hole in enclosure.
3. Hand tighten the thumbscrew to hold housing in place.
4. Place white washer onto back of auger.
5. Insert auger into housing, rotate back and forth to align
square end of auger with drive bushing of grinder, and
ensure the auger is all of the way against the white
washer.
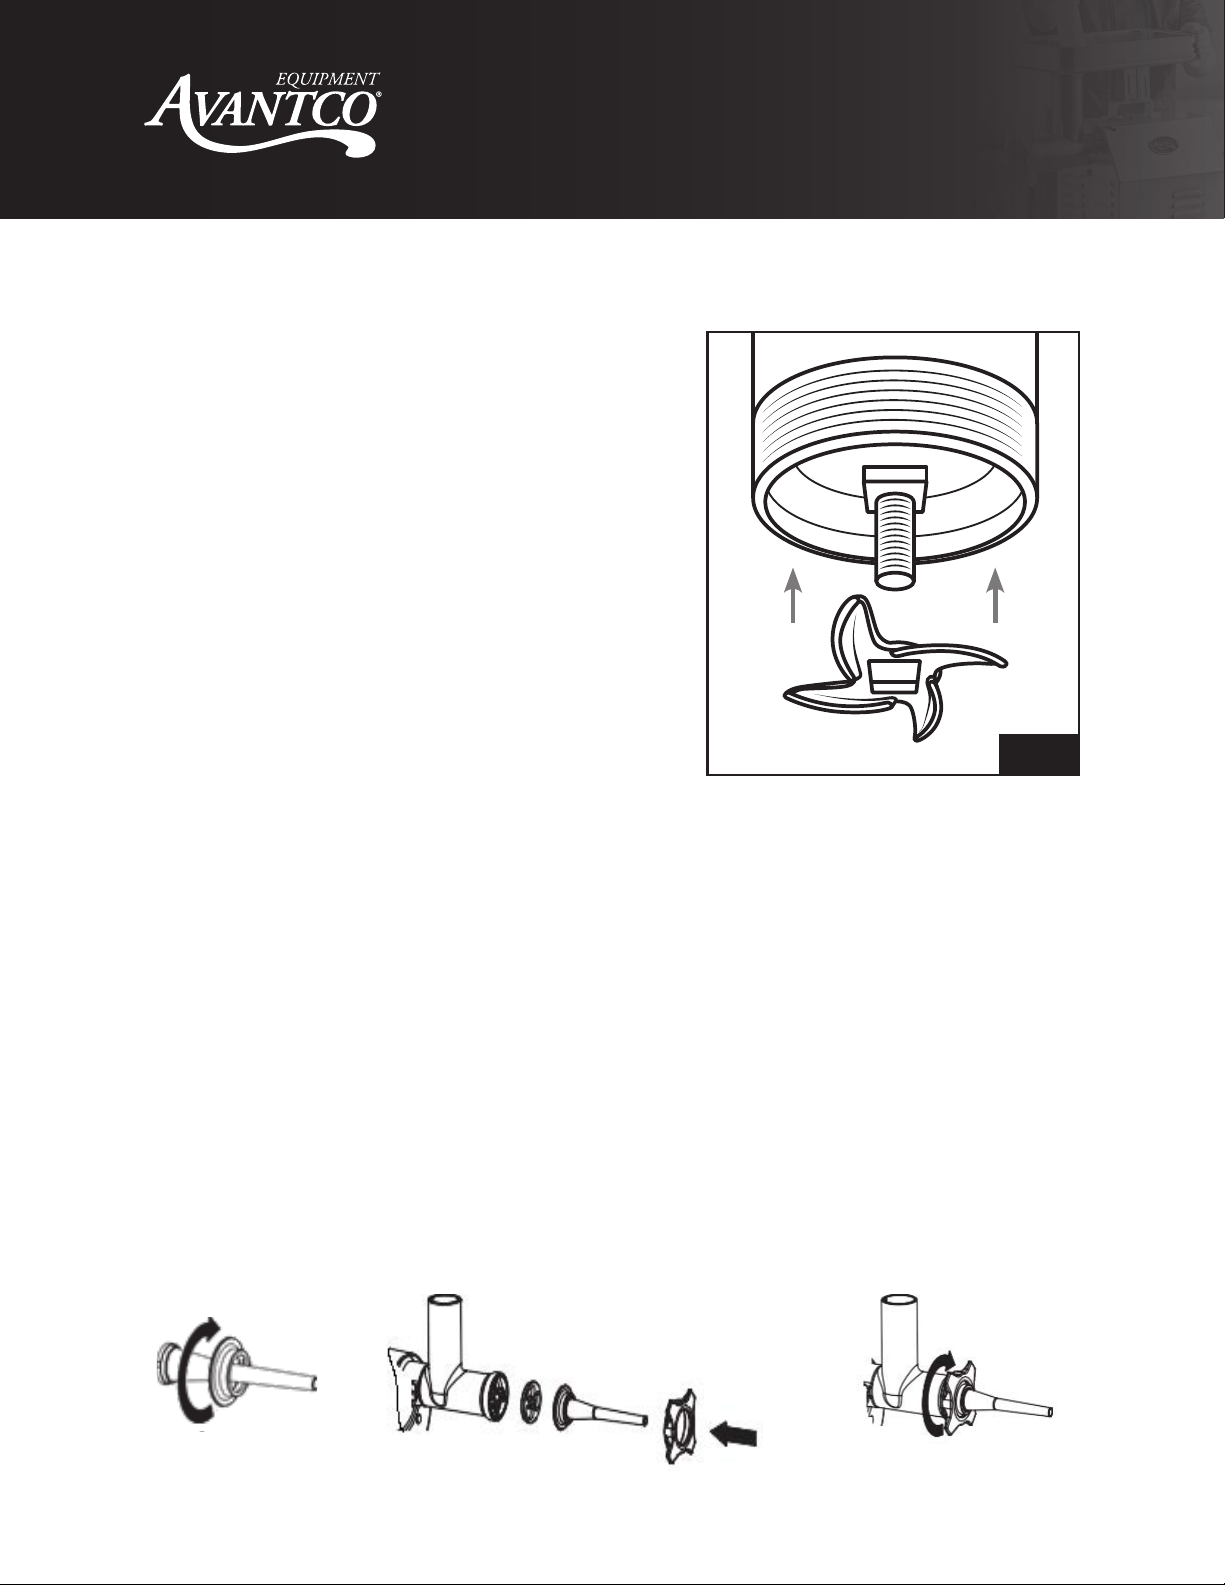
6. Insert 4 leaf blade/knife onto square end of auger.
The precisely ground, flat side of blades should face
you. (Fig. 1)
7. Insert the selected perforated plate/round knife (start
with larger perforations and grind progressively smaller
holes in perforated plates) with the raised nose facing
out/towards you. The flat side of blade should be
against the perforations when 4 blade knife orientation
is correct.
8. Confirm the outer edge of round knife is flush with the
end of the housing. Lifting the round knife can ease
engagement of the alignment pin with the notch at the
bottom of the housing.
9. Thread the retaining ring onto the housing. Tighten the
retaining ring securely. Tightening the retaining ring
applies pressure between the cutting surfaces and
produces a better grind.
Assembly
Fig. 1
1. Be sure the grinder is unplugged.
2. Attach grinder head to motor and install auger.
3. Slide the stung plate onto auger. (The grinding blade may or may not be used when stung.)
4. Slide one of the stung tubes through the funnel flange and place in the grinder ring cap
(stung tube faces out).
5. Firmly screw the grinder ring onto the grinder head.
Sausage Stuffing Assembly
SAUSAGE STUFFING ASSEMBLY
•Be sure the grinder is unplugged.
•Attach grinder head to motor and install auger as previously described in General Assembly
instructions.
•Slide the stuffing plate onto auger. The grinding blade is not used when stuffing.
•Slide one of the stuffing tubes through the funnel flange and place in the grinder ring cap
(stuffing tube faces out). The stuffing tube size used depends on the type of casing you have
chosen to use.(See Fig a)
•Firmly screw the grinder ring onto the grinder head. (See Fig b)
SAUSAGE STUFFING DIRECTIONS
•Properly prepare casings as directed on the casing packaging. Place artificial or natural
•intestines onto the sausage funnel.
•Load the hopper with prepared meat and feed meat into the grinder head opening before
operating unit. Reminder: Do not operate the grinder without meat in the grinder head. Damage
to auger and/or motor can occur.
•Plug in and turn the switch to the on position when ready to start.
•Begin to feed the sausage mixture into the hopper opening. (See Fig c)
•Hold the casing on the sausage tube in one hand and slowly let the meat output pull the casing
from the tube. Fill casing as desired by holding casing back on tube.
•Twist or tie the sausage into links as desired. Tie end of casing into a knot.
•It is recommended that 2 people perform sausage stuffing.
•Add small amounts of water to your ground meat when stuffing sausage to improve output of
meat through sausage stuffing tube.
Fig. aFig. c
Fig. b
AFTER USE
•Disassemble all parts and wash thoroughly in soapy water.
•You must remove all foreign material from all appliance parts.
•Dry all surfaces.
•Do not use bleach or chlorine based chemicals to clean. Discoloraon of plasc parts can occur.
•Wipe down all non stainless steel parts with a food-safe grade spray. Alternavely, wipe down with
a salad oil to keep from rusng.
•Do not immerse motor housing in water. Damage to motor can occur.

User Manual
Meat Grinders
6
www.AvantcoEquipment.com
Cleaning & Maintenance
1. Turn unit o and remove plug from power source.
2. Separate the head from the body using the thumbscrew located on top of the body.
3. Remove the tray and unscrew the front guard. The grinding plate, auger, and knife may now
be removed.
4. Wash all parts that have come in contact with meat in hot soapy water.
5. Rinse the grinder parts with clean hot water, then dry using a cloth.
6. Fully lubricate the head, plates, and the knife with a food grade silicone spray before and after
each use.
7. Clean the motor cover and gear housing with a damp towel and quickly wipe dry.
8. Make sure the grinder and all components are completely dry before assembling or storing.
Operation
1. Place grinder on a stable and secure surface.
2. Install the sausage stung assembly (optional).
NOTE: It is recommended that 2 people perform sausage stung.
3. Plug the unit into an appropriate electrical socket (110V/60Hz).
4. Load meat into the food pan.
5. Place a receptacle under the front grinder plate/place prepared casings onto the sausage funnel.
6. Turn the unit on using the green switch.
7. Gently push the meat into the grinder using the stomper. DO NOT USE HANDS.
8. If stung sausage, hold the casing on the sausage tube in one hand and slowly let the meat output
pull the casing from the tube. Fill casing as desired by holding casing back on tube.
NOTE: Adding small amounts of water to the ground meat can improve sausage output.
9. Twist or tie the sausage into links as desired. Knot the end of casing.
NOTE: Cleaning should be done IMMEDIATELY after use.
NOTE: DO NOT immerse the motor body in water.
NOTE: DO NOT place any pieces in a dishwasher.
Troubleshooting
Issue Possible Problem Solution
Grinder does not turn on.
Power cord damaged. DO NOT attempt to repair on your own.
Contact our customer service for assistance.
No power to the
outlet.
If circuit breaker is tripped, reset it. If unit continues to trip,
then the short circuit needs to be repaired.
DO NOT attempt to repair on your own.
Contact our customer service for assistance.
Thermal switch
overheats.
Turn o the unit, wait for 5-10 minutes, then restart.
If the unit still doesn't work, then it needs to be repaired.
Contact our customer service for assistance.

User Manual
Meat Grinders
7
www.AvantcoEquipment.com
Issue Possible Problem Solution
Not grinding properly.
Grinder head isn't
securely attached.
Turn o grinder and unplug the unit. Find the Locking Bolt (or
button) on grinder neck and disengage it, press the grinder
head firm and reinsert the Locking Bolt (or button) until it is
hand tightened and secured (subject to dierent model to use
the locking bolt or button).
Improper food being
ground.
DO NOT slice frozen meat. Remove bones and tendons
carefully before grinding.
Lack of lubricant after
using the grinder for a
long time.
Use a food grade lubricant to lubricate the grinding plates,
blade, and auger. We recommend doing this every 6 months.
Wrong grinding plate
is being used.
DO NOT try to start grinding the meat through the fine grind
plate. Start to grind the meat with the coarse grind plate, then
process once more by changing to the fine grind plate. Be sure
the meat is still chilled to the proper temperature when doing
the fine grind.
Retaining ring is
locked too tight.
Readjust the retaining ring until just right. If it is locked too
tight, meat will mash instead of grind.
Grinder plate is
blocked.
Turn o the unit and remove the grinder plate. Clean the
grinder plate and auger, then install it again properly and
tighten the retaining ring by hand.
Meat size is too big.
Cube into 2" x 2" and length below 4.5" for ideal grinding.
Grind the meat with coarse grind plate then repeat again with
fine grind plate.
Meat keeps mashing. Installed improperly.
Make sure everything is in place. Make sure the washer behind
the motor is installed correctly, and that the knives and blades
are sharp.
Meat easily jams in
grinder neck.
Improper loading of
meat.
You may be feeding too much meat through the grinder, or
trying to push it through too quickly. Feed the grinder only as
fast as the auger will take it.
Not stung well. Improper installation
of stung parts.
When using the grinder as a stuer, make sure you remove the
grinding plate and the knife, then replaced them by stung
plate and stung tube.
Machine is noisy.
Grinder not properly
warmed up before use.
Let the unit run for 10 minutes, turn o for 5 minutes, then run
again for 10 minutes. The noise should reach a normal level.
Lack of lubricant after
using the grinder for
long time.
Use a food grade lubricant to lubricate the grinding plates,
blade, and auger. We recommend doing this every 6 months.
Grinder is too hot
to touch.
Grinding meat
continuously for
a long time.
Switch o the grinder for 5 minutes between every 20 minutes
of operation for the grinder to cool down.
If you have a lot of meat to grind, we recommend grinding
the meat in smaller batches, so the grinder can cool down
between batches.
Over tightening the
retaining ring.
To prevent overheating, retaining ring should be tightened by
hand only.
Rust appearing on knife,
grinder plate, or neck.
Improper cleaning
or inadequate
lubrication.
Washing by hand is recommended (See Cleaning &
Maintenance on page 6). After washing, the stainless steel
grinding plates, blade, and auger must be coated with
vegetable oil or food grade lubricant.
This manual suits for next models
1
Table of contents
Other Avantco Equipment Meat Grinder manuals