Avaya 500AM User manual

Installation and User’s Instructions
555-015-173 Issue 1, February 1999 Comcode 108458878 1
500AM Headset Adapter
Introduction
The 500AM Headset Adapter provides enhanced headset connectivity
with business telephone sets equipped with an Adjunct jack. This
headset adapter allows you to place, answer, and end calls without
lifting the telephone’s handset.
In addition to this basic functionality, the 500AM Headset Adapter
accommodates directly connected headsets (that is, connected with a
Modular Plug rather than a Plug-Prong input adapter) which can be
routed to external audio equipment while the terminal is on-hook.
The 500AM allows headset connection to those digital and ISDN voice
terminals which have an Adjunct jack:
•Telephones/Voice terminals used with a DEFINITY®
Enterprise Communications Server (ECS), DEFINITY
Communications System, System 75, and System 85, which
include the 7100 Series, 7200 Series, 7400 Series, and 8400
Series DCP sets, and the ISDN 6500 Series, 7500 Series, and
8500 Series sets.
•ISDN sets used with a 5ESS®switch such as the
6500 Series, 7500 Series, and 8500 Series sets.
Note: The 7404 and 7407 sets may not have a connection available
for the adapter.
The 500AM adapter is not compatible and cannot be used
with the 7300 Series ATL or 7700 Series MERLIN®voice
terminals.

Features of the 500AM Headset Adapter
Installation and User’s Instructions 555-015-1732Issue 1, February 1999 Comcode 108458878
Features of the 500AM Headset Adapter
General Information
The 500AM Headset Adapter has been designed with the following
features:
•One-touch switchhook control with a green status indicator
•One-touch headset microphone mute control with a red status
indicator
•High quality direct headset interface with receiver volume
control
•Plug-prong headset adapter interface which can be used
simultaneously with direct headset while the telephone and
headset are off-hook
•Audio interface between direct headset and external audio
equipment while the telephone and headset are on-hook
Compatible Headsets
The 500AM Headset Adapter can be used with any Lucent Technologies
Universal headsets terminated with quick-disconnect (QD) connectors.

Installation and User’s Instructions
555-015-173
Features of the 500AM Headset Adapter
Issue 1, February 1999 Comcode 108458878 3
The Front of the 500AM
Figure 1. The 500AM Headset Adapter, Front View
1ON/MUTE
button With one touch, this button turns on the adapter
power and places the telephone off-hook. While
the telephone is off-hook, this button functions as a
microphone mute control. (Pressing the button
again, while off-hook, turns off the Mute function.)
2OFF button With one touch, this button turns off the adapter
power and places the telephone on-hook.
3Volume control The slide volume control adjusts the receive
volume for direct headsets while off-hook.
4Direct headset
input This 4-pin modular jack is used for connecting
compatible headsets. The headset is switched to
SPKR and MIC jacks when the telephone is
on-hook. (See 7 and 8 in Figure 2 for the location
of these two jacks.)
5Plug-prong
headset adapter
input
This jack is used for connecting a plug-prong
headset adapter.
HEADSET
ON/MUTE
500AM
OFF
12
5
4
3

Features of the 500AM Headset Adapter
Installation and User’s Instructions 555-015-1734Issue 1, February 1999 Comcode 108458878
The Rear of the 500AM
Figure 2. The 500AM Headset Adapter, Back View
6Feature jack Expansion port for future accessories
7SPKR jack This jack connects to the direct headset
speaker when the telephone is on-hook.
8MIC jack This jack connects to the direct headset
microphone when the telephone is on-hook.
9Adjunct interface This jack connects the adapter to the
Adjunct jack on the telephone.
500AM
OFF
SPKR
MIC
1
6
789
ON/MUTE

Installation and User’s Instructions
555-015-173
Package Contents
Issue 1, February 1999 Comcode 108458878 5
Package Contents
500AM Headset Adapter Package Contents
The 500AM Headset Adapter package contains the following items:
•The headset adapter
•An 18-inch adjunct cord
•A 6-foot modular headset cord with quick-disconnect connector
•This instruction manual
Audio Interface Kit Contents
An Audio Interface Kit of parts is also orderable; use Comcode
408118149. This kit contains the following:
•Two 6-foot 3.5 mm stereo cables
•A 7-foot adjunct cable
Power Requirements
The 500AM Headset Adapter requires that the telephone be supplied
with auxiliary power. However, note that, if there is auxiliary power
already connected to the telephone, as in the case of some display
terminals, no other auxiliary power is required. For this product,
auxiliary power must be at telecommunication circuit power level and
be supplied by either a local or a remote power supply. Recommended
power supplies are:
•Lucent Technologies 1151A1 local Power Unit or the 1151A2 local
Power Unit with Battery Holdover
•Lucent Technologies 1145A or 1145B remote Bulk Power Supply
Other approved power supplies are:
•Lucent Technologies MSP-1 local Power Supply
•Lucent Technologies KS22911 L1 or L2 local Power Supply

Installing the Headset Adapter
Installation and User’s Instructions 555-015-1736Issue 1, February 1999 Comcode 108458878
Installing the Headset Adapter
Use the following procedures to connect the headset adapter to the telephone.
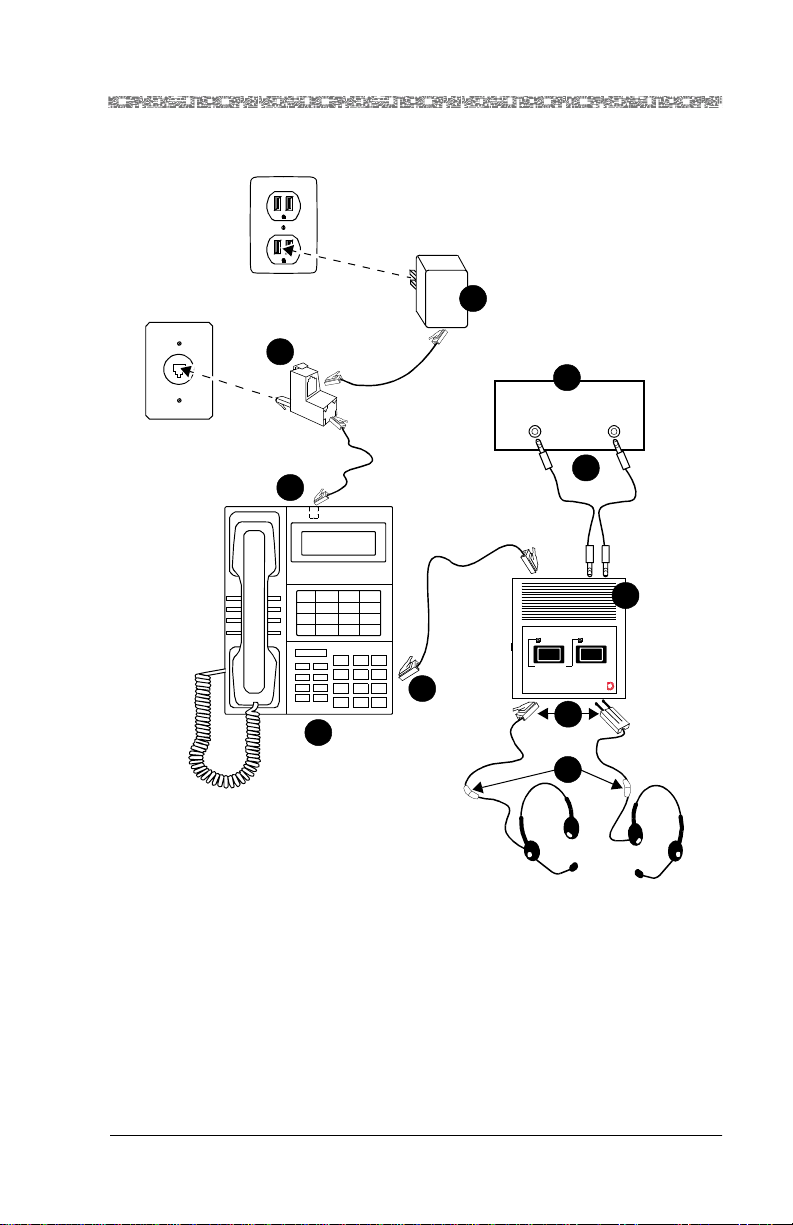
For a full installation diagram of all components, see Figure 3.
1 Place the headset adapter (shown as 3 in Figure 3) near the
telephone (7) to which it will be connected.
2 Connect the headset in the following manner:
aTo install a direct headset, plug the quick-disconnect (QD) connector (5)
on the headset into the QD connector on the supplied modular cord.
Insert the modular plug (4) into the direct headset interface on the front
left of the 500AM Headset Adapter.
bTo install a headset with an external Plug-Prong adapter, plug the QD on
your headset (5) into the QD of the Plug-Prong adapter. Insert the Plug-
Prong adapter (4) into the Plug-Prong headset interface jack on the
front right of the 500AM Headset Adapter.
Note: Headsets in both the Modular and Plug-Prong adapter interfaces
can work simultaneously such as for the supervisor monitoring
option often used in a Call Center environment.
3 Plug one end of the D8AC modular cord into the keyed Adjunct interface on
the back of the adapter.
4 Plug the other end of the D8AC modular cord into the jack labeled Other,
Adjunct, or (speaker) on the bottom of the telephone (6).
5 Connect the D8W cord from the bottom of the telephone (8) to the small
white 400B or 400B2 adapter (9). Plug the 400B or 400B2 adapter into the
DCP wall jack. Connect the D6AP cord to the power supply (10) and plug
the power supply into the AC wall outlet.
6 Install the direct headset external audio interface using 3.5 mm stereo cables
(2) supplied with your Audio Interface Kit. Connect the SPKR and MIC
ports on the 500AM to the headphone output and microphone inputports,
respectively, of your external audio equipment (1).
!CAUTION:
When the telephone is on-hook, the direct headset is connected directly
to any installed external audio devices. Care should be taken in setting
the headphone output and microphone input levels on these devices for
comfortable listening and sufficient speech transmission with the
headset.

Installation and User’s Instructions
555-015-173
Installing the Headset Adapter
Issue 1, February 1999 Comcode 108458878 7
Figure 3. Connecting the Headset Adapter to Your Telephone
ON/MUTE
500AM
Lucent
OFF
3
7
6
82
1
AC
DCP
D6AP
Microphone
D8W
D8AC
input Headphone
output
9
10
4
5

Using the Headset Adapter
Installation and User’s Instructions 555-015-1738Issue 1, February 1999 Comcode 108458878
Using the Headset Adapter
Follow these instructions to operate the headset connected to your
500AM Headset Adapter.
To place a call
1 Press the adapter ON/MUTE button.
2 Dial the number on the telephone keypad.
To answer a call
Press the adapter ON/MUTE button.
To end a call (and route your direct headset to
external equipment)
Press the adapter OFF button.
To switch from handset to headset
1 While you are active on the handset, press the adapter
ON/MUTE button.
2 Hang up the handset.
To switch from headset to handset
1 Pick up the handset.
2 Press the adapter OFF button.

Installation and User’s Instructions
555-015-173
Using the Headset Adapter
Issue 1, February 1999 Comcode 108458878 9
To mute the headset so that the other party cannot
hear you
Press the ON/MUTE button.
•The red Mute light goes on.
To turn off the mute function and resume
conversation
Press the ON/MUTE button again.
•The red Mute light goes off.
!CAUTION:
If you press the OFF button, you will disconnect the current call.
To raise or lower the direct headset listening level
To raise thevolume, slide thevolume lever upwards, away from you;
to lower the volume, slide the volume lever downwards, toward you.
Note: While the telephone is on-hook, listening levels must be
adjusted at the external audio equipment, not on the headset
adapter or on the telephone.
When using the plug-prong headset interface, set the volume
control to the minimum level and then adjust the listening level
on the external adapter.

Installation and User’s Instructions 555-015-17310 Issue 1, February 1999 Comcode 108458878
Copyright 2000 Avaya Inc.
All Rights Reserved
Table of contents
Other Avaya Adapter manuals

Avaya
Avaya CA40 User manual

Avaya
Avaya Wireless USB Client User manual

Avaya
Avaya Remote Supervisor Adapter User manual

Avaya
Avaya M12LU User manual

Avaya
Avaya HIC-1 User manual

Avaya
Avaya Octel 200 Manual

Avaya
Avaya Avaya one-X Gigabit Ethernet Adapter Manual

Avaya
Avaya 1101GT User manual

Avaya
Avaya 5600 Series Manual

Avaya
Avaya DA60 Supplement