aventon SINCH User manual

SINCH Electric Bicycle
User Manual
Thank you for purchasing the Aventon SINCH Ebike.
We are here to help!
Aventon Support Center: https://www.aventon.com/pages/support
Support link: https://support.aventon.com/contact-us
Phone: 1-866-300-3311
enjoyment. Please read and understand this manual fully before
assembling and riding your bike. If youhave questionsafter readingthis
manual, please refer to the Aventon support or contact usby email or
give us a call.
(Throttle On Demand)

USING THIS MANUAL
GENERAL INFORMATION
WARNINGS AND SAFETY
SPECIFICATIONS
ASSEMBLY INSTRUCTION
BATTERY CHARGING (LOCK & REMOVAL)
QUICK START GUIDE
OPERATION
MAINTENANCE
TROUBLESHOOTING
LIMITED WARRANTY
LINK TO ASSEMBLY VIDEO ANDONLINE RESOURCES
02
02
04
07
08
15
19
20
22
25
26
28
TABLE OF CONTENTS
01

USING THIS MANUAL
This manual contains details of the product,itsequipment, and information on operation, maintenance, and
other helpful tips for owners. Read it carefully andfamiliarize yourself with the ebike before usingit to
ensure safe use andprevent accidents. This manual contains many warnings and cautionsconcerningthe
safe operation and consequencesifproper setup, operation,andmaintenance are not performed. All
information in thismanual should be carefully reviewed and if you have any questions you should contact
Aventon immediately.
The notes, warnings, and cautions contained within the manual and paragraphs are marked by the triangular
Caution Symbol at the left side should be given special care. Users should also pay special attention to
information marked in this manual beginning with NOTICE.
Keep thismanual, alongwith any other documentsthat were included with your bike, for future reference,
however all content in this manual is subject to change or withdrawal without notice. Visit https://www.aven-
the accuracy of itsdocumentation and assumes no responsibility or liability if any errorsor inaccuracies
appear within.
Because it isimpossible to anticipate every situation or condition that will occur while riding, this manual
makes no representations about the safe use of bikes under all conditions. There are risks associated with
the use of any bike that cannot be predicted or avoided and are the sole responsibility of the rider.
GENERAL INFO
Assembly andFit
Correct assembly and fit are essential elements to ensure your bicyclingsafety, performance, and comfort.
Even ifyou have the experience, skill, and toolsto complete these essential steps before your first ride,
Aventon recommends having a certified,reputable bike mechanic to check your work.
NOTICE: If you do not have the experience, skill, and tools to complete assembly and fit, Aventon highly
recommends having acertified,reputable bike mechanic complete these procedures as well as any future
adjustmentsor tuning.
NOTICE: A critical aspect of assemblingyour bike issecuring the front wheel and checking the tightness of
the rear wheel axle nuts. Aventon bikes use boltedon,through axle or quick release front wheel mounting
mechanism and the rear wheel is bolted on. These mechanisms may become loose or unsecured during
shipment or over time. The torque and security of all wheel mountinghardware should be inspectedupon
arrival and on aregular basis. Both wheelsneedto be properly secured before operating your bike.
Mandatory Equipment and Use Locations
Before riding, ensure you have all required and recommended safety equipment and are following all laws
pertaining to use an electric bike in your region. For example, these laws may specify the need for
mandatory equipment, use of hand signals, and where youcan ride.
Changing Components or Attaching Accessories
The use of non-original componentsor spare partscan jeopardize the safety ofyour ebike, voidyour
warranty and,in some cases, cause your ebike to not conformwith laws pertainingto your bike.
02

Safety Check Before Each Ride
Always check the condition of your bike before youride in addition to havingregular maintenance
performed. If you are unsure of howto conduct acomplete check of the condition ofyour bike before every
ride, you should consult acertified, reputable bike mechanic for assistance.
Electrical System (Applicable to Pace, Sinch, Level, Soltera, Aventure)
and user preferences.It iscritical that you familiarize yourselfwith all aspectsofyour ebike selectrical
system and check to see if it is working correctly before every ride. The front and rear brake leverscontain
should be checked for correct operation. The throttle should provide smooth acceleration when gradually
intermittently, or not working, please discontinue the use ofyour ebike immediately and contact the
Aventon Support team for assistance.
Brakes
Ensure that the brakes and their system components are free from damage, properly securedand working
correctly. When fully squeezed, both front andrear brake levers shouldnot be touchingthe handlebar. Take
your bike to a certified,reputable bike mechanic to have the brakes repairedifyou findaproblem.
Tires and Wheels
Your wheels should always spin straight and must be repaired or replacedifthey wobble side to side or up
and down when spinning. If your wheels become untrue or spokes loosen, which can happen with normal
use, we recommendthat a certified, reputable bike mechanic performs all wheel tuning and truing
operations on your bike from Aventon. DO NOT attempt to true wheelsor tighten spokes unless youhave
adequate knowledge, tools, and experience. Ensure the tires and inner tubes are in goodworkingcondition
without any visual damage and have the correct amount of air pressure. Always replace tires and inner
tubes with punctures,cuts,or damage before youride. Tires without the correct amount of air pressure can
reduce performance, increase tire andcomponent wear, and make ridingyour bike unsafe.
Accessories, Straps, andHardware
Ensure all hardware is securedandall approved accessoriesare properly attachedper the specific
component manufacturer s instructions. It is goodpractice to look over all hardware, straps, and accesso-
ries before each ride and if youdo discover something wrongor somethingthat you are not sure about,
have it checked by a certified, reputable bike mechanic.
Suspension, Handlebar, Grips, and Seat Adjustments
before use. The suspension fork should be properly adjustedaccordingto your weight and terrain. Ensure
the handlebar and handlebar stem are properly aligned, fittedto the user, and securedto their recommend-
ed torque values. Handlebar grips should not move easily on the handlebar end. Loose, worn,or damaged
handlebar grips should be replaced before you ride . The seat and seatpost should be properly aligned,
fitted to the user, and the seatpost quick release should be properly tightened, fully closed, and secured
before riding.
03
The replacement of original components or installation of third-party accessories or accessories
not from Aventon explicitly recommended for your bike model is at your own risk. Using
aftermarket accessories or components thathave not been tested by Aventon for safety and
compatibility may void your warranty, create an unsafe riding condition, damage to property or
your bike by Aventon, or resultinserious injury or death.
’
’
’

Battery Charged, Secured, and Unplugged
Ensure the battery isadequately charged andoperating properly. Ensure the battery charger is unplugged
fromthe outlet, battery, then storedin a safe location before youride. The battery MUST be locked onto
the frame battery mount properly before use. DO NOT operate the electrical systemif the battery is removed.
WARNINGS AND SAFETY
Throttle on Demand
With throttle on demand,you can throttle the bike fromacomplete stop. This feature is to help give you
that extra push when youneed it on a steep hill, when hitting multiple stops signs,etc. However, we
strongly recommendto pedal first and throttle second to ensure proper stability and preparedness.
General Operating Rules
Notice: Pay special attention to all the general operatingrules belowbefore operatingyour bike from
Aventon.
speed bumps,drain gates, thorns, broken glass, and other obstacles, hazards, and puncture flat risks.
become proficient at shifting gears,applyingthe brakes, usingthe pedal assist system, and using the
throttle in acontrolled settingbefore ridingin riskier conditions.
usinglegclipsor elastic bandsto prevent themfrom being caught in the chain or gears. Do not use items
that may restrict your hearing.
may lock up and lead to youlosingcontrol and/or falling.
distancesare basedon factors such as road surface and light conditions among other variables.
04

Safety Notes
The following safety notes provide additional information on the safe operation ofyour bike from
Aventon and shouldbe closely reviewed. Failure to review these notes can lead to serious injury or
death.
manualsfor components usedon the bike may also be provided and should be read before installingor
usingthose components.
or too small.
instructions are usedfor fit and care ofyour helmet. Failure to wear ahelmet when riding may result in
seriousinjury or death.
before first usingit andcheck the setup, tightening, and condition of components and hardware regularly.
the area(s) where youride.
youto lose control and fall.
not tested for safety and compatibility and have verifiedas safe andcompatible with the bike.
Wear appropriate safety gear and do not ride alone in remote areas. Check local rules and regulations
exceedsyour capabilities. Although many articles/advertisements/catalogs depict extreme riding, thisis not
recommended nor permitted, and you can be seriously injuredor killedifyou performextreme riding.
to jumps, stunts, etc., should not be performed as it can damage bike components and/or cause or lead to
dangerous riding situationsin which youmay be seriously injuredor killed.
component or accessory can result in serious injury or death.
bike mechanic for a comprehensive inspection of all components, functions, and operations of the bike.
situation.
Ensure you understandand are prepared for the pedal assistance to engage as soon as pedalingis
underway.
usingthe bike and must take care to travel at speeds appropriate for the usage area, riding conditions, and
user experience level. Always use the lowest assist level until you are comfortable with the bike and feel
confident in controlling the power.
could void the warranty andcreate an unsafe ridingexperience.
while riding.
distances. Feet or handscan slip in wet conditions and leadto serious injury or death.
05

Helmets
Whenriding a bike, always wear a properly fitted helmet that covers the forehead. Many locations
requirespecificsafety devices. Itis your responsibility to familiarizeyourself with the local laws, rules,
and regulations where you ride and to comply with all applicable laws, including equipping yourself and
your bike as thelaw requires.
General Warnings
Like any sport, bicycling involves risk of damage, injury, and death. By choosing to ridea bike, you
assume the responsibility for thatrisk, soyou need to know, and practice the rules of safe and responsi-
ble riding and the proper use and maintenance of this bike. Proper useand maintenance of your bike
reduces risk of damage, injury, and death.
Biking and controlledsubstances do not mix. Never operate abike while under the influence of alcohol,
drugs, or any substance or condition that could impair motor functions, judgement, or theability to
safely operate a bike or another vehicle.
The Sinch is designed for use by persons 18 years old and older. Riders must have the physical
sudden situations, as well as respect the laws governing electric bike use where they ride, regardless of
age. Ifyou have an impairment or disability such as a visual impairment, hearing impairment, physical
impairment, cognitive/language impairment, aseizure disorder, or any other physical condition that
couldimpact your ability to safely operate a vehicle, consult your physicianbeforeriding any bike.
A Note for Parents and Guardians
As a parent or guardian, you are responsible for the activities and safety of your child. The Sinch isnot
designed for use by children under the age of18. If youare carryingapassenger in achild safety seat, they
should also be wearingaproperly fitted and approvedhelmet.
Wet Weather
It is recommended to not rideinwet weather if avoidable. Ride inwet weather only if necessary. This
electric bike is not meant for use in heavy rain,or streams. Never immerse or submerge this product in
water or liquid as the electrical system may be damaged.
conditions.
lights.
NightRiding
It is recommended to not rideat night if avoidable. Rideat night only if necessary.
06

07
Model Name Aventon Sinch
Max. LoadCapacity 250lbs. / 113 kg (Bike); 50lbs./22.68kg (Racks)
Max Speed 20 MPH
Motor 48V 500W BrushlessHub
Battery 48V 672Wh Li-ion
40 Miles Average
Wheel Size 20 x 4" Front / Rear
Wheel Inflation
Charger 48V 3A
Charging Time Approx. 4-5 Hours
Water Resistance IPX4
Weight 68 Lbs / 31kg
SPECIFICATIONS
86°F(30°C), 70% humidity, on a level road, in pure electric ridingmode. Actual results may vary
Range Average Per Charge
Inflation to 5-30 PSI
Tire Pressure

08
WHAT’ S IN THEBOX
ASSEMBLY INSTRUCTION
1* Sinch ebike
1*Charger
1*Charger cable
2* Front/Rear Reflector
1*Spare Derailleur Hanger
1*Grease
1*Hex key
1*Owner'smanual
2*Reflector holder
Aventon
HUB MOTOR
REAR WHEEL
FRONT WHEEL
SEAT CLAMP
PEDAL
SEAT
REARBRAKE
HANDLE BAR
THROTTLE
DISPLAY FRONT BRAKE
SUSPENSION FORK
LATCH

09
Step 1. Unfoldthe rear wheel/section and keep your eBike upright with kickstand. Turn the latch into the
"closed" position,, make sure the hook endofthe latch is secure and make sure youcannot open the latch
without disengagingthe latch safety lock.
NOTICE: The following steps areonly ageneral guide to assistin the assembly of your ebike and are
not a complete or comprehensivemanual of all aspects of assembly, maintenance, and repair. Consult
acertified, reputable bike mechanic to assist with assembly, repair, and maintenance of your ebike.
ASSEMBLY
1
2
Step 2.–Pull the stemupright and foldthe latch up to close it.
Step 3.Stand in front ofthe bike andclamp front wheel between both legs, verify the handle bars are straight
and in line with the front wheel. Make sure the pinch bolts are tight and your cannot turn the stemfreely
fromthe front wheel. Sit on the saddle, adjust the handlebar to comfortable angle, and close the handlebar

10
Step4.Display adjustment.
A. Use a 3mmhex key to loosen display screws.
B. The screws will be installedon the backside ofthe display bracket for shippingpurposes.
C.Rotate the display to the desired angle and use a3mm hex key to tighten the display onto the handlebar.
Step5.
your desired, then close the clamp to secure handlebar in place.
11
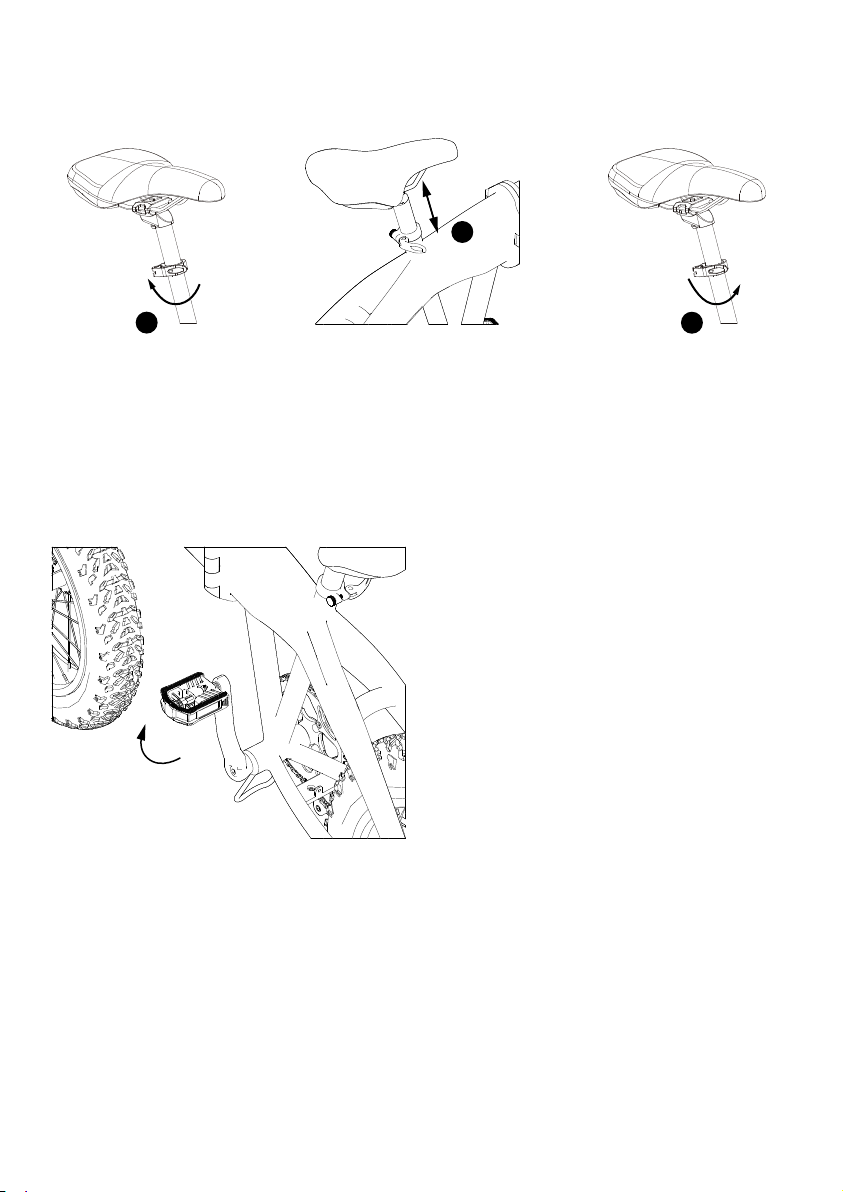
Step 6.Open the clamp under the seat post,set it to aheight which fitsthe rider then close the clamp
to secure the seat in place.
Step 7. Holding the crank armvertical, foldor unfold the pedal, repeat with other pedal as needed.
Step 8.Remove motor protector and put on the motor protection guard on both sides of back wheel.
Install motor protection guard on both sidesof back wheel.
Note: Position the seat at the right height is key for better pedaling, safety and overall comfort.
The rider’ sleglength isused to determine the seat’ s position. When pedaling, your hips shouldremain
level and your legs should not over-extend. To determine the right seat height,sit on the eBike with pedal
at itslowest point and place the ball ofyour foot on the pedal. If your knee is bent slightly at thisposition
( about 60 degrees) ,the seat is at the right height.
Note: Part ofplastic motor protector may break andwill be left inside the freewheel,use a pair of pliers
to take it out carefully.
1
2
3

12
SINCH ebike can be folded to become more compact size for storage or transportation. Followthe steps below
to fold your ebike.
Now your newbicycle is fully setup.
1.Hold the crank arm vertical and foldthe pedal by pushingthe pedal towardsthe bike and foldit up or down.
FOLD YOUR BIKE

13
2. Open the seat post clamp, lower the seat,andclose the seat post clamp.
3. Release the stemlatch by pullingit away fromthe stem( see pictures below) andfold the stem down.
Note: To release the latch, pull the metal safety lock upwards while at the same time pulling the latch outwards.
1
2
3

14
4.To fold the frame, pull the metal safety lock towards to front of the bike. While pulling the safety lock,
pull the Latchoutwards. When the latch has been released, foldthe bike.
Tip: While holding the front brake, press your thigh aginst the hinge to slightly unfold the bike and walk
the rear of the bike forward.
How to take out battery?
4
2
3
1
After folding the bike, insert the key into battery, turn the key andbattery can be taken out.

BATTERY CHARGING
Charging Procedure
Follow these steps for chargingyour ebike battery from Aventon Bikes:
1.
2. Remove the rubber cover on the charging port.
3. Plug the charger into the battery’s charging port, BEFORE PLUGGING CHARGER INTO POWER OUTLET:
place the charge on aflat, secure place, and connect the DC output plug
fromthe charger (round barrel connector) to the chargingport on the side ofthe battery.
4. Plug the charger into a power outlet:Connect the charger input plug (110/240-volt plug) to the power
outlet. Charging should initiate and will be indicated by the LED charge statuslight on the charger
illuminating as red light.
5. Unplug the charger from the outlet, then the charging port: Once fully charged,indicated by one
charging indicator light turning green , unplug the charger fromthe wall outlet first and then remove the
charger output plug fromthe battery chargingport.
Always charge your battery intemperatures between 50 °F– 77 °F(10 °C – 25 °C) and ensure the battery
and charger arenot damaged before initiating charge. Ifyou notice anything unusual while charging,
please discontinuecharging and using the bike and contact Aventon Bikes Product Support for help.
15
Ensure the bike is o

16
Failure to follow Battery ChargingInformation could result in unnecessary wear to the
charging components, battery, and or charger, and could lead to an underperforming or
non-functional battery and replacement will not be covered under warranty.
Use caution to avoid damage to battery connector terminals, which areexposed whenthebattery
is unlocked and removed from the frame of the bike.In the case of damageto the terminals or
battery mounts, please discontinue use and contact Aventon Support immediately.
Check the charger, charger cables, and battery for damage before beginning each charge.
Be sure to charge in an area where it is clear and safe from any potential damage or tripping situations
can occur while it is charging. Always charge indoors in a cool and dry area and away from direct sunlight,
dirt, or debris. Always charge your battery in temperature between 50 ˚F - 70˚F (10˚C-25˚C).
The battery can be charged on or o the bike. To remove the battery, turn the key to the unlocked
position, and take the battery out.
The battery should be recharged after each use, so it is ready to go the full range for your next ride.
There is no memory eect, so charging the battery after short rides will not cause damage.
Charging the battery normally takes 4-5 hours.
The indicator light on the charger will show solid red light while charging the battery. When the charging
process is completed, the indicator light will turn solid green. Ensure the light faces upward when charging.
Remove the charger from the battery within one hour after the green light indicating a complete charge.
The charger is designed to automatically stop charging when the battery is full, but unnecessary wear of
the charging components could occur if the charger is left attached to the battery and a power source for
longer than 12 hours.
Indicator light on the battery: Green - More than 66%. Yellow - 33%-66%. Red - Less than 33%
Never charge a battery for more than 12 hours at a time.
DO NOT leave a charging battery unattended.
Battery Charging Information

17
Charge the battery only with the charger originally supplied with the bikefrom AventonBikes, or
a charger purchased directly from Aventon Bikes, designed for use with your specific bike serial
number, as approved by Aventon Bikes. Never use an aftermarket charger, which can
result in damage, serious injury, or death.
Please take special care in charging your bike from Aventon Bikes in accordance with the
procedures and safety information detailed in thismanual. Failure to follow proper charging
procedures can result in damage to your bike, the charger,or personal property, and/or cause
serious injury or death
CHARGER SAFETY INFORMATION
The charger should only be used indoors in a cool, dry, ventilated area, on a flat, stable, hard surface.
Avoid charger contact with liquids, dirt, debris, or metal objects. DO NOT cover the charger while in use.
Store and use the charger in a safe place away from children.
Fully charging the battery before each use can help extend the life of the battery and reduces the
chance of over-discharging.
DO NOT charge the battery with any chargers other than the one originally supplied from Aventon Bikes
or a charger designed for use with your specific bike purchased directly from Aventon Bikes.
The charger works on 110/240V 50/60Hx standard home AC power outlets and automatically detects and
accounts for incoming voltage. DO NOT open the charger or modify voltage input.
DO NOT yank or pull on the cables of the charger. When unplugging, carefully remove both AC and DC
cables by pulling on the plastic plugs directly, and not on the cables.
The charger is expected to get relatively warmer as it charges (normally its environmental temp is
+ 40˚C/104˚F). If the charger gets too hot to touch, you notice a strange smell, or any other indicator of
overheating, discontinue using the charger and contact Aventon Support.

LONG-TERM BATTERY STORAGE
If storing your bike from Aventon Bikes for longer than two weeksat atime, followthe instructions below
to maintain the health and longevity ofyour battery.
to 75% charged.
18

19
SINCH QUICK START GUIDE
SPEED INDICATOR
(Current / Max / Average)
5 LEVELS OF ASSIST
(0: No Assist. 5: Max Assist)
WALK MODE
DISTANCE INDICATOR
(Current Trip / System Mileage)
ERROR CODE INDICATOR
(In the Event of a Problem)
BACKLIGHT INDICATOR
BATTERY LEVEL INDICATOR
(Current / Max / Average)
VOLTAGE OUTPUT INDICATOR
(Real-Time)
Press “M” button, you can switch to check Trip A, Trip B, Voltage, Timer(how long the bike has been on).
Hold both “UP” and “DOWN” arrows to enter a dierent menu. You can change Background light level (1-3),
km/h or mile/h, the Size of wheel’ s data (which you shouldn’ t change) and Max speed (in km/h). After
chaging in this menu, hold “M” to get back to normal menu.
Long press “Down” button while it’ s PAS 1-5 to trigger Walk Mode.
Other manuals for SINCH
2
Table of contents
Other aventon Bicycle manuals

aventon
aventon Pace 350/500 User manual

aventon
aventon Aventure User manual

aventon
aventon Aventure User manual

aventon
aventon PACE 500 User manual

aventon
aventon PACE 350 User manual

aventon
aventon PACE 350 User manual

aventon
aventon Pace 350 V2 User manual

aventon
aventon Soltera 7 User manual

aventon
aventon Level User manual

aventon
aventon PACE 350 User manual


