aventon PACE 350 User manual

User Manual
Thank you for purchasing the Aventon Pace350/500 Ebike.
We are here to help!
Aventon Support Center: https://www.aventon.com/pages/support
Support link: https://support.aventon.com/contact-us
Phone: 1-866-300-3311
We take pride in bringing you a quality product that will over years of
enjoyment. Please read and understand this manual fully before
assembling and riding your bike. If you have questions after reading this
manual, please refer to the Aventon support or contact us by email or
give us a call.
Pace 350/500 Electric Bicycle
(Throttle After Pedal)

2
2
4
11
12
16
USING THIS MANUAL
GENERAL INFORMATION
WARNINGS AND SAFETY
SPECIFICATIONS
ASSEMBLY INSTRUCTION
BATTERY CHARGING (LOCK & REMOVAL)
OPERATION
MAINTENANCE
TROUBLESHOOTING
LIMITED WARRANTY
LINK TO ASSEMBLY VIDEO AND ONLINE RESOURCES
20
21
25
26
28
TABLE OF CONTENTS
01

USING THIS MANUAL
This manual contains details of the product, its equipment, and information on operation,maintenance, and
other helpful tips for owners. Read it carefully and familiarize yourself with the ebike before using it to
ensure safe use and prevent accidents. This manual contains many warnings and cautions concerning the
safe operation and consequences if proper setup, operation, and maintenance are not performed. All
information in this manual should be carefully reviewed and if you have any questions you should contact
Aventon immediately.
The notes, warnings, and cautions contained within the manual and paragraphs are marked by the triangular
Caution Symbol at the left side should be given special care. Users should also pay special attention to
information marked in this manual beginning with NOTICE.
Keep this manual, along with any other documents that were included with your bike, for future reference,
however all content in this manual is subject to change or withdrawal without notice. Visit https://www.aven-
ton.com/pages/documents to view and download the latest version. Aventon makes every eort to ensure
the accuracy of its documentation and assumes no responsibility or liability if any errors or inaccuracies
appear within.
Because it is impossible to anticipate every situation or condition that will occur while riding,this manual
makes no representations about the safe use of bikes under all conditions. There are risks associated with
the use of any bike that cannot be predicted or avoided and are the sole responsibility of the rider.
GENERAL INFO
Assembly and Fit
Correct assembly and fit are essential elements to ensure your bicycling safety, performance, and comfort.
Even if you have the experience, skill, and tools to complete these essential steps before your first ride,
Aventon recommends having a certified, reputable bike mechanic to check your work.
NOTICE: If you do not have the experience, skill, and tools to complete assembly and fit, Aventon highly
recommends having a certified, reputable bike mechanic complete these procedures as well as any future
adjustments or tuning.
NOTICE: A critical aspect of assembling your bike is securing the front wheel and checking the tightness of
the rear wheel axle nuts. Aventon bikes use bolted on, through axle or quick release front wheel mounting
mechanism and the rear wheel is bolted on. These mechanisms may become loose or unsecured during
shipment or over time. The torque and security of all wheel mounting hardware should be inspected upon
arrival and on a regular basis. Both wheels need to be properly secured before operating your bike.
Mandatory Equipment and Use Locations
Before riding, ensure you have all required and recommended safety equipment and are following all laws
pertaining to use an electric bike in your region. For example, these laws may specify the need for
mandatory equipment, use of hand signals, and where you can ride.
Changing Components or Attaching Accessories
The use of non-original components or spare parts can jeopardize the safety of your ebike, void your
warranty and, in some cases, cause your ebike to not conform with laws pertaining to your bike.
02

Safety Check Before Each Ride
Always check the condition of your bike before you ride in addition to having regular maintenance
performed. If you are unsure of how to conduct a complete check of the condition of your bike before every
ride, you should consult a certified, reputable bike mechanic for assistance.
Electrical System (Applicable to Pace 500, Pace 350, Sinch, Level, Soltera,
Aventure)
The electrical system powers several components on your ebike that control dierent operating conditions
and user preferences.It is critical that you familiarize yourself with all aspects of your ebike s electrical
system and check to see if it is working correctly before every ride. The front and rear brake levers contain
safety power cuto switches, which disable the hub motor s assistance when applied, and both levers
should be checked for correct operation. The throttle should provide smooth acceleration when gradually
applied. If the throttle, brake lever cuto switches, pedal assistance, or lighting are functioning abnormally,
intermittently, or not working, please discontinue the use of your ebike immediately and contact the
Aventon Support team for assistance.
Brakes
Ensure that the brakes and their system components are free from damage, properly secured and working
correctly. When fully squeezed, both front and rear brake levers should not be touching the handlebar. Take
your bike to a certified, reputable bike mechanic to have the brakes repaired if you find a problem.
Tires and Wheels
Your wheels should always spin straight and must be repaired or replaced if they wobble side to side or up
and down when spinning. If your wheels become untrue or spokes loosen, which can happen with normal
use, we recommend that a certified, reputable bike mechanic performs all wheel tuning and truing
operations on your bike from Aventon. DO NOT attempt to true wheels or tighten spokes unless you have
adequate knowledge, tools, and experience. Ensure the tires and inner tubesare in good working condition
without any visual damage and have the correct amount of air pressure. Alwaysreplace tires and inner
tubes with punctures, cuts, or damage before you ride. Tires without the correct amount of air pressure can
reduce performance, increase tire and component wear, and make riding your bike unsafe.
Accessories, Straps, and Hardware
Ensure all hardware is secured and all approved accessories are properly attached per the specific
component manufacturer s instructions. It is good practice to look over all hardware, straps, and accesso-
ries before each ride and if you do discover something wrong or something that you are not sure about,
have it checked by a certified, reputable bike mechanic.
Handlebar, Grips, and Seat Adjustments
Ensure the handlebar and handlebar stem are properly aligned, fitted to the user, and secured to their
recommend torque values. Handlebar grips should not move easily on the handlebar end. Loose, worn,
or damaged handlebar grips should be replaced before you ride . The seat and seatpost shouldbe properly
aligned, fitted to the user, and the seatpost quick release should be properly tightened, fully closed, and
wsecured before riding.
03
The replacement of original components or installation of third-party accessories or accessories
not from Aventon explicitly recommended for your bike model is at your own risk. Using
aftermarket accessories or components that have not been tested by Aventonfor safety and
compatibility may void your warranty, create an unsafe riding condition, damage to property or
your bike by Aventon, or result in serious injury or death.
’
’
’

Battery Charged, Secured, and Unplugged
Ensure the battery is adequately charged and operating properly. Ensure the battery charger is unplugged
from the outlet, battery, then stored in a safe location before you ride. The battery MUST be locked onto
the frame battery mount properly before use. DO NOT operate the electrical system if the battery is remove.d
WARNINGS AND SAFETY
General Operating Rules
Notice: Pay special attention to all the general operating rules below before operating your bike from
Aventon.
When riding, obey the same road laws as all other road vehicles as applicable by law in your area.
For additional information regarding trafic/vehicles laws, contact the road trafic authority in your area.
Ride predictably , in a straight line, and with the flow of trafic. Never ride against trafic.
Use correct hand signals to indicate turning.
Ride defensively; to other road users you may be hard to see .
Concentrate on the path ahead. Avoid potholes, gravel, wet or oily roads, wet leaves, curbs, traintracks,
speed bumps, drain gates, thorns, broken glass, and other obstacles, hazards, andpuncture flat risks.
Cross train tracks at a 90-degree angle or walk your bike across.
Expect the unexpected such as opening car doors or cars backing out of driveways.
Be careful at intersections and when preparing to pass other vehicles or cyclists.
Familiarize yourself with all the features and operations of the bike by Aventon Bikes. Practice and become
proficient at shifting gears, applying the brakes, using the pedal assist system, and using the throttle in a
controlled setting before riding in riskier conditions.
Wear proper riding clothes including closed-toe shoes. If you are wearing loose pants, secure the bottom
using leg clips or elastic bands to prevent them from being caught in the chain or gears. Do not use items
that may restrict your hearing.
Check your local rules and regulations before carrying cargo .
When braking, apply the rear brake first, then the front brake. If brakes are not correctly applied, they
may lock up and lead to you losing control and/or falling.
Maintain a comfortable stopping distance from all other objects, riders, and vehicles. Safe braking
distances are based on factors such as road surface and light conditions among other variables.
04

Safety Notes
The following safety notes provide additional information on the safe operation of your bike from
Aventon and should be closely reviewed. Failure to review these notes can lead to serious injury or
death.
All users must read and understand this manual before riding their bike from Aventon Bike. Additional
manuals for components used on the bike may also be provided and should be read before installing or
using those components.
Ensure that you comprehend all instructions and safety notes/warnings.
Ensure the bike fits you properly before your first use. You may lose control or fall if your bike is too big
or too small.
Always wear an approved bicycle helmet whenever riding a bike and ensure that all helmet manufacturer
instructions are used for fit and care of your helmet. Failure to wear a helmet when riding may result in
serious injury or death.
Ensure correct setup, tightening, and torquing to recommended torque values is performed on your bike
before first using it and check the setup, tightening, and condition of components and hardware regularly.
It is your responsibility to familiarize yourself with the laws and requirements of operating this product in
the area(s) where you ride.
Ensure the handlebar grips are undamaged and properly installed. Loose or damaged grips can cause
you to lose control and fall.
DO NOT use this product with standard bike trailers, stands, vehicle racks, or accessories that Aventon has
not tested for safety and compatibility and have verified as safe and compatible with the bike.
Oroad riding requires close attention, specific skills, and presents variable conditions and hazards.
Wear appropriate safety gear and do not ride alone in remote areas. Check local rules and regulations
about whether oroad ebike riding is allowed.
DO NOT ENGAGEIN EXTREME RIDING. This includes but is not limited to jumps, stunts, or any riding that
exceeds your capabilities. Although many articles/advertisements/catalogs depict extreme riding, this is not
recommended nor permitted, and you can be seriously injured or killed if you perform extreme riding.
Bikes and bike parts have strength and integrity limitations, and extreme riding, including but not limited
to jumps, stunts, etc., should not be performed as it can damage bike components and/or cause or lead to
dangerous riding situations in which you may be seriously injured or killed.
Failure to perform and confirm proper installation, compatibility , proper operation, or maintenance of any
component or accessory can result in serious injury or death.
After any incident, you must consider your bike unsafe to ride until you consult with a certified , reputable
bike mechanic for a comprehensive inspection of all components, functions, and operations of the bike.
Failure to properly charge, store, or use your battery will void the warranty and may cause a hazardous
situation.
You should check the operation of the brake motor cuto switches before each ride . The brake system is
equipped with an inhibitor that cuts o power to the electric motor whenever the brakes are squeezed.
Check proper operation of brake motor cutoff switches before riding.
Extreme care should be taken when using the pedal assistance sensor and throttle on this product. Ensure you
understand and are prepared for the pedal assistance to engage as soon as pedaling is underway.
Users must understand the operation of the thumb switch throttle before using the bike and must take care
to travel at speeds appropriate for the usage area, riding conditions, and user experience level. Always use
the lowest assist level until you are comfortable with the bike and feel confident in controlling the power.
Any aftermarket changes to your bike from Aventon Bikes not expressly approved by Aventon Bikes
could void the warranty and create an unsafe riding experience.
Because electric bikes are heavier and faster than normal bikes, they require extra caution and care while
riding.
Take extra care while riding in wet conditions including decreasing speed and increasing braking distances.
Feet or hands can slip in wet conditions and lead to serious injury or death.
DO NOT remove any reflectors.
05

Helmets
When riding a bike, always wear a properly fitted helmet that covers the forehead. Many locations
require specific safety devices. It is your responsibility to familiarize yourself with the local laws, rules,
and regulations where you ride and to comply with all applicable laws, including equipping yourself and
your bike as the law requires.
General Warnings
Like any sport, bicycling involves risk of damage, injury, and death. By choosing to ride a bike, you
assume the responsibility for that risk, so you need to know, and practice the rules of safe and responsi-
ble riding and the proper use and maintenance of this bike. Proper use and maintenanceof your bike
reduces risk of damage, injury, and death.
Biking and controlled substances do not mix. Never operate a bike while under the influenceof alcohol,
drugs, or any substance or condition that could impair motor functions, judgement, or the ability to
safely operate a bike or another vehicle.
The PACE 500/350 is designed for use by persons 18 years old and older. Riders must havethephysical
condition, reaction time, and metal capability to ride safely and manage tra˛c, road conditions, and
sudden situations, as well as respect the laws governing electric bike use where they ride, regardless of
age. If you have an impairment or disability such as a visual impairment, hearing impairment, physical
impairment, cognitive/language impairment, a seizure disorder, or any other physical condition that
could impact your ability to safely operate a vehicle, consult your physician before riding any bike.
A Note for Parents and Guardians
As a parent or guardian, you are responsible for the activities and safety of your child.The Pace is not
designed for use by children under the age of 18. If you are carrying a passenger in a child safety seat, they
should also be wearing a properly fitted and approved helmet.
Wet Weather
It is recommended to not ride in wet weather if avoidable. Ride in wet weather only if necessary. This
electric bike is not meant for use in heavy rain, or streams. Never immerse or submerge this product in
water or liquid as the electrical system may be damaged.
In wet weather you need to take extra care when operating this bike.
Decrease riding speed to help you control the bike in slippery conditions.
Brake earlier since it will take longer to slow down and come to a stop than when operated in dry
conditions.
Take care to be more visible to others on the road. Wear reflective clothing and use approved safety
lights.
Road hazards are more dicult to see when wet; proceed with caution.
Night Riding
It is recommended to not ride at night if avoidable. Ride at night only if necessary.
Wear reflective and light-colored clothing.
Slow down and use familiar roads with street lighting, if possible .
Ensure tire wall, pedal, and other reflectors are installed and unobstructed.
Ensure head light and taillight/brake light are functioning correctly and use them.
06

07
Model Name Aventon Pace 350
Max. Load Capacity 300lbs. / 113 kg
Max.Speed20MPH
Motor 36V 350W Brushless Hub
Battery 36V 417.6Wh
35 Mile Average
Wheel Size 27.5 x 2.20" Front / Rear
Tire Pressure
Charger 36V 2A
Charging Time Approx. 3-4 Hours
Water Resistance IPX4
Gross Weight 46 lbs/ 20 kg
SPECIFICATIONS
* Range Per Charge is measured under the conditions that power is sucient, with a 75kg load, at
86°F(30°C), 70% humidity, on a level road, in pure electric riding mode. Actual results may vary
based on di˜erences in temperature, load, wind speed, road conditions andother factors.
Range Average Per Charge
Inflate to 30-50 PSI
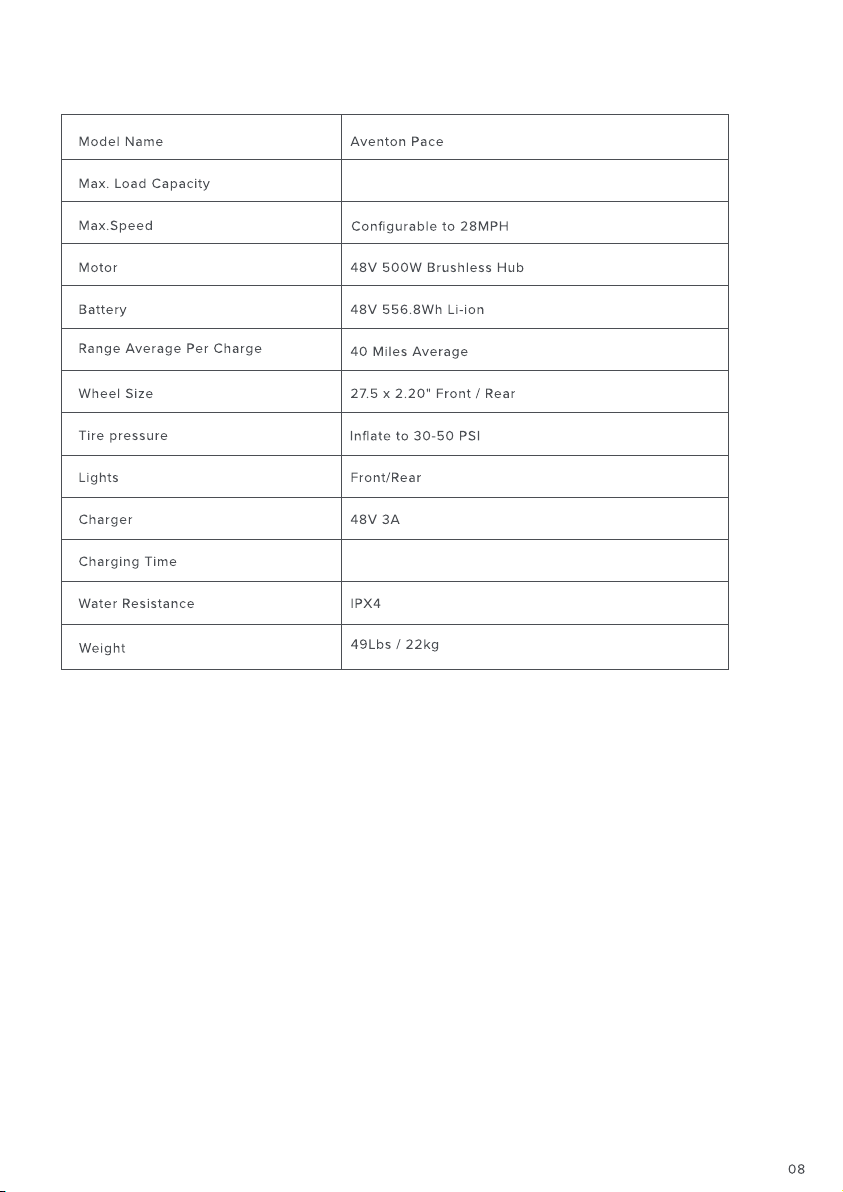
SPECIFICATIONS
500
* Range Per Charge is measured under the conditions that power is sucient, with a 75kg load, at
86°F(30°C), 70% humidity, on a level road, in pure electric riding mode. Actual results may vary
based on di˜erences in temperature, load, wind speed, road conditions andother factors.
300lbs. / 113 kg
Approx. 3-4 Hours
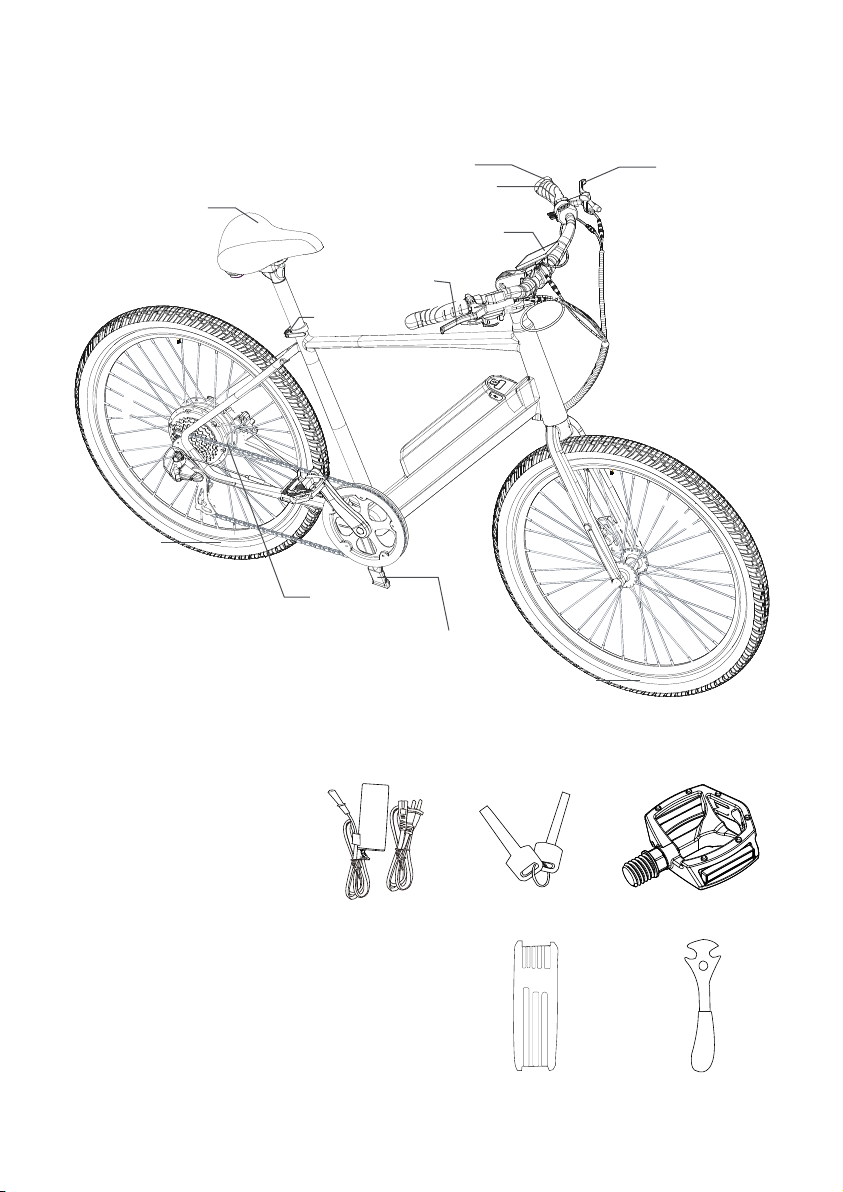
WHAT’ S IN THE BOX
ASSEMBLY INSTRUCTION
1*Charger
1*Charger cable
2*Front/Rear Reflector
1*Spare Derailleur Hanger
1*Grease
1*Hex key
1*Wrench
1*Owner's manual
2*Reflector holder
1*Left pedal
1*Right pedal
09
HUB MOTOR
REAR WHEEL
FRONT WHEEL
SEATPOST
PEDAL
SEAT
REAR BRAKE
HANDLE BAR
THROTTLE
DISPLAY
FRONT
BRAKE
Step 1. Unpack the bike.
Open the bike box.With the help of another person capable of safely lifting a heavy object, remove the
Pace from the bike box. Carefully remove the packaging material protecting the bike frame and
components, as well as remove the small boxes attached to the fork. These are your charger and
accessories. Please recycle packaging materials especially cardboard and foam whenever possible.
NOTICE: The following steps are only a general guide to assist in the assembly of your ebike and are
not a complete or comprehensive manual of all aspects of assembly, maintenance, and repair. Consult
a certified, reputable bike mechanic to assist with assembly, repair, and maintenance of your ebike.
Assembly
Step 2. Remove all the package foam and ribbon.
.
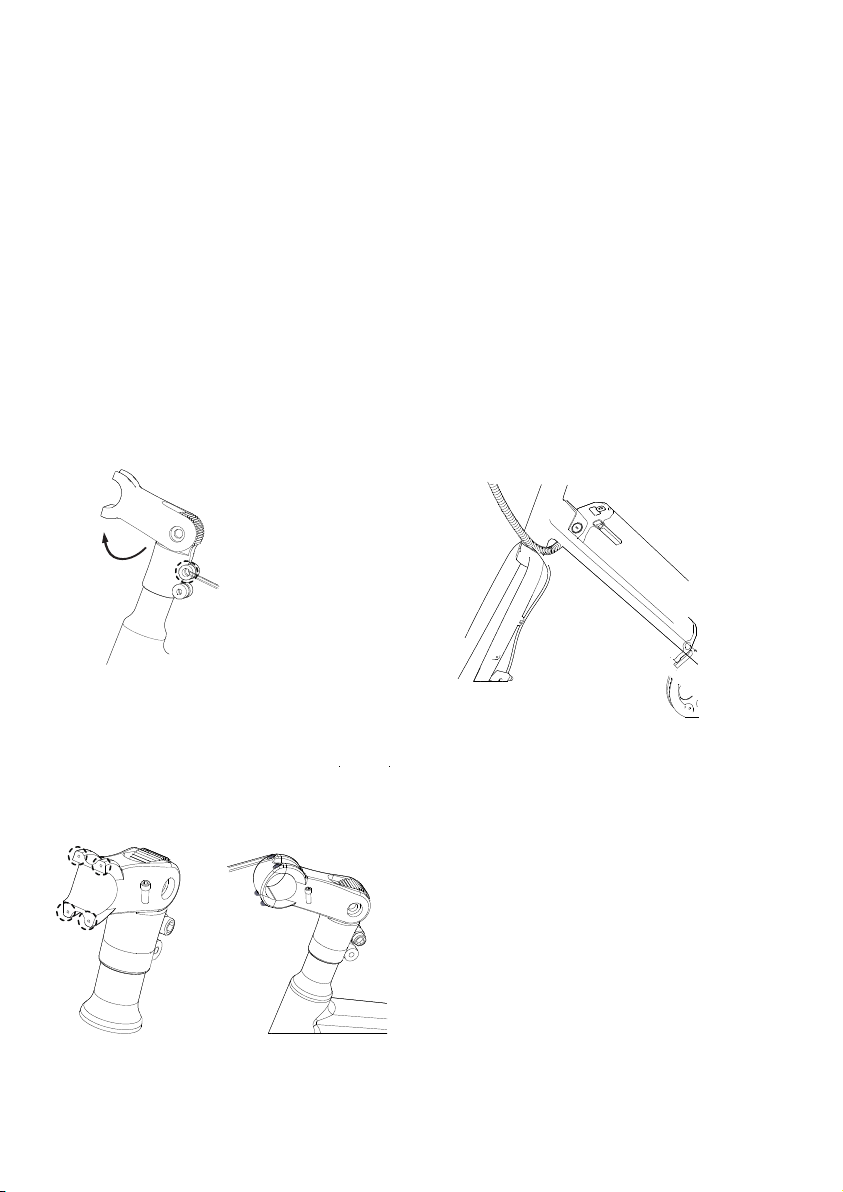
Step 3. Loosen the stem bolts with a 5mm hex key
and turn 180 degree.
Step 4. Make sure the handle bars stay on the
left side so after the handle bars are installed
the cables come out of the frame to the left side
of the bike. Make sure the cables are not twisted.
(Reference below pic)
Step 5: Use 4mm hex key to remove all four
stem faceplate bolts.
10
11
Step 6: Place the handlebar on the stem correctly. Center the handlebar and screw in the four stem
faceplate bolts evenly, however do not tighten all the way down for further adjustment.
C.Carefully install the front wheel and make sure the brake rotor sits in between the braking pads in the
brake caliper; the flat washer on the axle should sit outside the fork dropout.
Step 7: Install the front wheel.
A.Remove the plastic insert from the fork dropout. B.Remove the plastic insert card from the front
brake caliper.
Caution: Never touch the brake rotor, especially when the wheel and/or bike is in motion, or serious injury could occur.
Hand oils can cause squeaking and decrease brake performance

12
Step 9: Centralized the stem to make sure it's aligning to the center line of the front tire. Use 5mm hex key to tighten the stem
cap screw ( 8-12 Nm) ; Use 5mm hex key to tighten the two stem screws on the side ( 5-6 Nm). Cover the stem rubber cap.
D.Use a 15mm open wrench to tight the wheel axle bolt to recommended torque value at 25-30 Nm.
Step 10: Perform a handlebar twist test to ensure the handlebar stem is secure.
WARNING: an improperly secured front wheel and/or handlebar stem can cause loss of control, accidents,
serious injury, or death. Check that the front wheel and handlebar stem are properly secured to
the bike during assembly and before each ride.
Step 8: Put the kickstand down to hold the bike up.
Brace the front wheel. Stand at the front of the bike, facing the handlebar, and brace the front wheel
between your feet and lower legs.

13
Try to twist the handlebar. Hold both handlebar grips and push forward with one hand while pulling back with the other.
Push and pull at the same time with about 20 lb (9 kg) of force with each hand. .
Ensure the handlebar and wheel stay properly aligned. The handlebar and handlebar stem should be tightly secured
perpendicular to the front wheel..
Repeat the twist test pulling/pushing with the opposite hands, again with 20 lb (9 kg)of force pulling with one
hand and 20 lb (9 kg) of force pushing with the other.
If needed, align the handlebar and stem and torque the stem clamp bolts evenly to the specification for
the handlebar stem clamp bolts. After torqueing the stem clamp bolts to the proper specification, perform the twist test again.
If the handlebar still moves, contact Product Support.
Step 11: Use 3mm hex key to tighten the display clamp to desired angle .
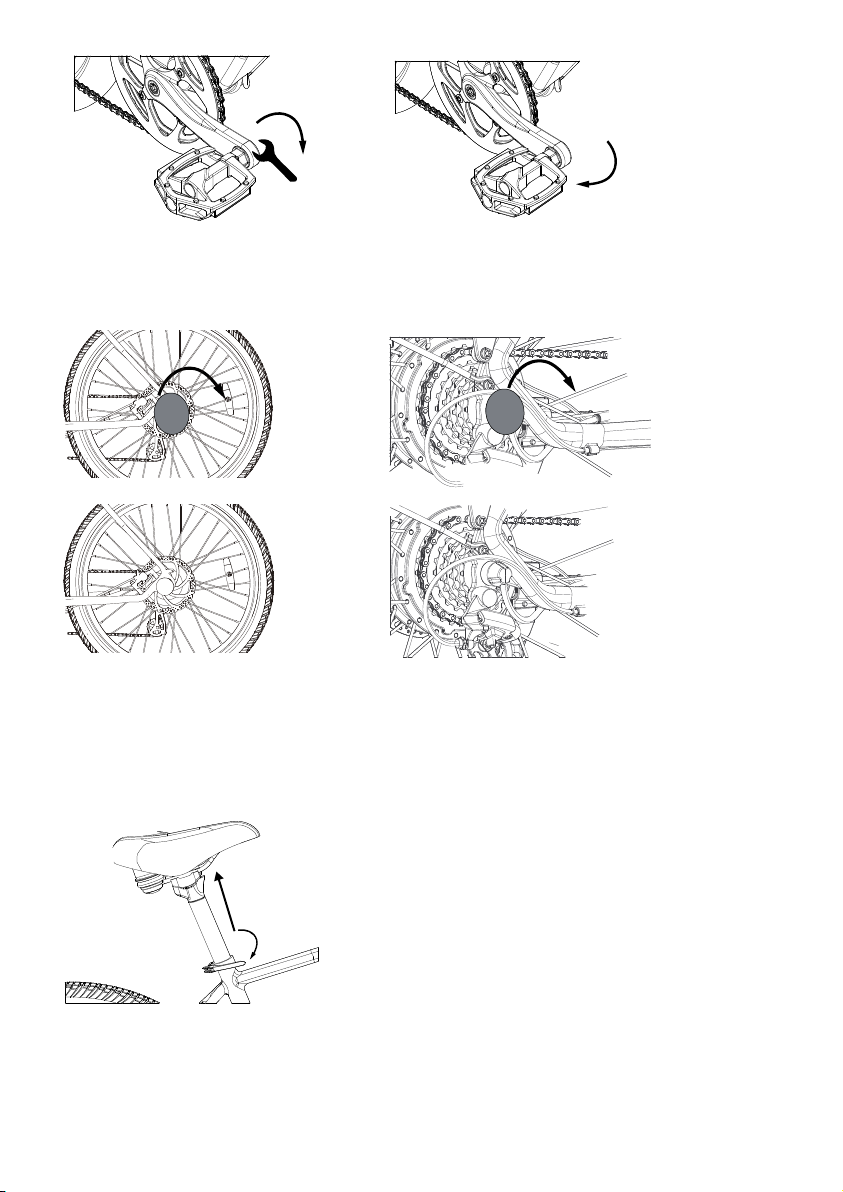
Step 12: Use a pedal wrench to install the pedals. Locate the pedal with a smooth pedal axle exterior and an “R” stamped
into the end of the pedal axle, which indicate it is the right pedal. The right pedal goes on the crank on the right side of the
bike (which has the drivetrain gears and is the same as a rider’ s right side when riding).
The right pedal (1) is threaded so that it is tightened by turning clockwise. Apply grease to the threads and
carefully thread the right pedal onto the crank on the right side of the bike slowly and by hand. Do not cross thread or
damage the threads.
The left pedal (2) is reverse-threaded and tightens counterclockwise. Ensure the remaining pedal has notches
on the exterior of the axle and an “L” stamped into the end of the axle. Apply grease and carefully thread the pedal onto the
left crank by hand slowly. Do not cross thread or damage the threads.
Torque each pedal to 35 Nm.
Identifying marks Right pedal (has a “R” sticker) tightens clockwise Left pedal (has a “L” sticker) tightens
counterclockwise
14
Step 13: Remove motor protector and put on the motor protection guard on both sides of back wheel.
Note: Part of plastic motor protector will likely break and be left in between the frame and the gears, use a pair of
pliers to carefully remove it.
Step 14: Inflate the tires. Check that the tire beads and tires are evenly seated on the rims. Use a pump with a Schrader
valve and pressure gauge to inflate each tire to the recommended pressure indicated on the tire sidewall, 30-50PSI (2.0-3.5
BAR).Do not overinflate or underinflate tires.
Step 15: Set the desired seat height. Open the quick release lever by hinging it open fully. Adjust the seatpost up or
down to a comfortable height, while ensuring the seatpost is inserted into the frame past the minimum insertion point.
If needed, use the thumb nut to add tension to the clamp so there is some resistance when the lever is in line with the
clamp bolt, but do not overtighten. Close the quick release lever to secure the seatpost and check that it cannot move.
See the Adjusting the Seat section of this manual for more details.

15
Step 16: Adjusting the seat position and angle
To change the angle and horizontal position of the seat:
Step 17: Check if the key and battery lock are with same serial no. .
B.Move the seat backward or forward and tilt to adjust the angle. The seat position horizontal to flat ground is desirable for
most riders. Do not exceed the limit markings on the seat rail, which show the minimum and maximum horizontal movement
allowed.
C.While holding the seat in the desired position, use a 5mm allen key to tighten the seat angle adjustment bolt securely to
the recommended torque value(8Nm).
A.Use a 5mm Allen wrench to loosen the seat adjustment bolt on the clamp positioned directly underneath the seat,
above the rear wheel. Do not completely remove the bolts.
Step 18: Check battery and display.
On the battery press the power button, 3 LED lights will light on, and then 1 LED light.
Press and hold the "M" button on the display unit to turn on the display.
"Press and hold the "M" button on the display
unit to turn on the display."
Press the power button once, 3 LED lights
will light on, and then 1 LED light stays on.
Charging Procedure
Follow these steps for charging your bike from Aventon Bikes:
1. Ensure the battery is o.
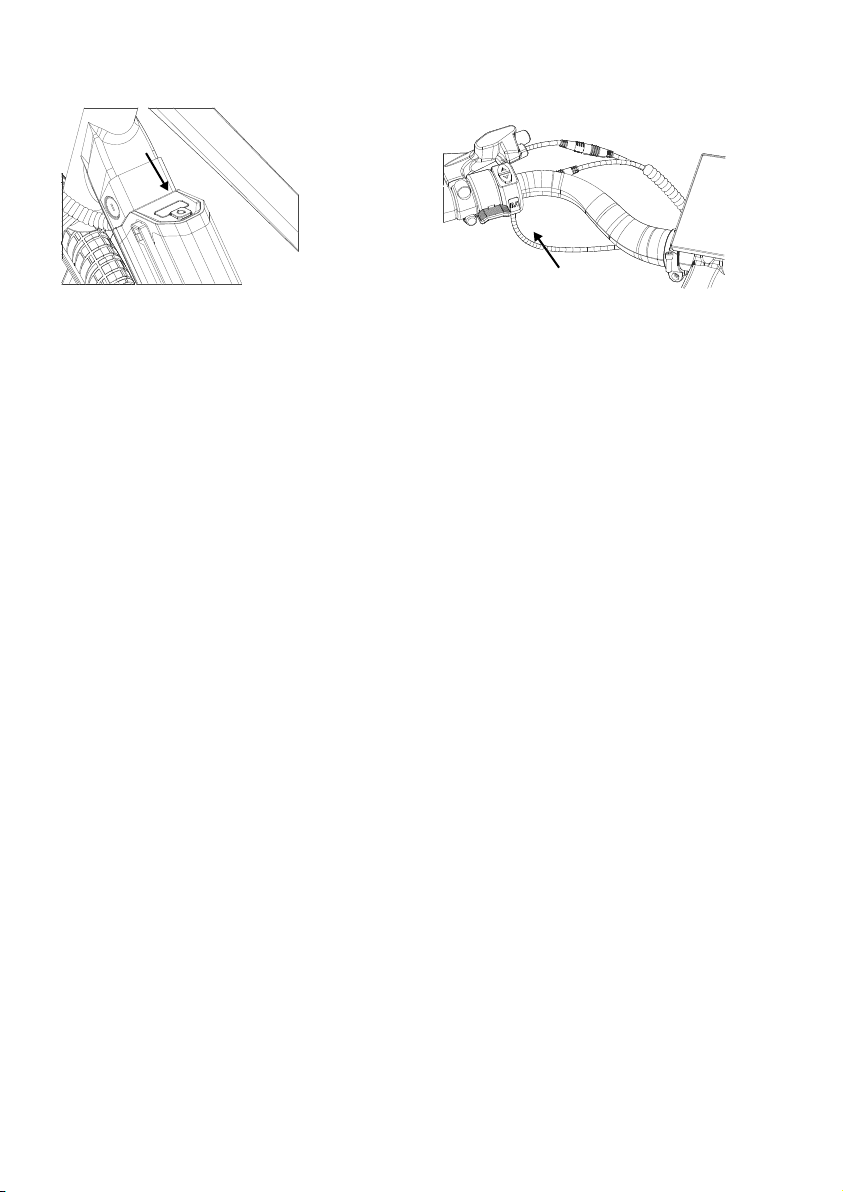
2. Remove the rubber cover on the charging port.
3. Plug the charger into the battery’s charging port,BEFORE PLUGGING CHARGER INTO POWER OUTLET.
With the battery on or o the bike, place the charger on a flat, secure place, and connect the DC output plug
from the charger (round barrel connector) to the charging port on the side of the battery.
4. Plug the charger into a power outlet.Connect the charger input plug (110/240-volt plug) to the power
outlet. Charging should initiate and will be indicated by the LED charge status light on the charger
illuminating as red light.
5. Unplug the charger from the outlet, then the charging port. Once fully charged, indicated by one
charging indicator light turning green , unplug the charger from the wall outlet first and then remove the
charger output plug from the battery charging port.
Always charge your battery in temperatures between 50 °F – 77 °F (10 °C – 25 °C) and ensure the battery
and charger are not damaged before initiating charge. If you notice anything unusual while charging,
please discontinue charging and using the bike and contact Aventon Bikes Product Support for help.
16
Battery Charging

Battery Charging Information
REMOVING THE BATTERY
Check the charger, charger cables, and battery for damage before beginning each charge.
Be sure to charge in an area where it is clear and safe from any potential damage or tripping situations
can occur while it is charging. Always charge indoors in a cool and dry area and away from direct sunlight,
dirt, or debris. Always charge your battery in temperatures between 50 °F – 77 °F (10 °C – 25 °C).
The battery can be charged on or o the bike. To remove the battery, turn the key to the unlocked position,
pull the lever and take the battery out.
The battery should be recharged after each use, so it is ready to go the full range for your next ride. There
is no memory eect, so charging the battery after short rides will not cause damage.
Charging the battery normally takes 3-7 hours.
The charger indicator lights will show red light while the battery charges. When charging is complete, the
indicator light will turn green. Ensure the light faces upward when charging.
Remove the charger from the battery within one hour of the green light indicating a complete charge.
The charger is designed to automatically stop charging when the battery is full, but unnecessary wear of
the charging components could occur if the charger is left attached to the battery and a power source for
longer than 12 hours.
Never charge a battery for more than 12 hours at a time.
DO NOT leave a charging battery unattended.
Ensure the battery is turned o , turn the key to the unlocked position.
Pull the battery lever and pull the battery outwards of the tray.
DO NOT touch or damage the “+” and “-” terminal contacts on the top of the battery and keep them clear
of debris.
16

17
WHEN INSTALLING THE BATTERY ONTO THE BIKE
Ensure the battery is turned o.
DO NOT force the battery into the tray; slowly align and gently push the battery down into the tray.
Make sure there is no space between battery and tray, confirm battery has been fully secured on the tray.
Ensure the battery has been properly secured to the bike before each use by carefully pulling outwards
on the battery with both hands once locked.
CHARGER SAFETY INFORMATION
The charger should only be used indoors in a cool, dry, ventilated area, on a flat, stable, hard surface.
Avoid charger contact with liquids, dirt, debris, or metal objects. DO NOT cover the charger while in use.
Store and use the charger in a safe place away from children.
Fully charging the battery before each use to can help extend the life of the battery and reduces the
chance of over-discharging.
DO NOT charge the battery with any chargers other than the one originally supplied by Aventon Bikes
or a charger designed for use with your specific bike purchased directly from Aventon Bikes.
The charger works on 110/240 V 50/60 Hz standard home AC power outlets and automatically
detects and accounts for incoming voltage. DO NOT open the charger or modify voltage input.
DO NOT yank or pull on the cables of the charger . When unplugging carefully remove both the AC and DC
cables by pulling on the plastic plugs directly, and not on the cables.
The charger is expected to get relatively warmer as it charges. If the charger gets too hot to touch, you
notice a strange smell, or any other indicator of overheating, discontinue using the charger and
contact Aventon Support.
Charge the battery only with the charger originally supplied with the bike from Aventon Bikes,
or a charger purchased directly from Aventon Bikes, designed for use with your specific bike
serial number, as approved by Aventon Bikes. Never use an aftermarket charger, which can
result in damage, serious injury, or death.
Please take special care in charging your bike from Aventon Bikes in accordance with the
procedures and safety information detailed in this manual. Failure to follow proper charging
procedures can result in damage to your bike, the charger, or personal property, and/or cause
serious injury or death.
LONG-TERM BATTERY STORAGE
If storing your bike from Aventon Bikes for longer than two weeks at a time, follow the instructions below
to maintain the health and longevity of your battery.
Charge (or discharge) the battery to approximately 75% charged.
DO NOT leave the battery attached to the bike frame. Remove it from the bike during long-term storage.
Store the battery in a dry, climate controlled, indoor location in between 50˚F - 70˚ F (10˚C -25˚C). Check
the battery every month, and if necessary, use the Aventon Bike Charger to charge the battery to 75%.
Please follow the above instructions for storing your bike and battery from Aventon Bikes.
Failure to follow proper battery storage procedures can result in a non-functional battery.
Replacement will not be convered under warranty.
If the battery is physically damaged, non-functional, performing abnormally, or was dropped
or involved in a crash, with or without obvious signs of damage, please discontinue use and
charging and contact Aventon Bikes immediately.

18
DO NOT cover up the charger while it is charging. The charger air cools and needs to be
on a hard, flat surface in an open space. Use the charger with the indicator light facing upward.
DO NOT use when the charger is inverted, which can inhibit cooling and reduce charger lifespan.
DO NOT open the battery housing, which will void the warranty and can result in damage to
the battery, property or cause serious injury and/or death.
PACE 350/500 QUICK START GUIDE
The Pace 350 /500E-Bike is equipped with a throttle, which is mounted
The motor stops when you: stop pedaling, squeeze the brake levers,
or release the throttle. Simply start pedaling again to re-engage the
motor.
BATTERY AND CHARGING
W
temperature conditions. To charge the battery, plug the charger into
the charging port and then connect the charger to a wall outlet. The
LED indicator light will be red when charging and will turn green when
charging is complete.
MAINTENANCE AND SERVICE
Properly maintaining your Pace 350/500 ensures its longevity and smooth
operation. Before assembling your bike, please watch the “How To
Assemble” video we’ve prepared for you. If you have questions during
the assembly process, please contact Aventon at (866) 300-3311 or
check link: https://support.aventon.com/contact-us
SAFETY
You should wear an approved bicycle helmet every time you ride
a bicycle, regardless of the legal requirement to do so. You should
comply with local law when riding your Pace 350/500 Ebike.
pace 350
GETTING STARTED
First, tap the power button on the battery to turn on. The current
charge level will be flashed upon four green LEDs (4 = full, 1 = near
empty), then one green LED to show the battery is turned on. Next,
press and hold the button on the handlebar controls to turn on the
display. Now, your e-bike is ready to ride. To turn off, press and hold
“M” for 3 seconds.
The Pace ebike offers pedal assist. When using pedal assist, an
electric motor supplements the rider's own effort. To use the pedal
assist, simply start pedaling, then tap the “U” or “D” arrows to increase
or decrease the amount of pedal assist. Pedal assist will engage at
speeds up to 28 MPH for Pace 500 and 20 MPH for Pace 350.
near the rider’s left thumb, to propel the bike without pedaling. To use
the throttle, start pedaling then apply the throttle. Once the bike is
moving on throttle power, you can stop pedaling entirely and use your
thumb to control the speed of the bike. The throttle can propel you at
speeds up to 20 MPH.
Derailleur
On the right side of handlebar, next to the brake lever,
you can see two levers with 7-1 (For Pace 350)/8-1 (For
Pace 500). Those are derailleur levers. By pressing those
levers, you can make the chain move to dierent gears to
change your riding experience.
Other manuals for PACE 350
3
This manual suits for next models
1
Table of contents
Other aventon Bicycle manuals

aventon
aventon SINCH User manual

aventon
aventon PACE 500 User manual

aventon
aventon Aventure User manual

aventon
aventon PACE 350 User manual

aventon
aventon Level User manual

aventon
aventon Soltera 7 User manual

aventon
aventon PACE 350 User manual

aventon
aventon Aventure User manual

aventon
aventon Pace 350 V2 User manual

aventon
aventon Pace 350/500 User manual


