aventon Soltera 7 User manual

Soltera 7 Electric Bicycle
User Manual
Thank you for purchasing the Aventon Soltera 7 Ebike.
We are here to help!
Aventon Help Center: https://www.aventon.com/pages/support
Customer service link: https://support.aventon.com/contact-us
Phone: 1-866-300-3311
We take pride in bringing you a quality product that will oer years of
enjoyment. Please read and understand this manual fully before
assembling and riding your bike. If you have questions after reading this
manual, please refer to the Aventon Support Help Center, contact us by
email, and/or give us a phone call.

2
2
4
8
9
14
USING THIS MANUAL
GENERAL SAFETY
CHARGER SAFETY
SPECIFICATIONS
INSTALLATION INSTRUCTION
BATTERY CHARGING (LOCK & REMOVAL)
OPERATION INSTRUCTION
USER MAINTENANCE AND SERVICE INSTRUCTIONS
TROUBLESHOOTING
LIMITED WARRANTY
LINK TO ASSEMBLY VIDEO AND ONLINE RESOURCES
16
20
23
24
26
01
TABLE OF CONTENTS

02
GENERAL SAFETY
WARNING! It is your responsibility to comply with all trac related laws and to use proper equipment.
This includes appropriate cycling attireand bike maintenance.
Observe all local bicycle trac laws andregulations.
Observe regulations about bicycle lighting,licensingridingon pavements/sidewalks, bike path and trail
use, helmet laws, childlaws relatingto cycling, and special bicycle trac laws, it isyour responsibility to
know and obey your local laws.
Whenriding a bike, always wear a properly fitted helmet that covers the forehead. Many locations require
specificsafety devices. Itis your responsibility to familiarizeyourself with the local laws, rules, and
regulations where you ride and to comply with all applicable laws, including equipping yourself and your bike
as thelaw requires.
Unless otherwise stated,arider’ s weight and luggage shouldnot exceed250lbs/113kg.
Before you ride your bike, always check to make sure everything is workingproperly and correctly
aligned.
Be familiar with the controlsofyour bicycle, such as brakes,pedals and shiftingetc..
Keep all body parts or any obtrusive objects away fromthe sharp chainrings when pedaling. Failure to
wear proper attire could leadto injuries.
While riding,remember youare sharingthe road or path with others. i.e. motorists,pedestrians and other
cyclists.
IMPORTANT SAFETY INSTRUCTIONS
WARNING! When using this product, basic precautions should always be followed, including the
following:
a)Read all the instructions before usingthe product.
b)To reduce the risk ofinjury, close supervision is necessary when the product is usednear children.
c) Do not put fingers or handsinto the product.
d)Do not use this product ifthe flexible power cordor output cable is frayed, has broken insulation,
or any other signs ofdamage.
e) Thisequipment is not intended to be usedat ambient temperatures lessthan 50°F (10°C) or above
ambient temperatures of 77°F (25°C).
f) The battery isintended to be charged when the ambient temperature is between 50°F (10°C) and
77°F (25°C). Never charge the battery when ambient temperatures are outside this range.”
INSTRUCTIONS PERTAINING TO RISK OF FIRE or ELECTRIC SHOCK
USING THIS MANUAL
This manual contains details of the product,itsequipment, and information on operation, maintenance, and
other helpful tips for owners. Read it carefully andfamiliarize yourself with the ebike before usingit to
ensure safe use andprevent accidents. This manual contains many warnings and cautionsconcerningthe
safe operation and consequencesifproper setup, operation,andmaintenance are not performed. All
information in thismanual should be carefully reviewed and if you have any questions you should contact
Aventon immediately.
The notes, warnings, and cautions contained within the manual and paragraphs are marked by the triangular
Caution Symbol at the left side should be given special care. Users should also pay special attention to
information marked in this manual beginning with NOTICE.
Keep thismanual, alongwith any other documentsthat were included with your bike, for future reference,
however all content in this manual is subject to change or withdrawal without notice. Visit https://www.aven
the accuracy of itsdocumentation and assumes no responsibility or liability if any errorsor inaccuracies
appear within.
Because it isimpossible to anticipate every situation or condition that will occur while riding, this manual
makes no representations about the safe use of bikes under all conditions. There are risks associated with
the use of any bike that cannot be predicted or avoided and are the sole responsibility of the rider.

03
’
Always be adefensive rider. Always assume that others do no see you and expect the unexpected
Always be aware of your surrounds. Be alert and responsive to:
1) Motor vehicles of all types andin all directions.
2) Unexpected movement of obstacles.
3) Nearby pedestrians.
4) Children or animals in the area.
5) Imperfectionsof bike paths or pavedroads includingpotholes, uneven surfaces, loose gravel
construction and debris.
6) Warning,hazard andyieldsigns.
Ride in designated bike laneswhen available and always ride in the direction oftrac.
Acknowledge and stop at ALLstop signs and trac lights.
When comingto acomplete stop, look both ways at street intersections before continuing onward.
Use ocial hand signals for turning and stopping.
Do not ride with headphones.
Never hold onto another vehicle.
Do not weave through trac or make unexpected movesor turns.
Rulesthat govern the right-of-way for motorists apply to cyclists. A bicyclist should always be preparedto
yield.
Do not ride while under the influence of alcohol or drugs.
Avoidriding in bad weather when visibility is obscured, for examples dawn, dusk, or in the dark such
conditions increase the risk of accident.
Cyclistsshouldexercise extracaution when riding at night. Bicyclists are very dicult for motorists and
pedestrians to see in the dark andin many cases, night riding can be more dangerousthan day riding.
Individuals ofan appropriate age who are aware of the increasedrisks shouldtake extracare when
riding at drawn, dusk or at night. Please not that it isimportant to choose suitable apparel and special
ized equipment when riding in unfavoureable conditions to reduce the risk of injury.
Warning! Reflectorsshouldnot worn asa substitute for requiredlighting. Cyclists are near to invisible
for other cyclistsand motorists if the necessary lights and reflective gear are not used. If you ride at
night, take all required precautionsto make yourselfvisible through the sue of lights and reflectors. Lack
of adequate lighting measures may result in seriousinjury or death. As amovingcyclist,reflectors are
designedto reflect o ofcar and street lights to help you become more visible and recognizable when
riding.
Caution! Reflectors and their mounting bracketsshould be checked regularly to ensure they are clean,
straight and securely mounted. Check to be sure youcomply with all local laws about night riding. The
followings are recommended.
It isimportant you take stepsto enhance your visibility by wearing light-colored, reflective clothing
and accessories. There are plenty ofproper reflective gear option that can be worn:
Vests, armbands, legbands,stripeson your helmet, and blinker attachedto your body andor bicycle.
Make sure your clothingor miscellaneous items do not obstruct the visibility ofyour reflectors and
lights.
NIGHT RIDING
Wet Weather
It is recommended to not rideinwet weather if avoidable. Ride inwet weather only if necessary.
electric bike is not meant for use in heavy rain,or streams. Never immerse or submerge this product in
water or liquid as the electrical system may be damaged.
conditions.
lights.

04
.
Throttle on Demand
With throttle on demand,you can throttle the bike fromacomplete stop. This feature is to help give you
that extra push when youneed it on a steep hill, when hitting multiple stops signs,etc. However, we
strongly recommendto pedal first and throttle second to ensure proper stability and preparedness.
Make sure that your bicycle is equipped with reflectorsfor riding at dawn, dusk or at night.
Always ride slowly when riding at night.
Assembly andFit
Correct assembly and fit are essential elements to ensure your bicyclingsafety, performance, and comfort.
Even ifyou have the experience, skill, and toolsto complete these essential steps before your first ride,
Aventon recommends having a certified,reputable bike mechanic to check your work.
NOTICE: If you do not have the experience, skill, and tools to complete assembly and fit, Aventon highly
recommends having acertified,reputable bike mechanic complete these procedures as well as any future
adjustmentsor tuning.
NOTICE: A critical aspect of assemblingyour bike issecuring the front wheel and checking the tightness of
the rear wheel axle nuts. Aventon bikes use boltedon,through axle or quick release front wheel mounting
mechanism and the rear wheel is bolted on. These mechanisms may become loose or unsecured during
shipment or over time. The torque and security of all wheel mountinghardware should be inspectedupon
arrival and on aregular basis. Both wheelsneedto be properly secured before operating your bike.
Mandatory Equipment and Use Locations
Before riding, ensure you have all required and recommended safety equipment and are following all laws
pertaining to use an electric bike in your region. For example, these laws may specify the need for
mandatory equipment, use of hand signals, and where youcan ride.
Changing Components or Attaching Accessories
The use of non-original componentsor spare partscan jeopardize the safety ofyour ebike, voidyour
warranty and,in some cases, cause your ebike to not conformwith laws pertainingto your bike.
Safety Check Before Each Ride
Always check the condition of your bike before youride in addition to havingregular maintenance
performed. If youare unsure of howto conduct acomplete check of the condition ofyour bike before every
ride, you should consult a certified, reputable bike mechanic for assistance.
The replacement of original components or installation of third-party accessories or accessories
not from Aventon explicitly recommended for your bike model is atyour own risk. Using
aftermarket accessories or components thathavenot been tested by Aventon for safety and
compatibility may void your warranty, create an unsaferiding condition, damage property or
your bike by Aventon, or result inserious injury or death.
Electrical System (Applicable to Pace, Sinch, Level, Aventure, Soltera)
and user preferences.It iscritical that you familiarize yourself with all aspectsof your ebike selectrical
system and check to see if it isworkingcorrectly before every ride. The front and rear brake leverscontain
should be checked for correct operation. The throttle shouldprovide smooth acceleration when gradually
intermittently, or not working, please discontinue the use ofyour ebike immediately and contact the
Aventon Support team for assistance.
Brakes
Ensure that the brakes andtheir system components are free from damage, properly securedand working
correctly. When fully squeezed, both front andrear brake levers shouldnot be touchingthe handlebar. Take
your bike to a certified, reputable bike mechanic to have the brakes repairedifyou findaproblem.

05
Battery Charged, Secured, and Unplugged
Ensure the battery isadequately charged andoperating properly. Ensure the battery charger is unplugged
fromthe outlet, battery, then storedin a safe location before youride. The battery MUST be locked onto
the frame battery mount properly before use. Do not operate the electrical systemif the battery is removed
.
Make sure push hard enough while installing the battery into the frame, and hear the “CLICK” sound.
The charger should only be used indoors in a cool, dry, ventilated area, on a flat, stable, hard surface.
Avoid charger contact with liquids, dirt, debris, or metal objects. DO NOT cover the charger while in use.
Store and use the charger in a safe place away from children.
Fully charging the battery before each use can help extend the life of the battery and reduces the chance
of over-discharging.
DO NOT charge the battery with any chargers other than the one originally supplied by Aventon Bikes or
a charger designed for use with your specific bike purchased directly from Aventon Bikes.
The charger works on 110/240V 50/60 Hz standard home AC power outlets and automatically detects
and accounts for incoming voltage. DO NOT open the charger or modify voltage input.
DO NOT yank or pull on the cables of the charger. When unplugging carefully remove both the AC and DC
cables by pulling on the plastic plugs directly, and not on the cables.
The charger is expected to get relatively warmer as it charged. If the charger gets too hot to touch, you
notice a strange smell, or any other indicator of overheating, discontinue using the charger and contact
Aventon Support.
CHARGER SAFETY INFORMATION
Charge the battery only with the charger originally supplied with the bike from Aventon BIkes,
or a charger purchased directly from Aventon Bikes, designed for use with your specific bike
serial number, as approved by Aventon Bikes. Never use an aftermarket charger, which can
result in damage, serious injury, or death.
Tires andWheels
Your wheels should always spin straight and must be repaired or replacedifthey wobble side to side or up
and down when spinning. If your wheels become untrue or spokes loosen, which can happen with normal
use, we recommend that a certified, reputable bike mechanic performs all wheel tuning and truing
operations on your bike from Aventon. Do not attempt to true wheelsor tighten spokes unless youhave
adequate knowledge, tools, and experience. Ensure the tires and inner tubes are in goodworkingcondition
without any visual damage and have the correct amount of air pressure. Always replace tires and inner
tubeswith punctures,cuts,or damage before youride. Tires without the correct amount of air pressure can
reduce performance, increase tire andcomponent wear, and make ridingyour bike unsafe.
Accessories, Straps, and Hardware
Ensure all hardware is securedandall approved accessoriesare properly attachedper the specific
component manufacturer s instructions. It is goodpractice to look over all hardware, straps, and accesso
ries before each ride andifyoudo discover something wrongor somethingthat you are not sure about,
have it checked by a certified, reputable bike mechanic.
Handlebar, Grips, and Seat Adjustments
Ensure the handlebar and handlebar stem are properly aligned, fittedto the user, and securedto their
recommended torque values. Handlebar grips should not move easily on the handlebar end. Loose, worn,
or damaged handlebar grips shouldbe replaced before you ride. The seat and seatpost shouldbe properly
aligned, fitted to the user, and the seatpost quick release should be properly tightened, fully closed, and
secured before riding.
’
Please take special care in charging your bike from Aventon Bikes in accordance with the
procedures and safety information detailed in this manual. Failure to follow proper charging
procedures can result in damage to your bike, the charger, or personal property, and/or cause
serious injury or death.

06
General Operating Rules
Notice: Pay special attention to all the general operatingrules belowbefore operatingyour bike from
Aventon.
speed bumps,drain gates, thorns, broken glass, and other obstacles, hazards, and puncture flat risks.
become proficient at shifting gears,applyingthe brakes, usingthe pedal assist system, and using the
throttle in acontrolled settingbefore ridingin riskier conditions.
usinglegclipsor elastic bandsto prevent themfrom being caught in the chain or gears. Do not use items
that may restrict your hearing.
may lock up and lead to youlosingcontrol and/or falling.
distancesare basedon factors such as road surface and light conditions among other variables.
Safety Notes
The following safety notes provide additional information on the safe operation ofyour bike from
Aventon and should be closely reviewed. Failure to review these notes can lead to serious injury or
death.
manuals for components usedon the bike may also be provided and should be read before installingor
usingthose components.
or too small.
instructionsare usedfor fit and care ofyour helmet. Failure to wear ahelmet when riding may result in
seriousinjury or death.
before first usingit and check the setup, tightening, and condition of components and hardware regularly.
the area(s) where youride.
you to lose control and fall.
not tested for safety and compatibility and have verifiedas safe andcompatible with the bike.
Wear appropriate safety gear and do not ride alone in remote areas. Check local rules and regulations
exceeds your capabilities. Although many articles/advertisements/catalogs depict extreme riding, thisis not
recommended nor permitted,and you can be seriously injuredor killedifyou performextreme riding.
to jumps, stunts, etc., should not be performed as it can damage bike components and/or cause or lead to
dangerousriding situationsin which youmay be seriously injuredor killed.

08
*Range Per Charge is measured under the conditions that power is sucient, with a 75kg load, at
86°F(30°C), 70% humidity, on a level road, in pure electric riding mode. Actual results may vary based
on dierences in temperature, load, wind speed, road conditions and other factors.
SPECIFICATIONS
20 mph/32km/h
Model Name Aventon Soltera 7
Max. Load Capacity 300 lbs. / 136 kg
Max. Speed
Motor 36V,350W (Nominal) brushless rear hub motor
Battery 36V 365Wh 10Ah Li-ion
41 Miles / 66 Km
Wheel Size 700c*35c Front / Rear
Tire Pressure
Lights Front/Rear
Charger Max DC 36V 2A
Charging Time Approx. 5 Hours
Water Resistance IPX4
Weight 43Lbs / 19.5kg
Range Per Charge (Average)*
50-80 PSI
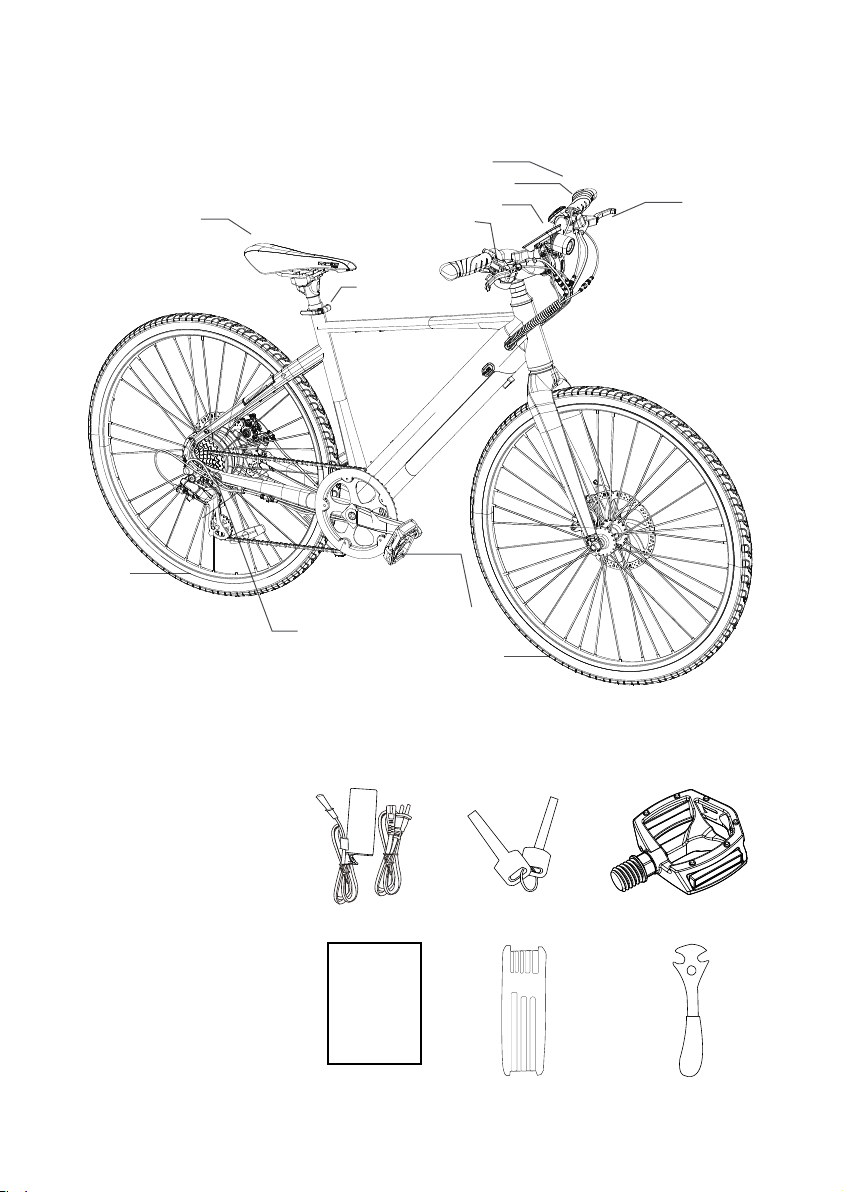
WHAT’ S IN THE BOX
INSTALLATION INSTRUCTION
1* Charger
1* Charger cable
1* Bag of spare screws
1* Hex key
1* Wrench
1* Owner's manual
1* Spare derailleur hanger
1* Grease
1* Left Pedal
1* Right pedal
2* Front/Rear reflector
09
SEAT
SEATPOST
REAR BRAKE
DISPLAY
FRONT
BRAKE
HANDLE BAR
THROTTLE
FRONT WHEEL
REAR WHEEL
HUB MOTOR
PEDAL
AVENTON

Step 1. Unpack the bike. Open the bike box, with another person’ s help who’ s capable of lifting a heavy
object, take out the Soltera 7 from the bike box. Carefully remove the packaging material protecting
the bike frame and components and remove the small boxes inserted in the foam. These are your charger
and accessories. Please recycle packaging materials, especially cardboard and foam, whenever possible.
NOTICE: The following steps are only a general guide to assist in the assembly of your ebike and are
not a complete or comprehensive manual of all aspects of assembly, maintenance, and repair. Consult
a certified, reputable bike mechanic to assist with assembly, repair, and maintenance of your ebike.
Step 2. Remove all the package foam and ribbon. (Be gentle if you use scissors)
.
Step 3. A. Remove the stem rubber cover, loosen the bolt using a 5mm hex key, and discard the plastic white
protective guard
Step 4: Install the front wheel
A. Remove the plastic insert by stepping one foot on it then lifting the fork.
10
B. Place the handlebar onto the stem with the display facing upwards. Remove the top cap and use a 5mm
hex key to tighten the screw in order to secure the handlebar stem. Reinsert the rubber cover back into
the top cap.

11
B. Carefully install the front wheel and make sure the brake rotor sits in between the braking pads in the
brake caliper; the flat washer on the axle should sit outside of the fork dropout.
Caution: Never touch the brake rotor, especially when the wheel and/or bike is in motion, or serious injury could occur. Hand
oils can cause squeaking and decrease brake performance.
Step 5: Put the kickstand down to hold the bike up
Step 6: Adjusting the display and handlebar
A. Stand in front of the bike and clamp front wheel between both legs, verify the handlebars are straight and
in line with the frontwheel. Make sure the pinch bolts are tight and you can not turn the stem freely from
the front wheel.
WARNING: an improperly secured front wheel and/or handlebar stem can cause loss of control, accidents,
serious injury, or death. Check that the front wheel and handlebar stem are properly secured to
the bike during assemly and before each ride
C. Use a 15mm open wrench to tight the wheel axle bolt to recommended torque value at 25-30Nm.

12
B. Sit on the saddle, adjust the display and handlebar to the desired position and thighten the screws which
secure it to the handlebar.
C. Rotate the handlebar height/angle to the desired position then use a 3mm hex key to tighten the screws
securing it to the frame.
Note: The 4pcs stem screws should be tightened. Follow the sequence in the photo below.
D. Use 3mm hex key to tighten the display clamp to desired angle.
12
34
Step 7: Pedal Installation
Use a pedal wrench to install the pedals. Locate the pedal with a smooth pedal axle enterior and an "R"
stamped into the end of the pedal axle (1, below), which indicate it is the right pedal. The right pedal goes
on the crank on the right side of the bike (which has the drivechain gears and is the same as a rider's right
side when riding).
The right pedal (1) is threaded so that it is tightened by turning clockwise. Apply grease to the thread and
carefully thread the right pedal onto the crank on the right side of the bike slowly and by hand. Do not cross thread or
damage the threads.
The left pedal (2) is reverse-threaded and tightens counterclockwise. Ensure the remaining pedal has notches
on the exterior of the axle and an “L” stamped into the end of the axle. Apply grease and carefully thread the pedal onto the
left crank by hand slowly. Do not cross thread or damage the threads.
Torque each pedal to 35 Nm.
Identifying marks Right pedal (has a "R" sticker) tightens clockwise Left pedal (has a "L" sticker) tightens
counterclockwise

13
Step 9: Inflate the tires. Check that the tire beads and tires are evenly seated on the rims. Use a pump with
a Schrader valve and pressure gauge to inflate each tire to the recommended pressure indicated on the tire
sidewall, 50-80PSI. Do not overinflate or underinflate tires.
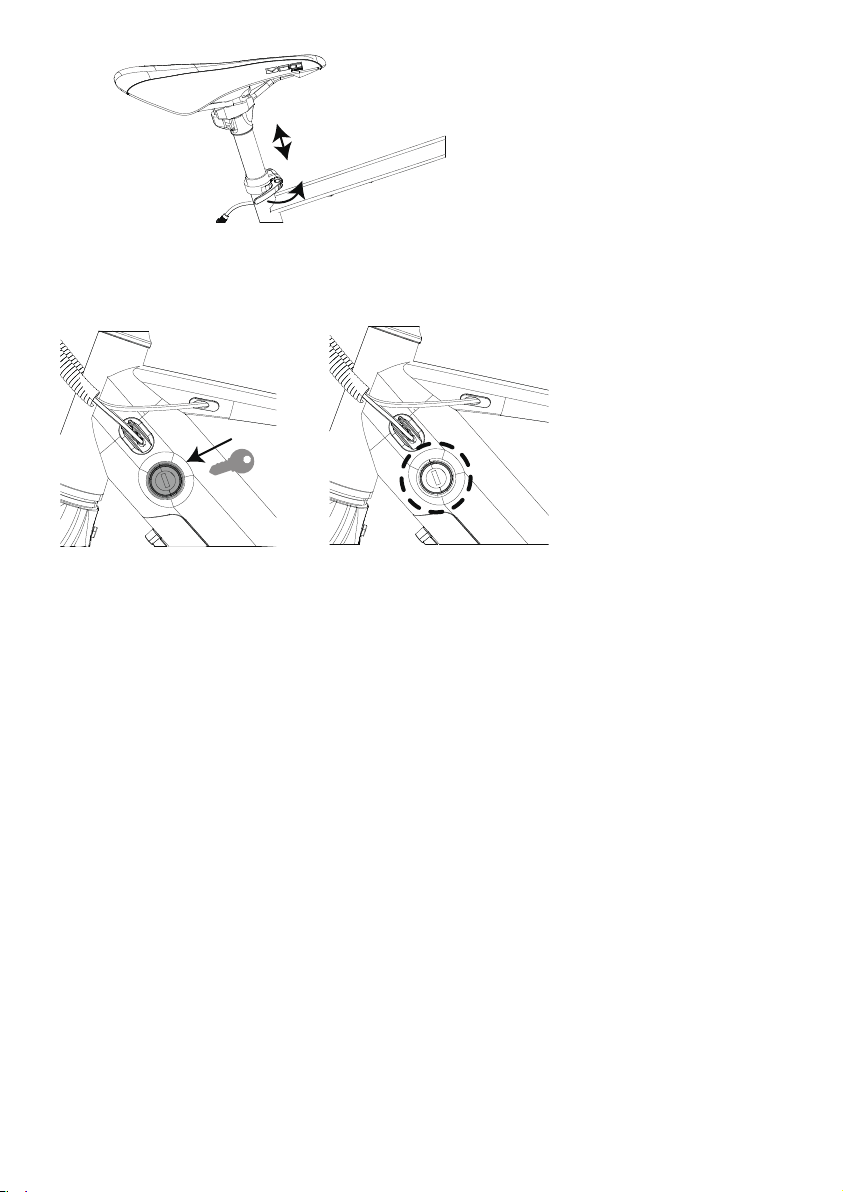
Step 10: Set the desired seat height. Open the quick release lever by hinging it open fully. Adjust the
seatpost up or down to a comfortable height, while ensuring the seatpost is inserted into the frame past the
minimum insertion point.
Step 8: Remove motor protector and put on the motor protection guard on both sides of back wheel. Then
press the rubber caps on both sides. (Rubber caps are in the accessories box)
Note: Part of the plastic motor protector may break and will be left inside the freewheel. Use a pair of pliers
to carefully remove it.
14
Step 11: Check if the key and battery lock have the same serial number.
If needed, use the thumb nut to add tension to the clamp so there is some resistance when the lever is in
line with the clamp bolt, but do not over-tighten. Close the quick release lever to secure the seat-post and
check that it cannot move.
Step 12: Check Battery
Quick press the button on the battery, you can tell how much energy left by the light color. Blue light
means the energy level is over 66%. Green light means the energy level is 33%-66%. Red light means the
energy level is under 33%.
Battery Charging (LOCK & REMOVAL)
Charging Procedure
Follow these steps for charging your bike from Aventon Bikes:
1. Ensure the bike is o.
2. Remove the rubber cover on the charging port.
3. Plug the charger into the battery’ s charging port, BEFORE PLUGGING CHARGER INTO POWER OUTLET.
With the battery on or o the bike, place the charger on a flat, secure place, and connect the DC output plug
from the charger (round barrel connector) to the charging port on the side of the battery.
4. Plug the charger into a power outlet. Connect the charger input plug (110/220-volt plug) to the power outlet.
Charging should initiate and will be indicated by the LED charge status light on the charger illuminating as red
light. During the charging process, the indicator light on the battery won't light up.
5. Unplug the charger from the outlet, then the charging port. Once fully charged, indicated by the charger's
indicator light turning green , unplug the charger from the wall outlet first, then remove the charger output
plug from the battery charging port. Quick press the button on the battery, the indicator light will turn blue.
Battery level: Blue (66%-100%), Green (33%-66%), Red (0%-33%).
Always charge your battery in temperatures between 50 °F – 77 °F (10 °C – 25 °C) and ensure the battery
and charger are not damaged before initiating charge. If you notice anything unusual while charging,
please discontinue charging and using of the bike and contact Aventon Bikes Product Support for help.

Battery Charging Information
FailuretofollowBatteryChargingInformationcouldresultinunnecessaryweartothe charging
components,battery,andorcharger,andcouldleadtoanunderperformingor non-functionalbattery
andreplacementwillnotbecoveredunderwarranty.
Check the charger, charger cables, and battery for damage before beginning each charge.
Be sure to charge in an area where it is clear and safe from any potential damage or tripping situations
can occur while it is charging. Always charge indoors in a cool and dry area and away from direct sunlight,
dirt, or debris. Always charge your battery in temperatures between 50 °F – 77 °F (10 °C – 25 °C).
The battery can be charged on or o the bike. To remove the battery, turn the key to the unlocked position,
pull the lever and take the battery out.
The battery should be recharged after each use, so it is ready to go the full range for your next ride. There
is no memory eect, so charging the battery after short rides will not cause damage.
Charging the battery normally takes 3-7 hours.
The charge indicator lights will show red light while the battery charges. When charging is complete, the
indicator light will turn green. Ensure the light faces upward when charging.
Remove the charger from the battery within one hour of the green light indicating a complete charge.
The charger is designed to automatically stop charging when the battery is full, but unnecessary wear of
the charging components could occur if the charger is left attached to the battery and a power source for
longer than 12 hours.
Indicator light on the battery: Blue - More than 66%. Green - 33%-66%. Red - Less than 33%
Never charge a battery for more than 12 hours at a time.
DO NOT leave a charging battery unattended.
15
Use caution to avoid damage to battery connector terminals, which are exposed when the battery is
unlocked and removed from the frame of the bike, In the case of damage to the terminals or battery
mounts, please discontinue use and contact Aventon Support immediately
REMOVING THE BATTERY
Ensure the bike is turned o , turn the key to the unlocked position.
Pull the battery lever and gently pull the battery outwards of the tray with one hand holding the battery.
Make sure it won't hit the fork.
DO NOT touch or damage the “+” and “-” terminal contacts on the top of the battery and keep them clear
of debris.
WHEN INSTALLING THE BATTERY ONTO THE BIKE
DO NOT force the battery into the tray; slowly align and gently push the battery down into the tray.
Make sure there is no space between battery and tray, confirm battery has been fully secured on the tray.
Ensure the battery has been properly secured to the bike before each use by carefully pulling outwards
on the battery with both hands once locked.

16
LONG-TERM BATTERY STORAGE
If storing your bike from Aventon Bikes for longer than two weeks at a time, follow the instructions below
to maintain the health and longevity of your battery. Charge (or discharge) the battery to approximately 75%
charged.
DO NOT leave the battery attached to the bike frame. Remove it from the bike during long-term storage.
Store the battery in a dry, climate controlled, indoor location in between 50˚F - 70˚ F (10˚C -25˚C). Check
the battery every month, and if necessary, use the Aventon Bike Charger to charge the battery to 75%.
Please follow the above instructions for storing your bike and battery from Aventon Bikes.
Failure to follow proper battery storage procedures can result in a non-functional battery.
Replacement will not be convered under warranty.
If the battery is physically damaged, non-functional, performing abnormally, or was dropped
or involved in a crash, with or without obvious signs of damage, please discontinue use and
charging and contact Aventon Bikes immediately.
DO NOT cover up the charger while it is charging. The charger air cools and needs to be
on a hard, flat surface in an open space. Use the charger with the indicator light facing upward.
DO NOT use when the charger is inverted, which can inhibit cooling and reduce charger lifespan.
DO NOT open the battery housing, which will void the warranty and can result in damage to
the battery, property or cause serious injury and/or death.
this entire manual, since there are important details related to safety in the following sections.
DO NOT perform any of the steps in the Operation section of this manual until you have read
Read and understand all sections of this entire manual before operating the bike for the first time.
There are important safety warnings throughout the manual that must be followed to prevent
dangerous situations, accidents, damage to the bike, damage to property, injury, or death.
Users must follow the instructions and warnings contained in this manual for safety. Do not
attempt to operate your bike from Aventon Bikes until you have adequate knowledge of
its control and operation. Damage caused by failing to follow instructions is not covered under
warranty and could result in serious injury or death. Contact Aventon Bikes if you have any
questions about assembly or operation.
Users must become accustomed to the bike’ s power control system before operating. The
pedal assistance feature is also a powerful option and users should fully research and
understand how to operate it before first time use. Not taking the time and care to familiarize
yourself and practice the operation of the power system on your bike from Aventon Bikes can
lead to damage, serious injury, or death.
OPERATION INSTRUCTION

17
SOLTERA 7 QUICK START GUIDE
Level

18
Use Aventon APP to change speed limit, and access to more functions.
GETTING STARTED
The Soltera 7 Ebike oers pedal assist. When using pedal assist, simply start pedaling, then
tap the '+'/'-' buttons to increase or decrease the amount of pedal assist. Pedal assist will engage at
speed up to 20MPH.
The Soltera 7 Ebike is equipped with a throttle, which is mounted near the rider's left thumb,
to propel the bike without pedaling. To use the throttle, you can throttle the bike from a complete stop
up to 20MPH while in PAS 1 through 5. However, we strongly encourage you to pedal first and throttle
second.
BATTERY AND CHARGING
We recommend charging the battery o the bike indoors, in moderate temperature conditions. To
charge the battery, plug the charger into the charging port and then connect the charger to a wall
outlet. The LED indicator light will be solid red while charging and will turn solid green when
charging is completed.
MAINTENANCE AND SERVICE
Properly maintaining your Soltera 7 Ebike ensures its longevity and smooth operation. Before
assmebling your bike, please watch the "HOW TO ASSEMBLE" video we've prepared for you. If you
have questions during the assembly process, please contact Aventon at (866)300-3311 or contact link
https://support.aventon.com/contact-us
SAFETY
You should wear an approved bicycle helmet every time you ride a bicycle, regardless of the legal
requirement to do so. You should comply with local law when riding your Soltera 7 Ebike.

Parking, Storage, and Transport
Please follow these basic parking, storage, and transport tips to ensure your bike is well cared for on and
o the road.
When pushing or carrying the bike manually, turn o the power to avoid accidental acceleration from
the motor.
Turn the power and any lights o to conserve battery.
Ensure the battery is locked to the frame in the o position or use the key to remove the battery and
bring it with you for security or storing in a temperature-controlled location.
Park indoors when possible. If you must park outdoors in rain or wet conditions, leave your
ebike outside for only a few hours and then park it in a dry location as soon as possible to allow all of the
systems to dry out. As with a regular bike, an ebike used in wet conditions needs more frequent
maintenance to prevent rust, corrosion, etc. and to ensure all systems are working safely.
In public places, your bike from Aventon Bikes must be parked in accordance with local rules and
regulations.
Locking up your bike is recommended to ensure your bike is secure and the chance of theft is reduced.
Aventon Bikes makes no claims or recommendations on the proper lock hardware or procedures to secure
your bike, but we do recommend you take appropriate precautions to keep your bike safe from theft.
Do not park, store, or transport your bike from Aventon Bikes on a vehicle rack not designed for the
bike s size and weight.
Use a vehicle rack compatible with the width of tires used on your bike. Some racks may not
accommodate all tire widths.
When carrying your bike on a vehicle rack for transport, unlock and remove the battery. This will reduce
the weight of the bike, make lifting and loading easier, and allow you to protect the battery by transporting
it in the cab of a vehicle.
Avoid transporting bikes from Aventon Bikes on a vehicle rack during rain, as this may cause water
damage to the electrical components. Contact Aventon Bikes Product Support if you have questions
about preventative measures.
19
’
DRIVING RANGE
The range of your bike from Aventon Bikes is the distance the bike will travel on a single full charge of the
onboard battery. The range values in this manual are estimated based on expected usage characteristics of
bikes by Aventon Bikes. Some of the factors that aect range include in elevation, speed, payload,
acceleration, number of starts and stops, ambient air temperature, tire pressure, and terrain.
We suggest that you select a lower assistance level when you first get your bike from Aventon
Bikes to get to know your bike and travel routes. Once you become familiar with the range
requirements of your travel routes and the capabilities of your bike, you can then adjust your
riding characteristics if you desire so. The following table provides general range estimates
based on various factors. This table is meant to help owners to understand the factors that can
contribute to decreased range, but Aventon Bikes makes no claims to the range that individual
users might experience in a particular use case.
Expected Range
32km (20 mi)
48km (30 mi)
64km (40 mi)
Operating Condition(s)
Hilly Terrain
Heavy Payload
Windy
High Pedal Assist
Level/HighThrottle Use
Flat Terrain
Normal Payload
Not Windy
Medium Pedal Assist
Level Moderate Throttle Use
Flat Terrain
Normal Payload
Not Windy
Low Pedal Assist
Level/Minimal Throttle Use

Regular inspection and maintenance are key to ensure Aventon Bikes function as intended, and to
reduce wear and tear on their systems. Recommended service intervals are meant to be used as
guidelines. Real world wear and tear, and the need for service, will vary with conditions of use. We
generally recommend inspections, service, and necessary replacements be performed at the time
or mileage interval that comes first in the following table.
Notice: Before every ride, and after every 25-45 miles (40-72 km), we advise following the pre-ride
safety checklist.
Basic Bike Care
If you do not have the experience, skill, and tools to complete maintenance and adjustment of
your bike, Aventon Bikes strongly recommends having a certified, reputable bike mechanic maintain,
tune, and ensure the bike is safe to ride.
Recommended Service Intervals
Pre-Ride Safety Checklist
20
USER MAINTENANCE AND SERVICE INSTRUCTIONS
Interval
Inspect
Service
Replace
Weekly,
160-321
km (100-
200 mi)
-
Check hardware for proper torque.
-
Check drivetrain for proper alignment and
function (including the chain, freewheel, chainrin
g,
and derailleur).
- Check wheel trueness and for quiet
wheel
operation (without spoke noise).
- Check if the brakes are functional.
- Check condition of frame for any damage.
- Bleed brake
- Clean frame by wiping frame
down with damp cloth.
- Use barrel adjuster(s) to tension
derailleur/brake cables if needed.
- Replace any components
conrmed by Aventon Bikes
Product Support or a certied,
reputable bike mechanic to be
damaged beyond repair or
broken.
Monthly,
402-1207
km (250-
750 mi)
- Check brake pad alignment, brake cable tension.
- Check bike is shifting properly, proper derailleur
cable tension.
- Check chain stretch.
- Check brake and shifter cables for corrosion or
fraying.
- Check spoke tension.
- Check accessory mounting (rack mounting bolts,
fender hardware, and alignment).
- Clean and lubricate drivetrain.
- Check crankset and pedal torque.
- Clean brake and shift cables.
- True and tension wheels if any
loose spokes are discovered.
- Replace brake and shift
cables if necessary.
- Replace brake pads if
necessary.
Every 6
Months,
1207-2011
km (750-
1250 mi)
- Inspect drivetrain (chain, chainring, freewheel,
and derailleur).
- Inspect all cables and housings.
- Standard tune-up by certied,
reputable bike mechanicis
recommended.
- Grease bottom bracket.
- Replace brake pads.
- Replace tires if necessary.
- Replace cables and housings
if necessary.
Table of contents
Other aventon Bicycle manuals

aventon
aventon Level User manual

aventon
aventon PACE 350 User manual

aventon
aventon Pace 350/500 User manual

aventon
aventon SINCH User manual

aventon
aventon Aventure User manual

aventon
aventon PACE 350 User manual

aventon
aventon PACE 350 User manual

aventon
aventon PACE 500 User manual

aventon
aventon Aventure User manual

aventon
aventon Pace 350 V2 User manual


