AVer PTZ Management User manual

AVer PTZ Management
User Manual

COPYRIGHT
© 2022 AVer Information Inc. All rights reserved.
All rights of this object belong to AVer Information Inc. Reproduced or transmitted
in any form or by any means without the prior written permission of AVer
Information Inc. is prohibited. All information or specifications are subject to
change without prior notice.
TRADEMARKS
“AVer” is a trademark owned by AVer Information Inc. Other trademarks used
herein for description purpose only belong to each of their companies.
DISCLAIMER
No warranty or representation, either expressed or implied, is made with respect to
the contents of this documentation, its quality, performance, merchantability, or
fitness for a particular purpose. Information presented in this documentation has
been carefully checked for reliability; however, no responsibility is assumed for
inaccuracies. The information contained in this documentation is subject to change
without notice.
In no event will AVer Information Inc. be liable for direct, indirect, special, incidental,
or consequential damages arising out of the use or inability to use this product or
documentation, even if advised of the possibility of such damages.

More Help
For FAQs, technical support, software and user manual download, please visit:
Headquarters
Download Center: https://www.aver.com/download-center
Technical Support: https://www.aver.com/technical-support
USA Branch office
Download Center: https://www.averusa.com/education/support
Technical Support: https://averusa.force.com/support/s/contactsupport
Europe Branch office
Download Center: https://www.avereurope.com/download-center
Technical Support: https://www.avereurope.com/technical-support
Contact Information
Headquarters
AVer Information Inc.
https://www.aver.com
8F, No.157, Da-An Rd., Tucheng Dist., New Taipei City 23673, Taiwan
Tel: +886 (2) 2269 8535
USA Branch office
AVer Information Inc., Americas
https://www.averusa.com
668 Mission Ct., Fremont, CA 94539, USA
Tel: +1 (408) 263 3828
Toll-free: +1 (877) 528 7824
Technical support: support.usa@aver.com
Europe Branch office
AVer Information Europe B.V.
https://www.avereurope.com
Westblaak 134, 3012 KM, Rotterdam, The Netherlands
Tel: +31 (0) 10 7600 550
Technical support: eu.rma@aver.com
Japan Branch Office
https://jp.aver.com
160-0023 3-2-26 7
Tel: +81 (0) 3 5989 0290
: Support.EDU.JP@aver.com
Vietnam Branch Office
Công ty TNHHAVer Information (Việt Nam)
Tầng 5, 596 Nguyễn Đình Chiểu, P.3, Quận 3, Thành phốHồChíMinh 700000, Việt Nam
Tel: +84 (0)28 22 539 211

Contents
PREFACE................................................................................................................. 1
MINIMUM SYSTEM REQUIREMENT.................................................................... 1
DOWNLOADING THE APPLICATION ................................................................... 2
HARDWARE CONNECTION .................................................................................. 3
INSTALLATION........................................................................................................ 4
Install AVer PTZ Management.............................................................................. 4
GETTING STARTED ............................................................................................... 5
Login..................................................................................................................... 5
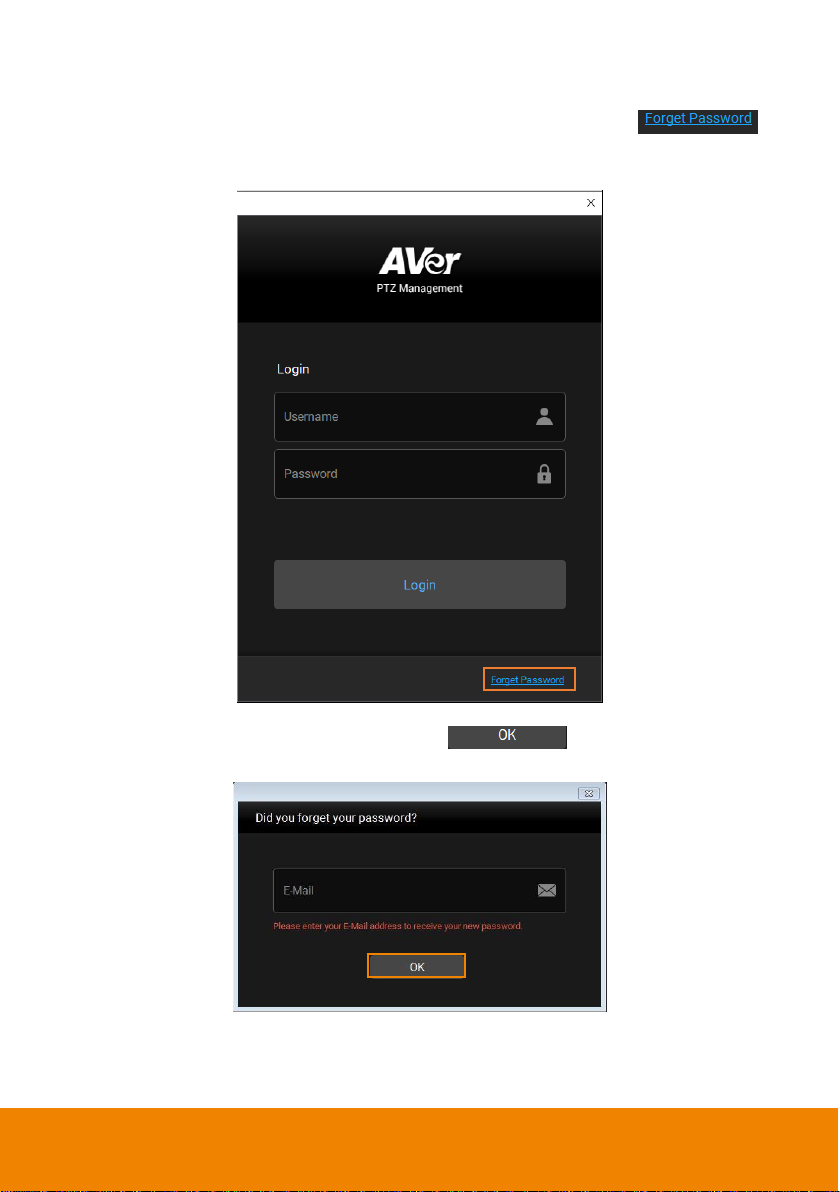
Forget Password............................................................................................. 6
Main Functions Introduction ................................................................................. 7
Camera........................................................................................................... 8
Control Panel ........................................................................................ 10
Setup ............................................................................................................ 14
Add Cameras........................................................................................ 15
Group Cameras .................................................................................... 20
Import/Export Camera Profile ............................................................... 22
User Account Management................................................................... 24
Configure System Settings ................................................................... 25
Management................................................................................................. 26
System Notifications ............................................................................. 27
Firmware Update .................................................................................. 28
Scheduling ............................................................................................ 29
TROUBLESHOOTING .......................................................................................... 31

1
PREFACE
AVer PTZ Management is a software that allows you to manage and control
multiple AVer cameras through the network. You can update, setup or group the
connected cameras anywhere as long as the network is available.
MINIMUM SYSTEM REQUIREMENT
PC hardware and software requirement:
CPU: Intel®Core™i5 CPU or above
RAM: 4G
HDD: 10G (Free Space)
Network card: 100M bps
OS: Windows®7, 8, 10, 11 (64 bits)

2
DOWNLOADING THE APPLICATION
You can find and manage the AVer cameras via AVer PTZ Management.
Download and install AVer PTZ Management at the client (PC/laptop) site.
Visit our download center (see the URL below) to download AVer PTZ
Management.
Headquarters: https://www.aver.com/download-center
USA: https://www.averusa.com/pro-av/support
Europe: https://www.avereurope.com/download-center
[Note] AVer IPCam Utility application will be installed along with AVer PTZ
Management. Users can set up camera IP via IPCam Utility.

3
HARDWARE CONNECTION
Please make sure all devices are well-connected and powered on.
Install “AVer PTZ Management”application.
The server site IP needs to be a public IP address, if the client site and
server site are not on the same LAN (different locations).
PTZ300(N) Series
Router/PoE Switch
(LAN )
Server Site
AVer PTZ Management
TR/PTC300(N) Series
PTC500/115 Series

4
INSTALLATION
Install AVer PTZ Management
1. After downloading AVer PTZ Management, double-click to start the
installation. Follow the on-screen instructions to complete the installation.
Select “I accept the terms in the license agreement” and click “Next”. If you
allow us to collect data, select “I agree”. [Note] You can later disable data
collection if required. Please refer to Usage Data in the Configure System
Settings chapter for more details.
2. After installation, theAVer PTZ Management icon will be displayed on
the desktop.
3. Double-click to launch AVer PTZ Management.

5
GETTING STARTED
Login
1. Double-click on your desktop to launch AVer PTZ Management.
2. Enter your User Name and Password (whose default values are both admin).
Click “Login.”
[Note] User name and password remain admin even if your device changes.
[Note] The recommended monitor resolution to view AVer PTZ Management is
1920x1080. Some layout will be incomplete in the 1366x768 resolution.
3. For first time login, please enter your email address in case you need to
request for “Forget Password”.

6
Forget Password
If the login password of AVer PTZ Management is forgotten, click
hyper link on the login dialog.
Enter the E-mail address and then click the button to receive your
new password.

7
Main Functions Introduction
AVer PTZ Management provides three main functions, including Camera, Setup
and Management.
Camera: You can use the Camera page to control the connected cameras and
display camera live views. For more details, please refer to Camera.
Setup: You can use the Setup page to add cameras or group the connected
cameras. You can also configure some system settings using this page. For more
details, please refer to Setup.
Management: Under Management, you can view the connected camera
information such as camera name, IP information, firmware version, camera status
and etc.. You can set up system notifications, update camera firmware, reset
camera value to factory default, reboot the camera, or set up schedules to power
on/off/reboot the cameras. For more details, please refer to Management.

8
Camera
You can use the Camera page to control the connected cameras and display
camera live views.
Camera List: After adding cameras to the system, you can see the added
cameras on the Camera List. If single-view is selected for the Layout, you can also
click on a camera to display camera live view on the single-view layout. To add
cameras, please refer to Add Cameras.
Switch Group: After creating groups to the system, you can select a group to
display all the camera live view included in the selected group. To create a group,
please refer to Group Cameras.
Switch Layout: Three layout options are provided, Single-View, Quad-View and
16-Division View. You can also use the “Switch Layout Page”buttons to switch
between layout pages. For example, if you have added 12 cameras and
Quad-View is selected, there will be 3 Quad-View pages. Click the “Switch Layout
Page”buttons to display between Layout page 1 (camera 1-4), Layout page 2
(camera 5-8) and Layout page 3 (camera 9-12).
Camera List
Switch Group
Switch Layout
Live View Window
Switch Layout Page
Audio Mute/Unmute
About
Logout
Control Panel

9
Live View Window: The live view of the added cameras will be displayed here.
For Quad-View and 16-Division View, double-click on a channel can display the
channel in Single-View. To return to the previous layout view, double-click on the
channel again.
Audio Mute/Unmute: Select a camera first and then click to mute or unmute the
audio of the selected camera. To select a camera on the Live View window, directly
click on a camera, the selected camera will be highlighted with a blue frame.
About: Click to see more info about AVer PTZ Management.
Logout: Click to logoutAVer PTZ Management.
Switch Layout Page: Click to switch between layout pages. For example, if you
have added 12 cameras and Quad-View is selected, there will be 3 Quad-View
pages. Click the “Switch Layout Page”buttons to display between Layout page 1
(camera 1-4), Layout page 2 (camera 5-8) and Layout page 3 (camera 9-12).
Control Panel: Select a camera first and then use the function on the Control
Panel to control the selected camera. For more details, please refer to Control
Panel.

10
Control Panel
You can use the Control Panel to control the camera selected on the Live View
window. Functions on the Control Panel are described as below.
To start using the Control Panel:
1. Select a camera on the Live View window by clicking on it, the selected
camera will be highlighted with a blue frame.
2. You can start using the Control Panel to control the selected camera.
(1)
(2)
Snapshot
Navigation/Home Buttons
Pan/Tilt Speed
Zoom
Focus
Go to Preset Positions
Tracking Control

11
Snapshot: Click to take a snapshot of the selected camera. The snapshot images
will be stored in the local system. To change the snapshot image directory, please
refer to Snapshot Folder in the Configure System Settings chapter.
Navigation/Home Buttons: Use the navigation buttons to control (pan/tilt)
camera direction. Click the button to go back to Home position.
Pan/Tilt Speed: Adjust the moving speed when using the Navigation buttons to
pan/tilt the camera.
Zoom: Click the + or –buttons to zoom in or zoom out.
Focus: Click on the “Auto”button to enable (blue button) or disable (gray button)
the Auto Focus mode. InAuto Focus mode (blue Auto button), the camera will
automatically adjust camera focus. In Manual Focus mode (grayAuto button), you
can manually click the + or –button to focus near or far.
Go to Preset Positions: AVer PTZ Management supports up to 256 preset
positions. You can control the camera to turn to the pre-configured preset positions.
For more details, please refer to Perform Go To Preset Function later in this
chapter.
Tracking Control: AVer PTZ Management allows users to lock on a target
presenter and track with his/her movement.
Tracking: Select On/Off to enable/disable the Tracking function.
Mode: Select a tracking mode.
-Presenter: Camera will focus on the presenter and track the presenter’s
movement.
-Zone: Camera will follow the presenter only when he/she moves from
one pre-configured zone into another. Otherwise, it focuses on the
content of, for instance, the whiteboard, the projector screen and etc..
-Hybrid: You can benefit from the advantages of both the Presenter and
Zone modes. Under Hybrid Mode, the camera tracks and captures the
presenter’s movement. As the presenter enters the pre-configured zone,
the camera navigates to focus on the content of the zone, such as the
whiteboard and the projector screen.
Auto Zoom: Auto Zoom is only available under Presenter and Hybrid
modes. When Auto Zoom is On, the camera can zoom in and out
automatically to keep up with the presenter’s walking back and forth and
body language. When Auto Zoom is Off, the camera stops zooming in/out
automatically and shoots the presenter according to the shot size of Preset
1 so that the camera footage remains stable.

12
Click Track: Click the “Click Track”button to enable (blue button) or disable
(gray button) the change target function. When camera has focused on a
target, the target will be locked on with a red frame. Other recognized
targets will be locked on with a blue frame. If you want to select a new target
for the camera to track, click on the “Click Track”button to enable (blue
button) the change target function, simply click on a new target in the
camera live view, the new target will be locked on with a red frame.
[Notes]
Cameras below don’t support Click Track:
USA: TR530, TR320, PTZ310, PTZ330
Non-USA: PTC500s, PTC115, PTZ310, PTZ330
Click Track only works under Single-View.

13
Perform Go to Preset Function
To perform the Go to Preset function, follow the steps below:
1. Ensure the preset positions of the camera have been pre-configured. You can
use the “Go To Web”button to enter the camera Web interface and then
configure the preset positions.
a. Under Setup > Device, select a camera from the Device List and then click
the Go To Web button. The system will direct to the camera Web interface.
b. On the Live View page of the camera, click the “Preset”tab on the bottom
panel to set up preset positions.
Input a preset number in the “Save Preset”input box first, use the direction
and zoom in/out buttons to move the camera view to the desired position,
and then click the “Save”button to save this position.
[Note]
Each camera’s web setting page may vary. Please refer to camera’s user
manual for more details.
Up to 256 (0~255) preset points can be set up.
2. To perform the Go to Preset function, select a camera on the Live View window
first. On the Control Panel, click on a preset number, the camera will turn to the
clicked preset position. You can also enter a preset number (0~255) in Go to
field and then press the Enter key on your keyboard.
1
3
2

14
Setup
You can use the Setup page to add cameras or group the connected cameras.
You can also configure some system settings using this page.
Assign the snapshot folder, select language, update
the supported camera list, adjust resolution, and
enable/disable the collection of usage data
Add, edit and delete
user information
Search, add, delete
and group cameras
Device List
The added cameras will be displayed here
All Devices:
Click to display all the added cameras
Groups: Click to display the cameras
added to the group
Select a camera and then click “Go
To Web”to enter camera Web UI

15
Add Cameras
You can add both AVer and NDI®cameras to the AVer PTZ Management
application. There are four ways to add cameras:
Manually add cameras
Automatically add cameras
Using NDI Manager to add pre-grouped NDI®cameras
Using the Import function to import camera profile. Refer to Import/Export
Camera Profile for more details
[Note] Both AVer and NDI®cameras (client sites) have to be connected on the
same LAN with the PC downloaded with AVer PTZ Management (server site).
To manually add cameras:
1. Under Setup > Device, click the “Add”button.
2. If you want to add an AVer camera, select AVer PTZ; if you want to add an NDI®
camera, select NDI.
3. Input the camera information.

16
4. Click “Save”. The camera will be added to the Device List.
5. Follow steps 1~4 to add more cameras.
6. If you want to edit or delete a camera, on the Device List, select a camera and
then click the “Delete”or “Edit”button.
To automatically add cameras:
You can automatically search for the cameras connected on the same LAN and
then add them to the PTZ Management application.
1. Under Setup > Device, click the “Add”button.
2. Click the “Auto Search”button. The application will automatically search for
both the AVer PTZ cameras and NDI®cameras connected on the same LAN.
3. The searched cameras will be displayed on the list. You can click AVer PTZ or
NDI to filter between AVer cameras and NDI cameras.
Table of contents
Other AVer Digital Camera manuals