AVIAIR AVVW-330 User manual
AVVW-330
Read & Keep These
Important Instructions
Electrolyzed
Hydroxyl Radical Technology
Food Ingredients
Sterilizer
Streilization by
Hydroxyl Radicals
Using only water
no chemicals added

01
Caution
Please operate in accordance with the following instructions
to prevent damaging the product and potential danger to user.
Use municipal water from the tap for electrolysis purification. Do not use
softened water, distilled water, or dirty water.
Water residue may remain inside the electrolysis generator from production
testing. This is normal and does not affect product performance.
If control panel is wet, operating buttons may be affected. Wipe dry before use.
In areas with hard water, it is recommended to use vinegar or citric acid to
clean the electrolysis generator maximum every two months to remove any
mineral buildups.
There may be a slight scent of chlorine in the cleaning process, which is
caused by municipal water treatment residue. This does not affect the
cleansing performance.
Do not insert any foreign objects into the gap of electrolysis generator to
prevent potential electric shock and malfunction.
Do not immerse control unit in liquids, it may cause electric shock or short circuit
and damage the machine.
Do not wipe the product with corrosive liquid cleaners.
Do not alter, disassemble, or repair product to prevent potential hazard
causing fire or electric shock.
Do not plug or unplug power with wet hands to avoid electric shock.
Do not pull the power cord to unplug.
Unplug the power supply before installation, maintenance, or not in use.
Ensure the power supply is within AC 100~240V / 50~60Hz
Do not power on with damaged power cord or power plug to avoid electric
shock , short circuit, and potential fire.
Do not use near stoves, fire, or under direct sunlight.
If the main control unit or accessories are damaged, please contact your
local dealer.
Do not add salt or detergent to water when using.
Children or any person with a physical, sensory, or mental disability should
not use the device unsupervised.

Dimensions
Power
Adaptor Model
Power In
Model Weight
Voltage
222 x 100 x 45 mm
KA3601A-1502400EU
100-240V 50/60Hz
Maximum water
7L
AVVW-330 675g
Product
Functions
Bacteria Removal*
Pesticide Removal**
Hormone Removal***
Proven by independent labs, tested :
* E. Coli / Candidia Albicans /
Staphylococcus aureus / Salmonella
** DDVP / Dimethoate
***
Clenbuterol
15V 2.4A
Specifications
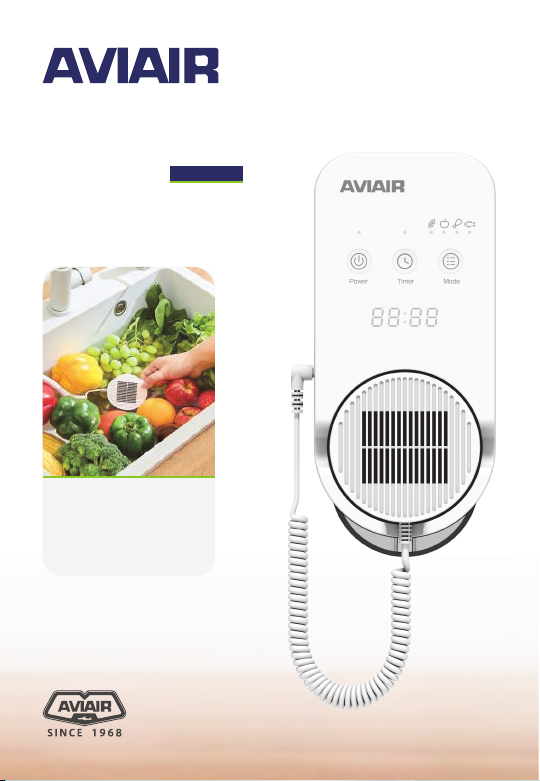
TIMER MODEPOWER
Descriptions
Main Control Unit
Power Button
Timer Button
Mode Button
Electrolysis Generator
Plug In
Water
Collection Tray
Digital Display
Screen
Electrolysis
Generator
Wall Mount Plate
Screw Holes
3M Tape Strip
3M Tape Strip
Power Plug In
02

03
03
Quick Installation Guide
wall mount with screws
At 20 in. (50cm) above the sink,
use the wall mount plate to mark
screw positions and drill holes.
Insert the expandable screw caps
into the holes for a tight fit.
1 2
Position the wall mount plate
accurately and tighten the screws.
Insert adaptor jack-plug into
the back side and push cable
into the recessed channel.
3 4
Properly hang the main control
unit on to the wall mount plate.
Press in electrolysis generator
jack-plug on to the left side.
6
* For installation on ceramic tiles, recommend to use 3M tapes.
* To wall mount on ceramic tiles with screws, must use
proper drilling tools to avoid cracks.
* Manufacturer does not assume any responsibilities for tile cracks.
WARM REMINDER
Finally, plug the power adaptor into the wall and you are
ready to start sterilizing your favorite food ingredients!
5

04
Quick Installation Guide
wall mount with 3M tapes
Finally, plug the power adaptor into the wall and you are
ready to start sterilizing your favorite food ingredients!
At 20 in. (50cm) above the sink,
wipe clean free of any oil or dust
particles, await surface to dry.
Peel off one side surface layer
of 3M tapes and stick on to
the wall mount plate.
1
Properly hang the main control
unit on to the wall mount plate. Press in electrolysis generator
jack-plug on to the left side.
Peel off both remaining tape
layers from the wall mount
plate and adhere to the wall.
Insert adaptor jack-plug into
the back side and push cable
into the recessed channel.
34
* Allow 12 hours for 3M tapes to firm up for secure positioning
before hanging on the main control unit.
* If the wall is painted, or other than ceramic tiles, recommend
to wall mount with screws.
WARM REMINDER
2
5 6
Table of contents
Popular Laboratory Equipment manuals by other brands


Belden
Belden HIRSCHMANN RPI-P1-4PoE installation manual

Koehler
Koehler K1223 Series Operation and instruction manual

Globe Scientific
Globe Scientific GCM-12 quick start guide

Getinge
Getinge 86 SERIES Technical manual

CORNING
CORNING Everon 6000 user manual

Biocomp
Biocomp GRADIENT MASTER 108 operating manual


