Avid Power ACD318-DB User manual

MODEL: ACD318-DB
SAVE THIS MANUAL
You will need this manual for safety instructions, operating procedures and warranty.
Put this manual and the original sales receipt in a safe dry place for future reference.
Operator's Manual
20V CORDLESS DRILL/DRIVER

1
TABLE OF CONTENTS
SCHEMATIC DRAWING....................................................................P16
MAINTENANCE.................................................................................P13
IMPORTANT SAFETY INSTRUCTIONS..........................................P2
SPECIFICATIONS.............................................................................P7
FUNCTIONAL DESCRIPTION..........................................................P8
OPERATION......................................................................................P9
SAFETY INSTRUCTIONS FOR CORDLESS DRILL/DRIVER.........P5
PARTS LIST.......................................................................................P15
SAFETY INSTRUCTIONS FOR BATTERIES AND CHARGER.......P6
ASSEMBLY.......................................................................................P8

2
IMPORTANT SAFETY INSTRUCTIONS
Read and understand all instructions. Failure to follow all
instructions listed below may result in serious personal injury.
WORK AREA
1. Keep your work area clean and well lit. Cluttered benches and dark
areas invite accidents.
2. Do not operate power tools in explosive atmospheres, such as in the
presence of flammable liquids, gases, or dust. Power tools create
sparks which may ignite the dust or fumes.
3. Keep bystanders, children, and visitors away while operating a power
tool. Distractions can cause you to lose control. Protect others in the
work area from debris such as chips and sparks. Provide barriers or
shields as needed.
ELECTRICAL SAFETY
4. Double Insulated tools are equipped with a polarized plug (one blade
is wider than the other.) This power plug will fit in a polarized outlet
only one way. If the plug does not fit fully in the outlet, reverse the
plug. If it still does not fit, contact a qualified electrician to install a
polarized outlet. Do not change the plug in any way. Double
Insulation eliminates the need for the three wire grounded power
cord and grounded power supply system.
5. Avoid body contact with grounded surfaces such as pipes, radiators,
ranges and refrigerators. There is an increased risk of electric shock
if your body is grounded.
6. Don’t expose power tools to rain or wet conditions. Water entering a
power tool will increase the risk of electric shock.
7. Handle the cord carefully.Never use the cord to carry the tools or
pull the plug from an outlet. Keep cord away from heat, oil, sharp
edges or moving parts. Replace damaged cords immediately.
Damaged cords increase the risk of electric shock.
When using electric tools, machines or equipment, basic safety
precautions should always be followed to reduce the risk of fire,
electric shock, and personal injury. Completely read the manual
before proceeding to use this tool. KEEP THESE INSTRUCTIONS.

3
IMPORTANT SAFETY INSTRUCTIONS
8. When operating a power tool outside, use outdoor extensions cord
marked “W-A” or “W”. These cords are rated for outdoor use and
reduce the risk of electric shock.
PERSONAL SAFETY
9. Stay alert, watch what you are doing, and use common sense when
operating a power tool. Do not use tool while tired or under the
influence of drugs, alcohol, or medication. A moment of inattention
while operating power tools may result in serious personal injury.
10. Dress properly. Do not wear loose clothing or jewelry. Contain long
hair. Keep your hair, clothing,and gloves away from moving parts.
Loose clothes, jewelry, or long hair can be caught in moving parts.
11. Avoid accidental starting.Be sure switch is off before plugging in.
Carrying tools with your finger on the switch or plugging in tools with
the switch on invites accidents.
12. Remove adjusting keys before turning the tool on. A wrench or a
key that is left attached to a rotating part of the tool may result in
personal injury.
13. Do not overreach.Keep proper footing and balance at all times.
Proper footing and balance enables better control of the tool in
unexpected situations.
14.Use safety equipment.Always wear eye protection. Dust mask,
non-skid safety shoes, hard hat, or hearing protection must be used
for appropriate conditions.
POWER TOOL USE AND CARE
15. Use clamps or other practical way to secure and support the work
piece to a stable platform. Holding the work by hand or against your
body is unstable and may lead to loss of control.
16. Do not force tool.Use the correct tool for your application. The
correct tool will do the job better and safer at the rate for which it is
designed.
17. Do not use tool if switch does not turn it on or off. Any tool that
cannot be controlled with the switch is dangerous and must be
repaired.

4
IMPORTANT SAFETY INSTRUCTIONS
18. Disconnect the plug from the power source before making any
adjustments, changing accessories, or storing the tool. Such
preventive safety measures reduce the risk of starting the tool
accidentally.
19. Store idle tools out of reach of children and other untrained persons.
Tools are dangerous in the hands of untrained users.
20. Maintain tools with care. Keep accessories sharp and clean.
Properly maintained tools with sharp cutting edges are less likely to
bind and are easier to control. Do not use a damaged tool. Tag
damaged tools“Do not use” until repaired.
21. Check for misalignment or binding of moving parts, breakage of
parts,and any other condition that may affect the tool’s operation. If
damaged,have the tool serviced before using. Many accidents are
caused by poorly maintained tools.
22. Use only accessories that are recommended by the manufacturer
for your model. Accessories that may be suitable for one tool may
become hazardous when used on another tool.
BATTERY TOOL USE AND CARE
23. Ensure the switch is in the off position before inserting the battery
pack. Inserting the battery pack into power tools that have the switch
on may cause an accident.
24. Recharge only with the charger specified by the manufacturer. A
charger that is suitable for one type of battery pack may create a
risk of fire when used with another battery pack.
25. Use power tools only with specifically designed battery packs. Use
of any other battery packs may create a risk of injury or fire.
26. When battery pack is not in use, keep it away from other metal
objects like paper clips, coins, keys, nails, screws, or other small
metal objects that can make a connection from one terminal to
another. Shorting the terminals together may cause burns or a fire.
a. Do not use the tool in wet or damp conditions.
b. Always keep the work area free of tripping hazards.
c. When using the tool, always ensure you are wearing protective
safety equipment including safety glasses/goggles, ear muffs, dust
mask and other protective clothing including gloves and apron.

5
IMPORTANT SAFETY INSTRUCTIONS
SAFETY INSTRUCTIONS FOR CORDLESS DRILL/DRIVE
27. Under abusive conditions, liquid may be ejected from the battery;
avoid contact. If contact accidentally occurs, flush with water. If liquid
contacts eyes, additionally seek medical help. Liquid ejected from the
battery may cause irritation or burns.
SERVICE
28. Tool service must be performed only by qualified repair personnel.
Service or maintenance performed by unqualified personnel could
result in a risk of injury.
29. When servicing a tool, use only identical replacement parts. Follow
instructions in the Maintenance section of this manual. Use of
unauthorized parts or failure to follow Maintenance instructionsmay
create a risk of electric shock or injury.
Use a dust mask or respirator for applications which generate dust.
chuck or drill bit. Your hand may be lacerated or may cause injury.
across your legs.Unstable support can cause loss of control and injury.
and walls or posts. Should the socket or bit become bound in the work,
the reaction torque of the tool could crush your hand or leg.
Cordless Drill before switching the tool “ON”. Keys or wrenches can fly
away at high velocity striking you or a bystander.
with both hands.
where the cutting tool may contact hidden wiring. Contact with a "live"
wire will also make exposed metal parts of the tool "live" and shock the
operator.
grease.

6
SAFETY INSTRUCTIONS FOR CORDLESS DRILL/DRIVE
SAFETY INSTRUCTIONS FOR BATTERIES AND CHARGER
socket or bit could become entangled with clothing and injury may
result.
switch in the locked or “OFF” position before making any assembly
adjustments, changing accessories, performing any inspection,
maintenance or cleaning procedures. Such preventive safety measures
reduce the risk of starting the tool accidentally.
the rain, snow, wet or damp environments, or immersed in liquid.
BATTERY
1. Never attempt to open or modify battery for any reason. Released
electrolyte is corrosive and may cause damage to eyes and skin. It
may be toxic if swallowed.
2. Under extreme conditions, battery leakage may occur. When you
notice liquid on the battery, proceed as follows:
• Carefully wipe the liquid off using a cloth. Avoid skin contact.
• In case of skin or eye contact, follow the instructions below.
• The battery fluid, a 25-30% solution of potassium hydroxide, can
be harmful. In case of skin contact, immediately rinse with water.
Neutralize with a mild acid such as lemon juice or vinegar. In case of
eye contact, rinse abundantly with clean water for at least 10 minutes.
3. Do not expose to water.
4. Do not store in locations where the temperature may exceed 40°C
(104°F).
5. Charge at room temperature: 0°C - 45°C (0°F-140.6°F). It is normal
for the battery charger to hum and be warm but not hot during
operation.
6. Charge only using the charger provided with the tool.
7. Before charging, make sure that the battery is dry and clean.
8. Use only the battery supplied with your tool.

7
SPECIFICATIONS
9. Exercise care in handling and storing batteries in order not to short
them with conductive materials such as rings, keys, coins. There is a
real risk of the battery or the conductor overheating, causing fire or
burns.
10. Do not dispose of battery in fire. It may explode. Follow instructions
and regulations given by local authorities concerning environmental
protection. Dispose of old batteries at an appropriate waste disposal
facility.
CHARGER
1. Use your charger only to charge batteries supplied with your tool.
Other batteries could burst, causing personal injury and damage.
2. Never attempt to charge a non-rechargeable battery.
3. Have defective cords replaced immediately.
4. Do not expose to water.
5. Do not open the charger.
6. Indoor use only. Do not recharge the battery in rain or in wet
conditions.
SAFETY INSTRUCTIONS FOR BATTERIES AND CHARGER
20V 1.5 Ah lithium-ion battery
3/8"(10mm) keyless chuck
No Load Speed: 0-350 RPM/0-1350 RPM
16+1-position adjustable torque clutch
Double-ended driver bit
Bright LED work light
3-5 hours charging time
1pc 20V Drill/Driver
1pc Double-end driver bit
2pcs 20V lithium-ion battery packs
1pc Charger
1pc Instruction manual
1pc Hook
33pcs Accessories set(32pcs 1"Screwdriver Bits; 1pc extension bar)
INCLUDES

8
FUNCTION
ASSEMBLY
TO INSTALL/REMOVE BATTERY PACK (SEE FIG.2)
To install:
Place the battery pack in the tool. Align the rib on the battery pack with
groove in the battery port.
Make sure the latches on the battery pack snap in place and that the
battery pack is secured in the tool before beginning operation.
To remove:
Depress the latches in the front of the battery pack to release the battery
pack and remove it from the tool.
A. 3/8” (10 mm) chuck
B. Double-end driver bit storage
C. Torque regulation ring
D. Torque indicator scale
E. LED work light
F. Forward / reverse switch
G. Variable speed trigger with electric brake
H. Rubber-covered handle
I. 20 volt lithium-ion rechargeable battery
J. Battery lock button
K. Hook ACD
F
H
B
K
I
J
E
G

9
ASSEMBLY
OPERATION
BATTERY PACK
1. The battery is not fully charged. Before first use, the battery pack
requires 3-5 hours charging time to be fully charged.
Subsequent recharging needs 1.5 hours for the battery to be
fully charged.
2. Always switch to a fresh battery when tool performance begins
to diminish. Severe heat is most destructive to a battery; the
more heat generated, the faster the battery loses power. A
battery that gets too hot can have a shortened life.
3. Never over-discharge a battery by using the tool even after tool
performance has decreased. Do not attempt to discharge a tool’s
battery by continuing to pull on the tool trigger. When tool
performance begins to diminish, stop the tool and recharge the
battery for optimal performance.
1. Batteries will reach full performance after about five charge/discharge
cycles.
2. Always have drill rotation switch in neutral/lock position when
removing or inserting battery to avoid unintentional starting.
3. To remove battery pack from the tool, press the lock spring buttons
and pull out.
4. To insert, simply push pack in until lock spring clicks.
5. The battery charger consists of two parts:
A.a switching adapter
B.a charging stand
6. To recharge battery, connnect the switching adapter/plug low-voltage
lead to the charging stand.

10
OPERATING
7. Insert the switching adapter/plug into a correct household current
receptacle.
8. The end of the battery pack has positive and negative terminal
markings on it. Align these with the identical markings on the top of
the charging stand and insert pack into base. (Pack will not insert
properly if reversed)
9. The green light is the power indicator. When the charger is
connected to AC household current, the green light is on (Fig.3).
10. The red light is the charge indicator. When the battery is properly
inserted into the charger and charging, the red light is on.
11. Normal charging time is 3 to 5 hours. The charger will charge the
battery at the normal rate until charging is complete. The red light will
turn off once charging is complete. After the battery is fully charged
according to the charging time provided in the instructions, remove
the battery pack from the charging stand immediately.
Battery temperature will cool to normal.
12. When charging more than one battery pack, allow 15 minutes
between charges.
13. After many charge/discharge cycles, your battery will lose its ability
to hold a charge. It should then be replaced. Dispose of batteries at
an appropriate waste disposal facility. Do not throw batteries away in
common trash receptacles.
When the machine is obstructed, please turn off the switch right
away and check if the work piece is right. An obstruction may
cause the machine motor to be burned.
REMEMBER: This tool is cordless and does not need to be connected
to a power supply.
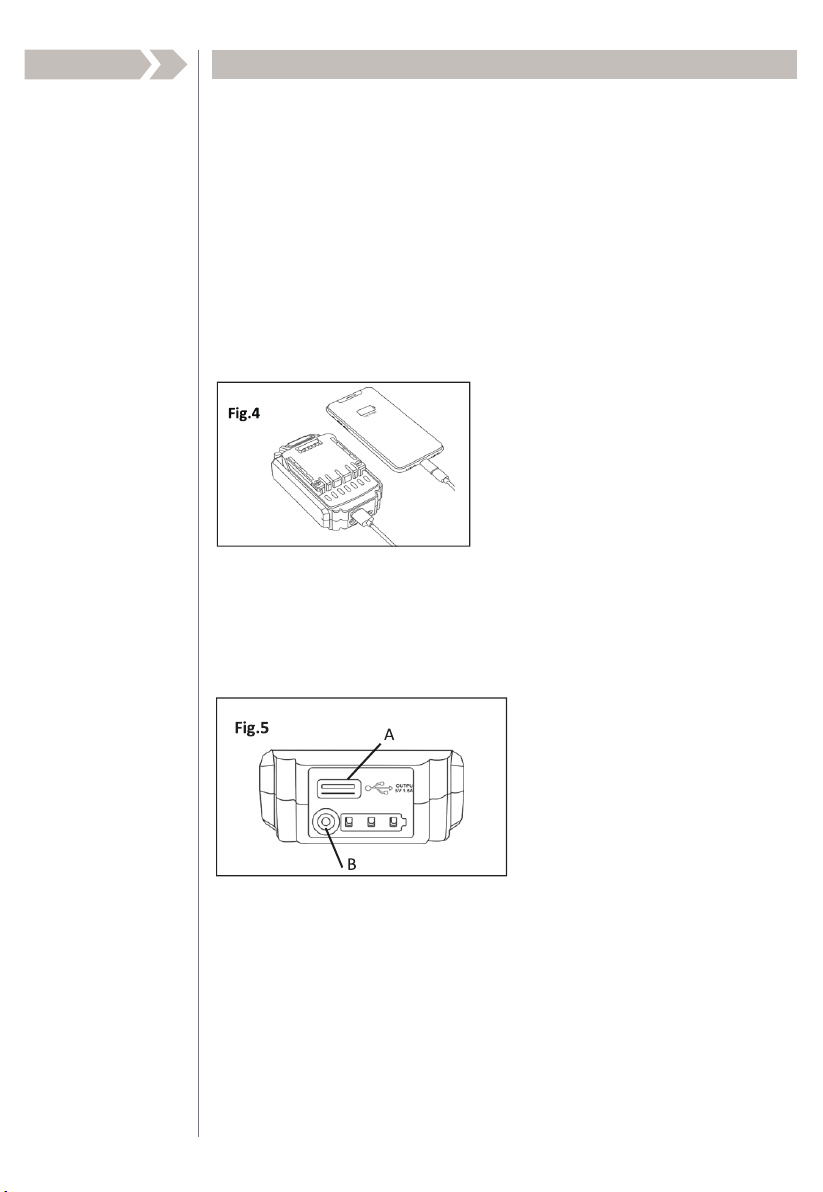
5V USB OUTPUT CHARGING
TORQUE REGULATOR
11
OPERATING
CAUTION: Do not expose either the electric tool or charger to the rain or
water.
Do not overcharge the battery as this could damage the battery's cells.
Do not force the tool. If the tool is stalling, it is possible that the battery
power is low. If so, stop working and recharge the battery pack.
To prolong the life of the tool, do not continually for work more than 20
minutes at a time.
1. Plug the device USB cable into the USB Output Port (A) on the battery
Pack (Fig.4)
1. When arrow on the top of the housing points to 1 on the Torque
indicator scale (D in the functional description), torque is at minimum
before the clutch disengages the chuck from the drive.
2. When indicator is just past 15, output is at maximum before it is
disengaged. This is useful in driving screws into different types of
material.
3. More torque will set a screw deeper into material, less torque will
prevent it stripping. Larger screws require more torque to drive than
2. Press the button (B) to display the battery level.(Fig.5) Three lights
show all power. Two lights show 50% of the charge. A lamp shows
25% of the electricity.
NOTE: Please remove the charger from the battery before checking
the battery level.
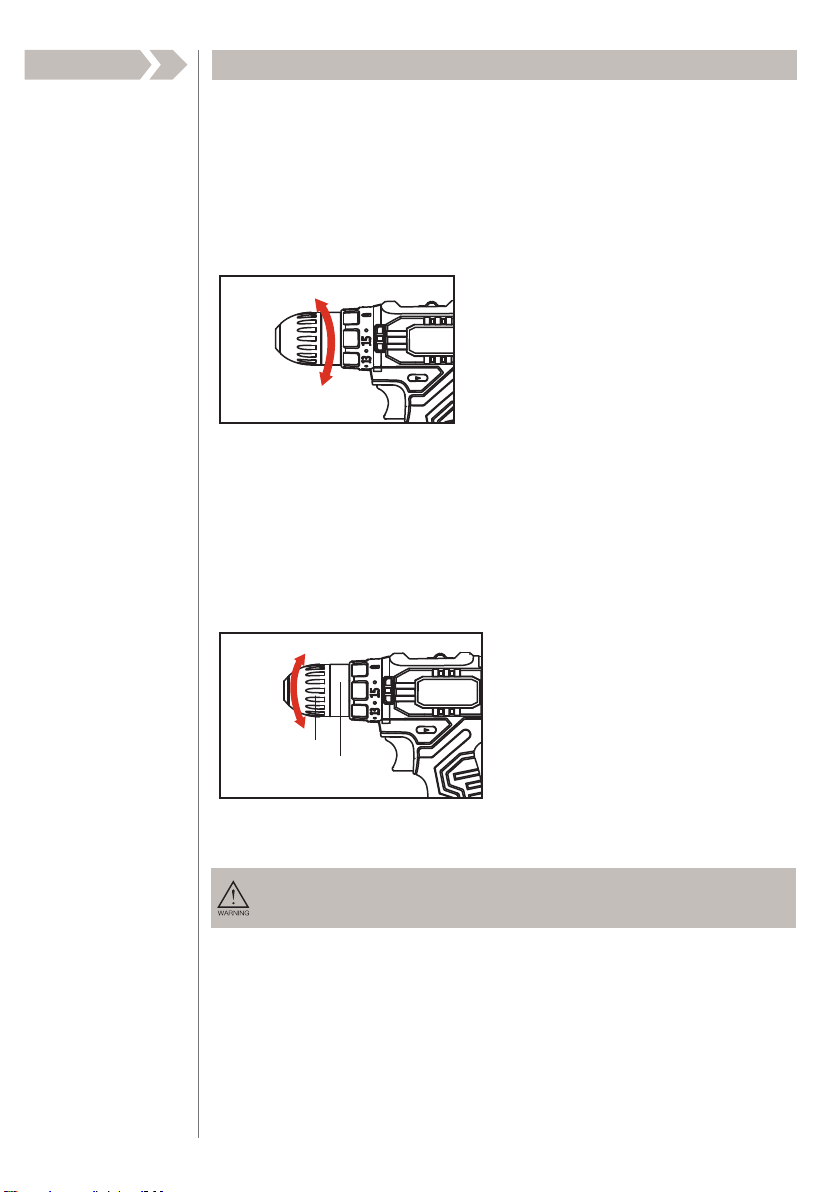
KEYLESS CHUCK
12
OPERATING
small ones. A little trial and error will show you which is the optimum
setting for the situation.
4. Release the trigger when the clicking sound indicates the chuck will
not turn further.
5. For drilling, always use the drill setting, indicated by the pictogram of
a drill bit. At this setting, the drive does not disengage from the chuck.
1. Holding ring C with one hand while another hand counter-clockwise
loose ring A and open the jaws.
2. To insert a drill bit / screwdriver bit.
3. Rotate the chuck counter-clockwise for tighten drill bit / screwdriver bit.
FORWARD/ REVERSING LEVER & TRIGGER LOCK
After tool use, lock trigger in “OFF” position to help prevent
accidental starts and accidental discharge.
For forward rotation, (with chuck pointed away from you) move the lever
to the far left.
For reverse rotation move the lever to the far right. To activate trigger lock
move lever to the center off position.
Fig.6
Fig.7
Loose
C
A
Tighten

OPERATING
1. Keep the tool clean using a soft damp (not wet) cloth. Do not use
solvents on the plastic parts.
2. Lubrication is not necessary. After long use, have an authorized service
centre maintain and lubricate the tool.
3. Should the chuck require replacement.
retaining screw.
with the jaws so they grip three of its six flat sides.
wood about 3/8" (10 mm) above that surface. Or press the drill body
13
MAINTENANCE
Do not change direction of rotation until the tool comes to a
complete stop. Shifting during rotation of the chuck can cause
damage to the tool.
on the working table and place the chuck over the edge of the table.
(Be careful with your hand!) Strike the long arm of the wrench with a
hammer so that the chuck turns counter-clockwise and unscrews from
the spindle. This may require a fairly sharp blow.

14
MAINTENANCE
4. To maintain the best performance of your rechargeable battery, protect
it from overheating, both from overcharging and during storage.
Occasionally charge the battery for 7 hours.

Repairs should be made by an authorized repair centre. Opening
this tool could invalidate your warranty.
Due to continuous product improvement, we reserve the right to
change the product specification without prior notice.
15
PARTS LIST
No. Description Qty. No. Description Qty.
1 5*23 Screw 1 13 Left housing 1
2 Chuck 1 14 Switch 1
3Threaded ring 1 15 Sounder 1
4 Chuck washer 3 16 Forward/ Reverse switch 1
5 2 speed switch 1 17 M4*10 Screw 2
6 spring 2 18 M4 Screw 2
7Gear box assembly 1 19 Hook 2
8Screw(with washer) 2 20 Driver bit support 1
9Motor gear 1 21 Driver bit 1
10 Motor 1 22 LED transparent cover 1
11 Screw 9 23 Battery 1
12 Right housing 1

16
SCHEMATIC DRAWING
1234
6
78
5
910
11
12
17
18 19
21
20
13
16
15
22
14
23

Table of contents
Other Avid Power Power Tools manuals


Popular Power Tools manuals by other brands


Atlas Copco
Atlas Copco EP6PTI32 HR10-MT Safety information

Parkside
Parkside 315570 Translation of the original instructions

B. Braun
B. Braun Manipler AZ-35W Instructions for use

Zenit
Zenit JS-1050M instruction manual

Shop fox
Shop fox SHOP FOX W1668 owner's manual

Bosch
Bosch GSH 16-28 Professional Original instructions


