Aviosys 9000A Plus User manual

IP Kamera 9000A Plus
User Guide

IP KAMERA 9000A PLUS USER MANUAL
User Guide
IP Kamera 9000A
Manual version: 1.0
Date: Apr.07, 2004
VER. 1.0.0,
- 1 -

Caution: Any changes or modifications not approved by the party
responsible for compliance could void the user’s authority to operate the
equipment.
Note: This equipment has been tested and found to comply with the limits
for FCC and CE. These limits are designed to provide reasonable
protection against harmful interference when the equipment is operated in
commercial environment.
Important Notice
1. IP Kamera 9000A is for indoor use. Note that the CMOS lens can be
damaged permanently if the camera lense is exposed directly to
sunlight. (We will not hold any responsibility if CMOS lens is damaged
by sunlight)
2. IP Kamera 9000A us not water proof. Therefore we will not hold
any damage responsibility if the camera is used under raining
condition.
3. Be sure to use the DC adapter that is provided by your dealer. We will
not hold any responsibly if wrong DC adapter is in use.
4. Be caution in handling IP Kamera 9000A for physical shocks may
occur serious damage.
5. If IP Kamera 9000A does not operate properly, please contact your
local dealer for after sale service. In all cases, you are prohibited to
disassemble the product. If so, Aviosys does not hold any
responsibility for mal-function nor service warranty.
- 2 -

IP KAMERA 9000A PLUS USER MANUAL
Table of Contents
1. PRODUCT OVERVIEW............................................................................................... 4
FEATURES ......................................................................................................
2. PHYSICAL DESCRIPTION ......................................................................................... 5
SPECIFICATION ..................................................................................................................
SYSTEM MINIMUM REQUIRNMENT .......................................................................................
3. PANEL DESCRIPTION…………………………………………………………………6
FRONT PANEL………………………………………………………………………………
BACK PANEL………………………………………………………………………………..
4. INSTALLATION………………………………………………………………………..9
PREPERATION....................................................................................................................
HARDWARE INSTALLATION .................................................................................................
5. INTERNET SET UP ................................................................................................... 13
LAN SET UP........................................................................................................................
INTERNET SET UP...............................................................................................................
6. FUNCTION…………………………………………………………………………….13
SIMPLE FUNCTION .............................................................................................................
VIDEO ADJUSTMENT………………………………………………………………………..
SECURITY SETTING ............................................................................................................
MOTION DETECTION FUNCTION...........................................................................................
7. OTHER FUNCTIONS………………………………………………………………….22
8. AOUTHORITY………………………………………………………………………….24
ADMINISTRATOR ................................................................................................................
NORMAL USER ...................................................................................................................
9. CAUTION................................................................................................................... 26
ADDITIONAL INFORMATION A: SPECIFICATION .............................................................
ADDITIONAL INFORMATION B: FAQ...................................................................................
VER. 1.0.0,
- 3 -

1. Product Overview
IP Kamera 9000A is an IP camera that has a digital web server in camera.
This camera can put up live image on-line and make remote locations
immediately accessible through standard web browsers.
IP Kamera 9000A is equipped with cutting edge technology, includes a
digital camera, web server, audio in device and optimized hardware for
image compression, and physical Ethernet connection. Therefore it does
not need to plug in front of computer, users can simply just plug into an
internet line and start oberserving from any where in the world.
FEATURES
IP Kamera 9000A features:
1. Embedded Web Server - No need PC for camera.
2. Audio in - can record live audio while video is in display
3. Support MSN & YAHOO Messenger
4. Multiple Cameras Supported
5. Multi - video from different area.
6. Layout 1x1, 2x2, 3x3, 4x4
7. Resolution - True 640x480, 352x288, 320x240, 176x144,
8. Video Quality - Low, High
9. Color adjustment: Brightness, Contrast, Hue, and Saturation
10. Motion Detection - Three-Sensitivity Level.
11.E-mail the Detected Images to preset e-Mail address.
12. FTP the Detected Images to preset FTP server.
13. Support Network - Fixed IP, DHCP or PPPoE.
14. Default HTTP Port supported-
15. Changed to fit different network.
16. Browser by Internet - IE (Internet Explore) .
17. Support Java Applet support and Active X control.
18. A Linux based server
•10/100BT LAN supported
•Built in JPEG Decoder
•Motion detection
•User able to monitor any place if select this Web Cam by using
any of Internet Browser.
•User may setup his email address in the system, let the system
notice the user when an event occur
•Provide some GPIOs for different application
- 4 -

IP KAMERA 9000A PLUS USER MANUAL
2.Physical Description
BOX CONTENT
IP Kamera package content:
! 1 x IP Kamera 9000A
! 1 x Tripot
! 1 x RJ 45 internet line
! 1 x Power DC Adopter 5V, 110~240.
! 1 x Composite Video Cable
! 1 x CD ( a. IP Editor program b. User Manual book)
! 1 x Quick Installation Guide
Minimum Requirement
≥300MHz Intel Pentium II and above
Any system can use IE( Internet Explore ) like Windows 98 / SE / 2000 / ME / XP,
or LINUX, MAC system
≥64MB memory
VGA Card:support Hi - Colors and above and direct draw
Suggest Internet Hub
Internet : one set of IP provided by your ISP
EX: xxx.xxx.xxx.xxx
VER. 1.0.0,
- 5 -

3. Panel Description
Front Panel :
1. Power indicator ( blue LED )
2. Lens ( CMOS )
Back Panel : from left to right:
1. Reset Button
2. DC Power - 5V , 110~240
3. On / Off
4. RJ 45(Cat5 Network)
5. Microphone In
Note: The Microphone Input support only audio from microphone . If input audio from
other audio device, the audio volume would be noise or over volume.
- 6 -

IP KAMERA 9000A PLUS USER MANUAL
4. Installation
Before using IP Kamera 9000A, follow bellow:
Before installation:
Reconfirm your package content
A Hub
Electricity 110 ~ 240 V
Hardware installation
1. Plug in IP Kamera 9000A ( Power ) 2. Plug in RJ 45 line to a HUB
3. Connect the other way to the computer 4. Connect your Hub into your modem.
5. Turn you computer on 6. Plug in microphone in audio in
VER. 1.0.0,
- 7 -

SOFTWARE INSTALLER
After connecting your power and RJ 45 line, please use IPEDIT program that provided
by Aviosys to find IP KAMERA 9000A’s address.
區域設定
NAME:IP KAMERA
GETEWAY:
IP:IP address now
NETMASK:
HTTP PORT1:sending address
HTTP PORT2:sending address
Set up : Step by step
- 8 -
1st step: In IE ( Internet Explorer ) / Nescape’s IP EDIT IP please type your IP: XXX.XXX.XXX.XXX
Factory setting default.
Username: administrator
Password : 1234
then you can find IP Kamera 9000’s web page.
2nd step:Press on the icon Active X Vision
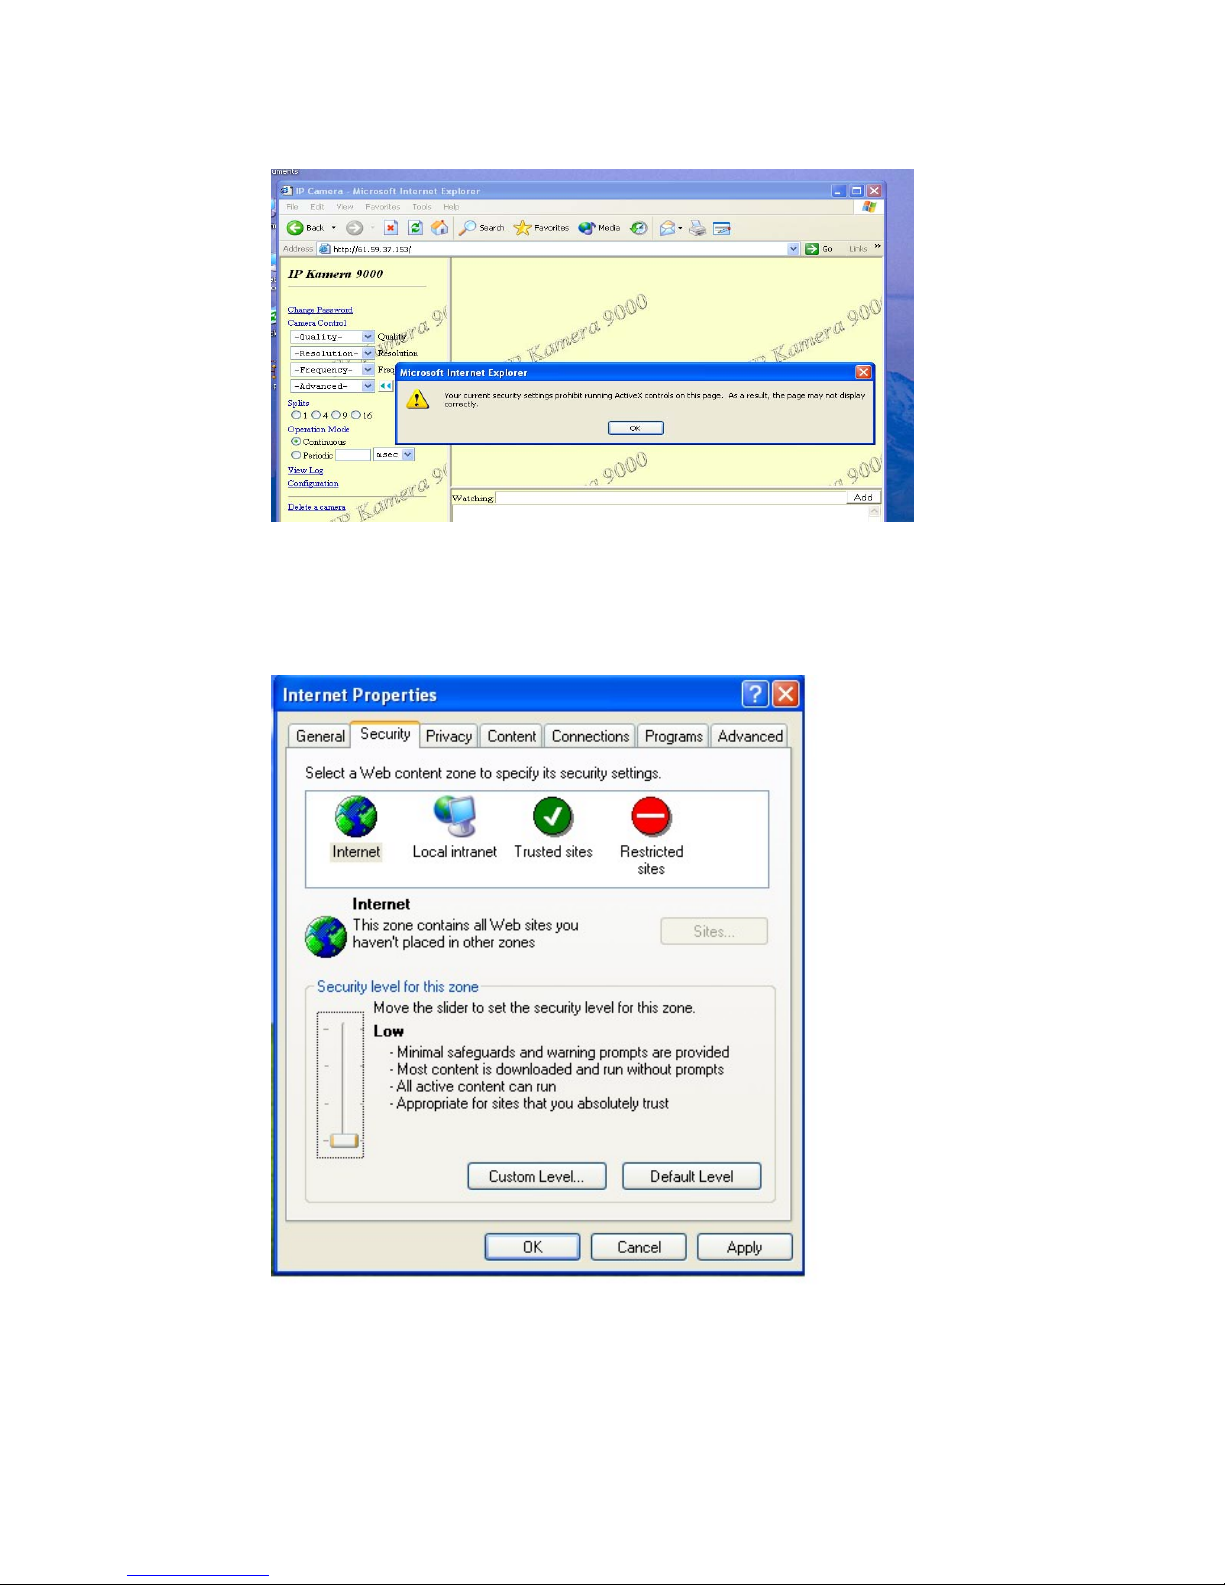
IP KAMERA 9000A PLUS USER MANUAL
*Security protection warning ( follow step 2 )
2th step:tools > internet option > security > default level > select Low
3rd step Switch default level to “low” then you will be able to see” IP Kamera 9000A”
in your own eye.
VER. 1.0.0,
- 9 -
Other manuals for 9000A Plus
1
Table of contents
Other Aviosys IP Camera manuals

Aviosys
Aviosys IP Kamera 9070 User manual

Aviosys
Aviosys 9070-Lite User manual

Aviosys
Aviosys 9077SPD-I User manual

Aviosys
Aviosys 9000A Plus User manual

Aviosys
Aviosys IP Kamera 9070-IR User manual

Aviosys
Aviosys 9070-IRW User manual

Aviosys
Aviosys 9070CS-PoE User manual

Aviosys
Aviosys IP Kamera 9070-IR User manual

Aviosys
Aviosys 9070-CSW User manual


