Avipas AV-1161 User manual

Preface
Thank you for using this HD Video Conferencing Camera.
This manual introduces the functions, installation process and operation of the HD
camera. Prior to installation and usage, please read the manual thoroughly.
Precautions
This product should only be used under the specified conditions in order to avoid
any damage to the camera:
◼Do not subject the camera to rain or moisture.
◼Do not remove the cover. Otherwise, you may risk receiving an electric shock.
In case of unintended equipment operation, contact an authorized engineer.
◼Never operate under unspecified temperature, humidity or power supply.
◼Please use soft dry cloth to clean the camera. If the camera is very dirty, clean
it with diluted neuter detergent; do not use any type of solvents, which may
damage the surface.
Note:
This is a class A production. Electromagnetic radiation at certain frequencies may
affect the image quality of TV in home environment.

Catalogue
ABOUT THE PRODUCT -------------------------------------------------------- 1
FEATURES -------------------------------------------------------------------------------- 1
LIST OF PARTS & ACCESSORIES ------------------------------------------------------------ 1
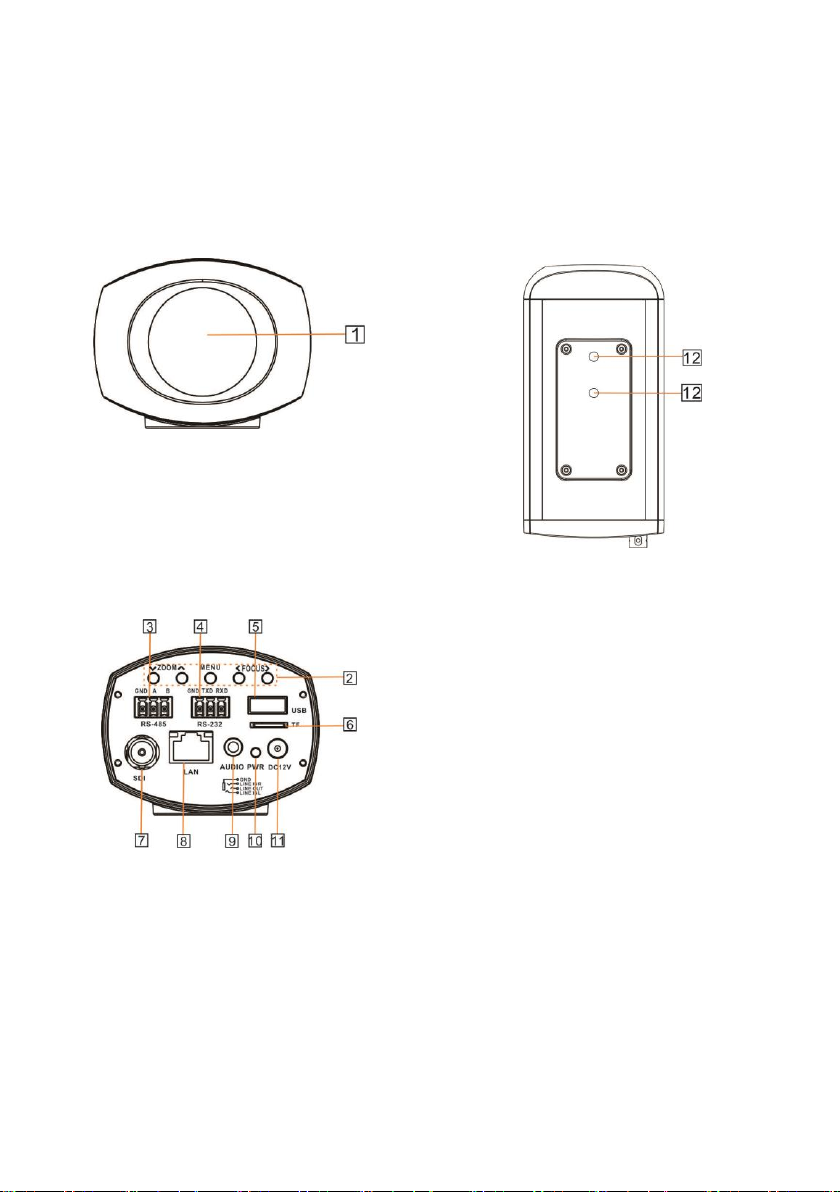
MAIN PARTS & INTERFACES ---------------------------------------------------------------- 2
INSTALLATION AND CONNECTION ------------------------------------------- 3
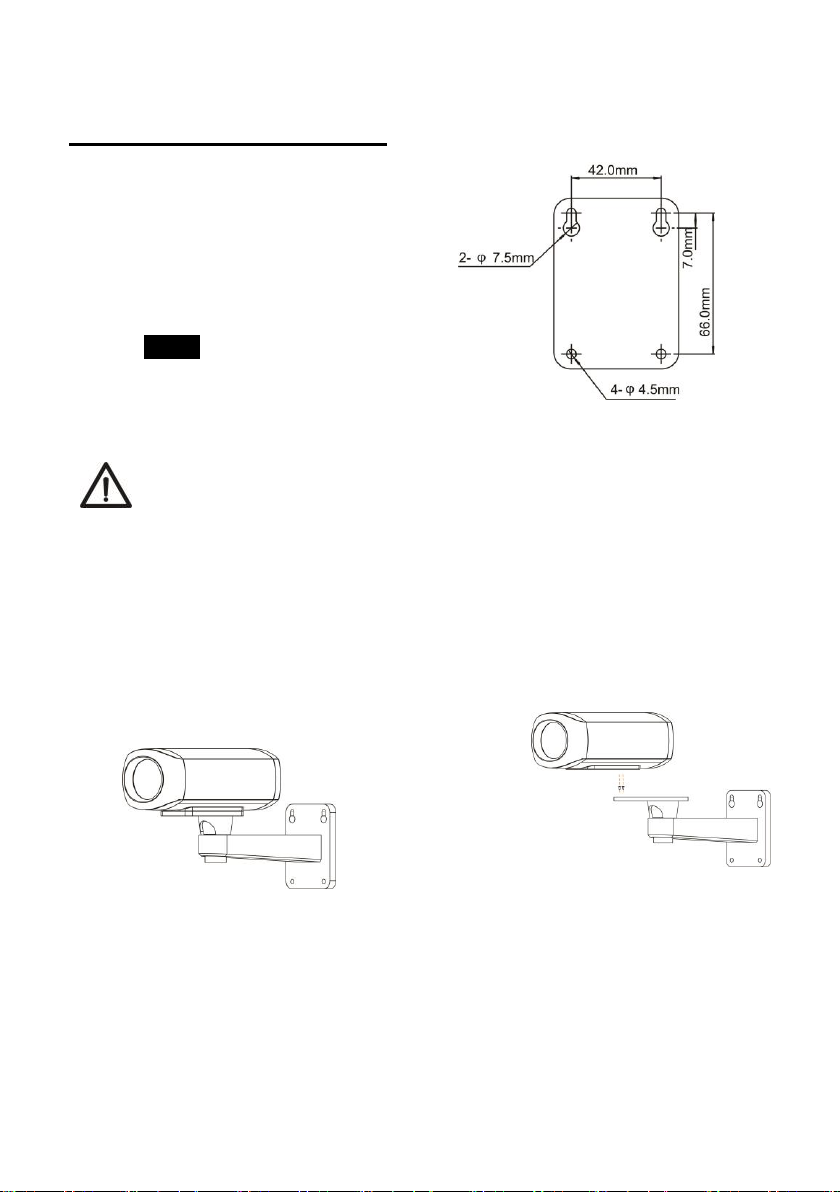
INSTALLATION ----------------------------------------------------------------------------- 3
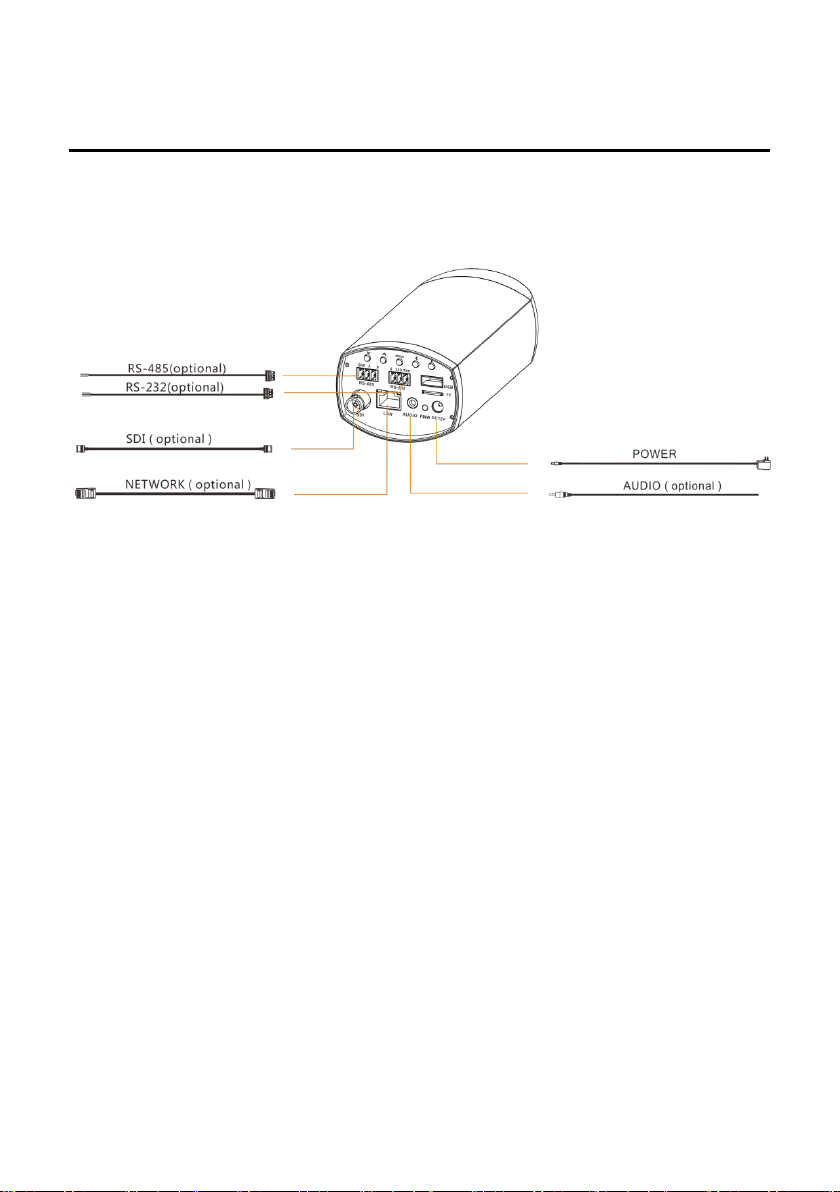
CONNECTION ------------------------------------------------------------------------------ 4
OPERATION ------------------------------------------------------------------- 5
ZOOM AND FOCUS ------------------------------------------------------------------------- 5
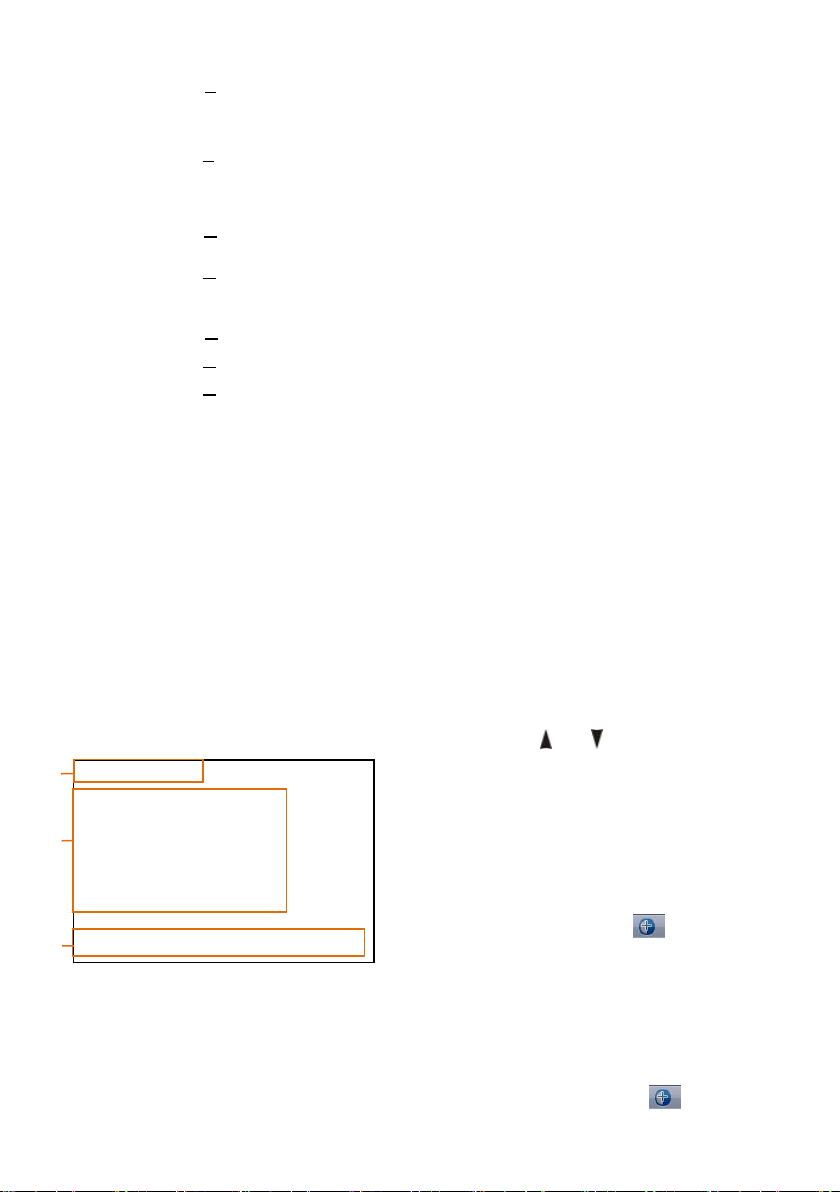
MENU ------------------------------------------------------------------------------------- 5
SPECIAL PRESETS LIST ----------------------------------------------------------------------- 5
MENU CONFIGURATION ----------------------------------------------------- 6
MENU EXPLANATION ----------------------------------------------------------------------- 8
VIDEO ------------------------------------------------------------------------------------ 9
EXPOSURE -------------------------------------------------------------------------------- 9
COLOR ----------------------------------------------------------------------------------- 10
SYSTEM ---------------------------------------------------------------------------------- 10
RESTORE DEFAULTS ---------------------------------------------------------------------- 11
NETWORK ------------------------------------------------------------------- 11
ANNEX 1 TECHNICAL SPECIFICATIONS ------------------------------------ 12
ANNEX 2 SIZE AND DIMENSION -------------------------------------------- 13
ANNEX 3 RECOMMENDATION DISTANCE FOR EXTENSION POWER
CABLE
------------------------------------------------------------------------------ 15
TROUBLE SHOOTING ------------------------------------------------------- 15

1
1 ABOUT THE PRODUCT
1.1 Features
◼1/3” CMOS sensor, 2.14MP;
◼5x optical zoom;
◼Support multi control
methods: LAN / RS-232 / RS-485
/ rear panel button;
◼Support SDI and network
interface, simultaneous full HD
video output;
◼H.264 video compression, up
to 1080P30 with low network
delay;
◼Support 2-channel audio
input, AAC compression;
◼Compatible with HTTP /RTSP/
RTMP / ONVIF protocols.
1.2 List of Parts & Accessories
When you open the box, check all
accessories according to the
packing list. In case of any items
missing, please contact your
supplier.
Camera (1)
Power Adapter (1)
RS-232/ RS-485 Connector(2)
Convertors for Extension
Power Cable

2
1.3 Main Parts & Interfaces
1.3.1 Camera
Front View
1 Camera Lens
Rear View
2 Button Operation
3 RS-485 Control Interface
4 RS -232 Control Interface
5 USB Interface
6 TF Card Slot
7 HD-SDI Interface
8 Network Interface
9 Audio Interface
10 Power Indicator
11 Power Input(DC12V)
Side View
12 Mounting Hole
1/4” screw, used to fix the
camera

3
2 INSTALLATION AND
CONNECTION
2.1 INSTALLATION
The installation mode of the camera
is wall mount.
NOTE
Before installing, make sure
there is enough space to
install the camera and its
parts.
Make sure the installed
place is strong and safe
enough to hold the camera
and relative parts, it is
suggested that the installed
place can withstand 4 times
the weight of the camera
and its relative parts.
2.1.1 Wall Mount
1. According to diameter and
position of the 4 installation
holes (as shown below on the
bracket), drill 4 holes on the
wall and fix the bracket onto
the wall using 4 screws (not
included in the package).
2. Use screws to fix the camera
on the bracket, fix the limit
screw to lock the camera.
Make sure the camera is tightly
fixed onto the bracket before
your hands leave the camera.

4
2.2 CONNECTION
Before powering on, make sure all connections are correct and secure.

5
3 OPERATION
Before operation, make sure all
connections are correct and secure.
Please refer to “INSTALALTION AND
CONNECITON” on page 3.
3.1 ZOOM AND FOCUS
Press or to zoom in / zoom out
the camera; press or to
manually focus of the camera. Make
sure you exit the camera menu
before zooming using buttons.
3.2 MENU
Press “MENU” button to enter
camera menu.
3.2.1 MENU SELECTION
Use and button to select
menu options, or to change
option / value.
3.2.2 MENU CONFIRMATION
Under camera menu, press “MENU”
to enter the submenu; press and hold
“MENU” button for 3 seconds to exit
menu operation.
4 SPECIAL PRESETS LIST
Preset
Numbe
r
Function
95
Enter into menu
101
video format: 1920X1080P25
103
video format: 1280X720P50
104
Installation mode: STAND
105
Installation mode: CEILING
106
Video format:
1920X1080P30
108
Video format: 1280X720P60
110
Image distortion
compensation: OFF
111
Image distortion
compensation: 1
112
Image distortion
compensation: 2
113
Image distortion
compensation: 3
114
Image distortion
compensation: 4
115
Image distortion
compensation: 5
116
Image distortion
compensation: 6
117
Image distortion
compensation: 7
118
Image distortion
compensation :8
119
Image distortion
compensation :9
120
Image distortion
compensation :10

6
5 MENU CONFIGURATION
<VIDEO>
(Please
refer
page 9)
I MAGE MODE
MODE1,MODE2, MODE3
SHARPNESS
0, 1, 2, 3, 4, 5, 6, 7, 8, 9, 10, 11, 12, 13,
14, 15
CONTRAST
1, 2, 3, 4, 5, 6, 7, 8, 9, 10, 11, 12, 13, 14,
15
GAMMA MODE
0, 1, 2, 3, 4,
DNR LEVEL
ON, OFF
LDC LEVEL
1,2,3,4,5,6,7,8,9,10,OFF
BACK
<EXPOSU
RE>
Please
refer page
9
EXP-
COMP
-7, -6, -5, -4, -3, -2, -1, 0, +1, +2, +3, +4, +5,
+6, +7
BLC
ON,OFF
ANTI–
FLICKER
OFF,50HZ,60HZ
BACK
<COLOR>
Please
refer page
10
WB MODE
AUTO,ONE PUSH,MANUAL
SATURATI
ON
1, 2, 3, 4, 5, 6, 7, 8, 9, 10, 11, 12, 13, 14
HUE MODE
AUTO,MANUAL
BACK
<
SYSTEM >
ADDRESS 1, 2, 3, 4, 5, 6, 7
PROTOCOL VISCA,PELCO-P,PELCO-D

7
❶
❷
❸
Please
refer page
10
BAUD RATE 2400,4800,9600,38400
VIDEO FORMAT 1080P30,1080P25,720P60
,720P50,
MOUNT MODE STAND,CEILING
RS485 PORT, HALF-DUPLEX-1,HALF-
DUPLEX-2
LANGUAGE ENGLISH,CHINESE
FIRMWARE VER V2.0.03
BACK
<RESTORE DEFAULTS>
Please refer page 11
<EXIT>
5.1 MENU EXPLANATION
5.1.1 MAIN MENU
Call preset 95 to enter main menu.
❶Current Menu
It displays currently selected
menu option.
❷Menu Options
It shows all the submenus under
the current menu.
Press or button to select
submenu options. You’ll see
an arrow if one submenu is
selected. Press button to
enter the selected submenu.
5.1.2 SUBMENU
Under main menu, navigate to select
<EXPOSURE>,press button to
MENU
VIDEO…
EXPOSURE…
COLOR…
SYSTEM…
RESTORE DEFAULTS…
EXIT
[ ]SELECT [OK]NEXT
[]EXIT

8
enter the submenu.
❶❷ Refer to the main menu
❸Set Parameters
Press or to change
value.
5.2 VIDEO
VIDEO menu is used to change video
parameters.
IMAGE MODE: MODE1, MODE2,
MODE3.
SHARPNESS: 1, 2, 3, 4, 5, 6, 7, 8, 9,
10, 11, 12, 13, 14, 15.
CONTRAST: 1, 2, 3, 4, 5, 6, 7, 8, 9,
10, 11, 12, 13, 14, 15.
GAMMA MODE:0, 1, 2, 3, 4
It is for optimizing and adjusting the
image curve, brightness and contrast,
make subtle adjustment for lighting
and shade level of the image, and
control the contrast of the whole
image. The higher the level is, the
steeper of the Gamma curve will be.
DNR LEVEL: It is suggested to be
off for a color video. Otherwise, it will
affect the video sharpness. The
higher the level is, the better the
noise reduction there will be, but it will
affect video sharpness. (DNR MODE:
ON, OFF)
LDC LEVEL: 1, 2, 3, 4, 5, 6, 7, 8, 9,
10, OFF.
It is used to compensate the image
distortion, the higher level is, the
better image distortion compensation
will be.
BACK
5.3 EXPOSURE
EXPOSURE menu is used to adjust
exposure value.
<EXPOSURE>
EXP-COMP
+7
BLC
ON
ANTI-FLICKER
OFF
BACK
[ ]SELECT
[]BACK
VIDEO IMAGE MODE MODE1
SHARPNESS 0
CONTRAST 1
GAMMA MODE 0
DNR LEVEL OFF
LDC LEVEL OFF
BACK
[ ]SELECT []BACK
❶
❸
❷
❹

9
EXP-COMP: -7, -6, -5, -4, -3, -2, -1,
0, +1, +2, +3, +4, +5, +6, +7。
+7 is the max compensation value for
bright exposure while -7 is the max
compensation value for dark
exposure.
BLC: ON, OFF
Backlight compensation (BLC) can
automatically compensate and
correct the exposure of subjects with
a background that is too bright or
dark.
ANTI-FLICKER: OFF, 50HZ, 60HZ
This function is to resolve the
problem when the image flicks when
the lighting frequency is different from
the power frequency.
5.4 COLOR
WB MODE: AUTO, ONE PUSH,
MANUAL.
“ONE PUSH” mode: Press or
button to select “ONE PUSH
TRIGGER”. Used for focusing the
camera at a pure white object (say a
white paper), then press button.
“MANUAL” R GAIN and B GAIN
values can be chosen from 0~255.
SATURATION: 1, 2, 3, 4, 5, 6, 7, 8, 9,
10, 11, 12, 13, 14.
HUE MODE: AUTO, MANUAL.
5.5 SYSTEM
EXPOSURE EXP-COMP +7
BLC ON
ANTI-FLICKER OFF
BACK
[ ] SELECT []BACK
COLOR WB MODE MANUAL
R GAIN 1
G GAIN 122
B GAIN 122
SATURATION 7
HUE MODE MANUAL
R GAIN +1
G GAIN +7
B GAIN +7
BACK
[ ]SELECT []BACK

10
ADDRESS: 1, 2, 3, 4, 5, 6, 7 (VISCA);
0~255 (PELCO-D/P)
PROTOCOL: VISCA, PELCO-D,
PELCO-P.
BAUD RATE: 2400, 4800, 9600,
38400.
VIDEO FORMAT: 1080P30,
1080P25, 720P60, 720P50.
MOUNT MODE: STAND, CEILING.
RS485 PORT: HALF-DUPLEX-1,
HALF-DUPLEX-2.
When HALF-DUPLEX-1 is chosen
under VISCA protocol, there will be
an error message after commands
have been executed.
When HALF-DUPLEX-2 is chosen
under VISCA protocol, there will be
an error message after commands
have been executed.
FIRMWARE VER: V2.0.03.
LANGUAGE: ENGLISH, CHINESE.
5.6 RESTORE DEFAULTS
RESTORE DEFAULTS: This option
is used to reset all parameters to
default values.
NETWORK
Please refer to network operation
instructions.
SYSTEM ADDRESS 1
PROTOCOL VISCA
BAUD RATE 9600
VIDEO FORMAT 1080P30
MOUNT MODE STAND
RS485 PORT HALF-DUPLEX-1
DISPLAY INFO ON
LANGUAGE ENGLISH
BACK
[ ]SELECT []BACK
< RESTORE DEFAULTS>
PRESS OK TO CONFIRM
BACK
[]BACK

11
6 ANNEX 1 TECHNICAL SPECIFICATIONS
Image Sensor
1/3" CMOS,2.14 megapixel
Max Resolution
1920*1080
Focal Lens
f=2.8mm-14mm
Optical Zoom
5x
Field of View
32°~84°
Focus System
Manual
Min. Illumination
0.5 lux
White Balance
Auto
Exposure Control
Auto
Control Buttons
5
SDI output
Video output
1080P30、1080P25、720P60、720P50
Network
Resolution
Max. Support 1920*1080@30fps
Video Compression
H.264
Audio Compression
AAC
Network Protocol
HTTP、RTSP、RTMP、ONVIF
Network Interface
100M, RJ45
Dual Stream
Support
Interface
Video output(HD)
1 channel SDI interface
Audio Interface
3.5mm interface (2-channel: Line in /Line out)
Comm. Port
RS-232, RS-485
General
Protocol
VISCA/PELCO-D/ PELCO-P
Power
DC(9V~12V)
Power
Consumption
<5W
Storage Temp
-20°C~+60°C
Dimensions
5.9x3x2.3inch (149×76×58mm)
Weight
0.9lb (0.42kg)
Color
Dark Grey

12
7 ANNEX 2 SIZE AND DIMENSION
Front
Top
Rear
Side
Bottom

14
8 ANNEX 3 RECOMMENDATION DISTANCE FOR EXTENSION POWER
CABLE
AWG
Nominal
sectional area
(mm2)
+20°C DC Resistance≤
(Ω/km)
Recommendation
distance (m)
20
0.5
36.0
55
19
0.5667
26.9
74
18
0.75
24.5
81
17
1
18.1
110
16
1.318
13.5
148
15
1.5
12.1
165
14
2.075
8.45
236
13
2.5
7.41
269
12
3.332
5.31
376
11
4
4.61
433
10
5.26
3.36
595
9
6
3.08
649

14
9 TROUBLE SHOOTING
Problem
Possible Cause
Solution
No lens action or
video after power on
Power supply failure
Check power supply
Power adapter
damaged
Replace power adapter
Loose power cable
connection
Check & reconnect
No control of the
camera after
powering on
Incorrect connection or
open circuit of RS-485/
RS-232
cable
Set the address, protocol
and baud rate according to
the camera settings.
Check the connection of
RS-485/RS-232 cable.

15
Warranty
Thank you for your interest in the products of AVIPAS Inc.
This Limited Warranty applies to HD Conference Camera purchased from AVIPAS Inc.
This Limited Warranty covers any defect in material and workmanship under normal use
within the Warranty Period. AVIPAS Inc. will repair or replace the qualified products at
no charge.
AVIPAS Inc. provides a one (1)-year warranty (from the date of purchase) for this HD
Conference Camera.
This Limited Warranty does not cover problems including but not limited to: improper
handling, malfunction or damage not resulting from defects in material.
To receive warranty service, please contact AVIPAS Inc. first. We will decide whether
a repair or replacement is needed and will advise you of the cost of such repair or
replacement.
Copyright Notice
All contents of this manual, whose copyright belongs to our Corporation cannot be
cloned, copied or translated without the permission of the company. Product
specifications and information which were referred to in this document are for reference
only. We may alter the content at any time and without prior notice.
VER: 2019-6-5 (EN)
Contact Details:
AViPAS Inc.
Address: 4320 Stevens Creek Blvd. Suite 227
San Jose, CA 95129
Phone: (408) 983-0866
1-844-228-4727
Website: http://www.avipas.com
Other manuals for AV-1161
1
Table of contents
Other Avipas Security Camera manuals