Avipas AV-2020 User manual

Preface
Thank you for using this HD All-in-one PTZ Camera.
This manual introduces the functions, installation process and operation of the HD camera. Prior to
installation and usage, please read the manual thoroughly.
Precautions
This product should only be used under the specified conditions in order to avoid any damage to the
camera:
◼Do not subject the camera to rain or moisture.
◼Do not remove the cover. Otherwise, you may risk receiving an electric shock. In case of
unintended equipment operation, contact an authorized engineer.
◼Never operate under unspecified temperature, humidity or power supply.
◼Please use soft dry cloth to clean the camera. If the camera is very dirty, clean it with diluted
neuter detergent; do not use any type of solvents, which may damage the surface.
Note:
This is a class A production. Electromagnetic radiation at certain frequencies may affect the image
quality of TV in home environment.

CONTENT
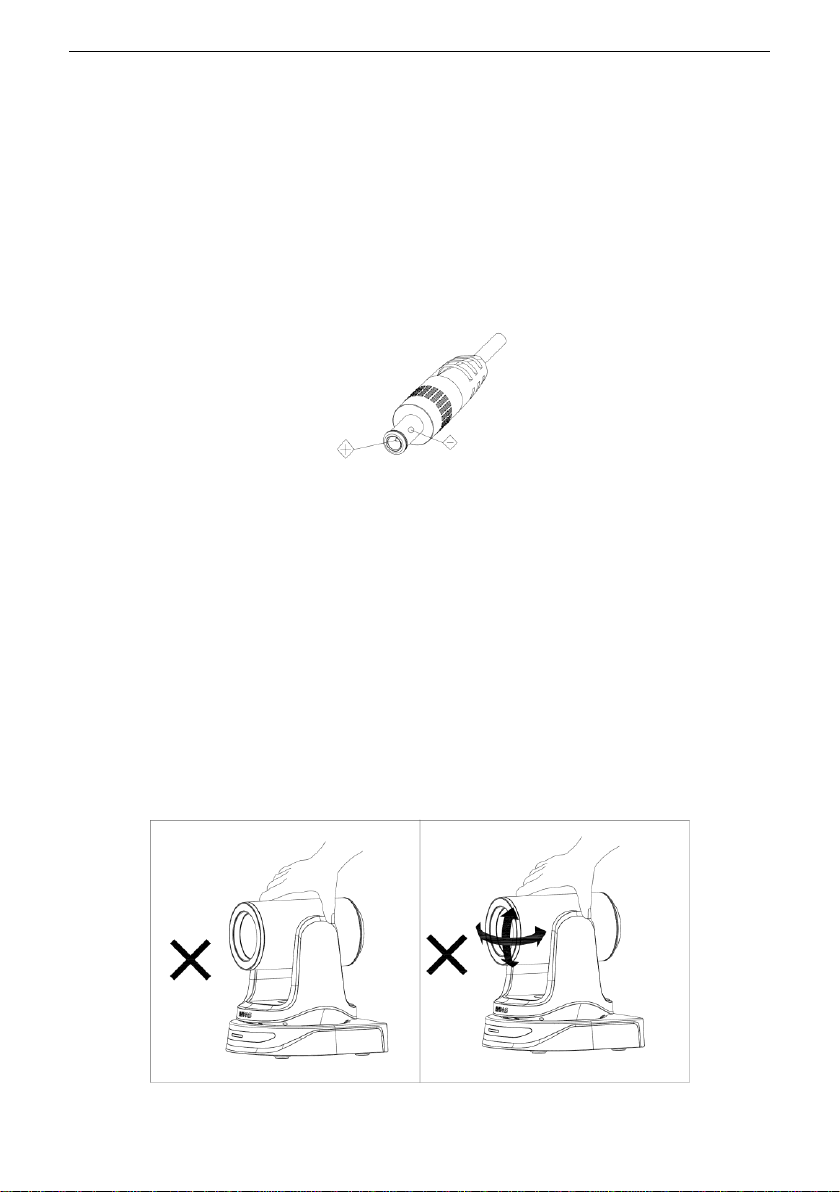
SAFETY GUIDES......................................................................................................................................... 1
PACKING LIST............................................................................................................................................. 2
QUICK START.............................................................................................................................................. 2
PRODUCT HIGHLIGHTS............................................................................................................................ 3
CAMERA SPECIFICATIONS....................................................................................................................... 3
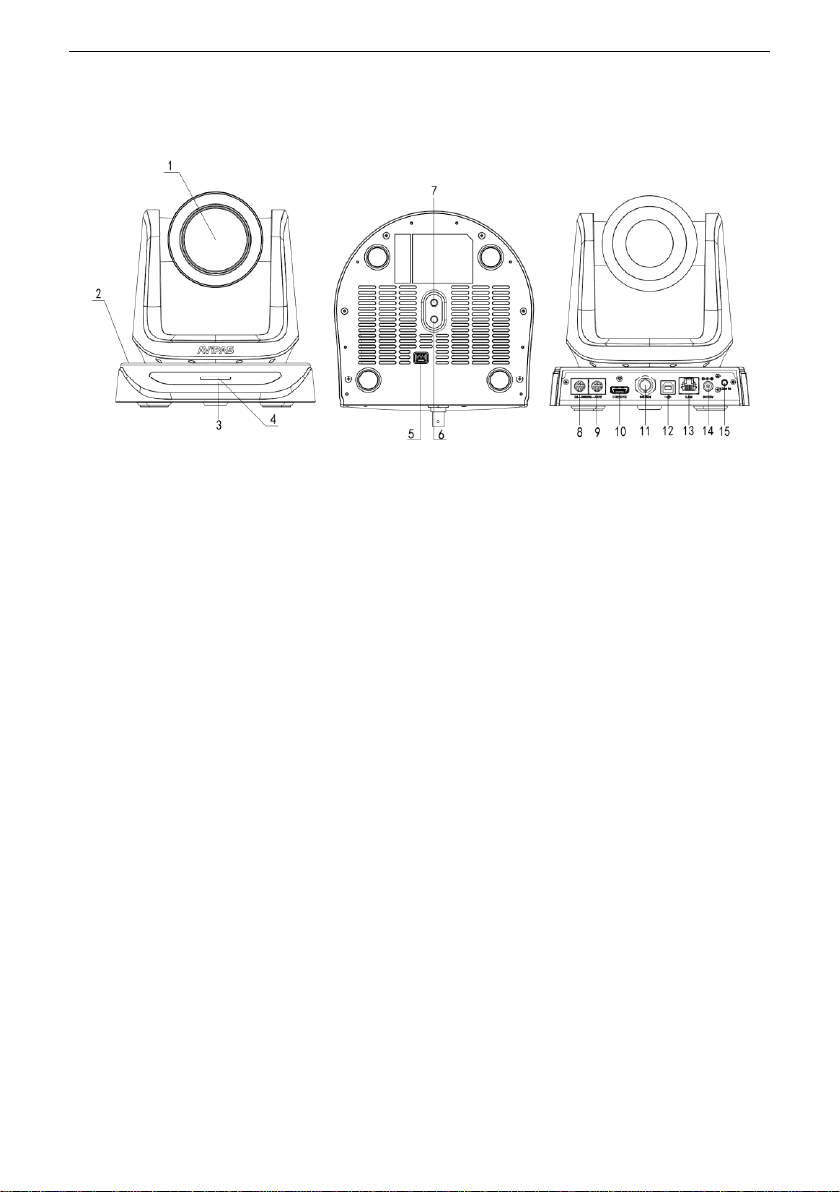
CAMERA INTERFACE................................................................................................................................ 5
CAMERA DIMENSION. .............................................................................................................................. 5
IR REMOTE CONTROLLER....................................................................................................................... 6
VISCA IN (RS232) PORT. ............................................................................................................................ 9
OSD MENU................................................................................................................................................. 10
UVC CONTROL......................................................................................................................................... 13
WEB SETTINGS......................................................................................................................................... 14
VIEW RTSP STREAM VIAVLC ............................................................................................................... 18
VISCA OVER IP ......................................................................................................................................... 19
VISCA PROTOCOL.................................................................................................................................... 22
PELCO-D PROTOCOL............................................................................................................................... 29
PELCO-P PROTOCOL................................................................................................................................ 30
WARRANTY............................................................................................................................................... 32

1
SAFETY GUIDES
1. Electric Safety Installation and operation must accord with electric safety standard.
2. Use caution to transport Avoid stress, vibration or soakage in transport, storage and installation.
3. Polarity of power supply
The power supply of this product is +12V, the max electrical current is 2A. Polarity of the power
supply plug is shown in the drawing below.
4. Installation precautions
Do not grasp the camera lens when carrying it. Do not touch camera lens by hand. Mechanical
damage may result from doing so. Do not use in corrosive liquid, gas or solid environment to avoid any
cover (plastic material) damage. Make sure there is no obstacle within rotation range. Do not power on
before installation is completed.
5. Do not dismantle the camera We are not responsible for any unauthorized modification or dismantling.
CAUTION! Certain frequencies of electromagnetic field may affect the image of the camera!
Note:
Video quality may be affected by the specific frequencies of electromagnetic field.
Never grasp the head of the camera, or move the camera by hand when it is working. Otherwise, mechanism
maybe affected.

2
PACKING LIST
When unpacked, check if all supplied accessories are included:
Camera ···································································1pc
Power Adapter···························································1pc
Power Cable ····························································· 1pc
RS232 Control Cable··················································· 1pc
USB2.0 Cable ···························································1pc
Remote Controller ······················································1pc
User Manual ·····························································1pc
Double-sided Adhesive·················································1pc
QC certification ·························································1pc
QUICK START
1. External interface: RS232 I/O, HDMI output, 3G-SDI output, USB2.0 output, LAN output, DC12V
power, Audio input. Please check all connections before powering on the device.
2. Dial switch settings (at the bottom of the camera):
Dial Switch (ARM)
SW-1
SW-2
Instruction
1
OFF
OFF
Updating mode
2
ON
OFF
Debugging mode
3
OFF
ON
Undefined
4
ON
ON
Working mode

3
PRODUCT HIGHLIGHTS
▪Adopts advanced ISP, 1/2.8-inch 5MPsensor, providing full HD video resolution.
▪High-quality 20x optical zoom, 2x digital zoom lens with 72.5-degree field of view.
▪IP, HDMI, 3G-SDI, USB video output interface, compatible with different applications.
▪White Balance/ Exposure/ Focus/ Iris can be adjusted automatically or manually.
▪Support PoE: one single CAT5/6 for video, control and power, highly efficient video encoding.
▪Support line-in function, ACC and LPCM audio encoding.
▪Advanced focusing algorithm: fast and precise focusing performance during movement.
▪Smooth PTZ mechanical, accurate pan tilt motor control.
▪Up to 128 presets available.
▪Support VISCA, PELCO-P, PELCO-D and VISCA over IP control protocol; IP VISCAover both
TCP and UDP.
▪Support RS232 daisy chain, up to 7 cameras under VISCA protocol.
▪Support upside-down (ceiling) installation, H/V flip.
▪Support RS232/UVC control
▪Standard UVC1.1 protocol, seamlessly compatible with all major video conferencing software
and platforms
CAMERASPECIFICATIONS
Video Format
HD
MI
1920*1080P60/59.94/50/30/29.97/25/24
1920*1080I60/59.94/50
1280*720P60/59.94/50/30/29.97/25
SDI
1920*1080P60/59.94/50/30/29.97/25/24
1920*1080I60/59.94/50
1280*720P60/59.94/50/30/29.97/25
USB
1280*720P25; 1024*576P30
960*540P30; 640*360P30
512*288P30
Dial Switch (USB)
SW-5
SW-6
Instruction
1
OFF
OFF
Updating mode
2
ON
OFF
Working mode
3
OFF
ON
Undefined
4
ON
ON
Undefined
Dial Switch
SW-3
SW-4
Instruction
1
OFF
OFF
reserve
2
ON
OFF
reserve
3
OFF
ON
reserve
4
ON
ON
reserve

4
RJ45
1920*1080@1~30 / 1280*720@1~30 / 1024*576 @1~30 (Main stream)
1280*720@1~30 / 1024*576@1~30 / 640*360 @1~30 (Sub stream)
Video Interface
HDMI,3G-SDI, RJ45, USB2.0
Sensor
1/2.8”5MP CMOS sensor
Zoom
F4.9~98mm (20X)
View angle: 60°(Far)~3.23°(Near)
Rotation Angle
Pan: -170° ~ +170° Tilt: -90° ~ +90°
Rotation Speed
Pan: 0°~120°/s Tilt: 0°~80°/s
Preset:
remote controller: 10; RS232: 128;
Accuracy: 0.1°
Control Port
RS232, RJ45 (VISCA over IP), USB2.0(UVC1.1)
Network Speed
1000M
Video encode
H.264/H.265 (default: H.264)
Bit Rate Control
Variable Bit Rate, Constant Bit Rate
Video Bit Rate
0Kbps~15360Kbps
IP Protocol
TCP/IP, HTTP, RTSP, DHCP, Onvif
PoE
Supported
Daisy Chain
RS232 serial daisy chain (up to 7 units under VISCA protocol)
Minimum Lux
0.01 lux
White Balance
Auto/Indoor/Outdoor/Manual/AWT/PUSH
Exposure
Auto/Manual/Bright/Shutter/Iris
Focus
Auto/Manual
Iris
Auto/Manual
Electric Shutter
Auto/Manual
Gamma
Support
WDR
Support
BLC
Support
2D/3D Noise Reduction
Support
Anti-Flicker
OFF/50Hz/60Hz
H/V Flip
Support
Input Voltage
DC12V/ PoE
Dimension
6.6*6.6*7.1inch (67.5*168*180.5mm)
Net Weight
1.4KG (3.1LBS)

5
CAMERA INTERFACE
1. Camera Lens
2. Camera Base
3. IR Receiver Panel
4. Power Indicator Light
5. Dial Switch
6. Tripod Screw Hole
7. Installation Hole
8. RS232 Control Input
9. RS232 Control Output
10. HDMI Output
11.3G-SDI Output
12, USB Output
13, RJ45 Output
14. DC12V Power Jack
15. Line-in Audio Input

6
CAMERADIMENSION(MM)

7
IR REMOTE CONTROLLER
POWER
Under normal working mode, press POWER to enter standby
mode;Press it again, the camera will start self-configuration, then go
back to HOME position.
It will go to preset position 0 if the preset is set.
FREEZE (do NOT support USB output)
Press FREEZE to freeze/ unfreeze the image.
IRT (IR Transfer/IR Pass)
Open / close the IR pass function. Once press the IRT key, the
camera will receive and pass the IR remote control signal to the
codec/terminal (via VISCA IN port).
SET 1~SET4 ADDRESS SETTING
To set the current camera’s address (ID), press and hold the
key for 3seconds until the backlight of that key is ON.
CAM1~CAM4(CAMERASELECTING)
Press the corresponding camera number to select the camera.
NUMERIC KEY (1-9)
Set preset: press and hold the number for 3 seconds to set preset
position.
Call preset: press the corresponding number to call preset
position.
CLR PRE (CLEAR PRESET)
Press CLR PRE + number key to clear the corresponding preset
position.
Press and hold the key to clear all existing preset positions.

8
FOCUS
Manually adjust focus, only valid under manual mode.
ZOOM
Manually adjust zoom.
NAVIGATE KEY: UP/DOWN/LEFT/RIGHT
Under camera normal mode, use navigate keys to pan/ tilt;
After entering camera OSD, use navigate keys to select and enter
submenu.
OK /HOME KEY
Under camera normal mode, press OK to make the camera go back to
its HOME position;
After entering camera OSD, press OK to confirm selection.
AF: Auto focus
MF: Manual focus
RESET: Press and hold for 3 seconds to reset camera
MENU: Enter OSD menu
LEARN+LIMIT L: Set the pan tilt left limit position.
LEARN+LIMIT R: Set the pan tilt right limit position.
LEARN+LMT CLR: Clear all limit position.
BLC OFF/ BLC ON:Not available
BRIGHT-/BRIGHT+: Set image brightness, only valid under bright
priority exposure mode.
Video Format Selection:
Press and hold for 3 seconds to select different video format output.

9
VISCAIN (RS232 PORT)
VISCA Network Construction:
SERIAL PORT CONFIGURATION
No.
V_IN
V_OU
T
VISCA
IN
RS485
1
DTR
DTR
1
2
DSR
DSR
2
3
TXD
TXD
3
4
GND
GND
4
5
RXD
RXD
5
6
A
6
A(+)
7
IR
OUT
7
IR OUT
8
B
8
B(-)
VISCAIN & DB9 Connection
Camera VISCA IN
Windows DB-9
1
DTR
6
DSR
2
DSR
4
DTR
3
TXD
2
RXD
4
GND
5
GND
5
RXD
3
TXD
6
A (+)
7
IR OUT
8
B (-)
VISCAIN &Mini DIN Connection
Camera VISCA
IN
Mini DIN
1
DTR
1
DSR
2
DSR
2
DTR
3
TXD
5
RXD
4
GND
4
GND
5
RXD
3
TXD
6
A (+)
6
NC
7
IR
OUT
7
NC
8
B (-)
8
NC
Parameter
Value
Parameter
Value
Baud rate
2400/4800/9600/115200
Stop Bit
1bit
Start Bit
1 bit
Check Bit
None
Date Bit
8 bit

10
OSD MENU
1. Under working mode, press the MENU key on the IR remote controller, to enter the OSD menu as shown
bellow:
2. After entering the main menu, use navigate UP/DOWN keys to select the from the main menu options.
3. Press RIGHT key to enter sub menu; use UP/DONW key to select the sub menu; use LEFT/RIGHT key
to change current settings.
4. Press MENU key again to return to the previous menu, repeat and exit the OSD menu.
5. OSD Menu setting list
SYSTEM
PROTOCOL
Optional item: VISCA/ PELCO-P/ PELCO-D
Default: VISCA
ADDRESS
VISCA: 1~7 PELCO-P/D: 1~255
Default: 1
BAUD RATE
2400/ 4800/ 9600/ 115200
Default: 9600
PTL LOCK
Protocol lock: once set, above protocol settings will be locked
Default: OFF
RS485
RS485 ON/OFF
Default: ON
VISCA
OVER ALL/ OVER IP/ OVER COM
Default: OVER
ALL
LANGUAGE
Chinese/ English
Default: English
EXPOSURE
EXPOSUR
E MODE
AUTO/ MANUAL/ SHUTTER/ IRIS/ BRIGHT
Default: AUTO
SHUTTER
Shutter speed: 1/30~1/10000, only valid under MANUAL and
SHUTTER mode
Default: AUTO
IRIS
Iris setting: CLOSE~F1.8, only valid under MANUAL and
IRIS mode
Default: AUTO
GAIN
Gain setting:0dB~30dB, only valid under MANUAL mode
Default: AUTO
EBRIGHT
Bright setting:0~27, only valid under BRIGHT priority mode.
Default: AUTO
BRIGHT
0~15
Default: 8

11
WD MODE
ON/OFF
Default: OFF
WD
LEVEL
WDR Level
Default: 1
BLC
ON/OFF
Default: OFF
IMAGE
WB MODE
ATW/ MANUAL/ AUTO/ INDOOR/ OUTDOOR/ PUSH
Default: ATW
R GAIN
Red gain level: 0~255, only valid under manual white
balance mode.
Default: AUTO
B GAIN
Blue gain level:0~255, only valid under manual white
balance mode
Default: AUTO
FLICK
Anti-Flicker setting: 50/60HZ
Default: 50HZ
DZOOM
ON/OFF
Default: OFF
FOCUS
Select focus mode
Default: AUTO
QUALITY
2D NR
2D noise reduction: the bigger value, the less noise on
image, the lower the resolution
Default: OFF
3D NR
3D noise reduction: OFF/AUTO/0~4, the bigger value, the
less motion noise on image, high value will cause image
smear.
Default: AUTO
SHARPNESS
Sharpness setting: 0~15
Default: 3
CONTRAST
Set contrast level
Default: 8
SATURATION
Set saturation level
Default: 8
GAMMA
Select gramma level
Default: 0
AF
SENSITIVITY
LOW/ NORMAL/ HIGH
Default:
NORMAL
PTZ
SPEEDBYZ
SpeedByZoom: proportional speed, the bigger zoom, the
slowerspeed
Default: ON
FLIP.HOR
Flip horizontal
Default: OFF
FLIP VER
Flip vertical
Default: OFF
PT SPD
Pan tilt speed
Default: 18
ZOOM SPD
Zoom speed
Default: 5

12
MENU MIR
NORMAL/ MIRROR
Default:
NORMAL
FORMAT
1080P59.94
After selecting the system, press OK to confirm. If it is the currently selected
system, it will not be activated.
1080P50
1080I59.94
1080I50
1080P29.97
1080P25
720P59.94
720P50
720P29.97
720P25
1080P60
1080P30
720P60
720P30
1080I60
1080P24
IP
DHCP
ON/OFF
Use up/down/left/right navigation keys to select
item to set, and use numeric keys to enter
parameters. Press menu button to return.
IP
192.168.001.188
MASK
255.255.255.000
GW (Gateway)
192.168.001.001
MAIN
Default: 1920*1080
BITRATE
Default: 04096k
SUB
Default: 1280*720
BITRATE
Default: 02048k
RESET
SYS RESET
Reset communication settings to default
CAM RESET
Reset camera settings to default
PT RESET
Reset pan/tilt settings to default

13
ALL RESET
Reset all settings to default
INFO
IR ADDR
Camera IR control address
USB
USB firmware version
CLIENT
Default client end protocol: VISCA
MODEL NO.
Model number
ARM VER
ARM firmware version
FPGA VER
FPGA firmware version
CAM VER
Camera version
RELEASE
Software release date
SET IPADDRESS IN MENU
In order to facilitate customer debugging, the camera supports IP address configuration under OSD.
1. Press "MENU" to enter the camera OSD, then select “IP”;
2. Press “”navigation key to enter the IP setting interface. Select the parameter needs to be changed using
the navigation “”and “”keys”;
3. Use numeric keys to set the corresponding parameters. After finishing entering, press the "MENU" again
to complete and save the setting;
4. Press "MENU" again to exit menu.
UVC CONTROL
1. Make sure the USB2.0 camera output is connected to the USB2.0 port on the PC/MAC, and it is
recognized by the PC Device Manager. If connected to the USB3.0 port, video resolution may be
compromised.

14
2. The interval of control commands sending from the server (via USB) to the camera should be no less than
250ms.
PU_BRIGHTNESS_CONTROL
81 01 04 4d 00 00 0p 0q FF
PU_CONTRAST_CONTROL
81 01 04 A2 00 00 0p 0q FF
PU_SATURATION_CONTROL
81 01 04 A1 00 00 0p 0q FF
PU_SHARPNESS_CONTROL
8x 01 04 42 00 00 0p 0q FF
PU_GAMMA_CONTROL
8x 01 04 5B 0p FF
PU_WHITE_BALANCE_TEMPERATURE_CONTROL
8x 01 04 35 0X FF
PU_BACKLIGHT_COMPENSATION_CONTROL
81 01 04 33 02/03 FF
PU_POWER_LINE_FREQUENCY_CONTROL
8x 01 04 AA 00/01/02 FF
CT_ZOOM_ABSOLUTE_CONTROL
8x 01 04 47 0p 0q 0r 0s FF
CT_PANTILT_ABSOLUTE_CONTROL
8x 01 06 02 VV WW 0Y 0Y 0Y 0Y 0Z 0Z 0Z 0Z F
CT_PANTILT_RELATIVE_CONTROL
8x 01 06 01 pp qq rr ss FF
CT_ZOOM_RELATIVE_CONTROL
8x 01 04 07 pp FF
WEB SETTINGS
1. Download and install Flash Player
When access the camera via Internet Explorer browser for the first time, Flash Player needs to be installed.
We recommend users download it from flash official website to get latest version:
https://www.flash.cn/english
After installation is complete, it will be listed in PC’s Programs and Features Control Panel:
2. Login
To access the camera interface, open IE browser, input IP address
(default IP address is 192.168.1.188). Users can select language
(Chinese/English). Default username: admin Default password:
admin
3. Real-time Preview
When log in to the web interface for the first time, a message below will show. Please go to IE browser
“Settings”, allow pop-ups and allow running Flash Player.

15
On the Preview interface shown above, there is a virtual control panel on the right-hand side. Options
include pan, tilt, zoom, focus, presets, focus speed and zoom speed. On the bottom of image preview, main
stream and sub stream preview can be selected.
4. Configuration
Click “Setting”to enter camera configuration interface shown below:
Video Encode: To set image encoding mode, main stream and sub stream resolution/bit rate/frame rate, bit
rate control option, I frame interval, etc. as shown above.

16
Video Transmission: To set RTMP settings.
Audio Setting: To enable/disable embedded audio. Audio encoding mode can be selected. Parameters such
as sampling rate and bit rate can be adjusted.
Image Parameter: To set focus, exposure, white balance, image, image quality, noise-reduction, etc.

17
Ethernet: To set DHCP mode, IP address, subnet mask, default gateway, http port, web port, main stream
port and sub stream port. Default settings are as following:
DHCP
OFF
Default gateway
192.168.1.1
IP address
192.168.1.188
HTTP port
80
Subnet mask
255.255.255.0
RTSP port
554
Firmware upgrade: To update the camera ISP. Steps are shown below:
Click “clicking to upload file”, in the dialog box, select the upgrade file. Click “upgrade”to start the
updating process.
DO NOT power off or do any operation when upgrading. Please reboot the camera at least 5 min after the
upgrade is finished.
Then re-login to web interface, select “Reset all”to reset the camera completely.
Other manuals for AV-2020
2
Table of contents
Other Avipas Security Camera manuals