AVIVA ACCU-CHEK User manual

BLOOD GLUCOSE METER
Owner’s Booklet
ACCU-CU-CHEKHEK
®
Aviva


Dear ACCU-CHEK
®
System Owner,
Thank you for choosing the ACCU-CHEK
®
Aviva system!
Congratulations on your decision to take control of your diabetes. We’ve designed your new
ACCU-CHEK Aviva system with comfort, convenience, and control in mind – to help make living
with diabetes a little easier.
This booklet will help you get the most from your ACCU-CHEK Aviva system.
To start testing quickly, you can also refer to the First Time Guide.
If you have questions, we’re here to help. Just call the ACCU-CHEK Customer Care Service Center
toll-free at 1-800-858-8072. We offer assistance 24 hours a day, 365 days a year in Spanish and
many other languages. You can also visit www.accu-chek.com for diabetes management tools
and product demonstrations.
Thanks again for choosing the ACCU-CHEK Aviva system.

The ACCU-CHEK®Aviva System
Your new ACCU-CHEK Aviva meter and accessories work together to measure the amount of sugar (glucose)
in your blood to help you and your doctor control your diabetes. The system includes:
2
• ACCU-CHEK Aviva meter with battery
• ACCU-CHEK Aviva test strips and code key
(may be sold separately)
• ACCU-CHEK Aviva control solution
(may be sold separately)
• ACCU-CHEK Multiclix lancet device (with a blue
cap for fingertip testing and a clear cap for
non-fingertip testing) (may be sold separately)
• ACCU-CHEK Multiclix lancet drum
(may be sold separately)
Why Regular Blood Sugar Testing Is Important
Testing your blood sugar regularly can make a big difference in how you manage your diabetes every day. We’ve
made it as simple as possible. Your meter is easy to use, plus you can adjust the lancet device for your comfort.
Need Help?
If you have questions, we’re here to help. Just call the ACCU-CHEK Customer Care Service Center toll-free at
1-800-858-8072. We offer assistance 24 hours a day, 365 days a year in Spanish and many other languages.
You can also visit www.accu-chek.com for diabetes management tools and product demonstrations.
Please complete your warranty card and mail it, so you receive the best customer service possible and
product update news.

Important Information About Your New Meter
• Your new meter is designed and approved for testing fresh capillary whole blood samples (for example,
blood from your fingertip or forearm.) The meter is for outside the body (
in vitro
) use. It should not be used
to diagnose diabetes.
• Use only ACCU-CHEK Aviva test strips. Other test strips will give inaccurate results.
Health-Related Information
• If you are very dehydrated or urinating frequently, you may get a test result that is lower than what your
blood sugar really is. If you think you are dehydrated, call your doctor right away.
• If you have followed the steps in the booklet, but still have symptoms that don’t seem to match your test
results—or if you have questions—talk to your doctor.
• Refer to your test strip package insert for additional health-related information.
3

Contents
Chapter 1: Understanding Your New System ..........................................................................6
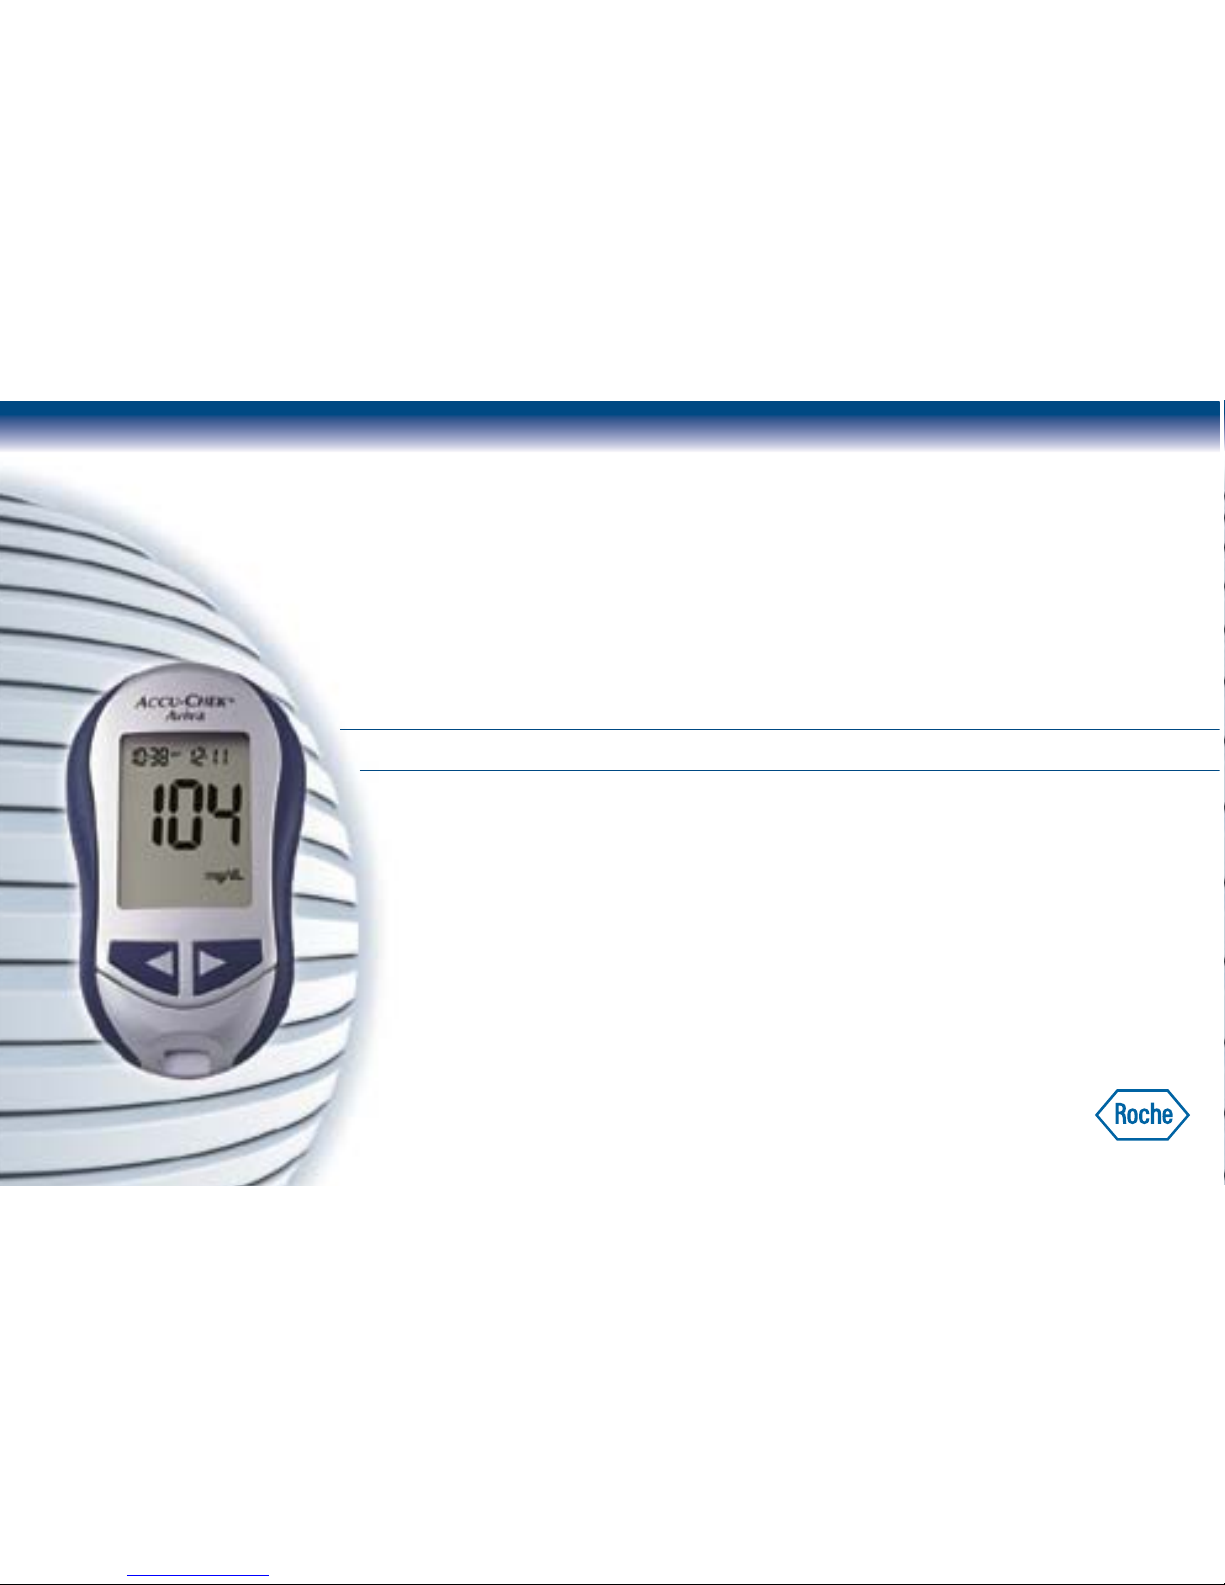
The ACCU-CHEK Aviva Meter ................................................................................................6
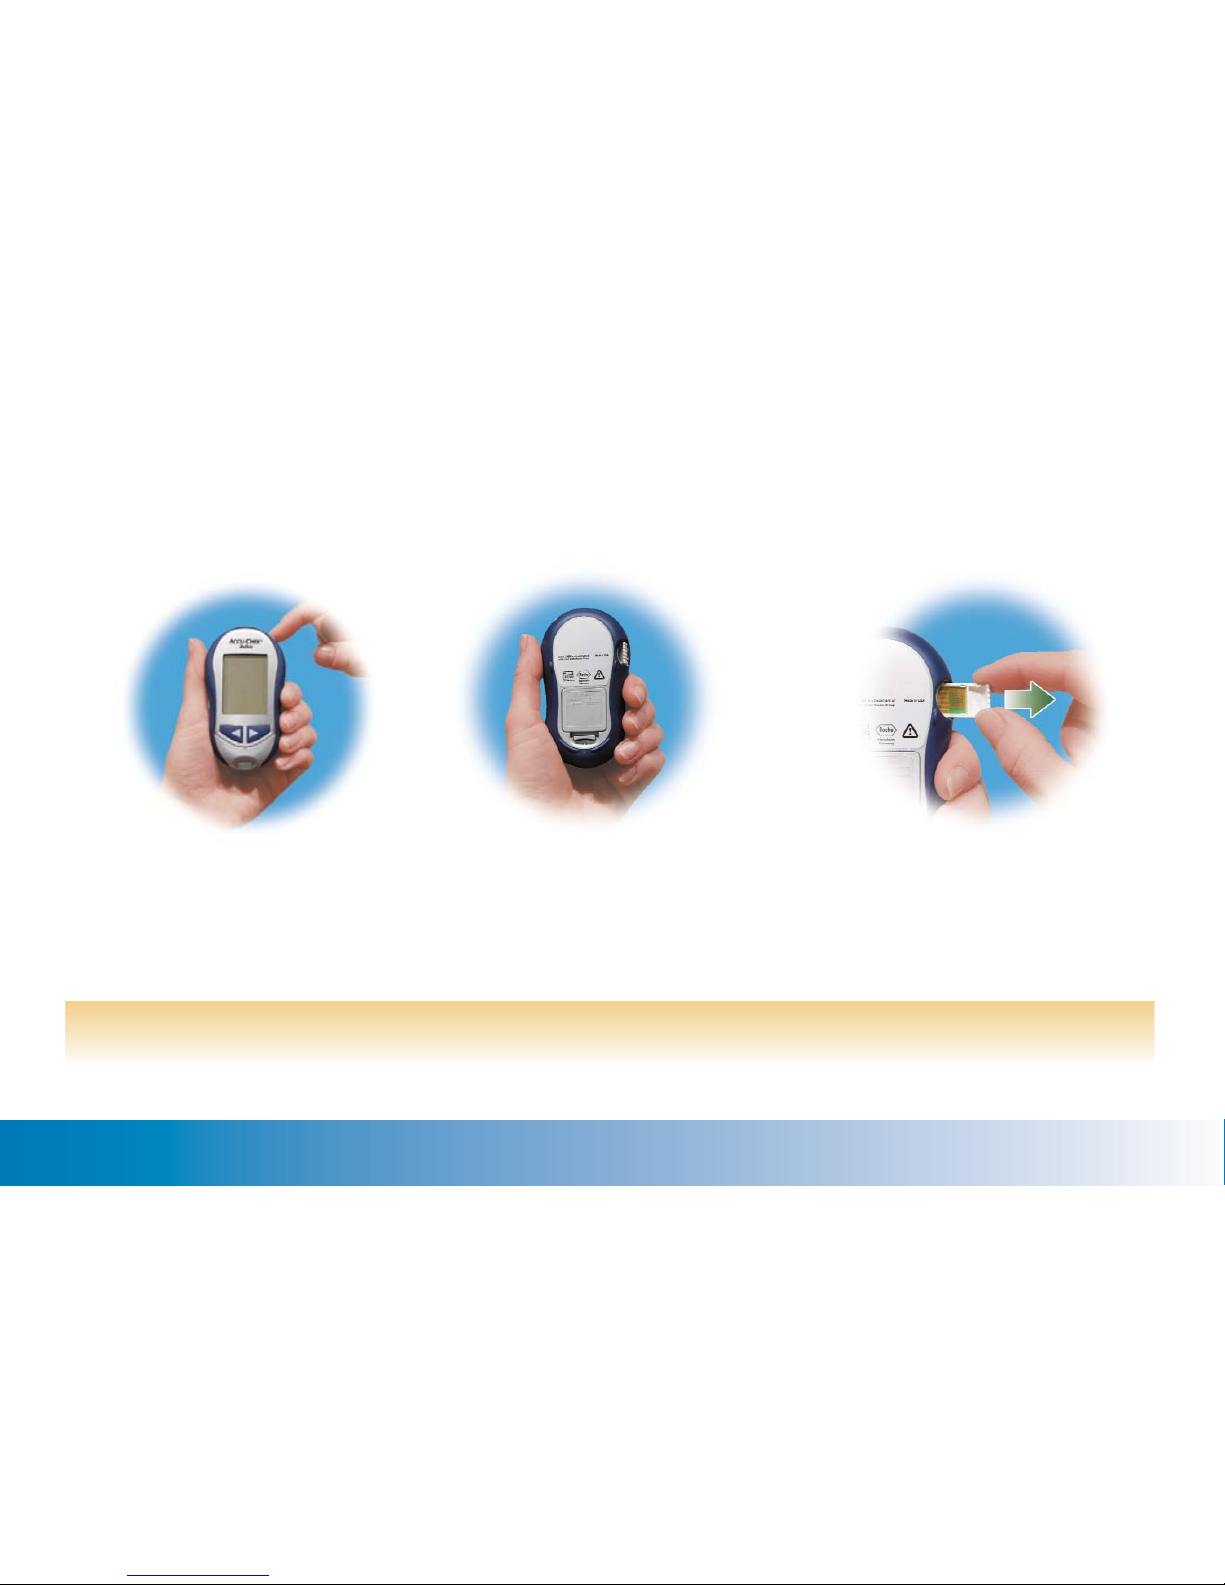
Coding Your Meter ................................................................................................................8
Adjusting the Time and Date—First Time Use.....................................................................10
Using ACCU-CHEK Aviva Test Strips ....................................................................................12
Chapter 2: Control Testing .....................................................................................................13
Why Run Control Tests ........................................................................................................13
About the Control Solutions.................................................................................................13
Running a Control Test........................................................................................................14
Understanding Control Test Results.....................................................................................18
Chapter 3: Testing Your Blood Sugar .....................................................................................20
Using the ACCU-CHEK Multiclix Lancet Device ....................................................................20
Inserting a Lancet Drum .....................................................................................................21
Preparing the Lancet Device for Fingertip Testing ...............................................................23
Running a Blood Sugar Test with Blood from Your Fingertip ................................................25
Changing the Lancet Drum .................................................................................................28
Running a Blood Sugar Test with Blood from Your Palm, Forearm, Upper Arm, Thigh, or Calf ....30
Flagging Test Results..........................................................................................................39
Understanding Your Test Results .........................................................................................40
Comparing Your Meter Result to a Lab Result .....................................................................42
Chapter 4: Meter Memory, Setup, and Downloading .............................................................43
Memory ..............................................................................................................................43
Contents 4

Meter Setup........................................................................................................................45
Setting the Time and Date ..................................................................................................46
Setting the Beeper On/Off...................................................................................................48
Setting Test Reminders .......................................................................................................50
Setting the Hypoglycemic (Hypo) Indicator ..........................................................................54
Downloading Your Results to a Computer............................................................................57
Chapter 5: Maintenance and Troubleshooting ......................................................................59
Changing the Battery ..........................................................................................................59
Cleaning Your Meter............................................................................................................60
Maintenance and Testing ....................................................................................................61
Cleaning Your Lancet Device...............................................................................................61
Screen Messages and Troubleshooting ...............................................................................62
Chapter 6: Technical Information ..........................................................................................66
Product Limitations.............................................................................................................66
Specifications .....................................................................................................................66
Product Safety Information..................................................................................................67
Warranty/Money-back Offer................................................................................................68
Limited License ..................................................................................................................70
Additional Supplies .............................................................................................................72
Information for Healthcare Professionals.............................................................................73
References .........................................................................................................................74
Index ..................................................................................................................................75
Contents 5

Chapter 1: Understanding Your New System*
The ACCU-CHEK Aviva Meter
Display –
Shows results,
messages, and
results stored in
memory.
Right and Left
Arrow Buttons –
Press to enter
memory, adjust
settings, and scroll
through results.
Test Strip Slot –
Insert test strip
here.
Infrared (IR) Window –
Used to transfer data
from the meter to a
computer.
(See Chapter 4.)
On/Off/Set Button –
Turns the meter on or
off and sets options.
Battery Door –
Flip open the battery
door by pushing the
tab in the direction of
the arrow.
Code Key Slot –
Insert code key
into this opening.
6
Code Key
(for example)
Battery – Insert with
(+) symbol facing up.

Chapter 1: Your New Meter 7
Test Strip Container Top View
On/Off/Set
Button
Infrared (IR) Window
Yellow
Window –
Touch blood
drop or control
solution here.
Comfort Dial with Depth Selection
Cap
Lancet Device
Release Button
Plunger
Lancet
Drum
Clear Cap
(for obtaining blood from places
other than your fingertip)
Test Strip
Golden End –
Insert this end
of the test strip
into the meter.
Control Solution
Bottle
*some items may be sold separately.
Lancet Counter
Depth Indicator

Chapter 1: Understanding Your New System 8
▲
!
Coding Your Meter
A new code key is inside each new box of test strips.
1. Make sure your meter is
turned off.
2. Turn the meter over. 3. Remove the old code key
(if there is one in the meter)
and throw it away.
Change the code key every time you open a new box of test strips!

Chapter 1: Understanding Your New System 9
Notes:
• Don’t force the code key into the meter — it is made to go in the meter only one way.
• If you see a code “- - -” turn the meter off and reinsert a code key in the meter.
4. Turn the code key over so the code number
faces away from you. Push it into the meter
until it stops.
5. Leave the code key in the meter until you
open a new box of test strips. Remember to
change the code key each time you open a
new box of test strips.

Chapter 1: Understanding Your New System 10
1.
Press and release to turn the
meter on. The time and date appear
on the display. The word “set” and
the hour flash. If this is the correct
time and date, press and hold
to exit the set mode.
2. Press and release or to
decrease or increase the hour.
Press and hold or to
scroll faster.
3. Press and release to
set the hour. The minutes flash.
Adjusting the Time and Date—First Time Use
Your new meter comes with a preset time and date. You may need to change the time to your time zone.
Having the right time and date in your meter is important if you use the meter memory or if you want to
download your results to a computer.
decrease increase
|
|
|
|
|
|
|
|
|
|
|
|
|
|
|
|
|
|
|
|
|

Chapter 1: Understanding Your New System 11
4. Repeat steps 2 and 3 to set the
minutes, am/pm, day, month,
and year. The flashing field is
the one you are changing.
5. Once you set the year, press
and hold until the flashing
test strip appears.
6. See Chapter 4 “Meter Setup” to
set other options.
|
|
|
|
|
|
|
|
|
|
|
|
|
|
|
|
|
|
|
|
|
|
|
|
|
|
|
|
|
|
|
|
|
|
|
|
|
|
|
|
|
|
|
|
|
|
|
|
|
|
|
|
|
|
|
|
|
|
|
|
|
|
|
|
|
|
|
|
|
|
|
|
Note: When you install a new battery, the meter automatically prompts you to check the time and date
when you turn it on. If it is correct, press and hold to exit the set mode.
|
|
|
|
|
|
|
|
|
|
|
|
|
|
|
|
|
|
|
|
decrease increase
|
|
|
|
|
|
|
|
|
|
|
|
|
|
|
|
|

Chapter 1: Understanding Your New System 12
Using ACCU-CHEK Aviva Test Strips
• Only use ACCU-CHEK Aviva test strips.
• Replace the code key and run a control test
every time you open a new box of test strips.
(See Chapter 2 “Control Testing.”)
• Keep the test strips in their original container.
• Close the container tightly right after you take a
test strip out. This helps keep the test strips dry.
• Use the test strip within three minutes after you
take it out of the container.
• Be sure to check the “Use by” date on the test
strip container. Do not use the test strips after
that date.
• Store the test strip container and your meter in a
cool dry place, such as a bedroom.
• Store the test strips at 36 to 90ºF. Do not freeze.
• Do not apply blood or control solution to the test
strip before you insert it into the meter.
▲
!Do not store test strips in high heat and moisture areas (bathroom, kitchen, laundry room)!
Heat and moisture can damage your test strips.

Chapter 1: Your New Meter 13
Chapter 2: Control Testing
Why Run Control Tests?
Running a control test lets you know that your meter and test strips are working properly to give reliable
results. You should run a control test when:
• You open a new box of test strips
• You left the test strip container open
• You want to check the meter and test strips
• Your test strips were stored in extreme temperatures
or humidity
• You dropped the meter
• Your test result doesn’t agree with how you feel
• You want to check if you are testing correctly
About the Control Solutions
• Only use ACCU-CHEK Aviva control solutions.
• Your meter automatically recognizes the difference
between a control solution and blood.
• Write the date you opened the bottle on the bottle
label. The control solution is good for three months
from that date or until the “Use by” date on the
bottle label, whichever comes first.
• Do not use control solution that is past the “Use
by” date.
• The control solution can stain clothing. If you spill
it, wash your clothes with soap and water.
• Close the bottle tightly after use.
• Store the bottle at 36 to 90ºF. Do not freeze.

Chapter 2: Control Testing 14
Running a Control Test
You need the meter, a test strip, and control solution Level 1 or Level 2.
The control level is printed on the bottle label.
1. Put a test strip into the
meter in the direction of
the arrow. The meter
turns on.
Note: Most people just test the Level 1 control. If you
wish, you can also test a Level 2 control. A set of
Level 1 and Level 2 control solutions is available
for purchase. Your meter automatically recognizes
the difference between a control solution and
blood. The control solution results are not
displayed in memory.

Chapter 2: Control Testing 15
2. Make sure the code number on
the display matches the code
number on the test strip
container. If you miss seeing the
code number, take the test strip
out and reinsert it into the meter.
3. Select the control solution you
want to test. You will enter the
level later in the test.
4. Place the meter on a flat
surface, like a table.
5. Remove the control bottle cap
and wipe the tip of the bottle
with a tissue.
OR

Chapter 2: Control Testing 16
|
|
|
|
|
|
|
|
|
|
|
|
Running a Control Test (continued)
6. Squeeze the bottle until a tiny drop forms at the
tip of the bottle. Touch the drop to the tip of the
yellow end of the test strip. Do not put control
solution on top of the test strip. When you see
flash, you have enough control solution in the
test strip. Wipe the tip of the bottle with a tissue,
then cap the bottle tightly.
7. A result appears on the display, along with a
control bottle symbol and a flashing “L.” Don’t
remove the test strip yet. Press once to
mark it as a Level 1. If you tested the Level 2
control, press a second time.

Chapter 2: Control Testing 17
8. Press to set the level in the meter. 9. The control result and “OK” alternate on the
display if the result is in range. The range is
printed on the test strip container label. The
control result and “Err” alternate on the display if
the result is out of range. Remove the test strip
and throw it away.
in range
example
out of range
example

Chapter 2: Control Testing 18
Understanding Control Test Results
Example
The label on your test strip container shows the acceptable
ranges for both the Level 1 and the Level 2 control solutions.
The result you get should be inside this range. Make sure you
compare the result to the correct level of control.
When the control result is inside the range on the test strip
container, your test strips and your meter are working properly.
Range (mg/dL)
Level 1 25–55
Level 2 255–345
(This is an example. Refer to the
ranges on your test strip container.)
Table of contents