Advocate PetTest BMB-EV099X User manual

1
English
Thank you for choosing PetTest
as your meter of choice. The first,
most important part of using your
new PetTest meter is to register
your meter with us online. When
you register your meter you are
assured that:
1) We can notify you about any important updates
or changes to your meter.
2) Registering confirms the full warranty period of
your PetTest meter.
3) Registering provides you piece of mind that
you are protected.
To Register your new PetTest Meter:
Go to: www.advocatemeters.com
Click on WARRANTY REGISTRATION in the
QUICK LINKS section.
Enter your information and meter serial number.
That's it!
Thank you

English
2
Table of Content
Important Information about Your System................. 03
Intended Use...........................................................03
Sampling Sites.........................................................04
Introduction of Your System......................................04
System Contents......................................................04
Meter Components...................................................05
Meter Display...........................................................06
Test Strip.................................................................06
Meter Set-Up............................................................. 07
Install Batteries........................................................07
Set the Meter........................................................... 08
Use the Alarm.......................................................... 12
Quality Control......................................................... 13
Important Control Solution Test Information............... 14
Run a Control Solution Test...................................... 14
Important Safety Instructions................................... 03
Delete Memory.........................................................11
When to check your system with control solutions....... 13
Run a Blood Glucose Test on Your Pet........................17
Blood Glucose Test.................................................. 16
Prepare for the Test................................................. 16
Expected Blood Glucose Values............................... 18
Limitations............................................................... 19
20
Meter Memory...........................................................
7-, 14-, 28- Day Average Results............................... 20
Test Results............................................................ 21
23
Maintenance.............................................................
Cleaning Procedure................................................. 23
Storage...................................................................27
Message and Troubleshooting.................................. 28
Specifications.......................................................... 32
Statements............................................................... 32
Warranty................................................................... 33
Appendix:
Warranty Card
Log Book
Symbol Information.................................................. 34
Disinfection Procedure............................................. 23

English
Important Safety Instructions
®
ADVOCATE
®
ADVOCATE
®
E
PetTest Blood Glucose Monitoring System is
not intended for human blood glucose testing and may give
inaccurate results when used on humans. DO NOT use on
humans! PetTest Blood Glucose Monitoring System is
intended for use outside the body only (in vitro diagnostic
use) .
Only use PetTest BMB-BA002P Test Strips with PetTest
Blood Glucose Meter. Other test strips may produce
inaccurate results.
Perform all quality control checks recommended in this
Owner's Manual.
All small parts in this system should be kept away from
children who still put things in their mouths. If they are
swallowed, promptly see a healthcare professional.
Read all instructions thoroughly and practice the test
before using the product to test your pet's blood glucose.
Do all quality control checks as directed and consult with
your veterinarian.
Failure to follow instructions might cause incorrect test results.
This device is for use under the direction of a veterinary
professional.
Home testing results are not a substitute for veterinary advice.
ADVOCAT PetTest is a system designed to aid in the
treatment of Pet Diabetes. Always consult with your pet's
veterinarian prior to starting new treatments. Advocate makes
no recommendations on treatment options and is solely a
system for measuring blood glucose levels in dogs and cats.
3
Intended Use
®
ADVOCATE PetTest BMB-EV099X Blood Glucose Monitoring
System is intended for use outside the body (in vitro diagnostic use).
It is used for quantitative measurement of glucose level in fresh
capillary whole blood samples drawn from dogs and cats.
®
ADVOCATE PetTest BMB-EV099X Blood Glucose Monitoring
System consists of the PetTest Blood Glucose Meter and PetTest
®
BMB-BA002P Blood Glucose Test Strips. ADVOCATE PetTest
®
Control Solutions are for use with ADVOCATE PetTest BMB-EV099X
Blood Glucose Monitoring System as a quality control check to verify
the accuracy of blood glucose test results.
Important Information about Your System

English
4
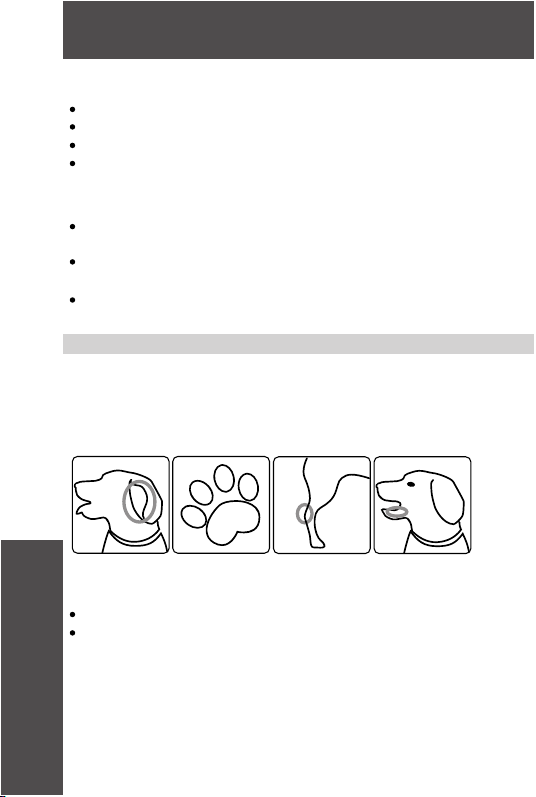
Sampling Sites
Consult veterinarian for recommendation if you don't know
which site is the best sampling site for your pet.
Marginal Ear
Vein
Both Dogs
and Cats
Paw Pad
Both Dogs
and Cats
Leg Callus Inner or
Outer Lip
Dogs only
System Contents
PetTest BMB-EA099X Blood Glucose Monitoring
System contains the following items:
PetTest Blood Glucose Meter
PetTest Owner's Manual
PetTest Quick Reference Guide
PetTest BMB-BA002P Blood Glucose Test Strips*
PetTest Control Solution*
Lancing Device*
Lancets*
Carrying Case*
®
ADVOCATE
Introduction of Your System
Notes:
(*) These contents may vary according to geographic
markets. You must check your outer package. If any items
printed on the outer box are missing from your package or
the package is opened prior to use, please contact the
place of purchase for assistance.
For information on how to obtain accessories including test
strips, lancets and control solutions, please contact
Customer Support 24/7 at 1-866-373-2824 for availability.
‧
‧
Dogs only

English
5
Test Strip Port
Insert test strip. The meter turns on
when you insert the test strip.
Display
Display results and other important
information.
Main Button
Press to enter memory mode to
review stored results or adjust setting.
Meter Components
Set Button
Press to enter setting mode
and change the date, time,
alarm settings and memory
deletion.
Battery Cover
Remove cover
to replace
battery.
Mini USB Port
Download port to connect PetTest meter
with computer.
English
6
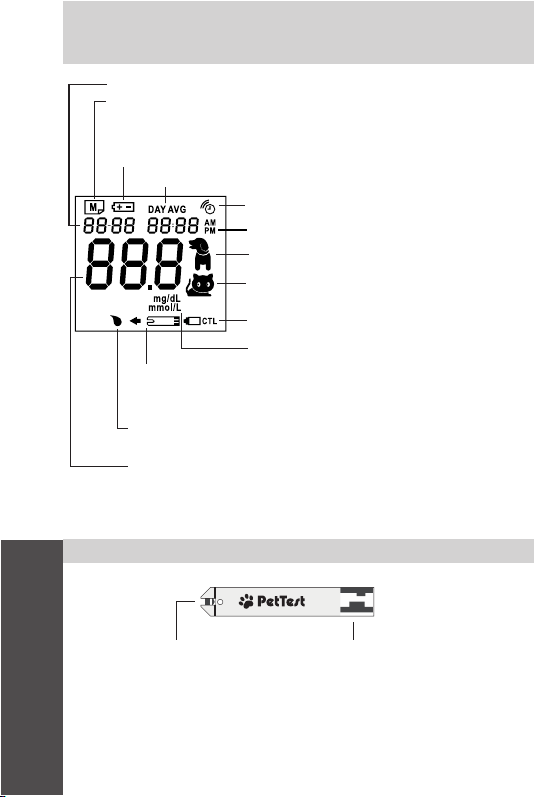
Meter Display
Memory
Appears when viewing test results stored in the memory
Battery
Indicates batteries are low and need to be changed
Day Average Appears when viewing averages
Alarm Marker
Indicate an alarm has been set
Time
Dog Mode Marker
Cat Mode Marker
Control Solution Marker
Unit of Measurement
Test Strip Marker
Appears when the meter is ready for inserting a
test strip
Blood Drop
Appears when the meter is ready for applying sample
Test Result Area
Test results are displayed here.
Year/Date
Test Strip
Confirmation Window
Blood is drawn in and
reacts with enzyme
Contact Bars
Insert this area to
test strip port
English
7
Meter Set-Up
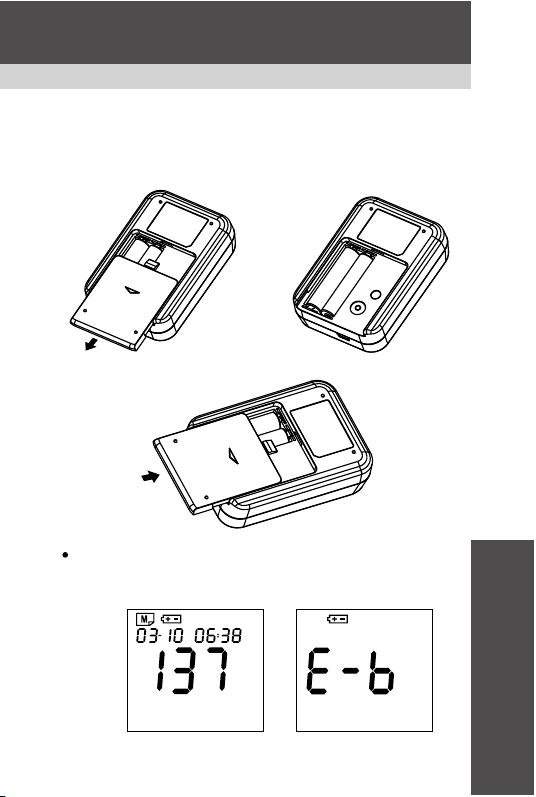
Install Batteries
Make sure that the meter is turned off before replacing the
batteries.
1. Press the buckle on battery
cover and lift up to remove
cover.
2. Remove the old battery
and replace with two 1.5V
AAA alkaline batteries.
3. Close the battery cover.
Notes:
Low batteries are indicated on the display by the battery
symbol or a brief display of “E-b” along with the battery
symbol.
mg/dL
AM

English
8
After installing new batteries, the
display check will appear briefly.
That means the batteries are installed
successfully.
Replacing the batteries does not affect the meter's memory.
However, the meter's setting (date, time and alarms) may
need to be reset.
Batteries might leak chemicals if not used for a long time.
Remove the batteries if you are not going to use this system
for an extended period (i.e., 3 months or more).
Set the Meter
Your meter allows you to set the year, month, date, time,
alarm as well as delete memory.
Enter Setting Mode
Start with the meter off. Press Set button (located on the
back of the meter).
Exit Setting Mode
Any time you want to exit setting mode, press and hold Set
button for 2 seconds until the meter turns off.
Move Setting Faster
Hold M button down to scroll forward quickly until the
number you desire appears.
English
9
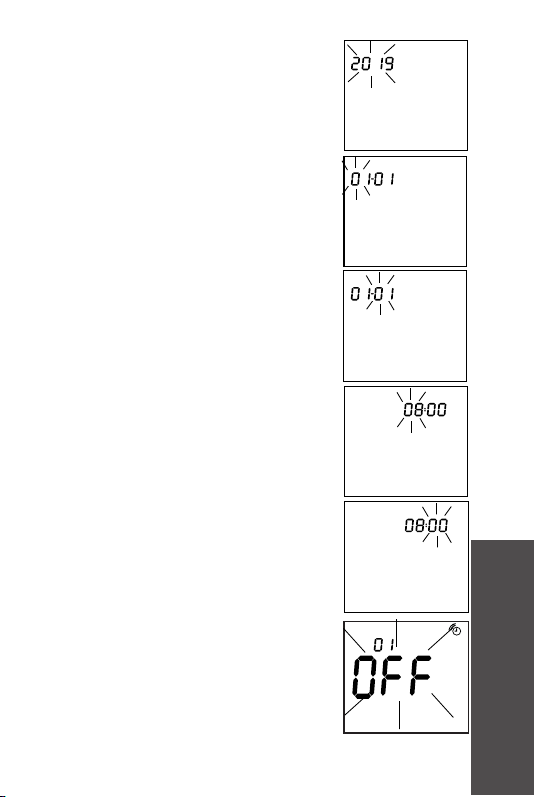
1. Set the Year
Press Set button to enter Setting mode.
The Year will be flashing. Press and
release M button until the correct year
appears. Press Set button to move to
Month setting.
2. Set the Month
With the month flashing, press and
release M button until the correct
month appears. Press Set button to
move to Day setting.
3. Set the Day
With the day flashing, press and
release M button until the correct day
appears. Press Set button to move to
Hour setting.
4. Set the Hour
With the hour flashing, press and
release M button until the correct hour
appears. Press Set button to move to
Minutes setting.
AM
5. Set the Minutes
With the minutes flashing, press and
release M button until the correct
minute appears. Press Set button to
move to Alarm setting.
AM
6. Set the Alarm
The meter provides four alarms (1-4).
You may set up any or all of them. With
the alarm sign on and ON/OFF flashing
(the default is OFF), press M button to
switch from "OFF" to "On" and go to
step 6-1 for details to set the alarm.
English
10
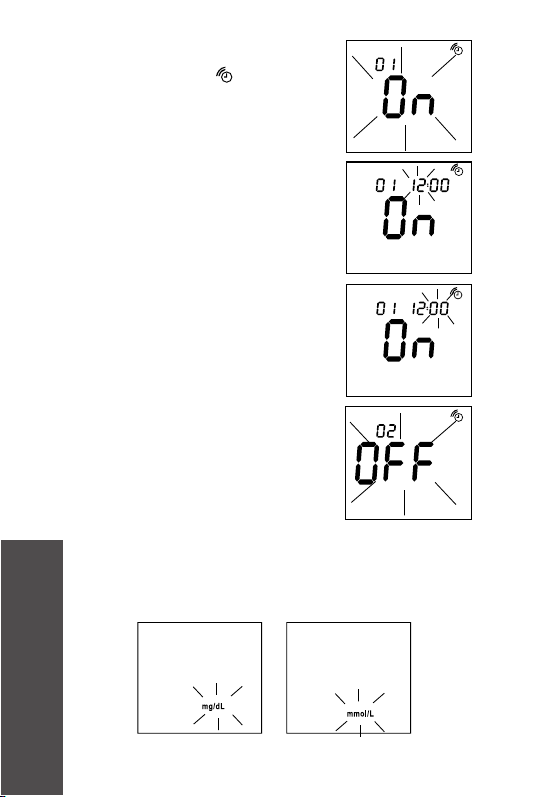
6-1. Enter the Alarm Setting
01 (Alarm 1) and with flashing
“On” displays, press Set button to
enter the hour setting.
6-2. Set the Alarm's Hour
With the hour flashing, press and
release M button until the correct
hour appears. Press Set button to
move to Minutes setting.
AM
6-3. Set the Alarm's Minutes
With the minutes flashing, press
and release M button to select 15
minutes, 30 minutes, or 45 minutes.
Press Set button to finalize Alarm 1
setting and then move to Alarm 2
setting. If you want to leave alarm
setting, when “OFF” displays with
alarm marker, press Set button to
move to Memory Deletion.
AM
6-4. Set Other Alarms (2-4)
Repeat steps 6-1, 6-2 and 6-3 to
set Alarm 2, Alarm 3, and Alarm 4.
After finalizing Alarm 4, Press Set
button to move to Select Unit mode.
7. Select Unit
The default unit is mg/dL (indicated by flashing mg/dL).
Press M button to toggle the unit setting to mmol/L
(indicated by flashing mmol/L) and press Set button to
move to Test Mode Setting.
English
11
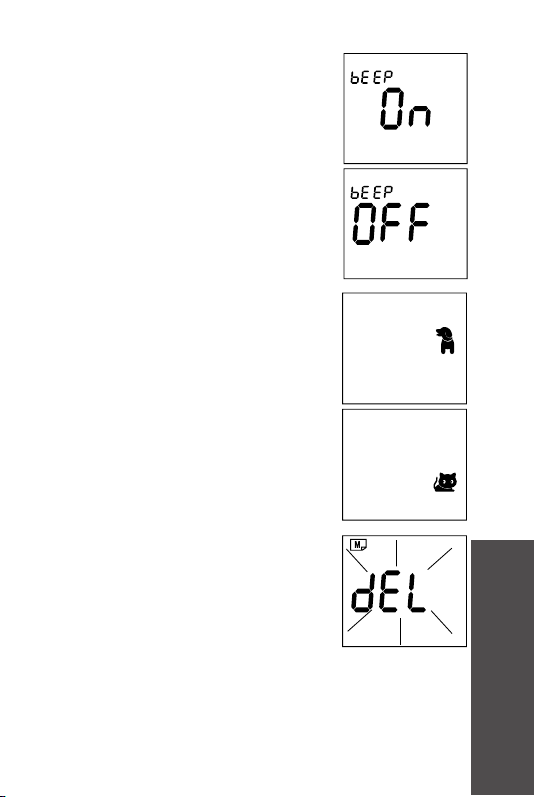
8. Mute mode setting
The default test mode is ON
(indicated by flashing “beep ON”).
Press M button to toggle the sound
setting to mute mode (indicated by
flashing “beep OFF) and press Set
button to move to Test Mode Setting.
9. Test Mode Setting
The default test mode is Dog Mode
(indicated by flashing dog mark).
Press M button to toggle the test mode
setting to cat mode (indicated by
flashing cat mark) and press Set button
to move to Delete Memory.
10.Delete Memory
When memory indicator “M” and flashing
“dEL” appears, if you DO NOT want to
delete memory, press Set button to skip
this step. If you want to delete ALL
memory, press and hold M button for 2
seconds to clear ALL memory.
12
Notes:
The date, time and alarm can ONLY be changed in the setting
mode. Therefore, when performing a glucose testing, those
parameters cannot be altered.
There are 3 kinds of average settings (7-, 14-,and 28-day)
which you can access from the meter memory. These averages
are calculated from results obtained during the 7-, 14-,and
28-day preceding the current date settings. Beware that when
you reset the date, the averages will be re-calculated and
updated automatically based on the new date.
The date and time might need to be adjusted due to daylight
savings.
The date and time setting might need to be reset after you
replace the batteries.
If no button is pressed for 2 minutes, the meter will turn off
automatically.
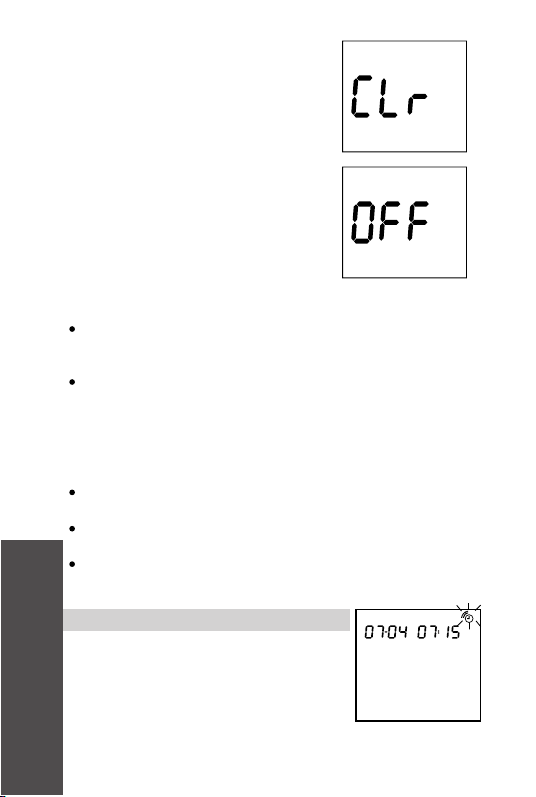
After pressing Set button or deleting
memory, all set-ups are completed.
The meter will show “OFF” and then
turn off automatically.
When “CLr” is displayed on the screen,
ALL memory is deleted.
Use the Alarm
When the alarm sounds, the meter will
automatically turn on. The alarm will keep
sounding for 30 seconds. You can perform
a test or turn off the meter.
AM
English

English
13
When to check your system with control solutions
Before using the meter for the first time.
When you begin using a new vial of test strips.
Whenever you suspect that the meter or test strips are not
working properly.
After cleaning your meter.
At least once a week.
To check your technique.
When you think results might be wrong.
When your test strips are exposed to extreme environmental
conditions (below 39.2°F(4 , or above 104°F ,
above 85% R.H. or below 15% R.H.).
If you drop the meter.
If you leave the strip vial cap opened.
°C) (40°C)
Quality Control
PetTest Level 1, Level 2 and Level 3 Control Solutions are
used to verify that the meter and test strips are working
properly together as a system. It is very important that you do
this simple check routinely to make sure results are accurate.
Follow manual's “Set the Meter” instructions to cancel the alarm.
Perform a Test
Insert a test strip into the test strip port
and follow the Blood Glucose Test
instructions.
Turn off the Alarm
Press M button to turn off the meter or
leave the alarm sounding for 30 seconds
and then the meter will turn off.
Cancel the Alarm
AM

English
14
Make sure that you have set the meter in the Control
Solution test "CTL"mode, so the result will not be stored in
the memory and not be incorporated into the average.
Shake the vial before use. Discard the first drop of control
solution. After squeezing, wipe off the dispenser tip to
avoid contamination. The above steps ensure you get a
good sample and an accurate result.
Important Control Solution Test Information
The control solution range printed on the test strip vial
is for PetTest Control Solution only. It is not a range for
the animal's blood glucose level .
Use only PetTest Control Solutions. Check the expiration
date on the control solution vial. Do not use if it is expired.
Use for only 90 days from the date that you first open it.
Record the discard date (date opened plus 90 days) on
control solution vial. Discard after 90 days.
Store the control solution tightly closed at temperatures
between 35°F -86°F(2°C -30°C). Do not freeze.
Control solution, meter, and test strips should come to room
temperature (between 68 -77°F/20 -25°C) before testing.
Run a Control Solution Test
1. Fully insert a test strip into the meter with the contact bars
end first. Push it in until it goes no further. The meter will
turn on and the display check will appear briefly.
2. When the flashing apply blood symbol ( ) appears on the
display, press M button until a control bottle with “CTL”
appears. Control results marked with a control bottle and
“CTL” will NOT be stored in the meter's memory.
3. Shake the control solution vial well. Remove the cap and
squeeze the vial to discard the first drop. Then wipe off the
dispenser tip to prevent contamination. Squeeze the vial
again to produce another drop and place this drop on a
clean non-porous surface.

English
15
If the result is not in the acceptable range, it may be
caused by:
Performing the test improperly.
Not shaking the control solution vial well enough.
Using expired or contaminated control solution or test strips.
Control solution is stored at environment out of the specified
temperature range, which is from 35°F to 86°F(2°C -30°C).
Test strips are stored at environment out of the specified
temperature range or humidity range, which are from 39.2°F
to 104°F(4°C -40°C), 15~85% R.H (non-condensing).
Using the first drop of control solution.
Using a damaged meter.
If you continue to get control solution test results that fall
outside the range, the system may be not working properly.
DO NOT use the system to test blood glucose.
Contact Customer Support 24/7 at 1-866-373-2824 for help.
4. Hold the meter to touch the drop until the meter beeps and
begins to count down. To avoid contaminating the control
solution with the content of the test strip, DO NOT directly
apply control solution into a strip.
5. After 5 seconds, the control solution test result appears.
Compare the result with the range printed on the test strip
vial. The result should fall within this range. Remove the
used strip, the meter will automatically turn off.
English
16
Blood Glucose Test
Make sure you have all items needed to test before you
perform a blood glucose test.
Blood Glucose Meter
Test Strips
Lancing Device
Sterile Lancets
Warnings:
Lancets are for single use only. Always use a new, sterile
lancet.
Keep the meter, the lancets and the lancing device clean
before using.
Wash hands thoroughly with soap and water after handling
the meter, lancing device, or test strips.
To reduce the chance of biohazardous infection
Prepare for the Test
1.Select the test site
There are many sites to obtain capillary blood samples from
your pets: the marginal ear vein in both cats and dogs; paw
pads in cats and dogs; leg callus in dogs; inner or outer lip
for dogs only.
Warming the area will help increase blood flow. This can be
done by:
Gently rubbing the test site or
Applying a warm (not hot) cloth to the test site. If using a
wet cloth, place the cloth inside a plastic bag to avoid
diluting the blood sample.

English
17
2. Wash your hands and the test site with warm water and
soap to ensure accurate results. Thoroughly dry your
hands and test site of your pet. (If using a 70% isopropyl
alcohol prep pad to clean the site, let it air dry before
sampling.)
3. Prepare lancing device and lancet according to instructions
included with the device.
4. After sampling, gently apply pressure to the test site with
sterile gauze or cotton wool to help stop the blood flow.
Run a Blood Glucose Test on Your Pet
1. Insert test strip from vial or foil-wrap
Fully insert the test strip into the meter until you feel it stop
against the end of the meter guide.
*Please tear off the middle part of foil package if needed
to open.
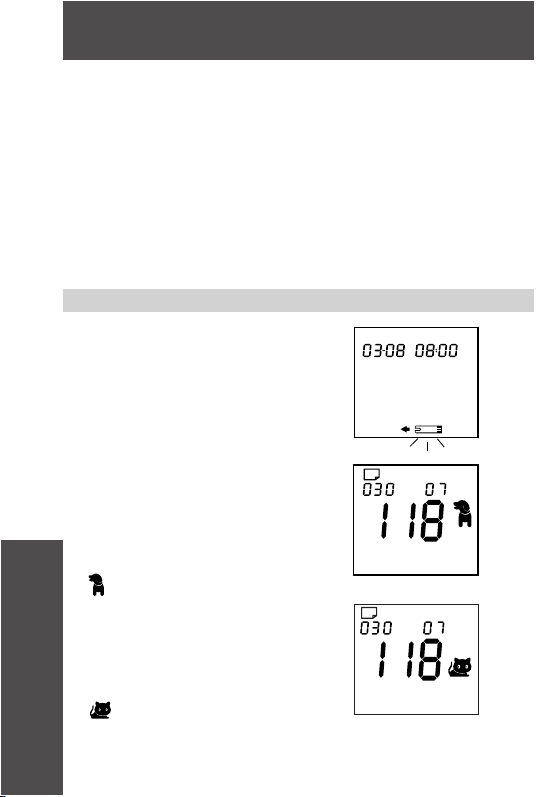
2. Choose Dog Mode/ Cat Mode/ CTL mode
You can choose from three modes by pressing M button. If
you miss the desired mode, you can continue pressing M
button to cycle through the mode choices again.
Dog Mode
When the dog marker is displayed and
the flashing blood drop ( ) indicator
appears on the display, go to step 3 for
obtaining a drop of blood or press M
button to move to Cat Mode.
AM
AM
Cat Mode
When the cat marker is displayed and
the flashing blood drop ( ) indicator
appears on the display, go to step 3 for
obtaining a drop of blood or press M
button to move to CTL Mode.

English
18
CTL Mode
When the control solution marker is
displayed and the flashing blood drop
( ) indicator appears on the display,
the meter is ready to perform a
control solution test. You can perform
a control solution test or press M button
to move back to Dog Mode.
AM
3. Apply Sample to the Test Strip
Touch the tip of the strip to the blood
sample until the meter beeps and
begins the 5 seconds countdown.
The minimum blood sample size is
0.3μl ( ). Please note that if the
confirmation window is not filled with
blood, the test result may be
inaccurate.
AM
4. Get Result
After 5 seconds, the blood glucose
test result appears. This result will
be automatically stored in the
meter's memory.
Expected Blood Glucose Values
Normal glucose ranges for cats and dogs without diabetes is
1
about 75~120 mg/dL (4.2~6.7 mmol/L). Many factors will
affect blood glucose values such as food intake, medication
dosages, health, stress, or exercise. You can consult your
veterinarian for appropriate “expected blood glucose values”
for pets.

English
19
Limitations
A. The test strips are to be used with fresh, capillary whole
blood samples.
B. DO NOT perform glucose tests on your pets when your pets
are sick or in poor body conditions.
C. DO NOT use to test newborn animals (neonates).
D. Not to be used for determination of a diagnosis or screening
of diabetes.
E. Extreme humidity may affect the results. A relative humidity
greater than 85% or lower than 15% may cause incorrect
results.
F. The system should be used at a temperature between
50°F-104°F (10°C - 40°C). Outside this range, the system
will cease operation. Bring system within operating
temperature range for 20 minutes before using.
G. DO NOT reuse the test strips. The test strips are for single
use only.
H. Red blood cell count (Hematocrit): Accurate results are
provided for hematocrit ranges between 20% and 60%;
hematocrit levels below 20% may cause higher results;
hematocrit levels above 60% may cause lower results. If
you do not know hematocrit level of your pets, please
consult with your veterinarian.
English
20
The meter stores the last 400 blood glucose test results along
with the date, time and species indicator. It also provides you
with 7-, 14-, and 28- day averages of dog and cat blood glucose
results, respectively. You can begin to review results stored in
the meter's memory by following the next steps.
Enter Memory Mode
Start with the meter off. Press M button until a test strip
marker appears.
Exit Memory Mode
Any time you want to exit memory mode, press and hold M
button for 2 seconds until the meter turns off.
7-, 14-, and 28-Day Average Results
1. Enter Memory Mode
When the meter is off, press and release
M button. The meter will show flashing
strip symbol, it means you can insert a
test strip now. If you do not want to
perform a test, press the M button to
view 7-day average result for Dog mode.
Meter Memory
AM
mg/dL
DAY AVG
M
mg/dL
DAY AVG
M
2. 7-Day Average Dog Result
The 7-day average dog result appears
after pressing and releasing M button.
07 DAY AVG = your 7-day average.
30= indicates the number of results
included in average.
=Dog marker
3. 7-Day Average Cat Result
Press M button again and 7-day average
Cat result appears. 07 DAY AVG = your
7-day average. 30= indicates the number
of results included in average.
=Cat marker
Table of contents
Languages:
Other Advocate Blood Glucose Meter manuals


Popular Blood Glucose Meter manuals by other brands


PharmaTech Solutions
PharmaTech Solutions GenUltimate! 4Pets Avantage Quick user guide

AgaMatrix
AgaMatrix Liberty owner's booklet

MediSure
MediSure DG001MM-MULTI quick start guide

Sinocare
Sinocare Safe AQ UG user manual

BIONIME
BIONIME Rightest GM210 user manual

Bayer HealthCare
Bayer HealthCare Contour next EZ user manual

Universal Biosensors
Universal Biosensors PETRACKR owner's booklet

Arkray
Arkray GLUCOCARD Expression Quick reference guide

Polymap Wireless
Polymap Wireless Polytel GMA2 PWR-09-02 user manual

Beurer medical
Beurer medical GL 50 evo manual

OmniPod
OmniPod FreeStyle Blood Glucose MonitoringSystem user guide

AgaMatrix
AgaMatrix WaveSense JAZZ owner's guide