DDI Prodigy Pocket User manual
Blood Glucose Monitoring System
Owner’s Manual

1
Diagnostic Devices, Inc. 1.800.243.2636
Prodigy Meter Owner’s Manual
Prodigy PocketTM Meter
Dear Prodigy®Owner:
Thank you for choosing the Prodigy PocketTM blood glucose
monitoring system. Please read this manual carefully as it
contains important information about your Prodigy® system.
A warranty registration card is included with your system.
Please return the completed card to us.
Prodigy®meters are designed to help you and your healthcare
professionals monitor your blood glucose levels. This owner’s
manual will help you learn how to use the Prodigy PocketTM Meter
effectively. Technical support is available 24 hours/7 days a week
by calling 1-800-243-2636. All questions about interpreting the
results should be directed to your healthcare professionals.
The Prodigy PocketTM is the latest technology for blood glucose
monitoring, easy to use and will give you fast and accurate results
with a minimal sample of blood. It has a large screen display for
easy reading and is small and lightweight for portable convenience
(fits in your pocket!).
The Prodigy PocketTM Meter:
• Requires no coding; allowing you to save time and avoid human
error due to coding.
• Allows you to perform Alternative Site Testing (AST).
• Has memory and data management capabilities. Prodigy®’s free
software, available at www.prodigymeter.com, gives you and your
healthcare professionals powerful graphic tools to manage your
diabetes.

Diagnostic Devices, Inc. www.prodigymeter.com
Prodigy Meter Owner’s Manual
2
Read this before using your Prodigy PocketTM Meter.
The following basic safety precautions should always be taken.
• Close supervision is necessary when the device is used by, on,
or near children, handicapped persons or invalids.
• Use the device only for the intended use described in this
manual.
• Do not use test strips and control solutions that are not
supplied by the manufacturer.
• Do not use the device if it is not working properly, or if it has
suffered any damage.
• Before using any product to test your blood glucose, read
all instructions thoroughly and practice the test. Do all quality
control checks as directed and consult with a diabetes
healthcare professional.
Warning: Keep the test strip vial away from children; the vial cap
and the test strips can be a potential choking hazard. Never chew
or swallow a test strip. If this occurs, please seek medical
assistance immediately.
Important Safety Instructions

3
Diagnostic Devices, Inc. 1.800.243.2636
Prodigy Meter Owner’s Manual
Important Safety Instructions .......................................................................... 2
Important Health-Related Information .............................................................. 4
About Alternative Site Testing (AST)................................................................ 5
Introduction to the Prodigy PocketTM Meter ....................................................... 7
Intended Use ................................................................................................. 7
Test Principle ................................................................................................. 7
Contents of the Prodigy PocketTM Meter............................................................ 8
Setting up the Prodigy PocketTM Meter.............................................................. 9
Key Functions of the Meter ............................................................................. 9
Meter Display ............................................................................................. 10
Key Functions of the Test Strip...................................................................... 11
Important Test Strip Information.................................................................... 12
Set-Up Steps ............................................................................................... 13
Control Solution Testing ................................................................................ 16
About Prodigy® Control Solution..................................................................... 16
Important Control Solution Test Information................................................... 17
Performing a Control Solution Test ............................................................... 18
Blood Glucose Testing ................................................................................... 21
Preparing the Lancing Device ........................................................................ 21
Getting a Blood Sample................................................................................ 22
Performing a Blood Glucose Test .................................................................. 24
Using the Meter Memory ............................................................................... 26
Viewing Results on a Personal Computer ....................................................... 29
Caring for your Prodigy PocketTM Meter............................................................ 30
Maintenance................................................................................................ 30
Battery ....................................................................................................... 30
Battery Replacement.................................................................................... 31
System Troubleshooting ................................................................................ 32
Special Messages........................................................................................ 32
Error Messages ........................................................................................... 33
Troubleshooting Guide.................................................................................. 34
Information about your Prodigy PocketTM Meter ............................................... 36
Comparing Meter and Laboratory Results ...................................................... 36
Specifications ............................................................................................... 38
Performance Characteristics......................................................................... 39
Expected Test Results .................................................................................. 40
Table of Contents

Diagnostic Devices, Inc. www.prodigymeter.com
Prodigy Meter Owner’s Manual
4
Severe dehydration and excessive water loss may cause false low
results. If you believe you are suffering from severe dehydration;
consult a healthcare professional immediately.
Elevated blood triglycerides, reducing substances such as uric acid
and ascorbic acid at normal blood concentration, or acetaminophen,
dopa, methyldopa, L-dopa, and tolbutamide at normal blood
concentrations should not significantly affect the results.
If you are experiencing symptoms that are not consistent with your
blood glucose test results and you have followed all instructions
described in the owner’s manual, call your healthcare professional.
Test results below 60 mg/dL (3.3 mmol/L) indicate low blood
glucose (hypoglycemia). Test results greater than 240 mg/dL (13.3
mmol/L) indicates high blood glucose (hyperglycemia). If your
results are below 60 mg/dL or above 240 mg/dL, repeat the test,
and if the results are still below 60 mg/dL (3.3 mmol/L) or above
240 mg/dL (13.3 mmol/L), consult your healthcare professional
immediately.
Inaccurate results may occur in severely hypotensive individuals
or patients in shock. Inaccurate low results may occur for
individuals experiencing a hyperglycemic-hyperosmolar state.
Please refer to your test strip package insert for additional
important information.
Important Health-Related Information
5
Diagnostic Devices, Inc. 1.800.243.2636
Prodigy Meter Owner’s Manual
There are important limitations to AST. Please consult your
healthcare professional before you perform AST.
What is AST?
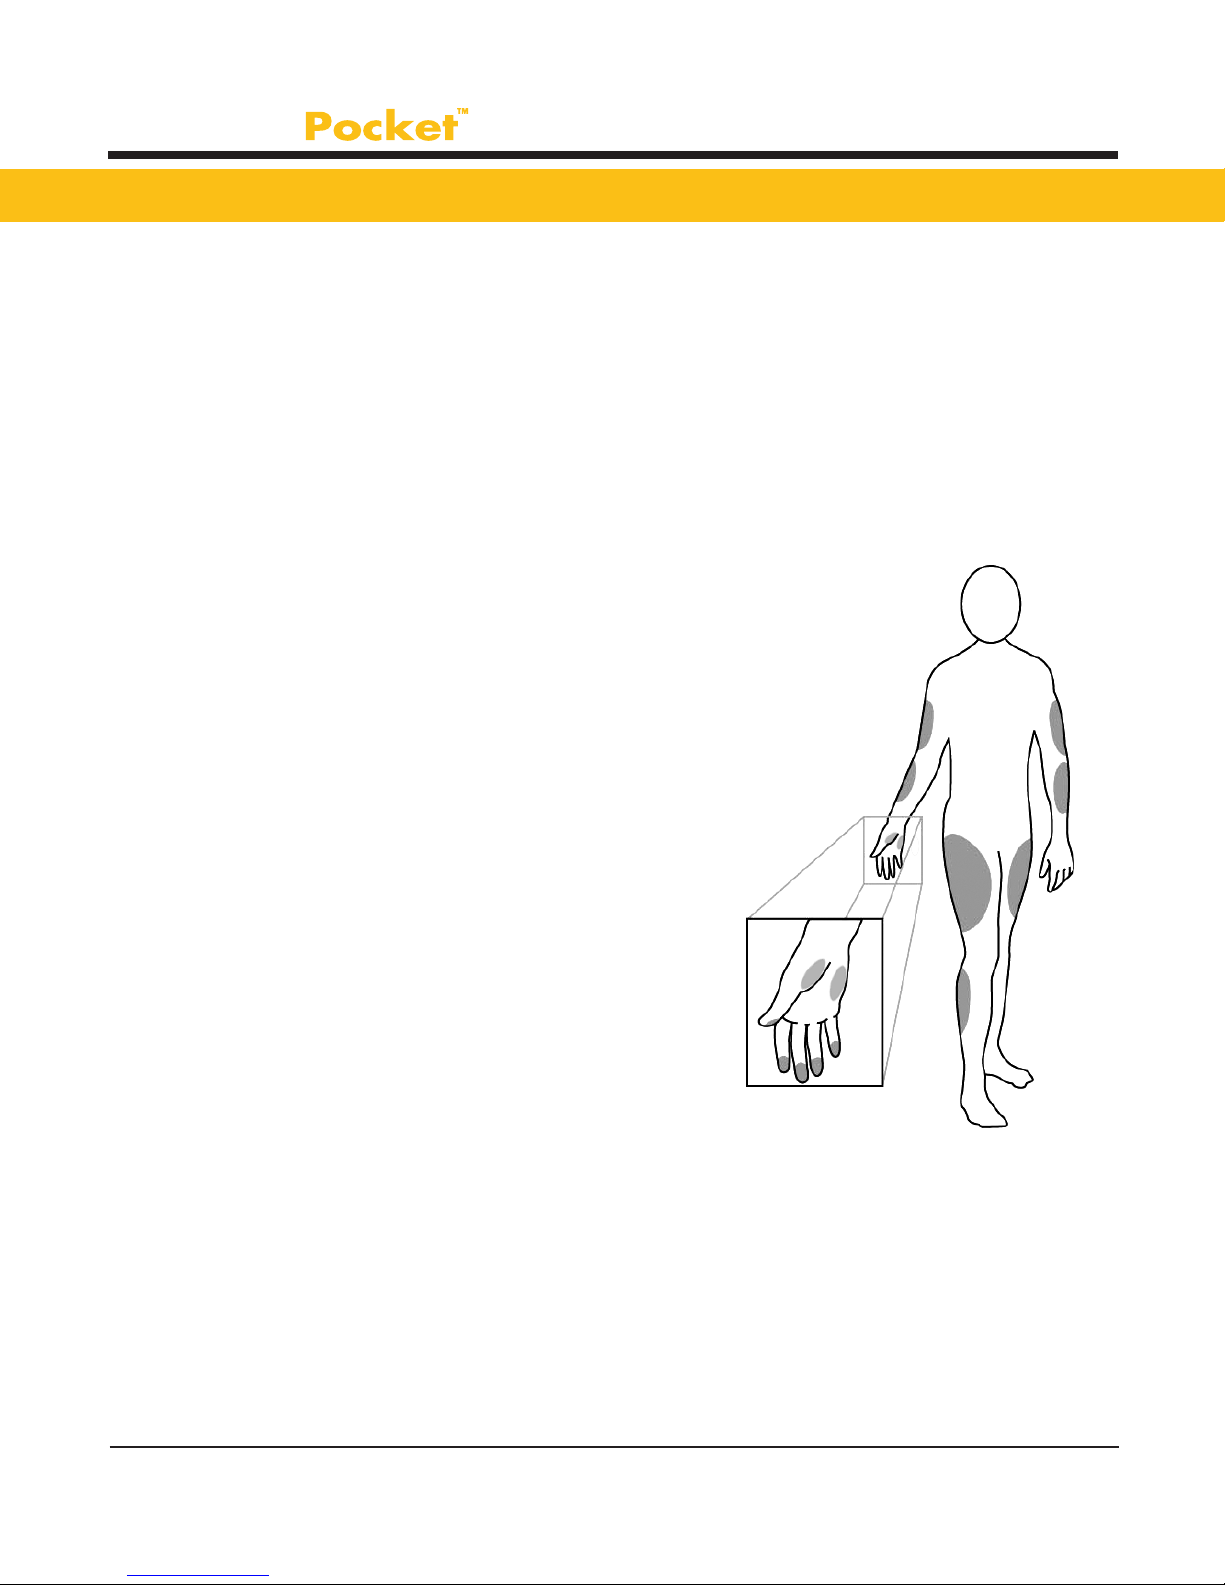
Alternative Site Testing (AST) means you can use parts of the body
other than your fingertips to check your blood glucose levels. The
Prodigy®Pocket Meter allows you to test your palm, forearm, upper
arm, calf or thigh. See Figure 1.
What is the advantage?
Fingertips feel pain more readily
because they are full of nerve endings
(receptors). At other body sites, nerve
endings are not so numerous and you
will not feel as much pain as you will
experience at the fingertip.
When to use AST?
Food, medication, illness, stress, and
exercise can affect blood glucose levels.
Capillary blood at the ngertip reects
these changes faster than capillary
blood at other sites. Therefore, if you
are testing your blood glucose level
during or immediately after a meal,
physical exercise or stressful event,
take the blood sample from your fingertip only.
About Alternative Site Testing (AST)
Figure 1

Diagnostic Devices, Inc. www.prodigymeter.com
Prodigy Meter Owner’s Manual
6
Use AST only:
vTwo hours or more after your last meal.
vTwo hours or more after taking insulin.
vTwo hours or more after exercise.
vDuring steady state blood glucose conditions.
Do not use AST if:
v You have reason to believe you have hypoglycemia or
hyperglycemia.
vYour routine glucose results are often uctuating.
vYou are pregnant.
*To increase the accuracy when using AST, rub the puncture site
before extracting blood.

7
Diagnostic Devices, Inc. 1.800.243.2636
Prodigy Meter Owner’s Manual
Intended Use
The system is intended for use outside the body (in vitro diagnostic
use only). It should be used only for testing blood glucose (blood
sugar) and only with fresh capillary whole blood samples. The
system is intended for use in the home and in clinical settings. It
should not be used for the diagnosis of diabetes or for the testing
of newborns.
Test Principle
Blood glucose is measured by an electric current that is produced
when a blood sample mixes with the reagent (special chemicals)
of the test strip. The electrical current changes with the amount of
glucose in the blood sample. The Prodigy PocketTM Meter measures
the strength of the electrical current, calculates your blood glucose
level and then displays your result in either mg/dL or mmol/L.
The Prodigy PocketTM Meter, Test Strips and Control Solutions have
been designed, tested and proven to work together as a system to
produce accurate blood glucose test results.
Important: Use only Prodigy® control solutions and Test Strips
with your Prodigy PocketTM Meter. Using other test strips and
control solutions with this meter can produce inaccurate results.
Introduction to the Prodigy PocketTM Meter

Diagnostic Devices, Inc. www.prodigymeter.com
Prodigy Meter Owner’s Manual
8
The Prodigy PocketTM Meter is available as a meter only or as a
meter kit. Please check the “REF” number marked on the outside
of the box to see if you have purchased a “Meter” or a “Meter Kit”.
Please review the contents of your purchase to confirm that all the
components are included as listed below:
*Available in five colors. See page 41 .
Important: Please review the contents of your purchase.
If any items are missing, please return your meter to the
place of purchase.
Contents of the Prodigy PocketTM Meter
REF 50300 Series
Your “Meter” includes:
• Prodigy PocketTM Meter
• One (1) 3 Volt CR 2032 Battery
• Carrying Case
• Complete Instructions:
- Manual
- Log Book
- Quick Reference
- Warranty Card
*You can purchase additional
supplies from your provider
REF 50360 or 70800 Series
Your “Meter Kit” includes:
• Prodigy PocketTM Meter
• One (1) 3 Volt CR 2032 Battery
• Prodigy® Control Solution (4ml)
• Prodigy® Test Strips (10ct)
• Sterile Lancets (10ct)
• Lancing Device (with clear cap)
• Complete Instructions:
- Carrying Case
- Manual
- Log Book
- Quick Reference
- Warranty Card
9
Diagnostic Devices, Inc. 1.800.243.2636
Prodigy Meter Owner’s Manual
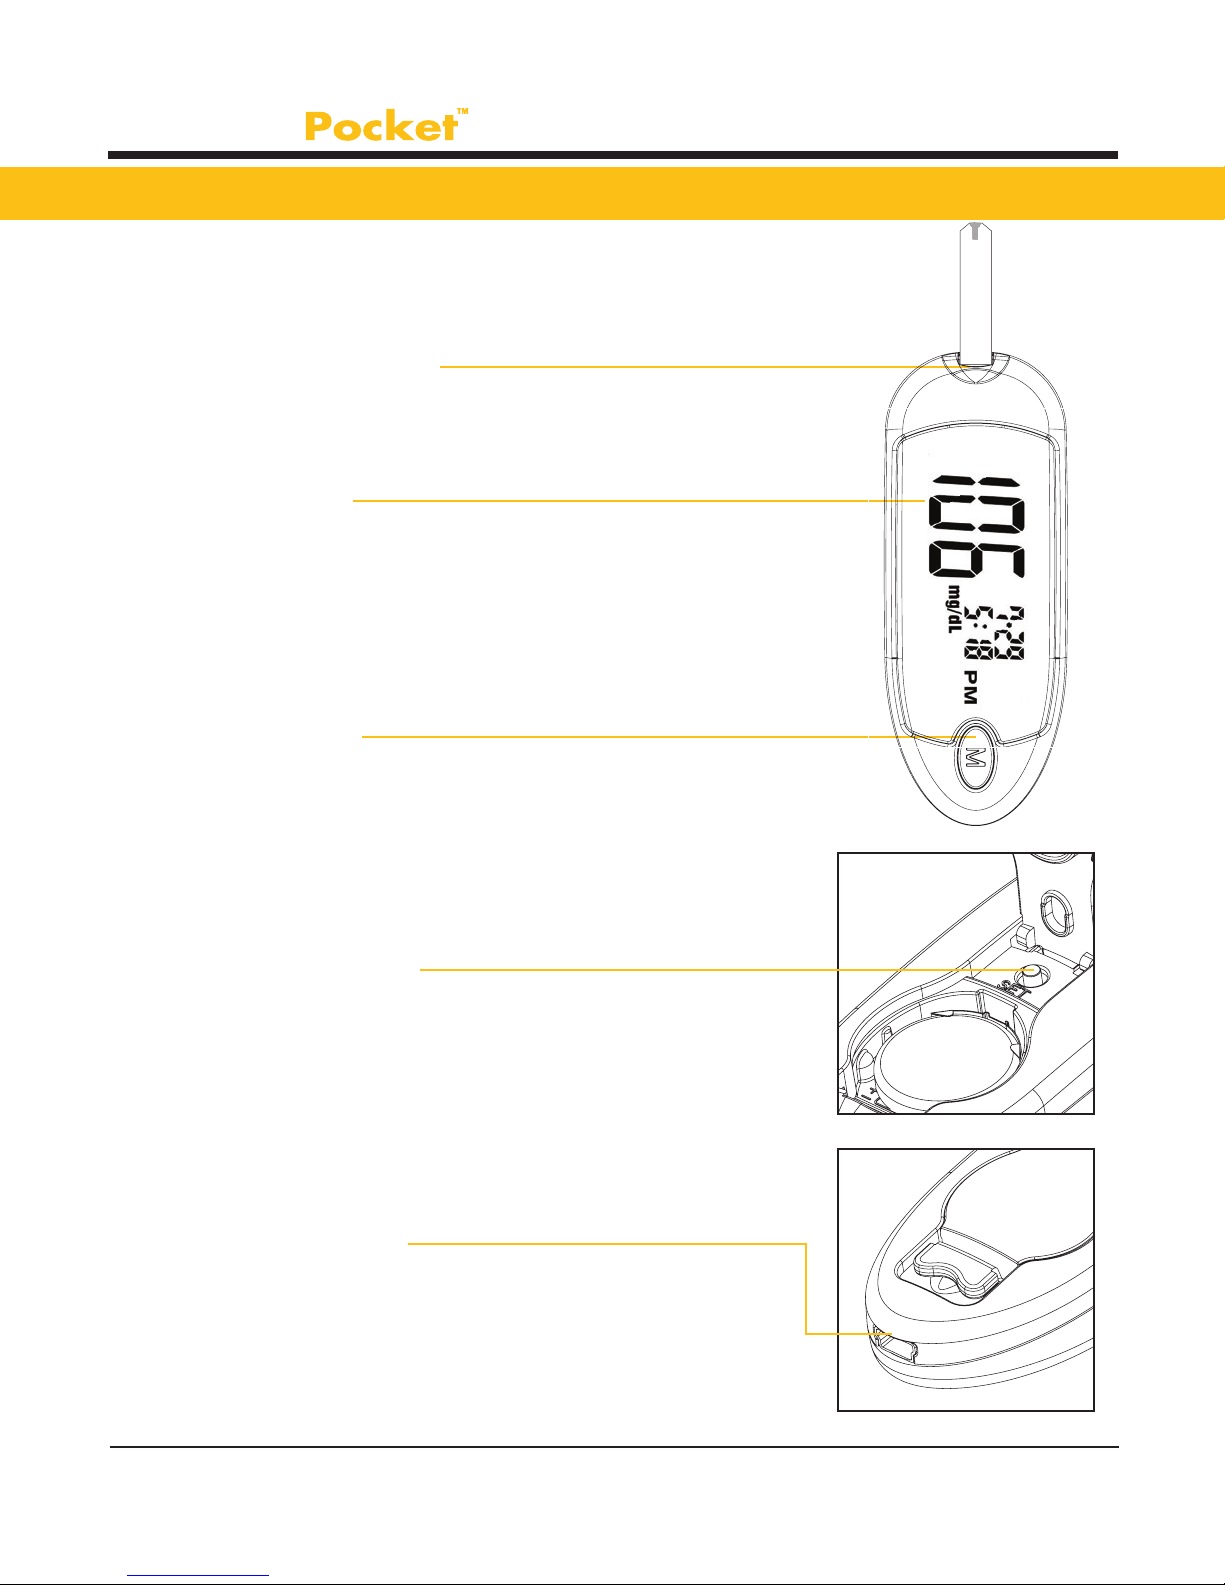
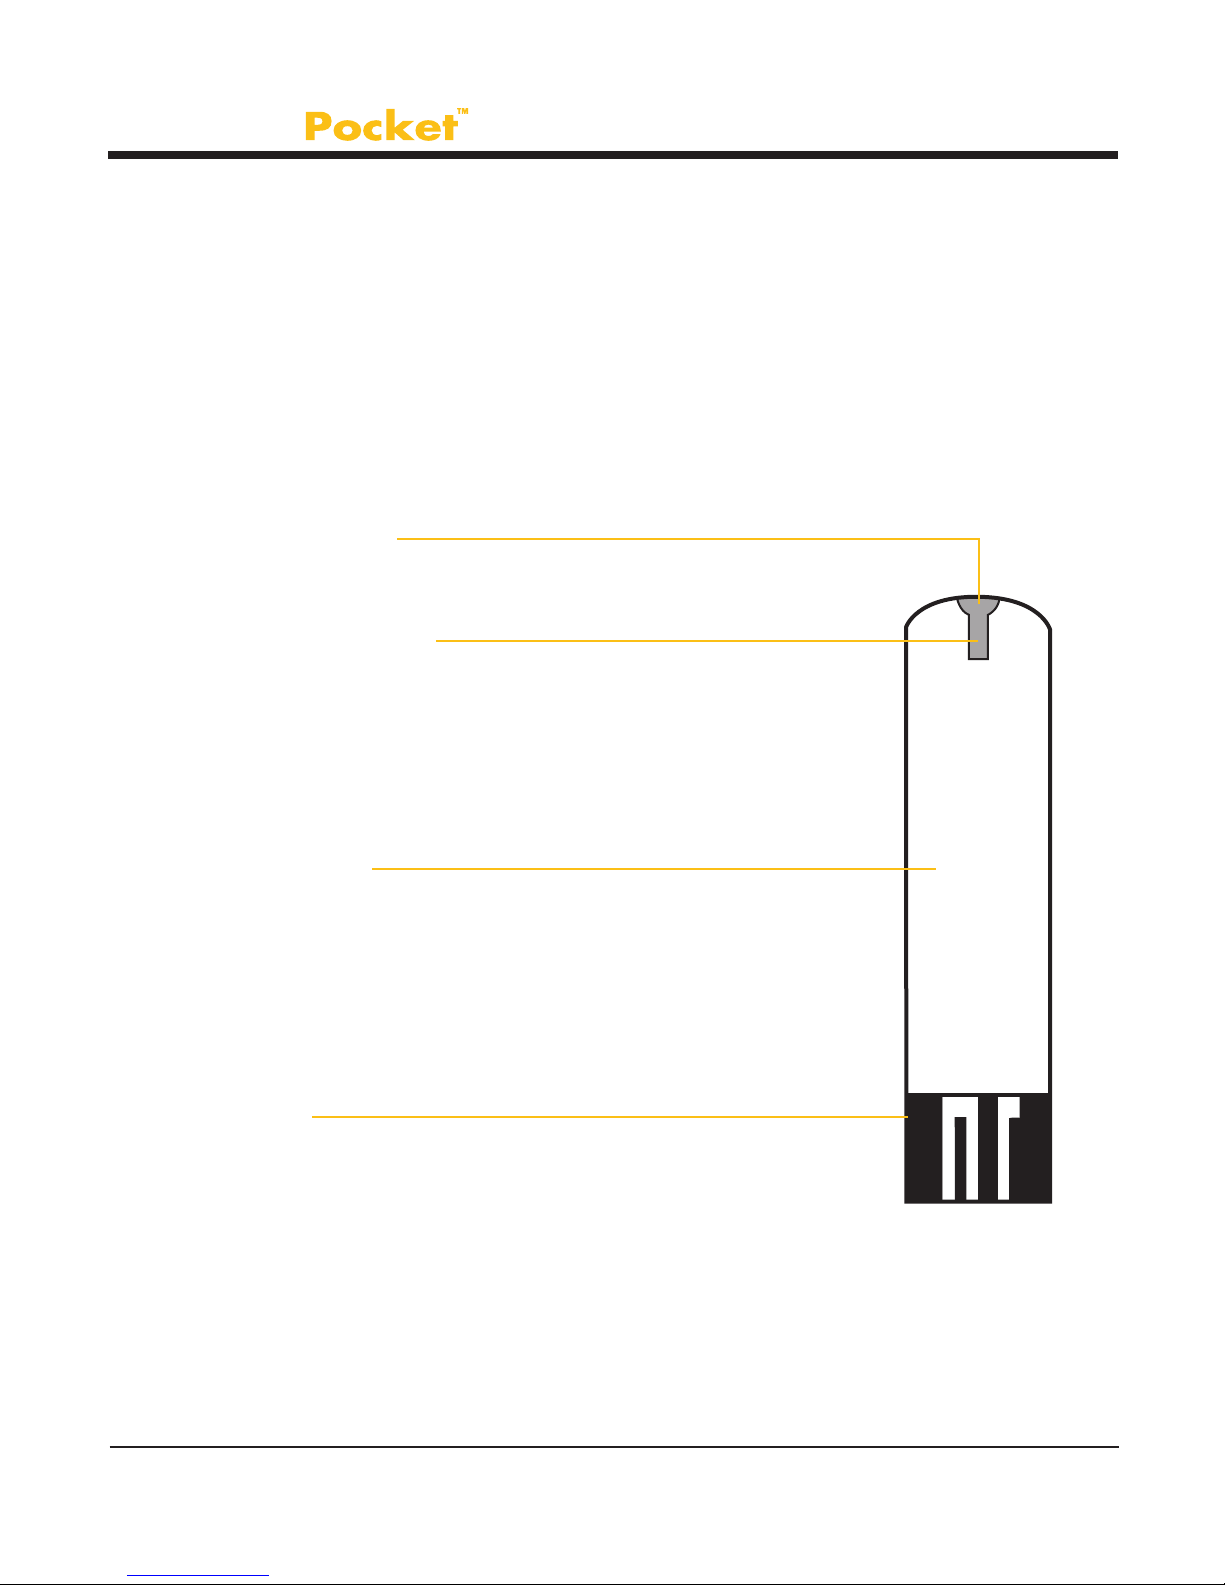
Key Functions of the Meter
Setting Up the Prodigy PocketTM Meter
Test Slot
Insert the test strip here.
The meter will turn on automatically.
LCD Display
Guides you through the test using
symbols and simple messages.
Set Button
Located in the battery compartment;
used to set up the meter.
Data Port
USB Port for USB Cable
connection to your computer.
Main Button
Turns the meter on or performs other
functions described in this manual.
Figure 3 - Back
Figure 4 - Back
Figure 2
Front
Diagnostic Devices, Inc. www.prodigymeter.com
Prodigy Meter Owner’s Manual
10
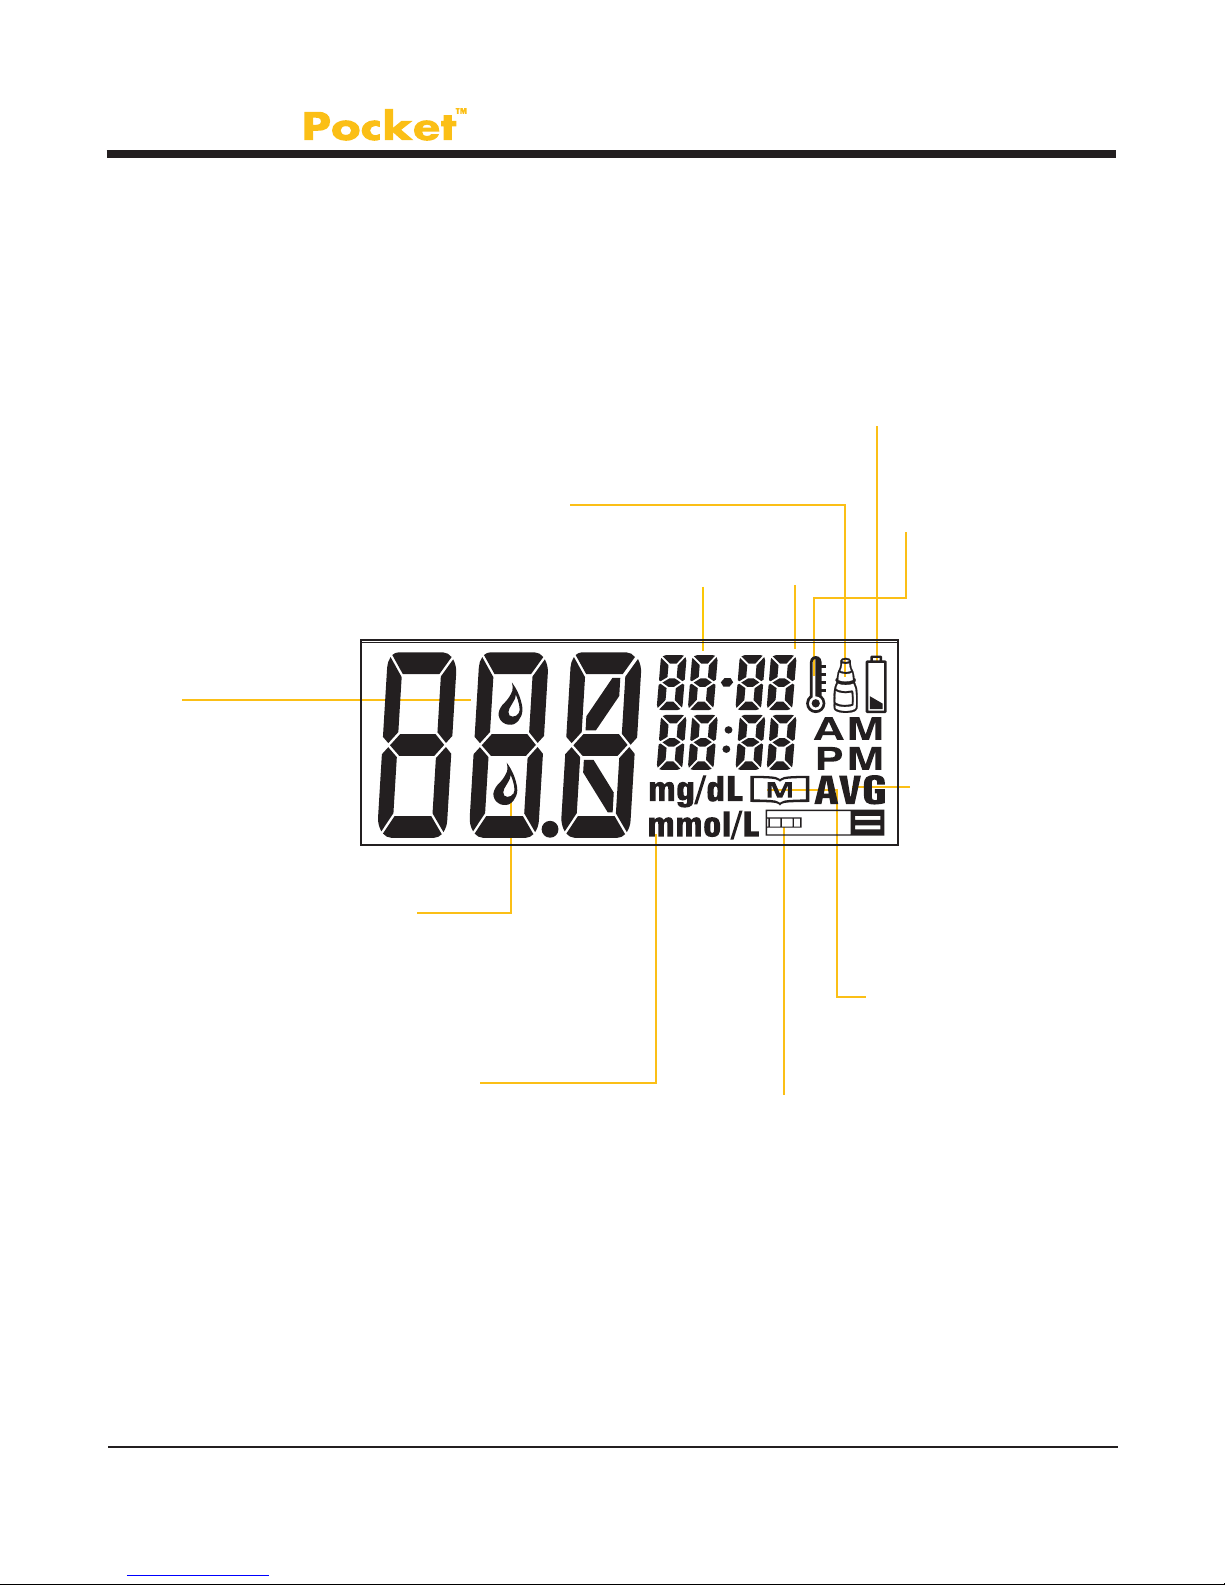
Control Solution Test Symbol
Shows that you are in Control
Solution Mode. Your test result will
not be stored in meter memory.
Test
Result Area
Displays test
results.
Blood Drop Symbol
Flashes when sample
should be applied.
Test Strip Symbol
Appears when the
meter is turned on.
Unit of Measure
Appears with the test result to
indicate what unit of measure
the test result is displayed in.
Low Battery Symbol
Appears when the battery
power is low.
Temperature
Symbol
Appears when
ambient
temperature
is outside of
operating range.
Memory Symbol
Appears when you
review the memory.
Day Average
Indicates
that the
displayed test
result is an
average.
Time Date
Meter Display
Figure 5
11
Diagnostic Devices, Inc. 1.800.243.2636
Prodigy Meter Owner’s Manual
Key Functions of the Test Strip
The Prodigy PocketTM Meter measures the amount of blood glucose
(blood sugar) in whole blood. Blood is applied to the opening of the
absorbent channel of the test strip and is automatically drawn into
the test strip.
The test strip consists of the following parts:
Absorbent Channel
Apply a drop of blood and it will be drawn in automatically.
Confirmation Window
Shows whether enough blood has been drawn
into the test strip’s absorbent channel.
Test Strip Handle
Hold this part to insert the test strip into the
test strip port on the meter.
Contact Bars
Insert this end of the test strip into the meter.
Push it in firmly until it will not go any further.
Please refer to the “Performing a Blood Glucose Test” Section
for complete instructions.
Figure 6

Diagnostic Devices, Inc. www.prodigymeter.com
Prodigy Meter Owner’s Manual
12
• Store test strip packages in a cool, dry place between
39.2°F ~ 104°F (4°C ~ 40°C). Keep away from direct sunlight
and heat. Do not refrigerate.
• Store your test strips in their original vial only. Do not transfer
them to a new vial or any other container.
• With clean, dry hands, you may touch the test strip anywhere
on its surface when removing it from the vial or inserting it into
the meter.
• Immediately use a test strip after removing it from the vial,
replace the vial cap and close it tightly.
• Only apply a blood sample or a control solution sample to the
test strip’s absorbent channel. Applying other substances
to the test strip’s absorbent channel will cause inaccurate
results.
• Record the discard date on the vial label when you rst open it.
Discard remaining test strips 90 days after the first opening
date.
• Do not use test strips beyond the expiration date printed on the
package.
Warning: Keep the test strip vial away from children; the vial
cap and the test strips can be a potential chocking hazard. Never
chew or swallow a test strip. If this occurs, please seek medical
assistance immediately.
Important Test Strip Information
13
Diagnostic Devices, Inc. 1.800.243.2636
Prodigy Meter Owner’s Manual
The Prodigy PocketTM Meter has the date, time and unit of
measurement presets. However, if you change the time or replace
the battery, you should check and update the time and date.
STEP 1: Insert the Battery
Open the battery cover located on the backside of the meter. Insert
one (1) 3 Volt CR 2032 lithium battery. The meter should beep and
turn on.
STEP 2: Enter Set-Up Mode
Start with the meter off. Then press the “SET” button located in the
battery compartment. The meter is now in the set-up mode.
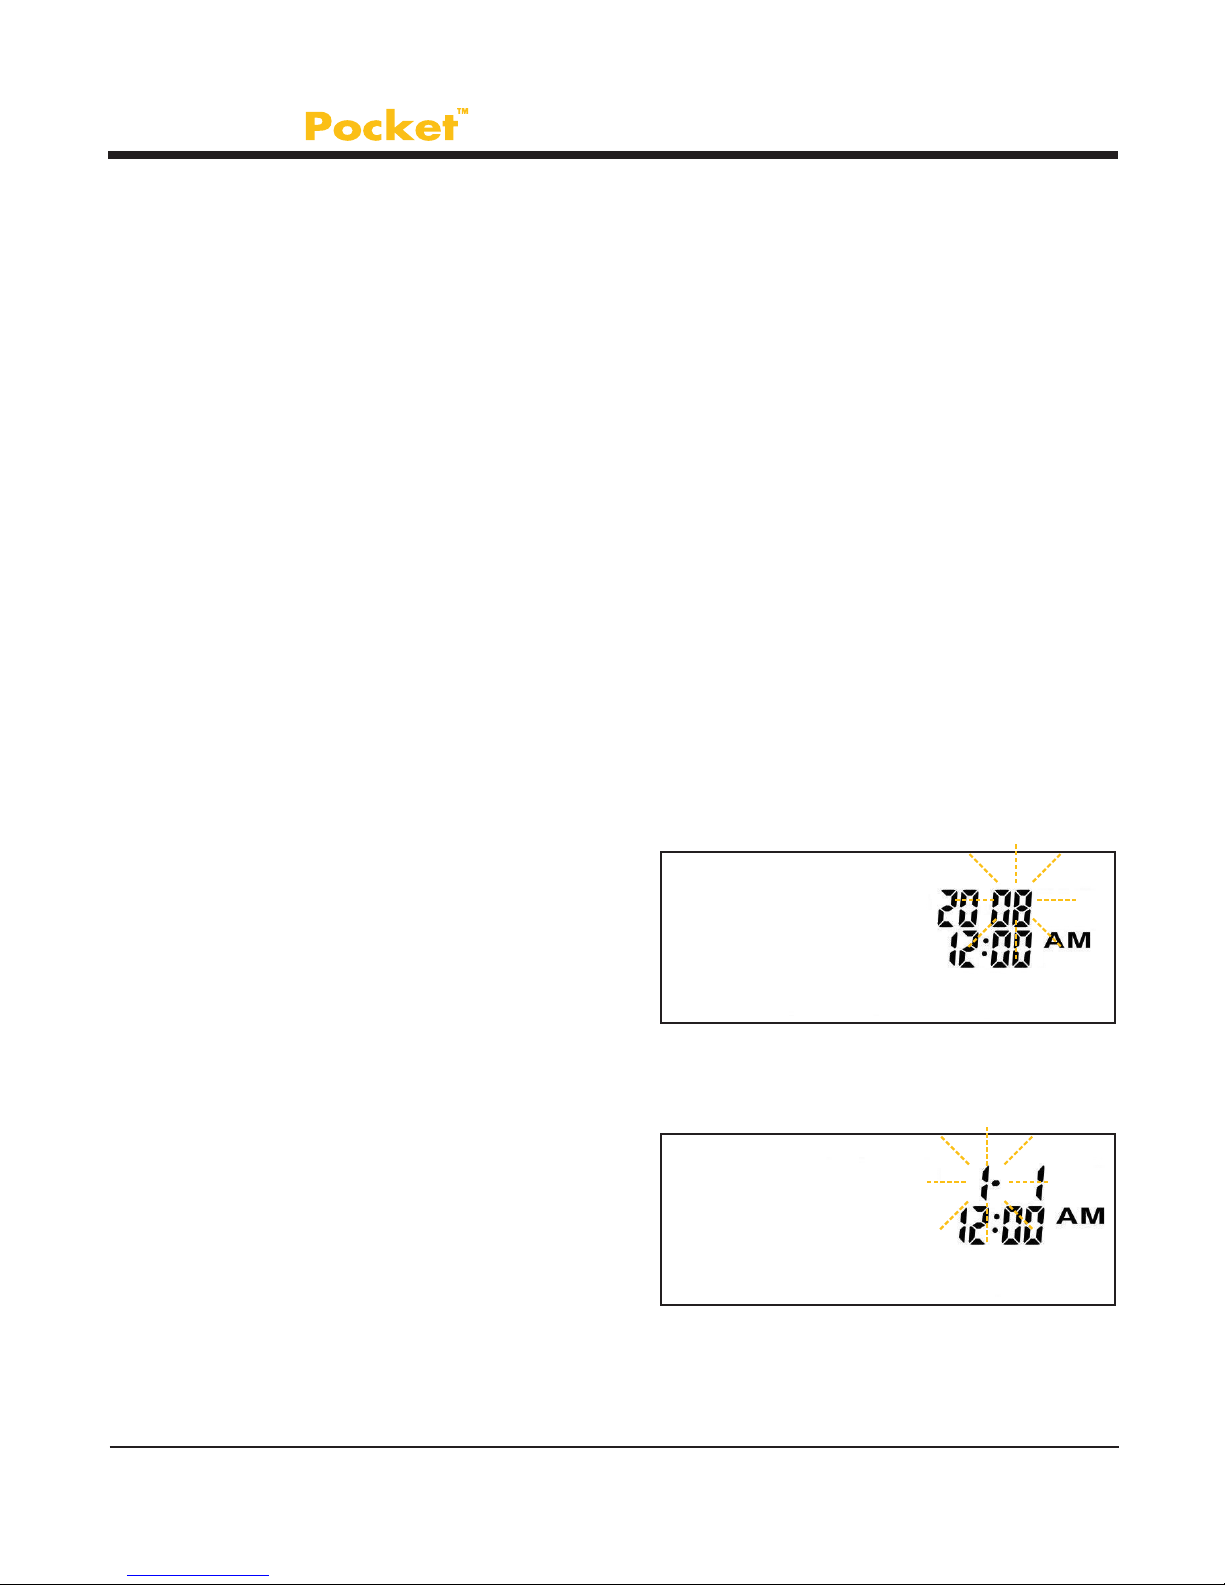
STEP 3: Set the Year
The year appears with the number
ashing. Press and release the
“M” button to advance the year.
With the correct year on the display,
press the “SET” button and the
date will appear on the display with
the month segment ashing.
See Figure 7.
STEP 4: Set the Month
Press and release the “M” button
to advance the month. With the
correct month on the display,
press the “SET” button and the
date segment will start ashing.
See Figure 8.
Set-Up Steps
Figure 7
Figure 8

Diagnostic Devices, Inc. www.prodigymeter.com
Prodigy Meter Owner’s Manual
14
STEP 5: Set the Date
Press and release the “M” button
to advance the date. With the
correct date on the display, press
the “SET” button and the time will
appear on the display with the hour
segment ashing.
See Figure 9.
STEP 6: Set the Hour
Press and release the “M”
button to advance the hour.
With the correct hour on the
display, press the “SET” button
and the minutes segment will
start ashing. See Figure 10.
STEP 7: Set the Minutes
Press and release the “M”
button to advance the minutes.
With the correct minute on the
display, press the “SET”
button and the current unit
of measurement will start
ashing. See Figure 11.
Important: Day averages are calculated from results obtained
during the 7, 14 and 28 days preceding the current date
and time settings. When the date and time are changed,
the 7, 14 and 28-day averages may change.
Figure 10
Figure 11
Figure 9
15
Diagnostic Devices, Inc. 1.800.243.2636
Prodigy Meter Owner’s Manual
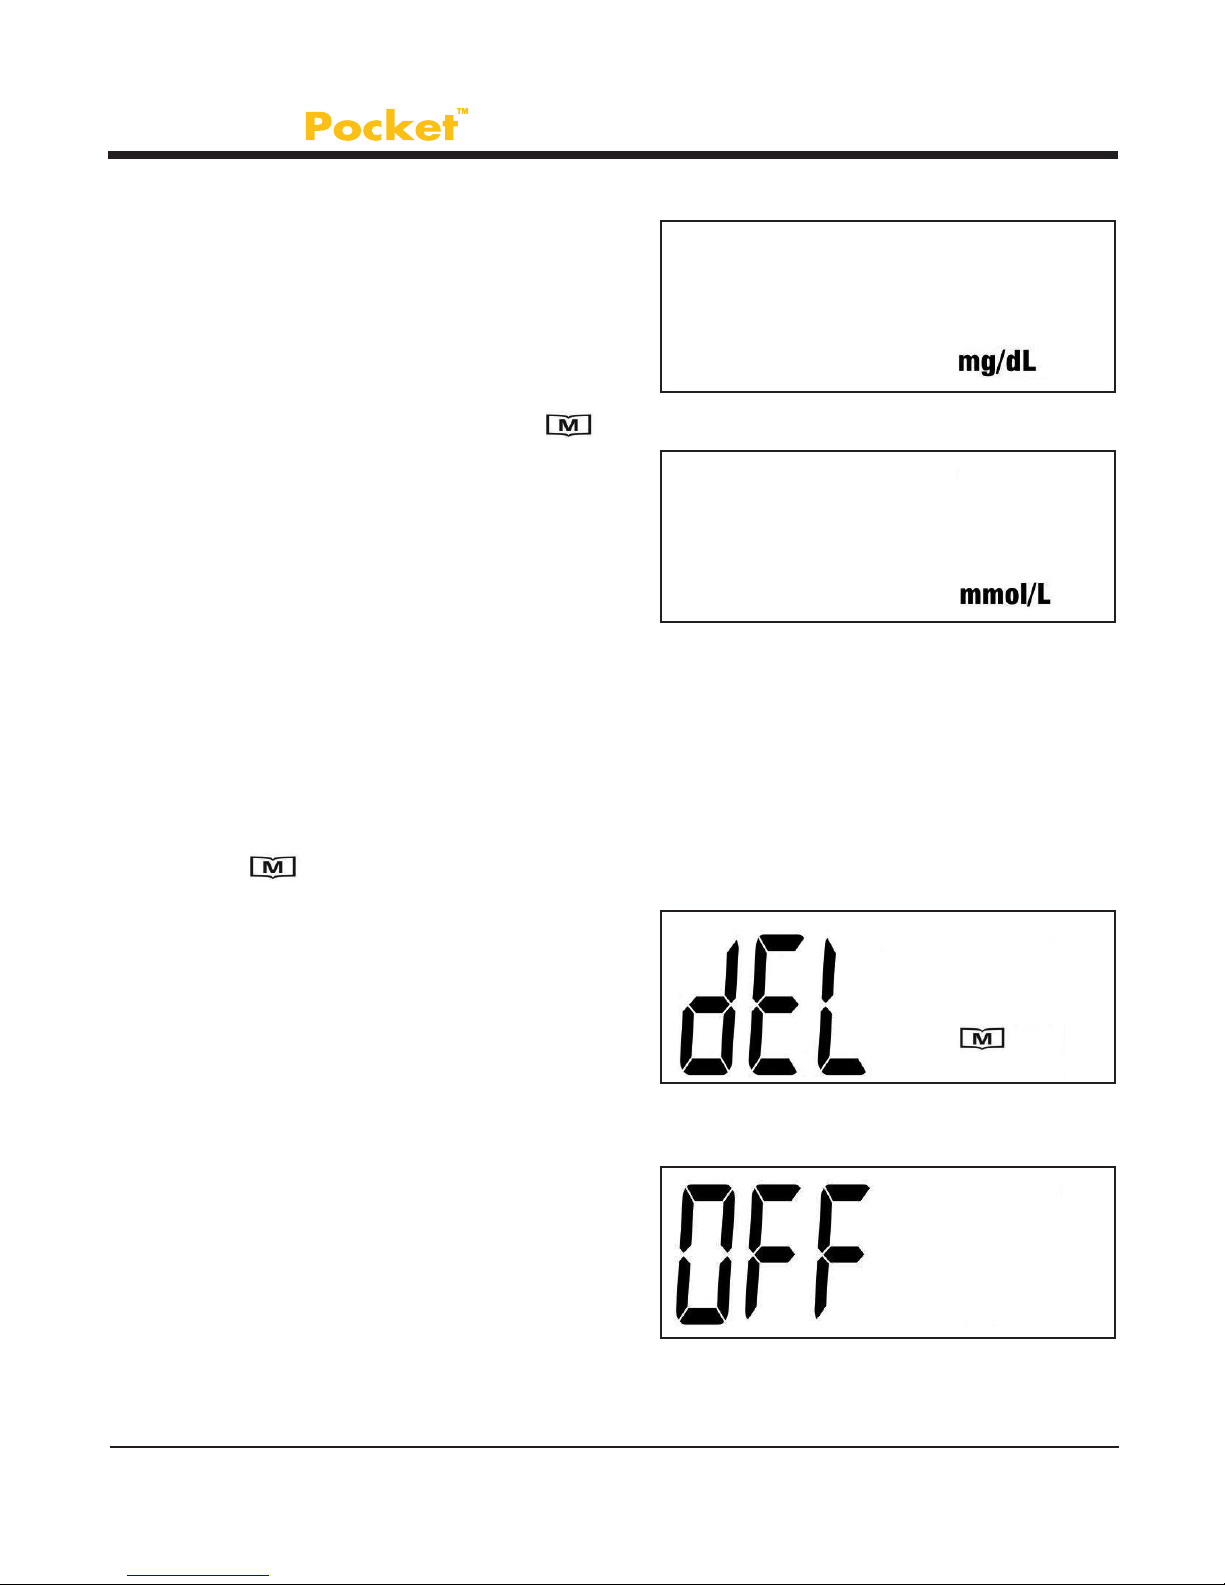
STEP 8: Unit of Measurement
Press and release the “M” button
until the unit of measurement you
are choosing appears on the display.
Press the “SET” button and “dEL”
will appear with the ashing “ ”
symbol. See Figures 12 and 13.
Your meter can display test results
in milligrams per deciliter (mg/dL)
or millimoles per liter (mmol/L).
• The mg/dL unit is standard in
the United States.
• The mmol/L unit is standard in Canada.
STEP 9: Delete Memory
When the “dEL” symbol and the
ashing “ ” symbol appear on the
display, you can choose to clear the
memory. If you do not want to clear
the memory, press the “SET” button
again to skip this step. If you want
to clear ALL memory, press and hold
the “M” button for four (4) seconds.
The “- - -” image will appear on the
LCD screen to indicate that all
memory has been deleted.
Set-up is now completed. Press
the “SET” button to turn off the
meter. “OFF” is displayed before
shut down. See Figures 14 and 15.
Figure 12
Figure 13
Figure 14
Figure 15

Diagnostic Devices, Inc. www.prodigymeter.com
Prodigy Meter Owner’s Manual
16
Control Solution Testing
About Prodigy®control solution
Prodigy®control solution is a red liquid that contains glucose
that will react with test strips and produce a test result.
Prodigy®systems use a high or low control solution.
v First, check your contents to see if you have a high or low
control solution kit.
v Then, after completing a control solution test, compare test
results with the correct range (high or low) located on the back
of the test strip vial.
Why Perform A Control Solution Test?
• To ensure that your meter and test strips are working properly
together.
• To allow you to practice testing without using your own blood.
It is recommended to do a control solution test:
• Once a week (to make sure that you continue to get
accurate results).
• When you begin using a new vial of test strips.
• When test strips are exposed to extreme
environmental conditions.
• If you drop the meter.
• If you change the battery.

17
Diagnostic Devices, Inc. 1.800.243.2636
Prodigy Meter Owner’s Manual
Important Control Solution Test Information
• Use only Prodigy®control solutions.
• Check the expiration date on the control solution bottle.
Do not use if expired.
• Control Solution, meter, and test strips should come to
room temperature (68 - 77°F/20 - 25°C) before testing.
• Use within a period of 90 days from the date that you rst
open it. Record the discard date on the control solution bottle
and discard after 90 days.
• Store the control solution tightly closed at temperatures below
86°F (30°C). Do not refrigerate.
Important: Prodigy®’s control solution ranges are located on
the back of the test strip vial. They are not recommended target
ranges for your blood glucose level.

Diagnostic Devices, Inc. www.prodigymeter.com
Prodigy Meter Owner’s Manual
18
Performing a Control Solution Test
Start with the meter off.
STEP 1: Insert Test Strip
Insert a test strip with the contact
bar end entering into the test slot
first. Push the test strip as far as it
will go without bending it. The meter
turns on automatically.
See Figure 16.
STEP 2: Mark as a Control Solution Test
After the “ ” symbol appears on
display, press the “M” button and
a “ ” symbol appears on the
display. With the “ ” symbol on
the display, the meter will not store
your test result in the memory.
If you decide not to perform a control
solution test, press the “M” button
again and the “ ” symbol will disappear.
See Figure 17.
Important: Be sure that you are in Control Solution Mode so
that the test result will not be stored in the meter memory.
Figure 16
Figure 17

19
Diagnostic Devices, Inc. 1.800.243.2636
Prodigy Meter Owner’s Manual
STEP 3: Apply Control Solution
Shake the control solution bottle well.
Remove cap. Squeeze the bottle,
discard the first drop, and wipe off
the dispenser tip with a clean tissue
paper or cotton. Squeeze the bottle
again to get a second drop onto a
clean non-absorbent surface or on your
fingertip first. Then apply the drop to the
opening of the absorbent channel of the
test strip (where it meets the narrow
channel) until the confirmation window
is filled. The meter begins to count down.
See Figures 18, 19 and 20.
Caution: To avoid contaminating the control solution with
the content of the test strip, DO NOT DIRECTLY APPLY
CONTROL SOLUTION ONTO THE TEST STRIP.
Figure 18
Figure 19 Figure 20
Table of contents
Other DDI Blood Glucose Meter manuals


