AVM CD 30.3 User manual

Operating Instructions
CD 30.3


Caution
This unit contains a class 1 laser diode. Do not open. Invisible laser radiation can damage
your eyes.
Laserdiode Typ: Ga-Al-As
Wavelength: 755 - 815 nm (25 °C)
Output power: max. 0,7 mW max.
Declaration of conformity (for EC only)
We herewith confirm, that the unit to which this manual belongs fulfils the EC rules necessary to
obtain the sign
the necessary measurements were taken with positive results.
AVM Audio Video Manufaktur GmbH
Daimlerstraße 8
D-76316 Malsch
Germany
www.avm.audio

Welcome!
We are pleased you have chosen an audiophile masterpiece of the AVM30 series and thank you
for your trust. With the CD 30.3 CD Player you own an extraordinary HiFi component with
excellent sound and a wide range of functions. In the following, we would like to explain the use
of your CD 30.3 in a comprehensive way and therefore ask you to take a little time to study this
manual in detail.
Should you have any questions which we have not been able to answer with this manual, please
contact your dealer or distributor who will be able to configure the unit according to your needs
and personal requirements and also give you instructions for daily use.
Udo Besser – AVM Owner & General Manager

Table of contents
1!Getting started.................................................................................................................... 6!
1.1!What’s in the box?........................................................................................................ 6!
1.2!Control and operating elements................................................................................... 6!
1.3!Pin assignments ........................................................................................................... 7!
1.4!Installation and cooling................................................................................................. 7!
1.5!Power connection......................................................................................................... 8!
1.6!Connecting a preamplifier or integrated amplifier ........................................................ 8!
1.7!Connecting digital sources and recording devices ...................................................... 8!
1.8!RC 3 remote control ..................................................................................................... 8!
2!Operation .......................................................................................................................... 10!
2.1!First power on / self test............................................................................................. 10!
2.2!Switching device on / off ............................................................................................ 10!
2.3!Display........................................................................................................................ 10!
2.4!Volume adjustment: Fixed / Variable level ................................................................. 10!
2.5!Display in CD player mode ......................................................................................... 11!
2.6!Display in D/A converter mode (digital input) ............................................................. 11!
2.7!Input selection ............................................................................................................ 11!
2.8!Sample rate and filter settings.................................................................................... 11!
2.9!Compatible CD Formats............................................................................................. 12!
2.10!Inserting / Ejecting the CD.......................................................................................... 12!
2.11!Function of the SKIP keys .......................................................................................... 13!
2.12!Repeating CD tracks (Repeat).................................................................................... 13!
2.13!PROG key (title programming and filter setting)......................................................... 13!
3!Advanced settings............................................................................................................ 15!
3.1!Personal Setup ........................................................................................................... 15!
4!Appendix ........................................................................................................................... 17!
4.1!Care of the housing .................................................................................................... 17!
4.2!Troubleshooting.......................................................................................................... 17!
4.3!Conditions of warranty (EC only)................................................................................ 18!
4.4!Specifications ............................................................................................................. 19!
6
1 Getting started
1.1 What’s in the box?
• CD 30.3 CD Player
• Power cable
• RC 3 remote control
NOTE: After unpacking, please check the scope of delivery to ensure that all parts have been
supplied and are undamaged. In case the original packing has already been opened, please
contact your local dealer. Often, your dealer prepares your new device prior to delivery to adapt
and change the configuration to your personal needs.
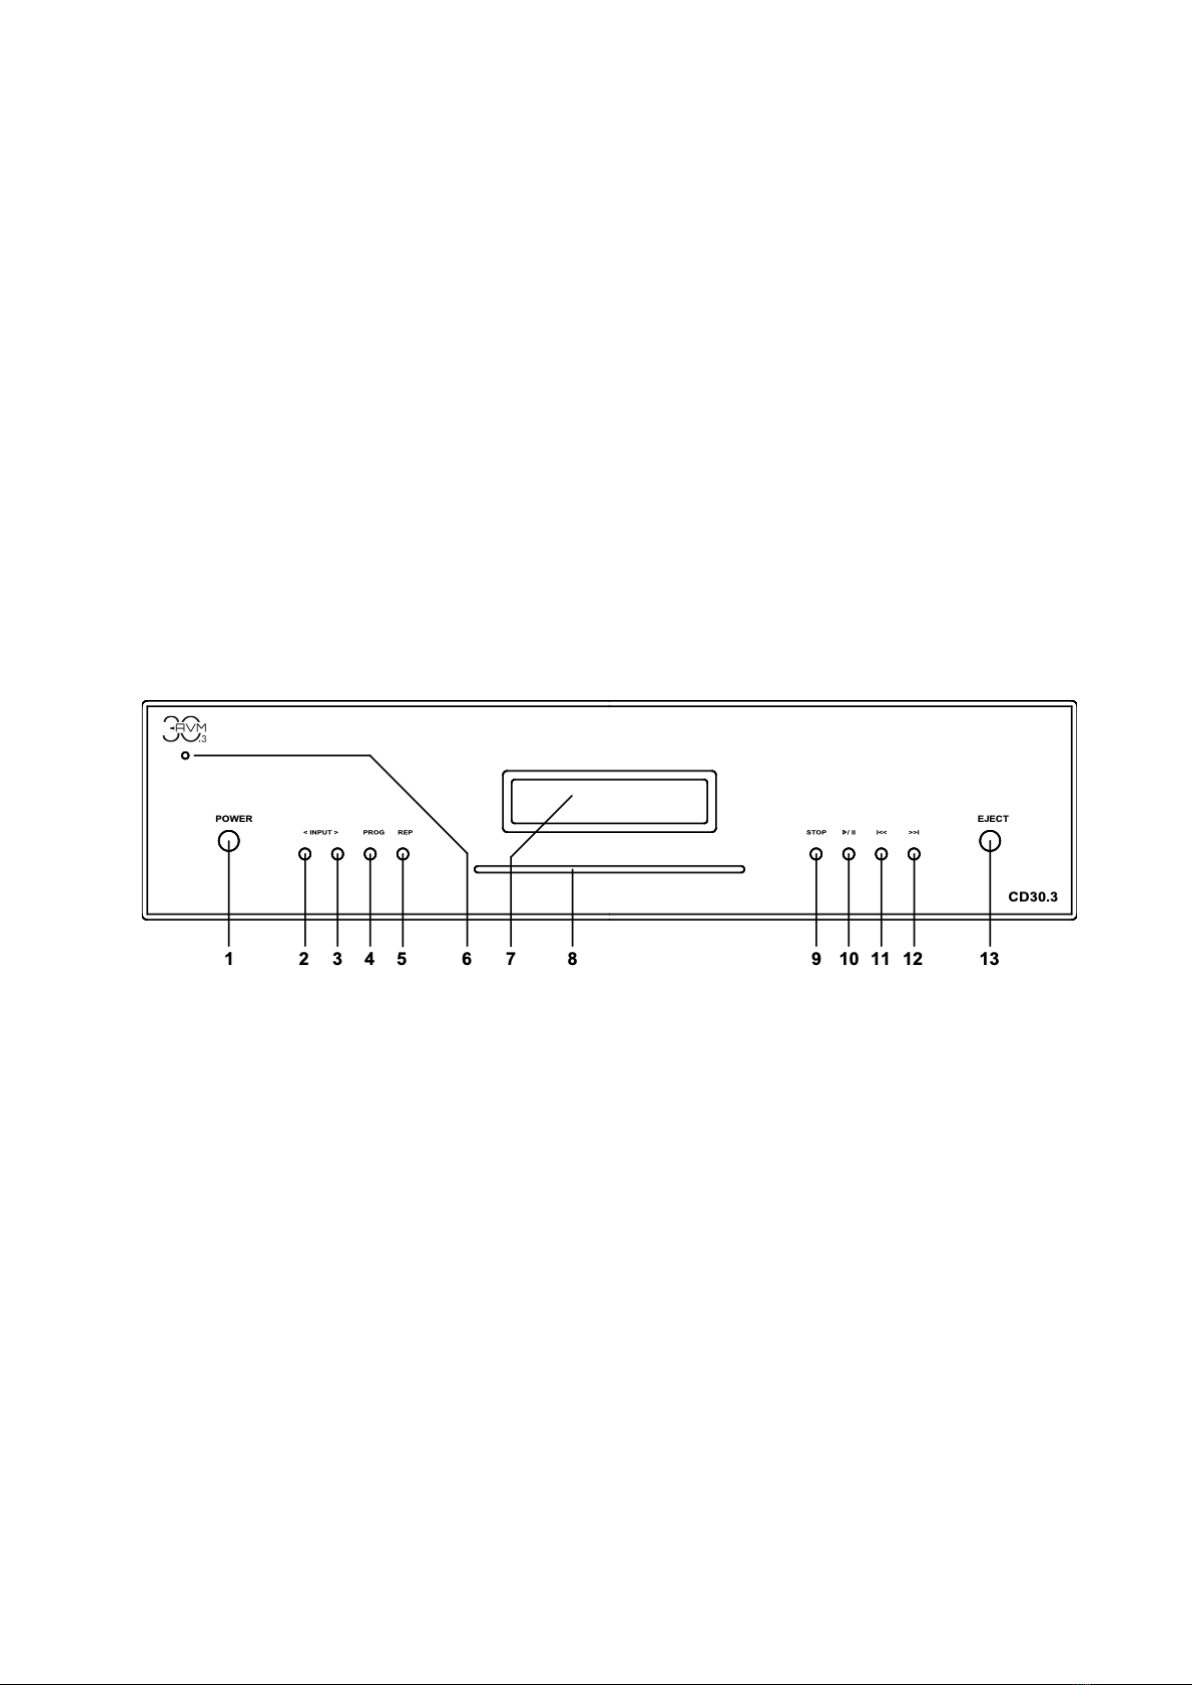
1.2 Control and operating elements
The numbers in the drawings below mark the control elements. They refer to the numbers in the
text, where the operation of the unit is described.
1 POWER key (on / off)
2 INPUT key < (input, title programming)
3 INPUT key > (input, title programming)
4 ROG key (title programming, RND)
5 REPEAT key
6 Control LED
7 Display
8 CD-Slot
9 STOP key
10 PLAY/PAUSE key
11 SKIP / Search I<< key
12 SKIP / Search >>I key
13 EJECT key
7
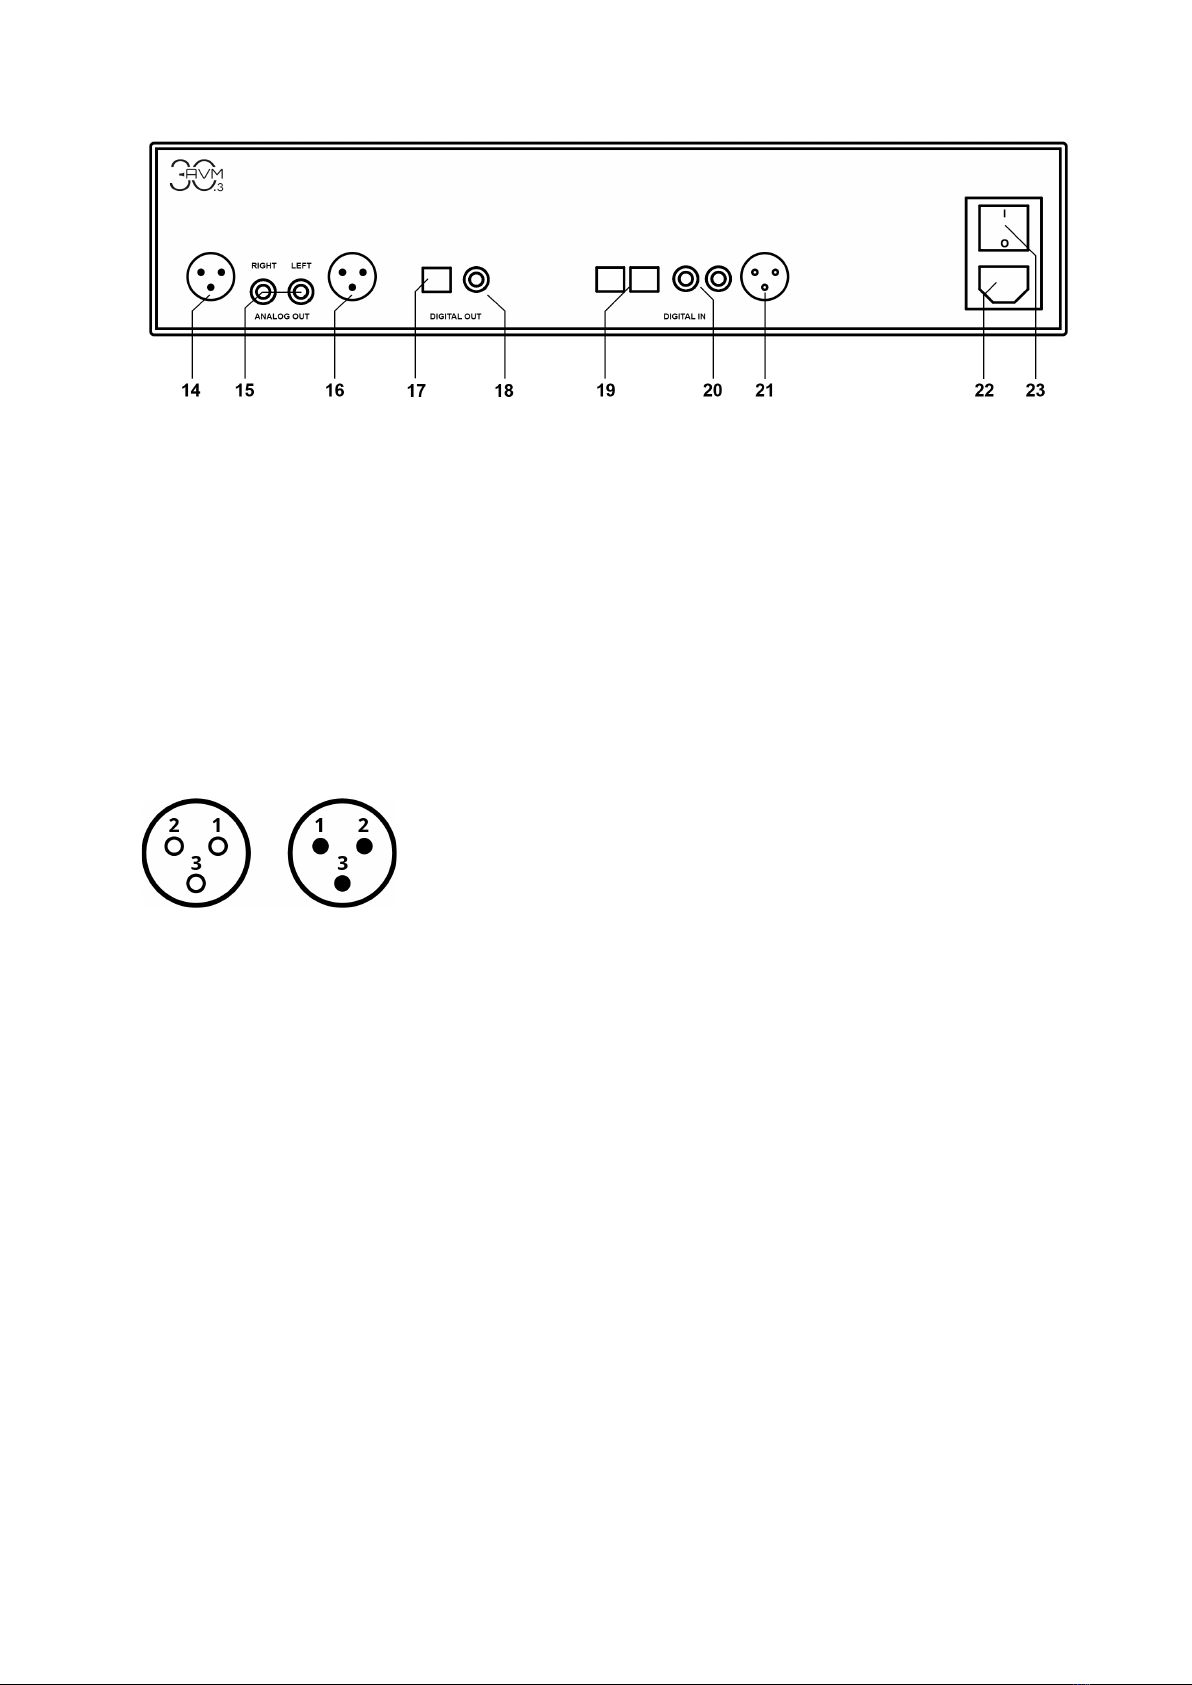
14 Right analog output (balanced XLR)
15 Analog outputs (unbalanced,
Cinch/RCA)
16 Left analog output (balanced XLR)
17 Optical digital output
18 Coaxial digital output
19 Coaxial digital output
20 Coxial digital inputs
21 Digital input AES/EBU
22 Power supply connection
23 Power switch
1.3 Pin assignments
1.3.1 Assignment XLR connectors
Eingang Ausgang
1) Ground (GND)
2) POS (+)
3) NEG (-)
1.4 Installation and cooling
The CD 30.3 generates almost no heat during normal operation. Therefore, it can be installed
in a rack without any problems. If you place the unit in a cabinet, please ensure sufficient air
circulation. If you place other components above or below your CD 30.3, please ensure a
minimum distance of 1 cm. We also recommend a location that is protected from direct sunlight
so that you can easily read the indications on the display of the device (7). Avoid placing the
device in the direct vicinity of a heating or in areas with extremely high humidity. When setting
up the unit, also make sure that there is a free area of at least 15 cm in front of the CD slot (8),
so that CDs can be inserted and ejected without hindrance.

8
1.5 Power connection
Connect the supplied power cable to the power supply connection (22) and plug it into a
shockproof socket.
NOTE: Please leave the device switched off for the time being (power switch (23) in zero
position) until you have established all cable connections to the rest of the system.
1.6 Connecting a preamplifier or integrated amplifier
Connect the analog outputs (14-16) to the amplifier inputs using suitable cables. XLR and RCA
outputs are mutually decoupled and can be used as desired.
If possible, we recommend a balanced connection via the XLR outputs (14, 16), especially for
longer connection lengths. Unbalanced RCA/RCA cables can also make excellent connections
in terms of sound quality - provided you use a sufficiently shielded cable of high quality.
1.7 Connecting digital sources and recording devices
Digital sources
Connect digital signal sources to the optical (19) or coaxial (20) digital inputs, to the AES/EBU
digital input (21) using a suitable cable.
Digital recording devices
If you want to record digitally, you can connect your recording devices (computer, CD recorder)
to the digital outputs (17, 18). Depending on the selected source, the output socket carries the
corresponding signal (dig in coax, dig in opt. etc.).
1.8 RC 3 remote control
The RC 3 remote control included in the scope of delivery allows you to control your CD 30.3
comfortably. Optionally, the RC 8 remote control is also available from us. This remote control
with its numeric keys allows you to control the CD player more comfortably.
The OFF and ON keys are common for all AVM devices in the system and switch them off and
on.
The STOP, PLAY and < SKIP > keys are used for drive control. The PLAY key switches
between PLAY and PAUSE when pressed several times, the STOP key ejects the CD when
pressed several times. The keys < SKIP > switch to the next / previous track of a CD when
pressed briefly - when pressed longer, the search through the current track is accelerated.
Pressing the keys < STATION > switches the digital inputs. If a digital input is selected,
pressing the PLAY key will select the CD player. If a variable volume level is activated in the

9
Personal Setup Menu (see also section 3.1 ), the volume of the analog outputs of your CD 30.3
can be adjusted using the VOLUME keys on the RC 3 or RC 8 remote control.
NOTE: When using the RC 8 remote control (available as an accessory), sampling rate and filter
can also be switched (< FILTER > keys). Furthermore, the number keys of the RC 8 can be
used to directly select a specific title of a CD (one or two digits).
Please note the following if the remote control does not work properly: Always hold the remote
control with the front end facing the device you want to operate. If the remote control is placed
too far away from the device to be controlled, or if the batteries are dead or objects are placed
between the remote control and the device to be controlled, the remote control may not
function properly.
1.8.1 Battery replacement
Bottom of the RC 3 remote control
If the range of the remote control decreases significantly, new batteries must be installed.
Remove the six screws on the bottom of the remote control marked with arrows (ATTENTION:
do not open the two middle screws without arrow marking!) Now turn the remote control over
and take out the bottom with the printed circuit board. Now remove the used batteries and
replace them with two new ones of the same type (Lithium button cell 3V, type CR2032). Make
sure that the polarity of the batteries is correct when inserting them (marking "+" upwards),
otherwise the electronics may be damaged.

10
2 Operation
2.1 First power on / self test
If your CD player is completely disconnected from the power supply or switched off via the
power switch (23), a so-called self-test is performed after switching on the device. The device
checks the configuration and functionality of the installed components and then goes into
stand-by mode. This process may take a few seconds.
2.2 Switching device on / off
With the on / off key (1) you can switch between operation and stand-by mode. In stand-by
mode, the display (7) is deactivated and the operation indicator LED (6) lights up. As soon as
your CD player is in operation, the operation indicator goes out and the display is activated.
ATTENTION: The device is not completely disconnected from the power supply in stand-by
mode. To disconnect the unit completely from the power supply, press the power switch (23)
at the back of the unit or pull the power cable out of the power socket (22).
2.3 Display
The display (7) shows you information about the current operating status of the CD player or
the digital input in D/A converter mode. In addition to the display of the selected source such
as CD player or digital input, the bottom line shows you the current settings of the D/A
converter: On the left side the sample rate (e.g.: 96), on the right side the current filter setting
(SMOOTH or STEEP).
2.4 Volume adjustment: Fixed / Variable level
Depending on the selection of a fixed or variable volume level (see section 3.1.1), information
about the current volume setting of the CD 30.3 is shown in the middle/upper area of the display
(7). VOL indicates a variable output level, so you can adjust the volume of the analog outputs
of your CD 30.3 using the VOLUME keys on the RC 3 or RC 8 remote control or by pressing
the INPUT keys (2, 3) for a long time. FIX, on the other hand, indicates the selection of a fixed
output level at the same place.
NOTE: When the variable volume setting is active, you can adjust the volume of the analog
outputs of your CD 30.3 using the VOLUME keys on the RC 3 or RC 8 remote control or by
pressing and holding the INPUT keys (2, 3).

11
2.5 Display in CD player mode
In the middle of the display you will see the total playing time of the CD in STOP mode. In PLAY
or PAUSE mode the elapsed playing time of the current track is shown.
TRACK
On the left side you will see the current title (large digit) and the total number of available titles
(small digit) of an inserted CD.
STATUS
The current operating status is displayed on the right side. (STOP, PLAY, PAUSE).
PROG
In case of title programming, the left area shows the currently played title in the program and
the total number of programmed titles (e.g. PROG 2/17).
RND
In case of a selected shuffle, the left area shows the current position in the shuffle program
and the total number of played titles (e.g. RND 5/12).
2.6 Display in D/A converter mode (digital input)
The name of the active input is displayed on the left. On the right SIGNAL LOCKED or NO DIG
SIGNAL, if no signal is currently present at the selected input.
2.7 Input selection
In addition to the integrated CD drive, the CD 30.3 has a large number of digital inputs that can
be selected using the two INPUT keys (2, 3). If no signal or an invalid signal is present at a
selected digital input, the display shows the message NO DIG SIGNAL on the right side. Press
the PLAY key (12) to return to CD mode.
2.8 Sample rate and filter settings
NOTE: This setting can be made in D/A converter mode without any restrictions. In CD player
mode it only works if the CD player is in PLAY / or PAUSE mode. In STOP mode, the PROG
key is used for title programming (see section 2.13).
Press and hold the PROG key (4). By additionally pressing one of the <INPUT> keys (2, 3) you
can now select the sampling rate and filter setting for the currently active digital input. The
currently selected sample rate will be displayed at the bottom left of the display (44.1, 48, 88.2,
96, 176.4, 192 kHz). The NATIVE display means that the applied sample rate of the signal is
processed directly. CONVERSION on the other hand means that the signal is up- or
downsampled to the selected sample rate.

12
You can select the SMOOTH and STEEP filter settings according to your tonal preferences.
Depending on the signal being reproduced, different filter settings can produce optimal sonic
results. Technically speaking, STEEP means a steep filtering at the end of the band with a flat
amplitude frequency response but stronger phase shift than in the SMOOTH setting described
below. SMOOTH filters less steeply and has a smaller amplitude drop before the end of the
band, but a smaller phase shift. The selected filter setting is only valid for the current input and
remains stored even after the unit is switched off,
NOTE: With the RC 8 on the optionally available RC 8 remote control, the filter setting can be
made using the <FILTER> keys.
2.9 Compatible CD Formats
The CD 30.3 is suitable for playing all 'Red Book' compliant audio CDs. Red Book is an audio
CD standard established by Philips and Sony. Furthermore, self-burned CDs can also be
played as long as they comply with the 'Red Book' standard.
NOTE: Some manufacturers produce CDs that do not comply with the Red Book standard for
copy protection reasons. We (and many other equipment manufacturers) cannot guarantee that
such CDs will play properly. If you have purchased such a CD, you can return it to your dealer
(even if you have already opened the package!) However, you can only do so if the CD case
does not clearly show a notice on the CD that it is copy protected and that the CD does not
conform to the standard.
ATTENTION: Do not use mats or stickers placed on the CD. These can cause imbalance and
impair music playback or interfere with the drive mechanics. We also advise against the use of
small 8cm CDs and Shape CDs. These could get stuck in the drive and cause defects in the
mechanics.
2.10 Inserting / Ejecting the CD
Insert
The CD 30.3 has a slot (8) instead of the usual drawer, through which the CD is inserted. Slide
the CD into the slot with the (silver reflective layer facing down). It will now be pulled in
automatically. The player then reads the CD's table of contents and displays it. The current title
is displayed on the left and the total number of titles is displayed next to it (e.g.: 1/17). In the
middle of the display the playing time is shown.
NOTES: If there is already a CD in the drive, the slot is blocked. and inserting another CD is
not possible. If the inserted CD cannot be read or if a data CD or DVD is inserted by mistake,
the NO AUDIODISC display appears and the CD is ejected again immediately.
Eject
To eject the CD, press the EJECT key (13). If no CD is inserted, the NO DISC display appears
and the key has no function.

13
AUTO-PLAY function
If the CD player is not selected as source, the CD 30.3 automatically switches to CD mode
when a CD is inserted and reads the CD. If this autoplay function is activated (see section 3.1.2)
the playback process will start automatically afterwards.
Playing CDs
If a CD is inserted, start the playback process by pressing the PLAY/PAUSE key (10). Press
this key again to pause the CD 30.3. A further press resumes the playback process. Pressing
the STOP key (10) stops the playback.
The respective operating status (PLAY, PAUSE, STOP) is shown in the display (7).
2.11 Function of the SKIP keys
With the SKIP keys (11, 12) you can select a certain title during PLAY or STOP (short tap), or
search for a certain position within the current title by pressing and holding for a longer time
during playback. These keys have no function in the PAUSE state.
NOTE: A fast search across title boundaries is not possible, so the search stops automatically
at the end of the current title and switches to the PAUSE state.
2.12 Repeating CD tracks (Repeat)
By pressing the REPEAT button (5) you can select whether either the current track (press once)
or the entire CD or programmed sequence (press twice) is repeated. The selected setting is
shown on the right side of the display (RP ONE / RP ALL). As soon as the REPEAT button is
pressed again, the repeat function is deactivated.
2.13 PROG key (title programming and filter setting)
The PROG key (4) has different functions depending on the operating status of the CD player:
- If no CD is inserted, the key has no function
- When the player is in PLAY or PAUSE mode: Filter setting (see section 2.8)
- If a CD is inserted and the player is in STOP mode: Title programming
2.13.1 Title programming, random playback (only in STOP state)
Press the PROG keys (4) to enter the programming menu.
Press the STOP key (9) to exit the programming menu.

14
By pressing the PROG key (4) again, a random playback sequence (RANDOM) is
automatically programmed.
Press the PLAY/PAUSE key (10) to enter the title programming:
On the left side of the display (7) the title number (TRCK) of the new title to be programmed is
shown. It can be selected with the two SKIP keys (11, 12). Below this the length of this title is
displayed (TIME= xx:xx).
Use the PLAY/PAUSE key (10) to insert the title into the program. The display (7) shows the
total number of already programmed titles in the upper right line (PGM-QTY xx). Below this the
display shows the total programmed playing time (TOTAL xx:xx).
With the PROG key (4) the program is stored. A possibly previously set repeat function is
deleted. By pressing the STOP key (9) you leave the programming menu without storing the
program.
2.13.1 Programming (Example)
The inserted CD contains all tracks, but only intend to play tracks 7, 3 and 8 in that order.
• Press the PROG key (4) then the PLAY/PAUSE key (10) to enter the programming
menu. Since no titles have been programmed yet, the top line of the display will show
PGM-QTY 00 (right), TRCK 01/15 (left).
• Use the SKIP keys (11, 12) to select the title number 7 (display: TRCK 07/15).
• Now insert the title into the program using the PLAY/PAUSE key (10).
• Now use the SKIP keys (11, 12) to set the title number 3 (TRCK 03/15)
• Use the PLAY/PAUSE key (10) to insert the title into the program.
• Now set the title number 8 with the SKIP keys (11, 12) (TRCK 08/15)
• Use the PLAY/PAUSE key (10) to insert the title into the program.
• Finally press the PROG key (4). The title programming is now active and can be played
back with the PLAY/PAUSE key (10).
NOTE: The maximum number of titles to be programmed is limited to 99. The maximum
program duration is limited to 99 minutes and 59 seconds.
Deleting the programming
To delete a programming, press the PROG key (4) and then the STOP key. Ejecting a CD or
switching off the machine also erases a programming. However, when switching to another
source, a programmed track sequence is retained.

15
3 Advanced settings
3.1 Personal Setup
In addition to its basic functions, the CD 30.3 has a wide range of options for individual
adaptation to your personal requirements. These functions are accessible via the Personal
Setup menu. To call up the Personal Setup, switch off the CD 30.3 completely using the power
switch (23) on the back of the device. Now hold down the PROG key (4) and switch the unit on
again with the power switch (23). As soon as the display shows *** personal setup ***, the
PROG key (4) can be released.
Use the two INPUT keys (2, 3) to select the desired setup point. Use the SKIP keys (11, 12) to
make the desired setting. Press the STOP keys (9) to exit the Personal Setup menu (EXIT).
Then the CD 30.3 must be switched off completely using the power switch on the back of the
unit (26) and switched on again after a short waiting period. The settings made are permanently
stored, but can be adjusted at any time by calling up the Personal Setup again.
3.1.1 Volume control
Choose between a fixed (fixlevel) or variable (variable) volume level of the analog outputs (14-
16). When selecting a variable output level, the volume of the analog outputs of your CD 30.3
can be adjusted by long pressing the < INPUT > keys (2, 3) or by using the VOLUME keys on
the RC 3 or RC 8 remote control. The RC 8 also allows you to mute / activate the outputs with
the MUTE key.
In the middle of the upper display line the current volume value is displayed (e.g. VOL 75). In
contrast, FIX indicates the selection of a fixed output level at the same position.
NOTE: If a digital input is selected where no valid signal is present (NO DIG SIGNAL), the
volume function is disabled.
3.1.2 Autoplay
If the autoplay function is activated, the unit will automatically start the playback process after
inserting a CD without the need to press the PLAY key first. If necessary, the unit will
automatically switch from the currently selected input to CD mode. This function is activated
(on) in the factory setting. If the autoplay off setting is selected, the CD will be read after
insertion, but the drive will not play it automatically but will go into STOP state.
3.1.3 Skip unused inputs
If you do not need all digital inputs of your CD 30.3, the unused inputs can be deactivated
(skipped). When selecting the source, all inputs defined as SKIPPED are automatically skipped
and cannot be selected via remote control. The settings can be cancelled at any time by calling
up the personal setup again (active).

16
3.1.4 Define input names
With the menu item define input names you can change the displayed names of the inputs as
you like. A name contains a maximum of 8 characters.
With the two INPUT keys (2, 3) you select the desired input. In the left half of the display the
current name of the selected input is shown, in the right half the new name is displayed. The
edited character is marked with an underline. With the REPEAT key (5) you determine the
position of the character to be changed, with the SKIP keys (11, 12) you set the desired
character.
3.1.5 Reset (Factory settings)
The RESET menu offers you the possibility to reset the device to the original delivery state.
You can choose to reset all settings (ALL) or only the input names (NAMES).
To call up the RESET menu, switch off the CD 30.3 completely using the power switch (23) on
the back of the unit. Now press and hold both REPEAT keys (5) and STOP (9) simultaneously
and switch the unit on again with the power switch (23). As soon as the display shows RESET,
the two keys can be released again.
Choose if you want to delete only the input names with the PAUSE key (NAMES) or if you want
to reset the unit to the factory settings by pressing the PLAY key (ALL).
By pressing the STOP key you can leave the RESET menu without resetting the device
(CANCEL).
Please note that the CD 30.3 has to be switched off completely after a RESET procedure using
the power switch on the back of the unit (26) and switched on again after a short waiting period
for further operation.

17
4 Appendix
4.1 Care of the housing
The surface and the printing on the housing are largely scratch-resistant. The CD 30.3 can be
cleaned with mild soapy water or a gentle glass cleaner and a soft duster.
ATTENTION: During cleaning, liquid must never be allowed to enter the interior of the housing.
In addition, for safety reasons, the power cord should be disconnected before wiping the CD
30.3 with a damp cloth. Do not use any solvents or abrasive cleaners that could damage the
surface or printing on the housing.
4.2 Troubleshooting
Often alleged defects can be traced back to operating errors, sometimes other devices
connected to the CD 30.3 are also responsible for a malfunction. Before you contact your dealer
or us about a defect, please check the following list to see if you can correct the malfunction
yourself.
1. No music playback
a) The MUTE function (via remote control RC 8) is active. Deactivate it.
b) Accidentally switch to stand-by. Press the power key (1).
c) If the display (7) is dark and the blue LED (6) is not lit, the mains fuse may be defective. Since
this is usually caused by a defect of the power supply unit or the other electronics (e.g. due to
lightning), please contact your dealer.
2. Remote control without function
a) The batteries of the remote control are flat. Please replace the batteries (see section 1.8.1).
b) There is no direct connection between the remote control and the unit or the distance is
too great. One of the protective circuits of the unit (e.g. overload, overtemperature, short
circuit) has responded. Please contact your specialist dealer.
3. A CD was inserted, but "no disc" appears in the display
a) Es wurde entweder eine verschmutzte oder defekte CD eingelegt oder die CD wurde falsch
herum eingelegt (Etikettenseite nach unten statt nach oben).

18
4.3 Conditions of warranty (EC only)
If despite expectations a defect occurs that cannot be repaired by yourself or your dealer, we
undertake the repair of your unit free of charge for up to three years from date of purchase. The
warranty covers the costs of material and working time, transport costs are to be borne by the
owner.
Provisions for this warranty are:
• The unit must have been purchased from an authorised dealer. Equipment from other
sources will not be repaired, not even at charge.
• The warranty registration card, together with a copy of the bill of sale, must be received
by us within four weeks of the date of purchase.
• The defect must not have been caused by improper handling or misuse.
• Return the unit to us only in its original packing. If this is not possible, we are entitled to
refuse acceptance. We will not assume responsibility for transport damage under any
circumstances.
• A short description of the defect is to be included with the returned unit.
• In cases of doubt we reserve the right to request a copy of the bill of sale.
• We also reserve the right to levy a handling charge for items returned without good or
valid reason, or if the unit proves to be not defective.
NOTE: If you are returning the unit from a country other than Germany you should ensure that
correct export documents are obtained. We cannot accept any charges for costs arising from
improper or incomplete export documentation.
If you have purchased your unit from a dealer outside Germany, please refer to him or the
relevant importing firm to process the warranty.

19
4.4 Specifications
4.4.1 Digital inputs
Input impedance Coax / XLR 75 Ohm / 110 Ohm
Input format Coax / XLR S/P-DIF, 32 kHz - 192 kHz / 16 - 24 Bit
Input format Optical S/P-DIF, 32 kHz - 96 kHz / 16 - 24 Bit
Sampling frequency Native, 32 kHz - 192 kHz / 16 - 24 bit
up/downsampling, switchable 44.1 kHz - 192 kHz / 24 bit
Deemphasis yes, automatic
4.4.2 Digital outputs
Output impedance Coax 75 Ohm
Input format Coax S/P-DIF, as input format, max 192 kHz / 24 Bit
Input format Toslink S/P-DIF, as input format, max 96 kHz / 24 Bit
4.4.3 CD-Player
CD-Formate CD Audio, CDR (according to Red-Book-Standard)
Frequenzgang CD <20 Hz – 20 kHz
4.4.4 Analog outputs
Output voltage 2.5 V
Frequency response DC - 96kHz
(depending on the input signal and selected filter setting, the upper cut-off frequency may be
lower)
Ssignal-to-noise ratio 115 dB / 117 dB(A)
4.4.5 Miscellaneous
Power supply 100 V - 240 V, 50 - 60Hz
Power consumption in operation typ. 11W
Power consumption in stand-by mode < 0.5 W
Dimensions (W x H x D) 430 x 110 x 320 mm
Weight 6 kg
Changes reserved without notice.
2020/09/23.
Table of contents


