AvMap Geosat 5 User manual

USER MANUAL
Ver. 0.2


Index
Warning 6
Maintenance and Battery disposal 7
1. Introduction 8
1.1 Box contents 8
1.2 Available accessories 8
1.3 Hardware features 8
1.4 The keyboard 9
2. Installation 10
2.1 Inserting the Secure Digital (SD) CARD 10
2.2 Fixing the bracket 10
2.3 Power connection 10
2.4 Battery Functioning 11
2.5 Fitting the optional external GPS antenna 11
2.6 Starting 12
3. The Main Menu 13
4. Setting the destination 15
4.1 Setting the first destination 15
4.2 View on Map 16
4.3 Routing preferences 16
5. Planning a route 17
5.1 Planning a route from A to B 17
5.2 Clearing a Route 17
5.3 Reversing a Route 17
5.4 Via points 17
5.5 Avoiding a street and Detour 18
5.6 Blocking a road 18
5.7 Walkways 18
5.8 Simulation 19
6. Map views 20
6.1 Navigation info 20
6.1.1 Unit Status 21

6.1.2 Data box 21
6.2 Exploring the map 22
6.3 2D and 3D view 22
6.4 Night vision 23
6.5 Turn List 23
6.6 Points of interest (POI) 23
7. Managing Contacts 25
7.1 Saving a contact on your GPS position 25
7.2 Saving a new contact directly on the map 25
7.3 Save a contact with a specific address 26
7.4 Address Book 26
7.5 Modify a contact 26
7.6 Set the HOME address 26
7.7 Contact alarm 27
7.8 File Manager 27
8. Advanced search options 28
8.1 Address advanced search 28
8.1.1 Recently found addresses 28
8.1.2 City Centre Search 28
8.1.3 Searching for intersections 29
8.1.4 Post code search 29
8.2 Advanced POI search (points of interests): 29
8.2.1 Recently found POI 29
8.2.2 Searching for nearest POI 30
8.2.3 Searching for POI near your destination 30
8.2.4 Searching for POI in a city 30
9. Special functions 32
9.1 Video 32
9.2 TMC 32
9.3 Speed cameras Database 32
10. Setting the preferences 33
10.1 User Preferences 33
10.1.1 General settings 33
10.1.2 Language 33
10.1.3 Routing 33

10.1.4 Display Options 34
10.1.5 Power 34
10.1.6 Simulation settings 35
10.1.7 Alarm 35
10.1.8 Reset 35
10.2 Map settings 35
10.3 Map Icons 36
10.4 Time zone 36
10.5 Traffic settings 36
10.6 Set data boxes 37
11. Updating the Software and the Map 38
11.1 Updating the Software 38
11.2 Updating the Map 39
12. Troubleshooting 40
12.1 MASTER RESET 40
12.2 Emergency Shut down 40
13. Warranty and Support 41
13.1 Warranty conditions 41
13.2 Repair and replacement under warranty 42
13.3 Tele Atlas End User Agreement 42
Appendix A 46
Appendix B 47

6
Warning
The manufacturer and the distribution chain disclaim any liability deriving from an improper use of
the device in a way that may cause accidents or damages to things or persons.
Using this navigator implies that the user accepts and follows all these warnings and all the
instructions contained in this manual. The driver is held responsible for using Geosat in the correct
way (passenger or non passenger mode).
The User should ignore the indications suggested by Geosat in situations that appear to be in contrast
with the Highway Code. The Manufacturer and the distribution chain disclaim any liability deriving
from an improper use of the device in a way that may violate the Highway Code.
The Tele Atlas cartographic data loaded in the navigator may present some discrepancies from the
reality. This is due to the continuous changes in the street network. Some areas have better coverage
than others.
Important:
• Do not place the navigator in positions that may obstruct the driver’s view
• Do not place the navigator in positions that may interfere with the correct functioning of the
security/safety equipment of the vehicle (e.g. airbags).
• Make sure that the navigator is correctly attached to the bracket before driving.
• Do not rely exclusively on vocal instructions. Depending on a variety of factors, (speed, weather,
GPS reception etc) these instructions may not be correct or timely. Always take the information
provided as indicative, and always respect the Highway Code. Satellite navigators should be
considered merely as aids. The driver is held responsible for safe driving and the choice of the
best route to take.
• Do not consult the navigator whilst driving if this represents a danger for you and other people.
• Do not program the navigator while driving
• The precision of the GPS signal, in the best possible conditions is guaranteed with a deviation of
15 meters
N.B.: The information contained in this manual is updated to September 2006. Any subsequent
changes in the system, in the functions, in the tools bar or maps introduced after this date will not
be present in this manual.

7
Maintenance and Battery disposal
• Do not leave the navigator in direct sunlight for extended periods. This could compromise the
correct running of your Geosat. If you suspect that the navigator has been over heated because of
sunlight exposure, let the temperature of the car cool down, and wait for the device temperature
to go down to normal values before switching it on.
• The Secure Digital memory card should not be formatted nor the content modified.
• Only AvMap branded Secure Digital memory cards are compatible with Geosat.
• Avoid knocking against the display.
• Do not use oil based products to clean the LCD surface.
• Keep away from water.
This product is equipped with a built-in Li-Ion battery. Do not use the product in damp or corrosive
environments. In order to lengthen the life of the battery, do not recharge it at temperatures higher
than 60 °C.
THE LI-ION BATTERY PROVIDED WITH THE PRODUCT MUST BE RECYCLED OR DISPOSED IN
THE CORRECT WAY.
WEEE: Waste of Electric and Electronic Equipment
The symbol shown here and on the box indicates the conformity to the WEEE directive.
Do not dispose of this WEEE product as domestic waste; some substances contained in
electronic equipment can damage the environment and harm human health if misused
or if they are not disposed of in the correct way. Return the device to the distributor
when purchasing a new one. The unlawful disposal of these wastes is punished with
sanctions.
Information about emissions for Canada: this Class B digital device conforms with the Canadian
law ICES-003/NMB-003.
R&TTE DL2 Directive: this device is in conformity with the EU directive 99/5/CE

8
1. Introduction
1.1 Box contents
1. Geosat 5 Navigator (5” LCD TFT display)
2. Secure Digital memory card preloaded
with Tele Atlas cartography
3. Car charger
4. Flexible bracket with suction cup
5. USB cable
6. Audio video cable
7. Quick start guide
1.2 Available accessories
1. Fixed holder
2. Pochette (carrying case)
3. External GPS antenna
4. TMC receiver
5. Additional maps / map-updates preloaded
on SD
6. AC-DC Adaptor
1.3 Hardware features
Looking at the navigator you can see the
following components:
1. Keyboard
2. 5” LCD TFT display
3. Infrared sensor
4. Slot for Secure Digital memory cards
5. Audio output
6. Microphone
7. Brightness sensor
8. Power supply plug
9. Audio video input
10.Serial port for external GPS antenna
11. Serial port for TMC receiver
12.Speaker
13.USB port
1
3
5
2
4
6
3
5
4
12
6

9
1.4 The keyboard
AvMap Geosat 5’s keyboard consists of 5 keys:
1. MENU
2. DRIVE ME HOME
3. WHERE TO GO
4. ROUTE FUNCTIONS / VOLUME
5. POWER / BRIGHTNESS
1
2
3
5
front view
side view
7
13
9
8
12
10
4
6
11

10
2. Installation
AvMap Geosat 5 is ready to be used. All you need to do is install the unit into the vehicle.
Carry out these operations in order:
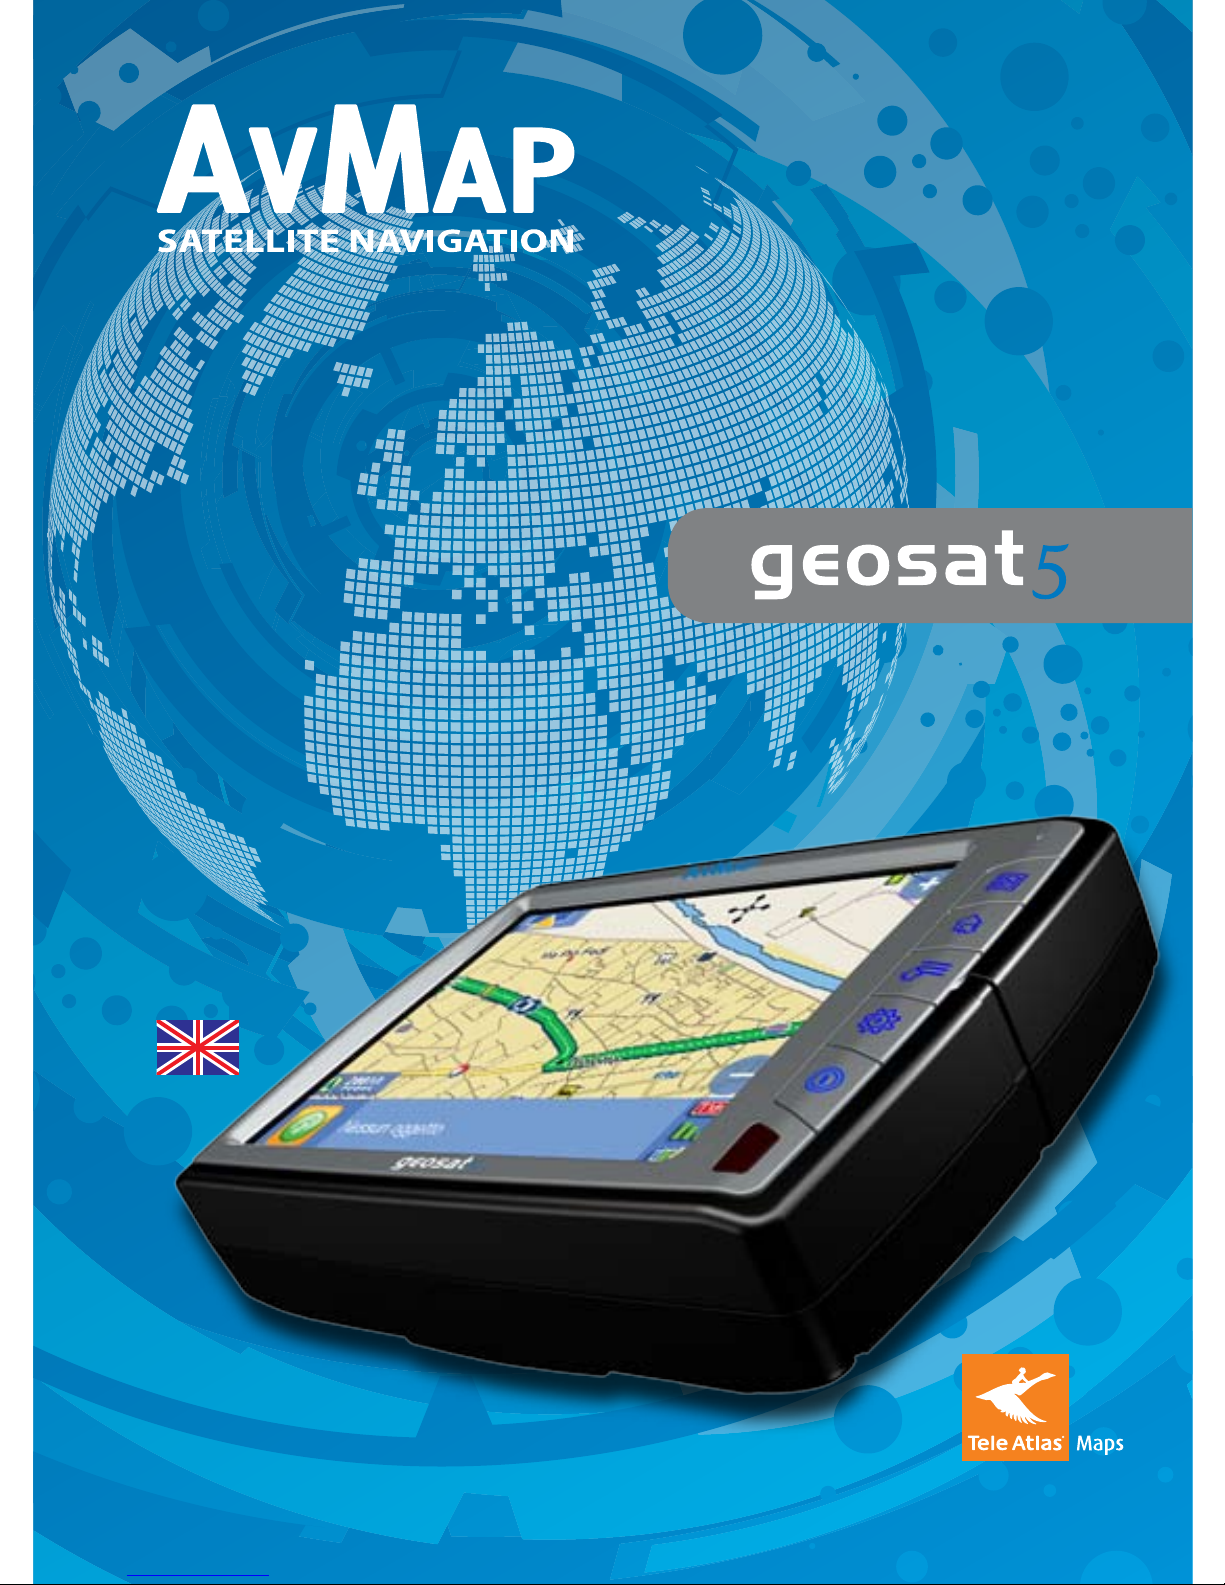
1. Make sure the secure digital card is in its slot
2. Fix the bracket on the windscreen
3. Fix Geosat 5 on the bracket
4. Plug in the car charger
2.1 Inserting the Secure Digital (SD) CARD
The Secure Digital card is pre-loaded with the Tele Atlas cartographic data, the Geosat 5 navigation
software and the
mobile software for PDA and Smartphones. The SD card is also used to store the user data (Contacts
and tracks).
Before inserting or extracting the SD memory card make sure that Geosat 5 is switched off.
Do not format or modify the contents of the Secure Digital card. Any modifications could compromise
the correct functioning of the navigator. Use only AvMap branded Secure Digital memory cards.
2.2 Fixing the bracket
Do not place the navigator on the passenger seat, as this position could cause a dangerous distraction
for the driver.
The navigator should be fixed with the bracket provided. The bracket with suction cup is included in
the box. There is also an optional fixed holder, available upon request. In either case, please follow
the following instructions:
• Place the navigator in a position high enough not to represent a risk of distraction from driving
• Make sure that the bracket does not represent a danger in case of accident or sharp braking.
• Make sure that the bracket, the navigator and the cables do not interfere with the safety devices
(e.g. airbag)
The bracket should be fixed to the windscreen via the suction cup. This will suit the majority of
vehicles. Before applying the suction cup, carefully clean the glass.
1. Lightly moisten the suction cup and place the flexible bracket in a position so that the navigator
will lie just above the dashboard.
2. Fix the suction cup by pushing the locking lever.
3. Fit Geosat 5 on the bracket.
2.3 Power connection
Whilst Geosat 5 is equipped with a built-in Li-Io rechargeable battery, it is recommended that you
power the unit via the car cigarette lighter / 12 V power socket during your journey.
Geosat 5 comes with the battery uncharged, but the navigator can be used right away with the car

11
charger. The battery will require 4 hours charging to be fully charged.
Geosat 5 can be fed with voltage between 10 and 35 V. The car charger cable provided in the box
should be used to power Geosat via the car cigarette/12 V power socket.
1. Plug the car charger cable into Geosat 5
2. Remove the cigarette lighter from its slot or remove the 12 V power socket cover
3. Insert the other end of the cable into the socket
Some vehicles are equipped with additional 12 V plugs.
The red LED on the plug confirms the correct functioning of the power supply. If the LED is off, check
the connections or try again with the vehicle engine on.
The battery recharges when the navigator is fed with the power supply cable, either if it is on or if
it has been switched off with the POWER button. In this case, the keyboard flashes until Geosat 5
is fully charged.
ATTENTION when the device encounters internal temperatures of higher than 60°, the battery will
not recharge and an alarm message will be displayed. This can happen if the navigator is exposed
for a long time to direct sunlight in hot weather. In such cases, it is suggested that you switch off the
navigator to recharge the battery.
2.4 Battery Functioning
Geosat 5’s battery allows the navigator to operate even without feeding it with the power supply
cable.
The maximum use of the battery in optimal conditions ranges from 30 minutes to 2 hours (according
to the usage patterns). It is possible to extend the battery-life to optimize efficiency: in the system
setup it is possible to choose fromthree levels of power-save (none, medium, maximum).
2.5 Fitting the optional external GPS antenna
Geosat 5 is equipped with a built-in GPS antenna and with a port for an optional external antenna.
The external antenna can be useful in case of complex installations. The external antenna does not
need power.
The magnetic base of the external GPS antenna can be placed on any flat metallic surface, with the
antenna facing up. The higher the GPS antenna is placed, the better it will receive the signal.
To guarantee a good signal place the external antenna on the bonnet or on the roof. The cable is
made of a tear-proof material so that it does not break if it is accidentally closed between the door
and the body of the vehicle. The antenna should not be covered with shielding materials (e.g. metal).
Do not put the antenna in the boot or in the glove box.
After positioning the antenna take its cable inside the vehicle, passing it through the passenger door
seal and connect the end plug into Geosat 5.

12
2.6 Starting
1. Switch on the navigator by pressing the POWER button
2. Some important warnings are displayed
3. If the warnings are not in the language required, it is possible to immediately set the text language
by touching the Language Setting button in the lower left corner. Select the desired language
for the text, then touch the upper right arrow button to select the voice language (for vocal
instructions)
4. Touch the OK button to close the language setting window and go back to the warning page
5. Touch the Accept button to accept the warning and display the Map
6. If a route was set before switching off Geosat, the navigation will continue toward the selected
destination.

13
3. The Main Menu
The MENU key
It opens the Main Menu, which consists of four pages with three big buttons each. Change page by
touching the arrow button.
By touching the Settings button in the lower right corner, you can access the system settings, while
touching the Map button on the lower left corner you can go back to the map view.
Where to Go button
It opens the Where to go page from which you
can choose a destination
Route functions button
It opens the Route Functions page from which
you can modify the route, detour, see the turn list
or delete it.
Volume button
It opens the Volume page from which you
can adjust the Volume or customize the vocal
instructions.
Night / Day Vision button
It switches the display mode to night or day vision.
The night vision uses a different colour palette in
order to be viewable during the night.
Display Settings button
It opens the Display Settings page from which
you can ad just brightness and view.
2D / 3D View
It switches the map view to 3D or 2D.
Unit status button
It opens the Unit status page which displays info
on the position and strength of the signal received
from the satellites, status of the TMC receiver, on
the battery status and on the power save options.
File manager button
It opens the File manager page from which you
can save contacts and tracks
Video button
It switches to the video mode, so that the navigator

14
screen displays whatever is connected to the
Audio Video input.
Tracks button
It opens the Tracks page from which you can
record tracks.
Demo button
It starts the Demo

15
4. Setting the destination
4.1 Setting the first destination
In order to insert your first destination:
1. Press the WHERE TO GO Key on the side keyboard to open the Where to go page.
2. Touch the Address button to open the Address page
3. Touch on the New Address button in the
upper right part of the screen
4. The address wizard will start with the Enter
country page. To insert the country, touch the
letters on the virtual keyboard.
5. Touch the green arrow button to go on with
the procedure and access the Enter city page.
If this is not the first time you have entered an
address, the name of the last city entered is
suggested.
6. Enter the city by touching the letters on the
virtual keyboard.
The name of selected country is shown on
the upper bar, and it is possible to go back to
the country selection by touching the Country
button.
7. Once the city has been entered, touch
the green arrow button to go on with the
procedure.
In case there are more cities with the same
name, a list with all the possible results will
be displayed. Touch the desired city on the list
to go on with the procedure and access to the
Enter address page.
8. To insert the name of the street country, touch
the letters on the virtual keyboard. To insert
symbols or numbers touch the 123 button to
open the virtual numeric keyboard then touch
the ABC button to go back to the alphabetic
keyboard.
9. Touch the green arrow button to go on with
the procedure and access to the Enter House
number page.
Insert a number and touch the green arrow
button. In case the selected House number is
not found, a list with all the available numbers’
ranges for the selected street will be displayed.
Choose the nearest house number.
10.The Start Navigation page will be displayed.
Touch the Go button to calculate the route

16
and start the navigation from the current GPS
position to the selected destination.
4.2 View on Map
From the Start Navigation page you can touch
the View on Map to display the location of the
selected address on the Map. Once you have
checked the position on the map press on the Back
arrow button to go back to the Start Navigation
page, then touch the Go button to calculate the
route and start the navigation from the current
GPS position to the selected destination.
4.3 Routing preferences
From the Start Navigation page you can touch the
Routing preferences button to set the preferences
for the calculation of the route. After setting the
preferences go back to the Start Navigation page
then touch the Go button to calculate the route
and start the navigation from the current GPS
position to the selected destination.

17
5. Planning a route
5.1 Planning a route from A to B
When you are in your car and Geosat receives a valid GPS fix, the starting point of a route corresponds
to your current GPSA position. It is also possible to plan a route without a Valid GPS fix, before
leaving, setting both the destination and the starting point.
1. Insert a new address following the instructions in par. 4 up to the Start Navigation page.
2. In the Start Navigation page it is possible to
set the inserted address as Departure touching
the button Set as Starting Point.
3. Repeat the operation to insert the destination
address
4. In the Start Navigation page touch the Go
button.
The navigation won’t start, but the route will be
shown on the map with a green line so that it
will be possible to check it and modify it. The
navigation will start only when the GPS fix will
be received.
5.2 Clearing a Route
Once a route has been planned, it is possible to
delete it:
1. Press the MENU key on the side keyboard
2. Touch the Route functions button
3. Touch the Clear route button.
5.3 Reversing a Route
Once a route has been planned, it is possible to
follow exactly the same route in reverse:
1. Press the MENU key on the side keyboard
2. Touch the Route functions button then touch
the upper right arrow to open the second
page
3. Touch the Invert route button
5.4 Via points
It is possible to plan a complex route inserting up
to waypoints
1. Press the MENU key on the side keyboard
2. Touch the Route functions button
3. Touch the Edit Trip button. In this page it is
possible to add a waypoint, delete it or change
the order.

18
4. Touch Add point to open the Add point page.
5. Select the desired address as for inserting a
new address (par. 4) or with the advanced
procedure (par. 8) then in the Start Navigation
Page, touch Set as Via Point and go back to
the Edit Trip page.
6. Again select Add Point to add a second via
point.
Once all the via points have been inserted it is
possible to change their order: in the Edit Trip
page select a Waypoint then touch Move up or
Move down to change the order.
7. Once the Trip has been modified, close the page by touching the cross on the upper right corner
to save the changes and go back to the Map.
5.5 Avoiding a street and Detour
Once a route is planned, it is possible to modify it in order to avoid a street:
1. Press the MENU key on the side keyboard
2. Touch the Route functions button
3. Touch the Detour button. This page displays
the list of all streets along the route.
4. Select the street you want to avoid,
5. Touch the Detour button to view the new list
of streets
6. Close the page by touching the cross button in
the upper right corner to go back to the Map.
5.6 Blocking a road
It is possible to block a road even if it is not yet
blocked on the map. This may be useful to block
a road with work in progress, or to block a road
you want to avoid for any reason.
1. Insert the correct address of the road you
want to block as described in par. 4
2. In the Start Navigation page touch the Block
Road button
3. The blocked road will be highlighted with a
red line delimited by two red bar icons.
5.7 Walkways
If you insert a walkway as your destination,
Geosat will calculate the route to the closet road
open to the traffic. To activate the walkways, the
settings must be modifies as described in par

19
10.1.
5.8 Simulation
After planning a route, it is also possible to
simulate navigation.
1. Press the MENU key on the side keyboard
2. Touch the Settings button in the right lower
corner
3. Touch the User preferences button
4. Touch the Simulation button
5. Set the speed for the simulation and Touch
OK to go back to the main Settings page.
6. Touch the Map button to go back to the
Map.

20
6. Map views
6.1 Navigation info
Inactive Navigation
Active Navigation
If the navigation is active, the position of the vehicle on the map is shown with an Icon (e.g. a blue
car).
On the right part of the map the zoom in and zoom out button are displayed.
The status bar in the lower right corner of the screen displays three icons indicating: the TMC status,
the GPS status and the battery status.
Info box
Next manoeuvre
Distance to
go to the next
manoeuvre
Address of current
GPS posiiton
Street to take at the
next manoeuvre
Info bar
Status bar
Zoom in
Zoom out
TMC status
GPS status
Battery status
Info bar
Info button
Back button
Show entire
route button
Scale
Show / Hide info
boxes bar
Other manuals for Geosat 5
1
Table of contents
Other AvMap GPS manuals

AvMap
AvMap GeoPilot II PLUS User manual

AvMap
AvMap EKP IV User manual

AvMap
AvMap EKPV User manual

AvMap
AvMap GeoPilot plus User manual

AvMap
AvMap Geosat 6 Series User manual

AvMap
AvMap Geosat 4 DRIVE User manual

AvMap
AvMap Geosat 4 ALL User manual

AvMap
AvMap EKP IV User manual

AvMap
AvMap Geosat 6 APRS Parts list manual

AvMap
AvMap Geosat 4x4 User manual

AvMap
AvMap EKPV User manual

AvMap
AvMap Geosat 5 BLU User manual

AvMap
AvMap EKP-IV PRO User manual

AvMap
AvMap Geosat 5 BLU User manual

AvMap
AvMap G6 Farmnavigator User manual

AvMap
AvMap Geosat 6 User manual

AvMap
AvMap Geosat 5 APRS User manual

AvMap
AvMap Geosat 5 User manual

AvMap
AvMap GeoPilot II User manual

AvMap
AvMap EKP III C User manual