AvMap Geosat 6 User manual

User Manual

Dear Costumer,
Congratulation for choosing an AvMap Satellite Navigator.
AvMap GPS systems are made in Italy since 1994.
SATELLITE NAVIGATION
Your journey, Our technology

Table of Contents
I. Warning 5
I.I Important notes 5
I.II Battery disposal 6
I. III Maintenance 7
I.IV Content of the box 7
II. Device Description 8
II.I Hardware features 8
II.II Smart Magnetic Mount 9
1. Getting started 10
1.1 Installation 10
1.2 Accessing to Navigation 10
1.3 Start page 11
2. The Navigation Menu 12
2.1 Fixed buttons 12
2.2 Mobile Menu 13
2.3 Portrait view 15
2.4 Help Mode 16
2.5 FAQ’s 16
3. The Map 18
3.1 Explore the map 18
3.2 Record your track on the map 20
4. Seting a destination 21
4.1 Search Options 21
4.2 Inserting an address as destination 22
4.3 Choosing the destination among the POIs 24
4.4 Choosing the destination among your Favourite POIs 26
4.5 Choosing the destination among the Contacts 27
4.6 The Start Navigation page 28
5. The map during the navigation 29
5.1 Changing the navigation data 30
5.2 2D and 3D view 31
5.3 Night vision 32
5.4 MyPosition 33
6. Planning and modifying a route 34
6.1 Planning a route from A to B 34
6.2 Route Functions Menu 35
6.3 Deleting a route 36
6.4 Adding Via Points 36
6.5 Changing the Via Points sequence 36
6.6 Simulating mode 37
7. Advanced planning 39
7.1 Viewing the Turn List 39
7.2 Detouring to avoid a street 39

7.3 Blocking a street 40
7.4 Route overview 40
7.5 Planning next stop 42
7.6 Choosing Route Options 44
8. Trip Computer 46
9. Managing Points of Interest 48
9.1 POI types 48
9.2 Displaying or Hiding a POI category 48
9.3 Setting the favourite POI categories 49
9.4 I User POI 50
10. Managing Address book 53
10.1 Address book 53
10.2 Creating or modifying a folder 53
10.3 Saving or modifying a contact 54
10.4 Setting Home address 56
11. Managing saved routes 58
11.1 Saving the route 58
12. Unit status 60
12.1 Unit status Menu 60
12.2 GPS page 60
13. Customizing the settings 62
13. 1 The Settings Menu 62
13.2 User Preferences 63
13.3 Interface 64
14. Updates 66
14.1 Checking the Software version 66
14.2 Map update 66
15. Problem solving 67
15.1 RESET 67
Warranty and Support 68
Warranty conditions 68
Repair and replacement under warranty 69
Tele Atlas End User agreement 71
Appendix
A - Preloaded POI categories 75
B - Setting the rst destination: ux diagram 77
C: Maps 78

AvMap - 5
I. Warning
The manufacturer and the distribution chain disclaim
any liability deriving from an improper use of the
device in a way that may cause accidents or damages
to things or persons.
Using this navigator implies that the user accepts
and follows all these warnings and all the
instructions contained on this manual. The driver is
held responsible for using Geosat in the correct way
(passenger or non passenger mode).
The User should ignore the indications suggested by
Geosat in situations that appear to be in contrast
with the Highway Code. The Manufacturer and the
distribution chain disclaim any liability deriving from
an improper use of the device in a way that may
violate the Highway Code.
The Tele Atlas cartographic data loaded in the
navigator may present some discrepancies from the
reality. This is due to the continuous changes in the
street network. Some areas have a better coverage
than others.
I.I Important notes
Important:
• Do not place the navigator in positions that may
obstruct the driver’s view
• Do not place the navigator in positions that may
interfere with the correct functioning of the security/
safety equipment of the vehicle (e.g. airbags).
• Make sure that the navigator is correctly attached
to the bracket before driving.
• Do not rely exclusively on vocal instructions.
Depending on a variety of factors, (speed, weather,
GPS reception etc) these instructions may not be
correct or timely. Always take the information
provided as indicative, and always respect the

6 - AvMap
Highway Code. Satellite navigators should be
considered merely as aids. The driver is held
responsible for safe driving and the choice of the
best route to take.
• Do not consult the navigator whilst driving if this
represents a danger for you and other people.
• Do not program the navigator while driving
•The precision of the GPS signal, in the best possible
conditions is guaranteed with a deviation of 15
meters
N.B.: The information contained in this manual is
updated to August 2007. Any subsequent changes in
the system, in the functions, in the tools bar or maps
introduced after this date will not be present in this
manual.
I.II Battery disposal
This product is equipped with a built-in Li-Ion
battery. Do not use the product in damp or corrosive
environments. In order to lengthen the life of the
battery, do not recharge it at temperatures higher
than 60°C.
THE LI-ION BATTERY PROVIDED WITH THE PRODUCT
MUST BE RECYCLED OR DISPOSED IN THE CORRECT
WAY.
The symbol shown here and on the box indicates the
conformity to the WEEE directive. Do not dispose
of this WEEE product as domestic waste; some
substances contained in electronic equipment can
damage the environment and harm human health if
misused or if they are not disposed of in the correct
way. Return the device to the distributor when

AvMap - 7
purchasing a new one. The unlawful
disposal of these wastes is punished with
sanctions.
Information about emissions for Canada:
this Class B digital device is in conformity
with the Canadian law ICES-003/NMB-
003.
R&TTE DL2 Directive: this device is in conformity
with the UE directive 99/5/CE
I. III Maintenance
• Do not leave the navigator in direct sunlight for
extended periods. This could compromise the correct
running of your Geosat. If you suspect that the
navigator has been over heated because of sunlight
exposure, let the temperature of the car cool down,
and wait for the device temperature to go down to
normal values before switching it on.
• The Secure Digital memory card should not be
formatted nor the content modied.
• Only AvMap branded Secure Digital memory cards
are compatible with Geosat.
• Avoid knocking against the display.
• Do not use oil based products to clean the LCD
surface.
• Keep away from water.
I.IV Content of the box
• Geosat 6 Satellite Navigator
• Self powered magnetic holder
• CA power supply cable
• USB cable
• User manual
8 - AvMap
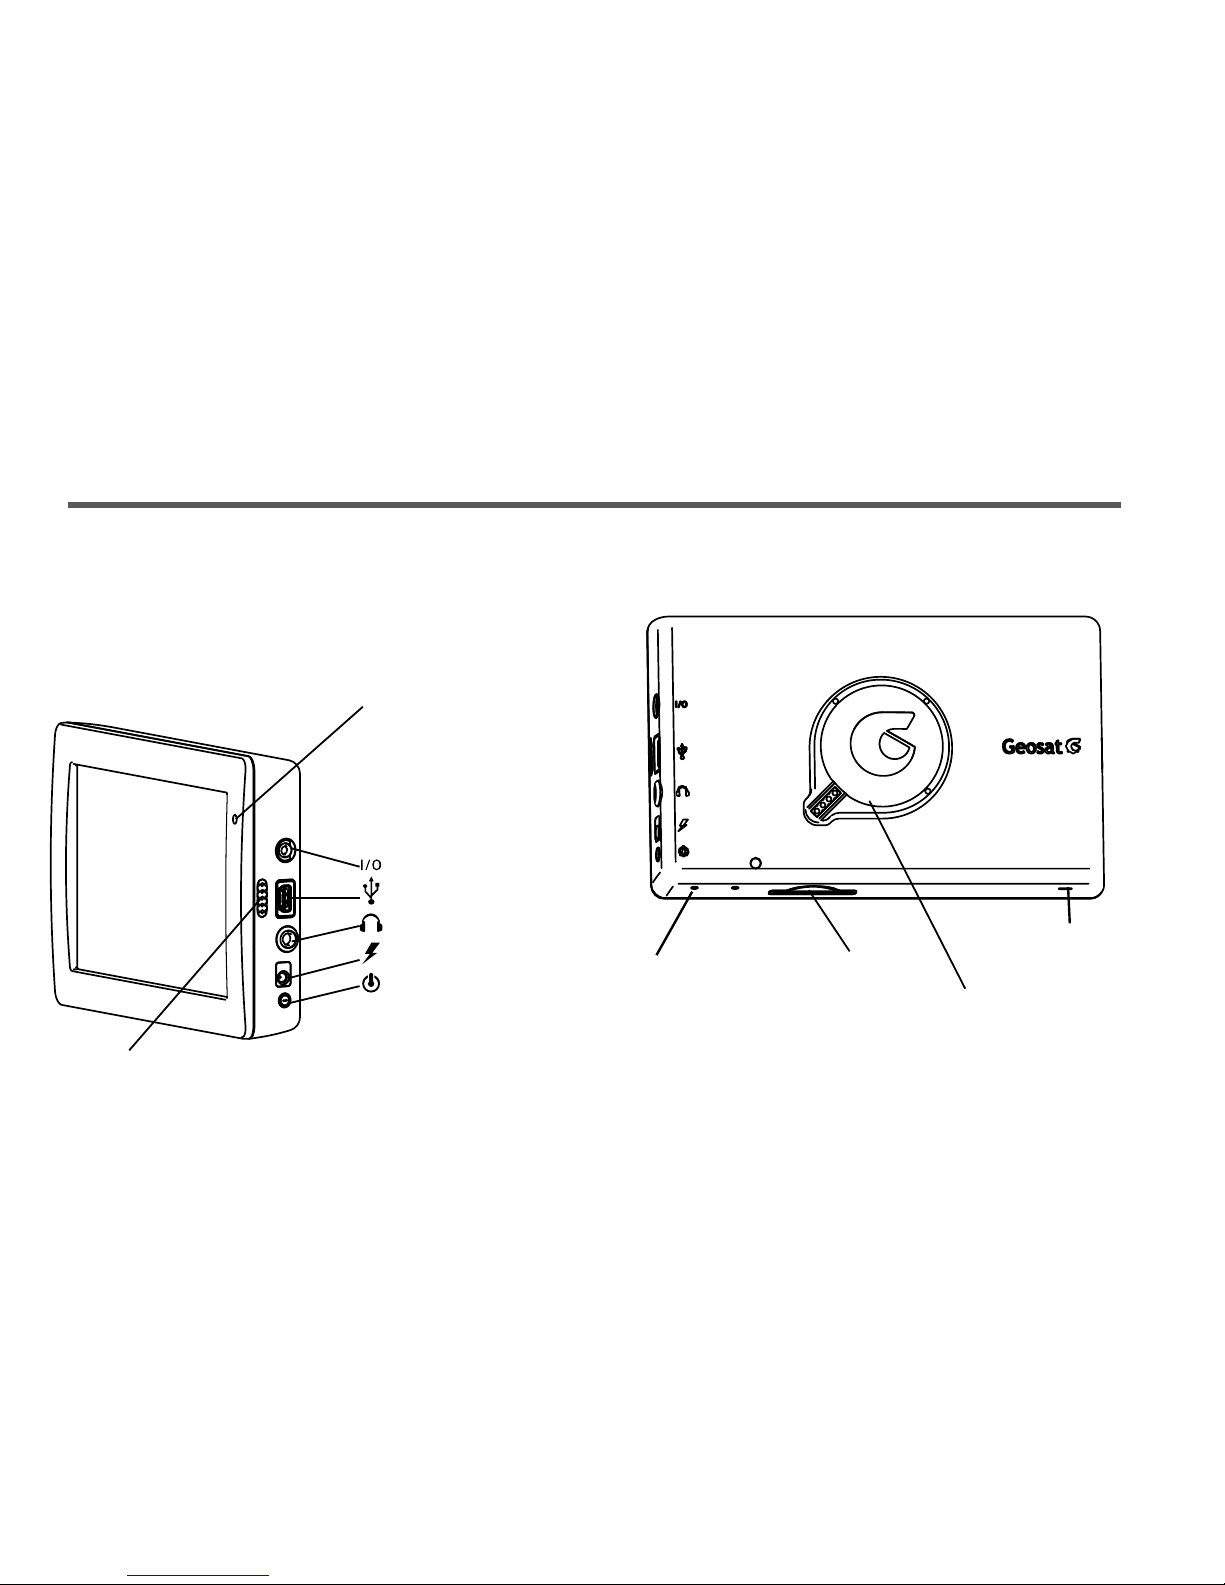
II. Device Description
SD slot
Hook for magnetic holder
Serial port
USB (master/slave)
Audio output
Power supply
Power key
Microphone
Speakers
Back
II.I Hardware features
The Geosat 6 is equipped with a 4.8” touch
screen, a microphone, 2 speakers, audio output.
The illustrations show the hardware features.
On / Off Switch
Reset

AvMap - 9
II.II Smart Magnetic Mount
1. Fix the car mount on the windscreen with the
suction cup in a position that does not represent a
danger in case of accident or sharp braking, and that
does not distract the driver.
2. Plug the power supply cable in the holder and in
the cigarette lighter.
3. Place the Geosat 6 on the magnetic car mount
coupling with a simple gesture.
4. Press the power key to power on the navigator.
5. The smart magnetic rotating mount makes it
possible to rotate the navigator from landscape to
portrait mode to choose your point of view. The
mount has been designed so that the driver can
easily rotate the navigator always keeping the eyes
on the road: the software will automatically switch
from landscape to portrait view.
Power supply

10 - AvMap
1. Getting started
1.1 Installation
AvMap Geosat 6 is ready to be used. All you need to do is
install the unit into the vehicle.
Fix the car mount on the windscreen with the suction
cup in a position that does not represent a danger in case
of accident or sharp braking, then place the Geosat 6 on
the magnetic mount. Move the On/Off switch towards
the On position and then press the power key to power
on the navigator.
The On/Off swith removes the power supply, while the
power key puts the navigator in stand by.
1.2 Accessing to Navigation
When powered on, Geosat 6 will display the main menu.
From the main menu you can choose among three
functions:
• Satellite Navigator
Table of contents
Other AvMap GPS manuals

AvMap
AvMap Geosat 5 BLU User manual

AvMap
AvMap Ultra EFIS Operating manual

AvMap
AvMap EKPV User manual

AvMap
AvMap GeoPilot plus User manual

AvMap
AvMap EKP IV User manual

AvMap
AvMap Geosat 4x4 User manual

AvMap
AvMap EKP-IV PRO User manual

AvMap
AvMap Geosat 6 APRS Parts list manual

AvMap
AvMap EKPV User manual

AvMap
AvMap Geosat 6 Series User manual

AvMap
AvMap EKP IV User manual

AvMap
AvMap Geosat 5 User manual

AvMap
AvMap Geosat 5 BLU User manual

AvMap
AvMap GeoPilot II PLUS User manual

AvMap
AvMap Geosat 5 User manual

AvMap
AvMap Geosat 4 ALL User manual

AvMap
AvMap Geosat 5 APRS User manual

AvMap
AvMap EKP III C User manual

AvMap
AvMap Geosat 4 DRIVE User manual

AvMap
AvMap EKPV User manual


