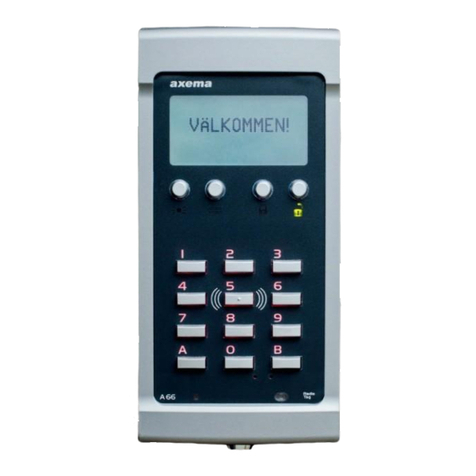
Axema VAKA A66 SOLO User manual

Axema Access Control AB | Box 90215 | 120 23 Stockholm, Sweden | +46 (0)8-722 34 40 | i[email protected] | www.axema.se
Reader VAKA A66 SOLO (offline)
Manual
Updated 04/11/2021

A66 SOLO (Offline)
Introduction A66 SOLO 3
Screw terminals 4
Commissioning the A66 4
Commissioning of a SOLO-system 5
Maintenance of SOLO systems 6
Synchronisation of all readers. 6
Programming 6
To be programmed in the master reader 6
To be programmed in each slave reader 7
Configuration of new slave reader 7
Convert a slave reader to a master reader 8
Replacement of a slave reader 8
About MIFARE DESFire EV2 tags 8
2 (9) ManualA66 SOLO

Introduction A66 SOLO
Reader VAKA A66 and operation mode SOLO is available from version 3.00.
With A66 SOLO, an offline system can be built with up to ten A66 readers, where a common data-
base is stored locally in the readers. One of the readers is set as Master, and the other readers are
set as Slaves. The configuration of the master reader is distributed to the slave readers by
MIFARE DESFire EV2 tags. Axema radio keys (RN18), MIFAREClassic, and EM credentials can
be used in a SOLO system, but not to distribute data.
In a SOLO system, permissions, time schedules (incl. day open func-
tion and open button) are identical in all readers. Codes can be con-
figured to be distributed to the slave readers or only work in the
master reader.
3 (9) ManualA66 SOLO

Screw terminals
Connector Function
1-2 AUX relay (NO/NC)
3-4 Supply voltage (12-35 VDC)
8-9 Exit button *
8, 10 Door contact **
The 100Ω resistor (supplied) is only used when the reader is connected to a door controller.
* Closing the open button input means that the lock is unlocked for the corresponding time (plus the
set opening time).
** When using the door contact, the opening relay returns to the locked position, regardless of the
opening time, as soon as the door is opened. A closed door is to be indicated by a closed contact
between the terminals.
Commissioning the A66
1. Connect the power supply to the A66. (The display will not turn on automatically).
2. Press A and B simultaneously.
3. When the text
Enter Programming
Code appears, enter the code 112233.
4. Select language and press
OK
. (Default language is Swedish)
5. Set time and date
4 (9) ManualA66 SOLO

Commissioning of a SOLO-system
Commissioning of a SOLO-system requires a MIFARE DESFire EV2 card or tag. If data in the sys-
tem is to be disseminated via users' cards and tags, the Master reader should be the reader where
most users pass.
1. Select the master reader.
2. If not already done, connect and commission the reader
3. Start the programming mode in the future master unit.
The programming mode is entered by pressing the programming button (the rightmost
round button) and entering of the programming code. (Default set to 112233).
4. Navigate to menu
Options
>
Operating mode
and select
Master
.
5. Return to the main menu and navigate to the
Tags
menu. Select
New tag
and present a
MIFAREDESFire EV2 tag, from now on referred to as programming tag. Select
Yes
if
the question to
erase tag
appears.
(The question "Erase tag" is asked when the tag is already registered in another SOLO
system.)
6. Program tags, codes, schedules, etc.
7. Leave the programming mode
8. Present the Programming tag to the master reader until
Hold tag
disappears.
9. For all slave readers,
i. If not already done, connect and commission the reader
ii. Enter programming mode
iii. Navigate to menu
Options
>
Operating mode
and select
Slave
.
iv. Select
Pair system
.
v. Present the Programming tag to the reader until
Hold tag
disappears.
vi. Set time/date and active buttons for radio keys.
vii. Leave the programming mode
5 (9) ManualA66 SOLO

10. A minus sign (-) at the top of the master reader display means that the database is not
consistent across the system's readers. Take action by: (Repetition may be required.)
i. Show the programming tag for the master reader.
ii. Display the programming tag to all slave readers.
A plus sign (+) appears at the top of the master reader's display when the database is
synchronized in all readers.
Maintenance of SOLO systems
When DESFire EV2 chips are used in the system, data is spread to slave readers automatically.
The database must be synchronized manually, using programming chip (s):
- If the system has readers whose users do not pass the master reader
- When the cards and tags used in the system are of the EM or MIFARE Classic type
Synchronisation of all readers.
Programming tag refers to a DESFire EV2 tag added to the system after the master reader
was configured as a master.
A minus sign (-) at the top of the master reader display means that the database is not consistent
across the system's readers. Take action by: (Repetition may be required.)
i. Show the programming tag for the master reader.
ii. Display the programming tag to all slave readers.
A plus sign (+) appears at the top of the master reader's display when the database is syn-
chronized in all readers.
Programming
To be programmed in the master reader
lTime schedules
lUnlocking time (always 7 sec. in slave readers)
6 (9) ManualA66 SOLO

lCodes (distribution of codes can be inactivated, witch means that codes only work in the
master reader).
lDaily unlocked function
lExit button
lEM (on/off)
lProgramming code
lLanguage
lAutomatic daylight saving time adjustments
To be programmed in each slave reader
lTime/date
lStandard/reversed lock function
lPostal IR codes (Sweden only)
lActive buttons on radio keys
lBacklight
lSound
Configuration of new slave reader
Programming tag refers to a DESFire EV2 tag added to the system after the master reader
was configured as a master.
1. If not already done, connect and commission the reader
2. Enter programming mode
3. Navigate to menu
Options
>
Operating mode
and select
Slave
.
4. Select
Pair system
.
5. Present the Programming tag to the reader until
Hold tag
disappears.
6. Set time/date and active buttons for radio keys.
7. Leave the programming mode
8. Follow the instructions in Maintenance of SOLO systems
7 (9) ManualA66 SOLO

Convert a slave reader to a master reader
An existing slave reader can, if necessary, be configured to be used as a new master reader.
1. Replace the previously broken master reader with a slave reader from the system.
2. Enter programming mode
The programming mode is entered by pressing the programming button (the rightmost
round button) and entering of the programming code. (Default set to 112233).
3. Navigate to
Options
menu ->
System
->
Operating mode
and select
Master
.
4. Verify that the settings in the new master reader are correct.
5. Leave the programming mode
6. To replace a slave reader, see Driftsättning av ny slavenhet.
Replacement of a slave reader
1. Enter the programming mode of the slave reader to be replaced.
The programming mode is entered by pressing the programming button (the rightmost
round button) and entering of the programming code. (Default set to 112233).
2. Navigate to menu
Options
>
System
and select
Show reader ID
.
3. Leave the programming mode
4. Enter programming mode of the master reader.
5. Navigate to menu
Options
>
System
and select
Uninstall reader
.
6. Select the ID of the slave reader to be replaced.
7. Leave the programming mode
8. Follow the instructions in Configuration of new slave reader.
About MIFARE DESFire EV2 tags
A MIFARE DESFire EV2 tag can only exist in one SOLO system at a time. If a tag is added to
another system, the tag will stop working in the previous system. DESFire EV2 tags can also be
used in systems where information is not distributed by the tag, even if the tags are active in a
SOLO system.
The table below shows capabilities for carrying information for different memory capacities of the
DESFire cards/tags.
8 (9) ManualA66 SOLO

Memory Capacity
2kB 9 tags
4kB 89 tags
8kB 210 tags
9 (9) ManualA66 SOLO
Other manuals for VAKA A66 SOLO
1
Table of contents
Other Axema Intercom System manuals