Axon VIEVU Docking Station User manual

VIEVU Docking Station User Guide 22 January 2019
Version 2.46.7.0 Page 1
INTRODUCTION
The VIEVU Docking Station is a multiple-camera docking option compatible with VIEVU Solution and
VERIPATROL. This guide describes how to use the VIEVU Docking Station with VIEVU cameras and software.
Additional support material is available at www.vievu.com/support.
VIEVU Docking Station
User Guide
CONTACT US
If you need assistance or have any questions, please visit www.vievu.com/docking-station-support,
contact us by phone at 888-285-4548, or email support@vievu.com.

VIEVU Docking Station User Guide 22 January 2019
Version 2.46.7.0 Page 2
TABLE OF CONTENTS
GETTING STARTED ................................................................. 4
PREPARING FOR DOCKING STATION SETUP.............................................................. 4
Overview ........................................................................................................................................... 4
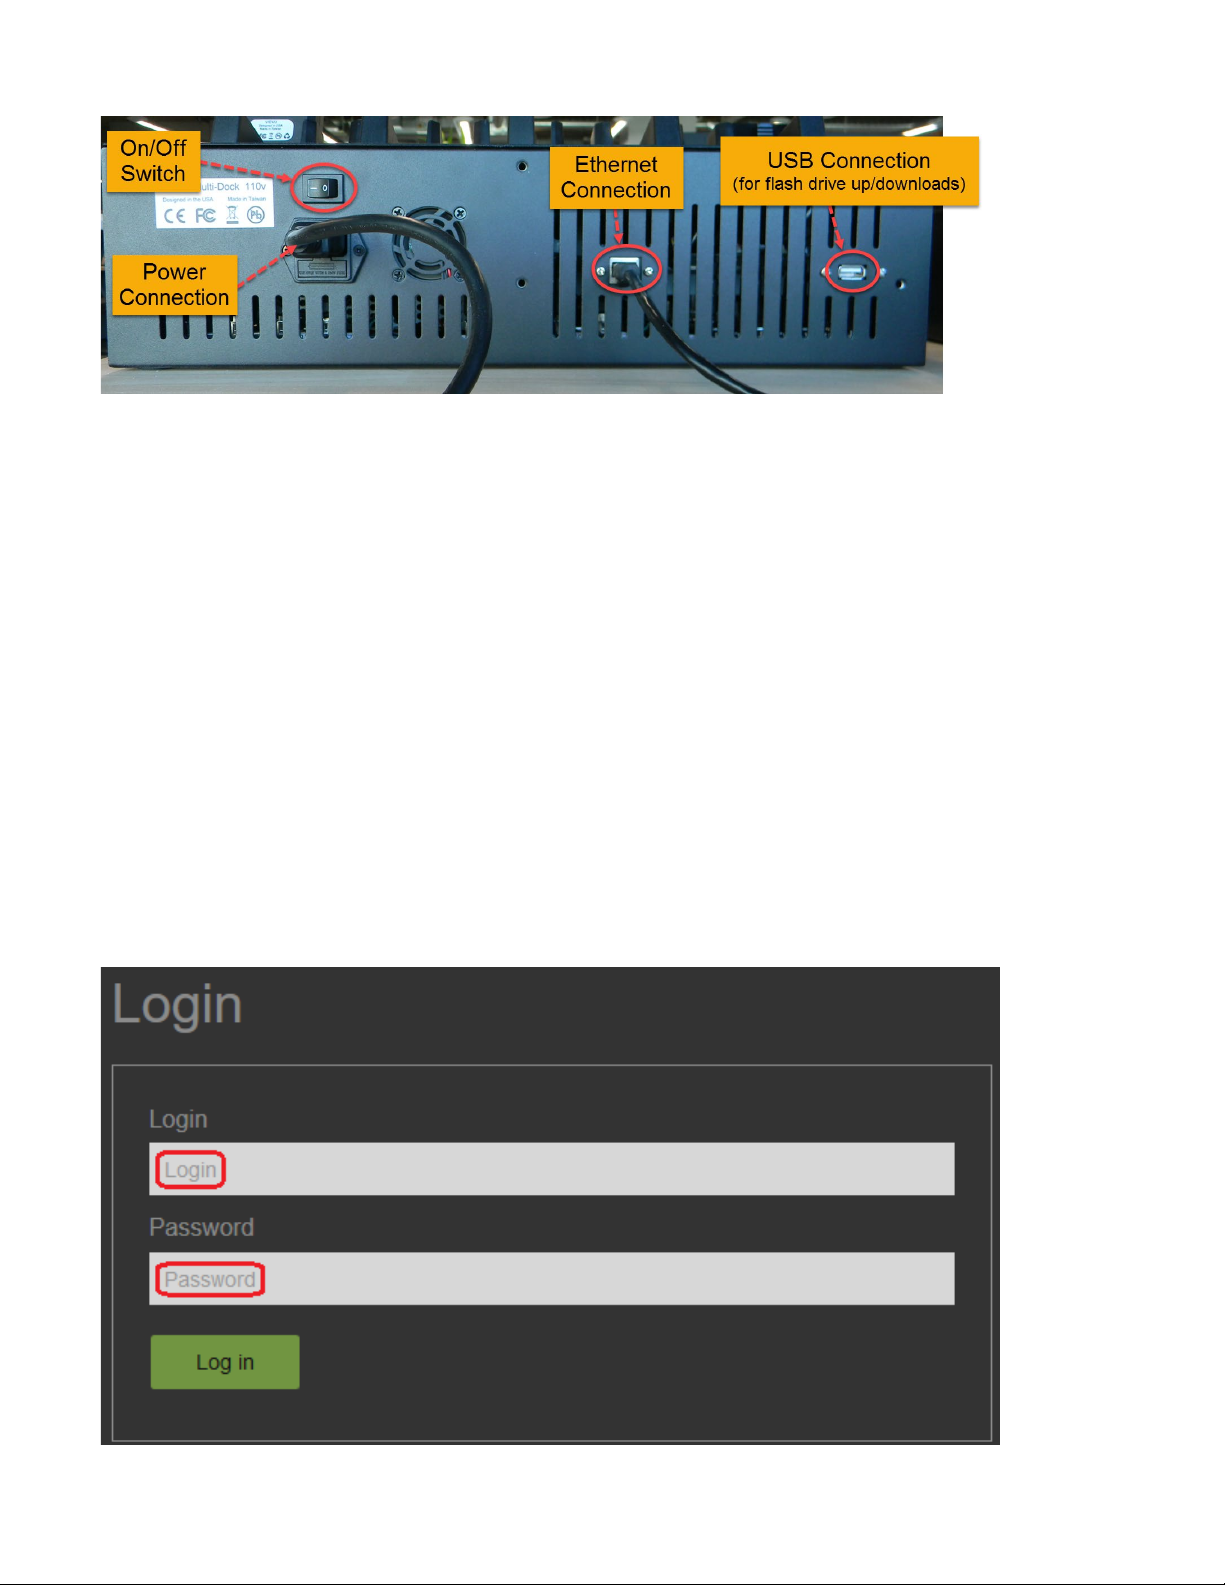
Obtaining IP Address......................................................................................................................... 4
Log In ................................................................................................................................................ 5
MAIN MENU .............................................................................. 7
CONFIGURATION ................................................................................................... 7
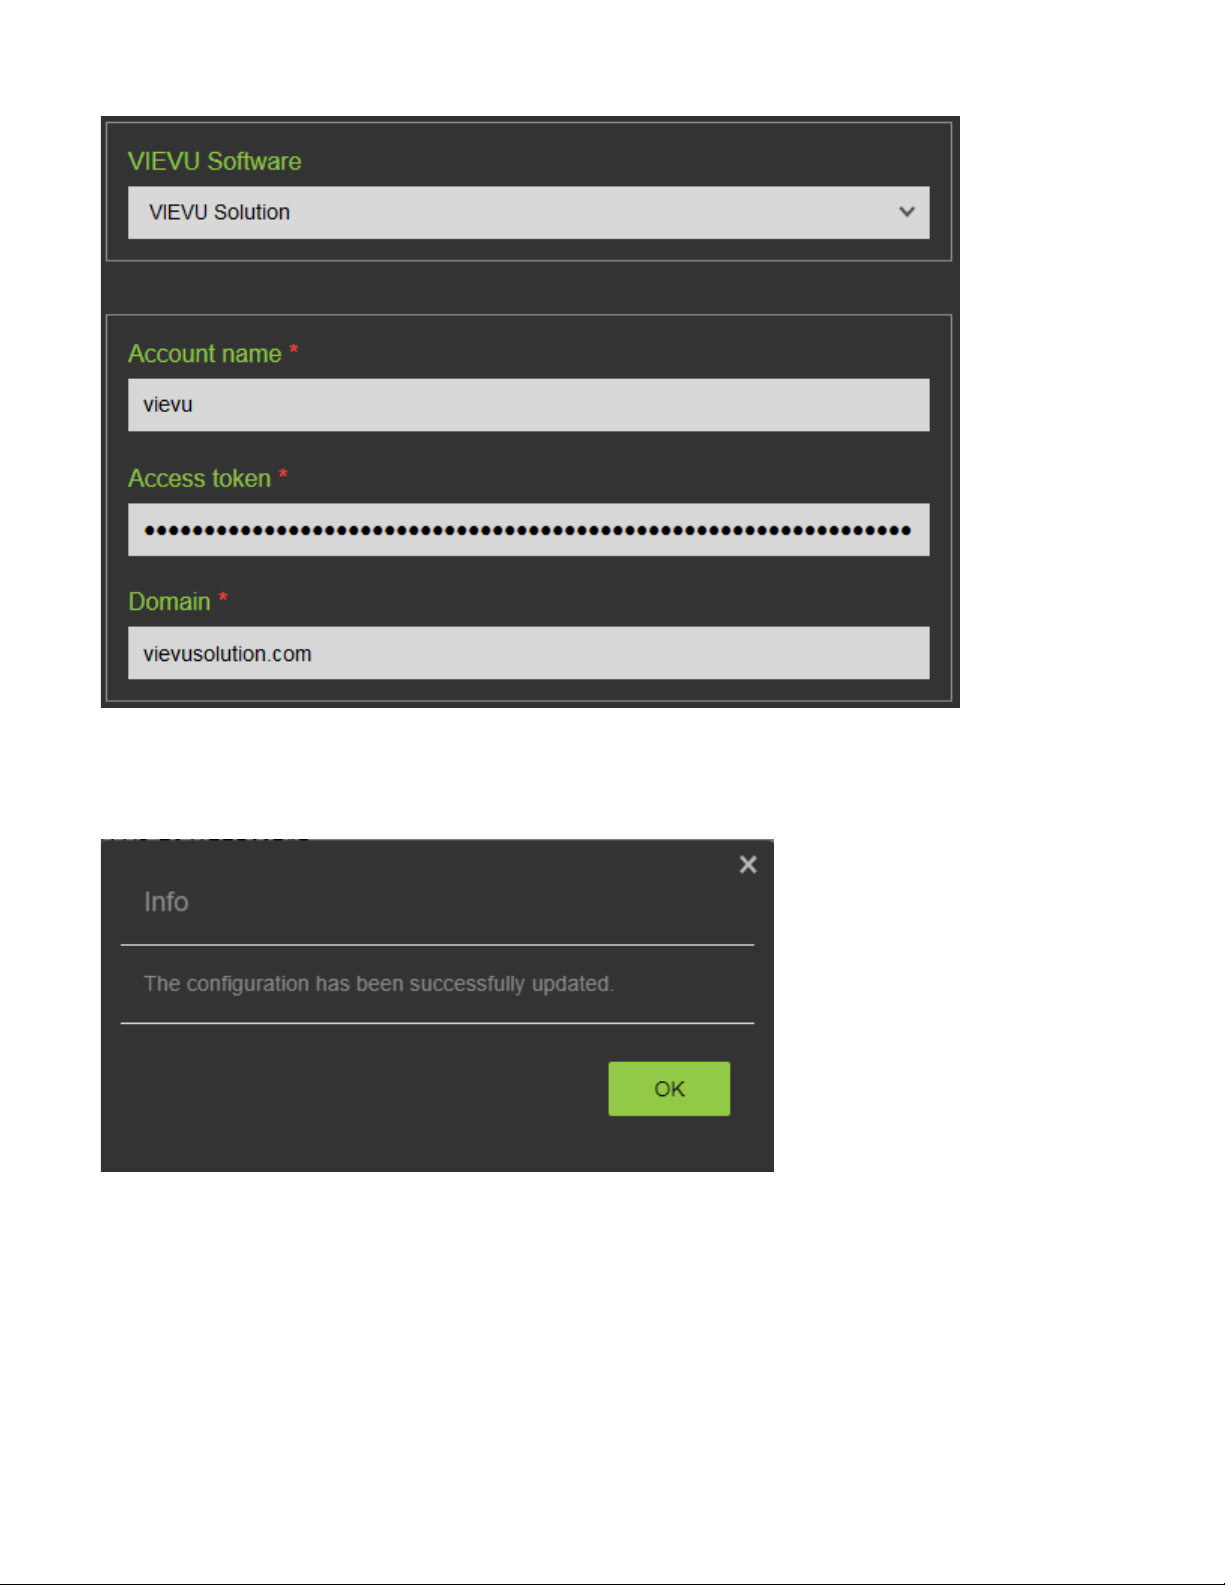
VIEVU Software ................................................................................................................................ 7
Time Zone ....................................................................................................................................... 11
Hostname........................................................................................................................................ 12
Location........................................................................................................................................... 13
Proxy Server.................................................................................................................................... 13
IP Address....................................................................................................................................... 14
DNS Settings................................................................................................................................... 15
NTP Server Settings........................................................................................................................ 16
SSL Certificate Support ................................................................................................................... 16
NETWORK TOOLS ................................................................................................ 17
Traceroute ....................................................................................................................................... 17
Ping................................................................................................................................................. 18
SNMP Monitoring ............................................................................................................................ 18
FIRMWARE.......................................................................................................... 24
Overview ......................................................................................................................................... 24
Remote Update Of Docking Stations From VIEVU Solution............................................................. 25
Automatic Update of Docking Station Firmware with VERIPATROL ................................................ 26
Manual Update of Docking Station Firmware................................................................................... 26
Automatic Update of Camera Firmware........................................................................................... 26
PREFERENCES .................................................................................................... 27

VIEVU Docking Station User Guide 22 January 2019
Version 2.46.7.0 Page 3
Overview ......................................................................................................................................... 27
Change Login .................................................................................................................................. 28
Change Password ........................................................................................................................... 29
OPERATION ........................................................................... 30
CONNECTING CAMERAS ....................................................................................... 30
Overview ......................................................................................................................................... 30
Docking Station Port........................................................................................................................ 30
LE4mini Port Insert .......................................................................................................................... 30
LE3 Docking Station Port................................................................................................................. 30
Connecting Cameras to a Docking Station ...................................................................................... 30
CAMERA LEDS................................................................................................... 32
LE5 LEDs ........................................................................................................................................ 32
LE5 LITE LEDs................................................................................................................................ 33
LE4/LE4mini LEDs .......................................................................................................................... 33
LE3 LEDs ........................................................................................................................................ 33
ARCHITECTURE..................................................................... 35
CLOUD ENVIRONMENT ......................................................................................... 35
LOCAL SERVER ENVIRONMENT ............................................................................. 36
APPENDIX A: XML CONFIGURATION FILE .......................... 38
CONFIGURE ADOCKING STATION USING AN XML FILE ........................................... 38

VIEVU Docking Station User Guide 22 January 2019
Version 2.46.7.0 Page 4
GETTING STARTED
Preparing your Docking Station for use with VIEVU Solution and VERIPATROL.
Preparing for Docking Station Setup
You will need to prepare your Docking Station before configuring it for use with your environment.
Overview
The Docking Station is a network-enabled platform for VIEVU cameras. The Docking Station is connected to an
Ethernet cable and communicates over the internet to automatically transfer video files to VIEVU Solution or
VERIPATROL.
Docking Stations may be mounted on a flat surface or be wall-mounted (Figure 1).
Figure 1
Obtaining IP Address
To set up the Docking Station, connect an Ethernet cable and power cable to the rear of the Docking Station
(Figure 2). The Docking Station uses DHCP by default, to acquire an IP address on a IPv4 network. (You may
acquire an IP address using either an automatic or manual configuration.)

VIEVU Docking Station User Guide 22 January 2019
Version 2.46.7.0 Page 5
Figure 2
To obtain an IP address using an automatic configuration:
1. Download the configuration file: DS_settings.XML from the VIEVU support web site
(http://www.vievu.com/docking-station-support/).
2. Edit the XML file to match your settings, (as described in Appendix A: XML Configuration File).
3. Copy the XML configuration file to a FAT formatted USB flash drive.
4. Insert the USB flash drive into the USB port on the back of the Docking Station and wait up to 5 minutes.
5. The Docking Station configures itself according to the XML file settings.
6. A text file containing the IP address assigned to the Docking Station is added to the USB drive.
(See Configure A Docking Station Using An XML File for more information.)
Log In
Once you know the IP Address of the Docking Station, you can access its user interface and log in to configure the
dock.
To login to the Docking Station:
1. Open an internet browser and navigate to the IP address of the Docking Station.
2. The login screen is displayed (Figure 3).
Figure 3

VIEVU Docking Station User Guide 22 January 2019
Version 2.46.7.0 Page 6
3. Use the following default credentials to login to the Docking Station:
Login ID: admin
Password: vievu123
4. The Docking Station Configuration page is displayed (Figure 4).
Note: If your login fails, the credentials may have already been changed. In that case, please
contact your system administrator to help resolve the issue.

VIEVU Docking Station User Guide 22 January 2019
Version 2.46.7.0 Page 7
MAIN MENU
The Docking Station Menu includes tools for configuring your Docking Station; tools for its network and configuring
SNMP monitoring; firmware installation and preferences.
The Configuration page is displayed by default, after you login to the Docking Station (Figure 4). Navigate
between configuration options by selecting from the following menu options:
Configuration – Setup your Docking Station for use with your VIEVU environment.
Network Tools – Assist with configuring your Docking Station network connection.
Firmware – Configure Docking Station and camera updates.
Preferences – Configure user accounts.
Configuration
Adjust the various settings on the Configuration page to match your current environment (VIEVU Solution or
VERIPATROL). The Configuration page also provides additional customer-manageable settings.
Figure 4
VIEVU Software
Your Docking Station can be configured for use with VIEVU Solution or VERIPATROL.
To configure the Docking Station for use with VIEVU Solution:
1. From the Configuration page, select VIEVU Solution in the drop-down box (Figure 5).
2. In the Account Name field, enter your Account Name. This is the first part of your assigned VIEVU Solution
website. For example, https://XYZDept.vievusolution.com (where XYZDept is the Account Name)
3. In the Access Token field, enter your access token. (You can find this information under the Settings page of
your VIEVU Solution website. (For more information, see the VIEVU Solution User Guide.)
4. In the Domain field enter a domain name where user accounts can be validated.

VIEVU Docking Station User Guide 22 January 2019
Version 2.46.7.0 Page 8
Figure 5
5. After entering VIEVU Solution server information, press Save.
6. When the Docking Station configuration has been updated, a success message is displayed.
Figure 6
7. Press OK, and you are returned to the Configuration screen.
8. Click on Test Connection, to verify that your settings are correct.
9. A Connection created successfully message is displayed (Figure 7).

VIEVU Docking Station User Guide 22 January 2019
Version 2.46.7.0 Page 9
Figure 7
Note: If the connection test fails, double check that the information has been entered correctly
and that traffic to and from the Docking Station is not blocked by a firewall.
10. If the connection fails (or changes), you may restore the default values by clicking on Reset To Defaults and
try configuring the Docking Station again.
11. Then press Test Connection to ensure that the Docking Station can communicate with the server.
To configure the Docking Station for use with VERIPATROL:
1. From the Start menu and in the VIEVU Software drop-down box, select VERIPATROL (Figure 8).
2. Enter your VERIPATROL Server IP Address and Port # in the fields in the VERIPATROL Server window. (The
default port is 43690.)

VIEVU Docking Station User Guide 22 January 2019
Version 2.46.7.0 Page 11
Yes, your changes are saved and the Docking Station reboots.
No, your changes are saved, you are reminded that the system needs to restart (Figure 10).
Figure 10
6. Press OK, and you are returned to the Configuration screen.
7. Then press Test Connection to ensure that the Docking Station can communicate with the server.
8. A Connection created successfully message is displayed (Figure 11).
Figure 11
Time Zone
To setup your time-zone:
1. From the Time Zone drop-down list, select the time zone for your location (Figure 12).

VIEVU Docking Station User Guide 22 January 2019
Version 2.46.7.0 Page 12
Figure 12
2. Press Save to apply the changes.
Note: The Time Zone setting is applied to cameras docked at this Docking Station and are
reflected in the video timestamps.
Hostname
A hostname allows you to reference your Docking Station using a name of your choosing.
To configure a hostname for your Docking Station:
1. In the Hostname field, enter the hostname that the Docking Station will use (Figure 13).
Note: By default, each Docking Station is given a unique hostname identifier.

VIEVU Docking Station User Guide 22 January 2019
Version 2.46.7.0 Page 13
Figure 13
Note: The Hostname field populates with MAC Addresses automatically. The default hostname will
use the following format: VIEVU-MDN-MAC Address.
2. Press Save to apply the changes.
Note: Although a restart is requested and recommended when the hostname is changed, it is not
necessary.
Location
The Location field identifies where your Docking Station is located.
To configure a location for your Docking Station:
1. Set the Docking Station location from the Docking Station page in VIEVU Solution. (See the VIEVU Solution
User’s Guide for details.)
Figure 14
2. Press Save to apply the changes.
Proxy Server
A proxy server overrides the Configuration settings that are entered into the Configuration screen.
To setup a proxy server:
1. If a proxy server is required, select the Enable Proxy Server check box (Figure 15).
2. With the check box selected, fields are displayed for Hostname, User Name, Password, and Port.
3. Enter the following information for the proxy server:

VIEVU Docking Station User Guide 22 January 2019
Version 2.46.7.0 Page 14
Hostname – The server name.
User Name – An account name on the server.
Password – The password of that account on the server.
Port – The connection port to access the server.
Figure 15
4. Press Save to apply the changes.
IP Address
By default, your Docking Station is setup to use an automatically generated DHCP IP Address. You may specify a
static IP address in the IP Address window.
To use a static IP address instead of a DHCP-assigned address:
1. Select the Static IP Address radio button (Figure 16).
2. The static IP Address information is requested.
3. Enter the IP Address, Subnet Mask, and Default Gateway for the Docking Station.

VIEVU Docking Station User Guide 22 January 2019
Version 2.46.7.0 Page 15
Figure 16
4. Press Save to apply the changes.
5. The Docking Station will become available at the new address.
Note: When using a Static IP Address, DNS names are not compatible with the proxy, NTP or
VERIPATROL address on the Docking Station.
DNS Settings
A Domain Name System (DNS) translates the Docking Station domain name into an IP address. The DNS
identifies Docking Stations on the network by a DNS Name instead of by an IP Address.
To configure a DNS:
1. Select the Use Static DNS Settingscheckbox in the DNS Settings window.
2. Two fields are added for a Primary DNS and a Secondary DNS (Figure 17).
Figure 17
3. Enter a Primary DNS and optional Secondary DNS.
4. Press Save to apply the changes.
5. The Docking Station will shortly become available on the network by its DNS name.
Note: When using a Static IP Address, DNS names are not compatible with the proxy, NTP or
VERIPATROL address on the Docking Station.

VIEVU Docking Station User Guide 22 January 2019
Version 2.46.7.0 Page 16
NTP Server Settings
You may obtain Docking Station time from the internet or a local time server. By default, the Docking Station is
configured to use internet time.
To use an local time server:
1. Ensure that the Docking Station internet connection is functioning correctly.
2. Select the Use local time server radio button.
3. A Server Address field is displayed (Figure 18).
Figure 18
4. Enter the IP Address of your local time server.
5. Press Save to apply the changes.
Note: The time information from the NTP server is applied to both the Docking Station and all
cameras connected to this Docking Station.
SSL Certificate Support
Secure Sockets Layer and, more recently, Transport Layer Security are both frequently referred to as SSL. These
are cryptographic protocols for providing communications security over a computer network. Uploading SSL
certificates to the Docking Station ensures secure HTTPS connections. By default, your Docking Station is
configured to use HTTP for SSL.
To set up secure HTTPS connection:
1. In the SSL window on the Docking Station Configuration page, click the HTTPS radio button (Figure 19).
Figure 19

VIEVU Docking Station User Guide 22 January 2019
Version 2.46.7.0 Page 17
2. Click the Browse button and select the SSL certificate file to upload.
3. The details of the certificate are displayed in the SSL window.
4. Press Save to apply the changes.
Network Tools
You can send network commands to the Network Tools page to diagnose and troubleshoot networking issues and
to configure SNMP monitoring.
To open the Network Tools page:
1. Select the Network Tools tab at the top of the screen.
2. The Docking Station Tools page is displayed (Figure 20).
Figure 20
The fields in the Docking Station Tools page are discussed in the following sections.
Traceroute
A traceroute traces an internet packet from your Docking Station to an Internet host. It shows you how many hops
the packet required to reach the host and how long each hop takes.
To perform a traceroute:
1. In the Method field drop-down box, select Traceroute.
2. In the target field, supply a valid IP Address or DNS.
3. Click Start to display the results in the output box below (Figure 21).

VIEVU Docking Station User Guide 22 January 2019
Version 2.46.7.0 Page 18
Figure 21
Note: If the Docking Station cannot get a response from the IP Address or DNS, “***” is displayed.
Ping
Ping is used to determine whether or not a specific IP address is accessible from the Docking Station.
To ping an IP address:
1. In the Method field drop-down box, select Ping.
2. In the target field supply a valid IP Address or DNS.
3. Click Start to display the results in the output box below (Figure 22).
Figure 22
Note: By default, your VIEVU Solution website does not respond to ping requests, which results in
packet loss.
SNMP Monitoring
The Simple Network Management Protocol (SNMP) is a protocol that governs querying and monitoring hardware
and software on a computer network. It is a popular protocol for network management used for collecting
information from, and configuring, network devices, such as servers, printers, hubs, switches, and routers on an
Internet Protocol (IP) network. The SNMP monitoring feature supports version 2c and version 3.
To setup SNMP v2c monitoring:
1. Click the SNMP toggle to enabled.

VIEVU Docking Station User Guide 22 January 2019
Version 2.46.7.0 Page 19
2. Select the SNMP v2c radio button (this the default selection).
3. The SNMP v2c configuration window is displayed, (Figure 23):
In the Manager Host box, specify the IP/Hostname where traps are to be sent (by default this is set to
localhost).
In the Manager Community String field, enter an ID that is sent along with each SNMP trap (by default, this is
set to public).
Note: VIEVU Docking Station sends traps on UDP Port 162.
In the Agent Community String field, enter an ID that is sent along with each SNMP Get-Request (by default,
this is set to public).
Figure 23
4. When finished, click Save to exit this window.
To setup SNMP v3 monitoring:
1. Click the SNMP toggle to enabled.
2. Select the SNMP v3radio button.
3. The SNMP v3 configuration windows are displayed, (Figure 24).

VIEVU Docking Station User Guide 22 January 2019
Version 2.46.7.0 Page 20
Figure 24
Table of contents
Other Axon Docking Station manuals