Axplor outdoor RAPID TENT Series User manual

A
A
A
A
A
A
A
A
AA
A
AA
A
A
A
A
A
A
A
A
A
A
A
A
A
A
A
A
A
A
A
A
A
A
A
A
A
A
A
A
A
A
A
A
A
A
A
A
A
A
A
A
A
A
A
A
A
A
A
A
A
A
A
A
A
A
A
A
A
A
A
A
A
A
A
A
A
A
A
A
A
A
A
A
A
A
A
A
A
A
A
A
A
A
A
A
A
RAPID TENT
Series
INSTRUCTION MANUAL
TAILGATER™SUMMERLIN™NOMAD™
Lanyard Eyebolt Handles
X Bracket
Exterior Stake Loop
Interior Tent Loop
No See-um Mesh
Guy Lines
Stakes
Bathtub Tarp Floor*
*for SUMMERLIN™and NOMAD™Models Only
Zippered Panels*
*for NOMAD™Model Only
A
B
C
D
E
outdoor
F
G
H
I
A
A
B
C
D
D
E
FF
G
G
G
H
I
I
I
Package Contents:
• Tent
• Carry Bag
• Fiberglass Poles (x2)
• 9 Stakes with 4 Guy Lines
(TAILGATER™)
• 11 Stakes with 5 Guy Lines
(SUMMERLIN™ and NOMAD™)
www.AxplorOutdoor.com
NOMAD™model shown
Material Specifications:
• 210 Denier Oxford Ripstop Nylon
with PU3000mm Coating
• Fiberglass Poles
• Polyethylene Tarpaulin

READ FIRST! IMPORTANT SAFTEY TIPS AND INSTRUCTIONS
1. Keep away from heat, sparks, and flame. Do not use as a cooking tent
or sweat lodge. Materials are flammable.
2. Avoid setting-up in moderate or heavy winds. May result in damage
to the product or cause injuries.
3. For recreational use only, not as a permanent structure.
Do not leave unattended in severe weather conditions.
4. Handle No See-Um Mesh with care. Mesh is delicate so avoid sharp
objects and zippers against it or excessive pulling. Watch out for
abrasive surfaces i.e. rocks, pavement.*
5. Do not force zippers or X Brackets if met with resistance. Check and reset
position.
6. Shake off excess water and dirt before storing in the bag.
7. Clean with mild detergent.
8. Store in Carry Case when not in use.
*Do not drag or set up against abrasive surfaces. AxplorOutdoor will not be responsible for wear and
tear for this type of handling.
Model TAILGATER™ SUMMERLIN™NOMAD™
Package Contents
Tent Shape / Color
Diagonal Dimensions (Ft)
Center Height / Entrance Height (Ft)
Interior (Sq Ft)
With Bathtub Tarp Floor
Zippered Wind Panels
Product Weight / Shipping Weight
Shipping Package Dimensions
Carry case dimensions
TENT, TENT CARRY BAG, 9 STAKES
WITH 4 GUY LINES IN BAG, 2 DOOR
POLES IN BAG.
Pentagon / Desert Beige
8.5 x 8.5
7.4 / 5.8
52
No
No
21 Lbs / 24 Lbs
7.5” x 7.5” x 59”
7” x 7” x 58”
TENT, TENT CARRY BAG, 11 STAKES
WITH 5 GUY LINES IN BAG, 2 DOOR
POLES IN BAGS, TARP FLOOR
Hexagon / Granite Grey
11.8 x 11.8
7.8 / 5.10
90
Yes
No
32 Lbs / 35 Lbs
8” x 8” x 71”
7” x 7” x 72”
TENT, TENT CARRY BAG, 11 STAKES
WITH 5 GUY LINES IN BAG, 2 DOOR
POLES IN BAGS, TARP FLOOR
Hexagon / Granite Grey
11.8 x 11.8
7.8 / 5.10
90
Yes
Yes
37 Lbs / 40 Lbs
8” x 8” x 71”
7” x 7” x 72”
RAPID TENT™ MODELS AND SPECIFICATIONS
1
www.AxplorOutdoor.com

2
SSEMBLY INSTRUCTIONS
1Remove products from the Carry Case.
Untie the tent in an open space. DO NOT remove Fiberglass Poles from the sockets.
Inspect the X Brackets. All X Brackets (covered in removable felt fabric pouch) should be facing the same
direction.
TIP: 5 sided tent has 5 joints; 6 sided tent has 6.
PULL OUTWARD
SETTING UP STRUCTURAL WALLS
Locate Lanyard Eyebolt Handle
(opposite side of the X Bracket.)
Step back as you pull on the Lanyard Eyebolt
Handle until the attached X Bracket pops
inward and becomes an interior wall. Repeat
until all walls are opened.
Tip 1: Allow plenty of room when setting up tent walls as
they expand quickly like umbrellas. Point all parts, X
Brackets away from animals, children and by standers to
avoid injury.
Tip 2: (NOMAD™ Model): Tent is packed with the curtains
zippered down. Reach inside the grommet to locate the
Lanyard Eyebolt Handle.
Lanyard Eyebolt Handle
LOCATE THE ENTRANCE
Check the roof line for AxplorOutdoor Logo which is imprinted on the top right corner of the entrance.
Once all walls are erected, adjust the tent to face a desired direction.
Unzip the mesh door to enter the tent.
2
3
4
5

outdoor
b. Insert the Fiberglass Poles into the top and bottom
sockets in the interior frame.
3
ASSEMBLY INSTRUCTIONS CONTINUED
SETTING UP THE ROOF
From the inside push up the center X Bracket
to erect the roofline.
push up from inside
the tent
Center X Bracket
Visual Inspection - From inside the tent, visually inspect the X Brackets making sure all the Fiberglass Poles
have expanded fully(a.) and not out the sockets(b.). Reposition the tent to ensure shape retention and equal
weight distribution.
a.
a.
b.
b.
SECURING THE ENTRANCE DOOR FRAME
a. Unpack the two Fiberglass Poles from their carry case.
6
7
8
top and bottom
pole sockets
top socket
pole
Entrance
pole
bottom socket
pole socket
pole

ASSEMBLY INSTRUCTIONS CONTINUED
9
GUY LINES (OPTIONAL)
For additional stability use Guy Lines. Tie one side to Lanyard Eyebolt Handle, and Stake down the other side.
10
Guy Lines
Lanyard Eyebolt Handle Lanyard Eyebolt Handle
Stake Stake
ATTACH THE FLOOR (SUMMERLIN™ / NOMAD™ MODELS ONLY)
a. Unfold the Bathtub Style Tarp Floor, Barrel Toggles and Floor Hooks should be facing outward.
b. Attach Barrel Toggle to Corner Tent Loop.
c. From the outside pull Floor Hook under the Tent and hook it to the Stake.
11
4
a. b. c.
Guy Lines
STAKING DOWN THE TENT (RECOMMENDED)*
Stake Loops are located at the base of each corner.
Stake down each corner of the tent for added security.
*Zip close entrance before staking down tent.
Hammer down
Floor Hook
Tarp Floor
Barrel Toggle
Corner Tent Loop
Bathtub Tarp Floor
Barrel Toggle
Floor Hook
Tent
Tent

outdoor
outdoor
DISASSEMBLY INSTRUCTIONS
5
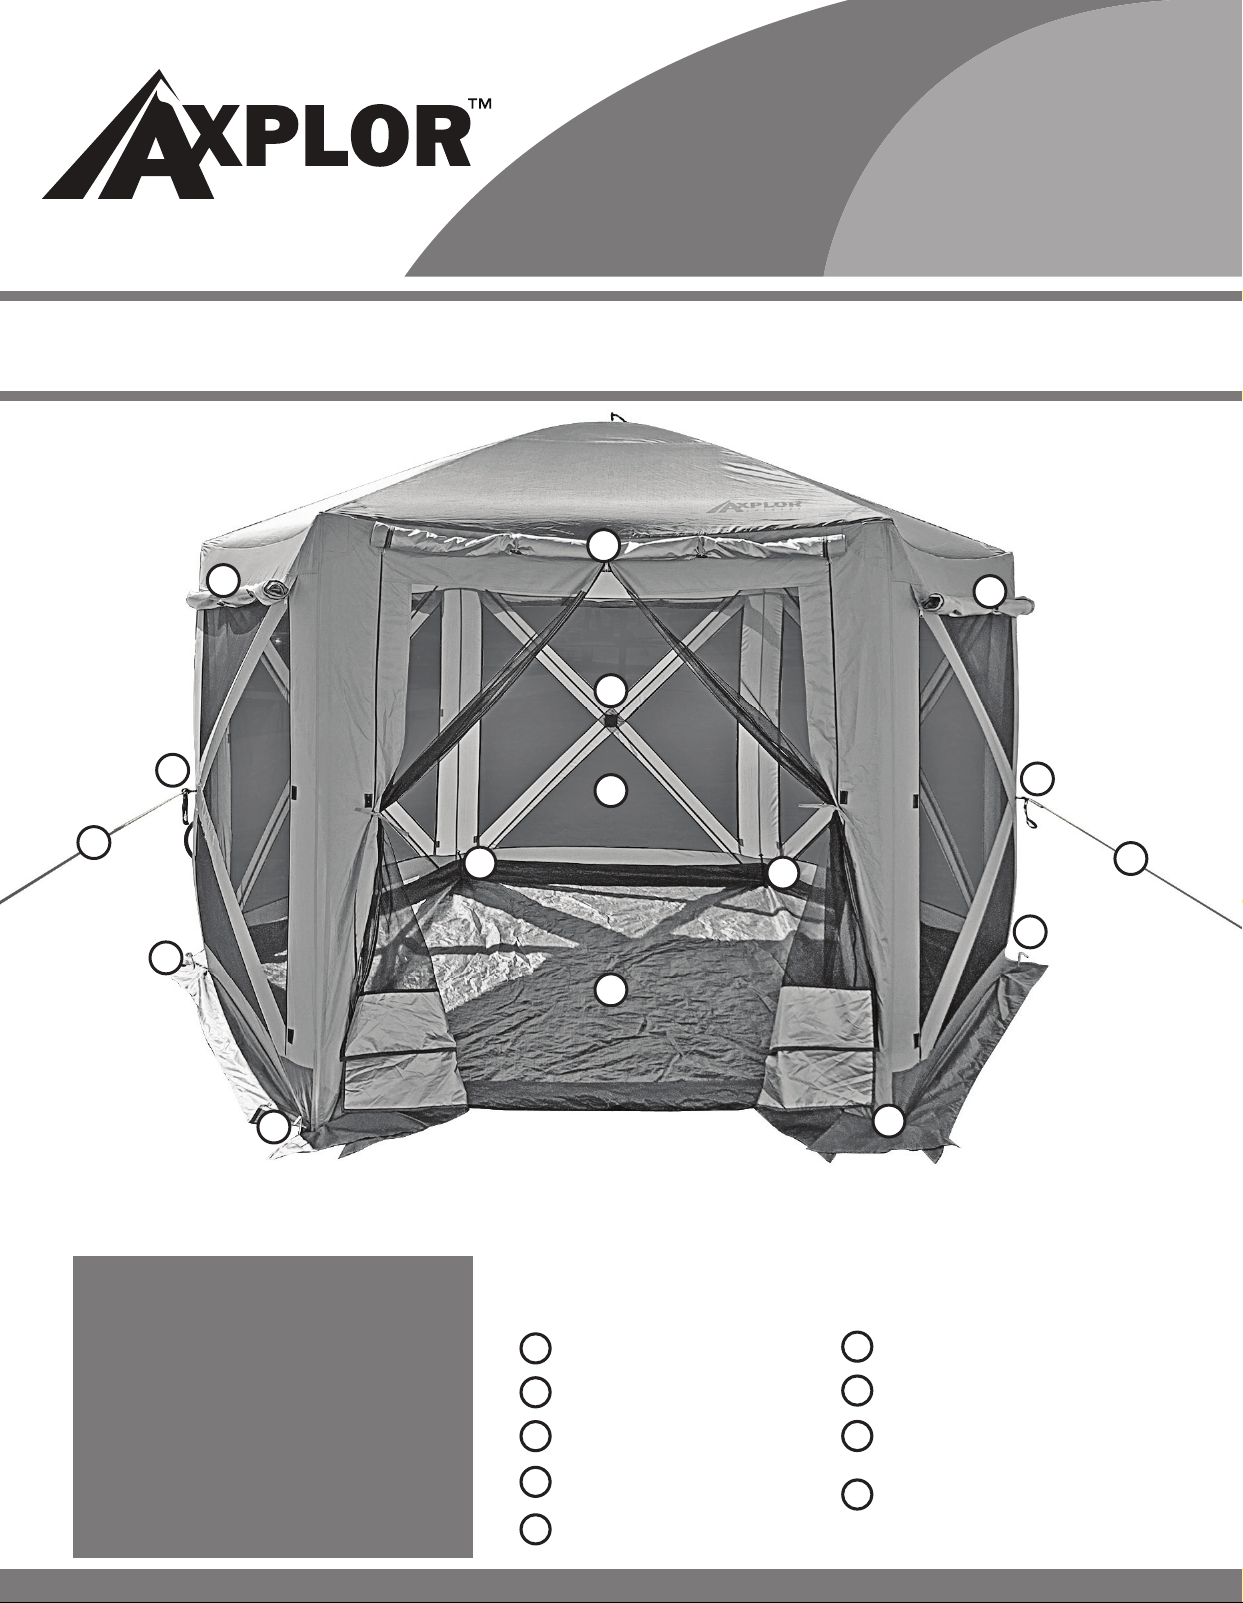
1Remove all items from inside the Tent and shake off any debris and water from the roof .
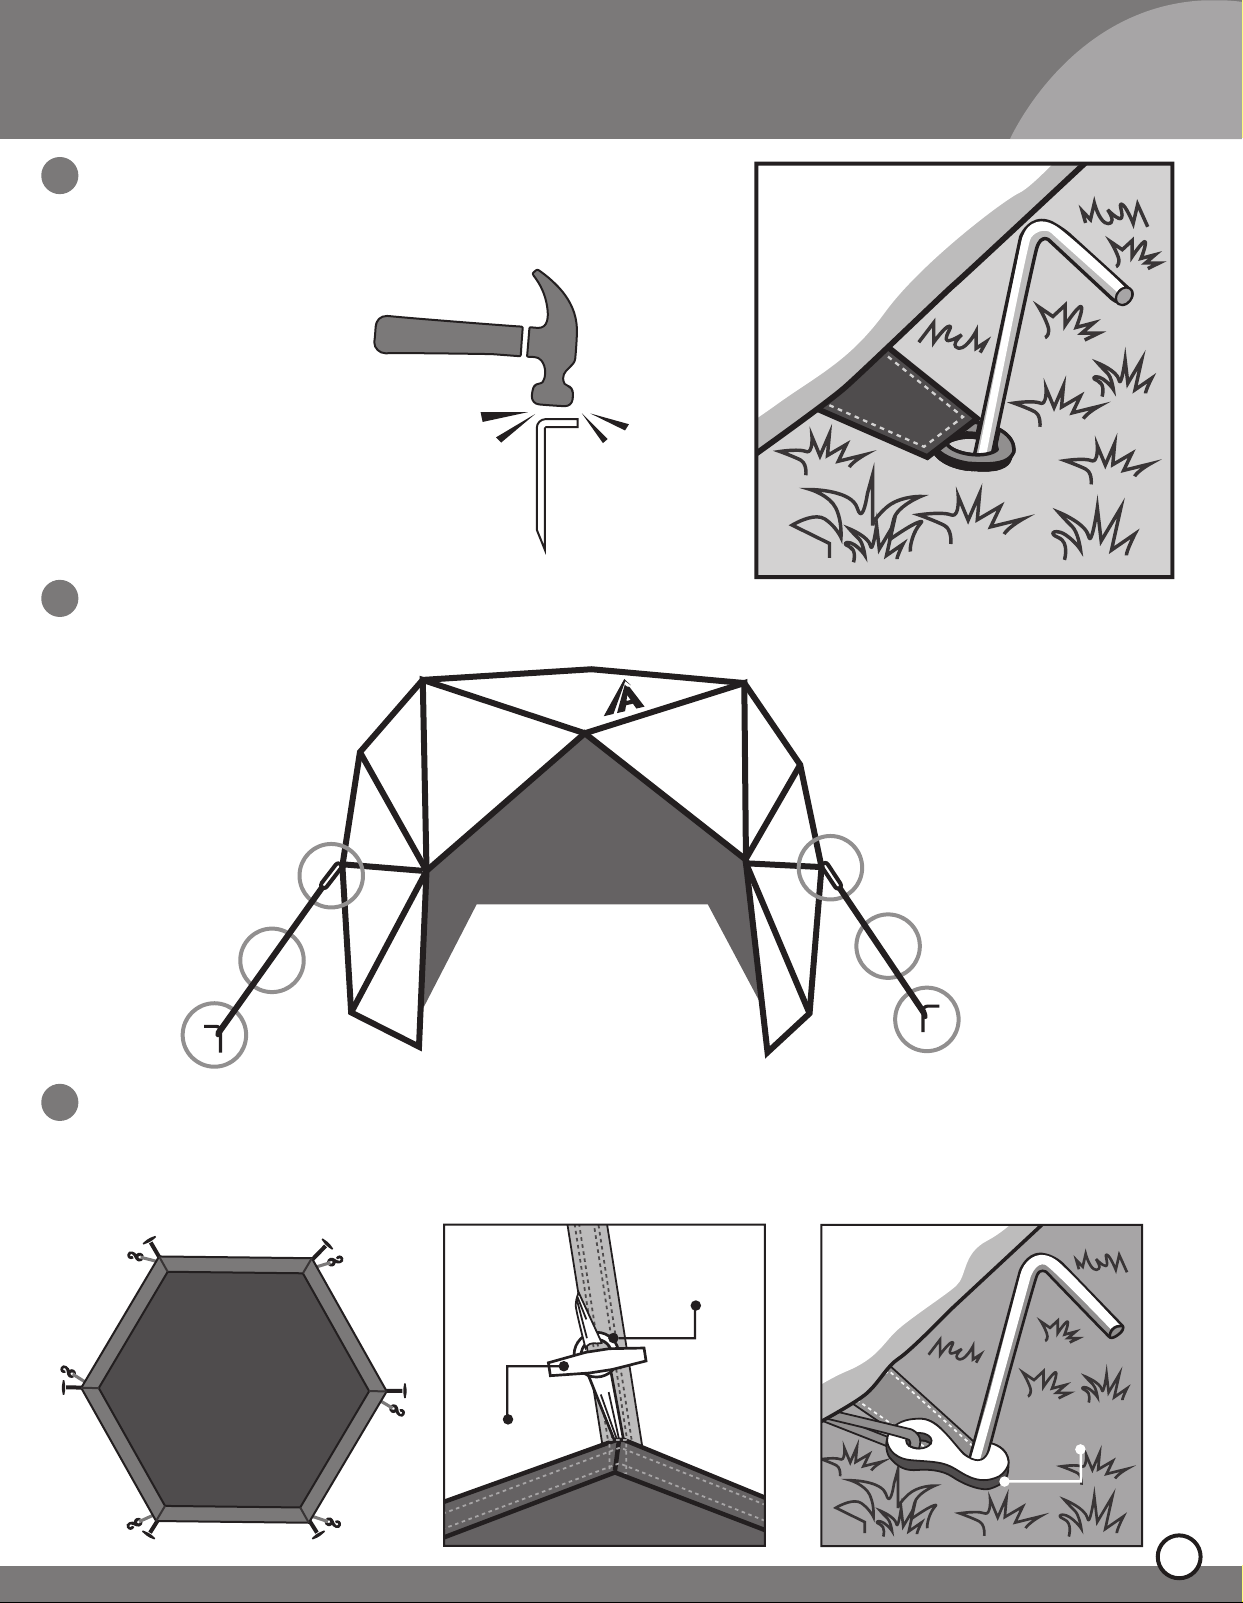
Remove Stakes and Guy Lines from the ground.
Zip down wind panels and pack away Bathtub Tarp Floor. (SUMMERLIN™ and NOMAD™ Models)
REMOVE TWO Fiberglass Poles from the interior right / left door frame. Refold and return to its carry bag.
DO NOT REMOVE ANY OTHER POLES from the sockets as you pack down the tent.
From the inside, pull down the roof top X Bracket slowly to lower the roof line.
From the outside, push in X Bracket one wall at a time.
Fold down the Tent with all X Brackets facing the same direction.
Return Tent and accessories to the Carry Case.
2
3
4
5
6
7
8
WARRANTY
Warranty covers manufacturer defects for products purchased through an authorized Dealer or directly from us. This warranty
does not cover tent or screen tears, ripped grommets, or broken poles due to high wind, severe weather, unattended or misuse
of the product. If deemed defective, the part(s) will be replaced or repaired at our discretion. Products have a one-year warranty
against manufacture defects from the original date of purchase.
LIMITATION OF LIABILITY
It is expressly understood that Liability for AxplorOutdoor products, whether due to breach of warranty, negligence, strict
liability, or otherwise, is limited to the repair of the product as stated above. AxplorOutdoor is not liable for any injury, loss,
damage, or expense, whether direct or consequential, including but not limited to loss of use, income, profit, or damage to
materials arising in connection with the sale, installation, use of, inability to use, or the repair or replacement of AxplorOutdoor
Products.
California Proposition 65 Warning
Warning: This product contains chemicals known to the State of California to cause cancer or birth defects or other
reproductive harm. www.AxplorOutdoor.com
ASSEMBLY INSTRUCTIONS CONTINUED
12 ENTRANCE AND WALL ZIPPER PANELS (NOMAD™ Model only)
a. Roll up and keep it up. b. Zippers on both sides. c. Hide the zipper with velcro attachment.
Keep it rolled up
with toggles
Zipper Velcro
a. b. c.
This manual suits for next models
3
Table of contents