ProScrub PG. 11
PG. 2 ProScrub
INTRODUCTION
The 20” ProScrub Automatic Scrubber is
designed to scrub floors in an indoor
environment and is not recommended for any
other use. All operators must read and
understand this manual before operating the
ProScrub.
SCRUBBER SPECIFICATIONS
L 44" W 23" 35" Wt. 325#
Solution tank capacity 12 gal.
Recovery tank capacity 15 gal.
Cleaning path 20"
Pad/brush diameter 20"
Squeegee width 30"
Brush Motor ¾ hp, 220 RPM
Vacuum Motor ½ hp, 2 stage, 24volt
Scrubbing pressure 65#
Batteries 2 – 130 amp/hour, 12volt
Deep cycle, lead/acid
RECOMMENDED SAFETY PROCEDURES:
1. The ProScrub should only be operated by
fully qualified maintenance personnel.
a. Do not operate, maintain, or service this
scrubber unless you are trained and
authorized.
b. Do not operate unless this manual is read
and understood.
c. Do not service or operate this scrubber if it
is not in proper operating condition.
2. Never attempt to ride on or otherwise attach
any type of rider platform to this scrubber.
3. Extreme caution should be used whenever a
ramp is used to load or unload this scrubber.
Never attempt to make turns on the ramp.
4. Do not park or leave the scrubber unattended
prior to loading or unloading.
5. Never operate this scrubber with the dash
panel removed. Always operate this scrubber
with the brush cover, battery cover, and all
side panels in the correct position.
6. Remove all loose objects from floor before
operating. Loose objects may become
dangerous projectiles when they come in
contact with revolving brushes/pads.
7. Keep scrubber moving along floor to avoid
burning or damage to floor surface.
8. Never use flammable or explosive cleaning
solutions such as gasoline, kerosene,
solvents, thinners, etc. in the solution tank in
an attempt to remove grease, oil, tar, etc.
from floors. Never operate scrubber where
flammable liquids or gases are present.
9. Always turn the master switch to the “OFF”
position whenever the scrubber is not in use.
Never leave scrubber parked on an uneven
floor. Always store scrubber safely.
10. When charging the scrubber, always
disconnect the AC plug before connecting or
disconnecting the DC plug.
11. BATTERIES ARE DANGEROUS
a. BATTERIES EMIT EXPLOSIVE GASES.
Always charge them in a well ventilated
area, keep hood open, wear eye protection
and face shield. Never smoke or use flame
or sparks around the batteries.
b. HAZARDOUS VOLTAGE! Severe shock or
electrocution can result. Always unplug
power-cord or disconnect batteries before
servicing machine.
c. BATTERY ACID CAN CAUSE BURNS.
Wear protective gloves when working with
them. Do not store them outside or let
water, chemicals, or any liquid come in
contact with them or the electrical system
of the scrubber. Damage will occur.
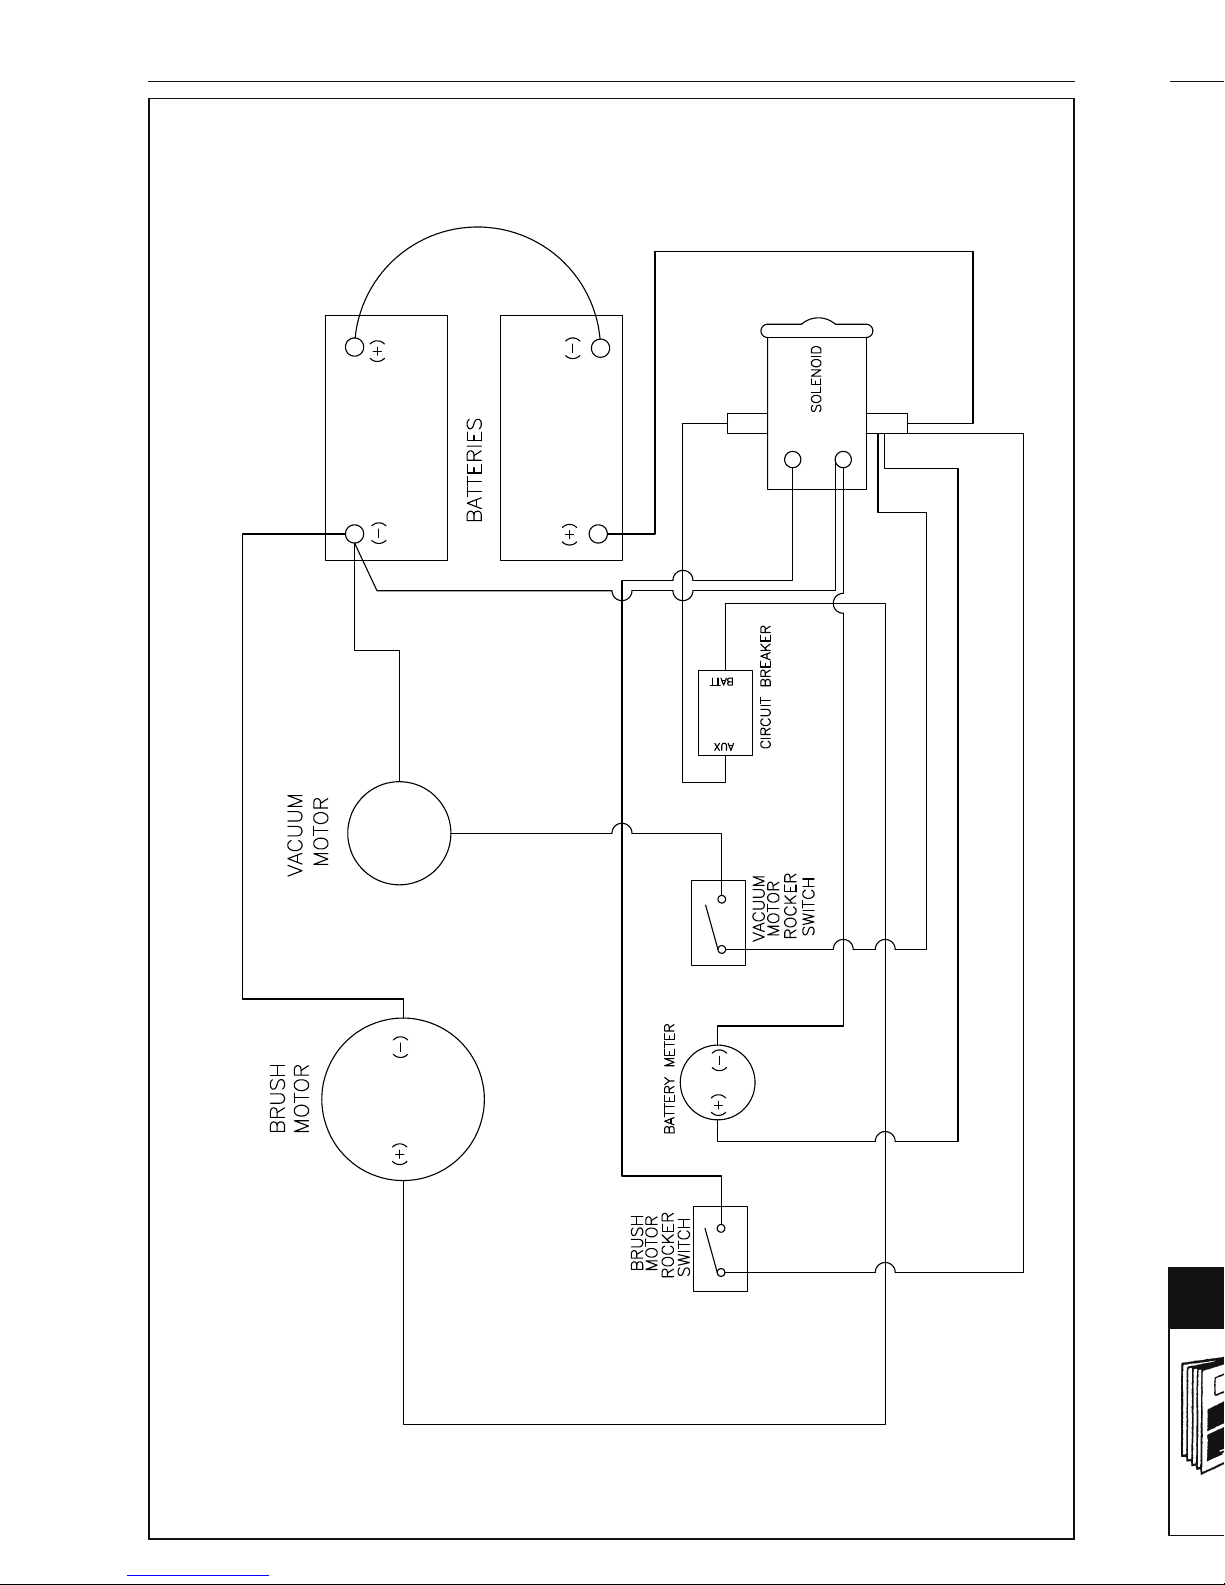
CHARGING BATTERIES
1. Charger Specifications
a. Output voltage – 24 volts
b. Output current – 10 to 20 amps
c. Automatic shutoff circuit
2. For deep cycle battery charging, life
expectancy of a battery is based on the
number of charges it receives. To get the
most life from your battery, recharge when
the meter drops into the red zone.
a. Do not continue to run the scrubber after
meter has gone into the red zone.
b. Do not let batteries sit uncharged for long
periods of time.
TROUBLESHOOTING
PROBLEM SYMPTOM SOLUTION
No power, nothing Batteries need charging Charge the batteries
runs Batteries faulty Replace batteries
Loose battery cable Tighten cable connection
Batteries not connected
Properly
Brush motor does Faulty brush switch Contact service center
not run Machine circuit breaker has tripped. Allow motor to cool down, breaker
will automatically reset.
Faulty wiring Contact service center
Faulty brush motor Contact service center
Carbon brushes worn Replace if worn to 3/8 or less
Faulty solenoid Contact service center
Vacuum motor does Faulty vacuum switch Contact service center
not run Faulty wiring Contact service center
Faulty vacuum motor Contact service center
Carbon brushes worn Replace if worn to 3/8 or less
Short run time Batteries not fully charged Charge batteries
Bad cell in one or more batteries Replace battery
Batteries need maintenance See “Battery Maintenance”
Faulty charger Replace charger
Little or no solution Solution flow lever is not activated Push flow lever forward
flow Solution line is clogged Remove hose and blow compressed
air through it. Then flush with
clean water
Solution valve is clogged Remove valve and clean. Do not
scratch or damage inside
Solution flow adjustment knob Turn knob down to increase flow
needs adjusting
Poor squeegee pickup Recovery tank is full Empty tank
Ball float shutoff screen is clogged Remove screen and clean
Squeegee is clogged with debris Clean squeegee
Squeegee blades are worn Replace blades
Squeegee thumbscrews are loose Tighten screws
Vacuum hose connections are loose Push hose firmly onto connections
Vacuum hose is worn or has a hole Replace
Vacuum is clogged with debris Remove debris
Tank gasket is defective Replace gasket
Recovery tank water inlet is plugged Empty recovery tank and tilt
sideways to remove clogged debris
Recovery tank lid is loose Tighten lid
Vacuum motor is loose Tighten down vacuum motor
Do not over-tighten!
Battery charge is low Do not run scrubber if meter is
in the red zone
WARNING!
!