B DUTCH BD700.000043 User manual
1
BD700.000043 -B DUTCH RVS inbouwdeel voor thermosstaat douche of bad
BD700.000044 -B DUTCH RVS geslepen bedieningsknop thermosstaat
douche of bad
Installatie handleiding - Installation
LET OP: LEES DEZE INSTALLATIE HANDLEIDING GOED DOOR! BIJ FOUTIEVE
INSTALLATIE, REINIGING EN ONDERHOUD VERVALT DE GARANTIE!
ATTENTION: READ THIS INSTALLATION MANUAL CAREFULLY! THE WARRANTY IS VOID IN
THE EVENT OF ERROR INSTALLATION, CLEANING AND MAINTENANCE!
BD700.000043 BD700.000044

2
NEDERLANDS
Bij de juiste installatie en het juiste gebruik gaan de B DUTCH RVS kranen vele tientallen jaren mee. De B
DUTCH RVS kranen zijn voorzien van een binnenwerk met een keramische afdichting. Dit binnenwerk is van
topkwaliteit en zorgt voor een lange levensduur van de kraan, maar dit binnenwerk kan niet tegen vuil. Vuil zorgt
ervoor dat de kraan niet meer goed sluit en dan lekt de uitloop. Spoel daarom altijd VÓÓR het plaatsen van het
inbouwdeel de leidingen goed door zodat al het vuil uit de leidingen is. Zet de kraan open en laat het water goed
doorlopen en doorspoelen en monteert de kraan daarna pas. Dit voorkomt dat er vuil tussen de schijven komt.
Om te voorkomen dat er vuil tussenkomt, moet u tijdens de montage ook altijd de witte plastic beschermkap op
het inbouwdeel houden.
Mocht er toch vuil in het binnenwerk zijn gekomen met een defecte kraan als gevolg, dan zit er niets anders op
dan het vervangen van de cartouche. De cartouche vormt één geheel en is niet te openen. Andere benamingen
voor de cartouche zijn cartridge en patroon.
Het inbouwdeel van de B DUTCH kranen kan maar op 1 juiste manier ingebouwd worden. Let dus goed op wat
de bovenkant is.
Bij alle RVS kranen van B DUTCH wordt ook een rozet meegeleverd, een passende RVS afdekring. Bij het
stucen en betegelen moet u er rekening mee houden dat deze RVS afdekring maar 7,5 mm afdekt ten opzichte
van de plastic beschermkap van het inbouwdeel. Er dient dus strak te worden gestucd of betegeld om het
inbouwdeel heen! Een grotere afdekring past niet bij het minimalistische design van onze RVS kranen.
Attentie - Vóór installatie
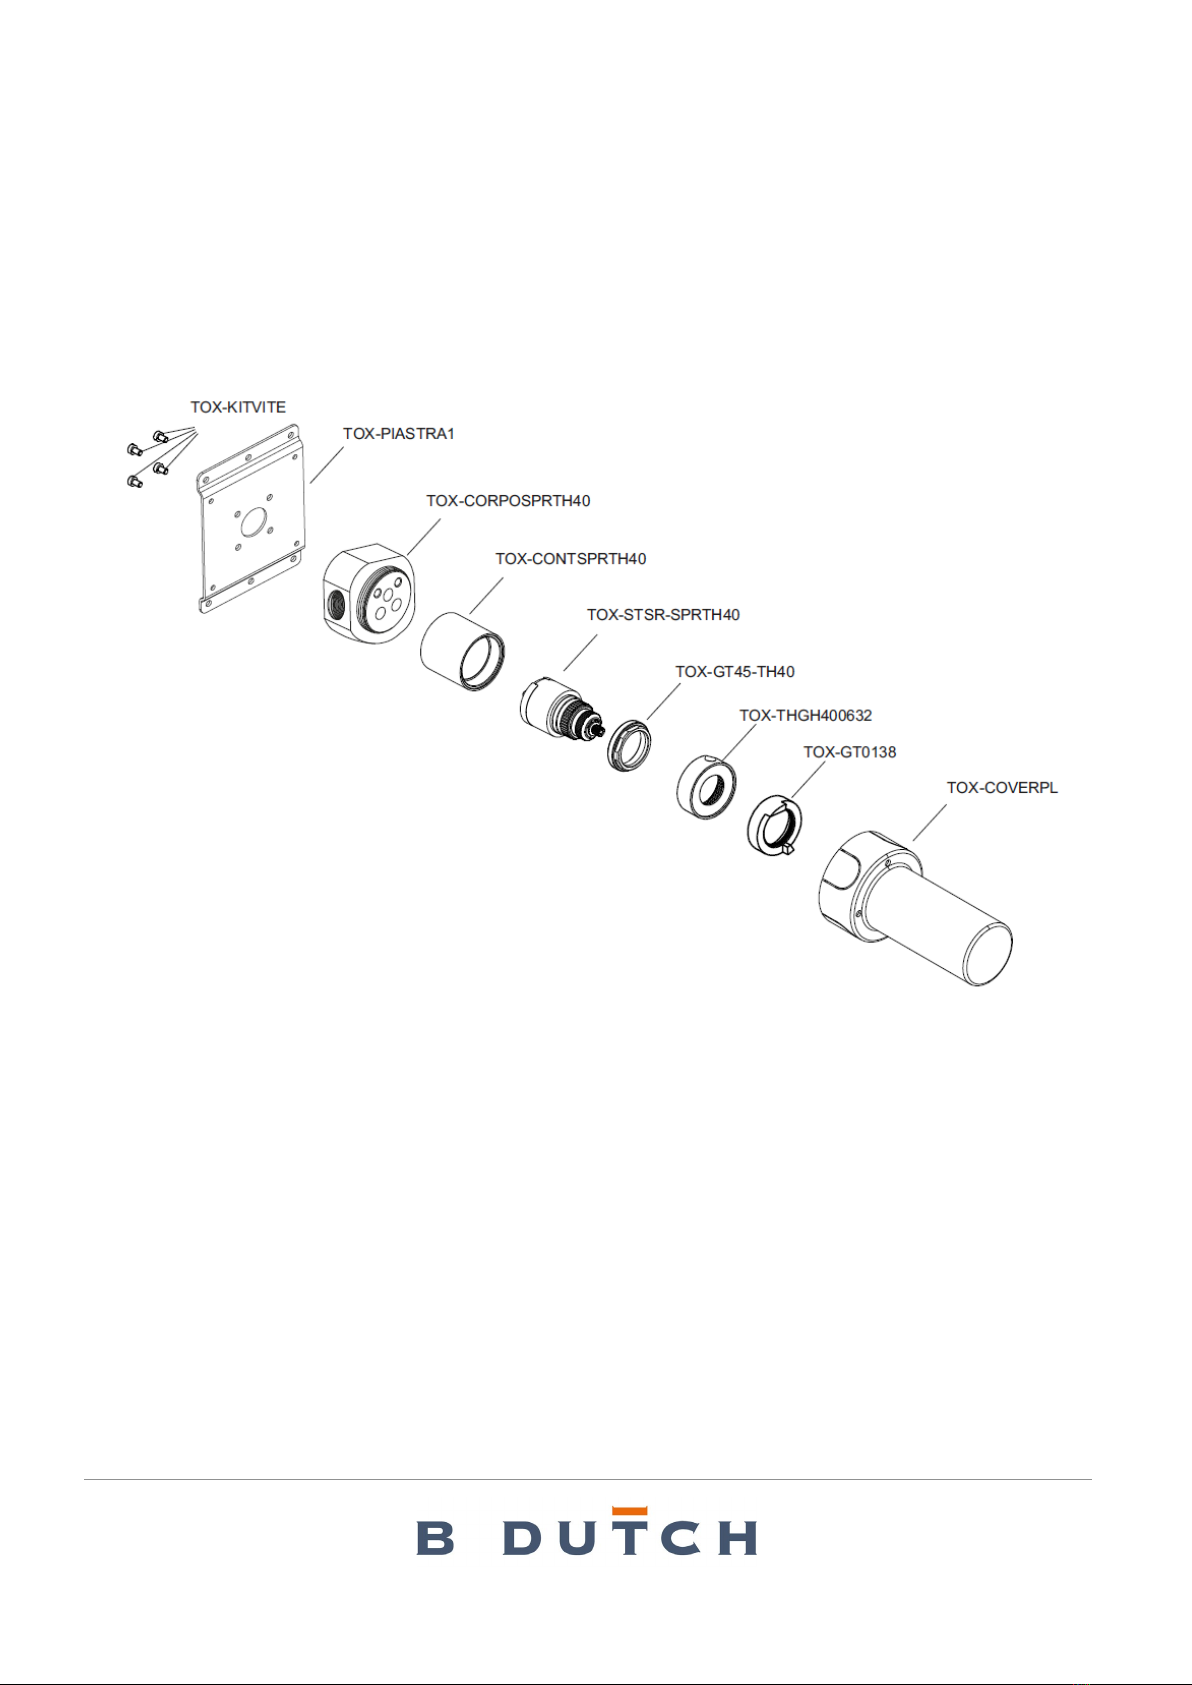
1. Inspecteer dit product om er zeker van te zijn dat u alle onderdelen heeft zoals afgebeeld. Deze zijn
nodig voor een juiste installatie.
2. De klepcartridge is in de fabriek getest en afgesteld - NEEM DE CARTRIDGE NIET APART. Als u
het patroon uit elkaar haalt, vervalt de garantie.
3. Zorg ervoor dat zowel de toevoer van warm als koud water goed is aangesloten op de gemarkeerde
lav-aansluiting.
4. Dit product moet worden geïnstalleerd door een professionele installateur.
5. Raadpleeg de bijgevoegde specificatie- en montagetekeningen voor installatie-instructies.
6. Stroomdruk - Min. 25 PSI, max. 80 PSI. Aanbevolen druk - 50 tot 60 PSI.
Installatie Vereisten
1. Om ervoor te zorgen dat dit product correct wordt geïnstalleerd, moet u deze richtlijnen lezen en
volgen.
2. De eigenaar / gebruiker van de kraan moet deze informatie bewaren voor toekomstige naslag.
3. Zorg ervoor dat uw installatie voldoet aan de lokale vereisten.
4. Raadpleeg de bijgevoegde specificatie- en montage-tekeningen. De kraan wordt gedeeltelijk
gemonteerd verkocht, maar wordt volledig gedemonteerd weergegeven, dit is uitsluitend voor
illustratieve en service doeleinden.
5. Inspecteer dit product om er zeker van te zijn dat u alle onderdelen heeft die nodig zijn voor een
juiste installatie.
6. Gebruik alleen een bandsleutel of een beschermde / gladde steeksleutel op een afgewerkt
oppervlak.
7. Installeer, indien mogelijk, de kraaneenheid op de gootsteen of het montageoppervlak voordat u
deze instelt.
8. Gebruik GEEN stopverf tijdens deze installatie.

3
ENGLISH
With the correct installation and use, the B DUTCH stainless steel taps last for many decades. The B DUTCH
stainless steel taps have an interior with a ceramic seal. This interior is of top quality and ensures a long
lifespan of the crane, but this interior cannot withstand dirt. Dirt prevents the tap from closing properly and the
spout leaks. Therefore, always flush the pipes well before installing the built-in part so that all dirt is removed
from the pipes. Open the tap and let the water run through and flush and then mount the tap. This prevents dirt
from getting between the discs. To prevent dirt from entering, always keep the white plastic protective cap on
the built-in part during assembly.
If dirt has entered the interior with a faulty faucet as a result, there is no other option than to replace the
cartridge. The cartouche forms one whole and cannot be opened.
The built-in part of the B DUTCH faucets can only be installed correctly. So pay close attention to the top.
All rosettes from B DUTCH also include a rosette, a suitable stainless steel cover ring. When plastering and
tiling, you must take into account that this stainless steel cover ring only covers 7.5 mm compared to the
plastic protective cover of the built-in part. So there must be tight plaster or tiled around the built-in part! A
larger cover ring does not match the minimalist design of our stainless steel taps.
Attention - Before Installation
1. Inspect this product to ensure you have all parts as shown that are required for proper installation.
2. The valve cartridge has been factory tested and adjusted – DO NOT TAKE THE CARTRIDGE
APART. Taking the cartridge apart will void the warranty.
3. Ensure that both hot and cold water feeds are properly connected to the marked lav connecting.
4. This product must be installed by a professional contractor.
5. Refer to the specification and assembly drawings attached for installation directions.
6. Flow Pressure – Min. 25 PSI, Max. 80 PSI. Recommended pressure – 50 to 60 PSI.
Installation Requirements
Please read the instructions carefully so as to avoid any damage to the fixture.
1. To ensure this product is installed properly, you must read and follow these guidelines.
2. The owner/user of the faucet must keep this information for future reference.
3. Be sure your installation conforms to local codes.
4. Refer to the specification and assembly drawings attached. Faucet is sold partially assembled but
shown fully disassembled for illustrative and service purposes only.
5. Inspect this product to ensure you have all parts required for proper installation.
6. Use only a strap wrench or protected/smooth-jaw wrench on any finished surface.
7. If possible, install the faucet assembly on the sink or mounting surface before setting.
8. Do NOT use putty during this installation.

4

5
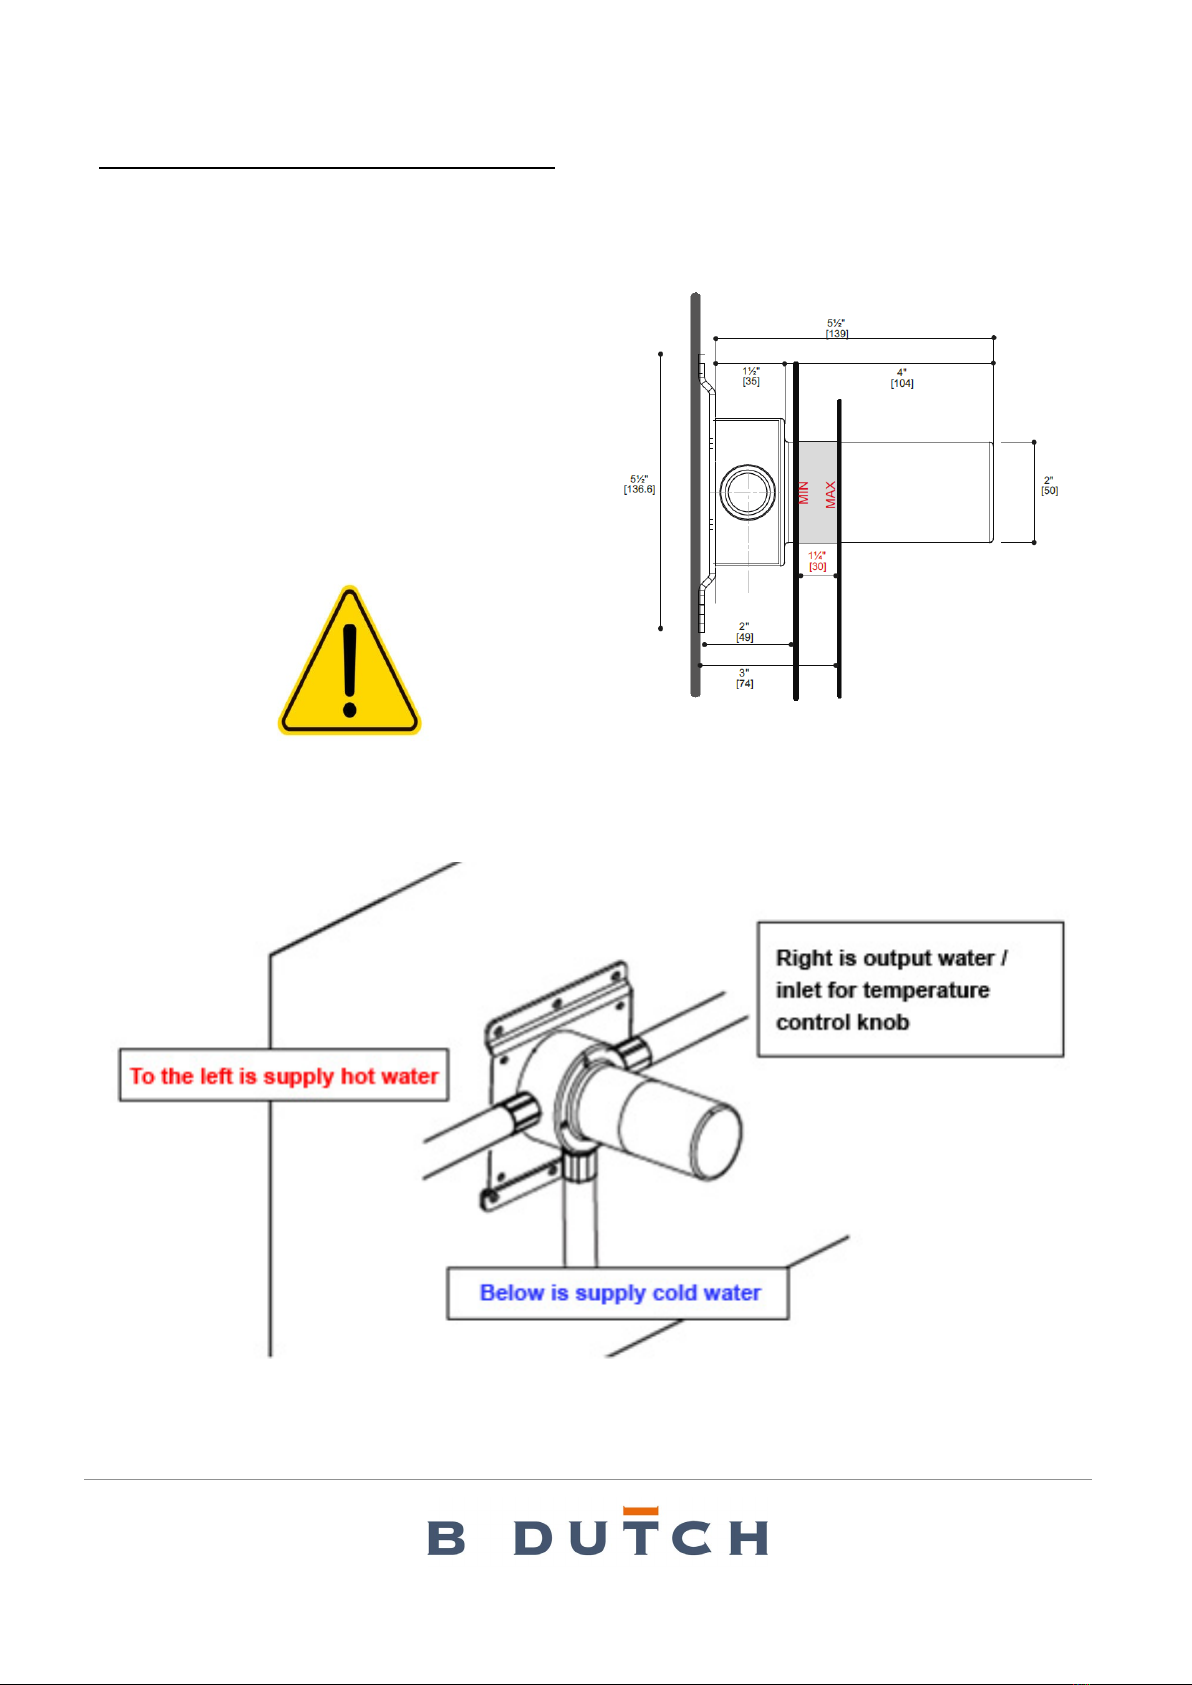
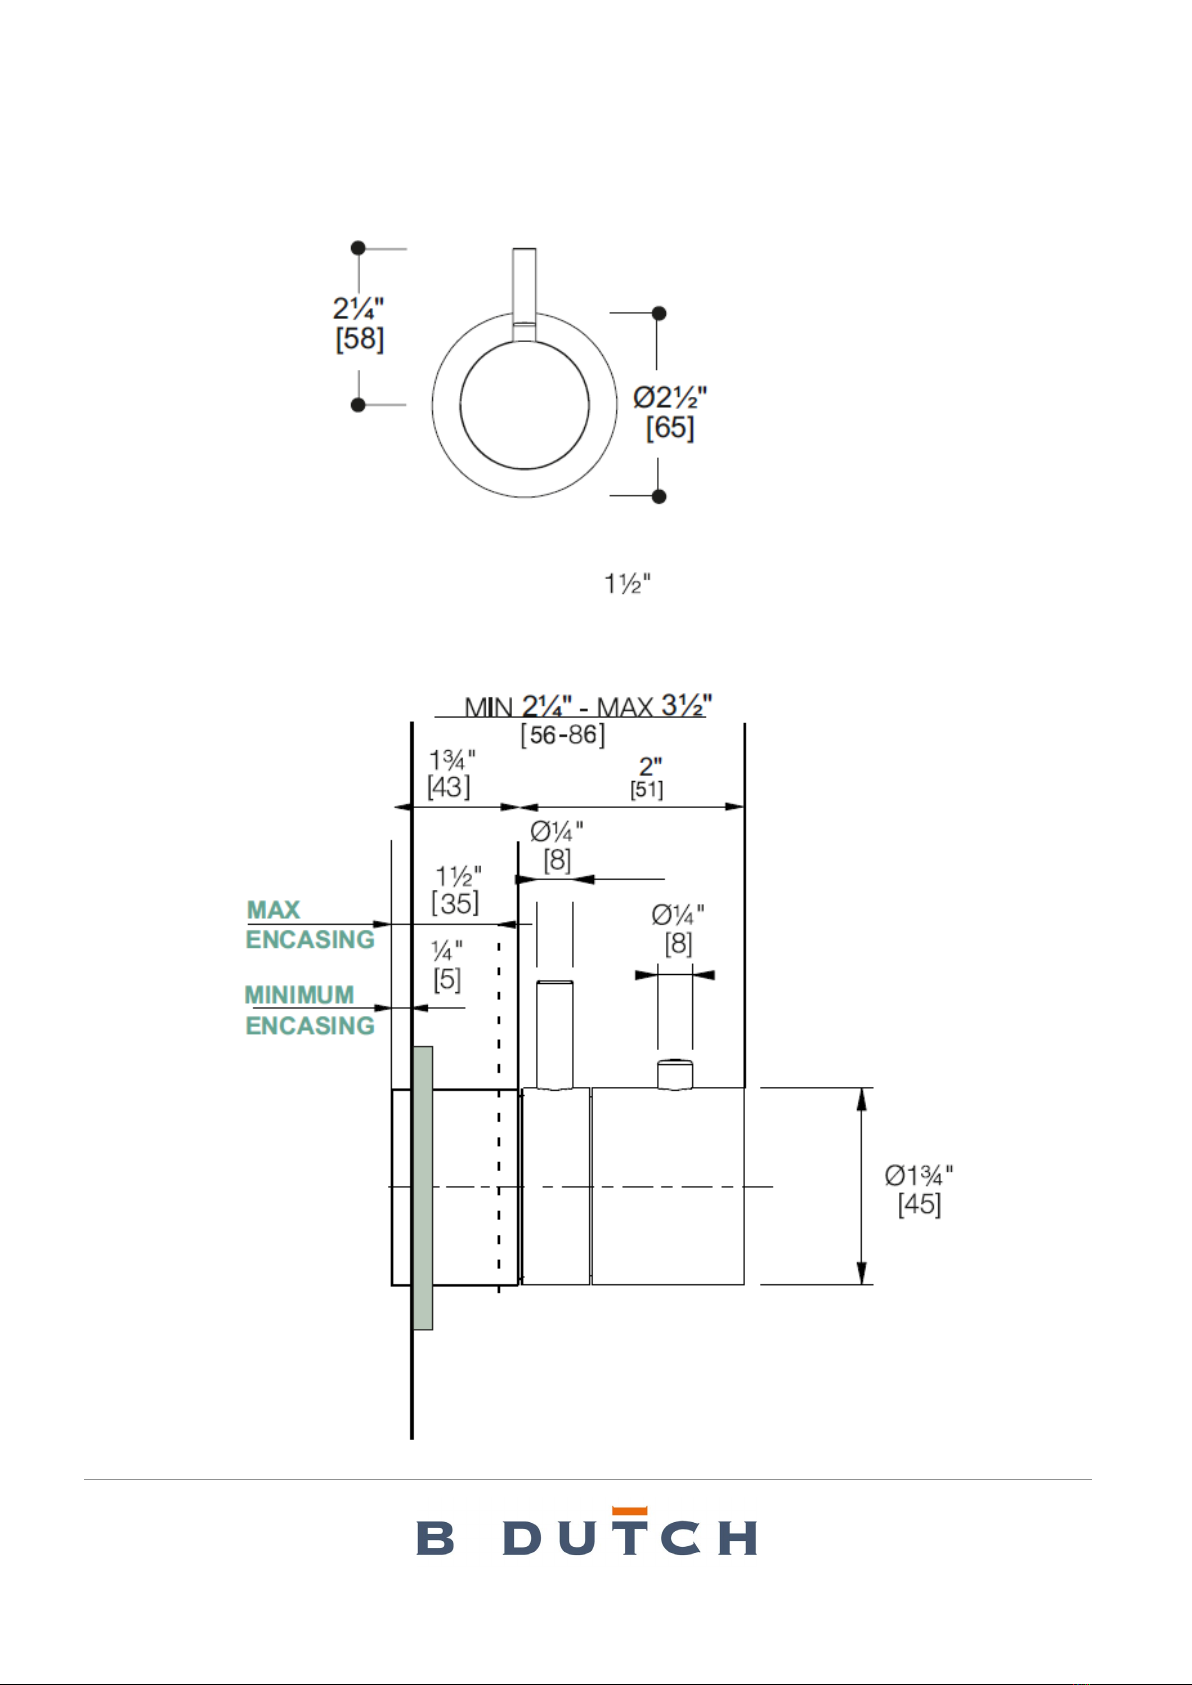
NEDERLANDS – INSTALLATIE LET OP!
LET OP, ZEER BELANGRIJK!
PLAATS HET INBOUWDEEL
VOLGENS DE AANGEGEVEN
MATEN
6
ENGLISH - INSTALLATION ATTENTION!
ATTENTION VERY
IMPORTANT!
PLACE THE ROUGH-IN WITH
THE MEASURES INDICATED

7
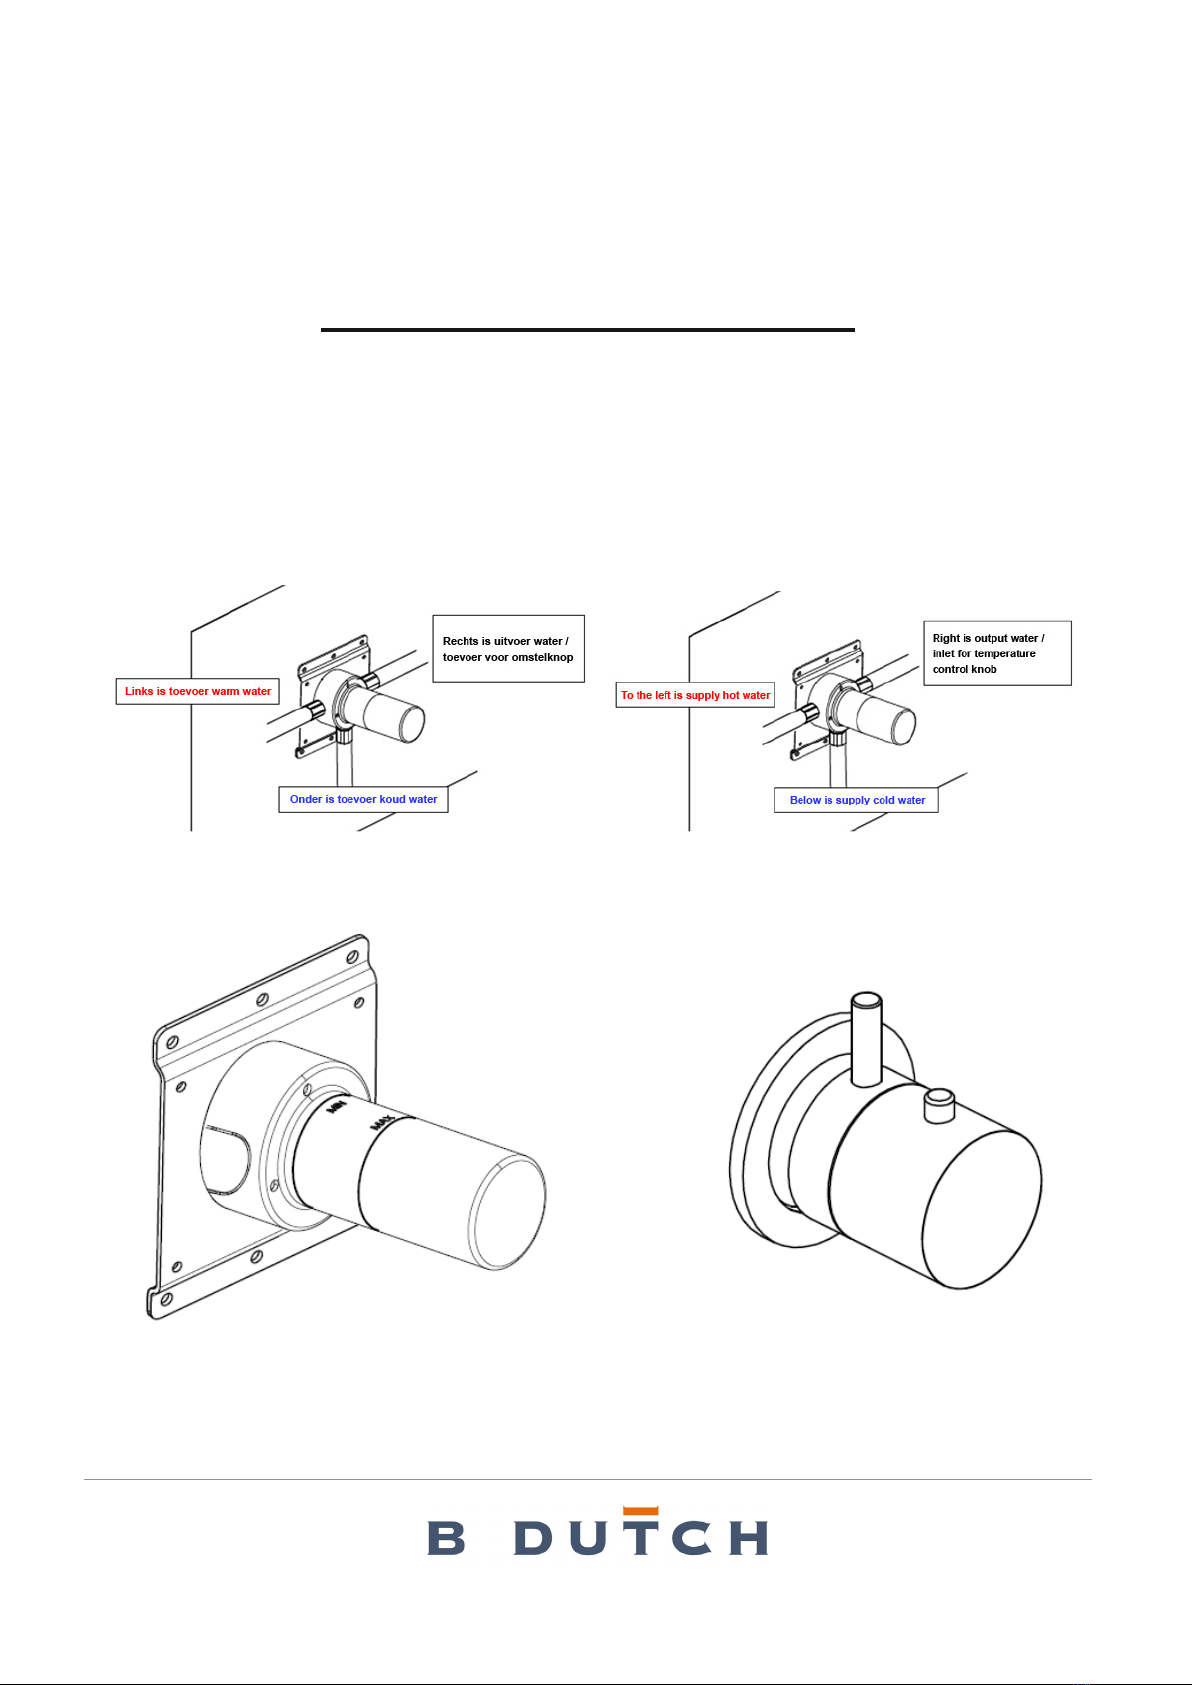
NL - INSTALLATIE HANDLEIDING
Plaats het inbouwdeel op de muur, met
inachtneming van de eerder aangegeven maat.
Controleer op het moment van bevestiging of het
inbouwdeel perfect waterpas is.
Ga verder met de aansluiting op het watersysteem.
Alvorens over te gaan tot bekledingen is het
raadzaam om het vloeibare membraan als
muurisolatie aan te brengen.
Breng de wandbekleding aan en let vooral op de
gaten in de tegels die dicht bij de kunststof kraan
moeten komen.
EN – INSTALLATION GUIDE
Place the rough In on the wall, respecting the
measurement indicated previously.
At the time of fixing, check that the rough-in part
is perfectly level.
Proceed with the connection to the water system.
Before proceeding with coverings it is advisable
to apply the liquid membrane as a wall insulation.
Apply the wall covering, paying particular
attention when making the holes in the tiles
which must adhere closely to the plastic tap.
8
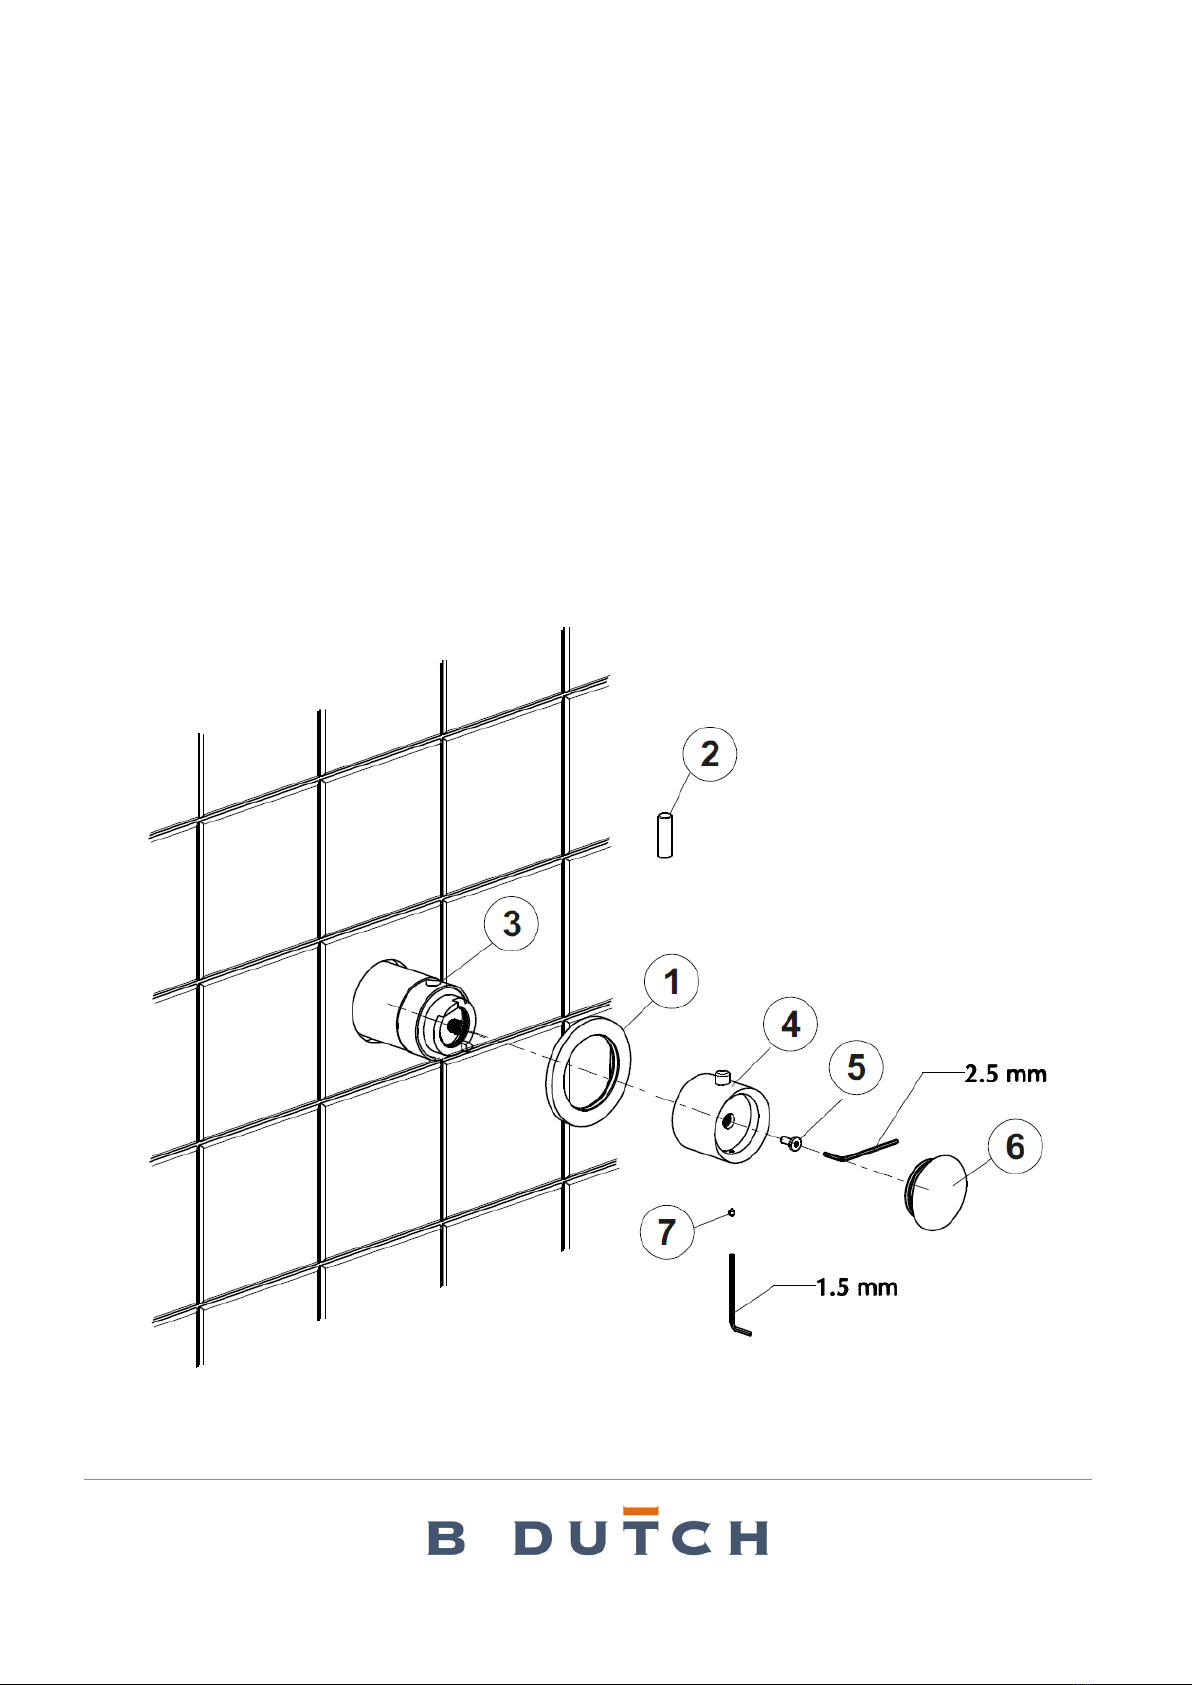
NL - INSTALLATIE HANDLEIDING
Plaats de rozet (1) tegen de muur. Schroef de hendel (2) op de regelring voor openen / sluiten van water (3).
Plaats de temperatuurregelknop (4) zodanig dat de vergrendelknop in de verticale positie staat en zet hem
vast met de meegeleverde speciale schroef (5). Plaats de afsluitdop (6) en zet hem vast met de stelschroef (7)
met behulp van de meegeleverde inbussleutel van 1,5 mm.
EN - INSTALLATION GUIDE
Position the cover (1) on the wall. Screw the lever (2) on to the water opening/closing control ring (3).
Insert the temperature control knob (4) so that the lock button is in the vertical position, fixing it with the special
screw (5) supplied. Insert the closing cap (6) securing it with the grub screw (7) using a 1.5 mm allen key
supplied.

9
NEDERLANDS
Reinigers voor fittingen en accessoires
Om te voorkomen dat het oppervlak en de werkende componenten van de bevestigingen worden beschadigd,
moeten er bepaalde voorzorgsmaatregelen worden genomen met betrekking tot het gebruik en de
daaropvolgende reiniging, aangezien veel reinigingsmiddelen zuren bevatten voor algemene reiniging en het
verwijderen van kalkaanslag. Let bij de verzorging van uw fittingen en accessoires op het volgende en lees
ook de B DUTCH ONDERHOUDSVOORSCHRIFTEN RVS KRANEN door, zie www.bdutch.nl/downloads:
•Gebruik alleen reinigingsmiddelen die uitdrukkelijk bedoeld zijn voor dit gebruik.
•Gebruik nooit schoonmaakmiddelen die zoutzuur, mierenzuur of azijnzuur bevatten op of nabij de
fittingen, aangezien deze aanzienlijke schade kunnen veroorzaken.
•Gebruik geen schoonmaakmiddelen die fosforzuur bevatten.
•Gebruik geen reinigingsmiddelen die chloorbleek oplossingen bevatten.
•Meng of combineer nooit reinigingsmiddelen.
•Gebruik geen schurende reinigingsmiddelen en ongeschikte schuurmiddelen zoals
schuursponsjes.
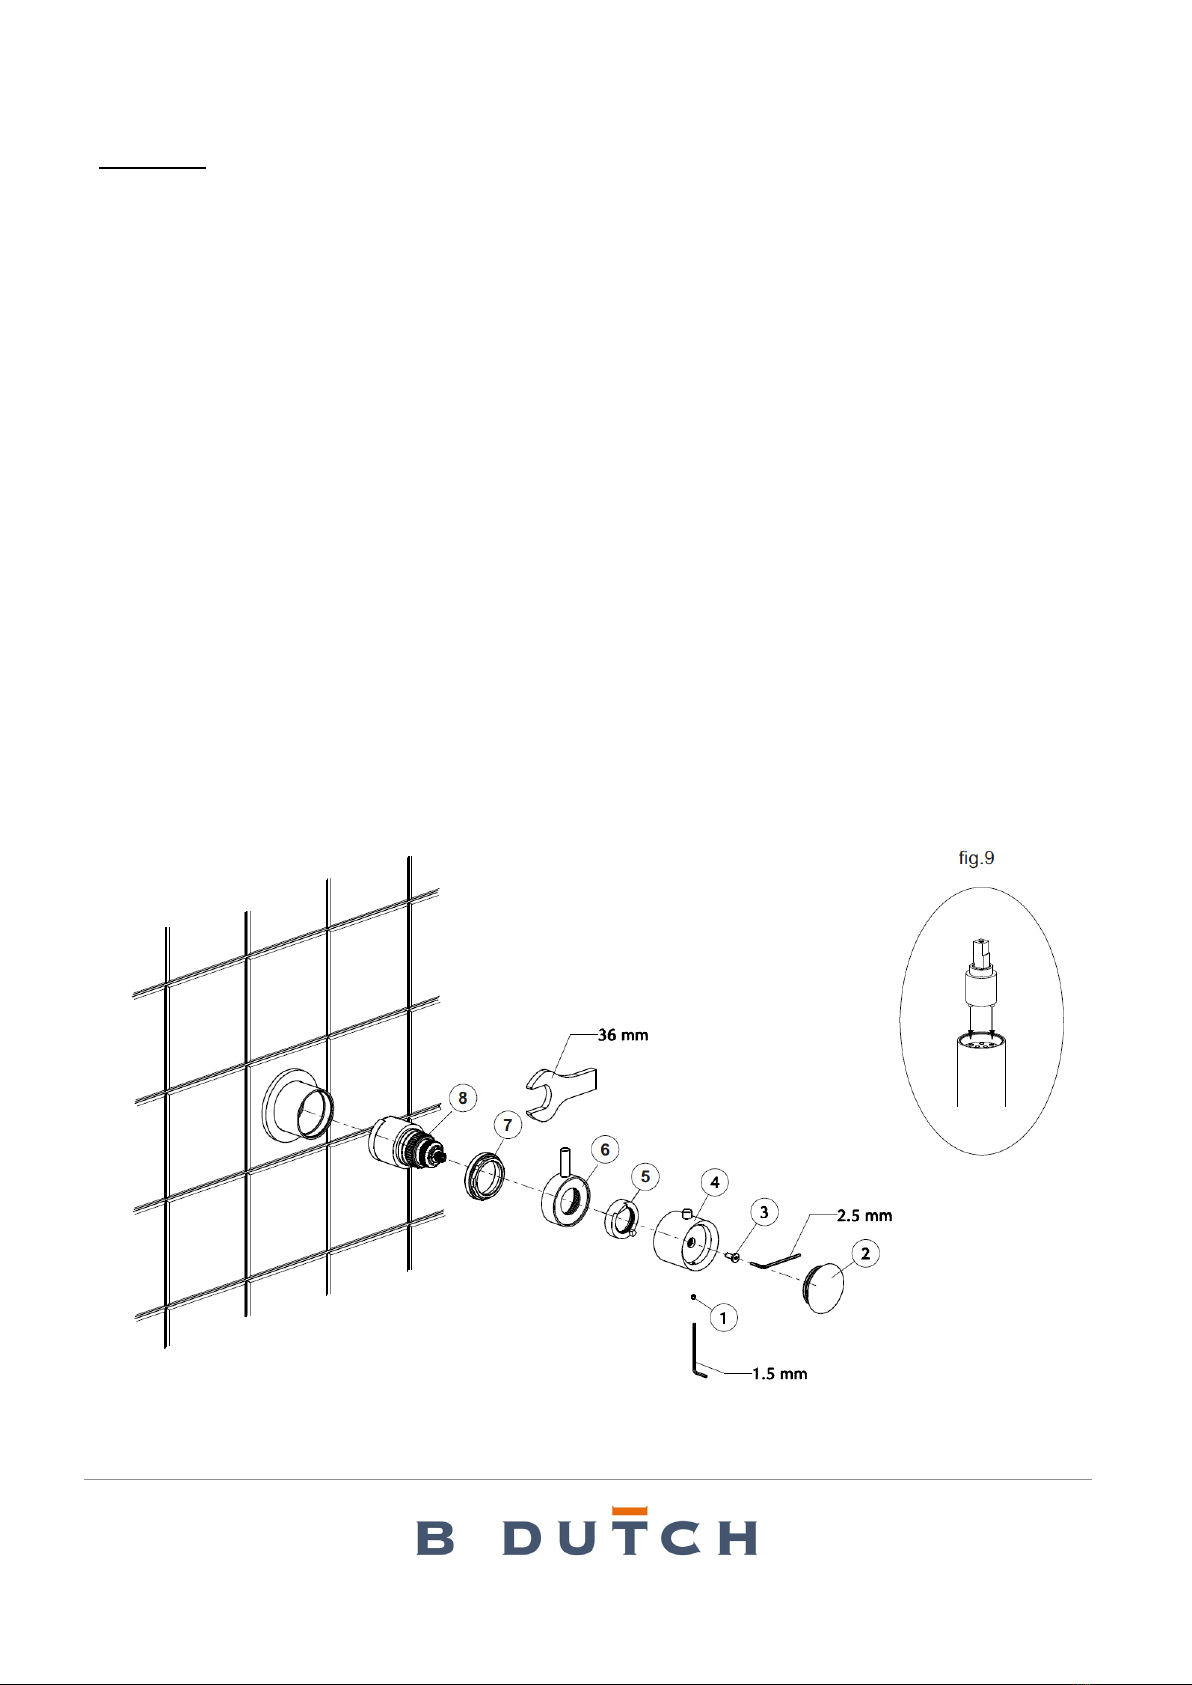
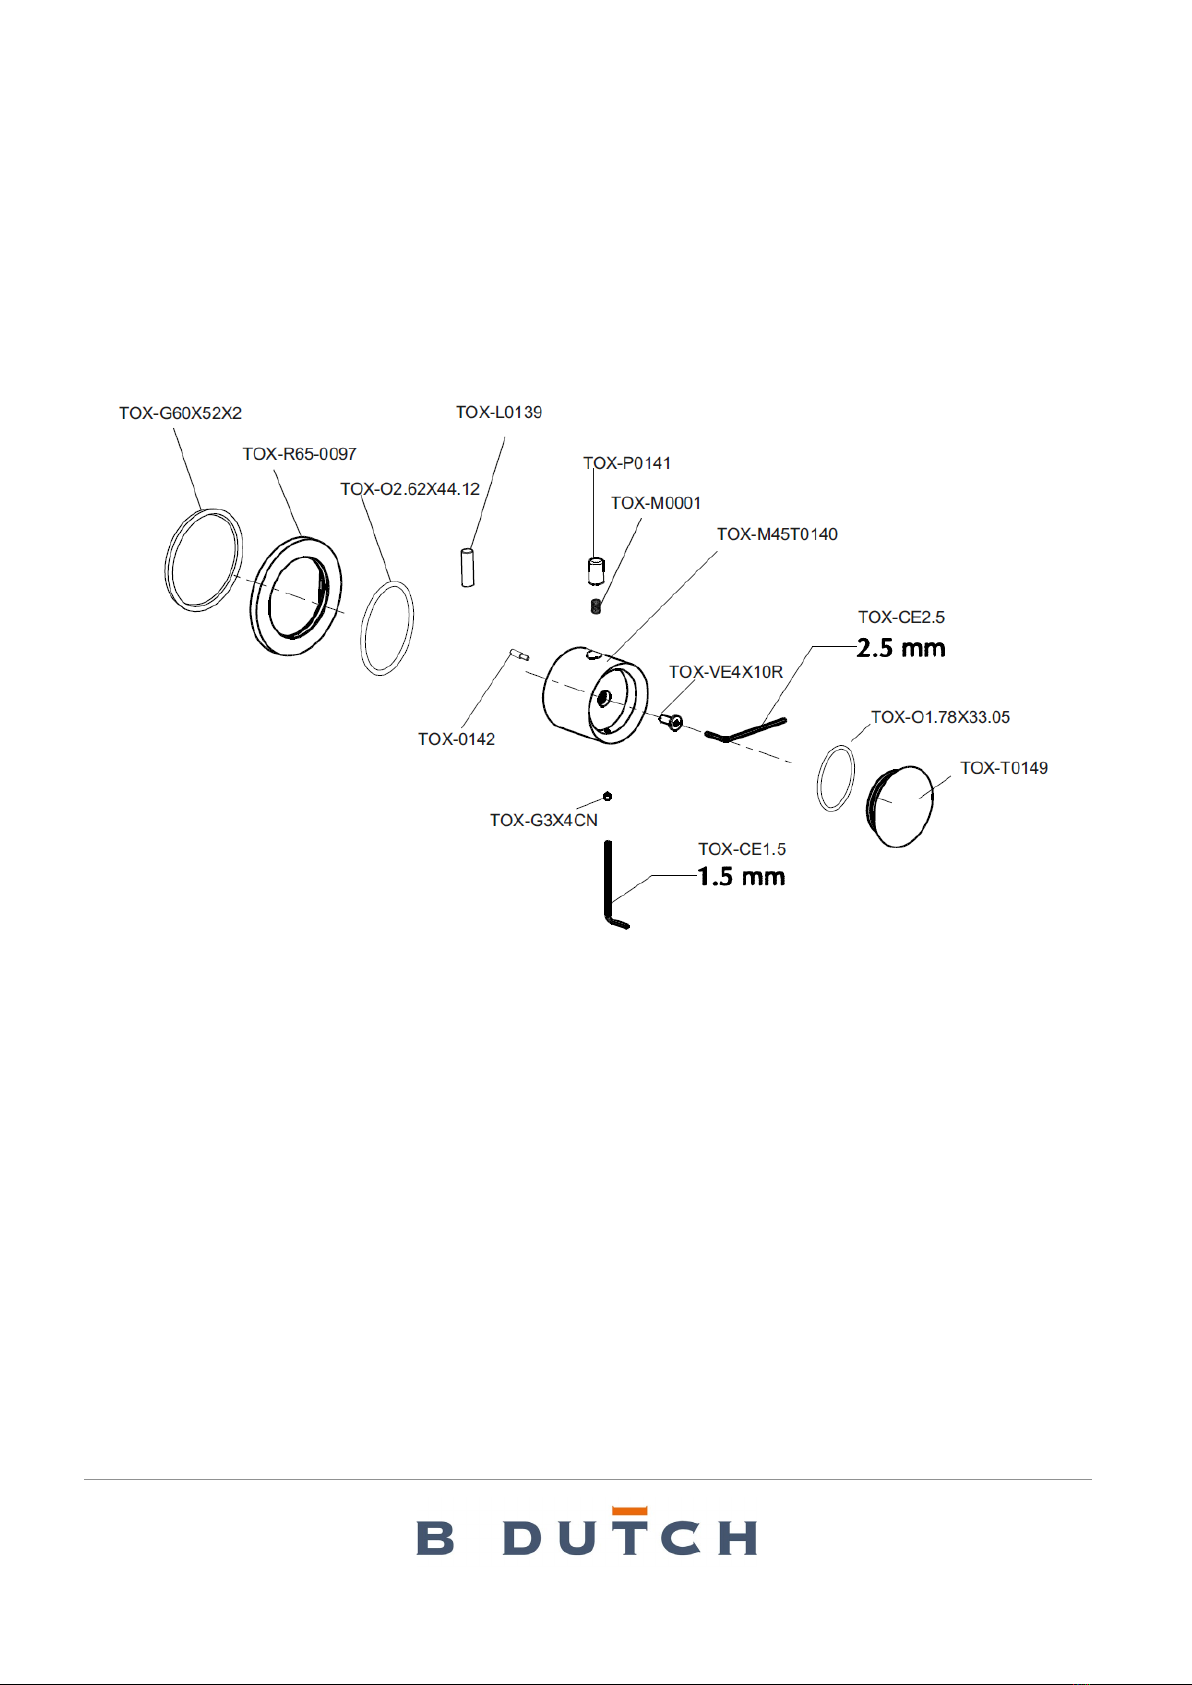
ONDERHOUD
Schroef de plug (1 ) los met behulp van de meegeleverde 1,5 mm inb ussleutel. Verwijder de dop (2 ). Draai de
s ch ro e f (3 ) lo s me t behulp van een inbussleutel van 2,5 mm. Verwijder de hendel (4) en de temperatuur
blokkering ring (5) en de bedieningshendel voor het openen en sluiten van het water (6). Draai de borgring (7)
los met een inbussleutel van 36 mm. Vervang de patroon (8). Monteer in omgekeerde volgorde en zorg ervoor
dat de pennen aan de onderkant van de patroon (8) correct worden geplaatst in de corresponderende verborgen
zitting en dat het oppervlak schoon is (fig.9). Open de watertoevoer opnieuw en controleer of de thermostatische
mengkraan correct werkt.
10
ENGLISH
Cleaners For Fittings and Accessoires
To avoid damaging the surface and working components of the fittings, certain precautions must be taken in
terms of usage and subsequent cleaning as many cleaning agents contain acids for general cleaning and
removing calcium deposits. When caring for your fittings and accessories, please note the following:
•Only apply cleaners which are expressly intended for the use.
•Never use any cleaner containing hydrochloric acid, formic acid or acetic acid on or near the
fitting, as they can cause considerable damage.
•Do not use cleaners containing phosphoric acid.
•Do not use cleaners containing chlorine bleach solutions.
•Never mix or combine cleaning agents.
•Abrasive cleaners and unsuitable scouring agents such as scouring pads.
MAINTENANCE
Remove the grub screw (1) using the 1.5 mm wrench supplied. Remove the cap (2). Unscrew th escrew (3)
with a 2.5 mm wrench. Remove the handle (4) and latch ring temperature (5) and the command handle for
opening and closing the water (6). With a 36 mm wrench unscrew the locking ring (7). Replace the cartridge
(8). Assemble in reverse order making sure that the pins at the base of the cartridge (8) are correctly in place
wcich corresponds to the concealed valve and that the surface is clean (fig.9). Reopen the input of water and
verify that the thermostatic mixer functions correctly.

11
BD700.000043
12
BD700.000044
13
BD700.000043
14
BD700.000044
This manual suits for next models
1
Table of contents
Other B DUTCH Industrial Equipment manuals


