B.Well PRO-30 User manual

EN FA AR
Instruction for use /ﻞﻤﻌﻟارﻮﺘﺳد یﺎﻤﻨھار /
PRO-30
PRO-30
Semi-automatic Upper Arm
Blood Pressure Monitor
High-accuracy
measurements
لﺎﻤﻌﺘﺳﻻا تادﺎﺷرا


Instruction for use
3
En
PRO-30
Model PRO-30
Semi-automatic Upper Arm Blood Pressure Monitor
Instruction for Use
INDEX
1. INTRODUCTION ...............................................................................................................................................................................4
2. IMPORTANT INFORMATION ON THE SUBJECT OF BLOOD-PRESSURE AND ITS MEASUREMENT................4
2.1. Normal blood pressure fluctuation ...................................................................................................................................4
2.2. Classification of blood pressure values............................................................................................................................5
3. CONTENTS AND DISPLAY INDICATORS.................................................................................................................................6
4. INTENDED USE................................................................................................................................................................................6
5. CONTRAINDICATION......................................................................................................................................................................6
6. PRECAUTIONS..................................................................................................................................................................................7
7. SETUP AND OPERATING PROCEDURES................................................................................................................................8
7.1. Battery loading.........................................................................................................................................................................8
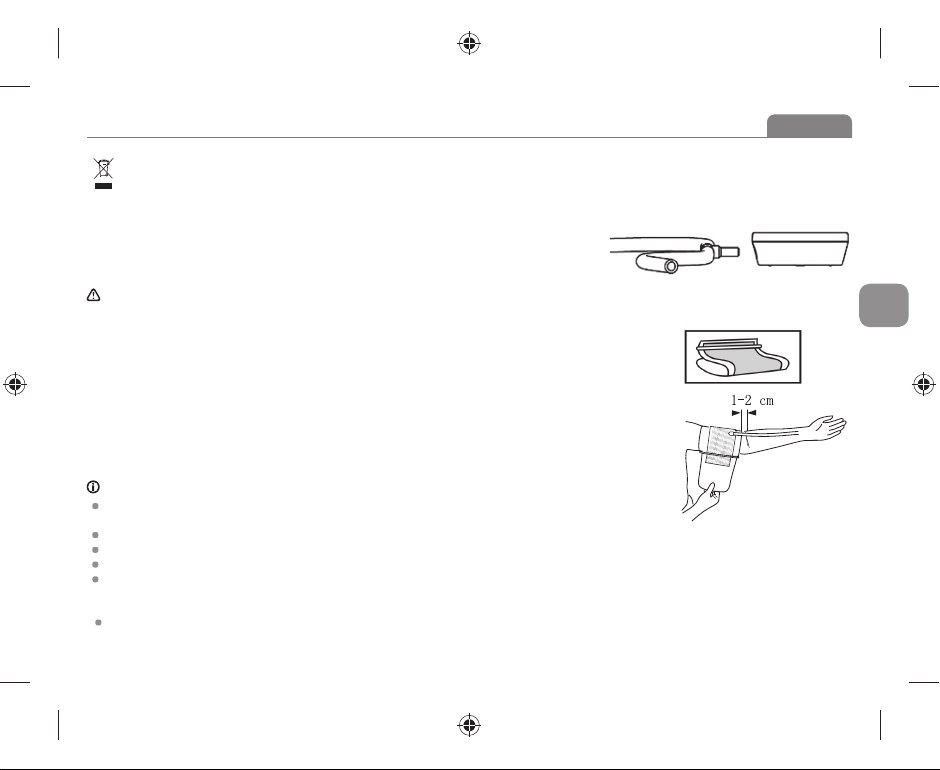
7.2. Connecting the cuff to the monitor...................................................................................................................................9
7.3. Applying the cuff......................................................................................................................................................................9
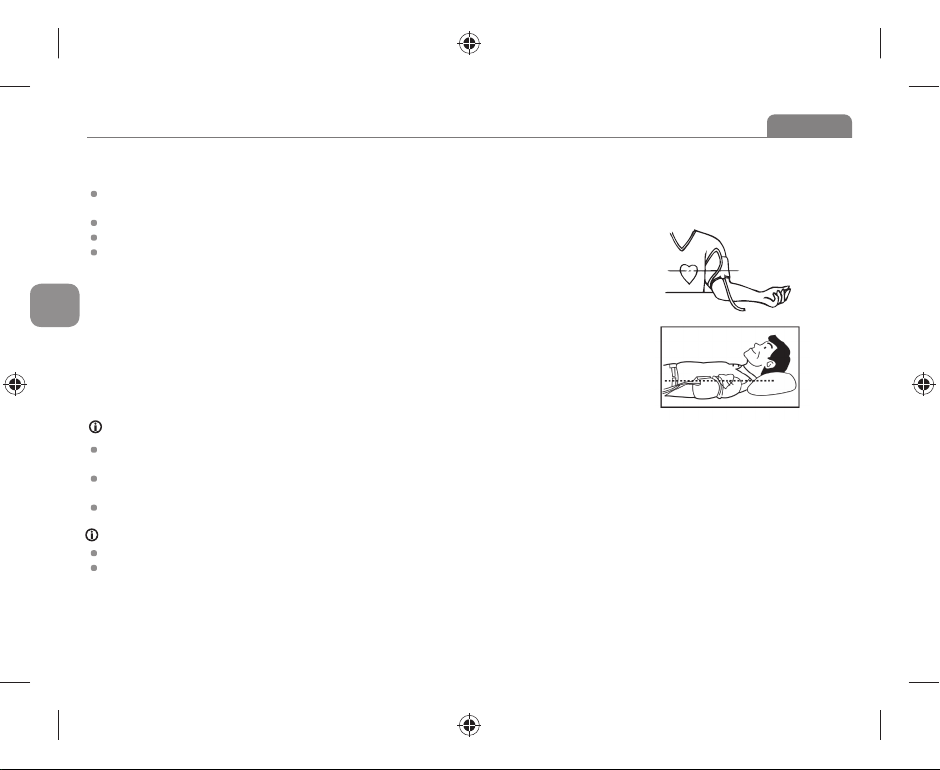
7.4. Carrying out a measurement ..............................................................................................................................................10
7.5. Taking your blood pressure reading..................................................................................................................................10
7.6. Pulse Arrhythmia Detection ................................................................................................................................................11
7.7. Technical alarm description..................................................................................................................................................12
7.8. Traffic Light Indication in the Display................................................................................................................................12
7.9. Troubleshooting (1)..................................................................................................................................................................13
7.10.Troubleshooting (2) .................................................................................................................................................................13
8. MAINTENANCE................................................................................................................................................................................14
9. SPECIFICATIONS..............................................................................................................................................................................15
10. APPLIED STANDARDS ..................................................................................................................................................................16
11. SYMBOL INFORMATION ..............................................................................................................................................................16
12. WARRANTY INFORMATION .......................................................................................................................................................17
13. ELECTROMAGNETIC COMPATIBILITY INFORMATION......................................................................................................17
14. LATEST REVISION ..........................................................................................................................................................................21

Instruction for use
4
En
PRO-30
1. INTRODUCTION
Thank you for purchasing the B.Well upper arm blood pressure monitor PRO-30. Designed for convenient and easy operation, this device
provides fast and reliable measurement of systolic and diastolic blood pressure as well as heart rate using the oscillometric measurement
method.
Your blood pressure is an important parameter that can be used to monitor your health. High blood pressure (hypertension) is a serious
health problem that is frequently found in the modern world.
The PRO-30 is a semi-automatic upper arm blood pressure measuring device.
The Pulse Arrhythmia Detection technology with an audible sound signal which warns about the malfunctions of normal rate and perio-
dicity of systole during the measurement.
Important advantages of PRO-30:
The Pulse Arrhythmia Detection technology with an audible sound signal which warns about the malfunctions of normal rate and
periodicity of systole during the measurement
Big 3-line LCD screen with blood pressure indication scale according to European Society of Hypertension (ESH)
One convenient button
Last measurement memory
Fan-shape anatomic cuff for arm, washable
Battery life indicator
Automatic switch off
This device is easy to use and has been proven in clinical studies to provide excellent accuracy.
Before using the PRO-30, read this instruction manual carefully and keep it in a safe place. For further questions on the subject of
blood-pressure and its measurement, please contact your doctor.
2. IMPORTANT INFORMATION ON THE SUBJECT OF BLOOD-PRESSURE AND ITS MEASUREMENT
2.1. Normal blood pressure fluctuation
All physical activity, excitement, stress, eating, drinking, smoking, body posture and many other activities or factors (including taking a
blood pressure measurement) will influence blood pressure value. Because of this, it is mostly unusual to obtain identical multiple blood
pressure readings. Blood pressure fluctuates continually day and night. The highest value usually appears in the daytime and lowest one
usually at midnight. Typically, the value begins to increase at around 3:00 AM, and reaches to highest level in the daytime while most
people are awake and active.

Instruction for use
5
En
PRO-30
Considering the above information, it is recommended that you measure your blood pressure at approximately the same time each day.
Too frequent measurements may cause injury due to blood flow interference, please always relax a minimum moment of 1 to 1.5 minutes
between measurements to allow the blood circulation in your arm to recover. It is rare that you obtain identical blood pressure readings
each time.
The device contains sensitive electronic components (Microcomputer). Therefore, avoid strong electrical or electromagnetic fields in the
direct vicinity of the device (e.g. mobile telephones, microwave cookers). These can lead to temporary impairment of the measuring ac-
curacy.
2.2. Classification of blood pressure values
Blood pressure is too high if at rest, the diastolic pressure is above 90mmHg and/or the systolic blood-pressure is over 160mmHg. In this
case, please consult your doctor immediately. Long-term values at this level endanger your health due to the associated advancing dam-
age to the blood vessels in your body.
Should the systolic blood-pressure values lie between 140mmHg and 160mmHg and/or the diastolic blood-pressure values lie between
90mmHg and 100mmHg, likewise, please consult your doctor. Furthermore, regular self-checks will be necessary.
With blood-pressure values that are too low, i.e. systolic values under 100mmHg and/or diastolic values under 60mmHg, likewise, please
consult your doctor.
Even with normal blood-pressure values, a regular self-check with your blood-pressure monitor is recommended. In this way you can
detect possible changes in your values early and react appropriately.
If you are undergoing medical treatment to control your blood pressure, please keep a record of the level of your blood pressure by carry-
ing out regular self-measurements at specific times of the day. Show these values to your doctor. Never use the results of your measure-
ments to alter independently the drug doses prescribed by your doctor.
Table for classifying blood-pressure values (unit: mmHg) according to European Society of Hypertension (ESH)
Range Systolic blood pressure Diastolic blood pressure Measures
Grade 3: severe hypertension Higher or equal to 180 Higher or equal to 110 Urgently seek medical advice!
Grade 2: moderate hypertension 160-179 100-109 Consult your doctor immediately
Grade 1: mild hypertension 140-159 90-99 Consult your doctor
High normal 130-139 85-89 Consult your doctor
Normal Lower than 130 Lower than 85 Self-check
Optimal Lower than 120 Lower than 80 Self-check

Instruction for use
6
En
PRO-30
3. CONTENTS AND DISPLAY INDICATORS
4. INTENDED USE
The digital semi-automatic blood pressure monitor is for use by medical professionals or at home and is a non-invasive blood pressure
measurement system intended to measure the diastolic and systolic blood pressures and pulse rate of an adult individual by using a non-
invasive technique in which an inflatable cuff is wrapped around the upper arm. The cuff circumference is limited to 22cm-48cm.
5. CONTRAINDICATION
It is inappropriate for people with serious arrhythmia to use the digital semi-automatic blood pressure monitor.
Systolic Pressure
Diastolic Pressure
Pulse Rate
LCD Display
Start button
Cuff socket
Cuff connector
D. ring
rapid exhaust
Air tube rubber bulb
Cuff
Heart beat symbol
You can begin to measure
Zero-seeking symbol
Batteries are running out
Low battery symbol
Pulse Arrhythmia Detection symbol
Indication of blood pressure level

Instruction for use
7
En
PRO-30
6. PRECAUTIONS
1. Read all of the information in the operation guide and any other literature in the box before operating the unit.
2. Stay still, calm and rest for 5 minutes before blood pressure measurement.
3. The cuff should be placed at the same level as your heart.
4. During measurement, neither speak nor move your body and arm.
5. Measuring on left arm for each measurement.
6. Please always relax a minimum moment of 1 to 1.5 minutes between measurements to allow the blood circulation in your arm to
recover. Prolonged over-inflation (cuff pressure exceed 300 mmHg or maintained above 15 mmHg for longer than 3 minutes) of the
bladder may cause ecchymoma of your arm.
7. Consult your physician if you have any doubt about below cases:
1) The application of the cuff over a wound or inflammation diseases;
2) The application of the cuff on any limb where intravascular access or therapy, or an arterio-venous (A-V) shunt, is present;
3) The application of the cuff on the arm on the side of a mastectomy;
4) Simultaneously used with other monitoring medical equipments on the same limb;
5) Need to check the blood circulation of the user.
8. This digital automatic blood pressure monitor is designed for adults and should never be used on infants or young children. Consult
your physician or other health care professionals before use on older children.
9. Do not use this unit in a moving vehicle, This may result in erroneous measurement.
10.Blood pressure measurements determined by this monitor are equivalent to those obtained by a trained observer using the cuff/
stethoscope auscultation method, within the limits prescribed by the American National Standard Institute, Electronic or automated
sphygmomanometers.
11. Information regarding potential electromagnetic or other interference between the blood pressure monitor and other devices
together with advice regarding avoidance of such interference please see part ELECTROMAGNETIC COMPATIBILITY INFORMATION.
12. If certain pulse irregularity caused by common arrhythmias is detected in the procedure of blood pressure measurement, a signal of
will be displayed. Under this condition, the digital automatic blood pressure monitor can keep function, but the results may not
be accurate, it’s suggested that you consult with your physician for accurate assessment.
There are 2 conditions under which the signal of Pulse Arrhytmia Detection will be displayed:
1) The coefficient of variation (CV) of pulse period >25%.
2) The difference of adjacent pulse period ≥0.14s, and the number of such pulse takes more than 53 percentage of the total number
of pulse.
13. Please do not use the cuff other than supplied by the manufacturer, otherwise it may bring biocompatible hazard and might result in
measurement error.

Instruction for use
8
En
PRO-30
14. The monitor might not meet its performance specifications or cause safety hazard if stored or used
outside the specified temperature and humidity ranges in specifications.
15. Please do not share the cuff with other infective person to avoid cross-infection.
16. Please note that changes or modifications not expressly approved by the party responsible for compliance could void the user’s
authority to operate the equipment.
17. This equipment has been tested and found to comply with the limits for a Class B digital device, pursuant to part 15 of the FCC Rules.
These limits are designed to provide reasonable protection against harmful interference in a residential installation. This equipment
generates, uses and can radiate radio frequency energy and, if not installed and used in accordance with the instructions, may cause
harmful interference to radio communications. However, there is no guarantee that interference will not occur in a particular instal-
lation. If this equipment does cause harmful interference to radio or television reception, which can be determined by turning the
equipment off and on, the user is encouraged to try to correct the interference by one or more of the following measures:
— Reorient or relocate the receiving antenna.
— Increase the separation between the equipment and receiver.
— Connect the equipment into an outlet on a circuit different from that to which the receiver is connected.
— Consult the dealer or an experienced radio/TV technician for help.
18.If this complete set did not switch on the mains adapter, it can be got separately. Use only the adapter AD-155. The AC adapter which
output is DC 6.0V 600mA and complied with IEC 60601-1/EN 60601-1/UL 60601-1 and IEC 60601-1-2/EN 60601-1-2/UL 60601-1-2.
Shouldn’t use the another adapter model.
7. SETUP AND OPERATING PROCEDURES
7.1. Battery loading
a. Open battery cover at the back of the monitor.
b. Load two “AAA” size batteries. Please pay attention to polarity.
c. Close the battery cover.
d. Once you install the batteries or turn off the monitor, the LCD does not display anything. Now the monitor is in Off Mode.
If the LCD display battery symbol while the monitor is on,the batteries are running out.
If the batteries are run out,battery symbol will blink for 10 seconds. Then the monitor will always display battery symbol
and cannot open. Please replace all batteries with new ones.
Rechargeable batteries are not suitable for this monitor.
Remove the batteries if the monitor will not be used for a month or more to avoid relevant damage of battery leakage.
Avoid the battery fluid to get in your eyes. If it should get in your eyes, immediately rinse with plenty of clean water and contact a
physician.

Instruction for use
9
En
PRO-30
The monitor, the batteries and the cuff, must be disposed of according to local
regulations at the end of their usage.
7.2. Connecting the cuff to the monitor
Insert the Air Tube Plug firmly into the Air Tube Socket on the side of the Monitor.
Make certain that the Plug is completely inserted in order to prevent air leakage
during use.
Avoid compression or restriction of the connection tubing during measurement,
which may cause inflation error, or harmful injury due to continuous cuff pressure.
7.3. Applying the cuff
a. Pulling the cuff end through the medal loop (the cuff is packaged like this already), turn it outward
(away from your body) and tighten it and close the Velcro fastener.
b. Place a cuff around a naked hand 1-2 cm higher than an elbow pole.
c. Being in a sitting position, put a hand palm up before yourself on a plain surface, for example,
on a table. Arrange a cuff on a hand so that its bottom edge was apart 1-2 cm above an elbow
bend. The red tag (Artery mark) has to be over an elbow pole.
d. The cuff has to cover densely a hand, otherwise the result of measurement will be the improper.
It is not recommended to dress a cuff over clothes.
Note:
Please refer to the cuff circumference range in “SPECIFICATIONS” to make sure that the
appropriate cuff is used.
Measure on the left arm each time.
Do not move your arm, body, or the monitor and do not move the rubber tube during measurement.
Stay still, calm for 5 minutes before blood pressure measurement.
Please keep the cuff clean. If the cuff becomes dirty, remove it from the monitor and clear it by hand in a mild detergent, then rinse
it thoroughly in cold water. Never dry the cuff in clothes dryer or iron it. Clean the cuff after the usage of every 200 times is recom-
mended.
Do not place the cuff around your arm if the arm has any inflammation, acute diseases, infections skin wounds.

Instruction for use
10
En
PRO-30
7.4. Carrying out a measurement
Before the measurement:
Avoid eating, smoking as well as all forms of exertion directly before the measurement. All these factors influence the measurement
result. Try and find time to relax by sitting in an armchair in a quiet atmosphere for about ten minutes before the measurement.
Remove any garment that fits closely to your upper arm.
Measure always on the same arm (normally left).
Attempt to carry out the measurements regularly at the same time of day, since the
blood-pressure changes during the course of the day.
Sitting Comfortably Measurement
a. Be seated with your feet flat on the floor, and don’t cross your legs.
b. Place palm upside in front of you on a flat surface such as a desk or table.
c. The middle of the cuff should be at the level of the right atrium of the heart.
Lying Down Measurement
d. Lie on your back.
e. Place your left arm straight along your side with your palm upside.
f. The cuff should be placed at the same level as your heart.
Common sources of error:
Note: Comparable blood-pressure measurements always require the same conditions! These are normally always quiet conditions.
All efforts by the patient to support the arm can increase the blood-pressure. Make sure you are in a comfortable, relaxed position
and do not activate any of the muscles in the measurement arm during the measurement. Use a cushion for support if necessary.
If the arm artery lies considerably lower (higher) than the heart, an erroneously higher (lower) blood-pressure will be measured! (Each
15cm difference in height results in a measurement error of 10mmHg)
Cuffs that are too narrow or too short result in false measurement values. Selecting the correct cuff is of extraordinary importance.
The cuff size is dependent upon the circumference of the arm (measured in the centre). The permissible range is printed on the cuff.
Note: only use clinically approved Original-Cuffs!
A loose cuff or a sideways protruding air-pocket causes false measurement values.
With repeated measurements, blood accumulates in the respective arm, which can lead to false results. Correctly executed blood-
pressure measurements should therefore first be repeated after a 1 minute pause.
7.5. Taking your blood pressure reading
a. After applying the cuff and your body is in a comfortable position, press the “START” button. A beep is heard and all display characters
are shown for self-test. See picture 5. Please contact the service center if segment is missing.

Instruction for use
11
En
PRO-30
b. The LCD will momentarily display the last measurement stored in the memory. See picture 5-1. If the monitor has no measurement
stored in the memory, the LCD will display show “0” for blood pressure and pulse rate. See picture 5-2.
Picture 5 Picture 5-1 Picture 5-2 Picture 5-3 Picture 5-4
c. After that, LCD will show “0” mmHg that indicates you can begin to measure. See picture 5-3.
d. Squeeze the bulb till the pressure is over your normal systolic pressure by 50 mmHg, if you don’t know your normal systolic pressure,
squeeze the bulb till the pressure reaches 190 mmHg. Then the monitor slowly releases air from the cuff and carries out the measure-
ment. Finally the blood pressure and pulse rate will be calculated and displayed on the LCD screen. Irregular heartbeat symbol (if any)
will blink. A bar or several bars, indicating blood pressure level, will appear. See picture 5-4.
e. After reading the result, press the exhaust valve which is located in the front of the bulb to release the air.
f. When all the air is pushed out of the cuff, monitor will blink the, then you can begin to measure again.
g. After measurement, the monitor will turn off automatically after 3 minutes of no operation. Alternatively, you can press the “START”
button to turn off the monitor manually.
h. During measurement, you can press the “START” button to turn off the monitor manually.
i. During measurement, you can press the exhaust valve which is located in the front of the bulb to release the air.
j. If you have initially pumped the insufficient level of pressure in a cuff, then on the display all figures will be out and there will be symbol
blinking and directed up. In that case it is necessary to pump air in a cuff additionally till the figures will be shown on the display.
Note: Please consult a health care professional for interpretation of pressure measurements.
Note: The monitor can memorize the last result. If you change the batteries, the last result may be lost.
7.6. Pulse Arrhythmia Detection
Appearance of the Arrhythmia indicator
The appearance of the symbol signifies that a certain pulse irregularity was detected during the measurement. The result can vary
from your normal blood pressure. As a rule this is not a cause for concern; however, if the symbol appears more frequently
(e.g. several times per week on measurements performed daily) or if it suddenly appears more often than usual, we recommend you
inform your doctor. Please show your doctor the following explanation:

Instruction for use
12
En
PRO-30
Information for the doctor on frequent appearance of the Arrhythmia indicator
The device is an oscillometric blood pressure measuring device that also analyses the pulse frequency during measurement.
The accuracy of this device has been clinically validated. If pulse irregularities occur during measurement, the arrhythmia symbol
is displayed after the measurement. If the symbol appears more frequently (e.g. several times per week on measurements
performed daily) or if it suddenly appears more often than usual, we recommend the patient to seek medical advice.
The device does not replace a cardiac examination, but serves to detect pulse irregularities at an early stage.
7.7. Technical alarm description
The monitor will show ‘HI’ or ‘Lo’ as technical alarm on LCD with no delay if the determined blood pressure (systolic or diastolic) is outside
the rated range specified in part SPECIFICACIONS. In this case, you should consult a physician or check if your operation violated the
instructions. The technical alarm condition (outside the rated range) is preset in the factory and cannot be adjusted or inactivated. This
alarm condition is assigned as low priority according to IEC 60601-1-8.
The technical alarm is non-latching and need no reset. The signal displayed on LCD will disappear automatically after about 8 seconds.
7.8. Traffic Light Indication in the Display
The bars on the left-hand edge of the display show you the range within which the indicated blood pressure values lies.
Depending on the number of bars, the readout value is either within the normal (1-3 bars), borderline (4-5 bars) or danger
(6 bars) range. The classification corresponds to the 6 ranges in the Table as defined by the ESH and described on the table of
the point 2.2 The recommendations of the European Society of Hypertension (ESH) allow to diagnose and treat the hyperten-
sion more effectively and do not contradict World Health Organization recommendations.
Indication of a «Normal» Blood Pressure Indication of a «Borderline» Blood Pressure Indication of a «Danger» Blood Pressure
Red
Orange
Yellow
Green
Green
Green
SYS
DIS
PULSE
Red
Orange
Yellow
Green
Green
Green
SYS
DIS
PULSE
Red
Orange
Yellow
Green
Green
Green
SYS
DIS
PULSE

Instruction for use
13
En
PRO-30
7.9. Troubleshooting (1)
PROBLEM POSSIBLE CAUSE SOLUTION
LCD Display shows
abnormal result
The cuff position was not correct or it was not
properly tightened Apply the cuff correctly and try again
Body posture was not correct during testing Review the “BODY POSTURE DURING MEASURE-
MENT” sections of the instructions and re-test.
Speaking, arm or body movement, angry,
excited or nervous during testing
Re-test when calm and without speaking or moving
during the test
Irregular heartbeat (arrhythmia) It is inappropriate for people with serious arrhythmia
to use this blood pressure monitor.
7.10. Troubleshooting (2)
PROBLEM POSSIBLE CAUSE SOLUTION
LCD shows low battery
symbol Low Battery Change the batteries
LCD shows “Er 0” Pressure system is unstable before measure-
ment
Don’t move and try again.
LCD shows “Er 1” Fail to detect systolic pressure
LCD shows “Er 2” Fail to detect diastolic pressure
LCD shows “Er 3” Pneumatic system blocked or cuff is too tight
during inflation Apply the cuff correctly and try again
LCD shows “Er 4” Pneumatic system leakage or cuff is too loose
during inflation

Instruction for use
14
En
PRO-30
LCD shows “Er 5” Cuff pressure above 300mmHg
Measure again after five minutes. If the monitor is
still abnormal, please contact the local distributor or
the factory.
LCD shows “Er 6” More than 3 minutes with cuff pressure above
15 mmHg
LCD shows “Er 7” EEPROM accessing error
LCD shows “Er 8” Device parameter checking error
LCD shows “Er A” Pressure sensor parameter error
No response when you
press button or load
battery.
Incorrect operation or strong electromagnetic
interference.
Take out batteries for five minutes, and then reinstall
all batteries.
8. MAINTENANCE
1. Do not drop this monitor or subject it to strong impact.
2. Avoid high temperature and solarization. Do not immerse the monitor in water as this will result in damage to the monitor.
3. If this monitor is stored near freezing, allow it to acclimate to room temperature before use.
4. Do not attempt to disassemble this monitor.
5. If you do not use the monitor for a long time, please remove the batteries.
6. It is recommended the performance should be checked every 2 years or after repair. Please contact the service center.
7. Clean the monitor with a dry, soft cloth or a soft cloth squeezed well after moistened with water, diluted disinfectant alcohol, or
diluted detergent.
8. No component can be maintained by user in the monitor. The circuit diagrams, component part lists, descriptions, calibration instruc-
tions, or other information which will assist the user’s appropriately qualified technical personnel to repair those parts of equipment
which are designated repairably can be supplied.
9. The monitor can maintain the safety and performance characteristics for a minimum of 10,000 measurements or three years, and the
cuff integrity is maintained after 1,000 open–close cycles of the closure.
10.It is recommended the cuff should be disinfected 2 times every week if needed (For example, in hospital or in clinique). Wipe the inner
side (the side contacts skin) of the cuff by a soft cloth squeezed after moistened with Ethyl alcohol (75-90%), then dry the cuff by air-
ing.
The cover of a cuff can be subjected to a hand wash at a temperature of 30°C. Not to iron!

Instruction for use
15
En
PRO-30
WARNING: Under no circumstances washing of the internal elastic camera isn’t allowed! Before washing take out the elastic bladder
from a cover and afterwards accurately insert back.
9. SPECIFICATIONS
1. Product name: Blood Pressure Monitor
2. Model: PRO-30
3. Classification: Internally powered, Type BF applied part, IPX0, No AP or APG, Continuous operation
4. Machine size: 91mm x 57mm x 19mm (3 7/16" x 4 13/16" x 2 3/32")
5. Cuff circumference: 22cm~42cm (8 21/32"~16 17/32") or 22cm~32cm (8 21/32"~ 12 19/32") (depending on picking of the device)
6. Weight: approx. 50g (6 3/4 oz.) (exclude batteries and cuff)
7. Measuring method: oscillometric method, air inflation and measurement
8. Memory volume: only the last measurement stored in the memory
9. Power source: DC 6V 600mA, batteries: 2 × 1.5V SIZE AAA
10.Measurement range:
Cuff pressure: 0-300mmHg
Systolic: 60-280mmHg
Diastolic: 40-199mmHg
Pulse rate: 40-180 beats/minute
11. Accuracy:
Pressure: ±3mmHg
Pulse rate: ±5%
12. Environmental temperature for operation: 10°C~40°C(50°F~104°F)
13. Environmental humidity for operation: ≤85% RH
14.Environmental temperature for storage and transport: -20°C~50°C(-4°F~122°F)
15. Environmental humidity for storage and transport: ≤85% RH
16. Environmental pressure: 80KPa-105KPa
17. Battery life: Approx.270 times
18.Blood pressure monitor set: M-L size’s fan shape cuff (upper arm circumferenze 22-42 cm) or M size’s fan shape cuff (upper arm
circumferenze 22-32 cm) (depending on picking of the device), a storage bag, AAA batteries – 2 pieces, the instruction manual.
Note: These specifications are subject to change without notice.

Instruction for use
16
En
PRO-30
10. APPLIED STANDARDS
The digital automatic blood pressure monitor corresponds to the below standards:
IEC 60601-1:2005/EN 60601-1:2006/AC:2010 (Medical electrical equipment – Part 1: General requirements for basic safety and essential
performance),
IEC60601-1-2:2007/EN 60601-1-2:2007 /AC:2010 (Medical electrical equipment – Part 1-2: General requirements for basic safety and
essential performance – Collateral standard: Electromagnetic compatibility – Requirements and tests),
IEC 80601-2-30 : 2009+Cor.2010 (Medical electrical equipment – Part 2-30: Particular requirements for the basic safety and essential
performance of automated non-invasive sphygmomanometers),
EN 1060-1: 1995 + A1: 2002 + A2: 2009 (Non-invasive sphygmomanometers – Part 1: General requirements),
EN 1060-3: 1997 + A1: 2005 + A2: 2009 (Non-invasive sphygmomanometers – Part 3: Supplementary requirements for electro-mechanical
blood pressure measuring systems).
11. SYMBOL INFORMATION
THE OPERATION GUIDE MUST BE READ
(The sign background colour: blue.The sign graphical symbol: white)
WARNING
TYPE BF APPLIED PARTS (The cuff is type BF applied part)
ENVIRONMENT PROTECTION – Waste electrical products should not be disposed of with household waste.
Please recycle where facilities exist. Check with your local Authority or retailer for recycling advice.
MANUFACTURER’S NAME
ARTICLE NUMBER
SERIAL NUMBER
CE mark (0044) COMPILES WITH MDD93/42/EEC REQUIREMENTS
0044

Instruction for use
17
En
PRO-30
OPERATING CONDITION, TEMPERATURE 10˚C ~ 40˚C
STORAGE CONDITION, TEMPERATURE –20˚C ~ 50˚C
KEEP DRY
12. WARRANTY INFORMATION
Warranty period is 3 years from the date of purchase for monitor and 1 year for cuff and bulb. This warranty doesn’t cover any damages
caused by improper using, and also battery, and packaging. When a manufacturing defect is revealed during the warranty period a faulty
unit would be repaired or, if repairing is impossible, replaced with another one.
Manufacturing date is in a serial number: WWYYXXXXX.
The manufacturer may change units partially or completely if necessary, without prior notice.
13. ELECTROMAGNETIC COMPATIBILITY INFORMATION
Table 1
For all ME EQUIPMENT and ME SYSTEMS
Guidance and manufacturer’s declaration – еlectromagnetic emissions
The PRO-30 is intended for use in the electromagnetic environment specified below.
The customer or the user of the PRO-30 should assure that it is used in such an environment.
Emissions test Compliance Electromagnetic enviroment-guidance
RF emissions
CISPR 11 Group 1 The PRO-30 uses RF energy only for its internal function. Therefore, its RF emissions are very
low and are not likely to cause any interference in nearby electronic equipment.

Instruction for use
18
En
PRO-30
RF emissions
CISPR 11 Class B
The PRO-30 is suitable for use in all establishments, including domestic establishments and
those directly connected to the public low-voltage power supply network that supplies build-
ings used for domestic purposes.
Harmonic emissions
IEC 61000-3-2
Not
applicable
Voltage fluctuations/
flicker emissions
IEC 61000-3-3
Not
applicable
Table 2
For all ME EQUIPMENT and ME SYSTEMS
Guidance and manufacturer’s declaration – еlectromagnetic immunity
The PRO-30 is intended for use in the electromagnetic environment specified below.
The customer or the user of the PRO-30 should assure that it is used in such an environment.
Immunity test IEC 60601 test level Compliance level Electromagnetic enviroment-guidance
Electrostatic discharge
(ESD)
IEC 61000-4-2
± 6 kV contact
± 8 kV air
± 6 kV contact
± 8 kV air
Floors should be wood, concrete or ceramic tile.
If floors are covered with synthetic material, the
relative humidity should be at least 30%.
Power frequency
(50/60 Hz)
magnetic field
IEC 61000-4-8
3 A/m 3 A/m
Power frequency magnetic fields should be at
levels characteristic of a typical location in a typical
commercial or hospital environmet.
NOTE: UTis the a.c. mains voltage prior to application of the test level.

Instruction for use
19
En
PRO-30
Table 3
For ME EQUIPMENT and ME SYSTEMS that are not LIFE-SUPPORTING
Guidance and manufacturer’s declaration – electromagnetic immunity
The PRO-30 is intended for use in the electromagnetic environment specified below. The customer or the user of the PRO-30 should
assure that it is used in such an environment.
Immunity test IEC 60601
test level
Compliance
level Electromagnetic enviroment-guidance
Radiated RF
IEC 61000-4-3
3 V/m
80 MHz
to
2,5 GHz
3 V/m
Portable and mobile RF communications equipment should be used no closer to any part
of the PRO-30, including cables, than the recommended separation distance calculated
from the equation applicable to the frequency of the transmitter
Recommended separation distance
d=1.2 P
d=1.2 P 80 MHz to 800 MHz
d=2.3 P 800 MHz to 2,5 GHz
where P is the maximum output power rating of the ransmitter in watts (W) according
to the transmitter manufacturer and d is the recommended separation distance in
metres (m).
Field strengths from fixed RF transmitters, as determined by an electromagnetic site
surveya, should be less than the compliance level in each frequency rangeb.
Interference may occur in the vicinity of equipment marked with the following
symbol:
NOTE 1 At 80 MHz and 800 MHz, the higher frequency range applies.
NOTE 2 These guidelines may not apply in all situations. Electromagnetic propagation is affected by absorption and reflection from
structures, objects and people.

Instruction for use
20
En
PRO-30
a. Field strengths from fixed transmitters, such as base stations for radio (cellular/cordless) telephones and land mobile radios,
amateur radio, AM and FM radio broadcast and TV broadcast cannot be predicted theoretically with accuracy. To assess the
electromagnetic environment due to fixed RF transmitters, an electromagnetic site survey should be considered. If the measured
field strength in the location in which the PRO-30 is used exceeds the applicable RF compliance level above, the PRO-30 should
be observed to verify normal operation. If abnormal performance is observed, additional measures may be necessary, such as
re-orienting or relocating the PRO-30.
b. Over the frequency range 150 kHz to 80 MHz, field strengths should be less than [V1] V/m.
Table 4
For ME EQUIPMENT and ME SYSTEMS that are not LIFE-SUPPORTING
Recommended separation distances between
portable and mobile RF communications equipment and the PRO-30
The PRO-30 is intended for use in an electromagnetic environment in which radiated RF disturbances are controlled. The customer
or the user of the PRO-30 can help prevent electromagnetic interference by maintaining a minimum distance between portable and
mobile RF communications equipment (transmitters) and the PRO-30 as recommended below, according to the maximum output
power of the communications equipment.
Rated maximum output
power of transmitter
W
Separation distance according to frequency of transmitter
m
150 kHz to 80 MHz
d= 1.2 P
80 MHz to 800 MHz
d= 1.2 P
800 MHz to 2.5 GHz
d= 2.3 P
0,01 0,12 0,12 0,23
0,1 0,38 0,38 0,73
1 1,2 1,2 2,3
10 3,8 3,8 7,3
100 12 12 23
Table of contents
Other B.Well Blood Pressure Monitor manuals