Mx Onda MX-CP2395 User manual
INSTRUCTION MANUAL
FULLY AUTOMATIC ELECTRONIC BLOOD
PRESSURE MONITOR WITH SPEECH MESSAGE
MODELO: MX-CP2395
PLEASE READ THIS MANUAL BEFORE USE 0197
2
BEFORE USING THE TENSIOMETER
•Read these instructions carefully and keep them for future use.
•After removing the packaging, check that the appliance is not damaged. If in doubt, do
not use the appliance; Contact technical support personnel.
•Packaging materials (plastic bags, polystyrene foam, etc.) should not be left out of the
reach of children, as they are a potential source of danger.
•The manufacturer declines all responsibility for damages arising from improper,
incorrect or reckless use of the appliance.
•This equipment has no part that can be repaired by you, in case of a malfunction,
contact an Official MX ONDA Service Center.
•This appliance is designed for home use ONLY. In case of professional use, improper
use or failure to follow the instructions, the manufacturer declines all responsibility,
accepts no responsibility and the warranty will be invalid.
•Use only the supplied cuff, otherwise it may cause damage to the unit and errors in
measurements.
•If the appliance has been dropped or if it does not work properly, refrain from using it
and do not attempt to disassemble or repair it. Contact your dealer or nearest MX
ONDA Service Center.
ATTENTION
THIS PRESSURE MONITOR MUST BE USED ONLY BY ADULTS
3
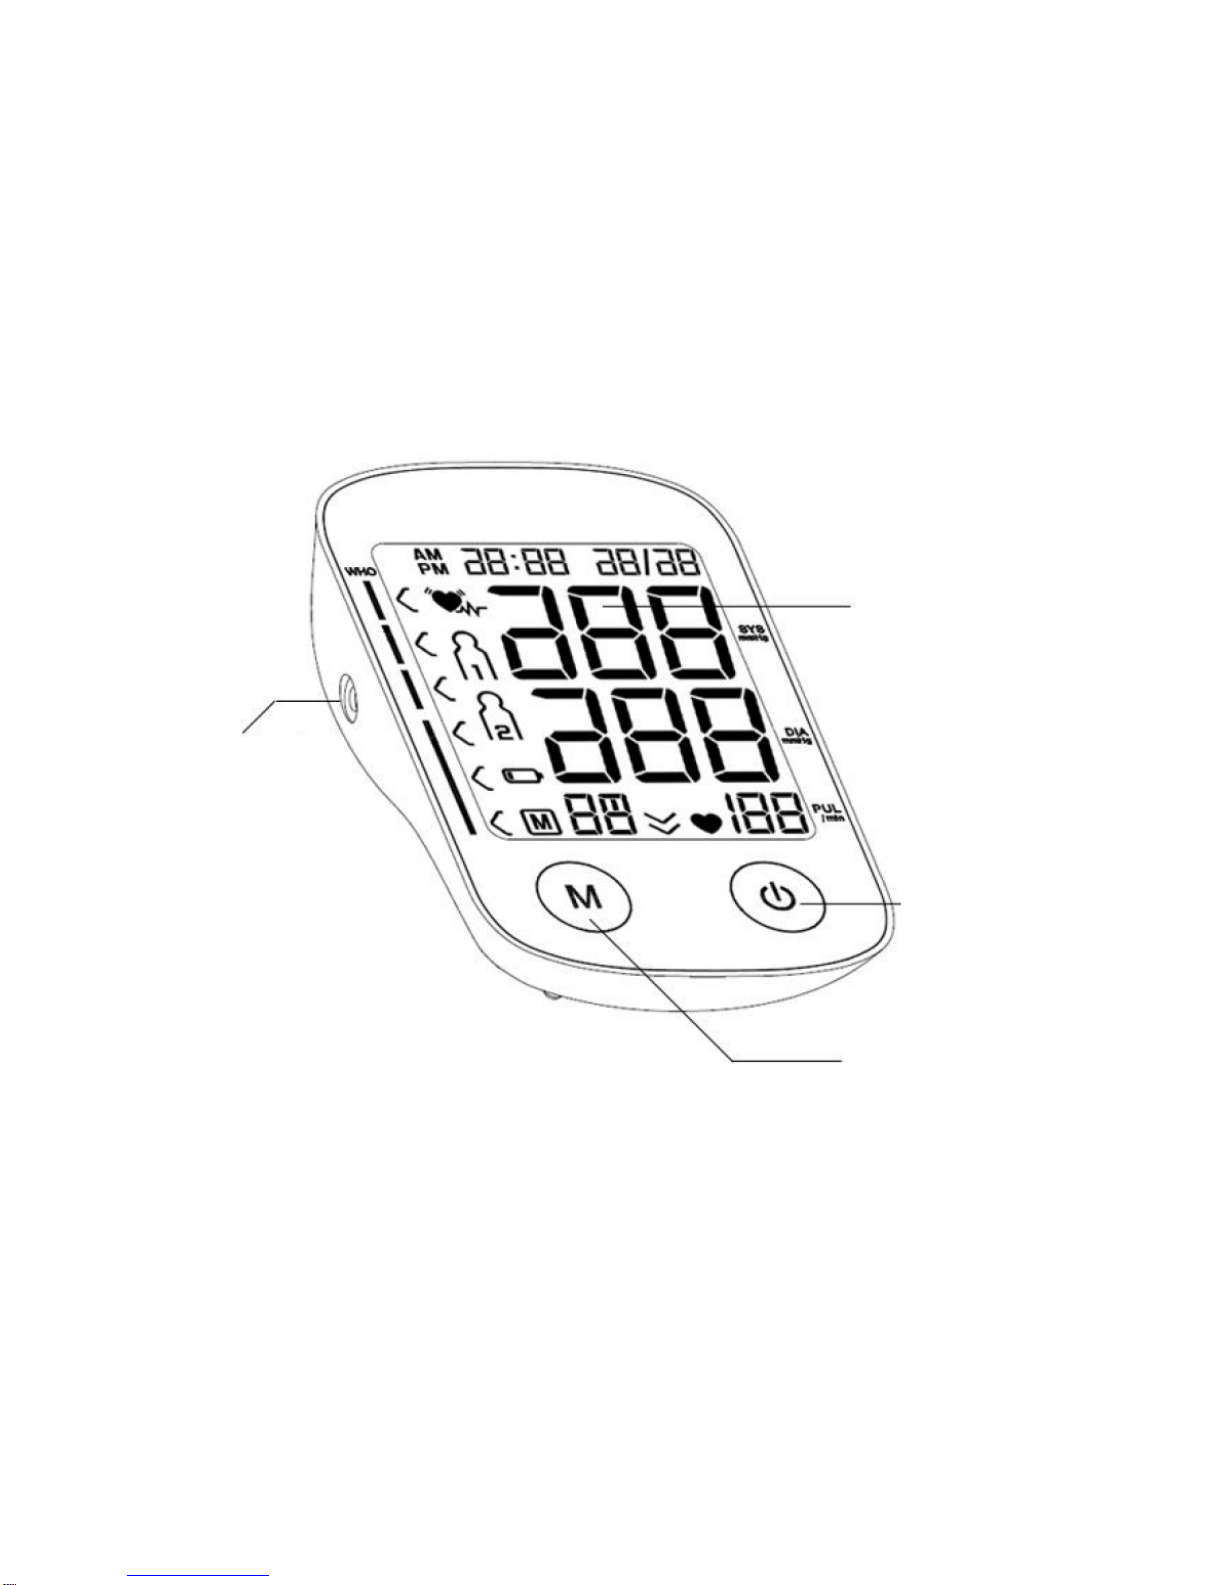
NAME OF EACH PART
Air tube socket
LCD Display
On/Off button
Memory
4
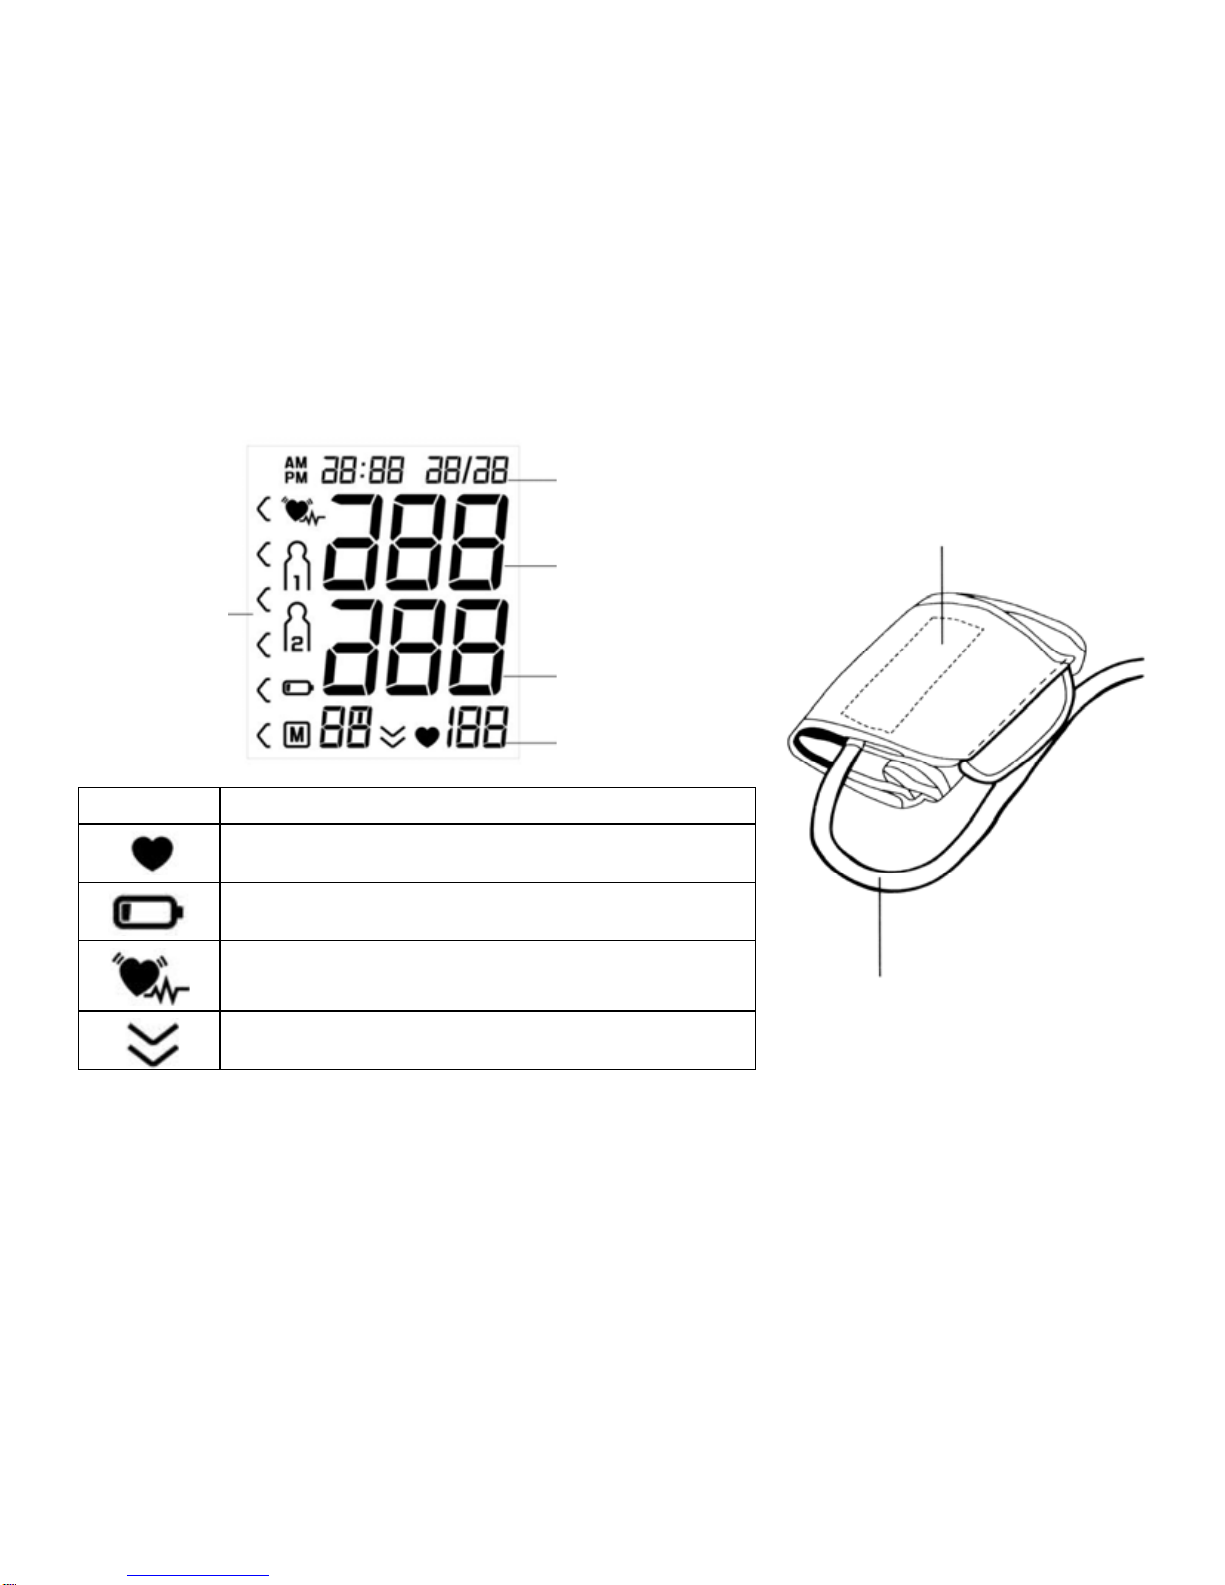
DISPLAY INDICATIONS AND CUFF
Symbol Condition / cause
This symbol appears when the pulse has been
found.
This symbol appears when the batteries are
exhausted and must be replaced.
The display shows this indication when there
are alterations in the heart rhythm.
The bracelet contains air, and it is expelled
from it.
CUFF
AIR TUBE
Date and Time
Systolic
Pressure and
pressure
indicator
arrows Diastolic
Pulse

5
BATTERY LOADING
To insert or change the batteries follow the next steps:
•Open battery cover at the back of the machine.
•Load four “AAA” size batteries. Please pay attention to the polarity.
•Close the battery cover.
Notes:
•When replace the batteries the date and the hour will erase.
•The batteries contain polluting materials of environment, for that reason once
exhausted the batteries, does not throw them to the sweepings, disposed in adapted
for their recycled one.
•If it does not use the apparatus for a long period of time, extracts the batteries and
keep in a dry place.
•Does not use 1.2 V rechargeable batteries.
When is necessary to change the batteries?
When in the apparatus sound a locution and the screen shows the symbol . it indicates
that the batteries are exhausted and must be replaced by other new ones.
SETTING THE CLOCK AND ADJUSTING THE DATE
The clock of this device is designed to indicate the hours in 12 or 24 hour format and the
date in "month / day" mode. To set the date and time, proceed as follows:
6
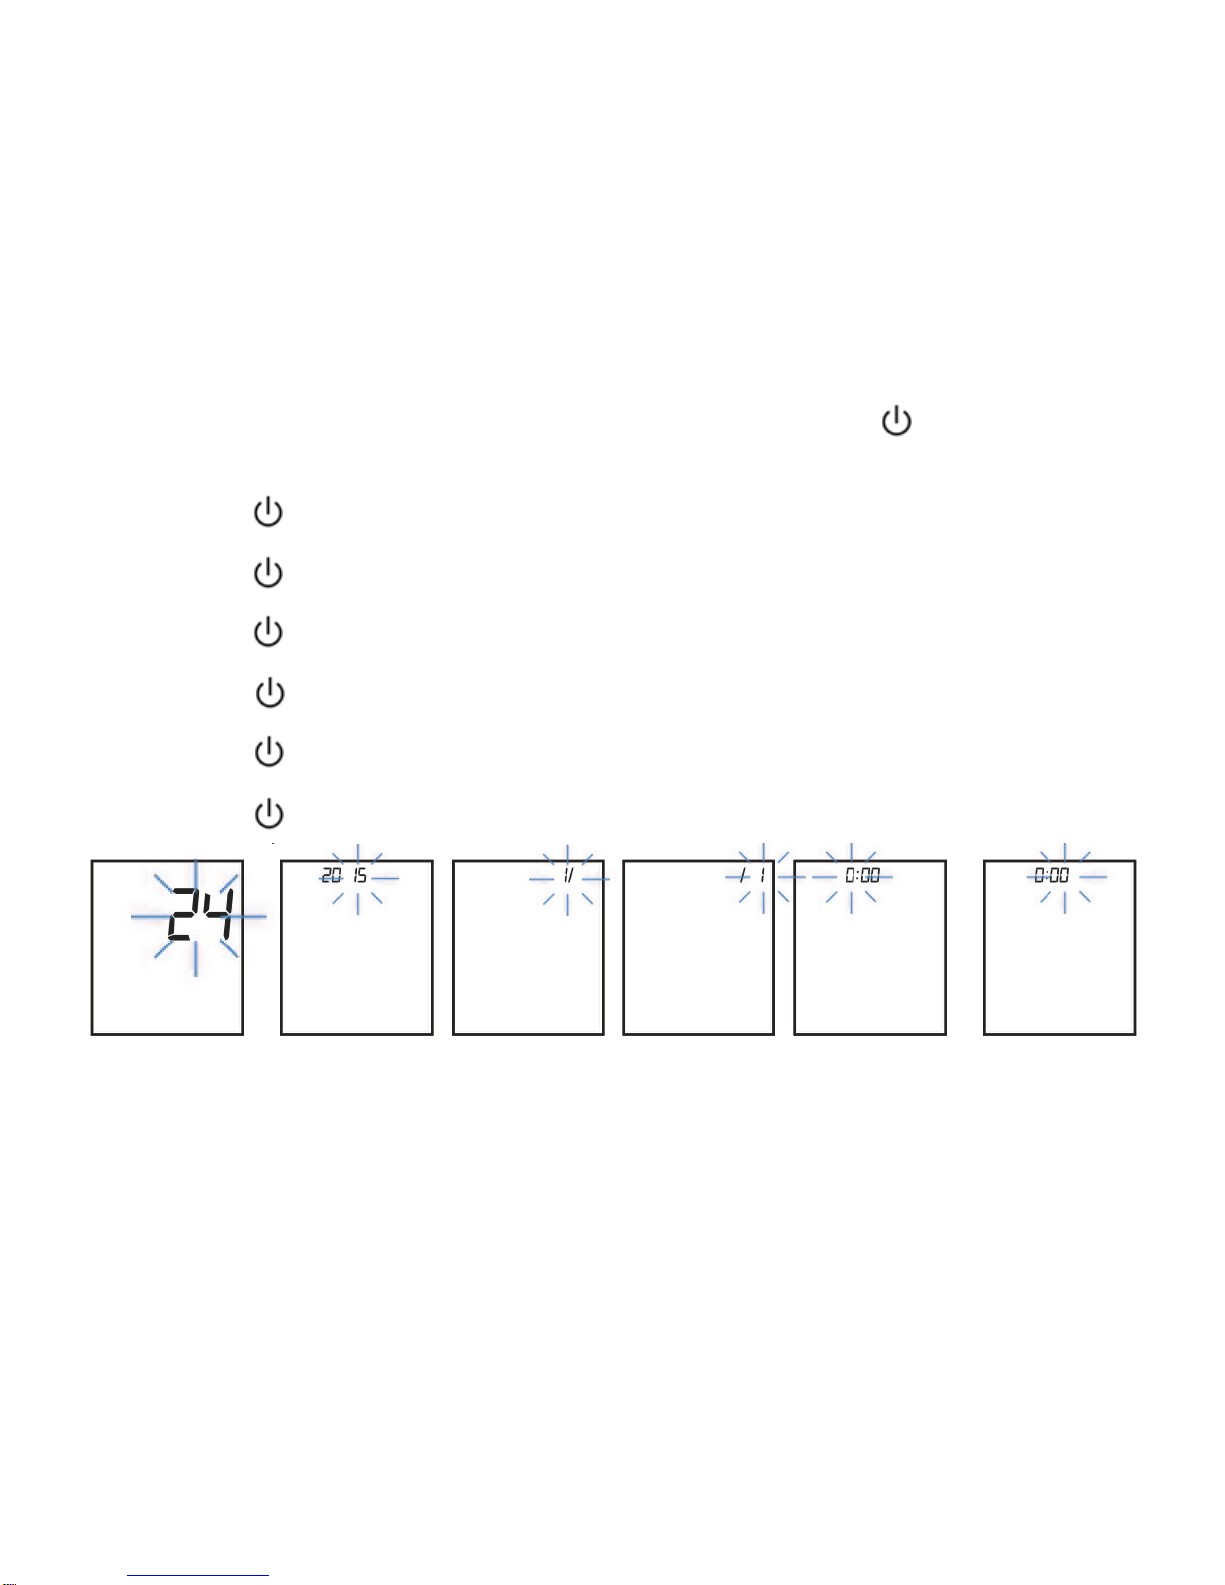
1. With the blood pressure monitor turned off, press and hold the " " and Mbuttons for
three seconds at a time. The digits of the time format will blink (Fig. 1).
2. Press the Mbutton successively and select the time format.
3. Press the " " button and the corresponding year digits will blink (Fig. 2),
4. Press the Mbutton to select the year.
5. Press the " " button and the month digits will blink (Fig. 3).
6. Press the Mbutton repeatedly and select the month.
7. Press the " " button and the corresponding digits for the day will flash (Fig. 4).
8. Press the Mbutton to set the day.
9. Press the " " button and the corresponding hour digits will blink (Fig. 5).
10. Press the Mbutton to set the hour.
11. Press the " " button and the minute digits will blink (Fig. 6)
12. Press the Mbutton to set the minutes.
13. Press the " " button again to store the data.
Fig. 1 Fig. 2 Fig. 3 Fig. 4 Fig. 5 Fig. 6

7
Notes:
•It is very important to keep the date and time updated as these are stored together with
the measured values.
•When replacing the batteries, the date and time will be erased, and the display will show
the menu for setting the date and time.
•During the setting of the clock and setting the date, if a minute passes without touching
any buttons, the tensiometer will turn off and will not store the entered data.
INDICATIONS BY MEANS OF LOCUTION
Before initiating the measurement a locution will inform the basic advice for the correct use
of blood measurement. Finalised the measurement a locution will inform the values
obtained, systolic pressure, diastolic pressure, the pulse as well as the state according to
WHO standard classification. Also will warn by means of a locution if an error takes place
during the measurement or when the batteries are low.
Selecting the language and adjusting the locution volume
The blood pressure monitor has six languages for the locution (Spanish, English,
Portuguese, Italian, French and German), as well as the possibility to deactivate it. To
select the language, deactivate the speech or adjust the volume level follow the steps
below:
8
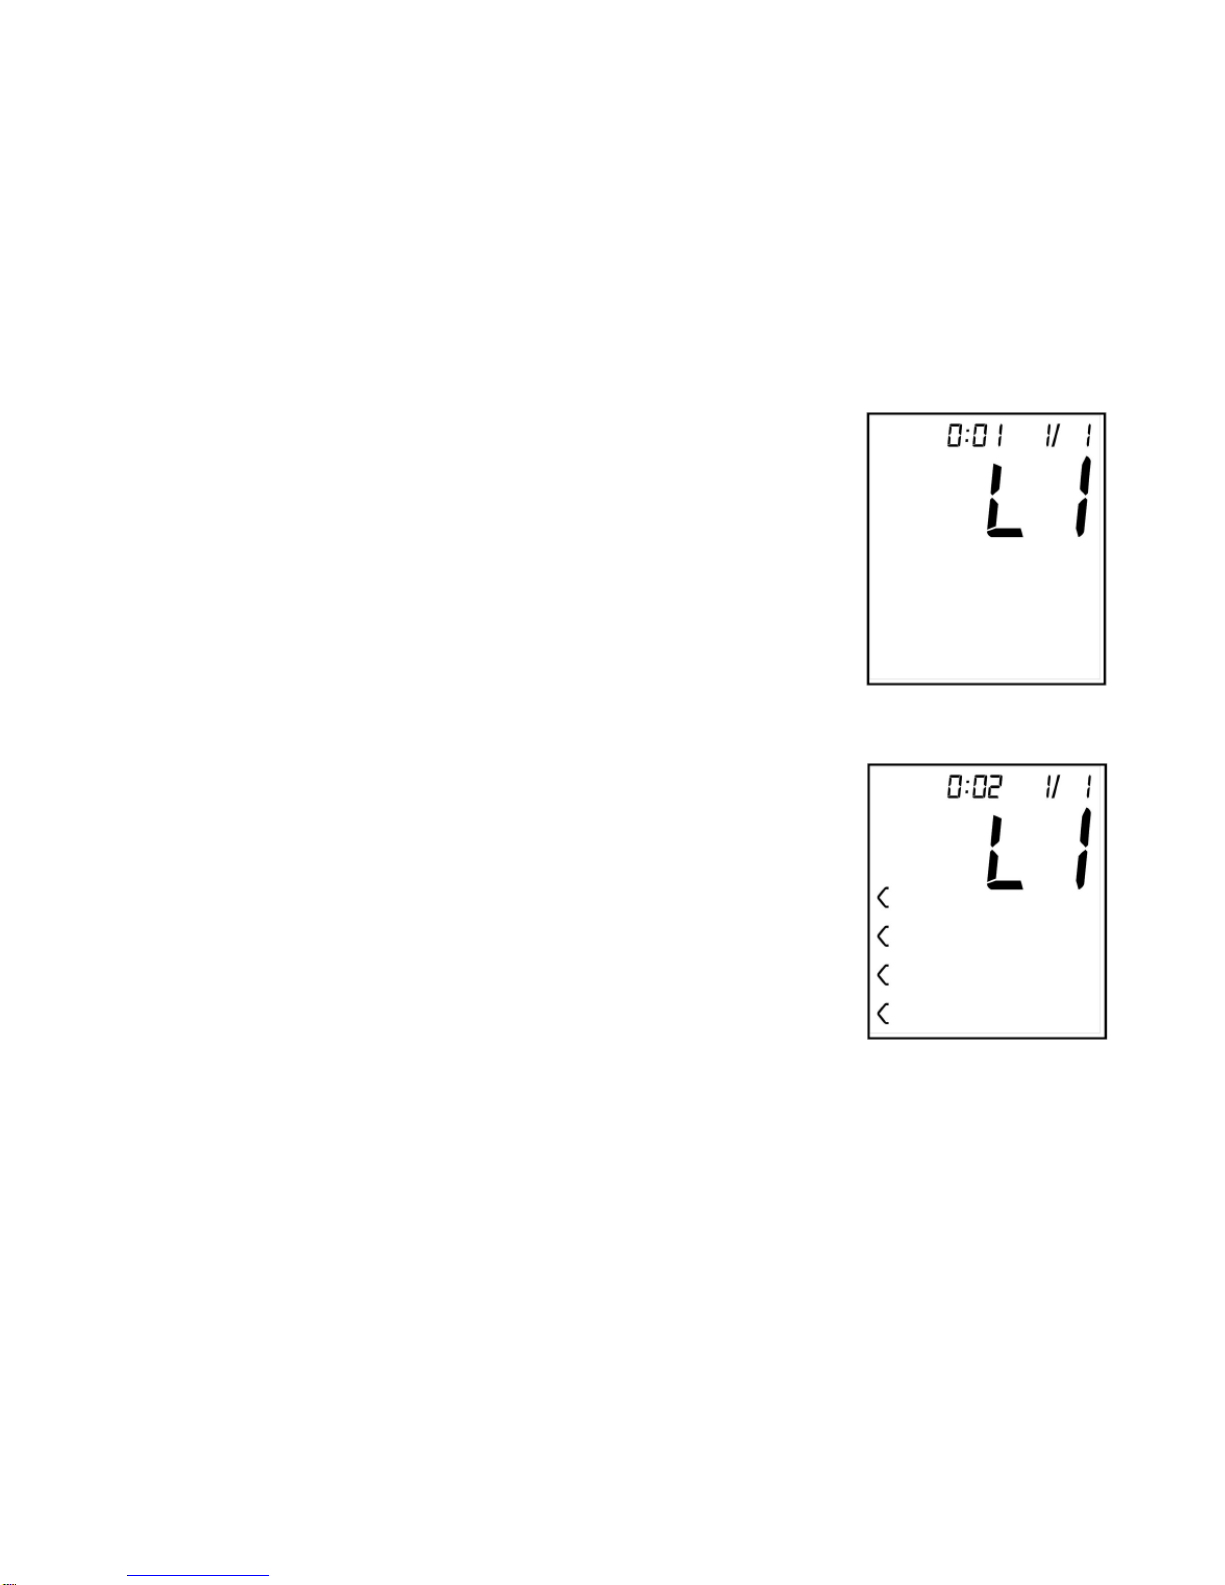
1. With the blood pressure monitor turned off, press and hold
the memory button M, a voice as well as the display (Fig. 7)
will consecutively display the available languages L0
(locution deactivated), L1 (Spanish), L2 (English), L3
(Portuguese), L4 (Italian), L5 (French) and L6 (German).
2. When the screen shows you the desired language (along
with its locution), stop pressing the memory button M.
3. The display will show the selected language (L0 ... L6) and
the pressure indicator arrows blinking (Fig. 8).
The volume level is determined by the number of pressure
indicating arrows, an arrow is the minimum volume level
and six arrows is the maximum volume level.
4. Press and hold the memory button M, the pressure indicator
arrows will increase by one unit until you reach the
maximum (6 arrows), and if you continue to press this
button the arrows will return to the minimum level (1 arrow).
Each time you increase the volume level you will hear an
acoustic warning that will serve as a reference.
5. Once the volume level is selected, stop pressing the M
memory button.
Fig. 7
Fig. 8

9
BASIC TIPS FOR CORRECT USE OF BLOOD PRESSURE MONITOR
•Measure in a quiet environment and in a relaxed position. Performing the measurement
in situations of stress, causes changes in blood pressure.
•Do not use the tensiometer when you have an injury to the arm and never share it when
you or someone else has an infectious disease
•The measured values may vary (inaccurate reading), depending on the position of the
bracelet. This should be placed on the inside of the arm and at the heart.
•Try to always measure blood pressure at the same time of day.
•Avoid moving the arm and do not talk during the measurement, as it may cause errors
in reading.
•Place the cuff so that it sticks tightly to the arm but never over tighten (remember that
the cuff is inflated during operation).
•Do not place the cuff on clothing (shirt, sweater, blouse, etc.) as the device can not
measure through textiles.
•Loosen the cuff immediately after prolonged measurement.
•Do not switch on the appliance if the cuff is not attached to the tensiometer or is not
attached to the arm.
•After performing the blood pressure measurement, if you want to perform a new
measurement you should wait for 3 to 5 minutes, so that the blood circulation returns to
normal. This time varies according to each person.

10
•Keep in mind that during daily blood pressure measurements, daily values depend on
many factors. Thus, consumption of tobacco, alcohol, drugs or body effort, influence the
values taken to a large extent. Stay relaxed and in a quiet environment at least 30
minutes before taking measurements.
•The blood pressure values should be interpreted by a physician or A.T.S. Who is
familiar with the patient's history. By regularly measuring blood pressure the physician
or A.T.S can carry out a more thorough follow-up of the patient.
•In exceptional cases it may happen that an irregular or very weak pulse does not allow
to carry out the measurements. If so, talk to your doctor or A.T.S.
•Using this apparatus correctly, the measured blood pressure corresponds to that
obtained by the stethoscope auscultation method.
•The blood pressure of the left arm relative to the right arm or viceversa, can vary
approximately 40 mmHg so it is recommended to always carry out the measurements in
the same arm.
•The cuff size is designed for adult use only.
•Do not use this appliance with people who have arrhythmias.
•Avoid measurements near appliances that generate strong magnetic fields, or
electrostatic interference such as mobile phones, microwave ovens, etc.
•If you do not intend to use the appliance for a long period of time, remove the batteries
and store them in a cool place.
Table of contents
Other Mx Onda Blood Pressure Monitor manuals


Popular Blood Pressure Monitor manuals by other brands


Nasco Healthcare
Nasco Healthcare Simulaids Life/form LF01095U USER HELP GUIDE

Microlife
Microlife WatchBP office instruction manual

HoMedics
HoMedics MiBody 360 instruction manual

ForaCare
ForaCare FORA P30 Plus owner's manual

JOYTECH
JOYTECH DBP-6296B owner's manual

Omron
Omron Silver BP5250 instruction manual