Baader Planetarium Astro & Nature User manual

Manual and
Application Tipps
Thank you for your purchase of the Astro & Nature Tripod. This large and sturdy tripod
was developed especially with thedemands of astronomy in mind.
To learn about all its possibilities and advantages, we recommend that you spend a few
minutes reading this manual before using your new tripod.
BAADER PLANETARIUM
Zur Sternwarte 4 •D-82291 Mammendorf •Tel. +49 (0) 8145 / 8089-0 •Fax +49 (0) 8145 / 8089-105
www.baader-planetarium.com •kontakt@baader-planetarium.de •www.celestron.de
G
M
B
H
Astro & Nature
Tripod
– EN ver. 09/2022 –
# 2451020

2Manual: Astro & Nature Tripod
Astro & Nature Tripod
MADE ESPECIALLY
FOR ASTRONOMY
The Astro & Nature photo tripod is a lightweight and stable
tripod that has been specially optimised for astronomical obser-
vations. With a maximum extension height of 189 cm, you can
mount binoculars or spotting scopes at a comfortable height
even when looking up at the sky.
The special arrangement of the handles makes it possible
to track targets comfortably and accurately in all directions –
regardless of whether you want to keep an eye on birds or stars.
At the same time, at only 3 kg, the tripod is light enough that
you can take it with you to remote areas to observe the night
sky or photograph nature with the sturdy carrying bag.
The Astro & Nature tripod at a Glance
Legs made of aluminium tube pairs – increased stability
The use of pairs of aluminium tubes for constructing the tripod legs
allow for a stable and torsionally stiff construction with a low weight
– it gets wider and wider towards the top (picture on the right), like
a classic pyramid tripod, which counteracts torsion even when the
legs are fully extended. The stiffness and the post-swing behaviour
are comparable to much more expensive carbon tripods – at least in
our tests did the differences not justify the signicantly higher price.
The legs can be retracted in two stages so that the tripod, inclu-
ding the tilt head, ts into the 80 cm long carrying bag. Neverthel-
ess, it is still stable even at a maximum height of 189 cm. The ge-
nerously dimensioned clamping levers on the legs can be operated
even with thick gloves.
The leg braces stiffen the unfolded
legs and provides additional stability.
When folded, the legs can be secured
with a xed clamp so that they do not
unfold unintentionally.
The movable plastic caps on the legs
provide a stable hold on smooth ground
and also protect the oor covering from
damage. For more stability on loose
soil, you can screw the caps back,
exposing the steel tips. You can press
these into the ground when using the
tripod outdoors.
The plastic caps on the legs can
be screwed in or out, depending
on whether the tripod is used on
sensitive floors or on earth.

© Baader Planetarium GmbH 3
Extendable centre column with connection for ¼ inch photo thread.
The 35 cm long extendable centre column 5is securely clamped with an easy-grip
screw whose plastic handle you can easily operate even on cold nights.
At the top end there is an adapter from 3
/
8inch to ¼ inch photo thread, so that you
can attach accessories with "small" photo threads – for example, a small travel mount
for telescopes instead of the uid head included. For accessories with 3
/
8inch thread,
you need either a 3
/
8inch reversing piece or a reducing piece (not included).
More stability with additional weights
At the bottom of the centre column is another spare
adapter with 1/4 inch thread. Here you can attach one
or more 1 kg leveling counterweights # 2951401 (sold
separately) to further increase the stability of the tripod
with this additional weight.
The usual trick with lightweight photo tripods of simply
hanging a backpack on the centre column has the dis-
advantage that it can act like a pendulum. The compact,
weight attached directly to the centre column avoids this
pendulum effect.
You can still hang your backpack between the tripod
legs by suspending it with small tension straps bet-
ween the tripod legs – there is enough space below the
braces. This way you can access your backpack without
putting it on the ground. By the way: Even if you hang your backpack on a classic tri-
pod with hooks on the centre column, you should also attach it to the tripod legs with
tension straps to prevent it from swinging.
Versatile Fluid-Head made of Metal
The uid tilt head is superior to a normal ball head in
many respects. The built-in bubble level allows you to
level the tripod – perfect for panoramic shots. If you
remove the transport screws, you can screw on the
two handles with which you can adjust the head verti-
cally and horizontally. The handle with the slightly
longer thread 1belongs to the height adjustment,
the longer one 2to the horizontal adjustment.
Depending on how much you tighten the handles,
you can move the binoculars or spotting scope sensi-
tively or clamp them rmly in one position.
The optional 1 kg leveling counter-
weight # 2951401 at the center column
The two handles of the tripod head. The
slightly longer handle replaces the slightly
longer clamping screw of the height axis,
the slightly shorter one is used for lateral
swivelling.
1
2

4Manual: Astro & Nature Tripod
Single-handed Operation for Quick Use and Photography
The Astro & Nature tripod can be used in two con-
gurations. If you only mount the elevation handle 2,
you can tighten the pre-installed Phillips screw of
the horizontal adjustment so that the uid damping
allows smooth pans and the tilt head still does not
change its position. You can then use the height
adjustment handle to align the head as you would
like. You can then x the height setting by turning
the handle around its axis.
In this conguration, the tripod ts into the carrying
bag. It then offers the same convenience as the
common uid tilt heads of photo tripods. This setup
is especially practical when you are using a camera
and have one hand on the shutter release.
Of course, this classic use is also possible if you
mount both handles.
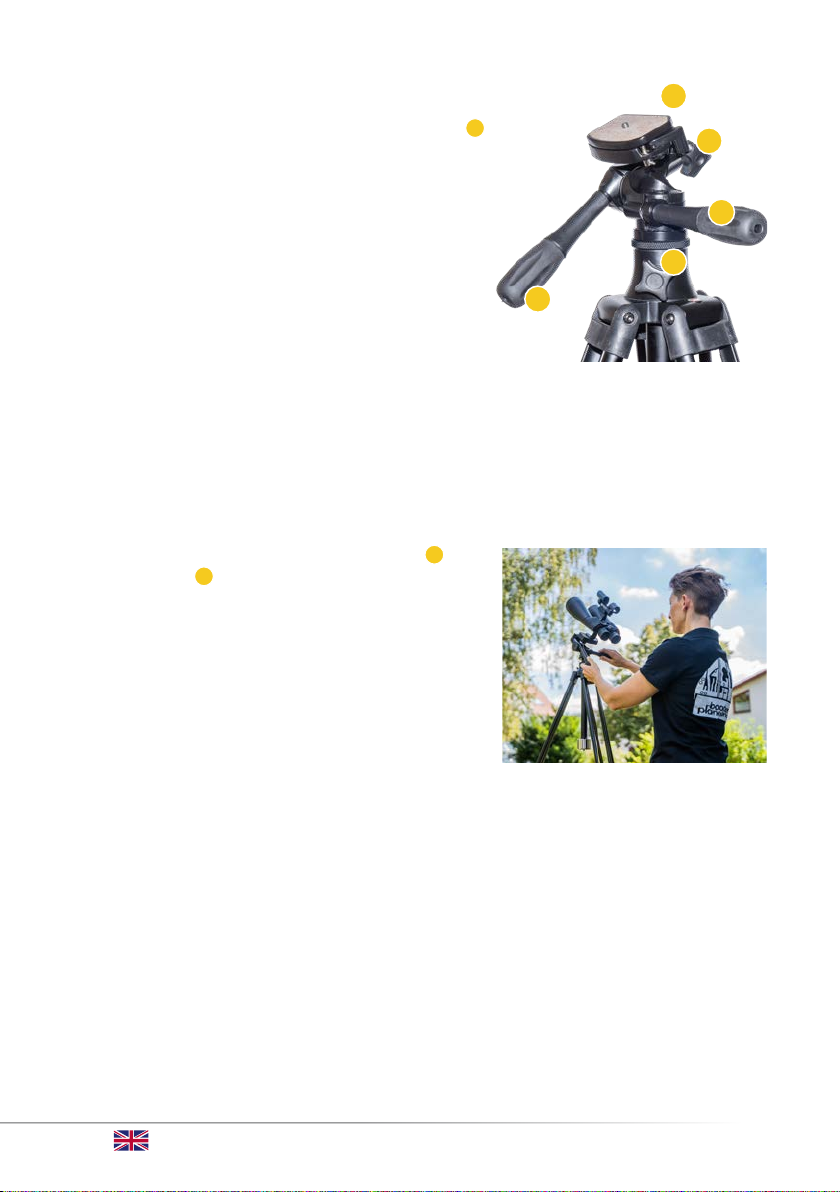
Comfortable Motion with Both Hands
The Astro & Nature shows its strengths when you use both handles and observe with
a spotting scope or binoculars. Instead of one handle for all movements, you have two
handles at your disposal: One for horizontal 1and
one for vertical 2movements. This allows you to
move your device much more sensitively than with
a simple photo tripod - whether you are tracking
animals or birds, or leaving the earth to observe
the sky.
Simply place one hand on each handle; the long
lever allows you to perform even small pans with
precision. The uid damping prevents jerky move-
ments.
This allows you to realise "smooth" pans even
when shooting video – no wonder that special video
tripods have been relying on uid technology for
years.
Transportation
To store the tripod in the bag, all you have to do is unscrew the handle for horizontal
adjustment. Depending on your preferences, you can also replace it with the silver
Phillips screw that is pre-mounted at the factory. With a screwdriver you can set a
comfortable resistance and pack the tripod like this – so it is always ready for use
when you take it out of the bag and use it as a "normal" photo tripod.
However, the second handle gives you more comfort when panning. However, since
there is no load on the panhead in this axis, you can replace it with the screw as a
slip clutch when observing near the horizon. Depending on whether compact packing
dimensions and quick usability or more comfort and accuracy during panning as well
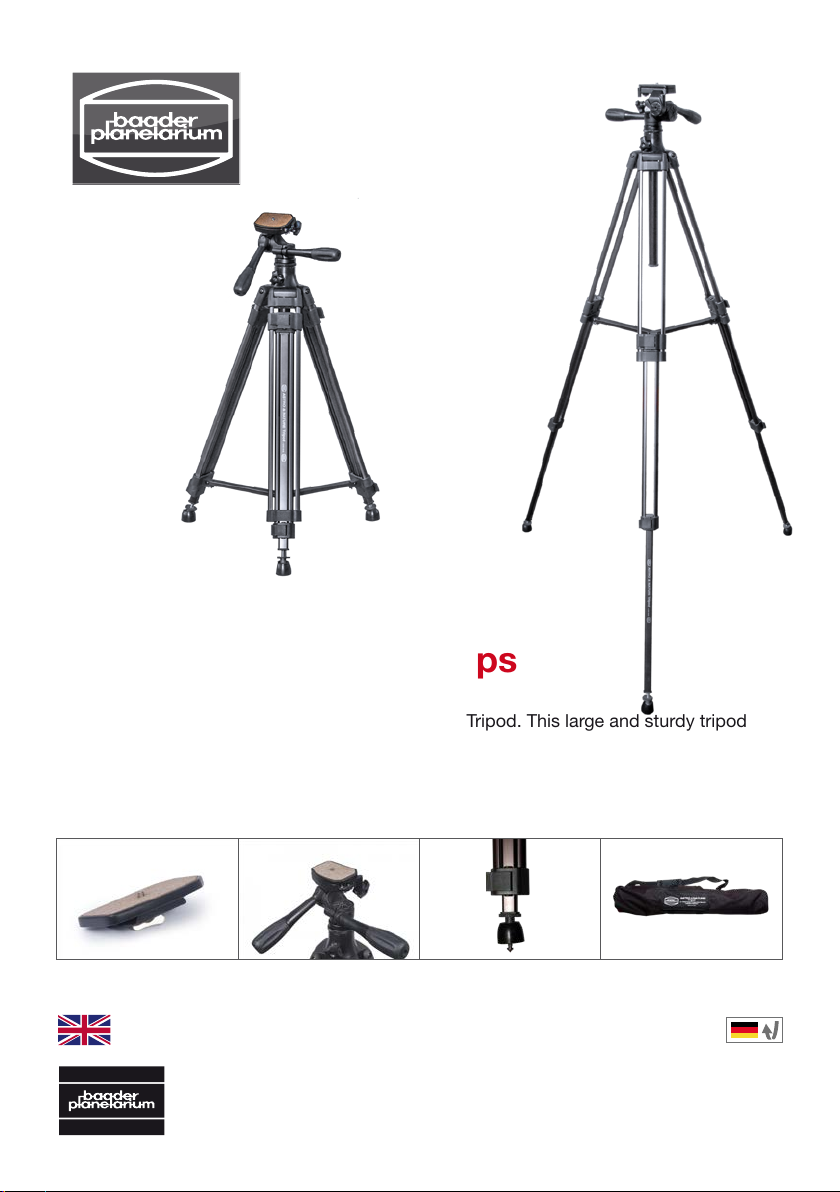
The fluid tilt head with quick release plate
and the specially arranged handles.
The special arrangement of the handles ena-
bles sensitive tilting – here a 70mm binocular
with Baader SkySurfer III illuminated dot
finder # 2957300
1
2
3
4
5

© Baader Planetarium GmbH 5
as a rm clamping are more important to you, you can adapt the tripod exactly to your
needs. Fluid damping allows for smooth pans, no matter which option you choose.
Even with just one handle, you can position the tilt sensitively.
Especially for astronomy or panning outside the horizontal, both handles allow you to
follow an object more sensitively with both hands than with just a single handle.
The Tilting Mechanism
Especially for photography in portrait for-
mat, you can tilt the complete platform by
90°. This is done with the small hand screw
3, which is attached to the uid head.
Even small telescopes with an adapter
plate with a photo thread on the right hand
side can be used so that the ne adjust-
ment and nder are oriented correctly.
Compared to some of the mounts supplied
with entrylevel telescopes, this is a clear
gain in stability!
Quick Release Plate with Safety Lock
With the quick-release plate with ¼-inch photo thread, you can also conveniently
mount heavy accessories on the quick-release plate rst and then just clip it onto
the tripod. The clamping lever 4holds the quick-release
plate securely in position. The small, silver safety lever 5
protects against unintentional activation of the lever. If you
ip it, the plate can no longer be accidentally released (see
pictures to the right).
If you often switch between several devices, working
becomes really conveniant if you use additional, optionally
available quick-release plates (# 2451021). Then the quick-
release plate can remain on the device and you can, for
example, take off one camera and put on a spotting scope
in a few seconds – without any tedious screwing. To attach
devices with 3
/
8inch thread, you still need a reducer to ¼
inch thread (not included with the tripod, please contact the
manufacturer of your device or your photo dealer).
Above: A camera in portrait format for taking pictures in
portrait format; right: A small telescope.
3
Der Scherungshebel der Schnell-
wechselplatte. Oben verriegelt,
darunter entriegelt.
5

6Manual: Astro & Nature Tripod
For maximum stability, place a camera in such a way that the interchangeable plate
covers as large an area of the support surface as possible. The plate is oriented in
such a way that this is automatically the case with cameras. At the same time, it is
wide enough (ve centimetres) to make use the support plate of common spotting
scopes and to allow you to move a spotting scope freely horizontally and vertically.
The cork coating ensures that the device does not get scratched and has a secure
hold.
When using long telephoto lenses, use the thread on the lens instead of that on the
camera, if possible, so that the camera is as balanced as good as possible. If neces-
sary, follow the operating instructions of the camera manufacturer.
Nylon Carrying Bag
The durable bag has a side compart-
ment where you can store the handles
or small accessories. With the pair of
carrying handles and a shoulder strap,
you will always nd a comfortable way
to transport the tripod.
Technical Data
BAADER PLANETARIUM
Zur Sternwarte 4 •D-82291 Mammendorf •Tel. +49 (0) 8145 / 8089-0 •Fax +49 (0) 8145 / 8089-105
www.baader-planetarium.com •kontakt@baader-planetarium.de •www.celestron.de
G
M
B
H
© Baader Planetarium. All Rights reserved. Products or instructions may change without notice or obligation. Im-
ages and illustrations may differ from the original products. We reserve the right of errors. Reproduction of this
instruction manual, complete or in parts, only with written permission by
www.baader-planetarium.com
The carrying bag with outer pocket for handles and other small
parts.
Maximum height: 189 cm
Weight of tripod & head: 3,1 kg
Payload: ca. 3 kg
Dimensions in carrying bag: 80x14x12 cm
Scope of delivery: Tripod, Fluid-head
made of metal, carrying bag
Item number of additional quick release
plates: # 2451021
This manual suits for next models
1
Table of contents
Other Baader Planetarium Camera Accessories manuals

Baader Planetarium
Baader Planetarium 2958550 User manual

Baader Planetarium
Baader Planetarium FlipMirror II User manual

Baader Planetarium
Baader Planetarium MicroStage II User manual

Baader Planetarium
Baader Planetarium Cool-Ceramic Safety Herschel prism Mark II User manual

Baader Planetarium
Baader Planetarium FCT I User manual

Baader Planetarium
Baader Planetarium SUNDANCER II User manual

Baader Planetarium
Baader Planetarium SolarSpectrum RG18 User manual