BackBubble Chase Technique User manual

User’s Guide
Featuring:
The Chase Technique
BackBubble_IM_ENG_06-16 ANZ-BDV1.indd 1 28/06/2016 10:06:57 a.m.

Congratulations!
You have just purchased a product that really is going to change your life!
The Chase Technique is the art of suspending your body correctly on the Back BubbleTM. This will enable
you to use your body weight to produce spinal decompression that will quickly relieve pain from your lower
back and sciatica. The Chase Technique will also help align your lower back, increase flexibility, strengthen
the core muscle groups and promote the movement of corrective fluids. It works!
Your Back BubbleTM is a unique inflatable cushion suspended from a properly calibrated buoyancy spring.
The combination of the inflatable cushion encircling and suspending you from the chrome plated spring
will give you a feeling of floating in air-cushioned weightlessness. The pressure will be removed from the
pain causing structures in your lower back, giving you relief from your pain in seconds. You will love it!
Please review the self evaluation guide on page 6 to learn how you, personally, should use the
Back BubbleTM for best results.
The Back Bubble is an inflatable cushioned device that enables a user to use their own body weight
to produce spinal decompression that will relieve pain from the lower back and sciatica.
The Back BubbleTM Package Includes the Following:
• EZ Hanger: To hang the Back BubbleTM in a doorway, hallway or other opening.
• Brackets & Screws: To suspend the removable EZ Hanger. Video instructions
can be found at:
www.trybackbubble.com.au & www.trybackbubble.co.nz
• The Back BubbleTM w/ Buoyancy Spring: Fully pre-assembled for you.
• Instructional Guide & Instructional Video Download at:
www.trybackbubble.com.au & www.trybackbubble.co.nz
BackBubble_IM_ENG_06-16 ANZ-BDV1.indd 2 28/06/2016 10:07:00 a.m.

Cautions & Warnings .........................................................03
Setting Up Your Back BubbleTM
Features....................................................................04
Assembling your Back BubbleTM ................................................05
Self Evaluation........................................................06
Using Your Back BubbleTM
Getting into the Back BubbleTM (for the Basic Suspended Upright Positions). . . . . . . .07 & 08
Exiting the Back BubbleTM (to slowly load your weight on your spine). . . . . . .. . . . . . . . . . . . .07
Basic Positions
The 3 Basic Suspended Upright Positions........................................08
The Basic Suspended Reclining Position .........................................09
Advanced Positions
The Basic Suspended Reclining Position w/ Chair ........................................10
Suspended Extension ...............................................................10
Suspended Hands & Knees Position ............................................11
Suspended Kneeling Position ..................................................11
Exercises ...............................................................12
The Comfort Spreader (optional)
Assembling the Comfort Spreader ..............................................13
Reassembling Your Back BubbleTM ................................14
One-Year Warranty ...................................................15
Contents
BackBubble_IM_ENG_06-16 ANZ-BDV1.indd 3 28/06/2016 10:07:00 a.m.

3
Cautions & Warnings
• Please review this User’s Guide and/or the instructional DVD prior to using your Back Bubble™
to understand the correct use of this product.
• DO NOT swing or bounce when using this product.
• DO NOT attempt to hang by your feet or legs when using this product.
• DO NOT use this product if you weigh over 120 kgs (264 lbs).
• DO NOT use this product if you are unsure of the stability of the doorway or doorjamb.
• DO test thoroughly to make sure your Back Bubble™ is completely secure before using it.
• DO maintain a controlled motion while in use.
• Consult your physician prior to use. Do not use in place of doctor’s treatment.
If your condition worsens, discontinue use.
• Carefully inspect the equipment prior to EVERY use. Never work with the device if it is not
functioning correctly or if it is damaged.
• Use this equipment EXCLUSIVELY for the purpose intended and described in this User’s Guide.
• Do not alter the equipment and only use those accessories which have been recommended by
the manufacturer.
• Ensure that sufficient free space is available surrounding the entire unit. It is important that pets,
furniture and other objects are kept away from the equipment during use.
• THIS EQUIPMENT IS NOT SUITABLE FOR CHILDREN. In order to avoid injuries,
keep out of the reach of children.
• Handicapped or disabled persons should not use the Back Bubble™ without prior
consultation with a qualified healthcare professional or physician.
• Wear appropriate clothing during training sessions. Apparel should be comfortable and light,
allowing freedom of movement. Wear comfortable shoes which provide good support and have
non-slip soles, such as running shoes or trainers.
• If you experience dizziness, nausea, chest pain, or any other abnormal symptoms, STOP using
this product at once. CONSULT A PHYSICIAN IMMEDIATELY.
• For use in Home or Clinic Only.
• Inspect the Back Bubble™ regularly for wear and tear in order to keep the unit safe for use. If the
Back Bubble™ shows any signs of wear and tear or is damaged do not use. Before use replace
defective components immediately. Pay special attention to the spring and the strap connection
point to the bag and harness.
• Install the Back Bubble™ in an area free of dangers and in an open space.
• Care and Maintenance – wash with a damp soapy cloth and dry. Do not wash in washing machine.
BackBubble_IM_ENG_06-16 ANZ-BDV1.indd 3 28/06/2016 10:07:00 a.m.

4
Features
Setting up your Back BubbleTM
Buoyancy Spring
Adjustment Buckle
Labels
Extra Ring
Webbing Strap
5cm to 25cm
Opening
Crease
Point of Crease
Valve Tip
Bottom of
The Back BubbleTM
Safety Tether
Tip: Adjust the air pressure for your own comfort needs.
BackBubble_IM_ENG_06-16 ANZ-BDV1.indd 4 28/06/2016 10:07:00 a.m.

5
Assembling your Back BubbleTM
Your Back BubbleTM is already pre-assembled. Wear comfortable clothes with tennis shoes or other non-
slipsole shoes while using the Back BubbleTM.
1) Installing the EZ Hanger bar
• Please refer to the EZ Hanger instruction
sheet, provided inside the hardware bag
or online at: www.trybackbubble.com.au or
www.trybackbubble.co.nz
2) To Inflate the Back BubbleTM
• Twist the Valve Tip to the left to open,
then blow into it. When complete, close
the Valve Tip by turning it to the right.
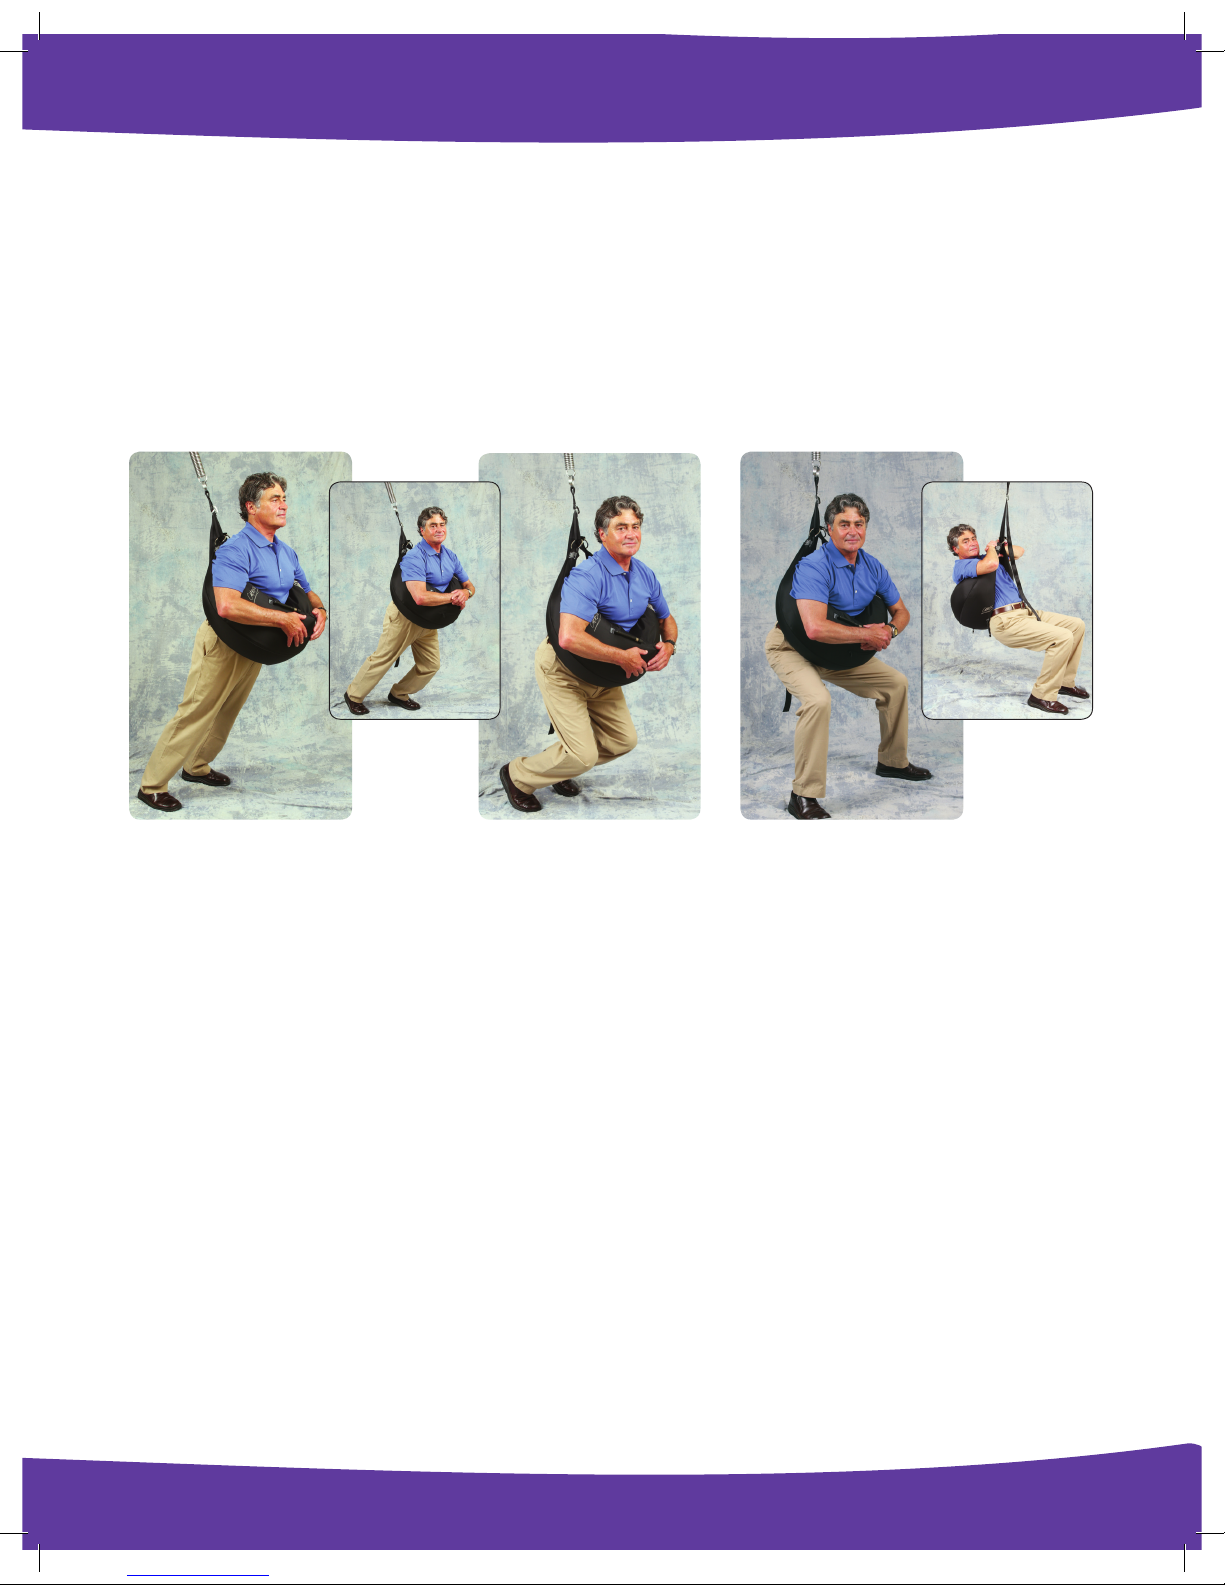
• Fill to about 70% capacity (the Back
BubbleTM should look like Fig. 5)
• Use the side of your hand to crease
the Back BubbleTM’s center and make
a point (Fig. 1 & 5)
• Your Back BubbleTM should look like
(Fig. 5) with a 5cm to 25cm opening
at the top
• Adjust comfort by opening the
Valve Tip by turning it to the left
to let air out. When desired level
is reached twist the Valve Tip to
the right to close.
3) Adjusting the Height of the Back BubbleTM
• Raise or lower the Back BubbleTM by
pressing the Adjustment Buckle (Fig. 4)
and pulling the strap downward firmly.
4) The Comfort Spreader (optional)
• The Comfort Spreader is normally used only for
the Upright Positions to open the Back BubbleTM
wider, for additional comfort on the ribs.
• If you ordered a Comfort Spreader (optional), the
Back Bubble will hang from it using the
2 rings on the ends of the Back BubbleTM
(See Comfort Spreader Instructions, page 13)
Tip: The Back BubbleTM can also hang from a
sturdy hook, rope or chain (min. 226kg) properly
installed by a professional into a ceiling joist or
beam approximately 2.13m from the floor.
That’s it! You’re ready to go!
Fig. 1 Fig. 2
Fig. 3 Fig. 4
Fig. 5
BackBubble_IM_ENG_06-16 ANZ-BDV1.indd 5 28/06/2016 10:07:02 a.m.

6
Use the Model Shown To:
1) Locate Your Pain
(A, B, C,D, E, F or combination)
2) Scale Your Pain
(1 = mild, 10 = extreme)
STAY WITH THE BASIC POSITIONS
UNTIL YOUR PAIN SYMPTOMS
ARE SUBSTANTIALLY REDUCED
USE THE BASIC SUSPENDED
UPRIGHT POSITIONS FOR (see pages 7 & 8):
• Pain that is 1 to 10 in any area (A-F)
• Pain above 2 in areas B, C, D, E and/or F
• Tingling, numbness or weakness in any area
• Fresh injury (within 3 weeks)
• Lower back intense muscle spasms
• Pain associated with Degenerative Disc Disease
& Herniated Discs with sciatica
USE THE BASIC SUSPENDED
RECLINING POSITION FOR
(see page 9):
• Pain 6 or lower in area A with little
or no symptoms in any other area
USE THE BASIC SUSPENDED
RECLINING POSITION W/ CHAIR FOR
(see page 10):
• Pain 6 or lower in area A and moderate
symptoms in any other area
Tip: Significant problems may want to stay with
the Basic Suspended Upright Positions.
Self Evaluation
BackBubble_IM_ENG_06-16 ANZ-BDV1.indd 6 28/06/2016 10:07:02 a.m.

7
Getting into the Back BubbleTM (for the Basic Suspended Upright Positions)
Head and arms go through
the Back BubbleTM. Stand
with feet shoulder width
apart, spring just behind
your head.
Adjust the height of the
Back BubbleTM so the
point of the crease is
about mid-thigh.
Push the Back BubbleTM
down under your rib
cage and center the
crease on your body.
Take one step forward
and lean out on the
Back BubbleTM, or
simply lean forward
onto the Back BubbleTM.
Exiting the Back BubbleTM (to slowly load your weight on your spine)
Keep your weight on the Back BubbleTM as you
walk forward.
Put feet back behind
you, keep your weight
on the Back BubbleTM
and start walking
forward with your feet.
Let the Back BubbleTM
bring you to your feet
gradually, to slowly load
your weight on your
spine.
1 2 3 4
1 2 3 4
Using Your Back BubbleTM
BackBubble_IM_ENG_06-16 ANZ-BDV1.indd 7 28/06/2016 10:07:06 a.m.

8
Take 2 steps backward and bend your
knees taking you down and backwards
into a crouching position. Tilt your
upper body over the Back BubbleTM
and keep your weight on the Back
BubbleTM as you move your feet.
Check your position. Hips should be
above your knees, on balls of feet,
feet under buttocks.
Move your foot or feet
back so you are lean-
ing out on the Back
BubbleTM. Keep body
straight, heels on the
floor. Stay relaxed.
Move your feet around
to see what feels best.
80% to 90% of your
body weight should be
on the Back BubbleTM.
The 3 Basic Suspended Upright Positions
For Mild to Severe Lower Back Pain, With or Without Sciatica, and/or Fresh Injuries
Tip: Alternate positions or simply use the one that feels best, and is most comfortable.
Tip: Ribs are delicate, adjust the air pressure for comfort and experiment with where the Back BubbleTM
touches you. Also check out the Comfort Spreader on Page 13.
Alternate
Sitting
Position
LEANING CROUCHING SITTING
Basic Positions
5 6 7
BackBubble_IM_ENG_06-16 ANZ-BDV1.indd 8 28/06/2016 10:07:09 a.m.

9
The Basic Suspended Reclining Position
For Mild or Moderate Lower Back Pain and/or Mild Sciatica
Put the Back BubbleTM
around the small of
your back at belt line.
Labels should be in
front, facing away from
you. Left on your left,
right on your right.
Set the height of the
Back BubbleTM so the
bottom is about 2.5cm
off the floor.
Grasping high & low,
step under the spring
and lower yourself gen-
tly down onto the Back
BubbleTM. Left & right
labels face away from
you, left on your left,
right on your right.
Slide your hands down,
and lay down so you
can bring your feet up.
Raise legs at the same
time that you lay down
to avoid extension.
Lowering yourself onto
the Back BubbleTM,
make sure the Back
BubbleTM stays at the
belt line.
Bring feet up and wrap
around the strap. Keep
knees slightly bent.
Switch feet to see what
feels best. Raise the
Back BubbleTM higher
for more stretch.
Pinpoint the pain relief
by reaching your hand to
where the Back BubbleTM
touches your spine. Move
the Back BubbleTM gently
to the most relieving spot.
Tip: The more
significant the lower
back problem, the
lower to the floor
you should hang.
For added comfort,
place a flat pillow
under your head.
1 2 3 4
5 6 7
BackBubble_IM_ENG_06-16 ANZ-BDV1.indd 9 28/06/2016 10:07:12 a.m.

10
Adjust the height of the Back
BubbleTM until the bottom is
about 15cm off the floor. Put the
Back BubbleTM around your lower
back. Cinch it tightly with rings in
front and lower your body while
holding the strap.
Extend as shown.
The Basic Suspended Reclining Position w/ Chair
For Lower Back Pain and/or Moderate Sciatica
Get into the Back BubbleTM the same as in the Suspended
Reclining Position detailed on Page 9, but your feet go on
the front edge of the chair. Do not let the chair move.
Set the height of the Back BubbleTM so
the bottom is lightly touching the floor.
Place a sturdy chair 30cm away from
the free hanging Back BubbleTM.
Have knees fully bent and feet lightly on the front edge
of the chair. The strap should be straight up and down.
Pinpoint the relief by moving the Back BubbleTM with
your hand, the same as in the Suspended Reclining
Position on Page 9.
Tip: For healthier backs.
Use caution & go slowly.
Experiment with the Back
BubbleTM height & place-
ment on your body.
Suspended Extension
For Lower Back Pain and/or Mild Sciatica
12
3
Advanced Positions
BackBubble_IM_ENG_06-16 ANZ-BDV1.indd 10 28/06/2016 10:07:13 a.m.

11
Suspended Hands & Knees Position
Put the Back BubbleTM
around you like the
Upright Positions but
low at the hips.
Set the height of the
Back BubbleTM so the
bottom is about 15cm
off the floor.
Assume a hands &
knees position with the
Back BubbleTM posi-
tioned low on your hips.
Let some air out so you
can push the Back Bub-
bleTM lower on your hips.
Move forward on hands
& knees until the strap
is tight. Lean forward &
down onto your fore-
arms. Keep knees bent
and push forward with
your toes.
Suspended Kneeling Position
Suspend yourself like
in the Upright Positions,
but in a kneeling
position.
Set the height of the
Back BubbleTM so the
underside is about
30cm off the floor.
Stretch laterally as
shown above.
Tip: Experiment
with the Back BubbleTM
height.
1 2 3 4
1 2 3
BackBubble_IM_ENG_06-16 ANZ-BDV1.indd 11 28/06/2016 10:07:16 a.m.

12
Set the Back Bub-
bleTM height 2.5cm
off the floor. While
twisting your hips push
one side of the Back
BubbleTM and pull the
other side.
Set height so point of crease is
mid-thigh. Put the Back BubbleTM
around you as in Upright Position
and do the hamstring stretch as
shown.
Set the Back BubbleTM height 2.5cm
off the floor. Keep one foot on the
strap straightening the knee and drop
the other foot toward the floor.
With the Back BubbleTM
height set 2.5cm off
the floor, do sit up exer-
cises with feet up on the
strap.
HAMSTRING STRETCH
ALIGNING HAMSTRING STRETCH 2 CRUNCHES
Exercises
Tip: Experiment
with the Back BubbleTM
height.
BackBubble_IM_ENG_06-16 ANZ-BDV1.indd 12 28/06/2016 10:07:18 a.m.

13
Assembling the Comfort Spreader
The Back BubbleTM Comfort Spreader is generally used
in the Upright Positions to open the Back BubbleTM wider
for additional comfort and is an optional attachment.
Use the directions below to properly install.
Send the end of the webbing strap
attached to the Comfort Spreader
from the back side of the
Adjustment Buckle through
the opening towards you, down-
ward under the teeth of the buckle.
(See fig.1)
Push the Adjustment Buckle
clamp and pull the webbing
strap that is attached to the
Back BubbleTM downward, all
the way out.
To hang the Back BubbleTM on
the Comfort Spreader, pull the
webbing strap out of the ring on
the other end and let it hang
down.
Adjust the Spreader up to
hang the Back BubbleTM.
Follow height setting
instruction #1 on Page 7
for using the Back BubbleTM
in Upright Positions.
Hang the rings on either end of
the Comfort Spreader. Remember
labels face outside. Make sure the
Comfort Spreader is balanced.
Comfort
Spreader
on Webbing
Strap
hanging
balanced.
The Comfort Spreader (optional)
1 2 3
4 5
Tip: Use the Comfort
Spreader only in the
upright position to open
the Back BubbleTM wider
for additional comfort.
BackBubble_IM_ENG_06-16 ANZ-BDV1.indd 13 28/06/2016 10:07:20 a.m.

14
If you disassemble your Back BubbleTM, follow these instructions to reassemble:
Tip: Labels should be on top and face away from
you when you hang on the Back BubbleTM. The “left” label
should be on your left side, and the “right” label on your right side,
as shown on the right.
For Best Results
• In the Upright Positions, hang with your upper body
tilted over the Back BubbleTM and experiment with where
the Back BubbleTM touches you.
• Adjust the air pressure for your own comfort needs.
• Use 1 to 5 times daily, for 2 to 20 minutes and build your time gradually.
• Consistency is the key to success. Occasional use will give fast relief, but using
the Back BubbleTM regularly will give the best, long lasting results.
• Consider using the Back BubbleTM before bedtime. It is always a good idea to lie down after use.
• Drink plenty of fluids.
Reassembling Your Back BubbleTM
Pull the webbing strap
through the chrome ring
on the other end of the Back
BubbleTM. Extra chrome ring
hangs free, ignore it.
Grasp buckle and push the
clamp, then pull the web-
bing strap from back to front
through the opening.
Release clamp and pull down
on webbing strap to desired
height.
Adjustment
Buckle
Webbing
Strap
Labels
1
2 3
BackBubble_IM_ENG_06-16 ANZ-BDV1.indd 14 28/06/2016 10:07:22 a.m.

15
If your product becomes defective due to faulty material or workmanship within a period of 1 year
from the date of purchase, we warrant to do the following:
• For New Zealand Consumers: We will replace the product with a new product, free of charge,
or repair the product at our cost, at our discretion.
• For Australian Consumers: Our goods come with guarantees that cannot be excluded under
the Australian Consumer Law. You are entitled to a replacement or refund for a major failure
and for compensation for any other reasonably foreseeable loss or damage. You are also
entitled to have the goods repaired or replaced if the goods fail to be of acceptable quality
and the failure does not amount to a major failure.
Your warranty is subject to the following conditions:
• The item has not been misused, abused, neglected, altered, modified or repaired by anyone.
• The item has been subjected to fair wear and tear
• The item has not been used for trade, professional or hire purposes.
• The item has not sustained damage through foreign objects, substances or accident.
Your warranty does not cover;
• Components that are subject to natural wear and tear caused by normal use in accordance
with operating instructions.
• Unauthorised/improper maintenance/handling or overload is excluded from this warranty.
• For guarantee claims, you will need to submit a proof of purchase in the form of a valid receipt
that displays date and place of purchase.
This warranty does not replace but is in addition to your statutory rights.
This warranty does not apply to accessories supplied with the item.
This warranty applies only to the original purchaser and may not be transferred.
Replacement items will be covered by the limited warranty for the balance of the warranty period
from the date of the original purchase.
Please note:
Only the defective product or parts returned to place of purchase will be replaced under this
warranty.
ONE (1) YEAR LIMITED REPLACEMENT
WARRANTY STATEMENT
Brand Developers Limited
Unit H, 686 Rosebank Road,
Avondale 1026, Auckland, New Zealand
Private Bag 93204, Parnell, Auckland 1151
FAX: +64 9 306 8203
NZ Customer Care: 0800 002 999
Brand Developers Aust Pty Ltd
Unit 3, 2 Roussos Place,
Truganina, VIC 3029, AUSTRALIA
FAX: +61 3 9681 7825
AUST Customer Care: 1800 890 840
Australia Contact New Zealand Contact
BackBubble_IM_ENG_06-16 ANZ-BDV1.indd 15 28/06/2016 10:07:23 a.m.

16
Notes
BackBubble_IM_ENG_06-16 ANZ-BDV1.indd 16 28/06/2016 10:07:23 a.m.

17
Notes
BackBubble_IM_ENG_06-16 ANZ-BDV1.indd 17 28/06/2016 10:07:23 a.m.

18
BackBubble_IM_ENG_06-16 ANZ-BDV1.indd 18 28/06/2016 10:07:23 a.m.

BackBubble_IM_ENG_06-16 ANZ-BDV1
BDV1
©2015 Back Bubble LP. All Rights Reserved.
www.TryBackBubble.com.au
www.TryBackBubble.co.nz
Exclusively Distributed
Throughout Australasia by:
Brand Developers Aust Pty Ltd
Unit 3, 2 Roussos Place,
Truganina, VIC 3029, AUSTRALIA
AUST Customer Care: 1800 890 840
Brand Developers Limited
Unit H, 686 Rosebank Road,
Avondale, 1026 Auckland, NEW ZEALAND
NZ Customer Care: 0800 002 999
BackBubble_IM_ENG_06-16 ANZ-BDV1.indd 19 28/06/2016 10:07:24 a.m.
Table of contents