BAK bakFlip Assembly instructions

1
2
3
45
Remove the paper backing and apply the seal
strip to the top of the bulkhead. Trim the ends
to tightly fit to the sides of the bed. Apply along
the radius of the bulkhead back edge.
NOTE: Wipe the surface with isopropyl alcohol
before applying.
NOTE: Installations with a drop-in bed liner
will NOT require the bulkhead seal.
BULKHEAD SEAL STRIP INSTALLATION
INSTALLATION SHEET
Parts will be shipped to you directly.
Call 818-365-9000 Mon - Fri 8:30 am - 7 pm EST
or email [email protected]
1 Hard Folding Cover
2 RH, passenger side rail
3 LH, driver side rail
4 Prop rod
5 Prop rod clip
6 Buckles
7 Buckle mounting inserts
8 Buckle mounting screws
9 Bulkhead seal
27 Allen wrench
28 Washers, retainer
29 Spacers
30 Screw & washers, M6
31 Cab bumpers
32 Jack nut installer wrench
10 Drain hoses
11 Cover mounting elevator bolts
12 Cover mounting rubber washers
13 Cover mounting washers
14 Cover mounting lock washers
15 Cover mounting knob
A
16 Well nuts
17 Washers, oversize #10
18 Screws, buttonhead
19 Screw and washers, truss head
B
20 Well nuts
21 Washers, flat
22 Washers, oversize #10
23 Screws, buttonhead
24 Jack nuts
25 Washers, flat
26 Bolts 1/4-20
1
• 1100 N. Glenstone Ave. Suite 140, Springfield, MO 65802 • 818-365-9000 • bakindustries.com Part# 318B0047 Rev. 8.12.2020BAK Industries Laurmark Enterprises, Inc., 2020
•
TOOLS RECOMMENDED
7/8”, [0.875”, (22mm)] drill bit & drill (optional)
Philips screwdriver
1/8” Hex head
T50 Torx drive
••
••
••
••
••
•
•
•
•
•
•
•
•
•
•
•
•
•
•
•
•
•
•
•
6
78
9
10
12
11 13 14 15 A
B
16
20
24
22
23
25 26
27
32
30
28 29
31
21
17 18 19
•
•
Any damaged or missing parts?
Jeep Gladiator
NOTE: The rail installation will require identifying the bulkhead hole configuration of your truck.
This will determine which hardware package, A or B, is used. This is in step 6.

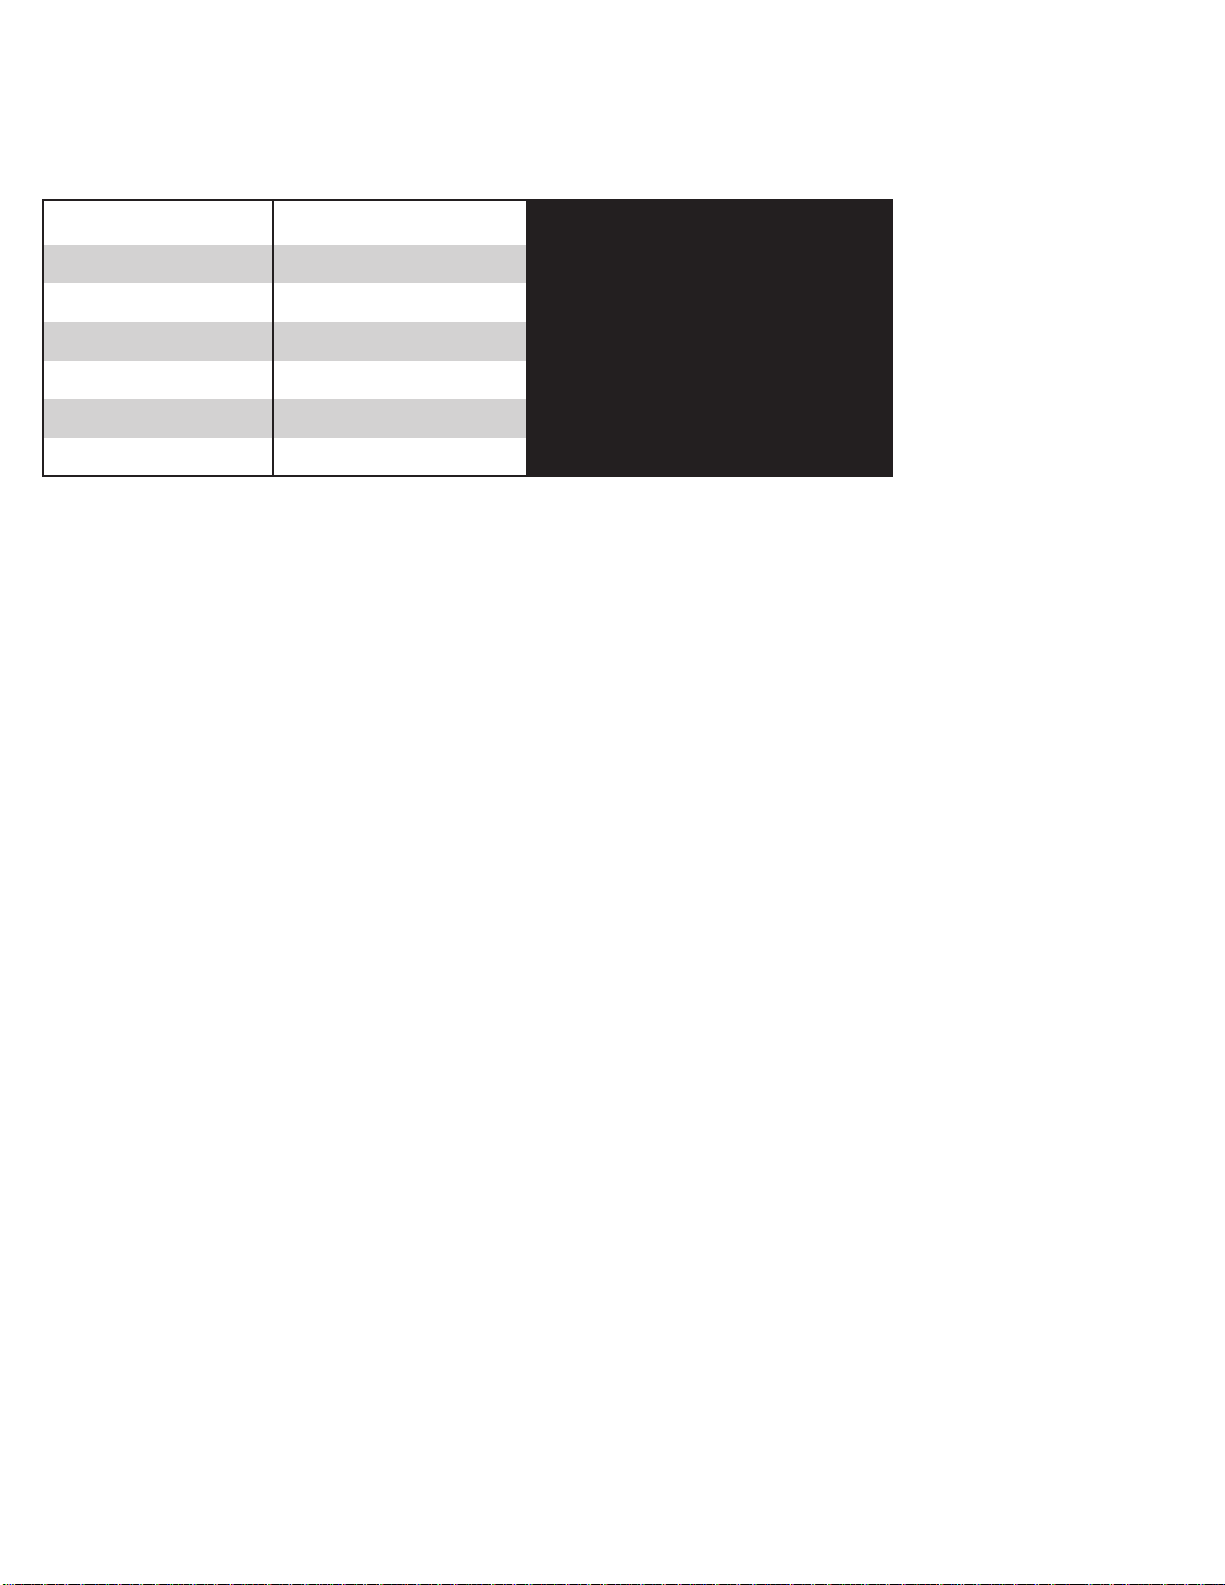
DROP IN LINER TRIMMING
If the truck has a drop in bed liner,
the top corners at the bulkhead,
and the top corners of the tailgate liner
need to be trimmed to allow for the
bed cover rails.
Locate the necessary cuts by starting with
the top left corner edge of the liner (1),
then measure a distance of 0.18”, 4.8mm,
outboard to establish point A.
The first cut is down from A 2.5”,
63.5mm, to point B. The next cut is
from point A, inboard horizontally
2.6”, 66.7mm, to point C.
Cut from point C to D, then finish with a
cut from B to D.
The cut is done on the right hand side as
a mirror image, Figure 5.
Locate the necessary cuts for the tailgate liner
by starting with the outside corner of the liner,
measure a distance of 0.375”, 9.5mm inboard,
then 0.875”, 22.2mm, down.
The cut is done on both sides,
as a mirror image.
10.18”,
4.8mm
2.6”, 66.7mm
2.6”, 66.7mm
2.5”,
63.5mm
2.5”,
63.5mm
BD
C
A
0.375”, 9.5mm
0.875”,
22.2mm
CAUTION: Move the bed liner away
from the truck sheet metal, or remove
the liner from the truck so that the
truck bed is not damaged.
CAUTION: Move the tailgate liner away
from the truck sheet metal, or remove
the liner from the truck so that the
truck bed is not damaged.
CAUTION: Move the tailgate liner away
from the truck sheet metal, or remove
the liner from the truck so that the
truck bed is not damaged.
2
3
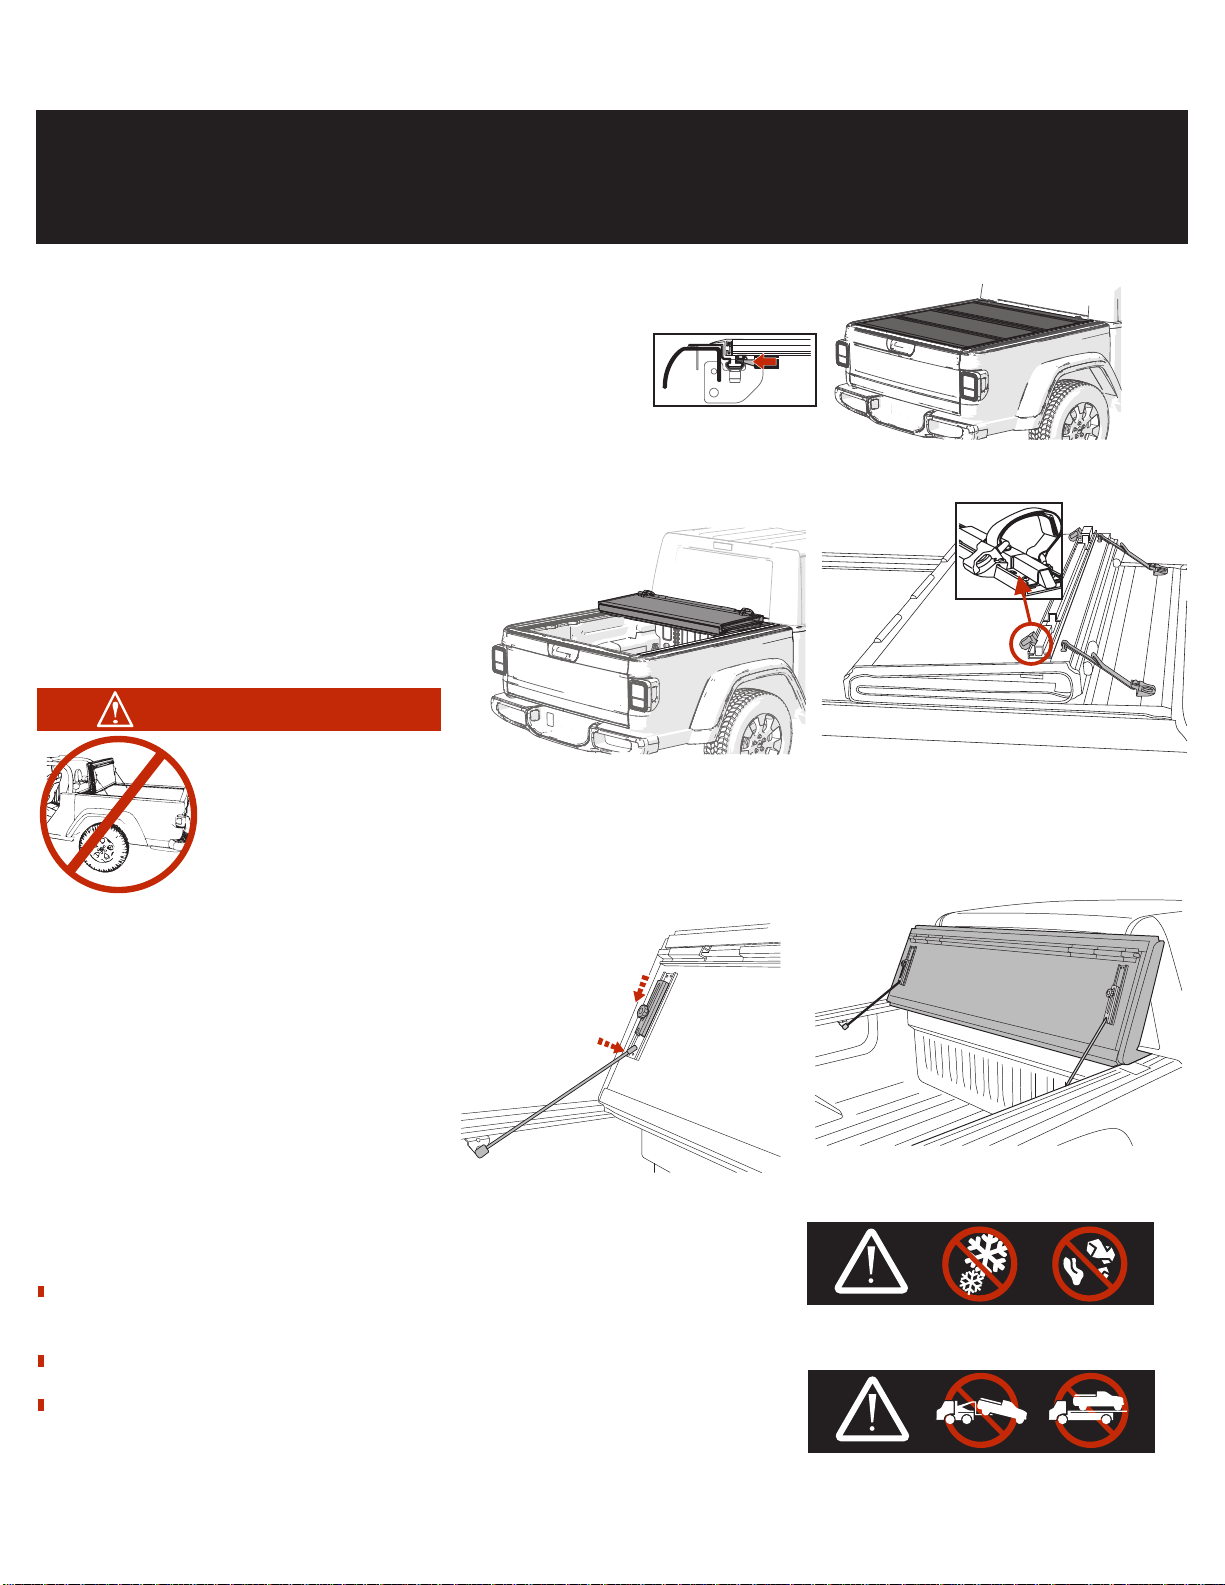
4Holes are necessary in the drop in liner for the bed cover rail drain tubes.
A 7/8”,[0.875”, (22mm)], diameter hole needs to be centered on the first
rib from the edge. The hole will be 2.875”, 73mm, up from the floor.
The hole is cut on both sides, as a mirror image. Centered on
the first rib.
Diameter =
7/8” [0.875”,
22mm]
2.875”,
73mm
Fig. 5
5If the bed rail caps are not trimmed in the rear
/tailgate section, cut using the scribed lines as
a guide to expose the area shown.
Perform this operation on both sides of the
pickup box.
• 1100 N. Glenstone Ave. Suite 140, Springfield, MO 65802 • 818-365-9000 • bakindustries.com BAK Industries Part# 318B0047 Rev. 8.12.2020

6
8
7
Identify your truck bulkhead mounting hole configuration.
Follow that letter through the next steps. A
A
A
AA
A
A- an open hole on top,
a threaded hole underneath. B- an open, hex shaped hole
on top; an open hole underneath.
For vehicles with a sprayed on bed liner,
the threaded area in the bulkhead must be
cleared of liner material.
Thread the buttonhead screw through the #10
oversize washer, through the top hole in the bracket
and into the well nut. One for each side.
Note:
Assemble just until contact
is made, do not tighten the
well nut.
Insert the M6 screw & washer into one of the rear rail
mounting holes as shown. Slide a spacer then a
retainer washer onto the threaded portion of the screw.
Repeat for the second rear mounting hole,
and repeat with the opposite rail.
9
Thread the truss head screw & washer through the
bottom hole of the cover rail bracket, and tighten to
17.5 Nm/12.9 ft/lbs on both sides. Snug up the
upper buttonhead screw in the well nut.
12
Place the cover rail onto the bed rail and
slide it forward, using the well nut as a
guide into the bulkhead opening.
10 A
At the rear/tailgate, thread the M6 screw & washers, installed
in step 9, into the threaded inserts in the bed wall.
Tighten with the 90 degree Torx key.
Leave the bolts
loose until the front/
cab bolts have been
installed and
tightened.
The Torx key is
included in the
hardware kit.
11
13 Tighten the rear/tailgate M6 screw & washers, on both
sides. While tightening the bolts, lift up on the rear/
tailgate end of the rail.
• 1100 N. Glenstone Ave. Suite 140, Springfield, MO 65802 • 818-365-9000 • bakindustries.com BAK Industries
STOP
B
A
Part# 318B0047 Rev. 8.12.2020

Install the jack nut into the truck bulkhead, one on both sides. Insert the jack nut into the upper, hexagonal hole.
Insert the 1/4-20 bolt through the install wrench and into the jack nut. Use the install wrench to hold the jack nut from
turning while tightening the bolt with a wrench or socket. This will pull and collapse the jack nut. Once the bolt has
stopped turning, remove it for later installation.
Seeing the jack nut
from behind is difficult,
but it will collapse
as shown
Note:
Assemble just until
contact is made,
do not tighten the
well nut.
Thread the buttonhead screw through the #10 oversize
washer, through the bottom hole in the bracket, through
the flat washer and into the well nut.
One for each side.
Thread the 1/4-20 bolt through the flat washer, into
the top hole of the cover rail bracket into the jack nut,
tighten to 17.5 Nm/ 12.9 ft/lbs on both sides.
Snug up the lower buttonhead screw in the well nut.
12
8
7
B
B
B
B
Insert the M6 screw & washer into one of the rear rail
mounting holes as shown. Slide a spacer then a
retainer washer onto the threaded portion of the screw.
Repeat for the second rear mounting hole,
and repeat with the opposite rail.
9
B
B
Place the cover rail onto the bed rail and
slide it forward, using the well nut as a
guide into the bulkhead opening.
10 B
At the rear/tailgate, thread the M6 screw & washers, installed
in step 9, into the threaded inserts in the bed wall.
Tighten with the 90 degree Torx key.
Leave the bolts
loose until the front/
cab bolts have been
installed and
tightened.
The Torx key is
included in the
hardware kit.
11
13 Tighten the rear/tailgate M6 screw & washers, on both
sides. While tightening the bolts, lift up on the rear/
tailgate end of the rail.
• 1100 N. Glenstone Ave. Suite 140, Springfield, MO 65802 • 818-365-9000 • bakindustries.com BAK Industries Part# 318B0047 Rev. 8.12.2020

Place the folded cover on the mounted rails at the
front/cab end of the bed. The cab panel holes will
align with the slotted brackets of the cover rails.
Clean along the
full length of the bottom
edges of each
panel,
both sides
Clean along
the full length
of the top rubber
surfaces
of both rails
15
16 17 Rotate the cab panel down and thread on to
the cover mounting bolt the large rubber
washer, the large metal washer, the lock
washer and thread on the cover mounting knob.
Do this on
both sides.
Hand tighten.
Unfold the cover toward the tailgate. Make sure the cover fits squarely between the rails. If it is not square adjust the
cover side to side . Then carefully fold the cover and tighten the cover mounting knobs.
18
910
NOTE: When the cover is adjusted
correctly and sitting square with the
truck bed, the latch pall will make the
proper contact with rail as shown (9)
on both sides. Not as shown in (10).
NOTE:
The bottom edges
of the cover and the
top rubber surfaces
of the rails should be
periodically cleaned
of dirt and debris
for best performance.
Insert the elevator bolt through a large rubber washer, into
the cab panel hole and down through the slotted rail bracket.
One on both sides.
To mount the strap buckles to the top of the cover-
push a threaded post (1) up from the bottom
into the pre-drilled hole (2) in the cab panel.
Place the buckle (3) over the holes and
with a screw driver thread the screw (4)
through the buckle and into the post.
Securely hand tighten only, DO NOT use
a screw gun.
Repeat on both sides.
1
2
34
14
• 1100 N. Glenstone Ave. Suite 140, Springfield, MO 65802 • 818-365-9000 • bakindustries.com BAK Industries Part# 318B0047 Rev. 8.12.2020

The cover’s aluminum frame will fit just inside the tailgate
when the forward and backward adjustment of the cover
is correct. With proper alignment the first two fins
of the tailgate seal will be engaged with the tailgate.
The rear edge of the cover and tailgate seal will rest
on top of the tailgate.
If this needs adjustment, loosen the cover mounting knobs
and move the cover forward or backward.
Be sure to maintain the side to side adjustments made
in step 16.
Re-tighten the cover knobs.
Insert one end of the drain hose
onto the cover rail drain nozzle.
The other end of the
drain hose must route
out of the truck bed,
drilling a hole in the
bulkhead plug
provides a route
outside of the bed.
Install drain hoses
on both sides.
20
22
21
The tail panel can be closed with the tailgate
either up or down. Assure that both latches engage.
The tailgate can be closed with the
tail panel opened or closed.
TO CLOSE THE TAIL PANEL
Open the tailgate and reach under the panel for the release cable (1)
at either side of the panel housing.
Pull down on either cable to release both rear latches
and lift the panel open.
TO OPEN THE TAIL PANEL
NOTE: DO NOT ATTEMPT TO
DRIVE WITH THE TAIL PANEL
IN A PARTIALLY OPEN POSITION. 1
Tonneau Cover Tail Panel Operation
No closer than
1”, (25.4mm) to
the edge of the
panel.
19 Fold the cover up to the cab, install the
three cab bumpers along the top edge
of the cover where it meets the truck cab.
1.0”, (25.4mm)
• 1100 N. Glenstone Ave. Suite 140, Springfield, MO 65802 • 818-365-9000 • bakindustries.com BAK Industries Part# 318B0047 Rev. 8.12.2020

Tonneau Cover Positions While Operating Vehicle
Prior to vehicle operation, tonneau cover MUST be properly secured.
CLOSED POSITION
CLOSED POSITION
All panels must be closed and FULLY LATCHED to tonneau side rail.
All panels must be layed flat and latches engaged.
COMPLETELY FOLDED POSITION
FLIPPED UP POSITION
FLIPPED UP POSITION
COMPLETELY FOLDED POSITION
To drive with your cover in the completely folded position, engage the provided
tie down straps and buckles provided with your cover. Ensure that BOTH
buckle clips are fully inserted into the buckle ends located on the front header
panel of the cover and adjust the straps to ensure the cover is secure
during vehicle operation.
The clips should be secured in the storage,
position as shown in Figure 1, when not in use.
Fold the cover open and lift it until its vertical or past 90 degrees
toward the truck cab. Then release the prop rod that is attached to
the cover rail. Fold the prop rod over and position it firmly against
the vertical plate on the underside of your cover. Then slide the
prop rod lock down and tighten the knobs to lock the prop rod
into position.
Do this on both sides of the cover.
The cover should be firmly in position with little
to no movement once the prop rods are locked
IMPORTANT NOTICE
IMPORTANT Safe operation and use
Storage
Position
for clip
While driving, the cover must be secured- either completely closed/flat with all of the latches engaged;
or in the completely folded position with the latches engaged and tie down straps attached for the
hard top and convertible top use; or folded open with both prop rods engaged for use ONLY with the hard top.
DO NOT DRIVE with the cover partially opened.
Fig. 1
For use with hard top ONLY
Additional Important Operating Tips
The bed cover MUST be free of foreign material including snow and ice
before opening panels.
Do NOT tow your vehicle from the rear with the bed cover on your truck.
Do NOT operate vehicle with objects on top of cover.
FAILURE TO FOLLOW THESE CAUTIONS MAY RESULT IN
SEVERE DAMAGE AND WILL VOID YOUR WARRANTY!
Remove any snow or foreign
matter before folding cover.
Do NOT tow your vehicle from the
rear with this cover on your truck.
WARNING
Do not drive with your
BAKFlip in the ipped up
and secured position
without the hard top
installed on your Jeep.
• 1100 N. Glenstone Ave. Suite 140, Springfield, MO 65802 • 818-365-9000 • bakindustries.com BAK Industries Part# 318B0047 Rev. 8.12.2020

Warranty
BAK® Industries (“BAK”) warrants your BAKFlip Hard Folding Cover to be structurally free from defects in material and
workmanship for the period as outlined in the table below from the retail date of purchase. Warranty registration must
be on file and/or proof of original purchase (detailed and dated receipt) required for warranty service. Warranty is non-
transferable and applies to the original purchaser of the BAK product only.
BAK reserves the right to determine whether a product needs to be repaired or replaced. No labor or service allowance
is given or implied. The warranty will be void if the product has been damaged by accident, unreasonable use, neglect,
improper service/installation/removal, modifications, acts of God or normal wear and tear or other causes not arising out
of defective materials or workmanship. BAK assumes no liability for injury, loss, incidental or consequential damages.
BAK reserves the right to substitute an entire replacement system or provide other remedies than those listed in this
warranty for discontinued products or other reasons. Shipping charges will apply for any repair or replacement.
BAK is committed to providing you with our best service at all times. Please feel free to contact us should you require any
assistance with your BAK product.
CARE AND MAINTENANCE
BAK Flip tonneaus are made from durable materials and require simple care to ensure a long life of performing well and
looking great.
Cleaning the Top (Washing)
Standard automotive soap and water with a soft sponge or cloth is recommended for cleaning. Shammy dry to keep
the finish polished and brilliant. Wax is NOT recommended as it tends to fill in cracks and crevices, which may affect the
textured panel finish. Do NOT use any harsh cleaners or abrasives.
Treating the Vinyl Top
3M 303 Aerospace Protectant may be used to keep the vinyl surface clean and protected from the elements and will also
remove any water spots that may have developed. 303 Aerospace not only protects against fading, discoloration and
cracking from harmful UV rays, but repels dust and stains. Simply spray on and wipe dry for a beautiful, matte finish that
protects your cover from road grime and dust.
Maintenance
It is recommended that you periodically check your cover is securely attached to your truck bed. Inspect the clamps and
front mounting bolts to ensure they were properly installed and have not come loose or knocked out of adjustment
during operation. Covers that are used with high frequency or that are subject to the vibrations and impact from rough
roadways can cause the cover to require adjustment.
Lubricating the Latches
It is recommended that you periodically inspect and service the latches on each panel. Clean away any excess dirt or
grime and lubricate with silicone spray. Ensure the latches move freely in and out to properly engage the side rail and
provide proper performance with optimum security. Be careful not to overspray the cover. Wipe away any excess around
PRODUCT WARRANTY PERIOD
BAKFlip G2 3 Year Limited Warranty
BAKFlip HD
BAKFlip MX4
3 Year Limited Warranty
5 Year Limited Warranty
BAKFlip FiberMax 3 Year Limited Warranty
BAKFlip F1 5 Year Limited Warranty
REGISTER Y OUR
WARRANTY
NOW AT
BAKINDUSTRIES.COM
the latch location.
• 1100 N. Glenstone Ave. Suite 140, Springfield, MO 65802 • 818-365-9000 • bakindustries.com BAK Industries Part# 318B0047 Rev. 8.12.2020
Table of contents
Other BAK Automobile Accessories manuals
Popular Automobile Accessories manuals by other brands

AMP Research
AMP Research Power Step 77121-01A installation guide

Careva
Careva Crossit 2.0 user manual

muth
muth Signal Mirror CRV 1997-2003 installation instructions

Mazda
Mazda 0000-8E-N31 installation instructions

Kenwood
Kenwood KW-PACK2 manual

National Cycle
National Cycle N920 Installation and owner's manual

Pioneer
Pioneer RP4500 SATR Installation, operation & maintenance manual

Reese Explore
Reese Explore 63153 Instruction guide

Mont Blanc
Mont Blanc Triton Series Fitting instructions

TruckCraft
TruckCraft TC-508 owner's manual

Prorack
Prorack K120 Fitting instructions

Kuda-Phonebase
Kuda-Phonebase 287040 Installation instruction