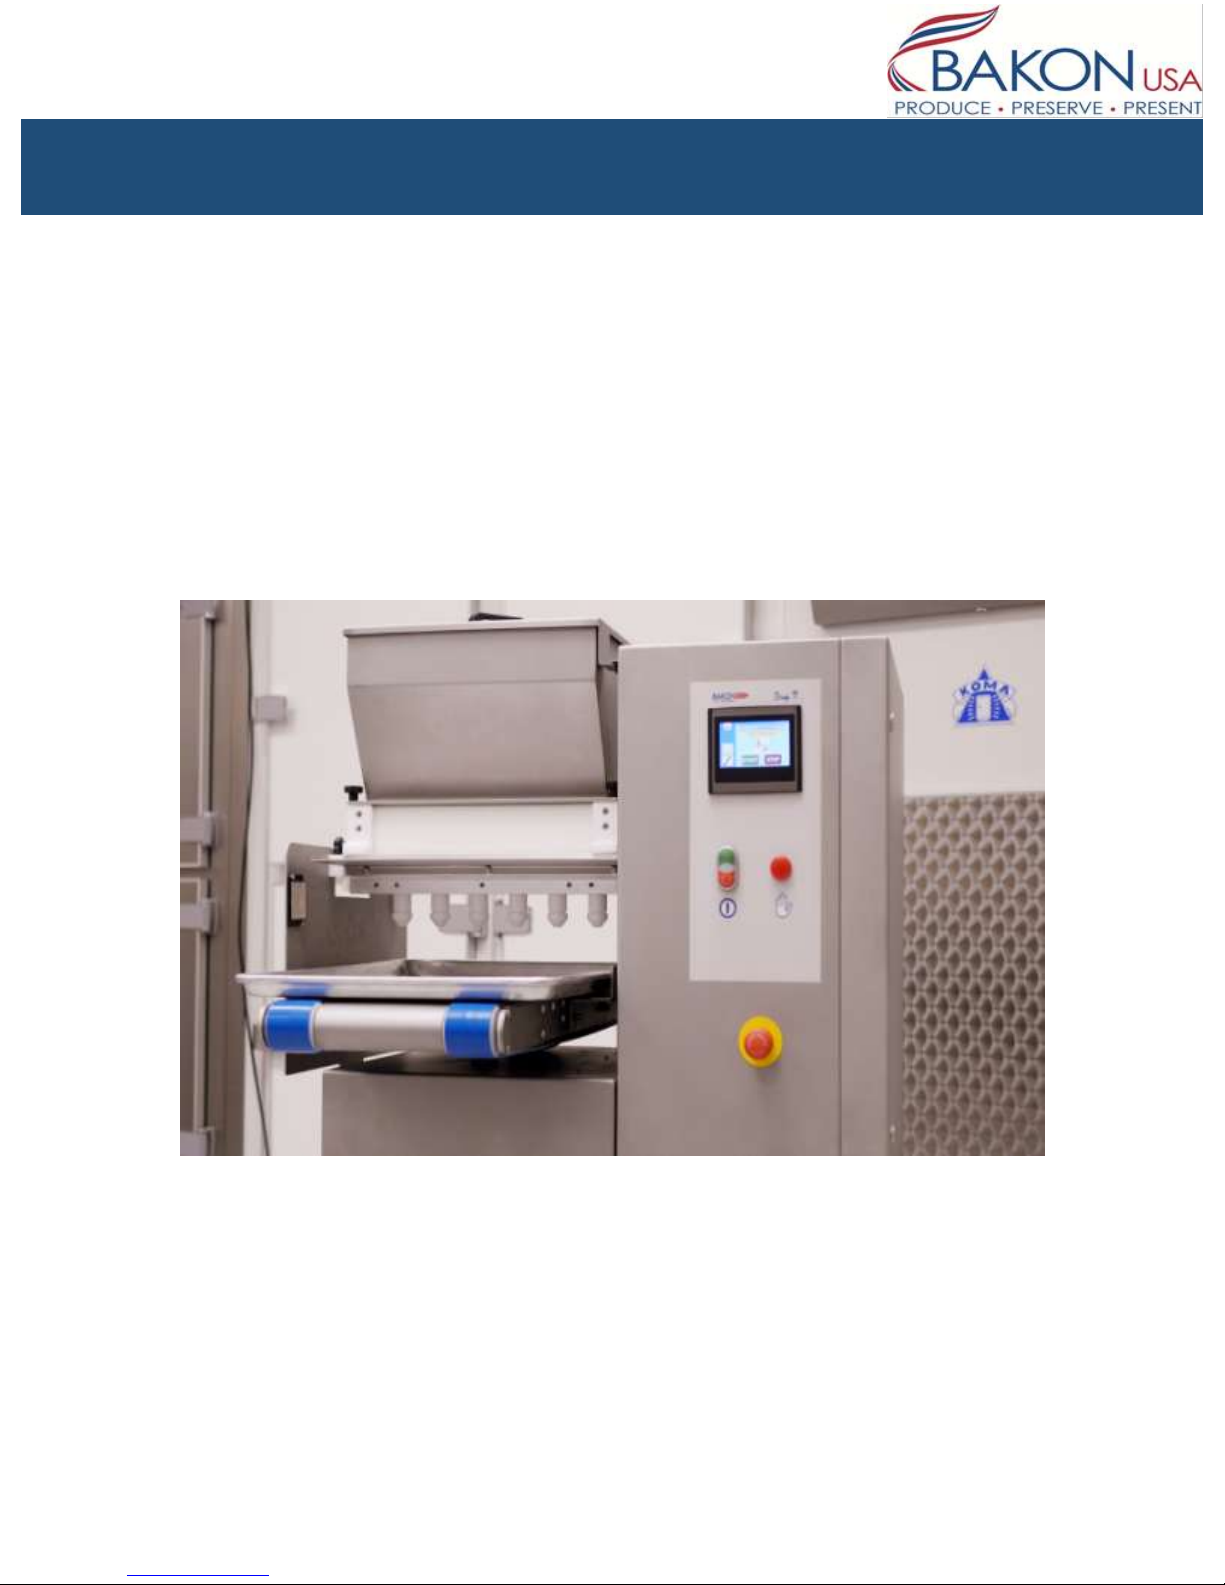
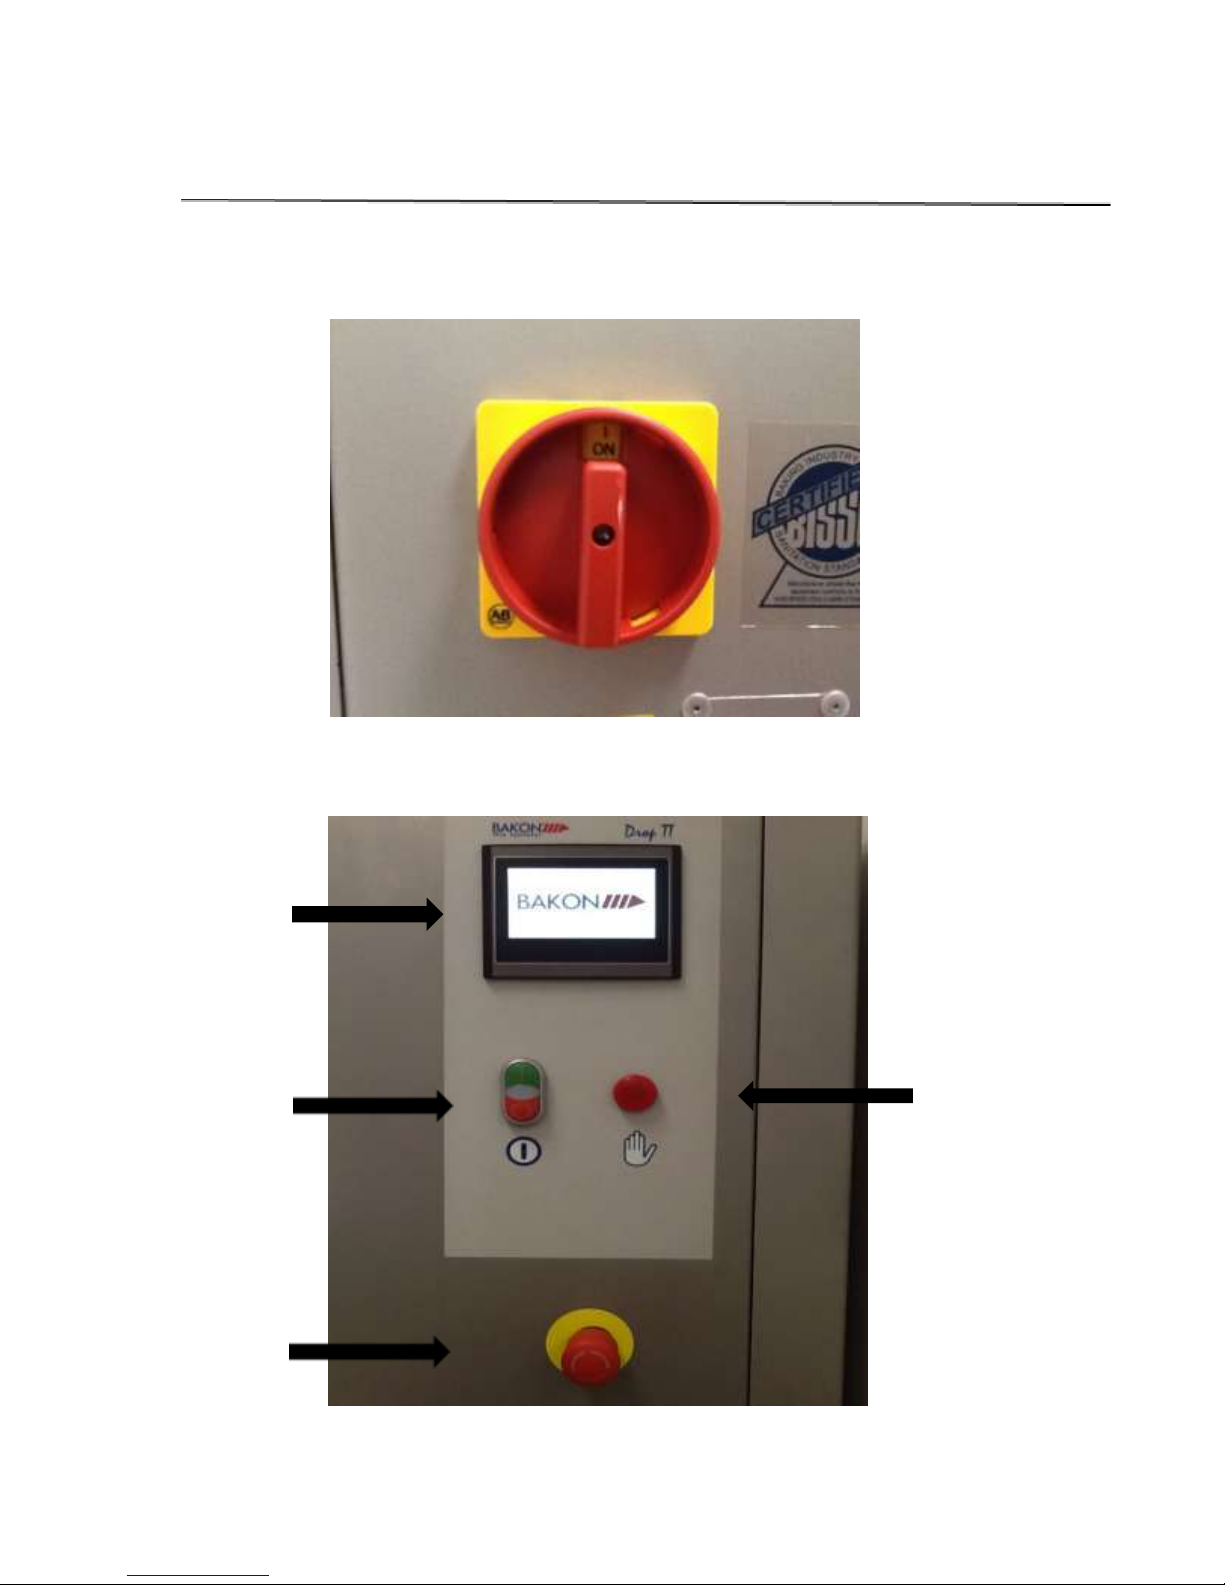
Bakon DROP TT Instruction manual

DROP TT QUICK START MANUAL

2
INDEX
SECTION 1: General information
•Power switch
•Control panel
•Passwords
•Safety sensors
•Stop button on the touch screen
SECTION 2: Filling the pump
•Purpose of filling pump
•Roller Head
•Pump Head
SECTION 3: Lowering and lifting table
•Step by step instruction
SECTION 4: Preprogrammed Recipes
•25-30 Preprogrammed recipes
•Copying and saving under a new name
SECTION 5: Placing trays
SECTION 6: Starting production
SECTION 7: Cleaning
•Step by step instructions on breakdown for cleaning
Section 8: Reassembly
Section 9: Standard recipes
Section 10: Adjusting recipes

3
SECTION 1: General information
1. The power switch is located on the back side of the machine
2. Control panel description
Touch screen
Start/ Stop switch
Emergency stop
button
Alarm light
Signal

4
3. Passwords:
Operator password 654321
Supervisor password 414990
4. Safety Sensors: There are three safety sensors on the machine
Two proximity sensors ( Front and back of hopper)
1 magnetic sensor on the hopper (Cover of the hopper)
(Proximity Sensors)
(Magnetic Sensor)
*Note: Interrupting the sensors will stop the machine. To reset press the start switch, if
it doesn’t reset by pushing the green start button first unlock the emergency stop button
by twisting to the right (it should pop out)

5
5. Stop function on the touch screen: The operator can use this function in two ways
5.1 Press the stop tab to pause depositing briefly, then push start tab on touch
screen to resume depositing where it left off.
5.2 Press and hold the stop tab on the touch screen for 5 seconds it will stop, eject
the tray and instruct you to push start. Push start and it will begin a new cycle.
(5.1)
(5.2)

6
SECTION 2: Filling the pump
When starting production with batter in the hopper, the pump is empty. You could
manually run the pump before starting production cycle will deposit the batter until pump
is filled, ensuring your first tray of product will be complete. Once the pump has
adequate amount of batter it will deposit a consistent stream. Now you can begin
production.
1. Add your batter to the hopper ( Be sure to close the lid properly)
2. Place a tray on the conveyor to catch any batter under the nozzles
3. Select Pump head for semi liquid batters.
a. i.e. Macarons, Choux, éclairs, muffins
•Using the touch screen press the wrench icon, then the pointing hand
icon. (The screen display should match the picture below.) Based on
the batter select the correct pump and hold for a few seconds until
your batter runs though the pump. Once the pump is depositing a
consistent product you are ready to begin production.
4. Select Roller head for dough like batters.
a. i.e. Butter cookies
•Same steps as described above.
**Note: Roller head motion is
inward, whereas Pump head
motion is outward.
Roller Head
Pump Head

7
SECTION 3: Lowering and lifting the table
To manually move the table up or down follow these instructions:
1. Press the wrench icon on the touch screen
2. Press the pointing hand icon
3. Select the blue table tab
4. The choice of up or down will pop up, just press and hold in the desired direction.

8
SECTION 4: Pre-programmed Recipes
The machine has room for 30 PROGRAMS (recipes). Six of these programs are
BASIC—EXAMPLE recipes factory set in order to make the programming easy and
user-friendly. They can be found in position 25 to 30.
Recipe N° Name Drop Picture
25 FIX FIX DROP
26 FIX FIX DROP
TWISTED W/ NOZZLE
ROTATION
27 LONG DROP long drop
28 LONG long drop w/
TWISTED nozzle rotation
29 WIRE CUT drop cut
30 WIRE CUT long drop
LONG cut

9
SECTION 4: Recipes Continued
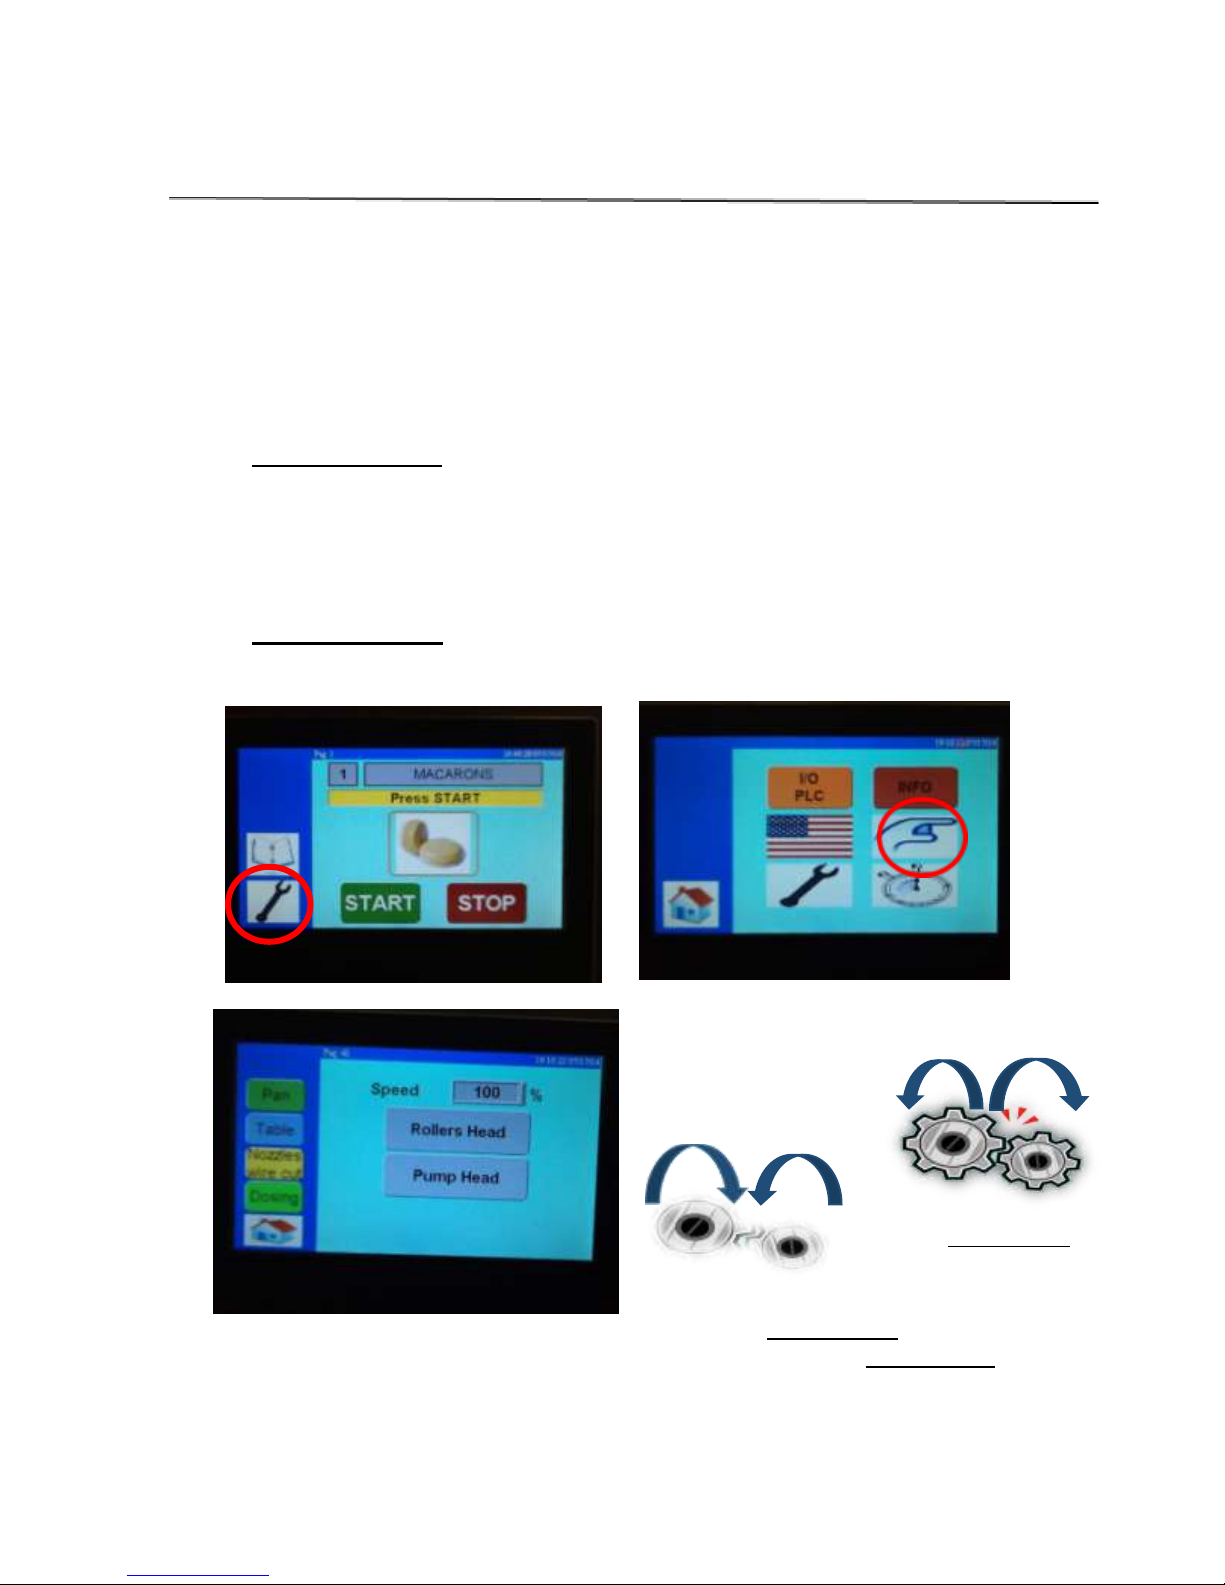
1. Selecting a preprogrammed recipe:
Press the Recipe book icon and enter the recipe list, navigate through the
recipe’s using the blue arrows and choose the recipe. Press the recipe to
highlight the tab.
Press the green arrow icon a box will pop up, push yes to confirm (The name on
the grey line will match the name on the yellow line)
Press the home icon
2. Copying a preprogrammed recipe:
Return into the recipe index by following the steps above
Select the recipe you’d like to copy. Press the recipe to highlight it yellow.
Hit the floppy disc icon, a box will pop up select Yes. You have successfully
copied that recipe.
Look for and select a blank spot to paste the copied recipe, select that spot by
press to highlight it yellow.
Press the Disc icon, key in the password.
Press the disc icon, yes to confirm. You have saved that recipe, now you can
rename it.
3. Renaming the copied recipe
Select the recipe you just copied and pasted by pressing the yellow tab where it
is located
Once in the recipe, press the highlighted tab where the name is displayed. A
keypad will pop up
Using the keypad type in the name you would like to use for this recipe. Hit the
enter button on the keypad.
Now you are able to modify all the data for that recipe without effecting the
original that was copied.

10
SECTION 5: Placing trays
1. Press the green START button on the touch screen; the machine starts cycle a
Green tab will turn on display “IN CYCLE”. The conveyor starts running and the
Machine is ready to deposit.
2. Place a tray on the conveyor, make sure you use only flat trays, the tray starts
moving forward and when it reaches the tray Sensor the dosing cycle will start.
Based on the pan configuration programmed (example: 9 rows) the cycle will stop
once completed, if no other trays are placed. If other trays are placed after the first
one, the tray coming out from the conveyor must be collected by the operator.
Make sure to leave 2 inches of space when placing the next tray, in order for the
tray sensor to come up.
3 The guide can be adjusted vertical and horizontal. Make sure the guide is always lower
than the conveyer.

11
SECTION 6: Starting production
1. Turn on machine and press the touch screen
2. Place a tray under the nozzle to collect batter while filling the pump
3. Fill the hopper
4. Reset (once hopper lid is properly closed)
5. Fill the pump manually (see section 2)
6. Remove collecting tray once all the nozzles are full
7. Press start
8. Place a tray on the belt and the machine will start depositing
9. Place the next tray if you want to continue depositing, make sure you leave 2
inches distance between trays.

12
SECTION 7: Cleaning
1. Place tray under depositor, run the pump manually (see section 2) until as much
batter as possible is deposited.
2. Carefully remove the hopper, pump, nozzles. Wash with soap and water. Be sure
to dry thoroughly. (See below for step by step removing)
A. Remove hopper by
unscrewing the black
star knobs
B. Remove the
white plastic
seal, by lifting it
up

13
C. Remove the
Stainless Steel
Side plate:
Unscrew and
remove the
black star
knobs at the
side, loosen
the black star
knobs at the
bottom.
D. Remove
white
plastic
spacer
bar, by
sliding it
out.

14
E. Remove the
template by
unscrewing
from the
machine,
using the
provided
4x130 Allen
key.
F. Remove template by
sliding out

15
G. Remove
nozzle
tips by
unscrewi
ng.
H. Remove pump by
sliding out from the
machine

16
I. Remove star knobs
from pump, and
slide gearhead
pump out.

17
J. Remove the seal from
around the pump cover

18
Section 8: Reassembly
1. Replace the seal for the Hopper. Be sure to pay special attention to the
placement of the seal. It should be flush with the hopper.
Incorrect placement
Correct placement

19
Section 8: Reassembly
2. Replace the hopper, be sure to pay special attention to the placement. The wider
part of the Hopper should be the back side ( The back is where the power button
is)
Incorrect placement
Correct placement

20
Section 9: Standard recipes
MACARONS
ECLAIRS
CHOUX
BISCUIT
Depositing Time
0.9
2.0
1.1
18.0
Depositing Speed
50%
50%
50%
40%
Pan Speed
30%
30%
PAN
Number of rows
9
3
9
1
First row distance
.4
0.2
0.2
0.1
Distance between row
.5
0.4
0.52
0.60
TABLE
Table Height
18
20
20
28
SUCTION
Suction Delay
Suction
0.3
0.3
0.3
0.3
Final Row Suction
Pre-deposit First Row
ADVANCED
Head:
Pump
Pump
Pump
Pump
Tip Off:
0.3
0.0
0.3
Tip Off Time:
100%
100%
100%
Tip off Speed
Backward
Backward
Backward
Head and Tail
Head
Tail
Table of contents
Popular Kitchen Appliance manuals by other brands

Panasonic
Panasonic NEDF20G - COMMERCIAL MICROVEN operating instructions

MIRRO
MIRRO 92040 Instruction manual & recipe booklet

Aroma Professional
Aroma Professional ARC-954SBD instruction manual

inventum
inventum CC070 instruction manual

TEFAL
TEFAL DT30 Series manual

Scarlett
Scarlett SC-1221 instruction manual

Dosel
Dosel DH/RPM002R/22 instructions

Firex Easybratt
Firex Easybratt BM7E050 Instruction manual for installation, maintenance and use

Morphy Richards
Morphy Richards FOODFUSION MIX 48955 instruction manual

Orbegozo
Orbegozo EP 3250 instruction manual

Brice
Brice CHIPPER Quick start quide

GreenPan
GreenPan MULTI SKILLET DELUXE user guide