Ballard Designs JU017 User manual

Page 1 of 10
Customer Service: 800-367-2810
Online: www.ballarddesigns.com
PRODUCT NAME: 11’ Octagon Cantilever *Umbrella
ITEM NUMBER: JU017
ASSEMBLED DIMENSIONS: 123”H (open) / 118”H (closed) x 11’ Octagonal
*Canopy featured in Assembly Instructions representative only. Canopy style may vary.

Customer Service: 800-367-2810
Online: www.ballarddesigns.com Page 2 of 10
Prior to assembly it is important to decide on the location of the umbrella.
• Allow ample height to avoid damage to your umbrella during assembly and usage.
• Choose a location that is level and sturdy.
• Avoid any sloping or soft ground cover.
• Consider a location that will maximize the umbrella’s rotating swivel function. Placing
between two entertaining areas is ideal.
Please remove all contents from the package, inspect and review checklist.
CAUTION: To avoid personal injury and damage read and
follow this assembly and operation guide We recommend a two-person team for
assembly and disassembly. Save information for future reference.
Assemble in location for intended use.

Page 3 of 10
Customer Service: 800-367-2810
Online: www.ballarddesigns.com
Cla mp (1)
C ollar (1)
S tem (1)
Hexagon
Wrench (1)
S teel Wrenc h (1)
P rotec tive C over (1)
B ase S hell B ase Lid
A
I
E
H
JK
L
D
B
N
C
F
G
M
Spr ing Loaded
R ib End C ap (8)
A- Base Shell and Base Lid H- Arm Connector
B- Collar Base Stem I- Mainframe Arm
C- Stopper A J- Gemel Hinge
D- Bottom Pole Mainframe K- Canopy
E- Housing L- Spring Loaded Rib End Cap
F- Crank Handle N- Optional Valance
G- Stopper B M- Light Adapter
REQUIRED FOR ASSEMBLY:
• 200 lbs. playground sand (not included).
NOTE: Avoid allowing sand into the center
of the base shell.
AG78/ AG78SQ CHECKLIST

Page 4 of 10
Customer Service: 800-367-2810
Online: www.ballarddesigns.com
S T E P 1 Assemble AG78/ AG78SQ Base
Select area to set base and place in desired location.
Remove base lid from base shell and set aside (Fig. 1). Insert the base stem into the base
shell (Fig. 2). Turn collar base stem in a clockwise motion to engage threading. Fill
base shell with dry playground sand (not included). NOTE: Base weight will be 250 lbs.
after sand is added. Remove the base stem carefully and avoid allowing sand into the center of
the base shell (Fig. 4). IMPORTANT: Do not allow sand to spill into the center of the base
(Fig. 4) as it will interfere with collar base stem installation. Place base lid back onto base shell.
CAUTION: Fully assembled, the umbrella weighs over 300 lbs.
Moving the umbrella fully assembled will increase the risk of damage to your
umbrella and can cause serious injury. We recommend a two-person team to
assemble the umbrella.
(Fig. 1)
(Fig. 3)
Avoid allowing sand
into the center of the
base shell.
!
(Fig. 2)
(Fig. 4)

Stem
Steel
Wr
ench
Cl
amp
Ba se
Stem
(Fig. 7)
(Fig. 5) (Fig. 6)
(Fig. 8)
S T E P 2 Assemble AG78/ AG78SQ Collar Base Stem
Re-insert the base stem into the base shell. Turn collar base stem in a clockwise
motion to engage threading (Fig. 5). Insert steel wrench provided into holes on top of
stem and tighten (Fig. 6). NOTE: To avoid damage to your base, do not over-tighten base
stem. With ribbed side up, insert clamp onto base stem and align gaps with base stem
grooves (Fig. 7). Attach collar to top of the base stem by engaging threading. Do not
completely tighten before inserting AG78 umbrella (Fig. 8).
Page 5 of 10
Customer Service: 800-367-2810
Online: www.ballarddesigns.com

Page 6 of 10
Customer Service: 800-367-2810
Online: www.ballarddesigns.com
S T E P 3 Assemble AG78/ AG78SQ Frame
Install umbrella frame into collar base stem by lifting umbrella frame and inserting main
frame bottom pole into collar base stem. (Two Persons Required) Secure position by
tightening the collar in a clockwise direction (Fig. 9). Insert crank handle into housing
and tighten with hexagon wrench by turning clockwise (Fig. 10).
(Fig. 9)
(Fig. 10)
1
2

Page 7 of 10
Customer Service: 800-367-2810
Online: www.ballarddesigns.com
S T E P 4 Opening, Tilting and Closing
To Extend Mainframe Arm and Open Canopy:
Turn knob on housing, counter-clockwise (Fig. 11). Push bottom of arm (Fig. 12)
until arm is fully extended and reaches Stopper B (Fig. 13). Turn knob clockwise
to tighten and secure in place (Fig. 14).
To Open Canopy:
Slowly crank the handle clockwise (Fig. 15) until canopy is completely open and
hub is inserted under center pole and crank handle stops (Fig. 16).
(Fig.12)
(Fig.15)
(Fig.11)
(Fig.13)
(Fig.14)
(Fig.16)

Page 8 of 10
Customer Service: 800-367-2810
Online: www.ballarddesigns.com
To Tilt Canopy:
When in horizontal open position, turn knob counter-clockwise and pull down
(Fig. 17) to retract arm to Stopper A (Fig. 18). Tighten knob to secure in place.
To Close Canopy:
Set canopy to horizontal position (Fig. 19) and turn crank handle counter-clockwise
until canopy is in closed position (Fig. 20).
To Close and Retract Arm:
Turn knob on housing, counter-clockwise. Pull arm down to retract arm and bring
umbrella canopy down to Stopper A (Fig. 21). Tighten knob clockwise to secure in
place.
(Fig.17)
(Fig.18)
(Fig.19)
(Fig.20) ( Fig.21)

Page 9 of 10
Customer Service: 800-367-2810
Online: www.ballarddesigns.com
To Attach an Umbrella Light:
Loosen the light adapter built into the umbrella runner by turning counter-clockwise
(Fig. 26). After loosening, pull down light adapter post (Fig. 27) to attach the
umbrella light (sold separately).
To Remove Umbrella Light and Close Adapter:
Remove VEGA umbrella light, and gently push up the light adapter post back into umbrella
runner and tighten turning clockwise (Fig. 26).
(Fig. 26) (Fig. 27)
AG78/ AG78SQ Features
Base Collar Swivel:
Unlock the position of the umbrella by turning the collar of the base in a counter-clockwise
direction (Fig. 22). Grab the bottom pole and rotate the umbrella frame (Fig. 23) in
either direction to choose your desired location (Fig. 24). After desired location is chosen,
return the base collar back to its original position and lock umbrella position by turning the
collar clockwise (Fig. 25).
/10 ft.
(Fig. 24) (Fig. 25)
(Fig. 22) (Fig. 23)
AG78/ AG78SQ Features

Page 10 of 10
Customer Service: 800-367-2810
Online: www.ballarddesigns.com
S A F E T Y P R E C A U T I O N S :
• Close the umbrella in windy conditions or when a storm approaches.
Never allow the umbrella to flap in the wind; this could damage the canopy.
• Do not leave open umbrella unattended. If damage occurs, this is not covered
by the warranty.
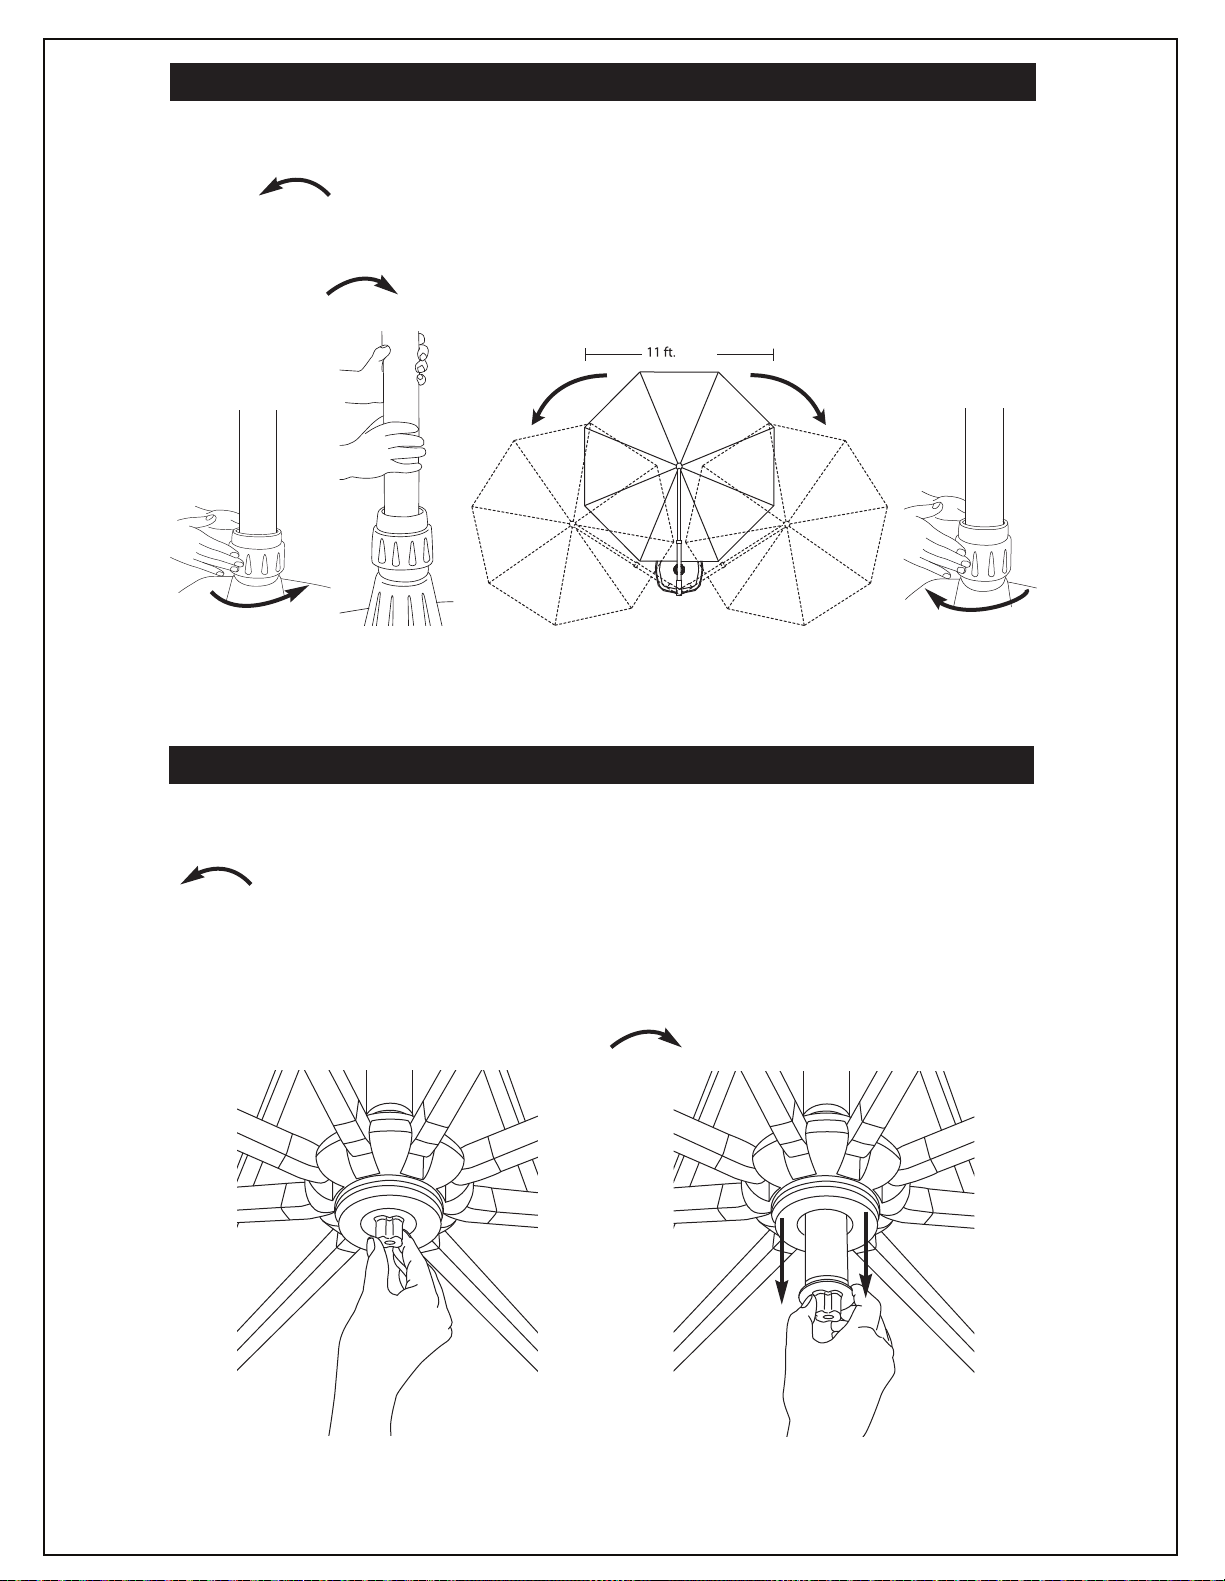
• When adjusting the umbrella, make sure that no person(s) or item(s) are close to the
umbrella. This is important to prevent injury or material damage.
C A R E A N D M A I N T E N A N C E :
• When not in use, close and cover umbrella with a protective cover (included).
• Allow a wet canopy to dry in open position.
• If necessary, clean the fabric with lukewarm water, mild detergent and a sponge.
• Wipe sliding marks on the aluminum poles with a damp cloth.
Winter Storage:
• Store in a dry, protected place.
• Any visible defects must be repaired by a professional.
After the Winter:
• Areas subject to turning and sliding can be treated with a non-staining lubricant spray
(silicone-based).
• Check the condition and function of the umbrella. Any defects must be repaired by a
professional.
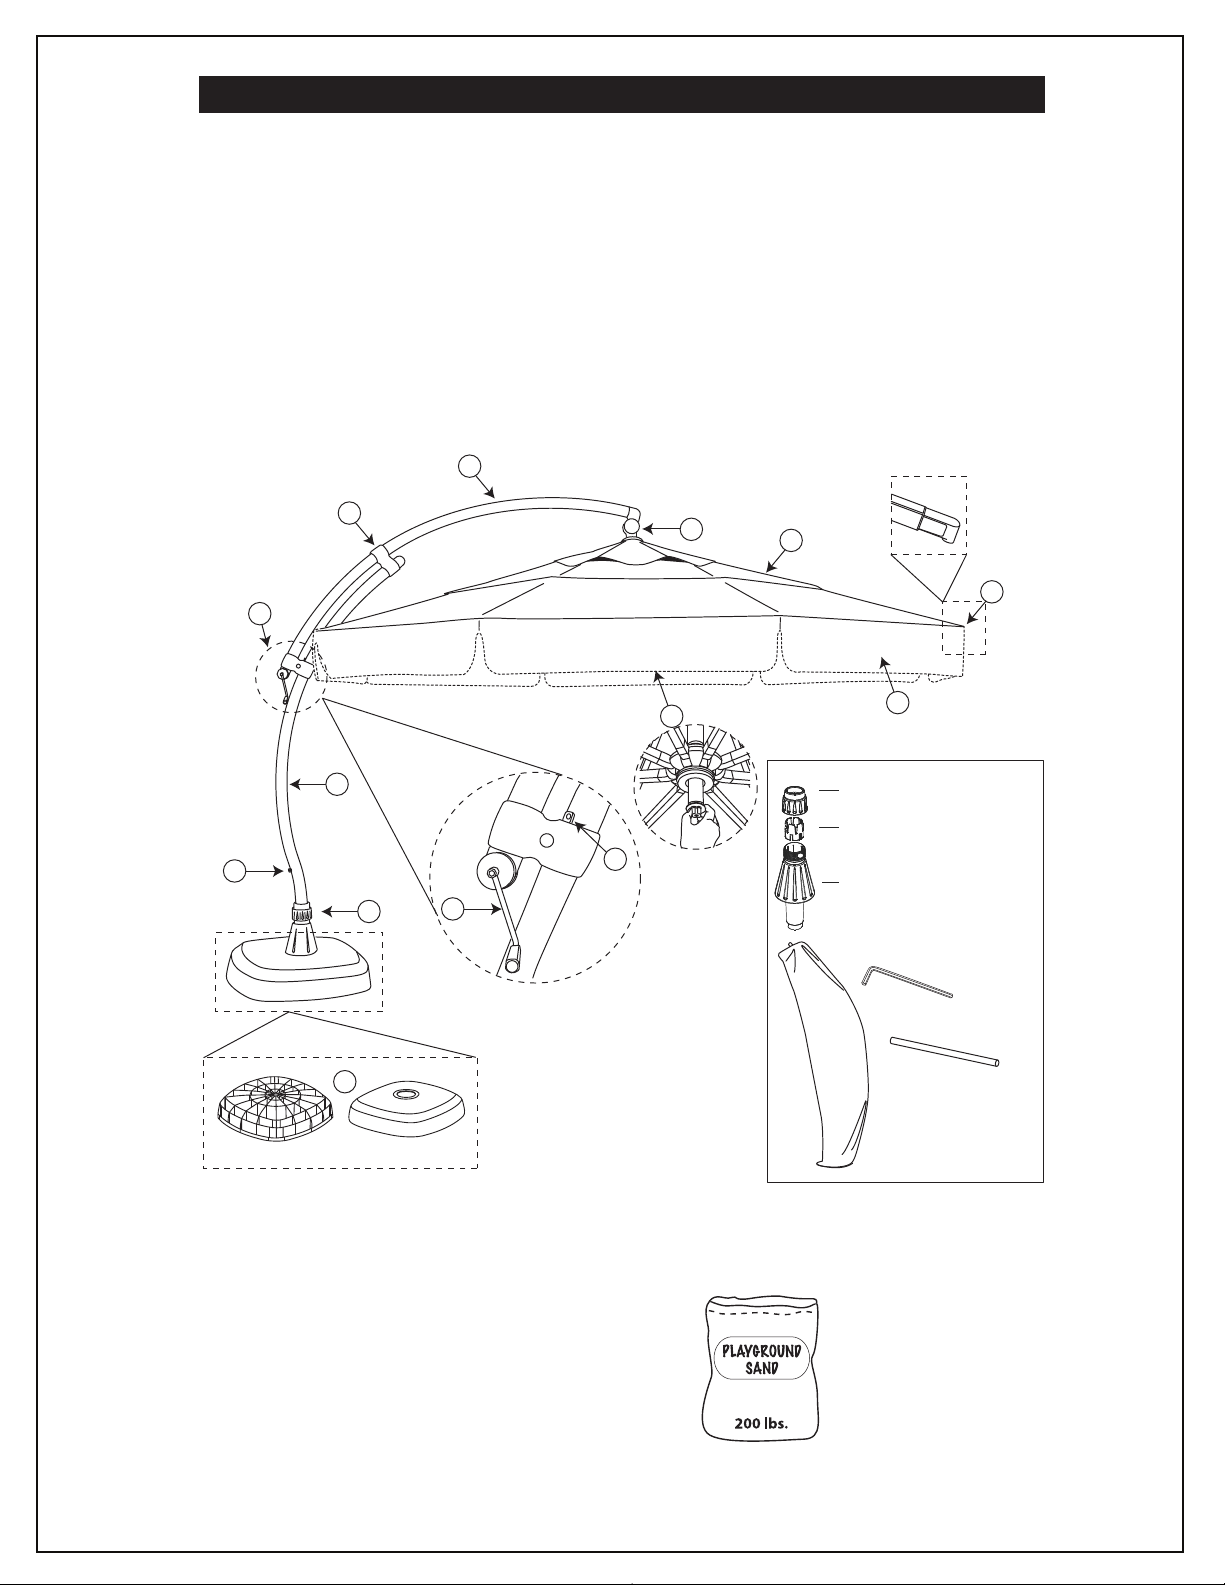
CAUTION: Fully assembled, the AG78/AG78SQ umbrella weighs over 300 lbs.
Moving the umbrella fully assembled will increase the risk of damage to your umbrella
and can cause serious injury. We recommend a two-person team to assemble or
disassemble the umbrella.
This manual suits for next models
2
Table of contents
Popular Tent manuals by other brands

Coleman
Coleman 2000002250 user manual

Primal
Primal Treestand Hub PTHU-134 Instruction and safety manual

Circutor
Circutor PV2 Series installation guide

Sunjoy
Sunjoy 10'x12' Bay Window Gazebo instruction manual

Everbilt
Everbilt NS HPP100 Use and care guide

Dometic
Dometic Rally Pro 260l Rally Pro 330 Installation and operating manual