BAOJIE BJ-318 User manual

BAOJIE BJ-318
User's Manual

Copyright (C) 2021 Mark W. Hartong
This document is free: you can redistribute it and/or modify
it under the terms of the GNU General Public License as published by
the Free Software Foundation, either version 3 of the License, or
any later version.
This document is distributed in the hope that it will be useful,
but WITHOUT ANY WARRANTY; without even the implied warranty of
MERCHANTABILITY or FITNESS FOR A PARTICULAR PURPOSE. See the
GNU General Public License for more details.
You should have received a copy of the GNU General Public License
along with this document. If not, see <https://www.gnu.org/licenses/>.

Table of Contents
Front Panel Description ........................................................................................................... 1
Symbols on the display .................................................................................................................... 2
Microphone Handset Controls ................................................................................................. 3
Functions of control buttons ............................................................................................................ 4
Changing the Frequency ................................................................................................................... 4
Changing the Chanel ........................................................................................................................ 4
Changing the radio output power "HIGH/MED/LOW" ...................................................................... 4
Changing the modulation width "W / N" .......................................................................................... 5
Turning on the "COMP" compander ................................................................................................. 5
Enabling the "SRMR" scrambler ....................................................................................................... 5
Setting the direction of the transmission frequency shift "SFT" ........................................................ 5
Changing the step of the frequency transition "STEP" ...................................................................... 6
Fast reverse of the transmit and receive frequencies "REV" ............................................................. 6
Switching on the FM radio "FM" ...................................................................................................... 6
Setting the threshold for opening the squelch "SQL" ........................................................................ 6
Scanning "SCAN" ............................................................................................................................. 6
In channel mode: ................................................................................................................................................. 6
In frequency mode: .............................................................................................................................................. 7
Locking the EXIT buttons .................................................................................................................. 7
Manually saving the frequency settings to a memory location "MEM" ............................................ 7
Clearing a memory location “DEL” ................................................................................................... 7
Front Panel Menu Operation ................................................................................................... 8
Description of menu items ............................................................................................................... 8
Personal and group call ........................................................................................................ 11
Personal call .................................................................................................................................. 11
Group call to specific stations ........................................................................................................ 12
Remote control of the unit .................................................................................................... 12
Native ID Code ............................................................................................................................... 12
Master Control ID Code .................................................................................................................. 13
Alarm Code .................................................................................................................................... 13

Identity Display Code ..................................................................................................................... 13
Revive Code ................................................................................................................................... 13
Remote Stun code .......................................................................................................................... 13
Remote Kill code ............................................................................................................................ 13
Remote Monitor Code ................................................................................................................... 13
Current state ................................................................................................................................. 14
Manually Programming ........................................................................................................ 14
Technical Specifications ........................................................................................................ 15
Appendix A: Standard Components ...................................................................................... 17
Appendix B. CHIRP Programing ............................................................................................. 18
Download and Upload Instructions ................................................................................................ 18
BJ-318 Menu Options ..................................................................................................................... 20
BJ-318 Limitations .......................................................................................................................... 23
List of Tables and Figures
Figure 1: BJ-318 Front Panel .......................................................................................................... 1
Figure 2: Microphone ..................................................................................................................... 3
Figure 3: Example of remote-control values ............................................................................... 12
Figure 4: Dimensions ................................................................................................................... 16
Figure 5: CHIRP Computer Port, Make and Model Selection ..................................................... 18
Figure 6: CHIRP BJ-318 Download Instructions (Upload Similar) ............................................... 19
Figure 7: CHIRP BJ-318 Specific Information ............................................................................... 19
Figure 8: CHIRP BJ-318 Memories Upper (Lower Memories Similar) ......................................... 20
Figure 8: CHIRP BJ-318 Basic Settings .......................................................................................... 20
Figure 9: CHIRP BJ-318 VFO A Upper Settings (VFO B Lower Similar) ........................................ 21
Figure 10: CHIRP BJ-318 Power-on and Frequency Limits .......................................................... 21
Figure 12: CHIRP BJ-318 Codes and DTMF Group ....................................................................... 22
Table 1: Display Options ................................................................................................................ 3
Table 2: Menu Options ................................................................................................................ 11
Table 3: Specifications ................................................................................................................. 15
Table 4: CHIRP BJ-318 Limitations ............................................................................................... 23

1
Front Panel Description
Figure 1: BJ-318 Front Panel
1. "ON / OFF" Power.
2. Microphone Jack and Programming Cable Jack
3. VFO Receiver: "A or B" (“A” Top, “B” Bottom)
4. Operating Mode: "V / M" (V= frequency / M = memory channel).
5. FM Radio reception.
6. Locking control buttons, as well as the "EXIT" menu function.
7. Display.
8. Decrease the speaker volume "VOL -".
9. Decrease the channel number or frequency "CH -".
10. "MENU" Mode Selection Button.
11. Increase the channel number or frequency "CH -".

2
12. Increase the speaker volume. "VOL +".
13. Receive signal indicator - "RX".
14. Transmit signal indicator - "TX".
Symbols on the display
Symbol
Meaning
MAIN
Active Receiver
CS
CTCSS subtone on receive
(If CTCSS is included in transmission, it is indicated only during
transmission)
DS
DCS subtone on receive
(If DCS is included in transmission, it is indicated only during transmission)
The mode of operation via a repeater is enabled
m
Scrambler enabled
C
Compander enabled
R
The function of reversing the receiving and transmitting frequencies is
turned on.
+
Offset of the transmit frequency from the receive frequency up
-
Offset of the transmit frequency from the receive frequency down
N
Narrowband modulation enabled
W
Wideband
H
High transmit power (HIGH)
M
Medium transmit power (MIG)

3
Symbol
Meaning
L
Low transmit power (LOW)
VOL
Volume
Keypad lock enabled. (Turn off by long pressing the [EXIT] button on the
front panel of the station)
Table 1: Display Options
When transmitting the display screen indicates transmitting signal strength and when receiving,
the screen indicates receiving signal strength.
In channel mode, the channel serial number is shown under the frequency and channel name.
When setting the menu, screen shows the current menu number, indicating receiving and
transmitting frequency, FM frequency, menu, menu value and other status.
Microphone Handset Controls
Note! Volume can NOT be controlled from the microphone.
Figure 2: Microphone

4
1. "PTT" -/ Release to end to transmission.
2. Selecting the VFO Receiver: "A-B"
3. Switching Operating Modes: "V / M" (frequency / channel).
4. "MENU" Mode Selection.
5. "EXIT" from menu.
6. Increase the channel number or frequency "CH -".
7. Decrease the channel number or frequency "CH +".
8. Keypad.
9. Microphone.
10. "TX" Indicator.
Functions of control buttons
[PTT] Key to work, to transmit.
Note: Without antenna attached, do not press PTT
[A / B] Receiver selection button: A or B
An icon appears on the screen opposite the selected receiver.
[V / M] Station mode select button
When pressed, a sequential change of modes occurs:
1. Frequency - a previously set frequency is displayed.
2. Channel - displays the frequency of the programmed channel.
3. Channel - displays the channel name set through the computer.
Changing the Frequency
1. Press A/B to select the required receiver [A or B].
2. Use the [▼] [▲] buttons to select the desired value: OR
3. Input Desired Frequency directly
Changing the Chanel
1. Press A/B to select the required receiver [A or B].
2. Use the [▼] [▲] buttons to select the desired value:
Changing the radio output power "HIGH/MED/LOW"
Note! The function works only in frequency mode.
1. Select the required receiver [A or B].
2. Press the [MENU] button.
3. Then press the [H / L] button.
4. Use the [▼] [▲] buttons to select the desired value:
"HIGH" - power 25W.
"MIG" - power 10W.
"LOW" - power 5W.

5
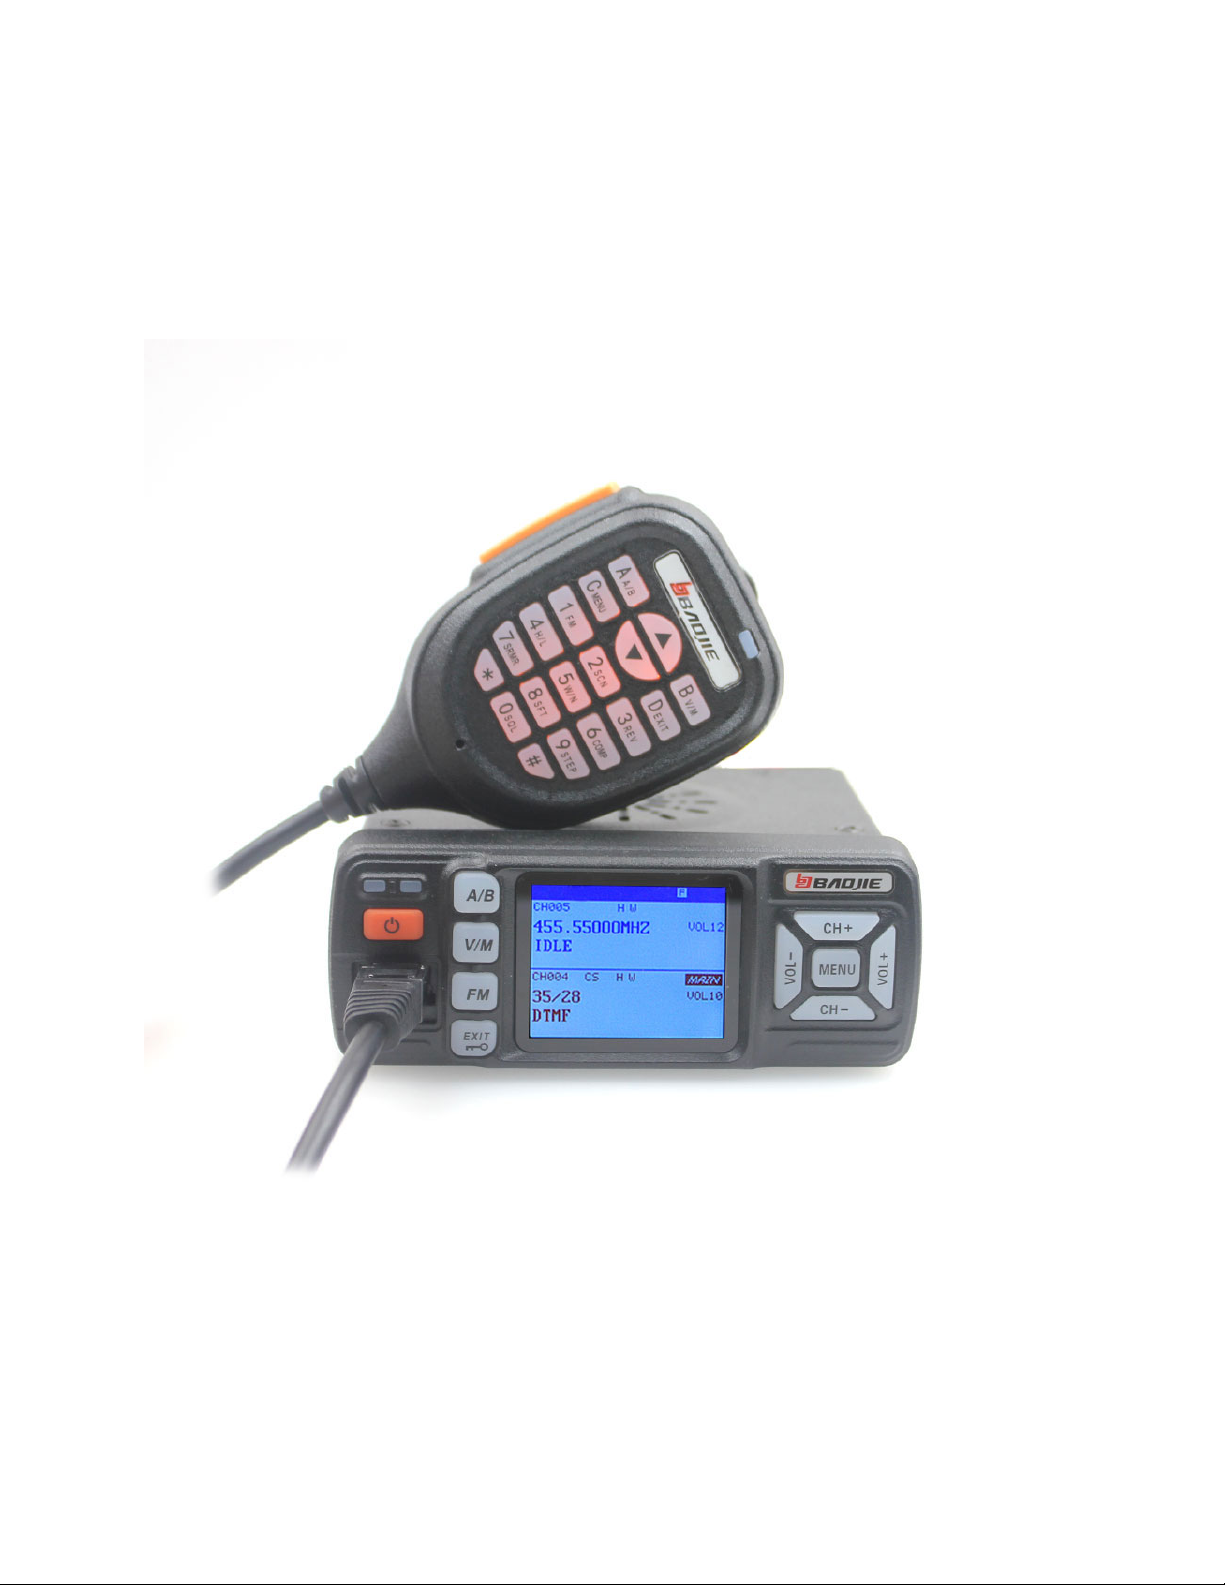
5. Save the selection by pressing the [MENU] button. When high power is selected, the
“H” indicator will appear on the screen, when mid power is selected, the “M” indicator
will appear on the screen, and when low power is selected, the “L” indicator will appear
on the screen.
Changing the modulation width "W / N"
Note! The function works only in frequency mode.
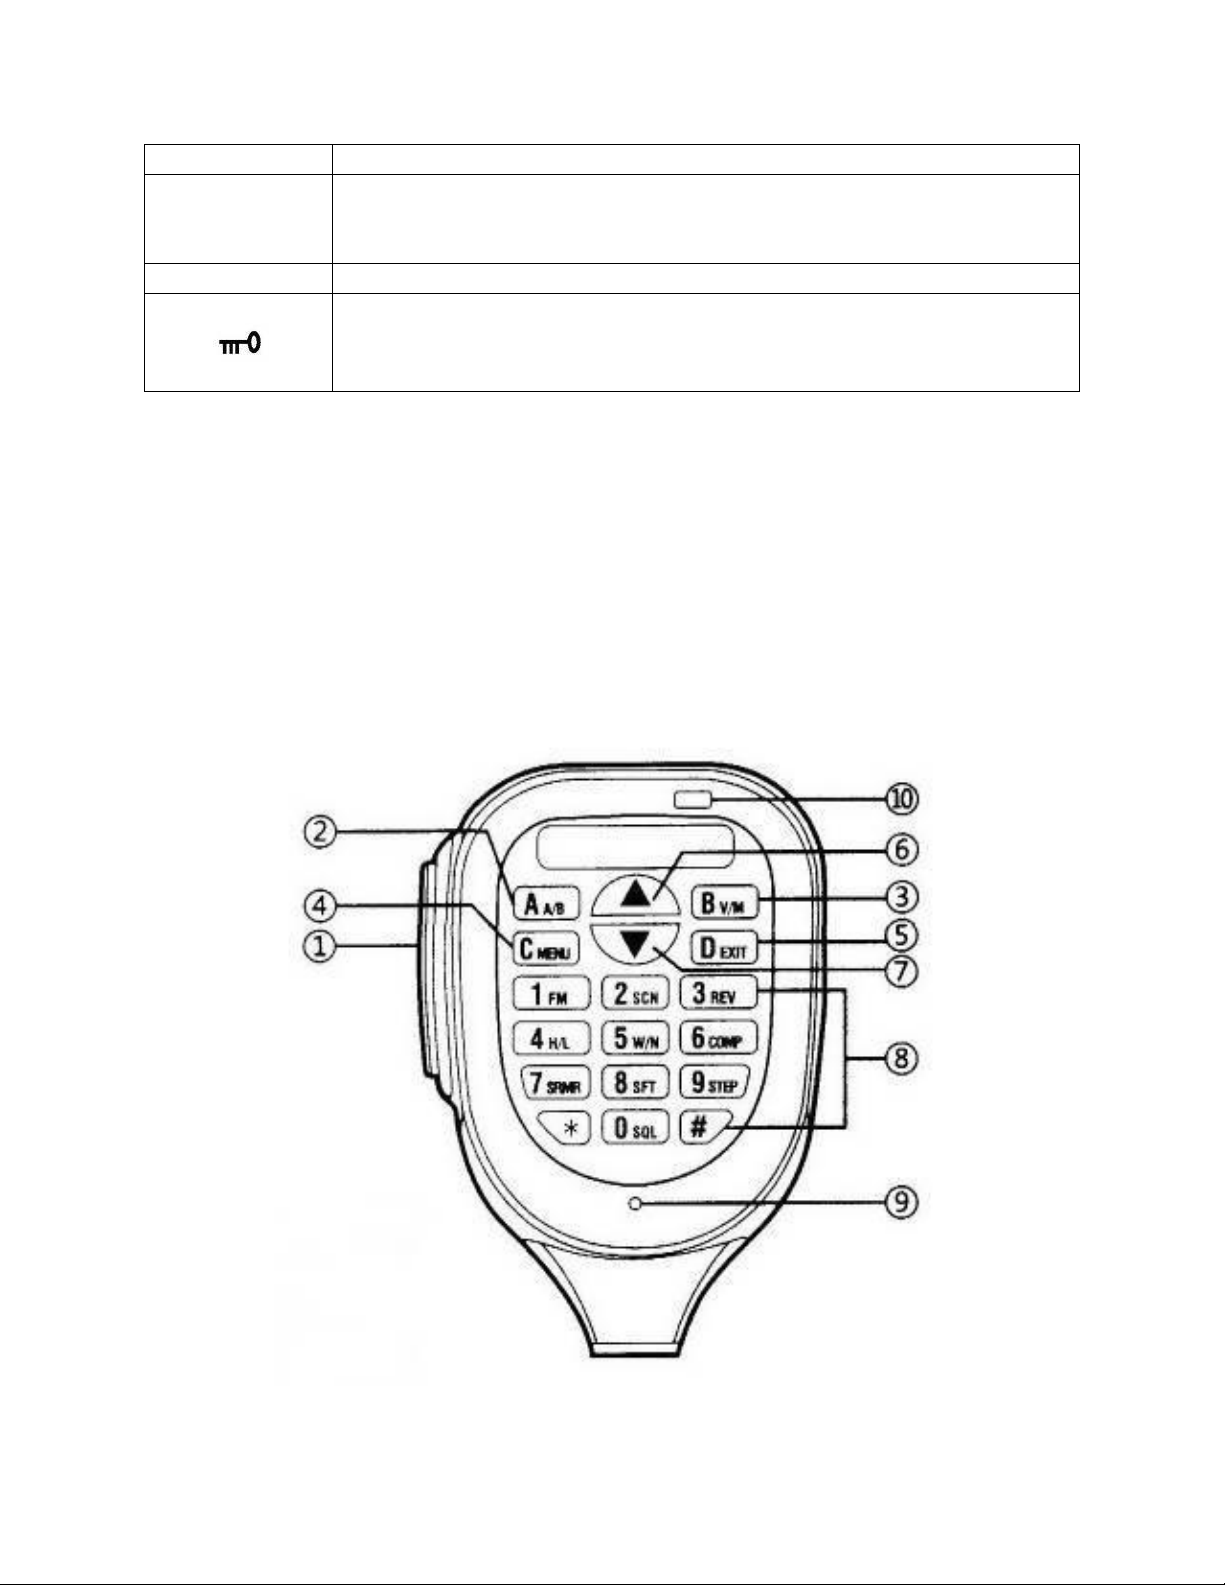
1. Select the required receiver, press the [MENU] button, then the [W / N] button.
2. Use the [▼] [▲] buttons to select the desired value:
"WIDE" stands for broadband.
"NARR" stands for narrowband.
3. Save the selection by pressing the [MENU] button. When narrowband modulation is
selected, the “N” indicator will appear on the screen, and when wideband modulation is
selected, the “E” indicator will appear on the screen.
Turning on the "COMP" compander
Note! The function works only in frequency mode.
1. Select the required receiver, press the [MENU] button, then the [COMP] button.
2. Use the [▼] [▲] buttons to select the desired value:
"ON" - the compander is on.
"OFF" - the compander is off.
3. Save the selection by pressing the [MENU] button. When the compander is on, the "D"
indicator will appear on the screen.
Enabling the "SRMR" scrambler
Note! The function works only in frequency mode.
Not authorized for use in the US by the FCC
1. Select the desired receiver, press the [MENU] button then the [SRMR] button.
2. Use the [▼] [▲] buttons to select the desired value:
"ON" - the scrambler is on.
"OFF" - the scrambler is disabled.
3. Save the selection by pressing the [MENU] button. When the scrambler is on, the "T"
indicator will appear on the screen.
Setting the direction of the transmission frequency shift "SFT"
Note! The function works only in frequency mode.
1. Select the required receiver, press the [MENU] button, then the [SFT] button.
2. Use the [▼] [▲] buttons to select the desired value:
"+" - the transmission frequency will be higher than the reception frequency.
"-" - the transmission frequency will be lower than the reception frequency.
"OFF" - no shift.

6
3. Save the selection by pressing the [MENU] button. When you set the shift, the "+" or "-"
indicator will appear on the screen, respectively. The shift value is set in menu 15
OFFSET.
Changing the step of the frequency transition "STEP"
Note! The function works only in frequency mode.
1. Select the required receiver, press the [MENU] button and then the [STEP] button.
2. Use the [▼] [▲] buttons to select the desired value:
2.5kHz / 5kHz / 6.5kHz / 10kHz / 12.5kHz / 25kHz / 50kHz.
3. Save the selection by pressing the [MENU] button.
Fast reverse of the transmit and receive frequencies "REV"
Note! Reverse turns on even with the same transmit and receive frequencies.
1. Select the required receiver, press the [MENU] button and then the [REV] button.
2. When the reverse mode is turned on, the "R" icon will appear on the screen.
3. To disable reverse, press the [MENU] button again and then the [REV] button.
Switching on the FM radio "FM"
1. Press the [MENU] button then the [FM] button.
2. Press one of the [▼] [▲] buttons, the frequency scrolling will start, which will stop
when the first FM station is found.
3. To retune to the next FM station in frequency, press [▼] [▲] again.
FM station reception stops if a signal appears on one of the main receivers. FM station
reception resumes a few seconds after the signal is lost on the main receivers.
Switching off the reception of an FM station is done by pressing the [EXIT] button.
A specific default FM station can be set using software to program it.
Setting the threshold for opening the squelch "SQL"
Note! The function works only in frequency mode.
1. Select the required receiver, press the [MENU] button and then the [SQL] button.
2. Use the [▼] [▲] buttons to select the desired value from SQ 0 to SQ 9
The lower the value, the more sensitive the transceiver. The squelch is completely disabled,
with a value of SQ 0.
Scanning "SCAN"
In channel mode:
1. Press the [MENU] button then the [SCN] button. The channel search will start in the
direction of increasing the channel number.

7
2. Using the [▼] [▲] buttons, you can change the "direction" of scanning on the fly.
Scanning stops on the channel in which a signal is present and continues if the signal
stops.
You can forcibly continue scanning by pressing one of the [▼] [▲] buttons.
Stop scanning by pressing the [EXIT] button.
In frequency mode:
1. Press the [MENU] button then the [SCN] button. The scrolling of frequencies will start
up in increments set in the 16 STE menu.
2. Using the [▼] [▲] buttons you can change the "direction" of scanning.
Scanning stops at the frequency that has a signal and continues if the signal stops.
You can forcibly continue scanning by pressing one of the [▼] [▲] buttons. Stop
scanning by pressing the [EXIT] button.
Locking the EXIT buttons
Note! When the lock is on, only the [PTT] key remains active.
To lock, you need to press the [EXIT] button for an extended period (>2 seconds). This
function works by pressing the [EXIT] button on the front panel of the transceiver only.
To unlock, repeat the same action.
Manually saving the frequency settings to a memory location "MEM"
Note! The function works only in frequency mode
1. Select a receiver and set the desired receive frequency. Do not forget to set the power
and subtones, if necessary, set the direction and value of the transmission frequency
shift.
2. Enter the menu by pressing the [MENU] button twice. Use the [▼] [▲] buttons to select
the 17 CH-MEM menu item, confirm the selection by pressing [MENU].
3. By buttons [▼] [▲] select the desired memory cell, confirm the selection by pressing
[MENU].
Clearing a memory location “DEL”
Note! The function works only in frequency mode
1. Enter the menu by pressing the [MENU] button twice.
2. Use the [▼] [▲] buttons to select the 18 CH-DEL menu item, confirm the selection by
pressing [MENU].

8
3. By buttons [▼] [▲] select the desired memory cell, confirm the selection by pressing
[MENU].
Front Panel Menu Operation
1. To enter the menu, press the [MENU] button twice, the display will show the name of
the menu item, and to the right its number.
2. Move to the desired menu item using the [▼] [▲] buttons.
3. To change the selected option, press the [MENU] button again, and the current value
of the parameter will appear in the line.
4. Select the desired parameter value using the [▼] [▲] buttons or type using the
keyboard if the value is numeric.
5. To save the entered parameter, press the [MENU] button again.
6. Exit from the menu mode by pressing [EXIT] or [PTT].
Description of menu items
Menu
Number
Function Name
Function Description
Values
01
R-CTC
Sets the CTCSS analog
sub-tone for reception
Selectable values from 67.0 to
254.1Hz or OFF
02
R-DSCN
Sets the DCS digital
subtone for reception
(direct codes).
Selectable code values from
D023N to D754N or OFF.
03
R-DCSI
Sets the DCS digital
subtone for reception
(reverse).
Selectable code values from
D023I to D754I or OFF.
04
R-MOD
Opens the Speaker
QT - opens when the received
CTCSS code is correct.
QT + ANI - opens upon receipt
of both valid codes, CTCSS and
ANI.
Note: The ANI ringing tone is
always heard, regardless of
the option selected, unless
disabled in the 24 RING menu
05
T-CTC
Sets the CTCSS subtone
for transmission.
Selectable values from 67.0 to
254.1Hz or OFF
06
T-DCSN
Sets the DCS digital
subtone for
transmission (direct
codes).
Selectable values from D023N
to D754N or OFF
07
T-DSCI
Sets the DCS digital
subtone for
Selectable code values from
D023I to D754I or OFF

9
Menu
Number
Function Name
Function Description
Values
transmission (reverse
codes).
08
T-DTMI1
Transmits preset DTMF
code
Codes transmitted by
pressing the [PTT]
button.
OFF - codes are not
transmitted.
DTMF1 - DTMF8 - one of eight
preset DTMF codes is
transmitted D1 + ANI - D2 +
ANI - one of eight DTMF codes
and an ANI code are
transmitted.
ANI - only ANI code is
transmitted.
09
T-DTM2
Transmits preset DTMF
code
Codes transmitted
when the [PTT] button
is released.
OFF - codes are not
transmitted.
DTMF1 - DTMF8 - one of eight
preset DTMF codes is
transmitted D1 + ANI - D2 +
ANI - one of eight DTMF codes
and an ANI code are
transmitted.
ANI - only ANI code is
transmitted.
10
POWER
Transmitter Power
Level
"HIGH" - large (25W).
"MIG" - medium (10W).
"LOW" - small (5W).
11
W/NA
Channel Bandwidth
"WIDE" Chanel spacing of 25
kHz.
"NARR" Chanel spacing of 12.5
kHz.
12
COMP
Comapner
"ON" Compander is on.
"OFF" Compander is off.
13
SRMR
Scrambler
"ON" Scrambler is on.
"OFF" Scrambler is disabled.
14
SFT
The direction of the
shift of the transmit
frequency relative to
the receive frequency
OFF - no shift.
"+" - the transmission
frequency will be higher than
the reception frequency.
"-" - the transmission
frequency will be lower than
the reception frequency.

10
Menu
Number
Function Name
Function Description
Values
Used in conjunction with
menu item 15 OFF SET
15
OFFSET
The value of the offset
of the transmit
frequency from the
receive frequency.
Values 00.000 to 90.000 MHz.
Used in conjunction with
menu item 14 SFT.
16
STEP
Frequency Step
Possible values: 2.5 / 5 / 6.25 /
10 / 12.5 / 25/50 kHz.
17
CH-MEM
Saving a channel to a
memory location
Values 0-127
18
CH-DEL
Delete a Channel in a
memory location
Values 0-127
19
LED-SW
Backlight Operating
Mode
"ON" - the backlight is always
on
"AUTO" - the backlight is on
for 10 seconds after the last
event.
20
BEEP
Button Confirmation
Push Sound
"ON" - there is confirmation.
"OFF" - no confirmation.
21
RING
Loudspeaker alert on
receipt of ANI code
OFF - the call signal is not
played.
1s-9s - the duration of the
ringing tone in the speaker.
22
BCL
Disable transmission
on a busy frequency.
ON - transmission is
prohibited.
OFF - transmission is allowed.
Note: The transmission
indicator on the headset is on
in any case.
23
TOT
Limiting the time of
continuous
transmission.
OFF
Possible values: 30 - 600 sec.
(in 30 sec increments).
24
TONE
Repeater Open Tone
Possible values:
1000/1450/1750/2100 kHz.
A tone is output during
transmission by pressing one
of the [▼] [▲] buttons

11
Menu
Number
Function Name
Function Description
Values
25
DTM-TM
The interval between
digits in the DTMF
message
Possible values: 50/100/150 /
200mS
Note: During DTMF sending,
voice input from the
microphone is blocked
26
SQL
Sets the SQL squelch
value.
Possible values: SQL1-SQL9,
Recommended value is SQL 1
27
RPT (REV)
Switching on the
operating mode, via
the repeater
Possible values:
ON - enabled.
OFF - disabled.
28
DTMF
DTMF Tone Value
8 Tones Values-
29
ANI-ID
Observer the value of
the ANI-ID
ANI-ID can only be set by
programing
30
AB-SW
Enabling the operating
mode, dual
transmit/reception
Possible values:
ON enabled.
OFF disabled (SIMPLEX).
31
MODE
Operating Mode
A-B Mode
SCAN
32
LANGUAGE
Display Language
Chinese/English/Korean?
33
RESET
Factory Reset
RESET-NO
RSET-SET Clears Menu
RESET-ALL Clears Memories
and Menus
34
UP-STR-COLOR
Sets the VFO A Screen
Color (Upper)
BLUE/ SKY-BLUE/ BLACK/
PURPLE/ RED/ EMERALD
35
DN-STR-COLOR
Sets the VFO B Screen
Color (Lower)
BLUE/ SKY-BLUE/ BLACK/
PURPLE/ RED/ EMERALD
Table 2: Menu Options
Personal and group call
1. Select menu item 04 R-MOD, option "QT + ANI" (speaker opening method).
2. Set the time of the ring signal by ANI-code, in the 24 RING menu item.
Personal call
Press the [PTT] key and hold it down and enter the ANI-code of the called station on the
microphone key pad. At the end of the dialing, transmit the necessary information by
voice.

12
Group call to specific stations
For example, the group contains stations with ANI codes: 12345, 12789, 23888.
You can only make a call to stations whose ANI code begins with 12.
To do this, press the [PTT] key and type [1] [2] [*] [*] [*] on the microphone keypad.
In this case, the call will not sound in the station with ANI-code starting with 23. Note.
An asterisk [*] can replace any code digits, or even all.
Remote control of the unit
Note! You must first program the control codes using a computer (CHIRP).
In the program, the tab "DTMF Groups" Factory recommended settings.
The length of the control codes can be from 1 to 7 characters.
The length of the control codes can be from 3 to 5 characters.
Reset, Transmit Inhibit, Complete Inhibit and Monitor codes must start with "#". The
master code must be the same as the identification code.
Figure 3: Example of remote-control values
Native ID Code
Individual station ID-code. It is also ANI-code (Automatic number identification).

13
Master Control ID Code
Master code. Used to activate control codes.
Alarm Code
Alarm code. Upon receipt of this code, the receiving remote station outputs an alarm
signal to the speaker and the message "ALARM" on the display. If the ANI code is
received together with this code, then it is also displayed on the display.
The alarm can be turned off by pressing any of the buttons: [A], [B], [C], [D], [PTT].
Identity Display Code
Code for outputting DTMF messages to the display.
Upon receipt of this code, the station displays on the display all received DTMF parcels
after it. The code is active only during one transmission-reception.
Revive Code
Reset code for transmit and receive interlocks. ("Remote Stun Code" and "Remote Kill
Code").
To activate, press the [PTT] button, while holding it, dial the code for clearing the locks
(# 77) and then the master code of the required station (54321).
Remote Stun code
Transmission disable code. Prohibit transmission by a remote controlling party
To activate, press the [PTT] button, while holding it, dial the code for resetting the locks
(# 33) and then the master code of the required station (54321).
The blocking is deactivated by the reset code (# 77).
Remote Kill code
Code for disconnecting reception and transmission.
To activate, press the [PTT] button, while holding it, dial the code for resetting the locks
(# 44) and then the master code of the required station (54321).
The blocking is deactivated by the reset code (# 77).
Remote Monitor Code
Monitoring activation code to use the system to eavesdrop

14
To activate, press the [PTT] button, while holding it, dial the code for resetting the locks
(# 22) and then the master code of the required station (54321).
The selected station will go into transmit mode for 7 seconds. and it will be possible to
listen to their surroundings through their microphone.
In this case, the transmission indicator on the headset does not light up.
Current state
The current state of the station.
Normal - no blocking is enabled in the remote station
Stun - transmission from the remote station is blocked
Kill - blocking of reception and transmission in the remote station is enabled
Manually Programming
Use the arrows on the microphone or the “CH+” or “CH-”. After scrolling to an item press
the “Menu” key to select that item.
Use the microphone arrows or the “CH+” “CH-” keys to move through the sub menu
selections.
To set a selection press the menu key again. A long beep to confirms the selection.
Use the “Exit” key to back out of the menu.
To program a repeater in to the radio, follow these steps
1
.
Step 1. Enter the receive frequency.
Use the keypad on the microphone and enter 145.490
Step 2. Set the PL (T-CTC) Code
Menu > Menu > T-CTC (05) > Menu
Use the arrows to scroll through the various tones until you reach 141.3 then press
“Menu”
Step 3. Set the shift direction
Arrow up or down until SFT (14) > Menu > + - or off > Menu. it was “-”
Step 4. Set Offset
Arrow to OFFSET (15) > Menu > enter 00.600 > menu
(00.600 MHZ is normal Ham Offset).
Step 5. Set Power Level
Arrow to POWER (10) > High, Mig, Low > Menu
Step 6. Press “Exit” and verify the proper operation of your programmed information.
1
Example is for a 2-meter repeater with a receive frequency of145.490, a transmit frequency of
144.890, an offset of -0.6 MHZ, and a PL code of 141.3.

15
Step 7. Set to memory channel
Menu > Menu > CH-MEM (17) > arrow to wanted channel # > Menu > Menu >
Exit
Technical Specifications
Frequency range
VHF: 136 MHz - 174 MHz
UHF: 400 MHz - 480 MHz
Emitter class
F3E (FM)
Antenna impedance
50 Ω
Frequency stability
2.5 ppm (-10 ° C - + 60 ° C)
Working temperature
-20 ° C - + 60 ° C. -4 ° F - + 140 ° F
Voltage
13.8V (± 15%)
Current
Receive 0.3A (SOL)
Transmit 5A (Max.)
Power
L ≈ 5 W, M ≈ 10 W, H ≈ 25 W
Maximum Deviation
± 5 kHz
Spurious radiation
<-60 dB
Receiver sensitivity
0.2 μV (at 12 dB S / N)
Audio output power
2 W (resistance 8 Ω distortion 5%)
Table 3: Specifications
Make sure the red wire is connected with the positive polarity (+) and the black wire with the
negative polarity (-) of the power supply.
External speaker interface: Connect with an external speaker for better sound effect when
necessary. This interface can connect with a 3.5mm single channel plug.
Antenna interface: Connect external antenna to this interface. The impedance of the antenna
should be 50 Ω

16
Figure 4: Dimensions
Table of contents
Other BAOJIE Radio manuals