Barazza B90M5 Series Guide

CABAR
-
inglese REV.06
INSTRUCTION FOR
INSTALLATION
AND USE
CLASSIC COOKER
Module 90
Module 123
F.lli BARA A s.r.l.
F.lli BARA A s.r.l.F.lli BARA A s.r.l.
F.lli BARA A s.r.l.
31025 Sarano di Santa Lucia di Piave (TV)
Via Risorgimento, 14 – Tel +39 0438 62888 Fax +39 0438 64901
www.barazzasrl.it E-mail: info@barazzasrl.it

2
DEAR CUSTOMER
F.lli Barazza S.r.l. in present in the household appliances market for over 40
years. Now it would thank you to have bought its appliance and it want to assure
you the quality of this product. The use of this appliance is not so difficult, but we
would invite you, before starting use it, to read careful the instructions below.
FOREWORD
- This booklet accompanies the appliance and contains all the information you need to
use and take care of it.
- The user should read its instructions carefully and keep the booklet within reach.
- The manufacturer shall not be held responsible for damage caused by improper use
of the appliance, moving of the appliance with unsuitable means, unauthorized
modifications and whatever else is not considered in this booklet.
SAFETY
- The appliance must be installed and connected to the mains by qualified personnel
according to the norms in force and following the instructions in the chapter
"Instructions for the installer", The use of protective glasses and gloves is
recommended when unpacking and during maintenance,
- This appliance has been designed and manufactured only to cook food. Never open
it unduly or modify its characteristics and or use it for different purposes.
- Please make sure that children do not touch the control panel or play with the
appliance. The parts exposed during cooking warm up and will stay warm for a while
after switching the appliance off.
- After using the appliance make sure that the knobs are on the “off ” position. If the
appliance is near other units make sure the cables are far enough from their hot parts.
- Clean the appliance regularly. Residual food can cause risks of fire.
- It is a good rule never to put food or containers in the oven when it is off. This would
produce humidity and could cause accidents if switched on involuntarily
- Should the appliance malfunction, authorized and competent personnel shall repair it
to avoid any damage or incidents. Therefore please contact the after sales service.
- The disposal of the appliance should follow the laws in force.
This appliance is in compliance with the EEC requirement rules n. 89/336 on the
electromagnetic compatibility and 73/23 on low tension and 90/396 on gas appliances.
The instructions in this booklet are valid only for the country of destination, see symbol
on the front page.

3
CONTROL PANEL:
Art.
B90M5*
B90M5F*
B90M5*M
B90M5F*M
63421
5
Art.
B90M6*
B90M6*M
63
4
21
5
Art.
B120*
B120*M
63
4
21
5
7
Fig. 1
DESCRIPTION:
1 – Timer knob with end cook
2 – Thermostat knob
3 – Selector knob
4 – Thermostat light
5 – Main pilot light
6 – Gas knob
7 – Fry top knob

4
INSTRUCTION FOR THE USER
Important:
The appliance must be installed, regulated, connected to the gas network and
electric mains, as well as adapted to the type of gas it will be fed with by qualified
personnel, according to the norms in force and following the instructions in the
second part of the instruction booklet.
Metal utensils should not be left on top of cooker as they are prone to heat up and
cause burns.
Once installation has been completed, the oven must be tested (heated) empty, in
the following way:
-Ensure kitchen is well ventilated.
-Regulated the thermostat control know to maximum and turn selector to
either fan forced oven or conventional oven. See illustration on following
page.
-Heat the oven for sixty minutes. A little smoke and some odour may be
emitted when first switched on (from oven lagging and lubricants used
during manufacture) and will cease after a short period.
Allow the oven to cool down before cleaning it carefully with a damp cloth and a
mild detergent.
HOB
- Finding burners and description of control panel
To find the knob that corresponds to the burner to use, refer to the silk screen
printing on the control panel.
The symbol on the silk screen printing mean:
BURNER
5 BURNERS 6 BURNERS
BACK LEFT
FRONT LEFT
BACK RIGHT
FRONT RIGHT
MIDDLE
FRONT MIDDLE
BACK MIDDLE
5
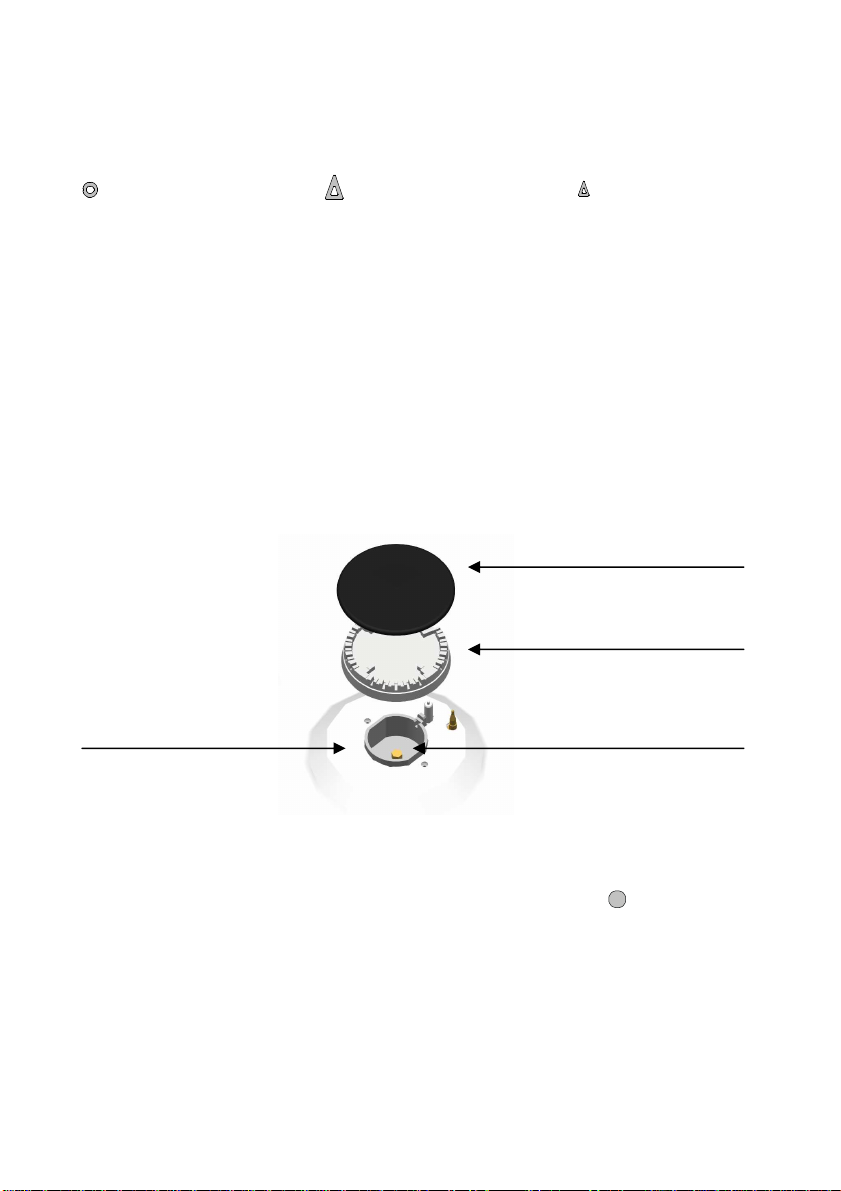
BURNER COVER
BURNER
INTERCHANGEABLE NOZZLE NOZZLE HOLDER
- How to use the burners and the Fry Top
Next to each knob there is a symbol that shows which burner it refers to. Each
gas burner knob has the following symbols:
Stop
Maximum setting
Minimum setting
The burner should be turned on before putting the pan on the rung.
To turn a burner on, press the knob right down turning it counter-clockwise to
the maximum position and then press the electric ignition button. Let go of the
knob after 5 seconds. If the burner fails to stay alight, keep the knob pressed
right down longer to give the safety valve time to warm up.
Check that the flame is regular and turn the knob to the setting required.
If ignition is difficult or the flame irregular, check the correct position of the burner
and its cover ( Fig.2 ).
Fig.2
To turn the flame out, turn the knob clockwise to the symbol. Before
taking the pans off the rung, lower the flame or turn it out. If, when you’re using
the hob, the flame goes out accidentally the safety valve will stop the flow of
gas in about 40 seconds.
6
- Choosing the burners.
For a better use of the burners you should use pans with diameters that match
the size of the burners so as to have maximum efficiency using as little gas as
possible.
It is also essential when you are cooking to centre the pans on the burners and to
use their lids.
Burner Ø Pan in cm.
Small auxiliary
Medium semi fast
Big fast
Triple ring
Fish kettle burner
from Ø 6 to Ø 18
from Ø 15 to Ø 22
from Ø 20 to Ø 24
from Ø 24 to Ø 32
oval which cover the burner
As soon as the liquid in the pan starts to boil we advise turning the flame down
just enough to keep the liquid boiling.
It is important to remember that all the working positions must be selected
between the maximum and minimum position, never between the maximum and
stop position.
DO NOT USE the burners without the pan supports supplied. Simmering aids
such as asbestos or mesh mats are not recommended. They may impede burner
performance, and damage the pan supports.
- How to use the fry top
For reaching the operating temperature of the fry top, should turn on the gas
burner on the maximum level for 10 minutes, and then turn down it on the
minimum for other 5 minutes. In this way the temperature on the surface will
become uniform (265°C), start cook leaving the gas burner at the minimum level.
The fry top is designed with a basin so that the cooking oil ends inside. If you use
the fry top in the correct way, as instructions, the oil will never reach an right an
high temperature also if you leave it in the basin for a long time. If you want you
can raise the flame of the burner, but it implies a rise in temperature that could
cause: a speeder and not uniform cooking, bad smells and in the extreme cases,
the fire of the oil that is in the basin.
Attention:
This appliance must only be used for home cooking. When the appliance is
working it can get very hot so keep children away.
7
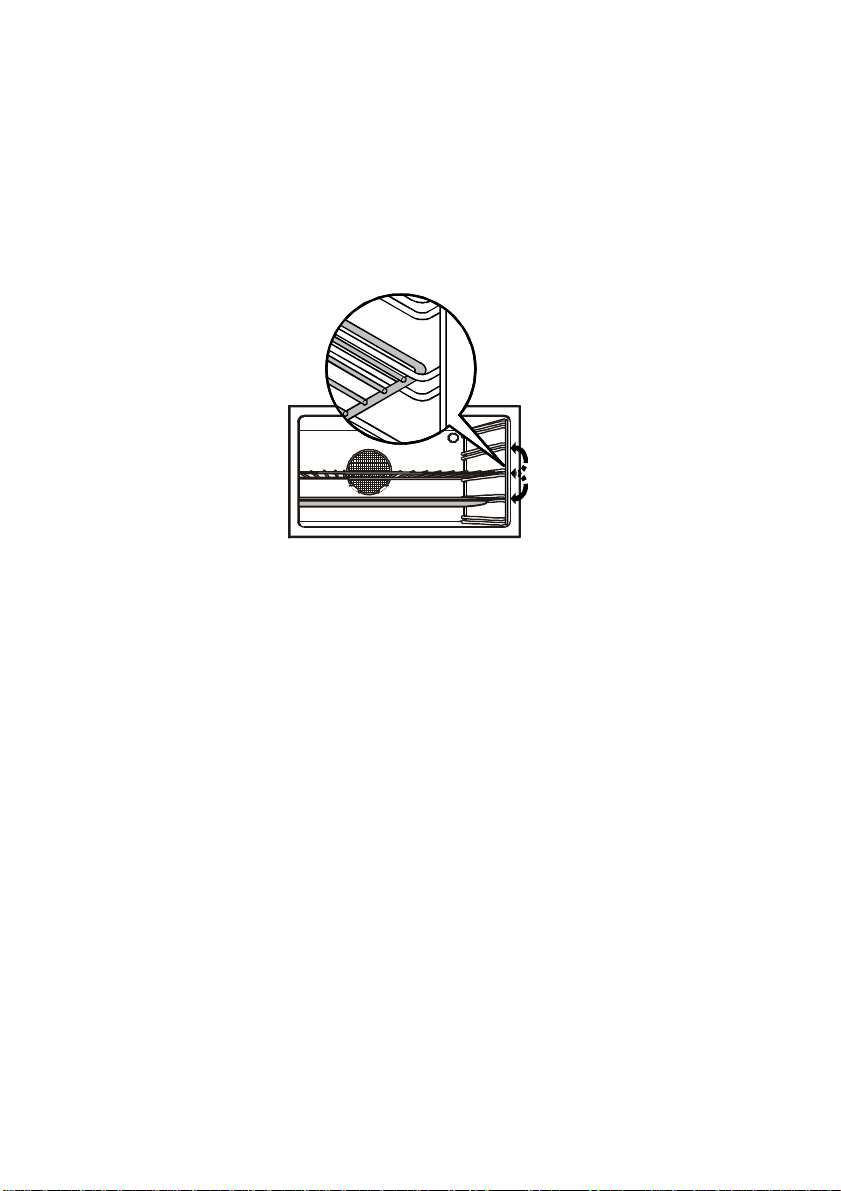
OVEN
During cooking time the oven door should be closed. Use an oven glove to take
food from the oven. The pans should be able to resist temperatures higher than
250 degrees.
Pay attention to the use of oil, especially if deposits remain on the bottom of the
oven: they could catch fire at high temperatures.
The grooves located inside the oven (Fig.3), offer different shelf position. These
positions allow you to finishing cooking your dishes to perfection.
Fig. 3
- Selector knobs and thermostat
To operate the electric oven use both the selector knob (3), see Fig. 1, that allows
you to choose the type of heating according to the different cooking needs, and
the thermostat knob (2) which should be set at the temperature required. The
symbols for the different types of heating are shown further on; once the desired
temperature has been reached the thermostat will keep it constant.
8
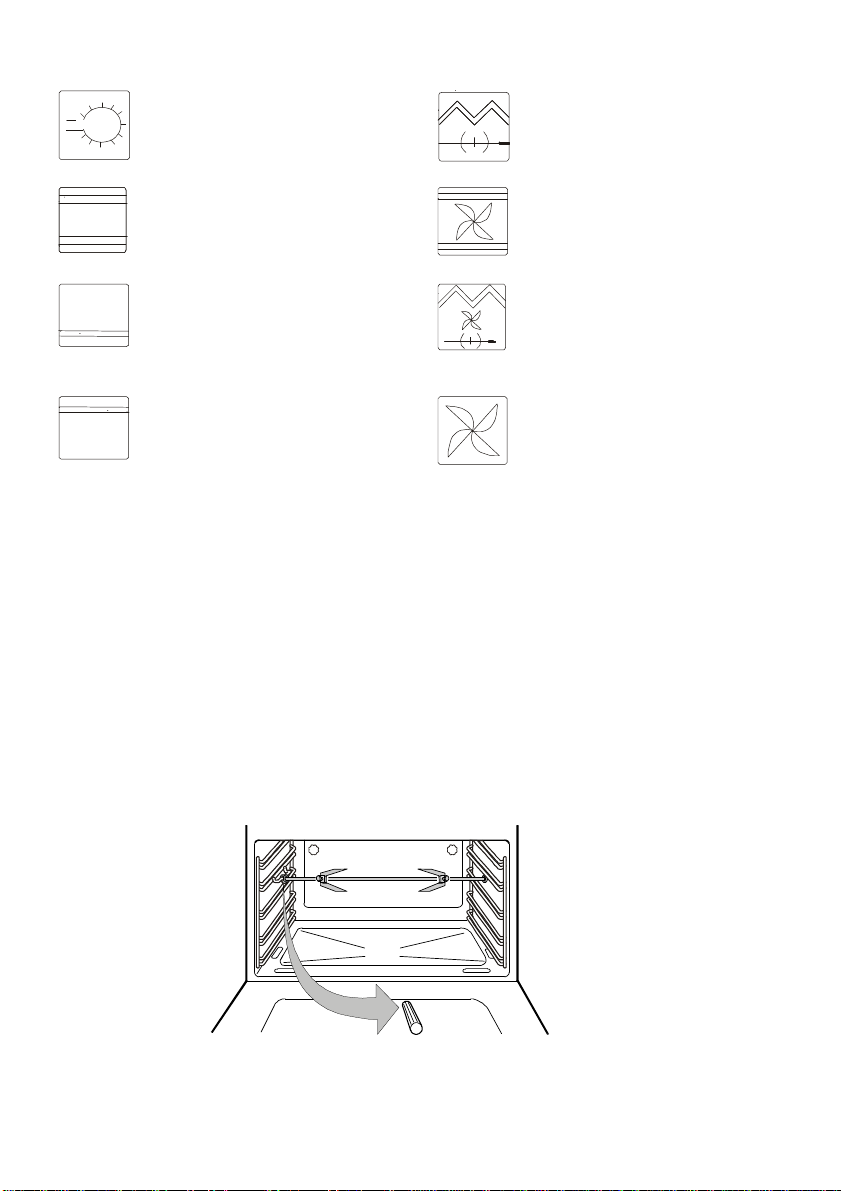
- Symbols of multifunctional oven knobs
General contacts and oven lamp.
Grill and spit.
For the grill and spit the top central
heating element and the spit are used
together. It is ideal for cooking meat on
the spit.
Traditional cooking.
Both the upper and lower heating
elements are on; it allows you to cook any
kind of dish; Ideal for cakes, pizza, roast
food and pies.
Intensive cooking.
The combination of the fan and
traditional cooking ensures rapid and
even cooking for delicate foods such as
biscuits and cakes.
Final cooking: warming up
.
Using only the lower heating element
gives the final touch to cooking and is
very useful to warm dishes up. It is
recommended to finish off cooking
biscuits, jam tarts and pies.
Fanned grill.
The combined action of the grill and the
fan ensures even cooking. Thick pieces
of meat and large dishes can also be
grilled perfectly.
Browning.
Dishes can be browned by using the
upper heating element. Very good results
with lasagna, pasta or vegetable pies.
Quick defrost.
Using just the fan, without any type of
heating, food is defrosted quickly and
optimally
- Control light
The ovens have two control lights. The first one, identified by n.5 (Fig.1), indicates that
any oven component is on, whereas the second, identified by n.4 is connected to the
thermostat and flashes. Showing that the thermostat is keeping the temperature
constant.
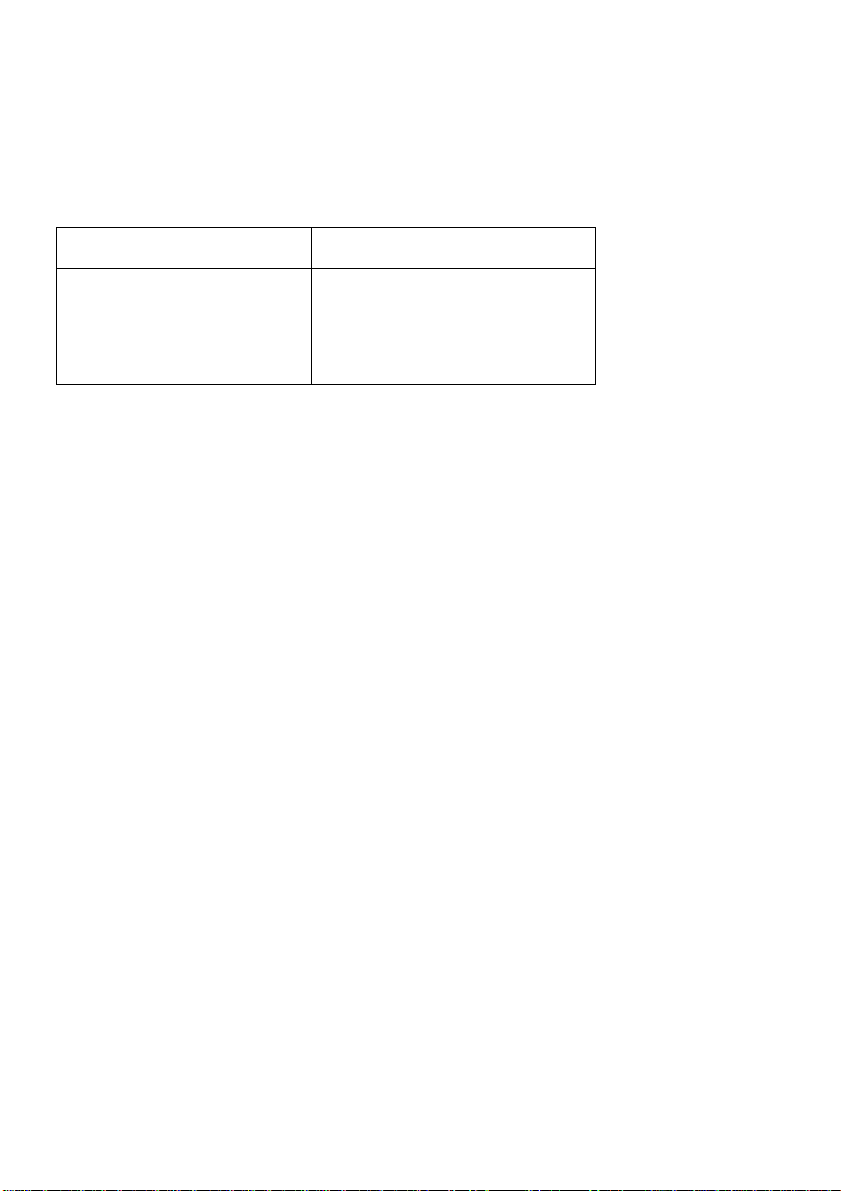
- Spit Roasting.
The oven comes supplied with spit roasting. Please refer to the picture Fig.4 for
correct positioning.
Remember to remove the plastic handle before inserting it in the oven.
Ensure the oven door is closed
Turn the selector knob to the grill and spit position as illustrated above and set the
temperature to 230°max.
Fig. 4
CAUTION
Accessible parts may be hot when the grill is in use. Young children should
be kept away.

9
- Timer with end of cooking time programmer
The appliance is fitted with a mechanical timer, which automatically turn off the
oven when the selected time expires. To set the time:
- Turn knob (rif.1 in fig.1) clockwise.
- Then move it back anti – clockwise to the desired time. (0 – 90 min). See
figure 5A for correct 30 minute position.
- An acoustic sound signals that cooking time has expired and turns oven off
automatically. See figure 5B.
- Remember to turn knob back to “normal” position. This allows the oven to be
used again. See figure 5C.
60
75
90
15
30
0
45
60
75
90
15
30
0
45
60
75
90
15
30
0
Fig. 5A
Fig. 5B
Fig. 5C
30 minutes to end of cooking
time In this position you will hear an
acoustic sound which signals
end of cooking time.
Position to be chosen if timer is
not to be used.
- Safety thermostat
To avoid dangerous overheating of the appliance due to incorrect use or a defect in
the components, the oven is provided with a safety thermostat that stops power
supply in case of malfunction. The thermostat starts working again automatically when
the temperature of the oven drops. Therefore, if the safety thermostat starts working
because of incorrect use of the oven, you should wait till it cools down and look for the
cause before using it again; if it starts because of defects in the components you
should call the after sales service.

10
COOKING ADVICE
Here is some information on ways of cooking some dishes and cooking times which
refer to optimal baking conditions. Since these conditions are often not found in the
private end user's appliance because of changes in the network voltage and because
cooking times differ according to the kind, volume and uniformity of the food, the user
should adapt this information to the actual situation of the oven checking the first
cooking results, until enough experience has been acquired to use the appliance at its
best. Open the oven door as little as possible when cooking.
By turning the knob to ‘browning’ it is possible to continue cooking the top part,
whereas ‘heating/final cooking’ allows you to continue cooking the lower part. For
further details turn to Symbols on Conventional oven knob
Type of food Selector Temperature °C
Cooking time
in minutes
Cakes
Cakes in baking tin,
Whisked dough
Cakes without baking tin
Pasty cakes in baking tin
Cakes in baking tin with leaven
Small cakes
Lasagna
Meat
(Cooking time needed for each cm of
thickness)
Poultry
Game
Vegetables
Fish
Pizza
Grill
Fun Grill
Panettone or flat cake
“Focaccia reale”
“Sublime” cake
Cake base
With fruit garnish
With dry garnish
Cake base
With ricotta cheese
With fruit
White bread 1 Kg of floure
Pastry
Puff pastry
Biscuits
Roasts
Lengthy cooking
Brief cooking
Meatloaf
Duck (1.5 - 2 kg)
Goose (3 kg)
Roast chicken
Turkey (5 kg)
Rabbit
Haunch of roe
Haunch of deer
Vegetable pie
Mullet
Chops
Sausages
Grilled chicken
To cook thick pieces of
meat and large quantities
of food gratin
175
175
175
175
175
175
200
200
200
200
200
200
200
200
175
200
200
200
200
200
175
20
200
175
200
200
240
200
200
200
180
180
55-65
60-70
60-70
30-40
50-60
40-50
8-10
25-35
25-35
25-35
10-15
30-45
15-20
50-60
12-15
10-12
30-40
120-180
150-210
60-90
240c.ca
60-90
90-150
90-180
40-45
40-50
15-20
15-20
20-25
60
20
20

11
INSTRUCTIONS FOR THE INSTALLER
Installation must be performed by a qualified installer and conform to local codes,
and carried out with extreme care.
Prior to installation, ensure that the local distribution conditions (nature of gas and
gas pressure) and the adjustments of the appliance are compatible.
The gas adjustment conditions for this appliance are stated on the data plate
located on the back of the appliance (see fig. 6).
Fig. 6
- Connection to the mains.
Check the following before connecting to the mains:
-The domestic network must be suitable for the load of the appliance; this
information is on the data plate on the rear of the oven Fig.6, on the guarantee
and the notes on “Technical characteristics”.
-The power supply must have an efficient earthing connection according to the
norms and local standards. In different case the earthing connection must be
make;
-The connection switch or socket must be within reach of the appliance installed;
The power supply cable, supplied with the appliance, should be provided with a
standardized plug that can take the load indicated on the data plate; the plug
should then be inserted in a suitable socket. If you want to connect the cable
directly to the distribution network, there must be an omnipolar switch with a
minimum opening of 3 mm between contacts.
This must be located between the appliance and the power network, in
accordance with the applicable safety standards; the green yellow earthing cable
must not be interrupted. In any case make sure that the power supply cable never
reaches, in any point, a temperature above 50°C.

12
1) NUT
2) GASKET
3) JOINT
- Connecting gas
-Ensure that it has been adjusted to local fuel types.
-If it has not been adjusted, follow adjustment instructions as set out in
‘Adjustments for alternative gas types’.
-If it is to be fuelled by liquid gas, only a certified and approved pressure
regulator is to be used.
-Connect the appliance to gas cylinder or other gas supply in accordance
with local codes and regulations.
- Connecting appliance
-The hob can be installed with either an approved stainless steel flexible
pipe or a rigid pipe.
-Connection is made to the GJ1/2” threaded elbow.
-The gasket has to guarantee the connection holds fast.
-The elbow can be turned by releasing the nut. Once the desired position
has been established it is to be tightened again.
The 123 cm. cooker with the fry top is equipped of two separated entrances for
the gas: one for burners and another one for the fry top.
Both must be connected to the gas installation in accordance with the current
regulations: for more information about this, see the chapter called “Gas
connection”.
Important: After installation check there are no leaks by using a soap
solution and never a flame.
The manufactured declines every responsibility if these safety
standards are not respected.
Fig. 7

13
TECHNICAL FEATURES
Dimensions: mod.90 mod.120
Height cm. 92 cm. 92
Width cm. 90 cm. 123
Depth cm. 65 cm. 65
Net content lt. 75 lt. 75
Heating elements and components:
Lower heating element W 1700
Upper heating element W 1000
Grill heating element W 2000
Oven light W 2 X 15
Rotisserie motor W 30
Tangential fan W 20
Max electric power absorbed: kW 2.8
Isolation category: I
Energy category: A
Feeling tension: 230V (50 Hz)
Oven accessories:
Drip pan 2
St.Steel grill 1
Pair spit holders 1
14
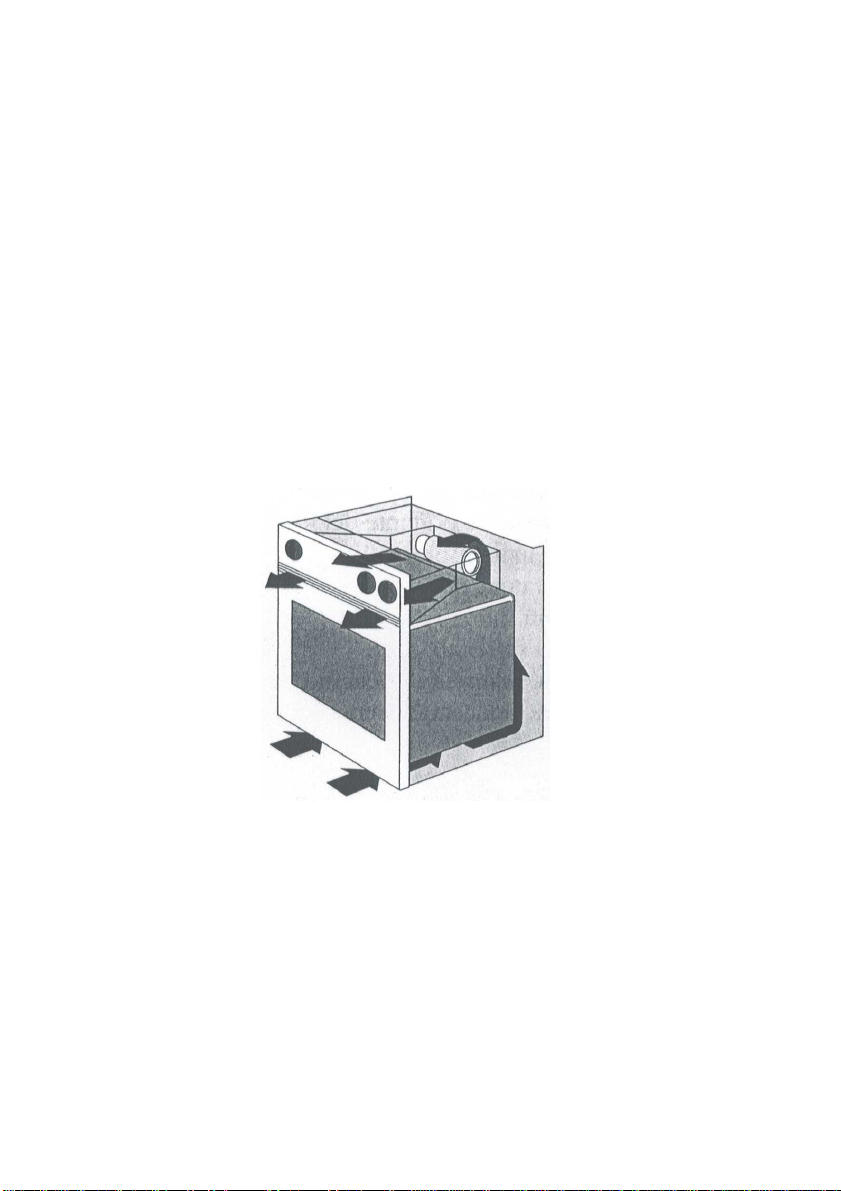
OVEN WITH TANGENTIAL FAN
All the multifunction ovens feature a tangential fan whose purpose is to stop steam
forming inside the oven which is a natural phenomena when cooking.
The fan works automatically whatever cooking is being done.
It is also true that even at the end of cooking steam can still form inside the oven: this
small inconvenience can be easily eliminated in one of the following ways:
1. Open the oven door, take the food out and close the oven door;
2. If you want to leave the food in the oven (maybe to finish cooking) then you must:
take the thermostat down to zero leaving the selector in the cooking position (this
way the oven turns off but the fan carries out working);
at the end, remove the food and move the selector to zero.
Fig. 8
15
MAINTAINANCE AND CLEANING
Disconnect from electricity and censure cooker is cold before servicing or
cleaning. If sprays are used, follow the manufacturer's instructions carefully and
do not direct the spray to the electric heating elements that are visible on the
upper part of the oven.
NB: DO NOT STEAM CLEAN
- Cleaning the internal parts of oven.
Wash the enamelled parts with warm water, detergent and a soft cloth.
Do not use scouring pads or abrasive substances as they ruin the enamel. Rinse
well and dry with a soft cloth. We advise cleaning the oven every time cooking
leaves residues, otherwise these will burn during the next cooking process and
make cleaning very difficult.
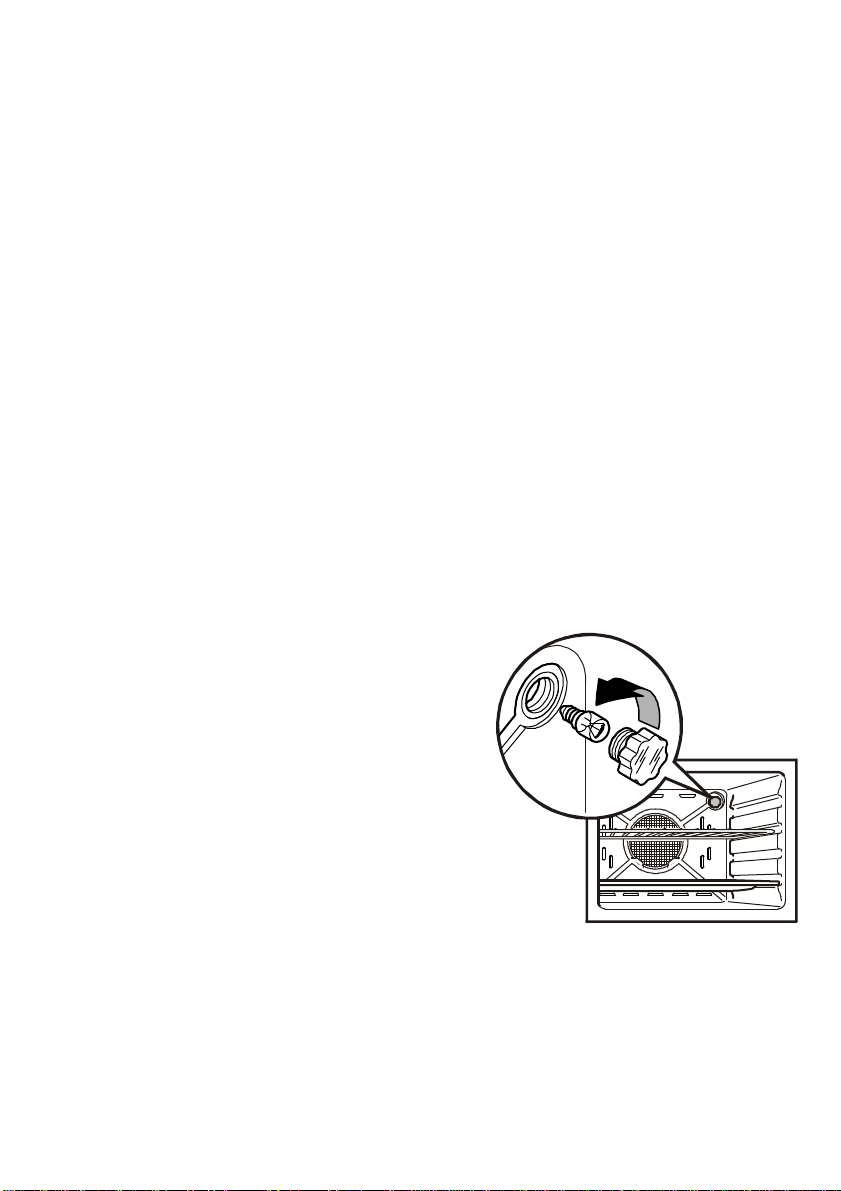
- Replacement of oven light
- Disconnect the appliance from the mains.
- Unscrew the glass protection Fig.9.
- Take out the light and replace it with another one with the same characteristics.
- Reassemble it all inversely.
Characteristics of light
- Power supply
230V
- Power
15W
- Coupling
E 14
- Resistant to temperature of
300°C.
Fig. 9

16
- Reparation electrical part
Before calling the after sales service check that:
- The plug is inserted in the socket well.
- The main switch in the house is on.
If necessary, have the appliance serviced by qualified personnel.
Remove the plug from socket before disassembling any part.
- Replacement of feed cable
The feed cable must be in HO5 RR-F, with a cross sectional area of 3x1.5 mm².
The cable can be replaced this way:
-open the terminal board (Fig.10);
-insert the wires to their terminals: N – L – Earth;
-the earthing wire is the yellow green one;
-fix the cable in its cable clamp;
-close the terminal board by pressing lightly on the lid until it shuts;
Fig.10
N.B.: After installation the lead must be accessible.

17
BURNER COVER
BURNER
INTERCHANGEABLE NOZZLE NOZZLE HOLDER
- Cleaning the hob
Before you start cleaning the hob wait until the rungs, burners and hotplates
are cold and then, for greater safety, turn the power off via the main switch.
Wash the enamelled, painted or chromium parts with warm water and soap or a
mild, non-corrosive liquid detergent, avoiding all abrasive substances. Do not
leave acid or alkaline substances (lemon juice, vinegar, etc.) on for any length of
time as they can ruin the surface. If your hob is in stainless steel, use a damp
cloth and a suitable, non-abrasive product, easily found on the market, or hot
vinegar. Dry with a soft cloth or chamois leather.
NB: Do not steam clean.
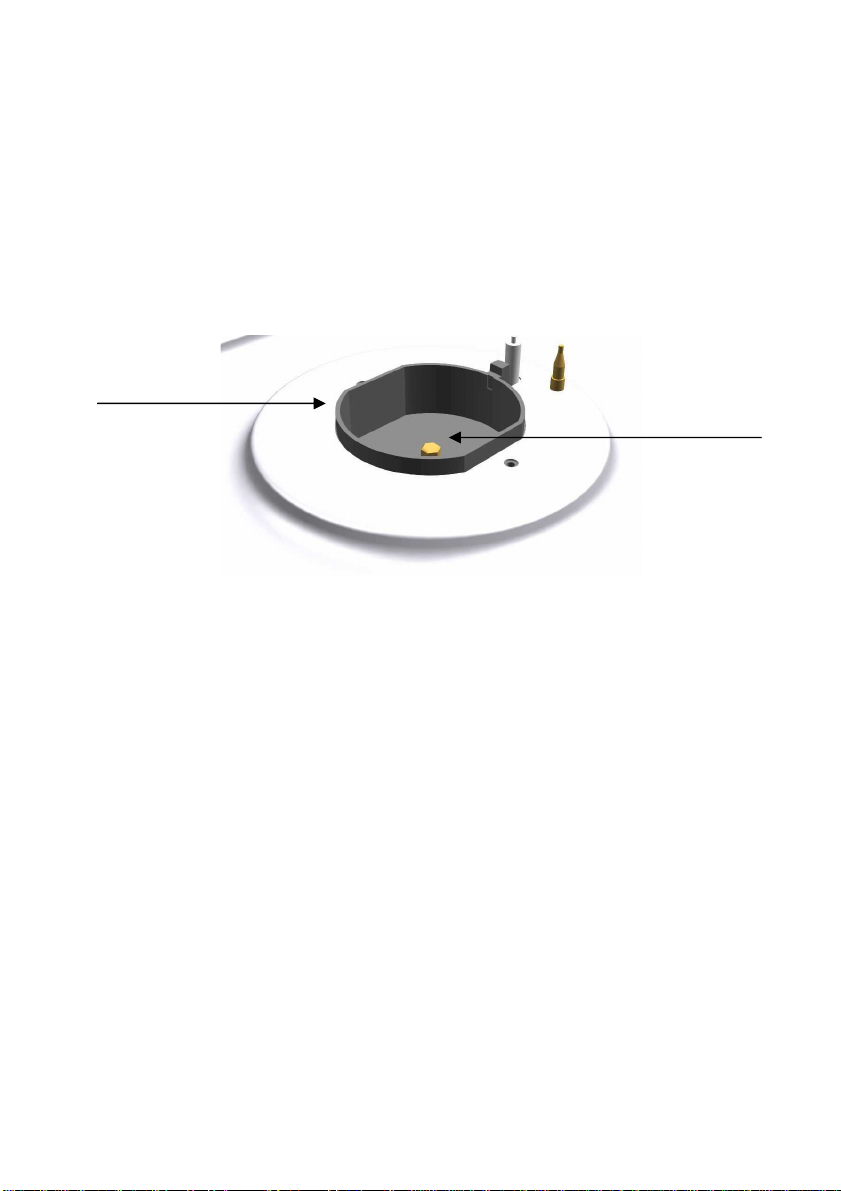
- Cleaning the gas burners
Once the components are cold take the burners off and wash them with hot
water and a liquid detergent. Dry them thoroughly before putting them back,
checking that no openings are clogged with dirt. The burners must be put back
properly otherwise it could lead to serious combustion anomalies. The nozzle
holders, Fig.11, also need cleaning periodically, removing any dirt that may have
accumulated and suctioning them, also checking that the gas outlet holes are not
clogged.
Fig.11
- Cleaning the Fry Top
For the fry top cleaning we advise to pour some vinegar on the plate still hot (the
vinegar have to boil when you pour on the fry top); then clean it with a spoon.
When the plate will be cool, you have to dry it with a cloth.
18
- Adapting hob burners to other types of gases
These hob models are fitted with burners that require no air regulation. For this
reason, to adapt the appliance to work with a gas different to what it has been set
for, simply substitute the nozzles and adjust the minimum.
a) Changing the nozzles
Remove the rungs, burners and flame dividers. Using the spanner provided with
the appliance, remove the nozzles – Fig.12 and replace them with those
enclosed, strictly observing the marking and the following table.
Fig. 12
If the appliance has to be adjusted to suit a different gas source, the installer has
to fix the new labels over the old ones. Two labels are found in the guarantee and
in the back of appliance.
INTERCHANGEABLE NOZZLE
NOZZLE HOLDER

19
NOZZLE TABLE
Bruciatore
gas Gas Pressione
esercizio Portata
Ø Ugelli
1/100 mm.
Portata
nominale
Portata
ridotta
Piccolo
ausiliario
Liquido G30
Liquido G31
Liquido G30
Liquido G31
Metano G20
Metano G25
30 mbar
37 mbar
50 mbar
50 mbar
20 mbar
20 mbar
g/h 73
g/h 73
g/h 73
g/h 73
l/h 94
l/h 107
50
50
43
43
71
72
kW 1
kW 1
kW 1
kW 1
kW 1
kW 1
kW 0.45
kW 0.45
kW 0.45
kW 0.45
kW 0.45
kW 0.45
Medio
semirapido
Liquido G30
Liquido G31
Liquido G30
Liquido G31
Metano G20
Metano G25
30 mbar
37 mbar
50 mbar
50 mbar
20 mbar
20 mbar
g/h 127
g/h 127
g/h 127
g/h 127
l/h 158
l/h 182
65
65
58
58
96
94
kW 1.75
kW 1.75
kW 1.75
kW 1.75
kW 1.75
kW 1.75
kW 0.45
kW 0.45
kW 0.45
kW 0.45
kW 0.45
kW 0.45
Grande
rapido
Liquido G30
Liquido G31
Liquido G30
Liquido G31
Metano G20
Metano G25
30 mbar
37 mbar
50 mbar
50 mbar
20 mbar
20 mbar
g/h 218
g/h 218
g/h 218
g/h 218
l/h 270
l/h 328
85
85
75
75
115
121
kW 3
kW 3
kW 3
kW 3
kW 3
kW 3
kW 0.85
kW 0.85
kW 0.85
kW 0.85
kW 0.85
kW 0.85
Tripla
corona
3.6 kW
Liquido G30
Liquido G31
Liquido G30
Liquido G31
Metano G20
Metano G25
30 mbar
37 mbar
50 mbar
50 mbar
20 mbar
20 mbar
g/h 262
g/h 262
g/h 262
g/h 262
l/h 340
l/h 374
96
96
76
76
138
138
kW 3.6
kW 3.6
kW 3.6
kW 3.6
kW 3.6
kW 3.6
kW 1.40
kW 1.40
kW 1.40
kW 1.40
kW 1.40
kW 1.40
Pesciera
Liquido G30
Liquido G31
Liquido G30
Liquido G31
Metano G20
Metano G25
30 mbar
37 mbar
50 mbar
50 mbar
20 mbar
20 mbar
g/h 182
g/h 182
g/h 182
g/h 182
l/h 233
l/h 263
80
80
66
66
114
122
kW 2.5
kW 2.5
kW 2.5
kW 2.5
kW 2.5
kW 2.5
kW 1.40
kW 1.40
kW 1.40
kW 1.40
kW 1.40
kW 1.40
b) Regulating the minimum
To adjust the hob burner minimum, light the burners and turn them down to minimum
(serigraphed small flame). Take the knob off (it simply pulls off) and insert the
screwdriver (provided with the appliance) in the screw in the side of the knob holder
pin (Fig.13)): turn this screw to the right to make the flame smaller or to the left to
make it bigger until you reach the minimum wanted.
If the appliance is working on liquid gas (G30/G31), the minimum adjustment screw
must be screwed down completely. After these conversions and adjustments use
soapy water to check for gas leaks and make sure the burners and working properly.
Turn quickly the knob from maximum to minimum, the flame mustn’t extinguish, in
case it comes, adjust the minimum again.

20
Fig.13
Attention:
Check the condition of the flexible gas pipe periodically and change it whenever
you notice it is deteriorating. It is advisable to check it at least once a year. It
must only be changed by qualified personnel.
WARNINGS:
- If the burner flame goes out accidentally, close the knob and do not attempt to
light it again for at least 1 minute.
- When gas cooking appliances are used they produce heat and humidity in the room in
which they are installed. Please ensure good aeration in the room keeping the natural
ventilation vents free and open or install a suction hood with discharge duct.
- An intensive and prolonged use of the appliance might need additional aeration
like, for instance, the opening of a window or a more effective aeration, increasing
mechanical suction power if it exists.
- Lubricating the cocks periodically
This must be done by qualified personnel whom you must contact also if the
appliance is malfunctioning.
It is however advisable each time work is done on the cocks, to change the cocks
and gasket.
- Knobs
- The gas hob burner knobs are ONLY TO BE REMOVED for servicing
(regulating the minimum flame) and NOT for cleaning.
- They are to be replaced in the correct order and in their original position. Any
changes will result in the appliance malfunctioning.
This manual suits for next models
7
Table of contents
Other Barazza Kitchen Appliance manuals


