Barco RLM-W12 User manual

USER’S GUIDE
User’s Guide
Please read this manual before using this projector
RLM W12

2
INDEX
Warning, Notices and Safety Instructions 4
Notice4
DescriptionpertainingtoFCCRulesPart15e: 4
WarningandSafetyInstructions 5
Noticesyoushouldreadpriortotheinstallationoftheprojector 7
Projector parts and functions 10
Frontview 10
Rearview 10
Bottomview 12
Rangeofeffectiveremotecontrolsignalreception 13
Installingbatteriesintheremotecontrol 13
Quick installation of the projector 14
Throwdistance 17
Modesofinstallation 17
Horizontalandverticallensshift 19
Installing the projector 20
Connectingtheprojectortootherdevices 20
12VTriggerconnection 20
RGBconnection 21
RGBsconnection 22
IRINPUTconnection 22
S-Video/Videoconnection 23
COMPONENTconnection 23
Turningontheprojector 24
ChangingOSDlanguage 24
Adjustingscreenorientation 25
Adjustingtheprojectorlens 26

3
Using the remote control 27
OSD Menu Tree 29
OSD Menu Description 31
INPUT 31
IMAGE33
LAYOUT 40
LAMP42
ALIGNMENT 44
CONTROL 50
SERVICE 53
Lamp and filter maintenance 54
Lampreplacement 54
Cleaningthelter 55
Simple troubleshooting and definition of the
LED indicators 57
Projector specifications 58

4
Notice
Pleasewritedownyourprojectormodelnumberandserialnumberandkeeptheinformation
formaintenancepurposesinthefuture.Shouldtheequipmentbelostorstolen,the
informationcouldalsobeusedforthepolicereport.
Modelnumber:
Serialnumber:
Pleasechecktheaccessoriesthatcomewiththeprojectorwiththefollowinglist.Shouldyou
ndanymissingaccessory,contactyourdealerimmediately.
1: USspecicationpowercord*1
2: EUspecicationpowercord*1
3: Chinaspecicationpowercord*1
4: Remotecontrol*1
5: AAbattery*2
6: User'sGuide*1
7: SetupManual*1
8: SafetyManual*1
9: WarrantyCard*1
10: WEEENoticationCard*1
11: CDROM*1
Description pertaining to FCC Rules Part 15e:
ThisdevicehasbeentestedandfoundtocomplywiththelimitsforaClassAdigitaldevice,
pursuanttoPart15oftheFCCRules.Theselimitsaredesignedtoprovidereasonable
protectionagainstharmfulinterferenceinaresidentialinstallation.
Thisequipmentgenerates,usesandcanradiateradiofrequencyenergy.Ifnotinstalled
andusedinaccordancewiththeinstructions,maycauseharmfulinterferencetoradio
ortelevisionreception.However,thereisnoguaranteethatinterferencewillnotoccurin
aparticularinstallation.Ifthisequipmentdoescauseinterferencetoradioortelevision
reception,whichcanbedeterminedbyturningtheequipmentoffandon,theuseris
encouragedtotrytocorrecttheinterferencebyoneorthefollowingmeasures:
• Reorientorrelocatethereceivingantenna.
• Increasetheseparationbetweentheequipmentandreceiver.
• Connecttheequipmentintoanoutletonacircuitdifferentfromthattowhichthereceiver
isconnected.
• Consultthedealeroranexperiencedradio/TVtechnicianforhelp.
ThisClassAdigitalapparatusmeetsallrequirementsoftheCanadianICES-003Standards.
CetappareilnumériquedelaclasseAestconformeàlanormeNMB-003duCanada.
Thelamp(s)inthisproductcontainmercury.Thisproductcouldcontainotherelectronic
wastesthatmightbehazardousifnothandledproperly.Pleaseconsultyourlocal/state/
federalregulationsregardingdisposalorrecycling.
Warning, Notices and Safety Instructions
1

5
Hg Formoreinformation,pleasecontactElectronicIndustriesAlliance(WWW.EIAE.
ORG).
Forinformationonproperlamphandling,visitWWW.LAMPRECYCLE.ORG.
Warning and Safety Instructions
Special Care for Laser Beams!
SpecialcareshouldbeconsideredwhenDLPprojectorsandhighpowerlaserequipmentare
usedinthesameroomas.
DirectorindirecthitofalaserbeamontotheprojectorlenscanseverelydamagetheDigital
MirrorDevices(DMD™).
Sun light Warning
AvoidusingtheRLMW12indirectsunlight.
SunlightontheprojectorlenscanseverelydamagetheDigitalMirrorDevices(DMD™).
Never look into the projector light source directly
Thisequipmentcontainsahighbrightnesslightsourceandaportion
ofthelightemittedbytheprojectorisultravioletlight.Neverlookinto
theprojectorlightsourcedirectlyandpayspecialattentiontoprevent
childrenfromlookingintotheprojectorlightsourceasitcandamage
theireyes.
AVOID EYE CONTACT TO THE LIGHT
CAUTION
RISK OF ELECTRIC SHOCK
DO NOT OPEN
The lightning flash with an arrowhead within a triangle
is intended to tell the user that inside this product
may cause risk of electrical shock to persons.
The exclamation point within a triangle is intended to tell
the user that important operating and/or servicing instructions
are included in the technical documentation for this equipment.
CAUTION / TO REDUCE THE RISK OF ELECTRIC SHOCK
DO NOT REMOVE COVER(OR BACK)
NO USER-SERVICEABLE PARTS INSIDE
REFER SERVICING TO QUALIFIED SERVICE PERSONNEL
Do not turn off the projector by unplugging the power cord.
Undernormaloperations,besuretousetheSOFTPOWERbuttontoturnofftheprojector.
Andassuch,avoidshuttingoffACpowertoturnofftheprojectorsinceitcouldleadtolamp
malfunctioningordamage.
Electric shock
Toprotectyourprojector,avoidturningontheprojectorduringlightningstormsandunplugit
fromthewalloutlet.Thiswillpreventsuddenelectricalsurgescausedbythelightningfrom
damagingtheprojector.
Do not overload wall outlets/extension cords
Payattentiontothecurrentloadoftheoutletyouareusing,beitwalloutletorextensioncord
outlettopreventreorelectricshock.
Warning, Notices and Safety Instructions 1

6
Cleaning
Whencleaningtheprojector,besuretounplugitfromthewalloutlettopreventelectric
shock.
Donotuseliquidoraerosolcleaners.Useadry/dampclothwithexcessivemoistureremoved
forcleaning.Besuretousecleaningclothdesignedtocleanmonitorsfortheprojectorto
preventdamagestotheprojectorcasingduetoabrasion.
Dampness, smoke, steam, dust, high temperature and direct
exposure to sunlight
Donotoperatetheprojectorinenvironmentswhereitcouldbeexposetodampness,smoke,
steam,dust,hightemperatureordirectsunlight.Forexample:bathroom,kitchen,adjacentto
washingmachine,dampbasementrooms,electricheatersorsimilarenvironments.Keeping
oroperatingtheprojectorintheabove-mentionedenvironmentcouldleadtodiscoloration,
moldformation,greaseordamagestotheprojector.
Ventilation
Theprojectorcaseisdesignedwithslotsandopeningstoremovetheheatinsidethe
projectorsothatitwillnotoverheatanddamagethecomponents.Besuretooperatethe
projectorinanenvironmentwithidealventilationanddon'toperateitonasofa,rugorother
closed-inenvironmentsthatcouldobstructventilation.
Filter
Makesuretocleanorreplacethelterwhenitisrequiredtokeeptheairintakeclearofdust,
andpreventpossibleovertemperatureissueoftheprojectorduetotheclogoflter.Please
refertoPage55fordetailsoflterreplacementprocedure.
Intrusion of foreign objects
Besuretokeepallforeignobjectsawayfromenteringtheprojectorbecauseitcouldbe
exposedtohazardousvoltagesandcausepartstoshortcircuit.Thiscouldinturnleadtore
hazardorelectricshock.Examplesofforeignobjectsinclude:cockroach,screws,liquidand
soforth.
Inaddition,neverspillliquidintotheprojector.
Carrying the projector
Whenmovingtheprojectoronacart,besuretohandlethecartwithcare
asabruptstops,joltsofexcessiveforceorunevengroundcouldleadtheprojector
totopple.
Please install the projector on an even and stable surface
Avoidplacingtheprojectoronunstablecart,tripod,tableandsoforthtopreventtheprojector
fromfalling,becomingdamagedorcausinginjuries.
Servicing
Shouldyouencounterproblemwiththeprojector,pleaseseekassistancefromyourlocal
dealerorqualiedservicepersonnel.Donotattempttoservicetheprojectoryourselfsothat
youwouldnotbeexposedtohighvoltageorotherpotentialhazards.
Warning, Notices and Safety Instructions
1

7
Shouldyouencounteranyofthefollowingsituation,pleaseunplugyourprojectorfromthe
walloutletandcontactaqualiedservicepersonnelforassistance:
• Damagedpowercordorpowerplug.
• Ifaforeignobjecthasfallenintotheprojectororifyouhavespilledwaterorotherliquid
intotheprojector.
• Iftheprojectorhasbeendroppedaccidentallyordamaged.
• Ifyouexperiencenoticeablypoorperformanceormalfunctioningwiththeprojectordespite
havingfollowedinstructionsfornormaloperation.
Changing parts
Shouldanypartoftheprojectorbedamaged,checkwithyourservicingpersonnelthatonly
manufacturercertiedpartswereusedforreplacement.Usedofnon-certiedpartsmay
resultindamagestotheprojectororhazardssuchasreorelectricshock.Afterchanging
parts,besuretoremindtheservicingpersonneltoperformsafetyinspectionstoensurethat
theprojectoroperatesnormally.
Power cord
Don'tplacetheprojectorwherethecordcanbewalkedon.Thismayresultinfrayingor
damagetothepowercord,especiallyattheplugandthepointofconnectionbetweenthe
powercordandtheprojector.
Pleaseusethepowercordthatcomeswiththeprojectororthetypeofpowercordspecied
fortheprojector(refertothedescriptionsprintedonthepowercord).Ifyouarenotsureof
thepoweravailableattheregionyouarein,consultyourlocalpowercompanytoprevent
damagestotheprojectorduetotheuseofwrongpowercordorpotentialrehazardsdueto
currentoverload.
Dependingonthecountryandregionyouarein,thevoltageandtypeofsocketofthewall
outletmaybedifferentfromtheprojector.Ifyouareunabletotthepowerplugintothewall
outlet,contactyourlocaldealeranddonotremovetheextrapinonthepowerplugtoforcibly
tittothesocketattheriskofyourownsafety.
Notices you should read prior to the
installation of the projector
Safety issues related to the lamp
Thelampusedinthisprojectorcontainsmercury.Shouldthelampbebroken,pleasebe
carefulwhenhandlingtheglassshardsandkeepthesurroundingenvironmentwellventilated.
Besuretowearamaskthatoffersadequateprotectionbeforecleaninguptopreventinhaling
mercuryvaporthatcouldcausebodilyharm.Forinstructionsonlampreplacement,referto"
Page55:Lampreplacement".
Take frequent breaks to let your eyes rest
Prolongedviewingoftheprojectorscreencouldstrainyoureyes.Pleasebesuretorestyour
eyesadequately.
Installation environment for the projector
Youshouldavoidinstallingtheprojectoratplaceofexcessivedampness,dustorsmoke.If
installationinsuchenvironmentisunavoidable, be sure to have the interior of the projector
Warning, Notices and Safety Instructions 1

8
cleaned routinely to prolong the projector's lifecycle.Cleaningoftheprojector'sinteriorshould
onlybeperformedbyqualiedservicepersonneldispatchedbyyourlocaldealerandyou
shouldnotattempttocleantheinsideoftheprojectorbyyourself.
Ifotherlightsourceisdirectlyprojectedontotheprojectorscreen,thecoloroftheimagefrom
theprojectorwillappeartobepaleandtheimagequalitywillbelower.Inaddition,youreyes
wouldbemorepronetofatigue.Therefore,itisrecommendedthattheprojectorbeinstalled
inplaceswithoutdirectexposuretosunlightorothersourcesofintenselight.
Theidealoperatingtemperaturerangefortheprojectorisbetween32°F~104°F(0°C~40°C)
Theidealstoragetemperaturerangefortheprojectorisbetween-4°F~104°F(0ºC~40°C)
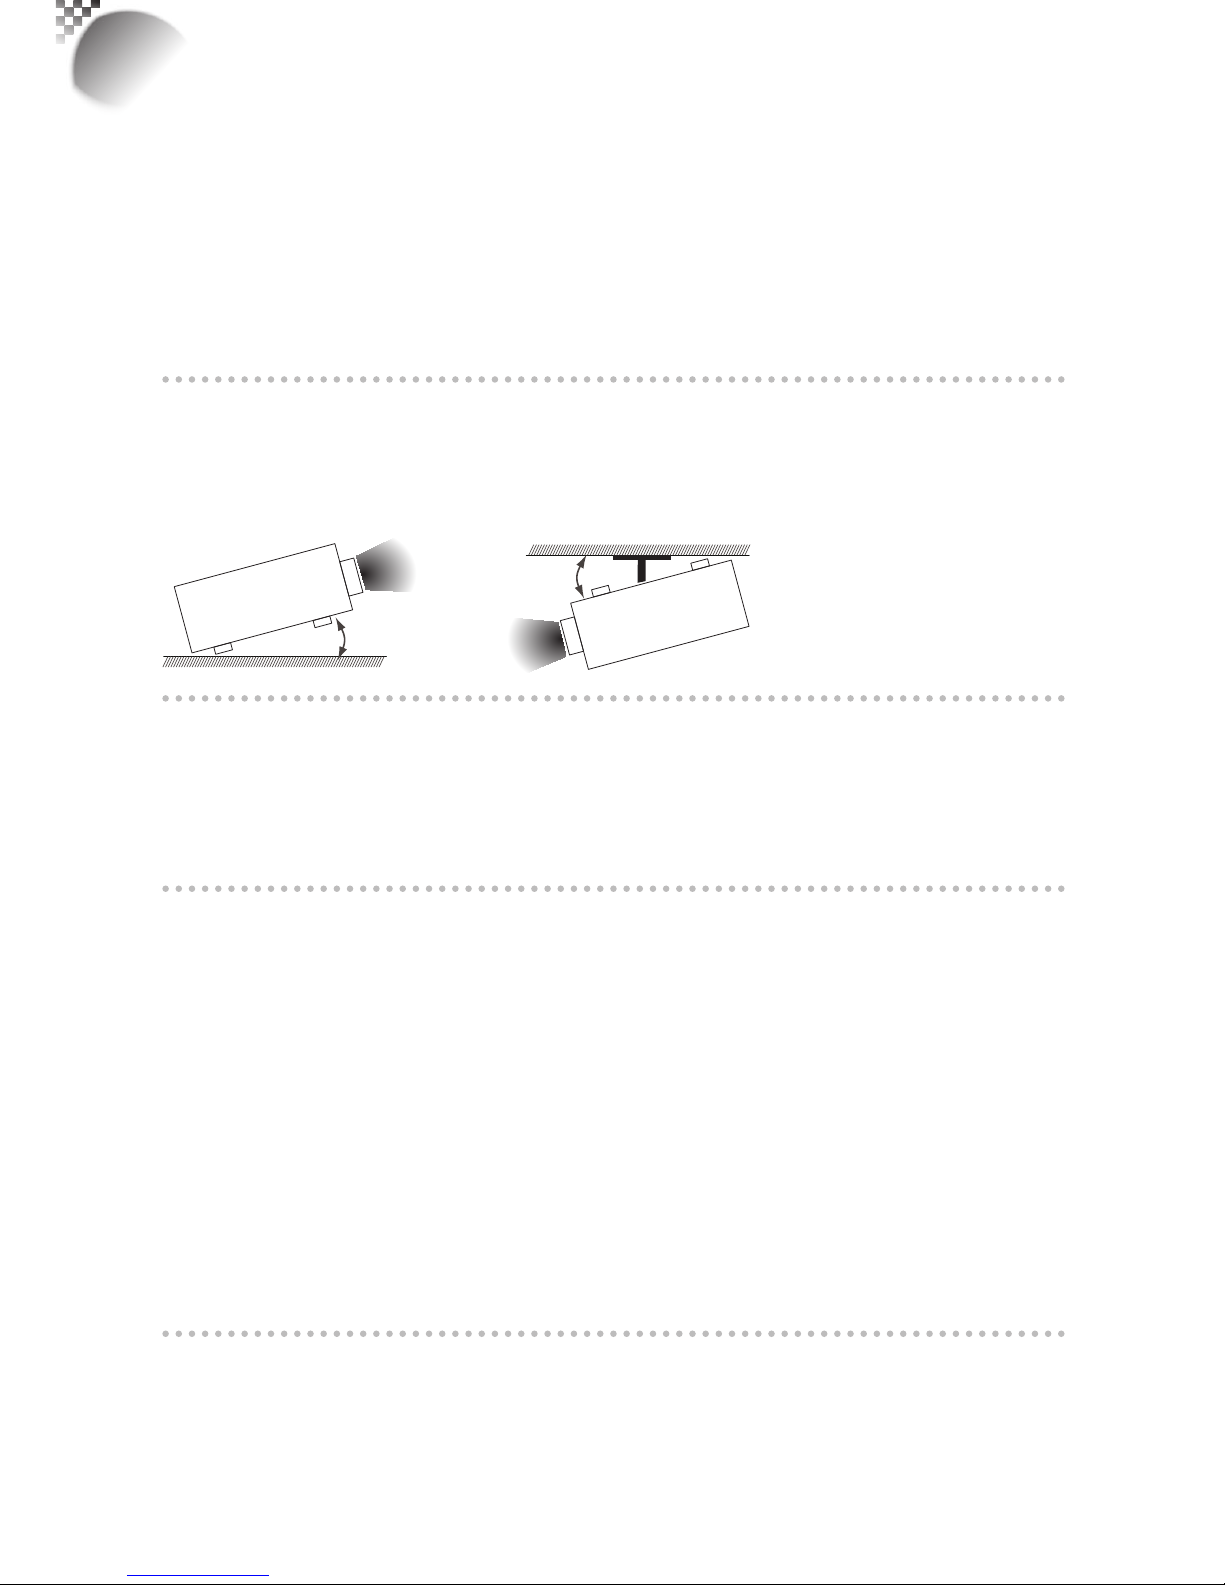
Do not tilt the projector more than 15 degrees.
Themaximumtiltanglefortheprojectoris15degrees.
Whentheprojectoristiltedmorethan15degrees,itwillshortenthelifeoftheprojectorlamp
andmayleadtootherunpredictabledamages.
Can’t >15°
Can’t >15°
Congurations for projector operation at high altitudes
Whenoperatingtheprojectorathigheraltitudes,be sure to manually set the fan mode to "High"
oritcouldshortenthelifeoftheopticalsystemintheprojector.Highaltitudeisdenedas
placesbeing1500meters(4900feet)orhigher.
Pleasereferto"Page44:HighAltitudeMode".
Keep the projector's ventilation inlets and outlets free from obstructions
Besuretokeepobjectsfornolessthan30cmawayfromtheventilationinletsandoutletsofthe
projectorandnotethedirectionofairowatthedesignatedspotofinstallation.Donotletthe
hotairreleasedfromtheoutletowbacktotheinletasitwillpreventpropercoolingandleadto
damageoftheprojector'sinternalstructure.
Intheeventofhightemperatureduetomalfunctioningoftheinternalcoolingfancausedby
cloggingattheventilationinletsandoutlets,theprojectorwillactivateitsautomaticprotection
modeandshutdown.Whenthishappens,itdoesnotnecessarymeanthattheequipmentis
malfunctioning.Trytounplugthepowercordfromthewalloutletandwaitforapproximately15
minutesbeforeoperatingtheprojectoragain(remembertoremovetheobjectsthathavecaused
poorventilationsothattheprojectorwillnotgointotheprotectionmodeagain).Pleasereferto"
Page58:LEDSTATUS".
Description:Theregulationoftemperatureinsidetheprojectorbythecoolingfanisautomatic.And
assuch,thesoundofcoolingfanchangingitsoperatingspeeddoesnotimplythataproblemhas
occurredwiththeprojector.
Protect the projector with care
Whenplacingtheprojectoratahighposition,besuretosecuretheprojectorrmlysothat
itwouldnotfallandcauseinjuries.Takecaretoprotecttheprojector'slensfromcollision,
abrasionorotherdamages.Besuretoclosethelenscoverorcovertheprojectorwithadust
coverifyouneedtostoretheprojectororifitwillnotbeusedforanextendedtime.
Warning, Notices and Safety Instructions
1

9
Name and quantity of toxic/hazardous substances/elements
contained in the product
Warning, Notices and Safety Instructions 1

10
Front view
Lens
Infraredreceiver
Adjustablefoot
Adjusttheheightandangleofthe
projectorwiththeadjustablefoot
Ventilationinlet
Theinternalcoolingfandraws
coolairfromtheventilationinlet
intotheprojector.
Rear view
Referto"Page58:LEDSTATUS".
fotthedetaildisplayinformation.
ERROR
Displaysthecauseofproblem(i.e.
temperature,fan,lamporsystem)
thathasledtoprojectormalfuncti
on.
▲▼
▼
▲
bottons
Usethesebuttonstoscroll,
congureoradjustitemsonthe
OSDortogglebetweendifferent
images.
POWER
Displaystheprojector'spower
status
ENTER
Pressthisbuttontoconrmselection
ofOSDitem;youcanchoosefrom
"SelectItem"oraccess"SubMenu"
congurations.
Adjustable foot
Adjustable foot
Infrared sensor
Power inlet Projector Keypad
Power switch
I→ON
O→OFF
Projector parts and functions
2
Ventilation slot
Thehotairgenerated
insidetheprojectoris
dispersedthroughthe
ventilationslot.Make
suretheventilationslot
isfreefromobstruction.
INPUT
Usedtotogglebetweendifferentinput
signalsource
Referto“Page32:InputSelection“.for
moredetails
MENU
DisplaysorhidestheOSD
adjustmentscreen
STBY
Usethisbuttontostartuporshutdown
theprojector.
STAND BY
Theindicatorthatshowstheprojector's
standbystatus.
Voltage Selector
(Default at 110V)

11
Projector parts and functions 2
RS-232
9-pinD-subsocket.ConnectsyourPCor
automatichometheater/controlsystem.
10/100 BASE-T
Connectstheprojectortoyour
PCvianetworktoenabledi-
rectcontroloftheprojectoron
yourPC.
HDMI 1 & 2
HDCPcompatibledigitalimageinput;
connectstosourcesusingHDMIorDVI.
SDI/HDSDI/3G
IN/OUT
Serialdigitalinterface,use
BNCconnectsinputoroutput
theimage.
12V TRIGGER
(3.5-mm,miniphonejack)
Offers12(+/-1.5)Vofoutputfor350mAmonitorrelay
withshortcircuitprotection.
RGBHV/SOG
Standard15-pinVGAconnectionsockettoconnecttoRGB,
high-denitioncomponentinputorPC.Theprojectorwill
automaticallydetecttheresolutionoftheinputsignal.
IR ext.
ReceivesinputsignalfromcompatibleNilesorXantechIR
repeatersystems.
S-VIDEO
StandardS-VideoinputthatconnectstoDVDplayers,satellite
receiverorSuperVHS(S-VHS)VCR.
VIDEO
ConnectstoVCR,laserdiscplayersorother
componentimagesources.Alsoconnectstothe
compositeimagesynchronizedinputfromRGBSinput
source. YUV1
Standardandhighdenition(480i/480p/
576i/576p/720p/1080i/1080p)component
input,connectstoDVD/HD-DVD/BDplayer,
HDset-top-boxorotherSD/HDinputsource.
AlsoconnectstoRGBinputfromRGBSinput
source.
RGBHV/YUV2
ConnectstotheveBNCinputsfor
component(YPbPr)imagesourceand
channel(Hs,Vs)source.
IO Control
(Input/Input control panel)
STEREO DVI
UsethisDVIduallinktoconnecttoastereo
3Dsource–itisusuallyacomputerwith3D
Graphicscard,and3Dapplications.
3D Sync In
The3DSyncInsignalisgeneratedfromthe
3Dsourcetomakesuretheleft/righteye
contentissynchronizedtotheuserandthe
projector.
3D Sync Out
ItistypicallyusedtoconnecttotheIR
emitterthatsendsL/Rsignalstothereceiver
ina3DshutterglassthatcontrolsL/R
shuttersalternativelytoopenorclosefor3D
applications.

12
Bottom view
305
160
220
532
105
152.5
CeilingMountOrderInfo:
1.R9849999-Ceilingmount
2.R9841260-ShortPulley400mmto765mm
3.R9841261-LongPulley800mmto1165mm
Adjustable foot
Adjusttheheightandangleoftheprojector
withtheadjustablefoot
Mounting bracket screw hole
Thesescrewholesareusedtomounttheprojector
toitsdesignatedmountingbracketusing3M8x15
screwsand3M8x40bolts.Thedimensionsofthe
screwholesareshownintheimagebelow.
M8x40
3bolts
M8x15
3screws
Projector parts and functions
2

13
Range of effective remote control signal
reception
Thediagrambelowillustratestherangeofeffectiveremotecontrolsignalreception.
40°
12m
12m
40°
Note:Avoidplacingtheremotecontrolatplacesofhightemperatureorhumidityasitcouldcausethe
remotecontroltomalfunction.
Installing batteries in the remote control
Removethecoverby
slidingitinthedirection
indicatedbythearrow.
InserttwonewAA
batteries
(observethepolarity).
Replacethecover.
Note1:Besuretoinsertthebatteriesinthecorrespondingorientationstomatchthepolarities.
Note2:Donotmixnewbatterieswithusedbatteriesasitwouldshortenthelifeofnewbatteriesorcause
leakage.
Note3:OnlyusedAAbatteriesasinstructed;donotattempttoinsertdifferenttypesofbatteriesintotheremote
control.
Note4:Iftheremoteisgoingtobeunusedforlongperiodsoftime,besuretoremovethebatteriestoprevent
leakage,whichcoulddamagetheremotecontrol.
Note5:Theliquidcontentsinthebatteriesisharmfultotheskin;donottouchtheleakagewithyourbarehands
directly.Wheninstallingfreshbatteries,besuretocleanuptheleakagethoroughly.
Note6:Undermostcircumstances,youonlyneedtopointtheremotecontroltowardsthescreenandtheIR
signalwouldbereectedoffthescreenandpickedupbytheIRsensorontheprojector.Butunderspecic
circumstances,theprojectormayfailtoreceivesignalsfromtheremotecontrolduetoenvironmental
factors.Whenthishappens,orienttheremotecontrolattheprojectorandtryagain.
Note7:Iftherangeofeffectiveremotecontrolsignalreceptiondecreasesoriftheremotecontrolstopsworking,
replacethebatteries.
Note8:Iftheinfraredreceiverisexposedtouorescentlamporstrongsunlight,theremotecontrolmaynot
operatenormally.
Note9:Refertotheregulationsenforcedbyyourlocalgovernmentonthedisposalofusedbatteries;improper
disposalcoulddamagetheenvironment.
Projector parts and functions 2

14
Quick installation of the projector.
1. Orient the projector towards the screen
Screen
2. Connect the power cord to the projector
Please note that select the correct input (110V or 220V) voltage according to the area
where you operate the projector before you turn on the power switch.
3. Connect the projector to your PC and ip the switch to “I” to
turn on the power.
S-VIDEO VIDEO YUV 1
RGB-S
RS-232
12V TRIGGER
IR ext.I II
350mA
RGBHV / YUV 2
G/Y B/Pb R/Pr H VRGB-HV/SOG
HDMI
AC MAINS
100-240 Volts
50/60Hz
AC POWER SWITCH
Desk Top or Notebook
桌上型或是筆記型電腦
連接至牆壁插座
S-VIDEO VIDEO YUV 1
RGB-S
RS-232
12V TRIGGER
IR ext.I II
350mA
RGBHV / YUV 2
G/Y B/Pb R/Pr H VRGB-HV/SOG
HDMI
AC MAINS
100-240 Volts
50/60Hz
AC POWER SWITCH
Desk Top or Notebook
桌上型或是筆記型電腦
連接至牆壁插座
4. Remove the lens PU foam on the projector before starting it up.
Pressthe STBY buttononthe
projectororthe
l
buttononthe
remotecontroltostartuptheprojector.
3Quick installation of the projector
AC MAINS
100-130 / 200-240 Volts
50/60Hz
AC POWER SWITCH
VOLTAGE SELECT
Pleaseselectthe
correctinputvoltage
beforeremovingthe
warnninglabe.

15
5. Adjusting the projector's angle
a.Pleaseusetheadjustablefeettochangetheangleoftheprojectorinordertoachieve
themostsuitableangleforprojectiononthescreen.
b.Adjustingthelensbyhorizontalandverticallensshift
Method1:PresstheENTERbuttonontheremotecontroltoaccessLensControl
adjustmentscreenbeforepressingENTERonceagaintoaccessthemenu
andusethe▼▲
▼
▲
buttonstoadjustthehorizontalorverticalpositionof
thelens.
PressENTERonceto
adjustzoomandfocus
PressENTERonceto
adjustzoomandfocuswith
crossline
PressENTERonceto
AdjustLinesshiftwith
crossline
Enter
Enter
Enter
Enter
PressENTERagain
toadjustverticaland
horizontallensshift
Method2:PresstheMENUbuttonontheremotecontrolandchooseAlignment
LensControl;thenusethe▼▲
▲
▼
buttonstoadjustthehorizontalor
verticalpositionofthelens.
6.Adjusting focus and zoom.
a. PresstheMENUbuttonontheremotecontrolandchooseAlignmentLens
Control;thenusethe
▼
▲
buttonstoadjustthelens'focus(clarity).
3
Quick installation of the projector

16
b. PresstheMENUbuttonontheremotecontrolandchooseAlignmentLens
Control;thenusethe▼▲buttonstoadjustthesizeoftheimagethatisprojected
ontothescreen.
Originalimagesize Zoomout Zoomin
7. Correcting keystoning caused by projection angle
a. Toadjusthorizontalkeystoning,presstheMENUbuttonontheremotecontroland
chooseALIGNMENTWarpKeystoneandusethebuttonsto
▲
▼
adjust the
image.
b. To adjust vertical keystoning, presstheMENUbuttonontheremotecontroland
chooseALIGNMENTWarpKeystoneandusethe▼▲ buttons to adjust the
image.
8. Turning off the projector
Pressthe STBY buttonontheprojectororthe buttonontheremotecontrolat
least3secondstoturnofftheprojector.Whentheprojectorhasbeenturnedoff,thecooling
fanwillremaininoperationforapproximately90seconds.
3Quick installation of the projector

17
Throw distance
ThrowDistance(TD)=ScreenWidth(W)xThrowRatio(TR)
Screen Width (W)
Throw Distance (TD)
Coupledwiththeavailableprojectionlenses,theprojectoroffersthefollowingthrowratios:
• R9862000-TLD+(0.73:1)
• R9840775-TLD+(1.2:1)
• R9862010-TLD+(1.5-2.0:1)
• R9862020-TLD+(2.0-2.8:1)
• R9862030-TLD+(2.8-4.5:1)
• R9862040-TLD+(4.5-7:5:1)
• R9829997-TLD+(7.5-11.2)
• R9862005-TLD+Ultra(1.25-1.6)
Note:
Projectionlensesareoptional
accessories.Pleasecontactyour
localdealertoacquiretheprojection
lensthatsuitsyourneedmost.
Modes of installation
• Installtheprojectorinanenvironmentbelow35°C(95°F).Theprojectorshouldbekept
clearfromsourcesofheatand/orventilationopeningsofairconditioner.
• Theprojectorshouldbekeptawayfromdevicesthatemitelectromagneticenergy,such
asmotorandtransformer.Commondevicesthatemitelectromagneticenergyinclude
slideshowsystem,speakers,powerampliersandelevators.
• Ifyouchoosetoinstalltheprojectorontheceiling,besuretousetheceilinginstallation
componentsmanufacturedbymanufacturer-certiedvendors.Fordetails,pleasecontact
yourlocaldealer.
Frontal projection - desktop installaion
Advantages:easytoinstallcanbeeasily
movedoradjustedeasyto
operate.
Disadvantage:occupiesoorspaceandlimits
seatingcapacity.
Installing the projector 4

18
Frontal projection - ceiling mode
Advantage:doesnotoccupyoorspace
doesnotdrawattentiontoit.
Eliminatesthepossibilitythat
someonewouldaccidentally
movetheprojector.
Disadvantage:stricterinstallation
requirementsandconditions;
careshouldbetakenduring
theinstallationtoensure
theprojectorhasbeen
securelymounted.
operationoftheprojector
becomesinconvenientwithout
theremotecontrol.
Rear projection - desktop
installaion
Advantage:theprojectoriscompletely
hiddenfromplainview
theprojectorcanbeeasily
operatedthissetupusually
offersbetterreductionofambient
noise.
Disadvantage:requiresanadditionalroom
forinstallationrelativelyhigher
costsforinstallation.
Rear projection - ceiling installation
Advantage:theprojectoriscompletely
hiddenfromplainviewthissetup
usuallyoffersbetterreductionof
ambientnoise.
Disadvantage:requiresanadditionalroomfor
installation.Stricterinstallation
requirementsandconditions;
careshouldbetakenduring
theinstallationtoensurethe
projectorhasbeensecurely
mounted.operationofthe
projectorbecomesinconvenient
withouttheremotecontrol.
Rear projection - submersive
installation
Ifyouwishtohavearearprojectionsetup
withlimitedspacetotherearoftheprojector,
youcanuseamirrortoreectthelight
path.However,boththeprojectorandthe
mirrorhavetobepreciselylocated.Ifyouare
consideringsuchinstallation,pleasecontact
yourdealerforassistance.
Advantage:theprojectoriscompletely
hiddenfromplainview
thissetupusuallyoffersbetter
reductionofambientnoise.
Disadvantage:requiresanadditionalroom
forinstallationrelativelyhigher
costsforinstallation.
Screen
Mirror
Installing the projector
4

19
Horizontal and vertical lens shift
Inadditiontousingtheadjustablefeettoadjustprojectionangle,youcanalsousetheLens
Shiftfunctiontoadjusttheprojectedimage.
Moving the lens vertically
Thedistanceofverticallensmovementis+110%,-70%ofhalfthescreenheightinboth
directions.Forinstance,ifyouareusinga80"×50"screen,youwillbeabletomovethe
imageupwardsmorethan27.5''ordownwardsmorethan17.5''.
Range of vertical
lens shift adjustment
Range of vertical
lens shift
adjustment
Thisillustrationshowsnormal
verticallensshiftwithoutthe
useofspecialspecication
lensorprojector.
Note:Please make sure the center of lens is retangular to the center of the ccreen.
Moving the lens horizontally
Thedistanceofhorizontallensmovementis30%ofhalfthescreenwidthinbothdirections.
Forinstance,ifyouareusinga80"×50"screen,youwillbeabletomovetheimageleftor
rightbynomorethan12".
Range of
horizontal
lens shift
adjustment
Range of
horizontal
lens shift
adjustment
Thisillustrationshowsnormal
horizontallensshiftwithoutthe
useofspecialspecicationlens
orprojector.
Note:whenthelensisinthe
neutralposition(i.e.without
horizontalorverticalshift),
thecenteroftheprojection
shouldbealignedwiththe
centerofthescreen.
Installing the projector 4

20
Connecting the projector to other devices
HDMI / DVI connection
SignalsfromimagesourceofferthebestprojectionimagequalitywhensentthroughHDMI.
Therefore,trytouseinputdeviceswithHDMIoutputasthesourceofimage.
HDMI/DVI input source
(BD/HD-DVD/DVD player, HD set-top-box,
gaming consoles and so forth)
12V Trigger connection
Ifyourhometheatresystemincludesaprojectorscreen,screencoverorother12VTrigger
equipment,
pleaseconnectsuchdevice/equipmenttotheprojector’s12VTriggeroutputasillustrated.
Afteryouhavedoneso,
Yourscreenwilllowerautomaticallywheneveryouturnonyourprojectorforyour
convenience.
S-VIDEO VIDEO YUV 1
RGB-S
RS-232
12V TRIGGER
IR ext.I II
350mA
RGBHV / YUV 2
G/Y B/Pb R/Pr H V
RGB-HV/SOG
HDMI HDMI
Tip = +12V
Sleeve = Ground
Retractable screen or other
12V device
Installing the projector
4
Other manuals for RLM-W12
4
Table of contents
Other Barco Projector manuals

Barco
Barco Medea series User manual

Barco
Barco R9002384 User manual

Barco
Barco F85 User manual

Barco
Barco iCon H600 User manual

Barco
Barco BarcoData 2100 LC User manual

Barco
Barco F400 User manual

Barco
Barco R9002411 User manual

Barco
Barco R6400 User manual

Barco
Barco Njord User manual

Barco
Barco HDF-W30LP Operating manual

Barco
Barco Galaxy NH-12 User manual

Barco
Barco PGWU-62L(-K) User manual

Barco
Barco R9001250 User manual

Barco
Barco Cine 5 User manual

Barco
Barco Cineo22 User manual

Barco
Barco SIM 7C R9011206 User manual

Barco
Barco ULTRA REALITY 7000 R9002810 User manual

Barco
Barco F50 User manual

Barco
Barco Vision 708 User manual

Barco
Barco G60 Series User guide