08
Recommendations, Installation and Service
Receiving inspection
Upon receiving the pump, it should
be inspected for damage or
shortages. If damage has occurred,
file a claim immediately with the
company that delivered the pump. If
the manual is removed from the
packaging, do not lose or misplace.
Storage
Any product that is stored for a
period longer than six (6) months
from the date of purchase should be
bench tested prior to installation. A
bench test consists of, checking the
impeller to assure it is free turning
and a run test to assure the motor
(and switch if provided) operate
properly.
Controls
Manual models require a separate
approved pump control device or
panel for automatic operation. Be
sure the electrical specification of the
control selected properly match the
electrical specifications of the pump.
The use of pipe the same size as the
port size is highly recommended.
Using a smaller pipe line can cause
internal damage. Make sure all lines
are have air-tight joints. The smallest
air leak in the suction line may
prevent the pump from priming. All
horizontal suction lines should slope
up to the pump to avoid trapped air
pockets.
Discharge
Connect discharge hose or pipe to
the discharge port. Make sure all
lines are have air-tight joints.
barmesapumps.com
Location
Locate pump as near as possible to
the liquid being pumped. Do Not
place pump more that 25 feet above
the surface of the liquid supply. Be
sure pump is level. Mount pump on a
firmly so not to move due to
vibration.
Motor Connection
All wiring of motor and control,
overload protection and grounding
should be in accordance with the
National Electrical Code, State and
Local codes. Make motor connection
per label located on motor or motor
manufactures manual.
Rotation
Pump rotation should agree with the
direction on the rotation plate. If
rotation on 3 phase is incorrect,
interchange any two incoming wire
leads. Rotation is “clockwise” when
looking from the motor end.
Suction
CAUTION! - Pump should
not be operated without a
suction strainer to prevent
foreign matter from being drawn
into impeller. The strainer should be
cleaned regularly.
Priming
Remove pipe plug in top of body and
fill the pump body completely with
solids free liquid. In freezing weather
prime pump with warm water.
DO NOT operate pump
without priming first.
Operating dry will damage
seal.
Starting
To start pump, apply power to motor
per the Motor manufactures
instructions.
Shutdown
Disconnect electric power to shut
down. It is recommended to drain
and fl ush pump if pump has been
operating in freezing weather.
Service
Turn offand lock out power before
servicing pump.
To replace, the HINGE section of
gasket is at the TOP and the LARGE
weight is on the pump side of gasket.
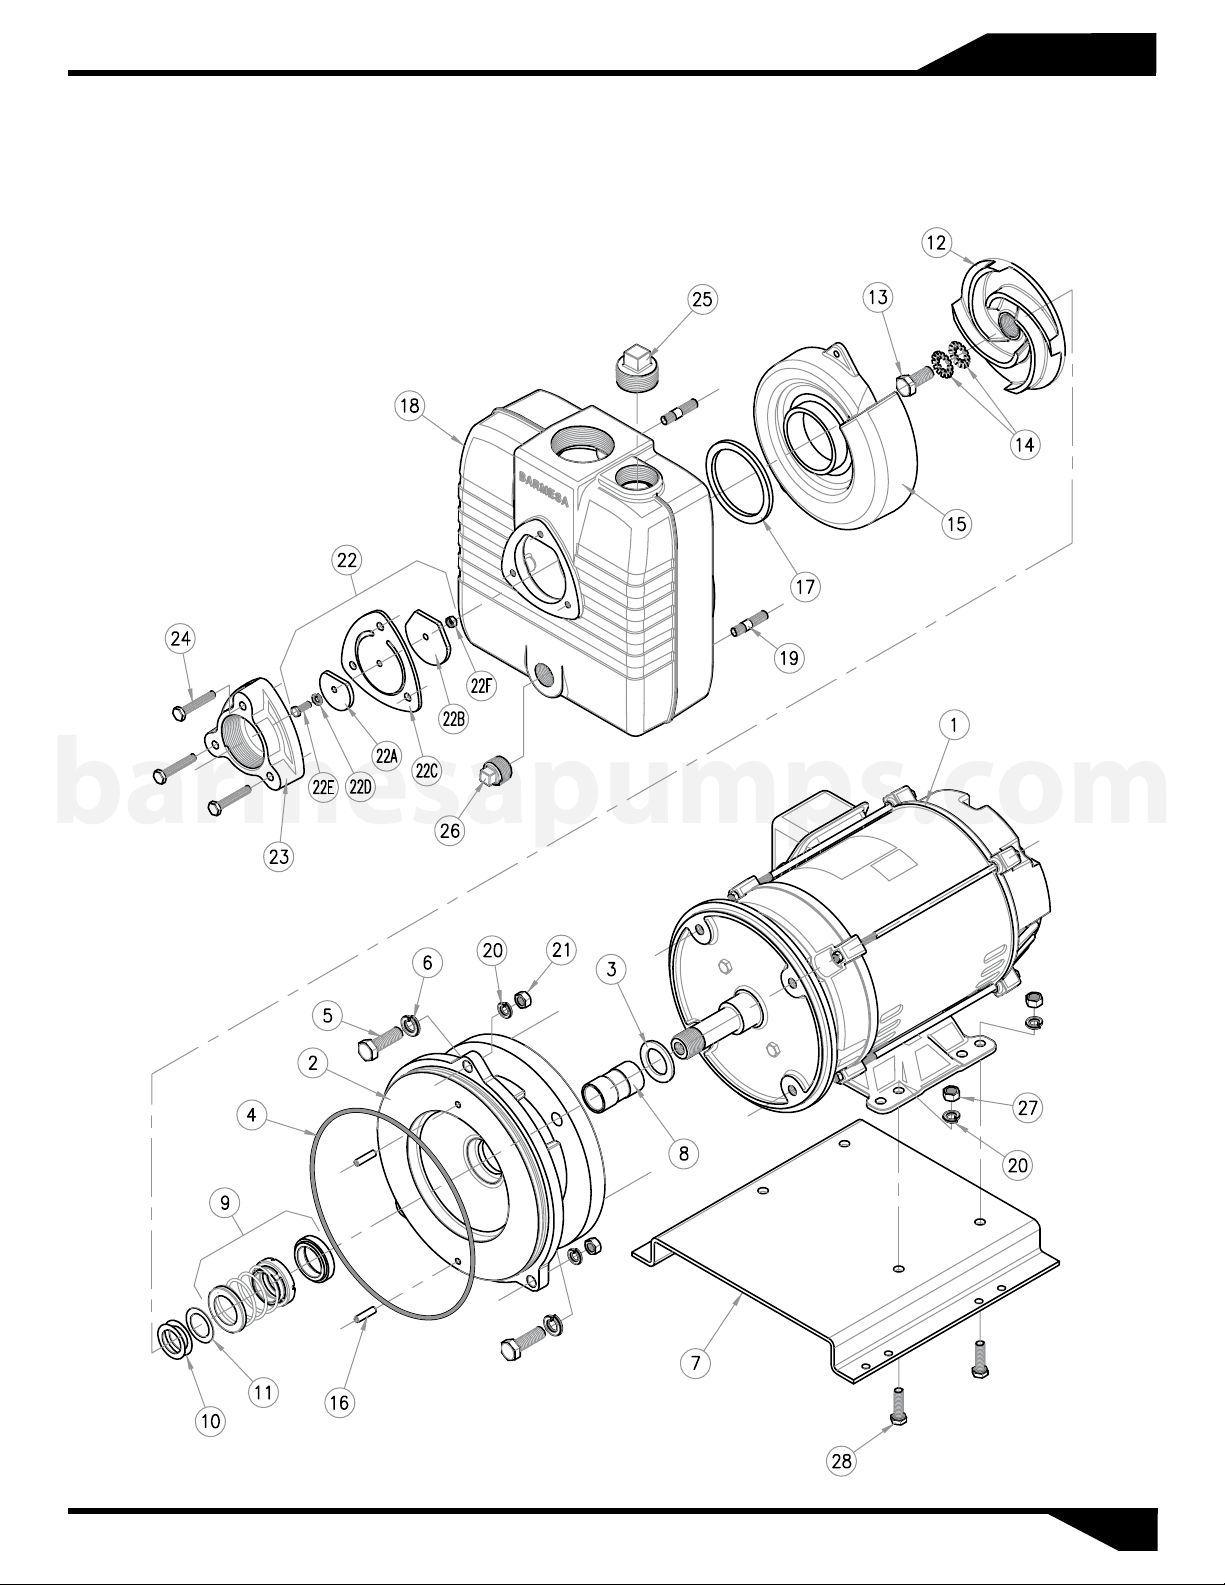
Body, Volute & Impeller
Disconnect suction and discharge
piping. Remove hex nuts and
lockwashers then remove body from
intermediate coupling.
Pull volute from intermediate. On
PF3CCE remove set screw on PF4CCE
& PF5CCE remove hex nut, on
PF10CCE thru PF25CCE’s remove
capscrew, and unscrew the impeller
from motor shaft in the right hand
direction. Take note of the size and
quantity of shims & used.
To reassemble, use the required
number of shims and to result in an
impeller-to-volute clearance of .015”
max.
Shaft Seal
Remove rotating member, spring and
retaining ring of seal from shaft.
Remove stationary by prying out
with screwdriver. If any part shows
wear or damage replace complete
seal.
Handle all seal parts with
care. Do Not damage
lapped faces.
To reassemble, lightly oil ring and
press stationary member over shaft
and into intermediate coupling.
Lightly oil motor shaft and inner
surface of bellows of rotating
member. With lapped surface facing
intermediate coupling, slide rotating
member onto shaft until lapped faces
are of rotating member and
stationary together.
Motor
Remove capscrews and lockwashers
to remove motor and slinger.
REASSEMBLE PUMP IN OPPOSITE
ORDER.