Barrett 2060 Specification sheet
BCM20600/11
© Barrett Communications
Head Office:
Barrett Communications Pty Ltd
47 Discovery Drive, Bibra Lake, WA 6163 Australia
Tel: +61 8 9434 1700 Fax: +61 8 9418 6757
Email: [email protected]
www.barrettcommunications.com.au

2 of 133
About this Operating and Installation Manual..............................................................................6
Icons and Standards..............................................................................................................6
Abbreviations and Acronyms ...............................................................................................6
Introduction .....................................................................................................................................8
System Overview ............................................................................................................................8
Operation .........................................................................................................................................9
User Controls..........................................................................................................................9
2060 Front panel.......................................................................................................9
Key pad .........................................................................................................9
2060 Control head rear view...................................................................................12
Microphone socket ......................................................................................12
Interconnect cable .......................................................................................12
2060 Rear panel description ...................................................................................13
Switching on the Interconnect............................................................................................14
Switching on the 2060 .................................................................................14
Switching off the 2060 .................................................................................14
Display...................................................................................................................................14
Adjusting the Audio Volume ...............................................................................................15
Selecting a Channel .............................................................................................................16
Using channel Up / Down keys....................................................................16
Direct channel number entry .......................................................................17
Using the Microphone..........................................................................................................18
2060 Operating Modes.........................................................................................................19
Automatic Mode Overview ..................................................................................................19
Facilities available to the telephone user ................................................................20
Selecting a channel .....................................................................................20
Sending a beacon request...........................................................................20
Sending a Selcall.........................................................................................21
Sending a Telcall .........................................................................................22
Sending an ALE call ....................................................................................22
Sending a Secure Call.................................................................................23
Sending a GPS request...............................................................................23
Using the voice operated switch (VOX).......................................................24
Requesting current channel information......................................................24
Turning off Call Timer ..................................................................................24
Frequency hopping mode............................................................................24
Entering the hopping prefix code...............................................25
To enable hopping mode...........................................................25
To disable hopping mode ..........................................................25
Requesting 2060 status...............................................................................25
Completing a call - "hanging up" .................................................................25
Facilities available to the HF station .......................................................................26
Sending a beacon request...........................................................................26
Sending a Selcall - dialling a preset phone number ....................................26
Sending a Telcall - dialling a telephone number .........................................26
Terminating a call ........................................................................................26
Sending an ALE call ....................................................................................26
Manual Mode Overview........................................................................................................27
Receiving a preset telephone number Selcall from an HF station ..........................28
Receiving a preset telephone number ALE call from an HF station .......................28

3 of 133
To on-forward the call..................................................................................28
Receiving a Telcall from an HF station ...................................................................29
Receiving a telephone number ALE call from an HF station ..................................30
To on-forward the call..................................................................................30
Incoming phone calls ..............................................................................................30
Completing the call - "hanging up" ..............................................................31
Making a telephone call ..........................................................................................32
Contacting another station - using selective call Selcall, Telcall or ALE Calls........33
International.................................................................................................33
OEM ............................................................................................................33
CCIR............................................................................................................33
Selective call - Selcall..................................................................................33
Selective call - Telcall..................................................................................33
Station ID ranges.........................................................................................33
ALE Fed Std 188/Mil Std 188-141B.............................................................34
ALE system overview ................................................................34
ALE operation overview.............................................................34
Checking for the best channel to use between two stations - Beacon Call.35
Sending a Beacon Call ................................................................................35
Receiving a Beacon Call .............................................................................36
Sending a Selcall.........................................................................................37
Receiving a preset phone number Selcall ...................................................38
Direct dial telephone calls - Telcalls ............................................................40
Making ALE calls.........................................................................................42
Disconnecting ALE calls..............................................................................43
Scanning ...............................................................................................................................44
Mute (squelch) Selection.....................................................................................................45
Front panel mute.....................................................................................................45
Scan mute...............................................................................................................45
Mode Selection.....................................................................................................................46
Advanced Selective Call Functions....................................................................................47
Requesting a station’s GPS position.......................................................................47
Menu Functions.............................................................................................................................49
Menus....................................................................................................................................49
Navigating the menus .............................................................................................49
Standard Menu .....................................................................................................................50
Identification............................................................................................................50
Display options........................................................................................................51
Backlight level..............................................................................................51
Backlight timeout .........................................................................................52
Protected Menu ....................................................................................................................53
General ...................................................................................................................53
Setting the clock ..........................................................................................53
Setting the date ...........................................................................................54
Automatic VOX ............................................................................................55
VOX Timeout ...............................................................................................56
VOX Hang Time ..........................................................................................57
VOX Sensitivity............................................................................................58
Charging Method .........................................................................................59
Hopping Prefix .............................................................................................60
ALE..............................................................................................................61
Audio settings .........................................................................................................62
RxTx configuration.......................................................................................62

4 of 133
Local line out level .......................................................................................63
Local line in level .........................................................................................64
Aux line out level .........................................................................................65
Noise reduction............................................................................................66
Phone line set up procedure........................................................................67
Phone Level Out........................................................................67
Phone Level In...........................................................................68
Selcall settings ........................................................................................................70
Selcall ID – Setting 4 digit Selcall self ID.....................................................70
Setting Six Digit ID – Setting 6 digit Selcall self ID......................................70
Periodic beacon...........................................................................................71
Selcall before Vox........................................................................................72
Telcall settings ........................................................................................................73
Barred prefixes ............................................................................................73
Toll-free prefixes..........................................................................................73
STD prefixes................................................................................................74
Phone settings ........................................................................................................75
Dialling method............................................................................................75
Dial tone wait ...............................................................................................76
DTMF tone length........................................................................................77
Wait for ring .................................................................................................78
Line reversal ................................................................................................79
Ring till answer ............................................................................................80
Ring till hang-up...........................................................................................81
Call length....................................................................................................82
Hang-up counts ...........................................................................................83
PABX prefix .................................................................................................84
Telcall num length .......................................................................................85
STD num length...........................................................................................86
Preset numbers.......................................................................................................87
Cadence Settings .................................................................................................................88
Set country cadence ...............................................................................................88
Manual set cadence................................................................................................89
Learn cadence ........................................................................................................91
Busy tone.....................................................................................................91
Ring tone .....................................................................................................93
Scan Settings........................................................................................................................95
Scan dwell...............................................................................................................95
Scan resume time ...................................................................................................96
Scan on start-up......................................................................................................97
Scan mute...............................................................................................................98
Scan entries ............................................................................................................99
Adding channels to the scan table...............................................................99
Searching and editing entries in the scan table.........................................100
Removing channels from the scan table ...................................................101
Voice Messages..................................................................................................................102
Welcome message ...............................................................................................102
No dial tone message ...........................................................................................102
Access denied message .......................................................................................102
Access.................................................................................................................................107
Phone access .......................................................................................................107
Txcvr access .........................................................................................................109
View access ..........................................................................................................111
ALE Phone Access ...............................................................................................112

5 of 133
Secure Keys........................................................................................................................114
Program secure keys ............................................................................................114
Clearing secure call keys ......................................................................................115
View secure keys ..................................................................................................116
Factory ................................................................................................................................117
Restore defaults....................................................................................................117
Erase access levels ..............................................................................................118
Erase secure call keys ..........................................................................................119
Erase channels .....................................................................................................120
Erase preset numbers...........................................................................................121
View data log ........................................................................................................122
Programming Functions.............................................................................................................123
Programming using the Barrett 2060 supervisory software ..................................123
Programming using the Barrett cable P/N BCA90023/BCA204020......................123
Programming a channel from the front panel........................................................124
Transmit and receive frequencies .............................................................124
Operating mode.........................................................................................125
Selcall format.............................................................................................125
Antenna socket selection...........................................................................125
Deleting a channel from the front panel ................................................................127
Installing the Barrett 2060 Interconnect....................................................................................128
Connectors .........................................................................................................................130
Power connector ...................................................................................................130
RS232 connector ..................................................................................................130
BUS connector......................................................................................................131
Transceiver connector ..........................................................................................132
Auxiliary connector................................................................................................133

About this Operating and Installation Manual
This manual describes all aspects of the Barrett 2060 interconnects functions and
should be viewed as a reference manual.
Icons and Standards
This manual refers to Scroll keys, these keys are:-
to scroll Up to scroll Left
to scroll Down to scroll Right
Abbreviations and Acronyms
This term… Means….
Station ID The ID of the station being called (the
receiving station’s self ID)
GPS Global Positioning System
HF High Frequency
LCD Liquid Crystal Display
LSB Lower Sideband
USB Upper Sideband
PCB Printed Circuit Board
PIN Personal Identification Number
PSTN Public Switched Telephone Network
PTT button Press-to-talk button
RDD Radio Direct Dial
Revertive signal An acknowledgement signal automatically
transmitted from a station receiving a Selcall
RF Radio Frequency
Rx Receive
6 of 133

Scan Table A list of channels used when scanning for
incoming calls
Selcall Selective calls
Telcall Telephone calls via the selective call protocol
Self ID The programmed address identification
number of your interconnect. (Used by other
stations to call you).
SSB Single Sideband (a transmission format)
Tx Transmit
USB Upper Sideband
Warning: Equipment will be inoperable when mains
power fails.
Battery Warning: This equipment has a Lithium Ion battery,
which although contains no toxic materials,
can be a fire risk if the used internal battery is
exposed to moisture.
Proper battery handling and disposal procedures must
be observed at all times.
7 of 133

8 of 133
Introduction
The 2060 HF Telephone interconnect is designed to provide users on an HF
network full interconnection with the international telephone network. It is designed
to be operated as a completely automatic facility with no requirement for human
operator supervision. A high level of security is incorporated to eliminate system
abuse.
This manual gives a brief system overview and details the operation of the 2060
telephone interconnect assuming the 2060 has already been setup by a system
supervisor.
System Overview
The 2060 telephone interconnect allows HF network stations to become extensions
of the international telephone network.
The 2060 telephone interconnect provides a fully automated interface between the
international telephone network and an HF network. Stations in an HF network
equipped with selective call systems based on CCIR 493 can call up to 98 preset
telephone numbers that can be stored in the 2060 telephone interconnect. Stations
fitted with a “Telcall” facility, based on selective call format CCIR 493, can direct dial
any telephone number on the international telephone network. Telephone
subscribers can dial into the 2060 telephone interconnect from anywhere on the
international telephone network and call any station on the HF network.
The Barrett 2060 telephone interconnect provides full network management
facilities including multiple telephone access levels for HF stations, call logging and
remote supervision by dial up computer links.
Operation
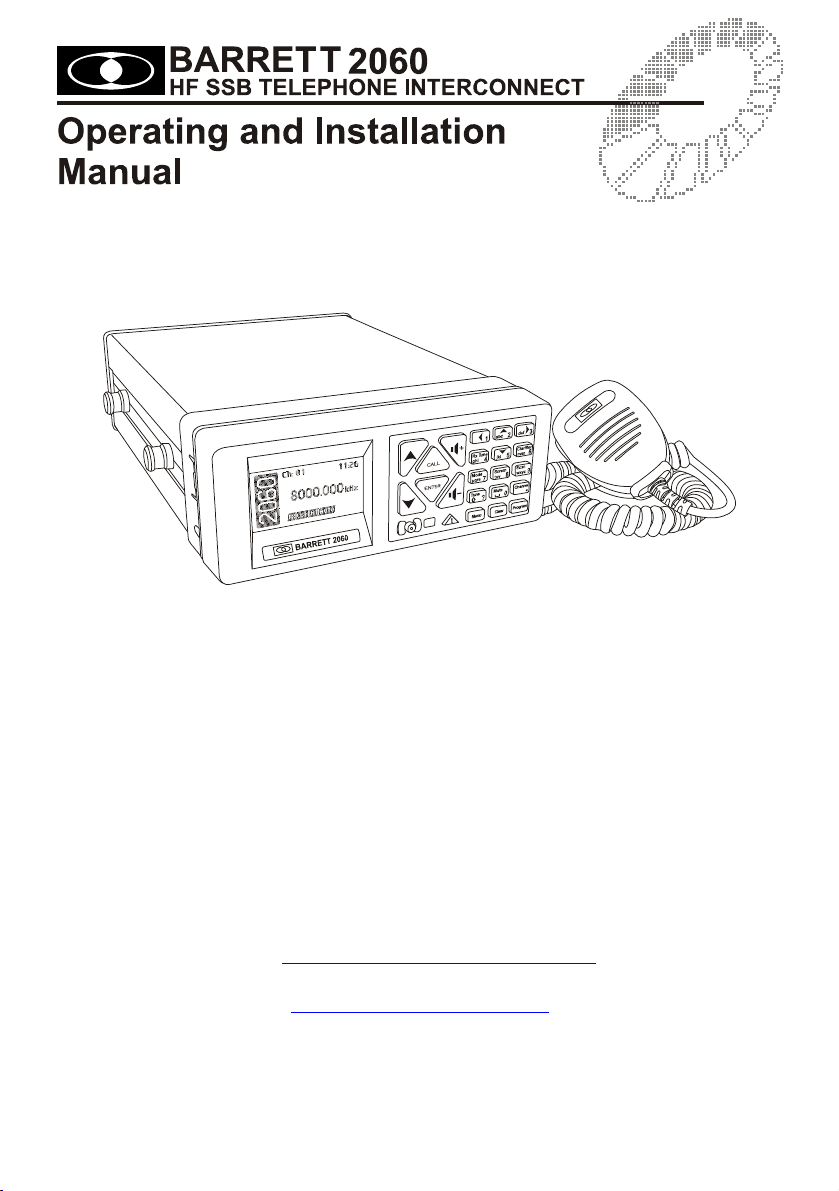
User Controls
2060 Front panel
Key pad
There are 23 keys on the keypad. A group of five keys in the centre access many
major functions. Some keys have multiple functions assigned to them depending on
when the key is pressed and for how long the key is pressed. Key functions are
listed below followed by a detailed description of their functions.
Key Key Primary function Secondary function
Power on/off None
Channel up General scroll key
Channel down General scroll key
Volume up None
Volume down None
9 of 133

Key Key Primary function Secondary function
Make a call None
Enter None
Help None
Enter menus None
Manual / Auto Mode Select Change case
Numeric key “6" Alpha “mno”
Clear back one step None
Enter direct channel change
mode Decimal point
Numeric key “4" Alpha “ghi”
Numeric key ”8"
Online / Offline Switch
Alpha “tuv”
Enter program mode None
Mute (squelch ) selection Alpha “space”
Numeric key “0"
Mode select
USB, LSB, AM
Alpha “pqrs”
Numeric key “7"
Start scan, force next scan
channel Alpha “wxyz”
Numeric key “9"
10 of 133

Key Key Primary function Secondary function
Scroll left Numeric key “1"
Numeric key “2" Alpha “abc”
Scroll right Alpha “def”
Numeric key “3"
Numeric key “5" Alpha “jkl”
11 of 133

2060 Control head rear view
Microphone socket
The microphone supplied with the Barrett 2060 is inserted here.
Note:- When the interconnect is supplied it is assembled in the one piece base
station configuration and the microphone is already fitted.
Interconnect cable
The small interconnect cable supplied in the kit is plugged in here with the other
end into the front of the main interconnect module.
12 of 133

2060 Rear panel description
SPEAKER - Output for loudspeaker (Barrett P/N: BCA20015)
RS-232 - Interface for connecting 2060 directly to a PC for
programming and downloading of log information.
BUS - Future expansion port.
AUXILIARY - Used for connecting a second transceiver to the 2060 in
a remote RX/TX configuration.
LINE -This RJ11C provides the telephone line connection.
This is used by the 2060 when it goes “Online”.
PHONE - This RJ11C jack allows the connection of a telephone
set (telephone) to 2060. The telephone can be
connected to the telephone line when the 2060 is in
“Manual” mode, allowing the handset to be used as a
standard telephone for receiving and making telephone
calls. When the unit is switched to “Online” this jack is
disconnected from both the line and the unit until the
2060 goes back to an “Offline” state.
POWER - Power input and speaker output for use with the 2022
power supply.
TRANSCEIVER - This is the connector for the interface between a
transceiver and the 2060. It contains transmit and
receive audio and key lines.
13 of 133
Switching on the Interconnect
Switching on the 2060
Press for 1 second turns transceiver on.
Switching off the 2060
Press for 1 second turns transceiver off.
After switching on, the 2060 performs a series of internal checks and displays
important system information on the front panel display.
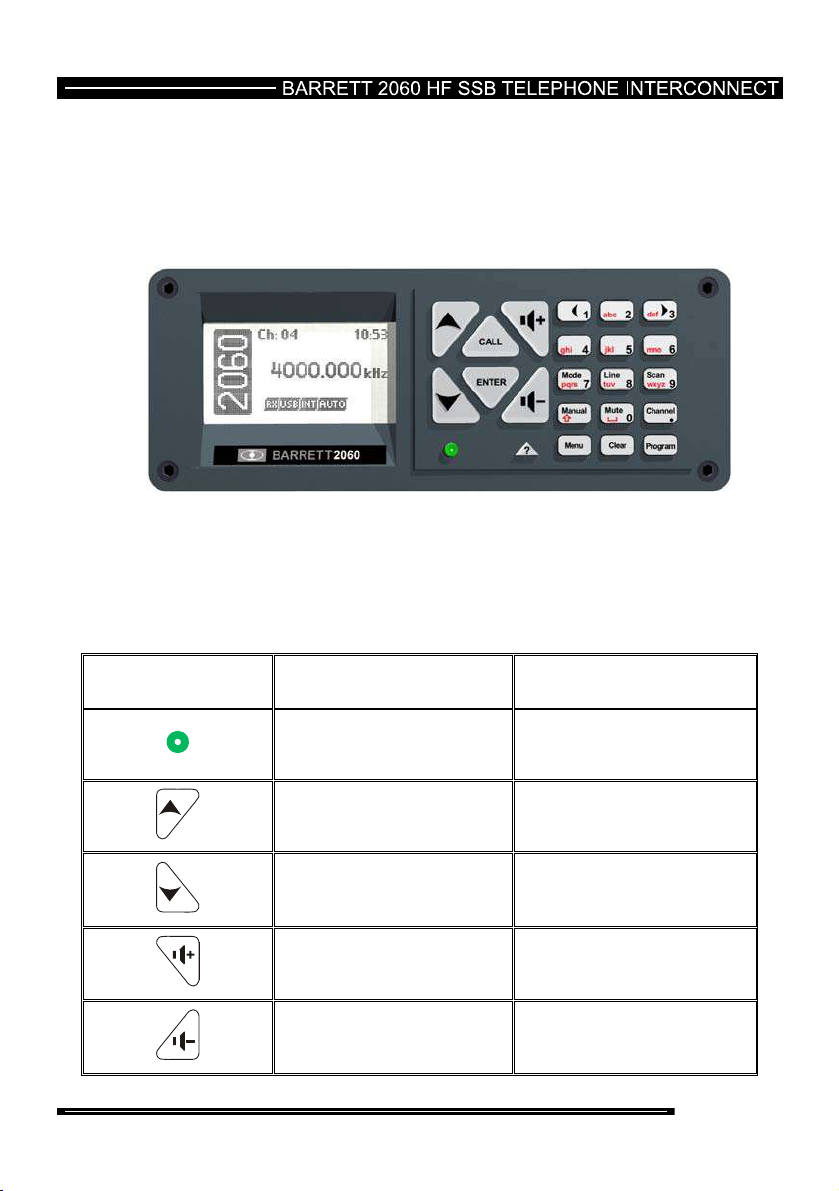
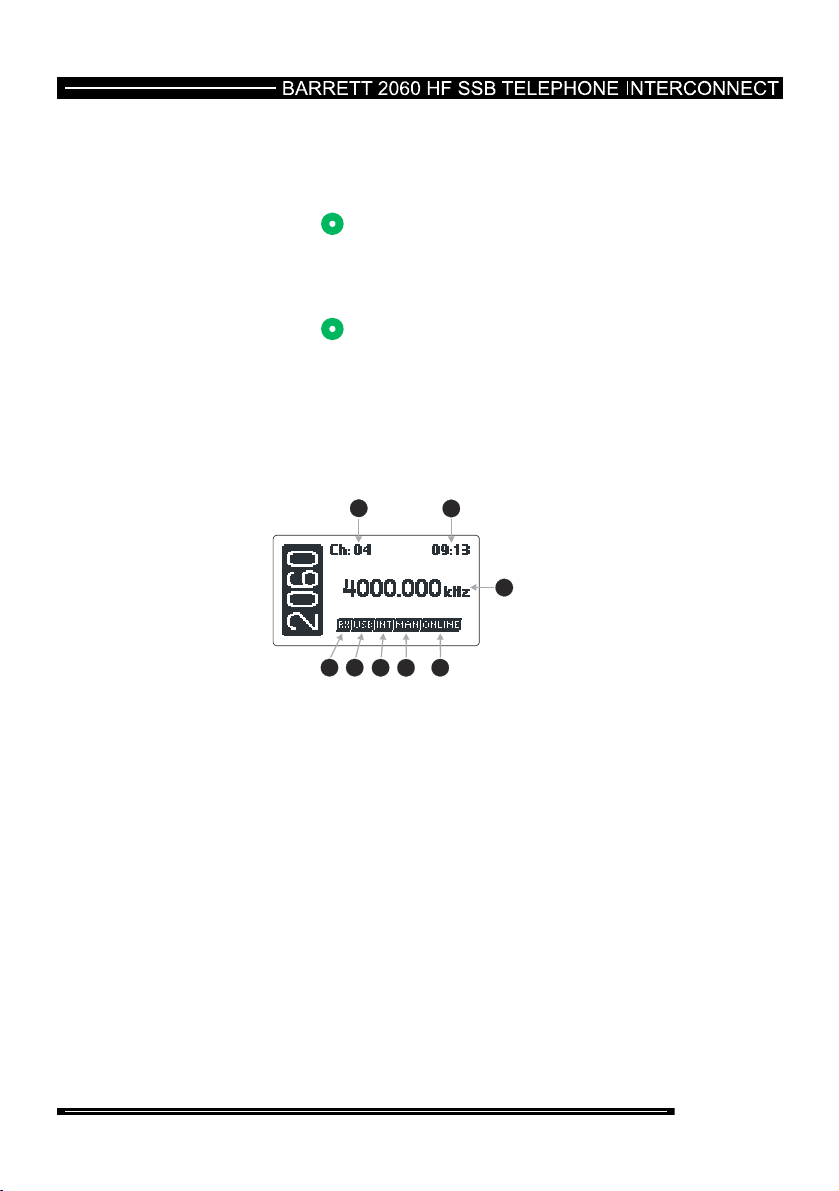
Display
12
3
54
6
78
The LCD display shows:-
1 Channel number
2 Time
3 Receive / Transmit frequency
4 Online / Offline
5 Auto / Manual mode
6 Selective call type
7 Mode
8 RX / TX Mode
14 of 133

Adjusting the Audio Volume
To increase the audio volume in the loudspeaker
To decrease the audio volume in the loudspeaker
The display looks like this when adjusting the volume:-
15 of 133

Selecting a Channel
Using channel Up / Down keys
Pressing the channel up or down key will select respectively the next higher or
lower programmed channel. Holding down either of the keys will cause the rate of
the channel change to increase.
The channel up/down keys on the microphone have the same function as the
channel up/down keys on the keypad.
Channel up
Channel down
16 of 133

Direct channel number entry
press the key
Enter the channel number required using the numeric keys, channel range is from 1
to 9999 inclusive. Note:- Channel zero cannot be selected. (example selects
channel 12)
press the keys
press the key
If the channel selected had not been previously programmed then the following is
displayed:-
Note: Empty channels can only be accessed by direct channel selection and are
not displayed when scrolling through channels.
17 of 133

Using the Microphone
When using the microphone:-
Press and hold down the PTT (transmit) button only while talking.
Hold the microphone close to your mouth.
Speak clearly.
Use the word ‘over” to indicate you have finished speaking and
release the PTT (transmit) button.
18 of 133

19 of 133
2060 Operating Modes
There are two operating modes available with the 2060 telephone interconnect, one
is automatic mode and the other is manual mode. Overviews of both modes follow.
Automatic Mode Overview
In automatic mode the 2060 can:-
- scan all channels programmed for scan looking for an incoming Selcall,
Telcall or ALE call (if ALE is enabled) from an HF network station.
- on receipt of a Selcall, Telcall or ALE call, check that the station calling is
registered in the database and has the required access privilege
programmed by the system supervisor, if so it then initiates a telephone call
and connects the telephone party with the HF station.
- return to scan when the call is complete.
- answer an incoming telephone call, prompt the telephone caller with
recorded instructions on how to select a channel and how to send a call to
connect to a user on the HF network.
- send periodic beacons. If selected, beacons will be sent on all channels to
help the user determine if a particular channel is suitable for communication
at the required time. A beacon signal can also be requested from the
transceiver being called to check if a particular channel is suitable for use at
the required time.

20 of 133
Facilities available to the telephone user
A telephone subscriber using a DTMF telephone can access the following facilities
provided by the 2060 telephone interconnect. These facilities are available after the
2060 has answered the call and played its recorded instruction messages. To make
a call to a station on the HF network a channel must be selected and the Selcall
number of the station required must be entered, after which the 2060 will send the
call and if successful an audible reply will be heard from the station being called. If
this audible reply (revertive call) is not heard another channel should be selected
and the call repeated.
If ALE is enabled the telephone user need only enter the 2 digit ID of the ALE HF
station to be called, the ALE system will automatically select the best channel for
connection. Once an ALE connection is made a voice annunciation will be heard by
the telephone user.
Selecting a channel
The 2060 can store up to 50 channels. These are selected as follows:-
- press the two digits, representing the channel number required, on the
DTMF key pad of the phone being used. Valid channel numbers are from 01
to 50. Once the second number is pressed, the request is processed and a
stored voice will repeat back the channel number.
Note:- channel numbers must be two digits in length. e.g. Enter 03 instead of 3.
Note:- once channel entry commences HF receiver noise will disappear until the
DTMF function being entered is complete. This lack of HF receiver noise identifies
that you are still in the DTMF request sequence.
Sending a beacon request
A beacon request is used to test to see if a channel is "open" to an HF station you
may wish to call later with a Selcall. A beacon request does not alert the HF station
being called. After the beacon request is sent a confirmation tone (revertive call) will
be heard from the HF station, the strength of this confirmation tone (revertive call)
indicates the quality of the channel for communication. If no confirmation tone
(revertive call) is heard try another channel.
A beacon request can be sent to any HF station that has an access level that allows
it to receive Selcalls (access levels are set in the 2060 by the system supervisor
and are described in the setup section within this manual).
To send a beacon request, press the '*'(star) key on the telephone key pad.
If the '*' key is recognised the receiver noise will disappear. Some DTMF
telephones do not send the '*' and '#' tones. This should be tested before the
system is first used.
Then enter the 4 or 6 digit Selcall ID of the transceiver you wish to contact using the
telephone key pad. Press the '*’(star) then the ‘#' (hash) buttons to send the beacon
request. The tones of the beacon request Selcall being sent will now be heard.
Table of contents


